
1998 4runner Gauge Back Lighting
 Apr 9, 2010 | 05:15 PM
#1
1998 4runner Gauge Back Lighting
This thread is to document what size, color, etc bulbs will work in all the various locations in a 1998 Toyota 4runner. This information may translate to other years and models too, but just know that this information was taken from my 1998 Toyota 4runner SR5 4X4 with automatic transmission.
*This thread will be updated as I have time and when I get new information on what works, what doesn't, and I'll post as many pictures as possible to keep the information clear.
1998 Toyota 4runner SR5
This photo is the back of the instrument cluster once pulled from the dash. Please note the number indicated next to the bulb location and the description of each bulb below:
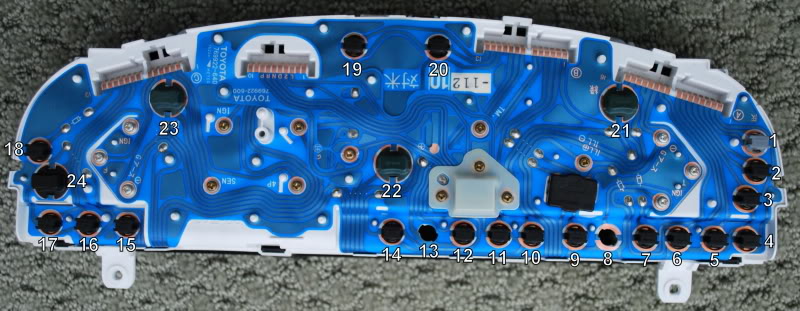
1. Airbag - Red #74
2. Door Ajar - Red #74
3. Cruise Control - Green #74
4. A/T Trans Temp - Red #74
5. Seat Belt - Red #74
6. Brake - Red #74
7. Battery - Red #74
8. Blank
9. ABS - Amber #74
10. Check Engine - Amber #74
11. Oil - Red #74
12. Brights - Blue #74
13. Blank
14. OD Off - Amber #74
15. ECT Power - Green #74
16. RR Diff Lock - Red #74
17. 4X4 - Green #74
18. A/T - Red #74
19. Right Turn - Green #74
20. Left Turn - Green #74
21. Gauge Back light - Color of your choice #194
22. Gauge Back light - Color of your choice #194
23. Gauge Back light - Color of your choice #194
24. Low Fuel - Amber #194
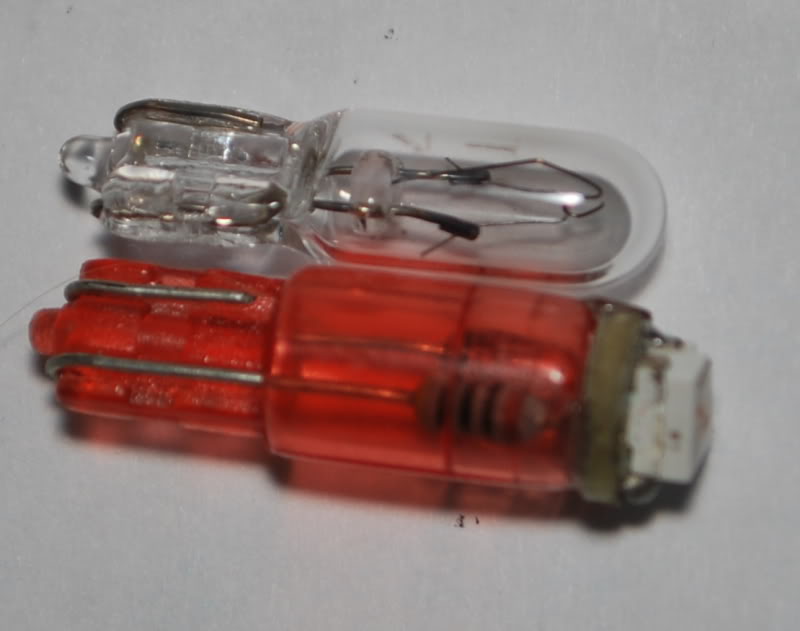
One special note on changing any of the instrument cluster #74 bulbs with LED bulbs, the base of the regular incandescent bulbs is a smaller diameter than the LED bulbs I bought so the LED version will not lock into the twist connectors for the cluster. I suppose you can could try a dab of hot glue, rubber cement, etc so they won't fall out from being loose but I'm going to investigate some more and see if I can find an LED bulb that fits correctly instead of the bulbs falling into the cluster and causing more headaches.
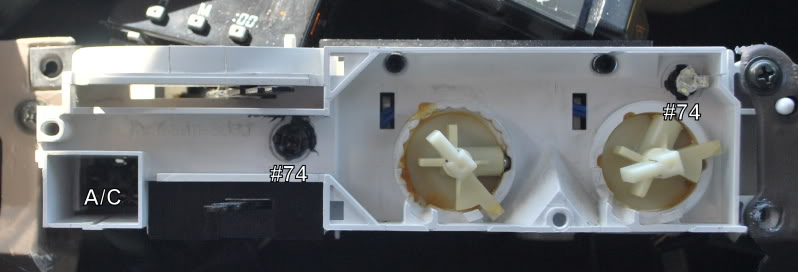
The Heat and Air Conditioning controls have two #74 lights. I'm experimenting on what bulbs to put in these spots since it's going to be hard for just two bulbs to throw enough light around to illuminate the panel without hot spots.
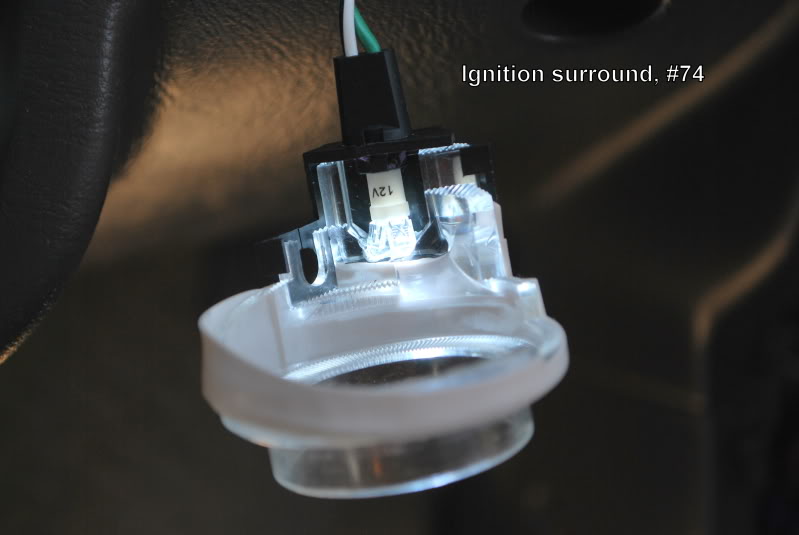
The ignition surround uses one #74 bulb. The stock incandescent bulbs are much shorter than the LED bulbs I have purchased which causes a bit of a clearance problem. My solution was to take my Dremel and lightly grind a little bit of the plastic to make room for the longer LED bulb. Again, it's difficult for one bulb to throw enough light around the outside of the surround, so for now the light is brighter on the passenger side than it is on the driver's side of the surround, but since it's a small piece and only on for a few seconds when entering the vehicle I don't see this as a big deal.
For the automatic transmission gear selector, it uses a #74 bulb. The bulb pushes into the socket which then is inserted and turned clockwise to lock it in place. This is going to be a tricky bulb to figure out for several reasons. Again, it needs to throw a lot of light over a fairly large area in all directions to illuminate the gear selector, the bulb itself can't be any larger in diameter than a standard #74 bulb, and the height of the bulb is also important because there can be a clearance issue. I'm going to try and find a bulb that fires from all directions so it illuminates the gear selector area but doesn't create a hot spot directly over the bulb, this might be a tall order.

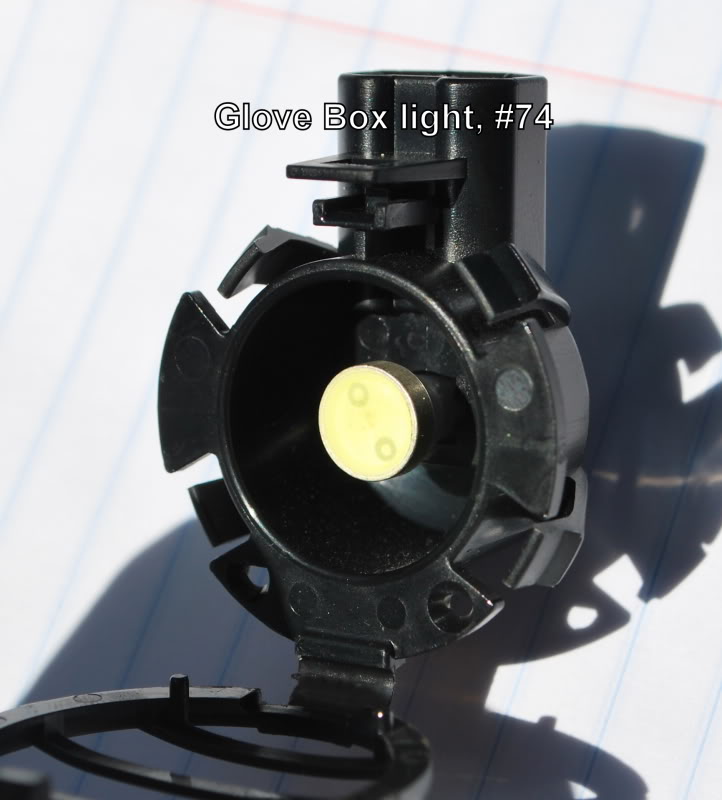
The glove box uses a single #74 bulb. I tried to find a bulb that had a large light pattern so it would illuminate the entire (or most) of the glove box. Unfortunately the LED bulb I bought (and shown here) came DOA so I have not been able to test the light pattern of this particular bulb.
The Rear Window switch uses a Type A T3 Neo Wedge bulb. This illuminates the "Back Window" in the center of the switch. I took apart this switch to give you an idea of the parts in the switch.
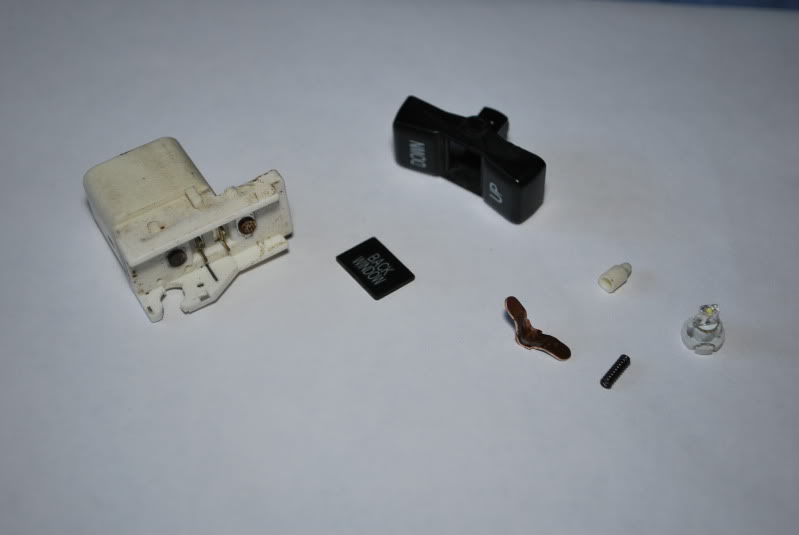
Once the rocker part of the switch is removed, you can push the "Rear Window" piece from behind and it comes off, it has a light adhesive on it to keep it from falling out of the rocker. It also has some green paint behind the lettering that can be gently and carefully scraped off if you don't want that tinting the color of your new bulbs if you are changing your color scheme. Please note, that even with a steady hand and being SUPER careful, I still scraped away some of the white and black around the lettering on mine and it doesn't look too great now. Perhaps there is a better way of removing the green paint without going through to the black and white, experiments are ongoing and I'll report what I find, good or bad.
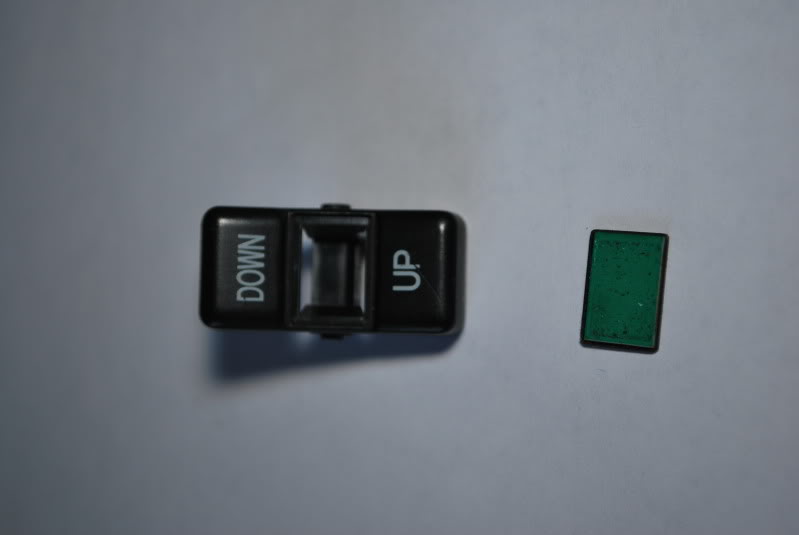
I also disassembled the A/C button to see what was inside. This picture shows the housing and the front panel of the button. With the housing taken apart, it's easy to push the front panel off of the button to reveal the back side. It has a clear lens that will shine green when pressed, and the "A/C" has some green paint on it as well. If you are changing the color or your lighting, it is possible to lightly scrape off the green paint so it won't tint your new lighting, but be careful since it's VERY easy to also scrape off the black surrounding the letters, that will show through the switch letting light pass to the front side and look bad.
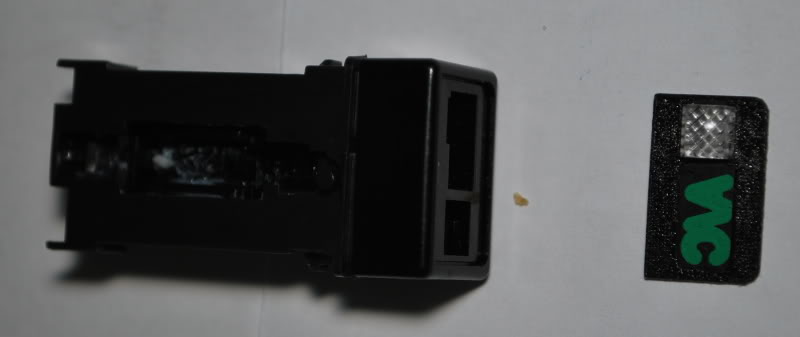
Here is a picture of the "guts" of the A/C switch. Not everything is shown but it gives a good idea of what is inside the switch. There is a green bulb hard wired to the PCB of the switch, which turns on when the switch is pushed. I carefully snipped the bulb and soldered in a small LED in it's place (not shown), so it is possible to change this out if you have a different color preference. The other bulb used for back lighting is a Type A T3 Neo Wedge.
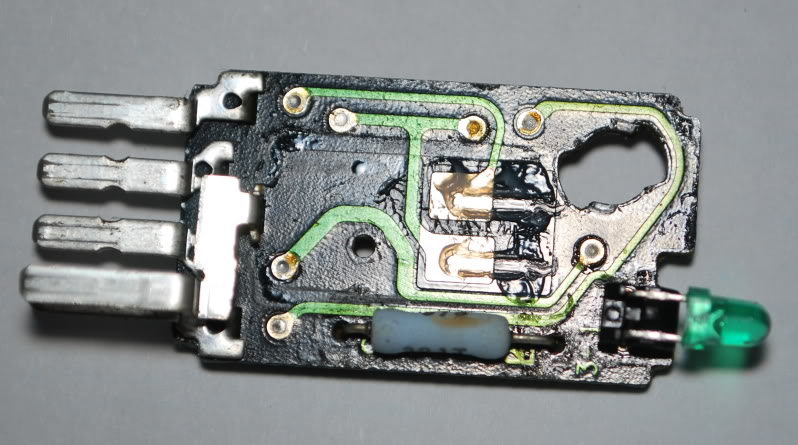
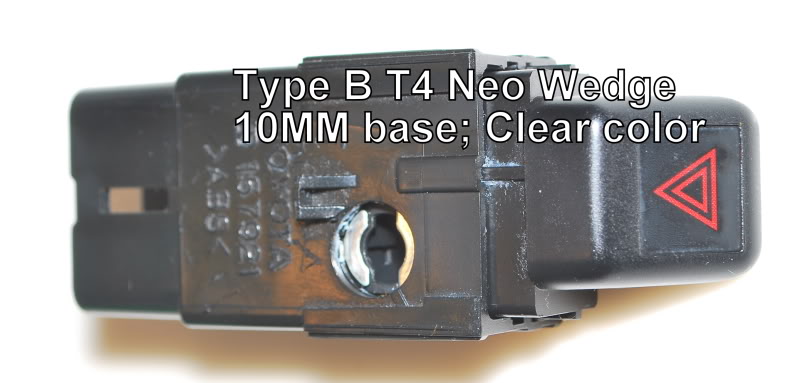
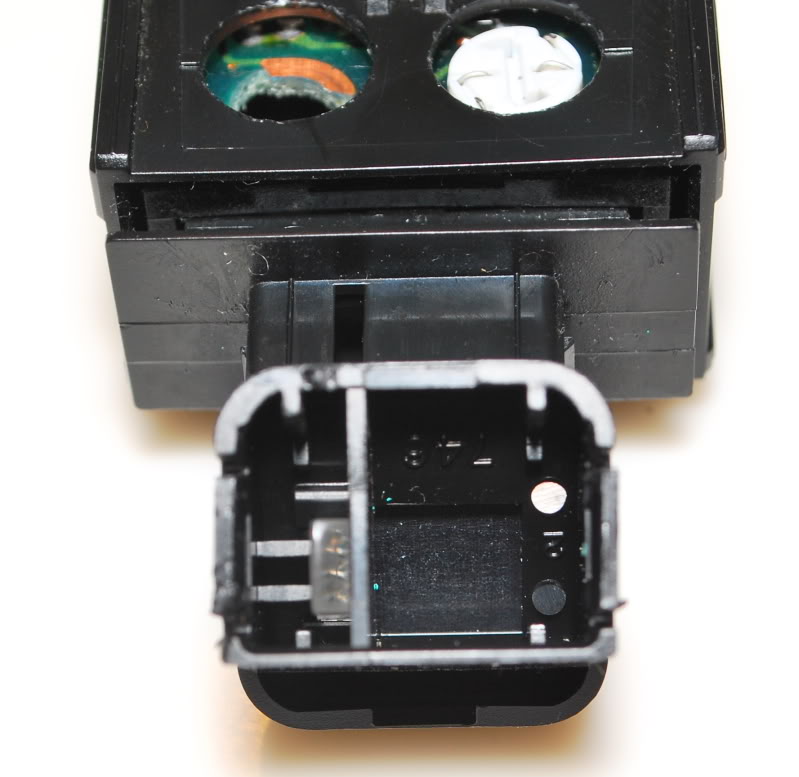
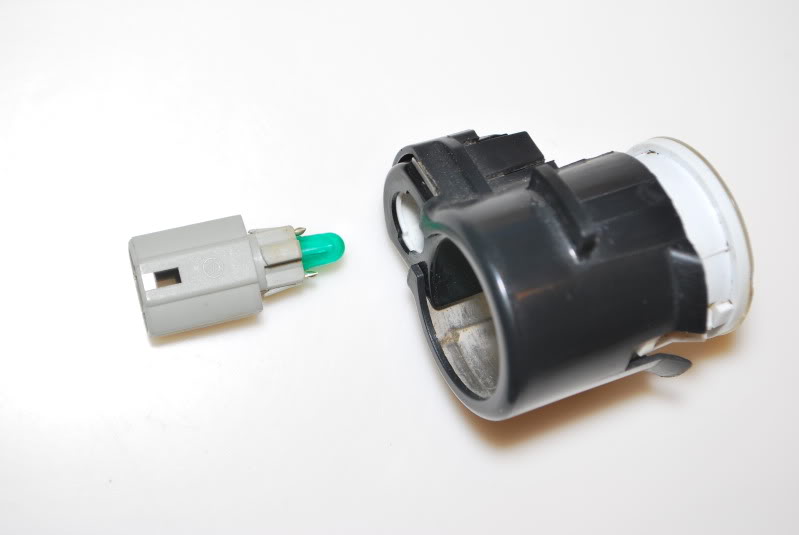
The Hazard switch uses one Type B T4 Neo Wedge bulb. I did my best to disassemble the switch but decided not to go very far for fear of breaking something. The bulb in this switch is clear and I'm sure there is no green paint on the back of the button since the image for the hazards is red. I am replacing this bulb with a clear LED again.
*Another special note about any of the Neo Wedge bulbs, BE CAREFUL!!! They need to be twisted in place using a flat head screw driver, and as careful as I've been I have broken several, which is a pretty darn expensive lesson.
The rear defrost switch has two Type A T3 Neo Wedge bulbs, one is clear and the other is yellow/amber. Make sure the correct color goes in the correct slot, the clear is for back lighting the switch and the yellow/amber lights up the indicator when the defrost is on.

This switch had the green paint on the inside of the button and I successfully scraped it off without going too far.
The cigarette lighter or power outlet has an incandescent bulb hard wired into a twist lock connector.
This bulb can be removed by prying two plastic tabs on either side of the twist lock and pushing the metal contacts through the connector.
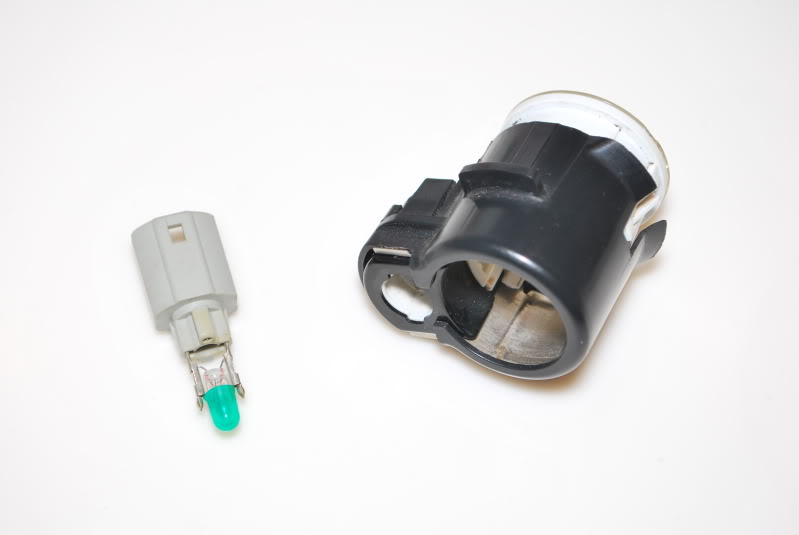
Here is the bulb totally removed from the connector.
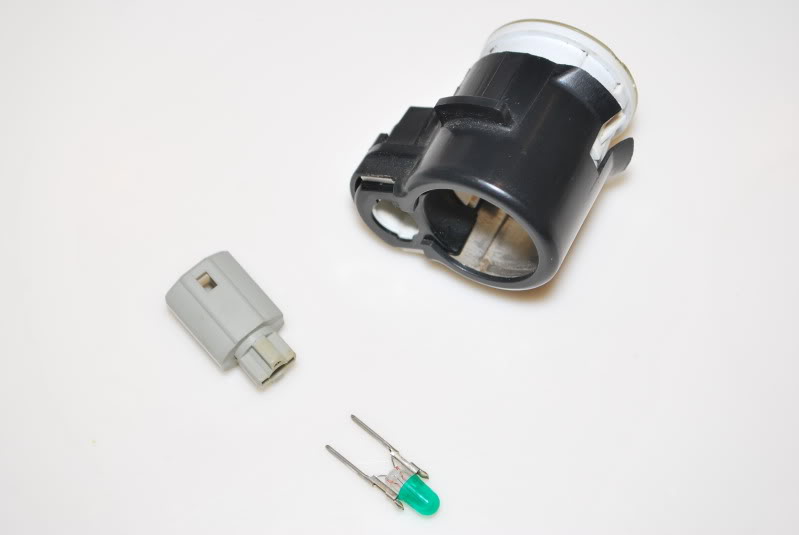
I'm sure it's possible to hard wire a new bulb or LED into this but I have not tried yet. The biggest problem would be clearance issues since the bulb has to sit a little inside the twist lock, not exceed the diameter of the original OEM incandescent bulb, and not be too long so it can still fit inside the illumination housing of the power outlet / cigarette lighter. I hope these pictures help you if you're planning on replacing this bulb.
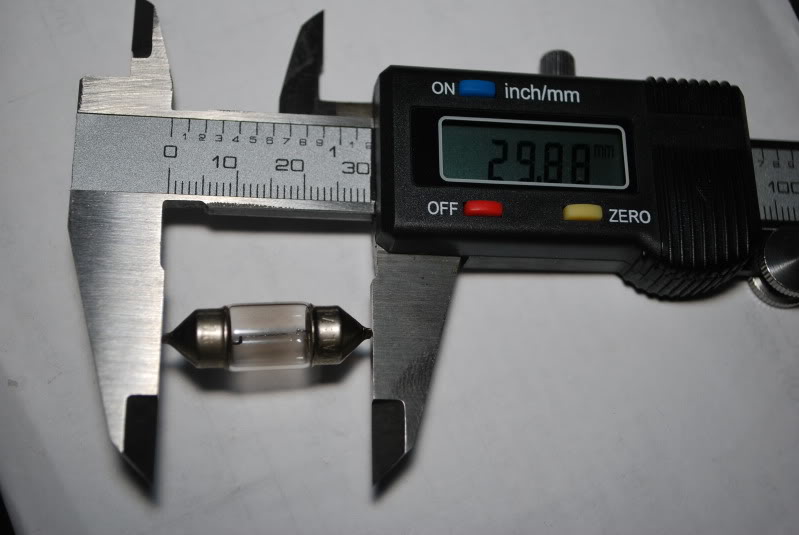
The dome light seems to be approximately 30mm and from what I can tell it's called a "festoon" style bulb. Everywhere I look for replacement LED bulbs in this style it shows the length dimension as "31mm", slightly longer than stock. To put these in there are two metal contacts that have some "give" to them and spring back into shape when the bulb is put in, I doubt half a MM one each side is going to cause any fitment trouble.
*That is where I've stopped for now. I know the ash tray light is a #74 bulb but since I no longer have the ash tray in my vehicle I can't show any pictures of speak about fitment etc, feel free to add pictures and your experiences in this thread if you have anything to contribute. Also, I replaced my '98 map light / door opener / sunroof controls with a '99+ roof console so I have no info on the original map light bulbs used. I can post pictures of the bulbs used in the '99+ roof console if anyone is interested. I'm also going to take apart the master window switch on the driver's door to show the light that illuminates the "Auto" for the driver's window.
Please let me know if I've missed anything, any corrections, or if something is not clear.
*This thread will be updated as I have time and when I get new information on what works, what doesn't, and I'll post as many pictures as possible to keep the information clear.
1998 Toyota 4runner SR5
This photo is the back of the instrument cluster once pulled from the dash. Please note the number indicated next to the bulb location and the description of each bulb below:
1. Airbag - Red #74
2. Door Ajar - Red #74
3. Cruise Control - Green #74
4. A/T Trans Temp - Red #74
5. Seat Belt - Red #74
6. Brake - Red #74
7. Battery - Red #74
8. Blank
9. ABS - Amber #74
10. Check Engine - Amber #74
11. Oil - Red #74
12. Brights - Blue #74
13. Blank
14. OD Off - Amber #74
15. ECT Power - Green #74
16. RR Diff Lock - Red #74
17. 4X4 - Green #74
18. A/T - Red #74
19. Right Turn - Green #74
20. Left Turn - Green #74
21. Gauge Back light - Color of your choice #194
22. Gauge Back light - Color of your choice #194
23. Gauge Back light - Color of your choice #194
24. Low Fuel - Amber #194
One special note on changing any of the instrument cluster #74 bulbs with LED bulbs, the base of the regular incandescent bulbs is a smaller diameter than the LED bulbs I bought so the LED version will not lock into the twist connectors for the cluster. I suppose you can could try a dab of hot glue, rubber cement, etc so they won't fall out from being loose but I'm going to investigate some more and see if I can find an LED bulb that fits correctly instead of the bulbs falling into the cluster and causing more headaches.
The Heat and Air Conditioning controls have two #74 lights. I'm experimenting on what bulbs to put in these spots since it's going to be hard for just two bulbs to throw enough light around to illuminate the panel without hot spots.
The ignition surround uses one #74 bulb. The stock incandescent bulbs are much shorter than the LED bulbs I have purchased which causes a bit of a clearance problem. My solution was to take my Dremel and lightly grind a little bit of the plastic to make room for the longer LED bulb. Again, it's difficult for one bulb to throw enough light around the outside of the surround, so for now the light is brighter on the passenger side than it is on the driver's side of the surround, but since it's a small piece and only on for a few seconds when entering the vehicle I don't see this as a big deal.
For the automatic transmission gear selector, it uses a #74 bulb. The bulb pushes into the socket which then is inserted and turned clockwise to lock it in place. This is going to be a tricky bulb to figure out for several reasons. Again, it needs to throw a lot of light over a fairly large area in all directions to illuminate the gear selector, the bulb itself can't be any larger in diameter than a standard #74 bulb, and the height of the bulb is also important because there can be a clearance issue. I'm going to try and find a bulb that fires from all directions so it illuminates the gear selector area but doesn't create a hot spot directly over the bulb, this might be a tall order.
The glove box uses a single #74 bulb. I tried to find a bulb that had a large light pattern so it would illuminate the entire (or most) of the glove box. Unfortunately the LED bulb I bought (and shown here) came DOA so I have not been able to test the light pattern of this particular bulb.
The Rear Window switch uses a Type A T3 Neo Wedge bulb. This illuminates the "Back Window" in the center of the switch. I took apart this switch to give you an idea of the parts in the switch.
Once the rocker part of the switch is removed, you can push the "Rear Window" piece from behind and it comes off, it has a light adhesive on it to keep it from falling out of the rocker. It also has some green paint behind the lettering that can be gently and carefully scraped off if you don't want that tinting the color of your new bulbs if you are changing your color scheme. Please note, that even with a steady hand and being SUPER careful, I still scraped away some of the white and black around the lettering on mine and it doesn't look too great now. Perhaps there is a better way of removing the green paint without going through to the black and white, experiments are ongoing and I'll report what I find, good or bad.
I also disassembled the A/C button to see what was inside. This picture shows the housing and the front panel of the button. With the housing taken apart, it's easy to push the front panel off of the button to reveal the back side. It has a clear lens that will shine green when pressed, and the "A/C" has some green paint on it as well. If you are changing the color or your lighting, it is possible to lightly scrape off the green paint so it won't tint your new lighting, but be careful since it's VERY easy to also scrape off the black surrounding the letters, that will show through the switch letting light pass to the front side and look bad.
Here is a picture of the "guts" of the A/C switch. Not everything is shown but it gives a good idea of what is inside the switch. There is a green bulb hard wired to the PCB of the switch, which turns on when the switch is pushed. I carefully snipped the bulb and soldered in a small LED in it's place (not shown), so it is possible to change this out if you have a different color preference. The other bulb used for back lighting is a Type A T3 Neo Wedge.
The Hazard switch uses one Type B T4 Neo Wedge bulb. I did my best to disassemble the switch but decided not to go very far for fear of breaking something. The bulb in this switch is clear and I'm sure there is no green paint on the back of the button since the image for the hazards is red. I am replacing this bulb with a clear LED again.
*Another special note about any of the Neo Wedge bulbs, BE CAREFUL!!! They need to be twisted in place using a flat head screw driver, and as careful as I've been I have broken several, which is a pretty darn expensive lesson.
The rear defrost switch has two Type A T3 Neo Wedge bulbs, one is clear and the other is yellow/amber. Make sure the correct color goes in the correct slot, the clear is for back lighting the switch and the yellow/amber lights up the indicator when the defrost is on.
This switch had the green paint on the inside of the button and I successfully scraped it off without going too far.
The cigarette lighter or power outlet has an incandescent bulb hard wired into a twist lock connector.
This bulb can be removed by prying two plastic tabs on either side of the twist lock and pushing the metal contacts through the connector.
Here is the bulb totally removed from the connector.
I'm sure it's possible to hard wire a new bulb or LED into this but I have not tried yet. The biggest problem would be clearance issues since the bulb has to sit a little inside the twist lock, not exceed the diameter of the original OEM incandescent bulb, and not be too long so it can still fit inside the illumination housing of the power outlet / cigarette lighter. I hope these pictures help you if you're planning on replacing this bulb.
The dome light seems to be approximately 30mm and from what I can tell it's called a "festoon" style bulb. Everywhere I look for replacement LED bulbs in this style it shows the length dimension as "31mm", slightly longer than stock. To put these in there are two metal contacts that have some "give" to them and spring back into shape when the bulb is put in, I doubt half a MM one each side is going to cause any fitment trouble.
*That is where I've stopped for now. I know the ash tray light is a #74 bulb but since I no longer have the ash tray in my vehicle I can't show any pictures of speak about fitment etc, feel free to add pictures and your experiences in this thread if you have anything to contribute. Also, I replaced my '98 map light / door opener / sunroof controls with a '99+ roof console so I have no info on the original map light bulbs used. I can post pictures of the bulbs used in the '99+ roof console if anyone is interested. I'm also going to take apart the master window switch on the driver's door to show the light that illuminates the "Auto" for the driver's window.
Please let me know if I've missed anything, any corrections, or if something is not clear.
Last edited by pattycakes77; Apr 10, 2010 at 03:56 PM.
 Apr 10, 2010 | 04:00 PM
#4
No problem, just trying to get the info out there for other '98 owners instead of reading through that HUGE thread about LED lighting. I've also got a '99+ bezel that I've taken apart and documented, and I plan on sharing info on what bulbs can be replaced on that as well.
Apr 10, 2010 | 04:17 PM
#5
Contributing Member
Joined: Nov 2004
Posts: 3,572
Likes: 1
From: Upsate SC
Excellent contribution!!!! I've already done mine but indeed it was a headache trying to sort which ones would work when there were so many different variations. Also just and FYI and that you don't make a dummy mistake like I did. When you put in an order DOUBLE CHECK WHAT COLORS YOU'VE SELECTED! I ordered a bunch of blue #74s but forgot to change my color for the 194s and got red. It's actually grown on me and I find it easier on the eyes with red IPC gauges but I have blue A/C gauges.
Apr 10, 2010 | 04:33 PM
#6
Registered User
Joined: Dec 2007
Posts: 364
Likes: 1
From: Mississippi
No problem, just trying to get the info out there for other '98 owners instead of reading through that HUGE thread about LED lighting. I've also got a '99+ bezel that I've taken apart and documented, and I plan on sharing info on what bulbs can be replaced on that as well.
I'm looking forward to the '99 documentation. My 1999 SR5 doesn't light up the green 'D' on the gear indicator on the instrument panel (just the 'D') and I'd like to see some photos of what I'll be in for if I go in to fix it.
Apr 10, 2010 | 06:56 PM
#7

Trending Topics
 Aug 13, 2010 | 08:50 AM
#11
https://www.yotatech.com/forums/f131...ll-how-177866/

Thread
Thread Starter
Forum
Replies
Last Post
the1998sr5
95.5-2004 Tacomas & 96-2002 4Runners
6
Oct 19, 2016 12:48 PM
B. Graves
95.5-2004 Tacomas & 96-2002 4Runners
4
Jul 3, 2015 04:10 AM


