
LED Guage Light Install How-To
 Mar 26, 2009 | 07:59 AM
#1
Thread Starter
Registered User
iTrader: (1)
Joined: Jun 2007
Posts: 416
Likes: 0
From: Anne Arundel County, MD
Gauge Cluster LED Install Write-up
Yesterday i got rid of the green light behind the gauges and ignition and put in white LEDs. I also changed the blinkers to blue. Heres a quick write up with some pictures. This install was on my 2002 4Runner, it may be different on other vehicles.
What You will Need:
4 #74 LED bulbs, i chose white
2 #74 LED bulbs(for the blinkers) i chose blue.
Philips Screwdriver
10mm socket with ratchet.
There are many colors of bulbs and different designs out there.
vleds.com
autolumination.com
I bought all my leds from autolumination.com, they have the most to offer and decent prices.
1. Remove steering wheel cover, there is one screw on the bottom, and one screw behind the steering wheel on each side.
1A. To get to the screws on the side, start the truck, turn the wheel to the left until you see a screw on the right side of the cover. Then turn the wheel to the right until you see the screw on the left side of the cover. remove both of those. The cover then pulls apart into two top and bottom pieces.
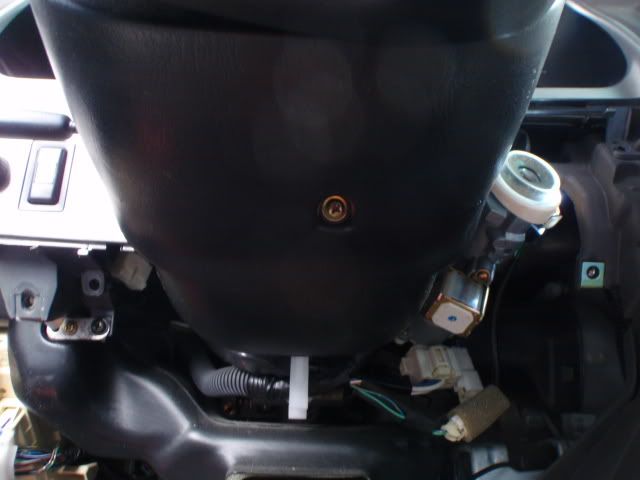
The screw on the bottom.
2. Remove the bottom piece of the dash below the steering wheel, it is held on by 4-10mm bolts.
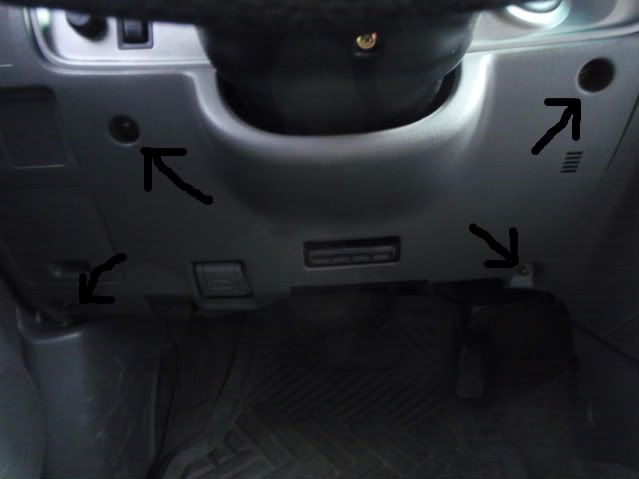
That piece then just pops off.
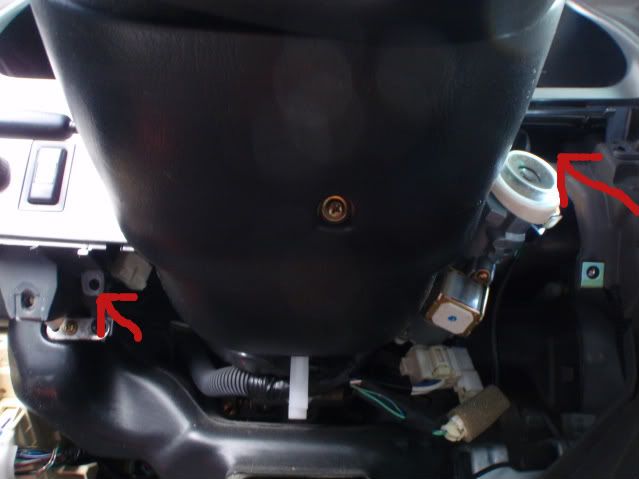
3. Pull the cover around the ignition off, it doesnt have any screws it just pops off.
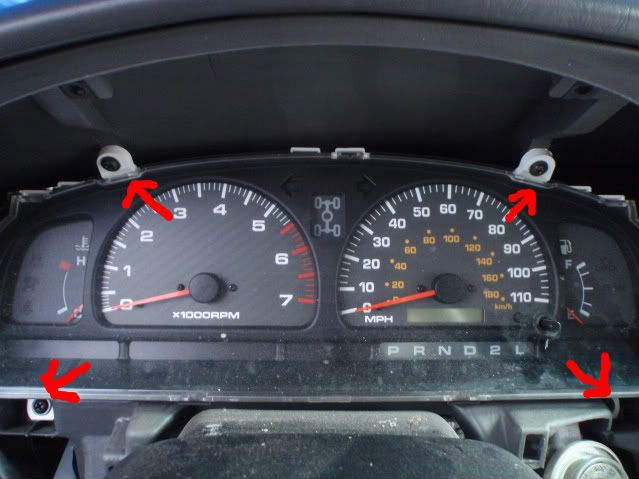
4. Remove the 4 screw that hold the piece around the gauge on.
Top two screws are here:
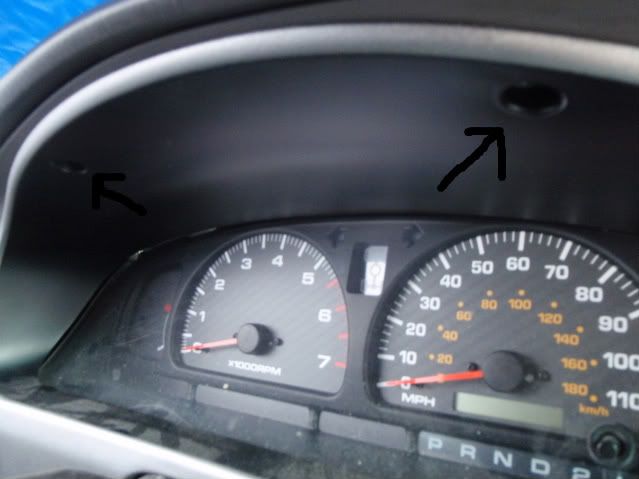
Bottom two screws are here:
The face piece around the gauge cluster then pops off.
5. Remove the 4 screw holding the guage cluster in.
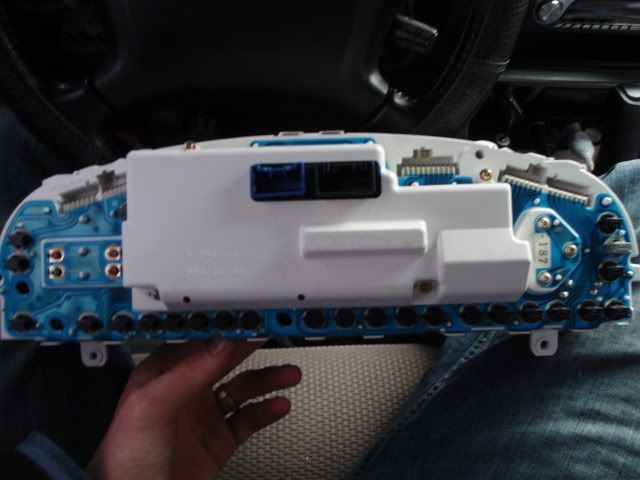
6. Pull the gauge cluster out a little bit and disconnect the 5 plugs on the back of it. Then pull the cluster out the rest of the way. Here is what the back looks like.
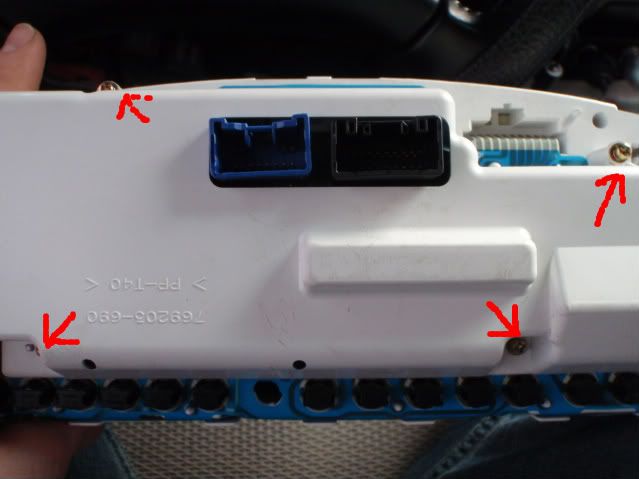
7. Take the white cover off the back of the cluster, by taking out 4 little gold screws.
8. Taking caution in not breaking anything on the circuit board, remove the two screws at the top of it and the two flat wires at the top as well. The wires come off by gently lifting up on the front of the black holder, which doesnt come all the way off.
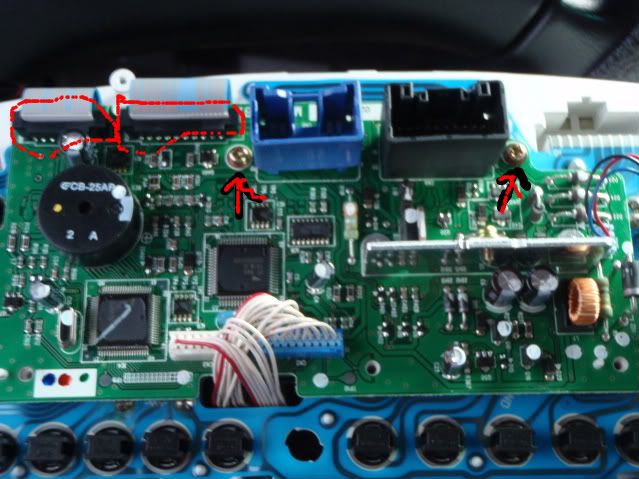
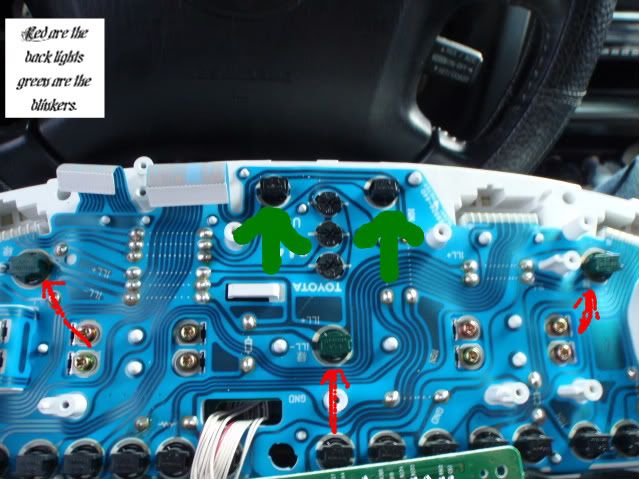
9. You can now see where the three cluster back lights and two blinkers go. The back lights are arrowed with red the blinkers are green.
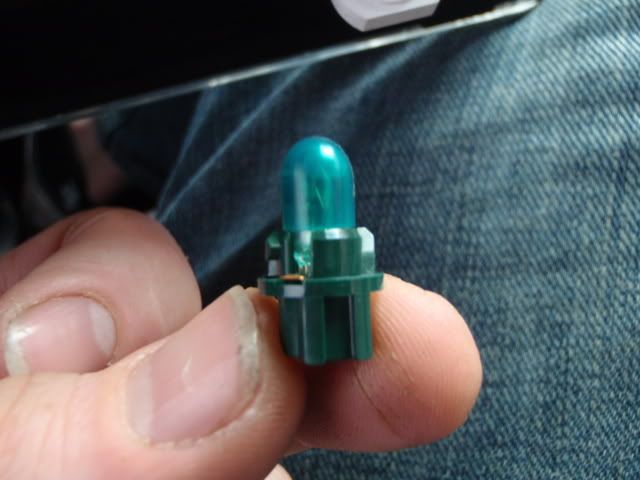
10. Remove each plug with a slight left turn, its about a 1/4 turn and they can be pulled out. Here is what one of the lights look like when they are out.
11. Pull the bulb out, and set it aside.
11A. Insert one of the new #74 bulbs.
12. Repeat step 11 for the remaining bulbs.
13. Now that all the bulbs are in, put the circuit board back on, (two screws and two flatwires) and insert the cluster into its opening and plug the 5 connections back in.
14. Turn the truck on, then the lights and flashers, some of the lights are probably not lit. That is because the LEDs are not made the same way as the normal halogen lights.
15. Unplug the 5 connections, pull the cluster out, and each light that was not on needs to be rotated in the older 180 degrees, make note of which way the bulb holder was plugged in and plug it back in the same way, after rotating the bulb 180 degrees. Make sure the bulbs are fully seated in the holder.
16. Replace the cluster and plugs and recheck the lights.
17. Repeat steps 13-16 until all lights are lit. (That is what took me so long. I had to plug and unplug about 20 times before all the lights were on.)
18. After lights are all lit, insert gauge cluster and connect all plugs and re-attach to it mounting location with the 4 screws
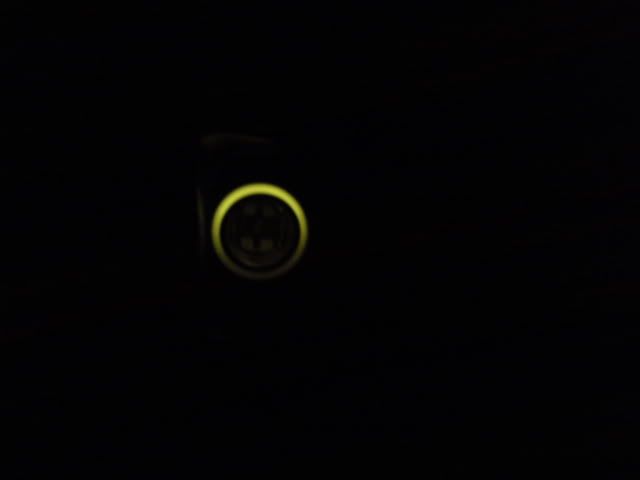
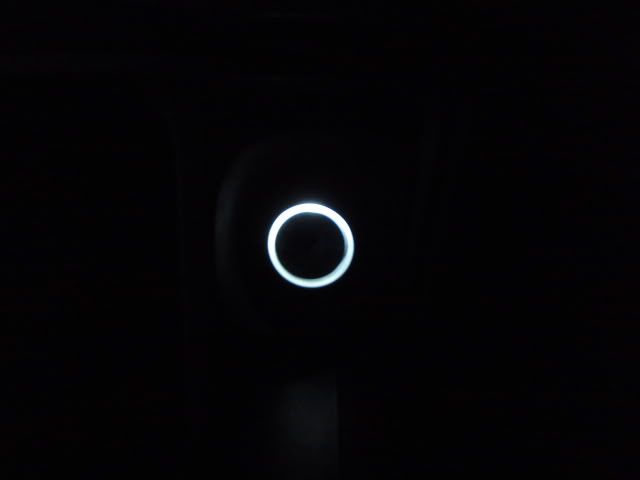
19. Now a quick one bulb change for the ignition light and then back together.
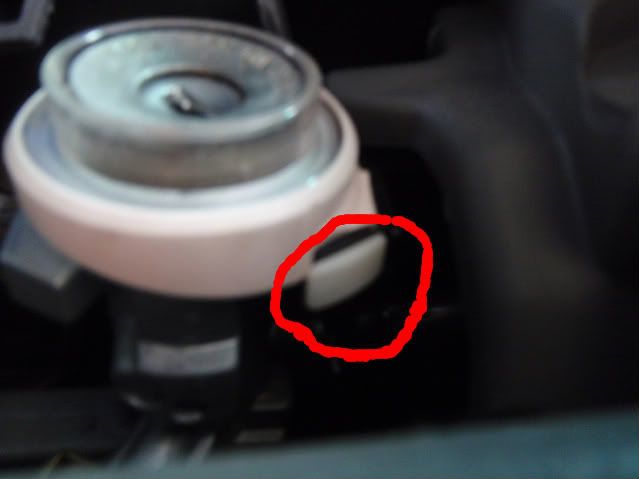
20. Pull the white plastic piece out of the bottom of the ignition light holder.
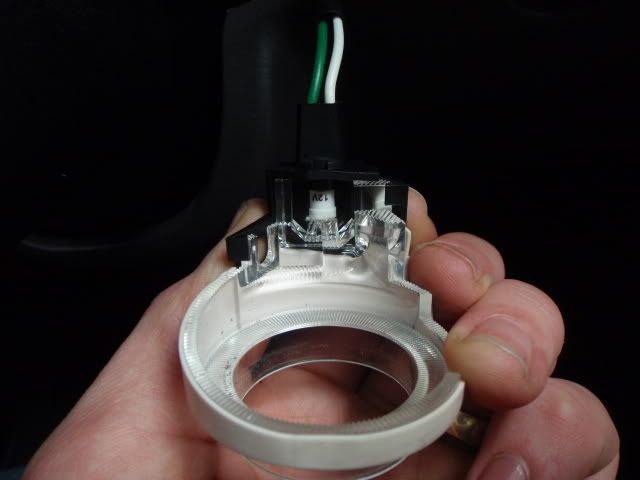
21. Pull the ignition light ring off the ignition.
22. 1/4 twist and to remove the bulb holder.
23. Replace halogen with LED.
24. Open door, if the light comes on put it back together, if the light does not come on, rotate the bulb 180 degrees and make sure it is fully seated. Open the door again and you should have light.
25. Put the ignition light ring back on the ignition and insert the plastic holder piece.
26. Re-install the gauge cluster face plate with its 4 screws.
27. Snap the ignition face plate back into place.
28. Re-install steering wheel cover, with its three screws.
29. Re-install bottom plastic piece below the steering with with its 4 bolts.
Congratulations, You have now successfully replaced you halogen gauge cluster lights, blinkers, and ignition light with LEDS.
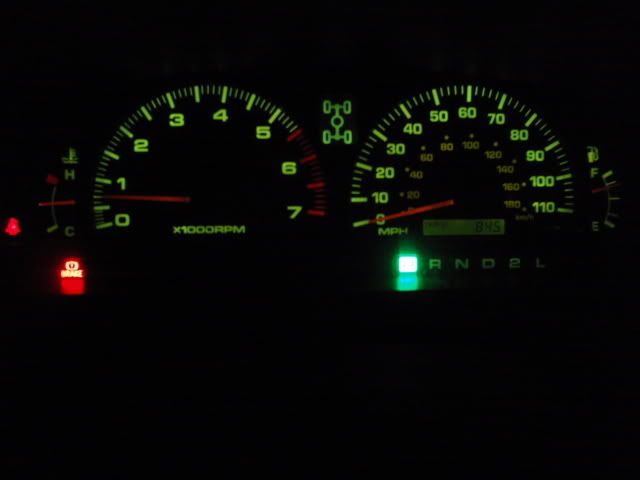
Here is what it looked like before:
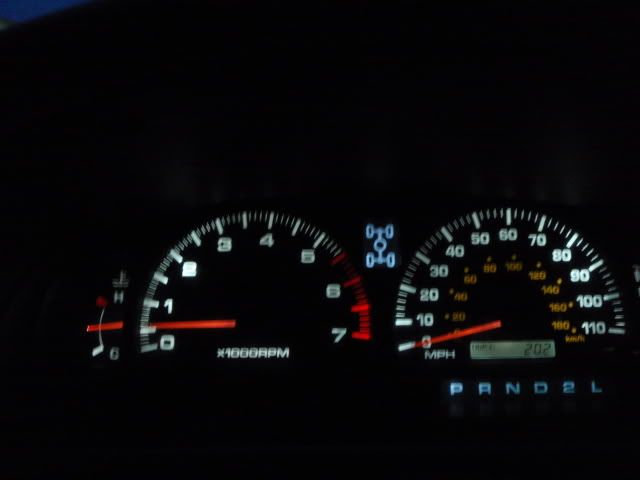
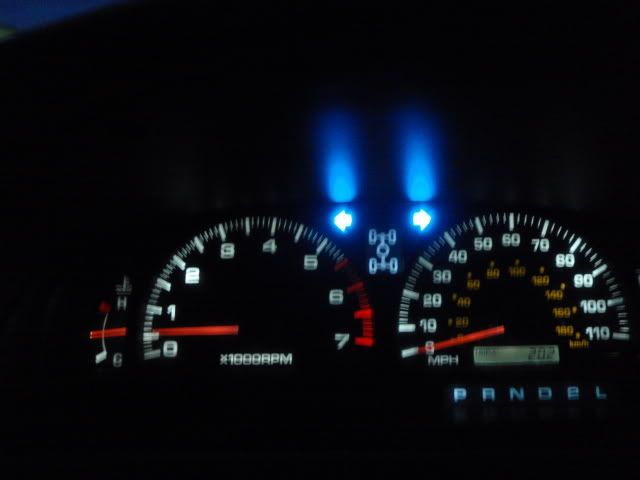
And now after the install:
I Also switched out the overhead lights with two LEDs and they make a huge difference. Next is the tempuerature controls, cigerette lighter, and shifter.
What You will Need:
4 #74 LED bulbs, i chose white
2 #74 LED bulbs(for the blinkers) i chose blue.
Philips Screwdriver
10mm socket with ratchet.
There are many colors of bulbs and different designs out there.
vleds.com
autolumination.com
I bought all my leds from autolumination.com, they have the most to offer and decent prices.
1. Remove steering wheel cover, there is one screw on the bottom, and one screw behind the steering wheel on each side.
1A. To get to the screws on the side, start the truck, turn the wheel to the left until you see a screw on the right side of the cover. Then turn the wheel to the right until you see the screw on the left side of the cover. remove both of those. The cover then pulls apart into two top and bottom pieces.
The screw on the bottom.
2. Remove the bottom piece of the dash below the steering wheel, it is held on by 4-10mm bolts.
That piece then just pops off.
3. Pull the cover around the ignition off, it doesnt have any screws it just pops off.
4. Remove the 4 screw that hold the piece around the gauge on.
Top two screws are here:
Bottom two screws are here:
The face piece around the gauge cluster then pops off.
5. Remove the 4 screw holding the guage cluster in.
6. Pull the gauge cluster out a little bit and disconnect the 5 plugs on the back of it. Then pull the cluster out the rest of the way. Here is what the back looks like.
7. Take the white cover off the back of the cluster, by taking out 4 little gold screws.
8. Taking caution in not breaking anything on the circuit board, remove the two screws at the top of it and the two flat wires at the top as well. The wires come off by gently lifting up on the front of the black holder, which doesnt come all the way off.
9. You can now see where the three cluster back lights and two blinkers go. The back lights are arrowed with red the blinkers are green.
10. Remove each plug with a slight left turn, its about a 1/4 turn and they can be pulled out. Here is what one of the lights look like when they are out.
11. Pull the bulb out, and set it aside.
11A. Insert one of the new #74 bulbs.
12. Repeat step 11 for the remaining bulbs.
13. Now that all the bulbs are in, put the circuit board back on, (two screws and two flatwires) and insert the cluster into its opening and plug the 5 connections back in.
14. Turn the truck on, then the lights and flashers, some of the lights are probably not lit. That is because the LEDs are not made the same way as the normal halogen lights.
15. Unplug the 5 connections, pull the cluster out, and each light that was not on needs to be rotated in the older 180 degrees, make note of which way the bulb holder was plugged in and plug it back in the same way, after rotating the bulb 180 degrees. Make sure the bulbs are fully seated in the holder.
16. Replace the cluster and plugs and recheck the lights.
17. Repeat steps 13-16 until all lights are lit. (That is what took me so long. I had to plug and unplug about 20 times before all the lights were on.)
18. After lights are all lit, insert gauge cluster and connect all plugs and re-attach to it mounting location with the 4 screws
19. Now a quick one bulb change for the ignition light and then back together.
20. Pull the white plastic piece out of the bottom of the ignition light holder.
21. Pull the ignition light ring off the ignition.
22. 1/4 twist and to remove the bulb holder.
23. Replace halogen with LED.
24. Open door, if the light comes on put it back together, if the light does not come on, rotate the bulb 180 degrees and make sure it is fully seated. Open the door again and you should have light.
25. Put the ignition light ring back on the ignition and insert the plastic holder piece.
26. Re-install the gauge cluster face plate with its 4 screws.
27. Snap the ignition face plate back into place.
28. Re-install steering wheel cover, with its three screws.
29. Re-install bottom plastic piece below the steering with with its 4 bolts.
Congratulations, You have now successfully replaced you halogen gauge cluster lights, blinkers, and ignition light with LEDS.
Here is what it looked like before:
And now after the install:
I Also switched out the overhead lights with two LEDs and they make a huge difference. Next is the tempuerature controls, cigerette lighter, and shifter.
Last edited by wyorunner; Mar 26, 2009 at 08:08 AM.
 Mar 26, 2009 | 08:10 AM
#3
Thread Starter
Registered User
iTrader: (1)
Joined: Jun 2007
Posts: 416
Likes: 0
From: Anne Arundel County, MD
thanks, im gonna do another on the temp control, cigerette lighter, and shifter lights in the next few days. and a transmission oil cooler as well. and maybe some others.

Trending Topics
Mar 26, 2009 | 09:35 AM
#8
Registered User
Joined: Feb 2009
Posts: 24
Likes: 0
 Aug 4, 2009 | 07:40 AM
#11
Awesome writeup! I just ordered new LEDs for my 02 4Runner 3 days ago and I can't wait to get them installed! I bought 10 of the #74's for the dash and all the instruments, temperature controls, shifter, ignition, etc. and 4 of the #194's for the backlight on the gauges. Will I even need the #194's or can they be used for the backlight of the gauges?
Aug 7, 2009 | 06:57 PM
#13
I ended up ordering some of the #194's anyway (just in case I need them). If I end up not needing them I can just return them or sell them, not a big deal. I will let everyone know how mine turns out. I am going with blue so I'll see how it goes and I will try to post some pics.
Thanks again wyorunner for the awesome writeup and advice!
Thanks again wyorunner for the awesome writeup and advice!
 Aug 25, 2009 | 11:19 AM
#15
Thread Starter
Registered User
iTrader: (1)
Joined: Jun 2007
Posts: 416
Likes: 0
From: Anne Arundel County, MD
bhanu, if your truck is a 92 its not a tacoma, if your truck IS a tacoma its not a 92. and yea you can do this mod to any truck, but the bulbs you will need will be different.
Sep 10, 2009 | 01:07 PM
#18
Thread Starter
Registered User
iTrader: (1)
Joined: Jun 2007
Posts: 416
Likes: 0
From: Anne Arundel County, MD
no i didnt put resistors in. and this mod will work on a hilux, BUT it may not be the same bulbs. !!!DISCLAIMER!!! ANY VEHICLE BESIDES A 2002 4RUNNER WILL TAKE DIFFERENT BULBS.
Sep 11, 2009 | 10:32 AM
#19

Registered User
Joined: Sep 2009
Posts: 2
Likes: 0
From: Memphis, TN area
Nice write up. I have done the same thing to my 1991 MR2 & will be doing this to my 1990 4X4 extra-cab (I am original owner of truck & 2nd owner of MR2). The Hilux models will use the type #194 replacement bulbs (like my MR2). These Instrument Cluster replacement LED bulbs should have resistors built in to them. Most all the bulbs that replace OEM bulbs have built in resistors, like the ones I used from superbrightleds.com.
As for the climate control system, you will have to solder in LED's & resistors, at least in the hilux models (89-95). Not sure about 95-1/2 + models (Tacomas & Tundras, should be same in the T-100's though). But, only for the buttons. Superbrightleds.com make a replacement bulb (neowedge) that will go right in to the OEM back light bulb areas. The PW & PDL controls I had to remove the circuit boards & solder in new LED's & resistors, but it was pretty easy since the OEM lighting there is LED's & resistors, so I just removed the old ones & soldered in new ones.
Here is my pics of how I did the MR2 & will be doing similar to my 1990 4X4...
http://pics.midsouthspyders.com/list...stall+%26+LEDs
FWIW If you sand down the tip of the LED bulb (do not sand too far or you will touch the metal & ruin the LED) you will get better light dispersion & virtually eliminate those dim spots. As seen in this pic of the 5WLED bulb that is in my MR2 Instrument Cluster...
http://pics.midsouthspyders.com/list...=show&ID=19387
Here is the final pic of the MR2 interior with Cool White (5-WLED bulbs) & digital boost gauge in the Instrument Cluster & the climate control unit, hazard switch, & the S2000 engine start switch finished. The neowedge bulbs are in the S2000 engine start switch, back lights of the climate control unit, & hazard switch & a type #74 wedge bulb in the key ring. Note that it is very hard to get even lighting in the climate control unit. The neowedge bulbs did the best of everything I tried. The only thing I have not tried in the climate control unit is a string of LEDs, but that will be complicated & the camera pic makes the dim spots look worse than what it really is. Also, note the old swamp green color of the OEM stereo (stereo now removed - but nothing in place yet)...
http://pics.midsouthspyders.com/list...=show&ID=19051
Hope this helps out some!
Daniel
Last edited by mr2boost; Sep 11, 2009 at 10:51 AM.


