
Terrys87 88 Truck Build
 Dec 9, 2012 | 10:34 AM
#362
Thread Starter
Super Moderator
iTrader: (1)
Joined: Aug 2008
Posts: 11,787
Likes: 28
From: Anderson Missouri
Great thread for parts OEM parts https://www.yotatech.com/forums/f199...-parts-258178/
204- FF.. is a part number for the Power Steering Pulley. $22
http://www.densoproducts.com/Den-Aut-l1351.aspx
http://www.densoaftermarket.com/catalog/index.php
http://www.aisinaftermarket.com/English/home_eng.php
www.sparkplugs.com has been great for O2 sensors. I have a California Emissions truck and got 2 sensors for the price of one that I would of paid from a parts store. Price varies
On ebay "BackseatAuto" Part Number 76689 is good replacement latches for the sliding back glass on pickups. It is for the 1 1/2" wide latch. Around $6 and $3 shipping. My 2WD has the 3/4" wide latch and I havent had to replace it. There are 2 different sizes on these trucks.
Another site for the backglass latch http://www.dkhardware.com/product-29...ta-trucks.html
"carpartswholesale" ebay seller for fuel pumps. http://api.viglink.com/api/click?for...13464420007671
Part # 90916-03070 for Dual Stage Themostat. 4Runners with back heater can have this problem.
For your valves yes noisy is normal with the 22re...So usually what we all do is .007 and .011 COLD. Then they quite down but aren't too tight to cause issues. If you ask around most of the toyota gurus run 7-11 for valve clearance.
Hood Prop Stay Clip.... http://www.clipsandfasteners.com/Toy...s_p/a17611.htm
Hood Prop Stay Clip.... http://www.lowrangeoffroad.com/index...stay-clip.html
Hood Prop Stay Clip.. http://www.ebay.com/itm/Toyota-Picku...sories&vxp=mtr
Hood Grommet PN 53430B http://www.utoyot8.com/Picture.aspx?...ccode=&ppName=
Where to buy http://www.villagetoyotaparts.com/sh...ssembly=332649
http://www.ebay.com/itm/84-88-Toyota...4a353d&vxp=mtr
Front Bumper on Ebay ... http://www.ebay.com/itm/New-Bumper-F...0fd500&vxp=mtr
Denso Plug Wire PN# 671-4003.
Denso Plug Wires ... http://www.ebay.com/itm/250854901322...84.m1438.l2649
Front Valance .... http://www.ebay.com/itm/New-Valance-...a1b629&vxp=mtr
Tools
Spindle Nut Socket
http://www.wabfab.org/Knuckle-Servic...ypage.tpl.html
Valve Spring Compressor Tool
http://www.ebay.com/itm/Universal-Pr...-/120364836909
http://www.tooltopia.com/otc-tools-4572.aspx
I got a tank out of my parts truck and it was loaded with rust and so was the pump. I surprised the truck even ran. Filter was all plugged up. I spent quite a bit of time cleaning the tank out. First I drained it and tapped the outside with a rubber hammer to break the thick rust loose. Put a little water in to avoid sparks and put some chain and rocked it back and forth to get more loose and then I let it soak with some vinegar in it. I found this on the web. It actually came pretty clean. Have heard of using The Works toilet bowl cleaner from K Mart.
http://www.mopedarmy.com/wiki/Removi...rom_a_gas_tank Several products you can use.
http://www.ehow.com/how_4540637_remo...-gas-tank.html
http://www.vjmog.com/ftopict-3687.html
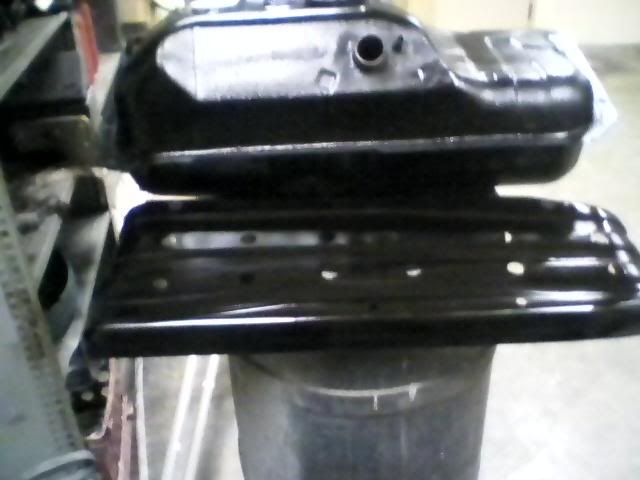
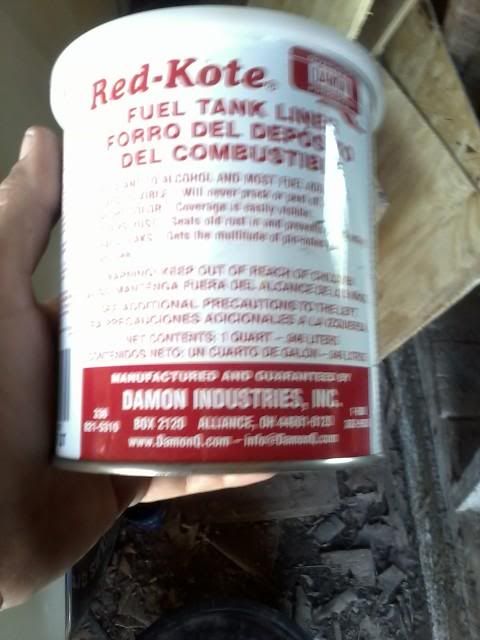
I have a friend that works in a parts store and he suggested Red Kote to coat the tank. I have coated it and am waiting for my new fuel pump to come in. I ready to get the tank in and see if this thing fires up.
I dont mess with tanks in the summer. The fumes are what are dangerous.
I bought the fuel pump off of ebay from "carpartswholesale" for $27.85 plus cheap shipping. Parts store wanted $150
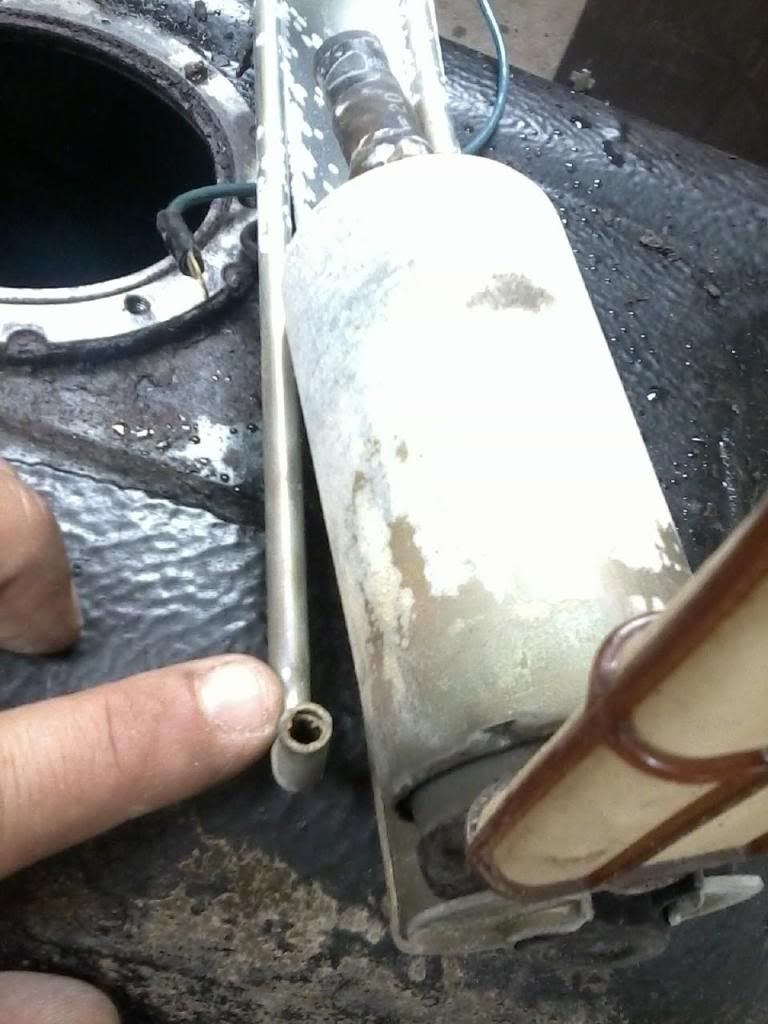
This "J" line likes to get clogged. Check all of them, but most likely this one will be clogged.
New $25 dollar fuel pump. http://www.ebay.com/itm/New-Fuel-Pum...item35b6422050
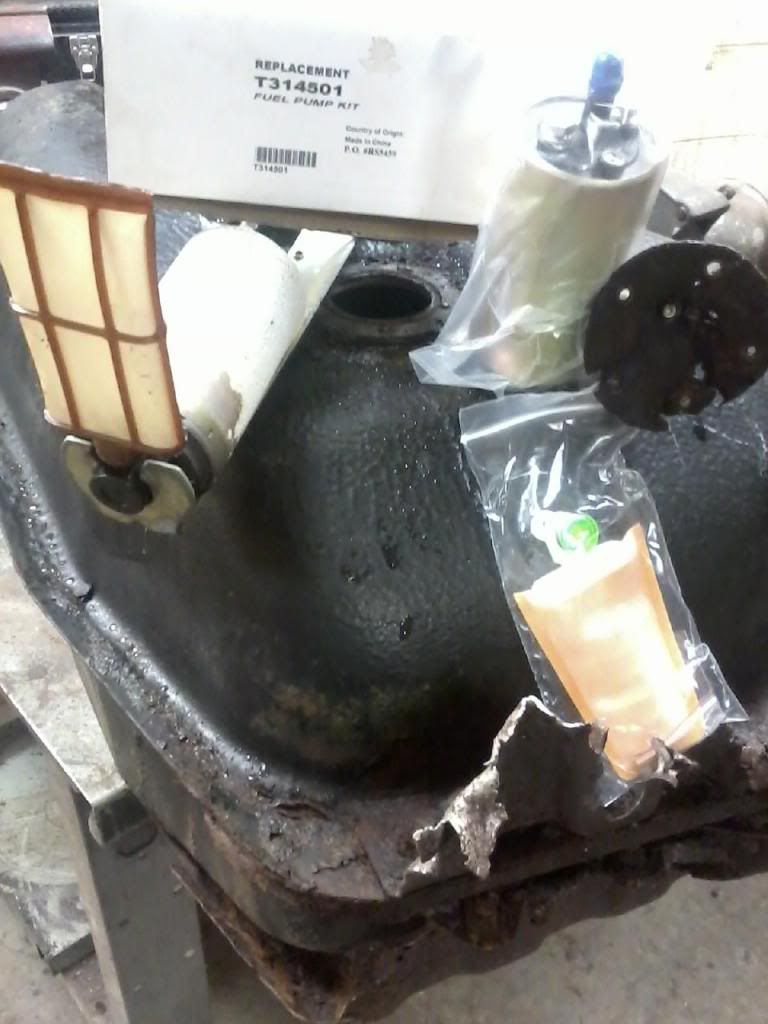
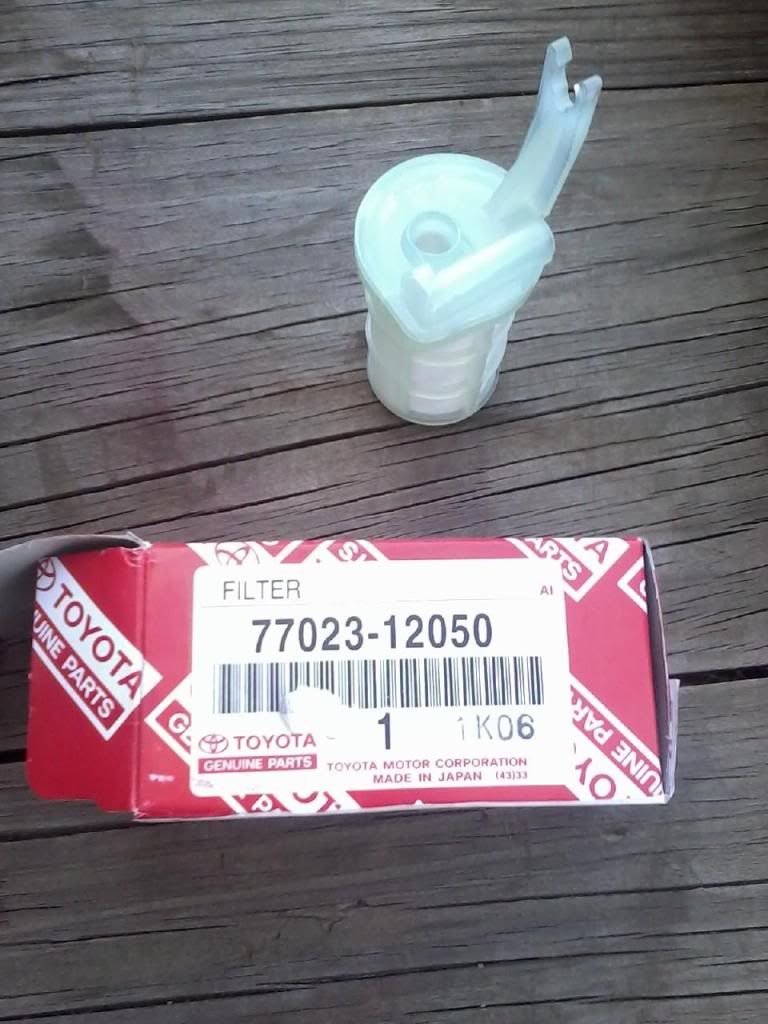
Carburated in tank fuel filter.
Part number for a new intank filter is #77023-12050. On ebay it is called a TOYOTA FACTORY NIB FUEL FILTER SUCTION TUBE DIESEL. It was selling for $4.50 when I finally found it. I paid $15 at Toyota.
Depending on how bad your rust is, you may not need to do all of these steps. This is worse case scenario.
First I get it empty and tap on the out side with a rubber hammer just to cause vibrations and to break up the big chunks. Then I add a few gallons of water and drop a couple of feet of chain and rock back and forth to break up even more rust and flush out with a hose. ( Water to avoid sparks)
Then I soak with white vinegar. On this tank I just had to soak for 4 or 5 days. I would go check on it every couple of days and finally started to see some shiney metal in there. There is still some small signs of rust but nothing like it was earlier. I then flushed it out with a water hose. As of now I am just letting it dry.
I need to get some Red Kote and there are other brands as well, I just like using this brand as I am use to it. I then pour it in and roll it around and coat everything. When done, I pour out the excess and give it a few days to dry.
This works really well and between the vinegar and Red Kote will probably have less then $40 into it. You still need to coat it as there will be grit about like sand that is just nearly impossible to get out. This will stop future rust issues. Red Kote I believe says you can just seal over the rust, but I like to get as much out as possible. I try to do it right.
Here are some other links you can try.
http://www.mopedarmy.com/wiki/Removi...rom_a_gas_tank
http://www.ehow.com/how_4540637_remo...-gas-tank.html
http://www.vjmog.com/ftopict-3687.html
I will get some pics up when I coat it.
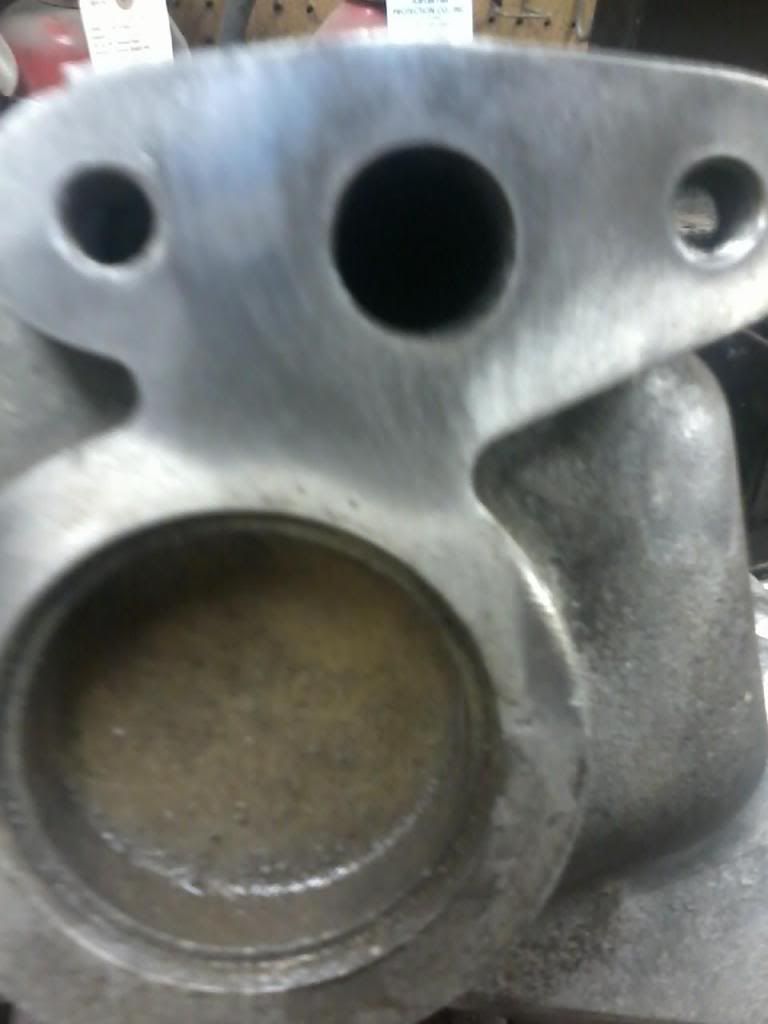
Here are some after pics. Not the best view but it is looking through the Pickup assembly and Float assembly.

[IMG]http://i1098.photobucket.com/albums/g377/Terrys87/gastank1.jpg[/IMG
Here is the Red Kote I have been talking about.

I took a high pressure air hose and blew into the tank. That is rust dust on the tank. One reason you should seal it.

Here is what it should look like when done.

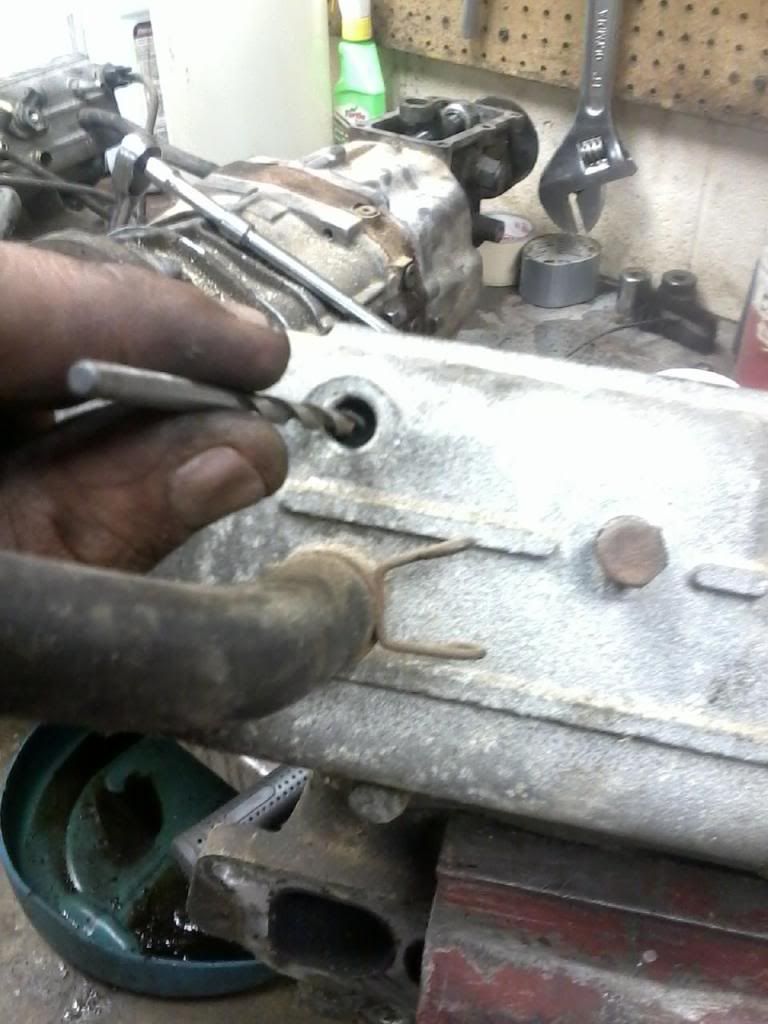
Here I am checking to see if one of the fuel return lines is clear. I pop the gas cap off and you will hear air or bubbles in the tank. I have seen these return lines clogged.

Checking the other line.

Fix: How to clean an EGR and fix code 71 is below pictures.
I take a thin piece of metal and bolt it to the EGR and grind it to fit to shape. After all of the carbon that builds up in these and how bad it plugs up all of the tubing. I just dont see how this can be good for the motor. I have spent alot of time trying to get carbon out of the Plenum and still have a ways to go. I can always remove it for inspections, if we ever have to start having them.

Did get a few more parts cleaned and got the stripped Allen bolt out. So am making steady progress.

--------------------------------------------------------------------------------------------------
Fix for EGR/ Code 71
I got a couple of pictures out of order, but this should give you a good idea of what is needed to be done. You can leave the Plenum on the truck and clean the parts and hoses, I tried to explain both on and off the truck. Best is to take it off and pressure wash it.
I have ran into several EGR codes 71. I have been able to get them fixed without ever replacing one. There may come a time that I will have to replace one. To fix this problem, it will have a bunch of carbon, blocking flow of things. These EGRs usually cost $150 or more new.
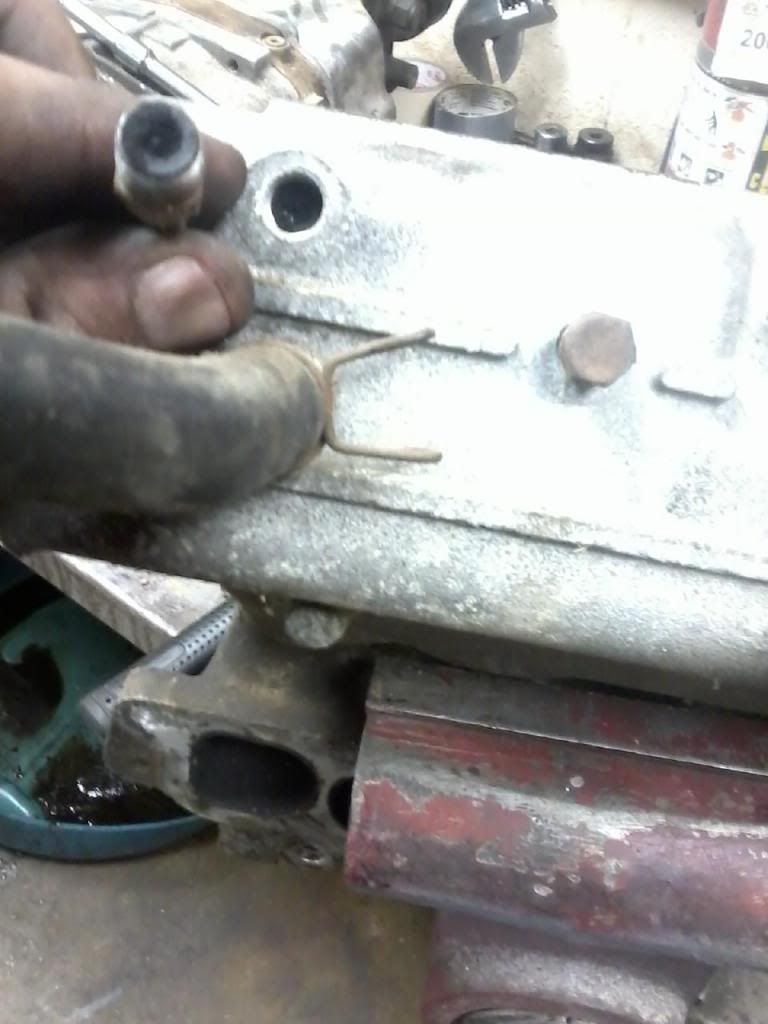
2 bolts hold it to the back of the plenum and 3 to the head. Remove and clean out the little tube on the EGR for the vacuum hose and the pipes attached to the EGR. I will use a drill bit, cloth hanger and air hose. Probably could use brake cleaner or something.
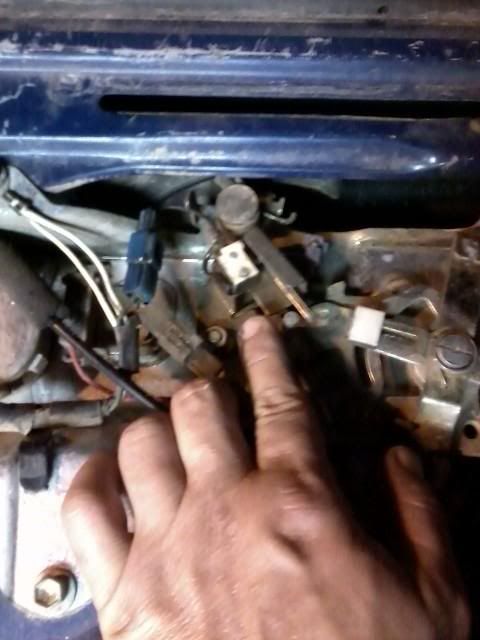
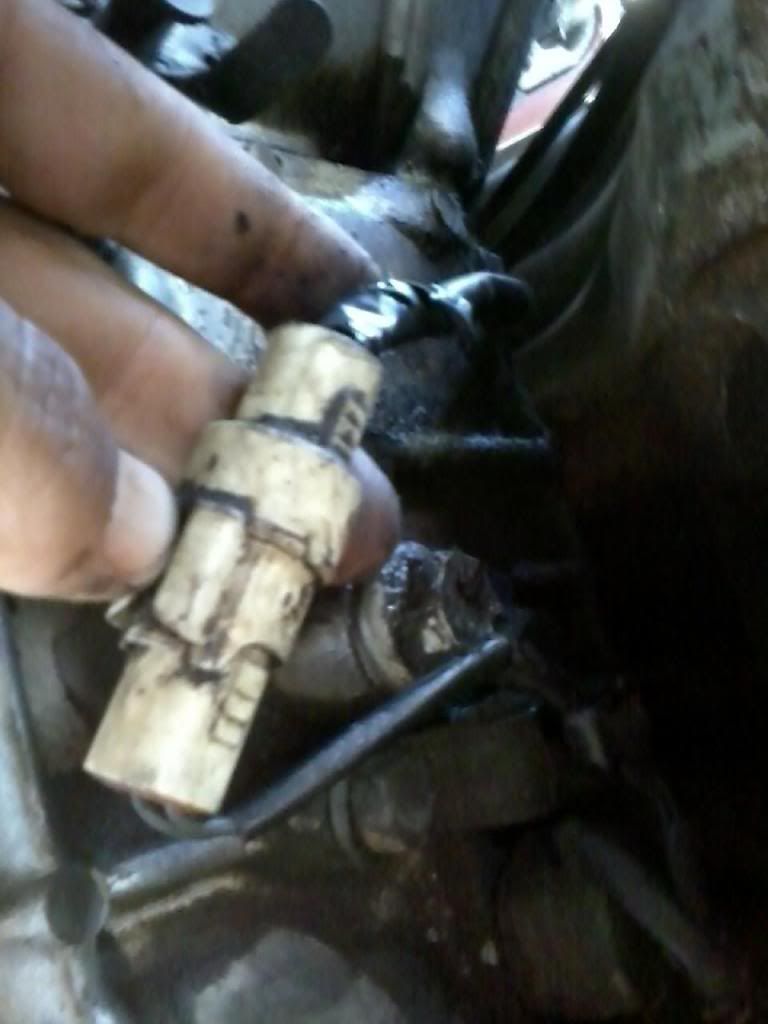
This EGR is set up a little different then most but the Valve and EGR are the same as yours. You should be able to a vacuum on the hose and a vacuum on the EGR and get air to flow through(where my thumb and pointer finger is). I have a drill bit in the small tube. I usually try to take the screw out and but this one doesnt want to come out and dont want to risk breaking. A small wire will get around the bend. Get all pipes clean.

If you leave the Plenum on the truck,take a cloth hanger/ wire and clean out the back of the Plenum where the 2 bolts connect. It will have a bunch of carbon there also. I just work it with wire and air hose til I get it the best that I can.
If you take the Plenum off, Pull the Throttle Body off and take the Plenum to the carwash. The Thottle Postion Sensor is on the Throttle Body. Dont get it wet with water or cleaner. I just leave it on. You dont want the TPS giving problems. Where the EGR connects on to the Plenum, it will be very dirty. It has tubes that go through the Plenum so you wont be able to see all the way through. I take some kind of cleaner and spray into it to break up the carbon.
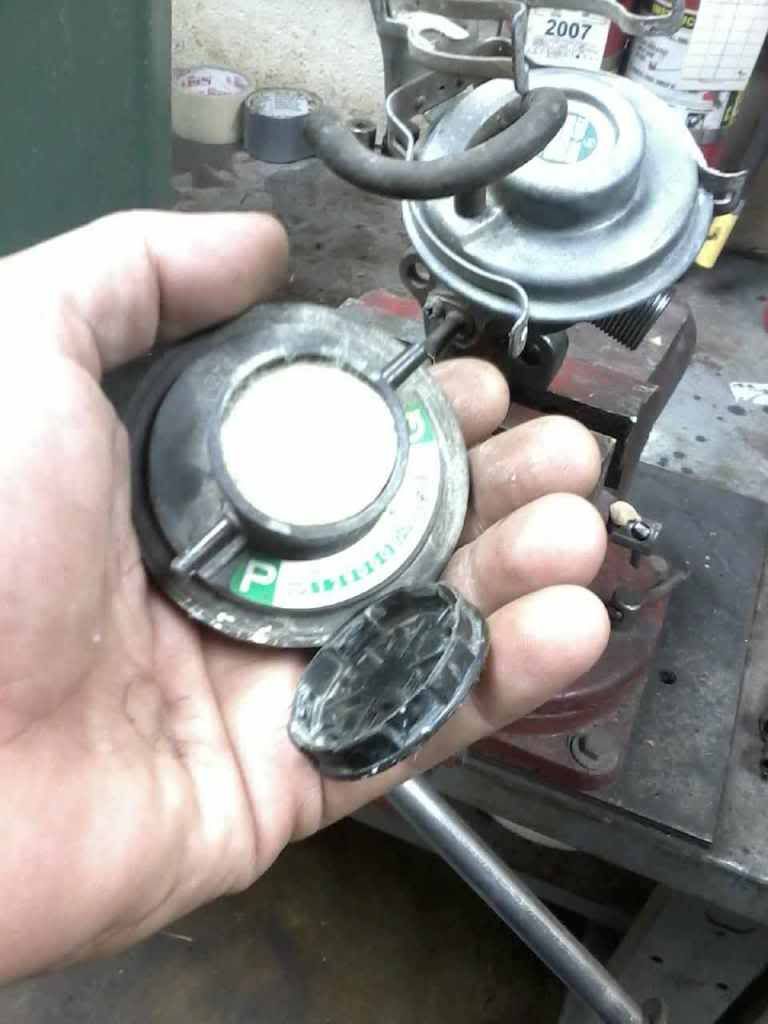
On the Brown Valve, just pop the black cap off and take an air hose and blow the paper filter clean.
All of the hose connections on the Plenum will more than likely be plugged to. Here to I use a drill bit with my fingers and get it all cleared out. Check the hoses also and make sure there is no carbon blocking them.
Here both the port and line is completely plugged with carbon. There were others plugged as well.
The Cold Start Injector is held on with two 10 mm bolts. The Throttle Body and Cold Start Injector gaskets usually stay on the Plenum and I just reuse the gaskets. Just be careful cleaning around them so as not to damage and you can reuse the gasket. Here is a picture of a dirty CSI. I just clean it up with a wire tooth brush. It will have a metal line connected to it. Double check when you start your truck up that it is not leaking. This is on place it will want to leak and is under a lot of pressure.
Here is a picture of the Throttle Position Sensor. You dont want to remove this from the Throttle Body or get it wet with water or chemical cleaners. Just clean around it.
This is the reason, I make a block off plate because of all of the carbon it produces. A soda can will work, I like to use a little thicker material if I can find some. Then I put a little gasket sealer around the plate and EGR just to keep from getting air leaks.
The best way to get this is to remove the Throttle Body and take the Plenum to a carwash and really wash it out good. You will be surprised at the build up in it. I can usually have this done from start to finish in about an hour to an hour and half.
In Post #42 is a poor picture of some of the build up. The Modulator on the head cover may just need taken apart and cleaned with an air hose. The Haynes manual on page 6-38 says "California Model only" for a Code #71, this pretty much applies to all trucks.
Air Injection System block off plates. LCE link to purchase >>> http://www.lceperformance.com/Air-In...-p/1045014.htm

Youtube video...
My Power Steering Pulley is a little noisey so thought I would show how to replace the bearing. I used PN# 204-FF.

Then I removed the nut and the pulley. On the backside there is a wire clip that holds the bearing to the pulley. Remove it,
then I used a 3/4 inch socket and drove it out over a vice.
I put a little oil in side the pulley and used the vice and slowly worked it back in most of the way. Once it is flush with
the pulley I used another socket to finish getting it all the way in so as the wire clip would seat.

Here it is all cleaned and painted. The bearing was $22. Toyota wants to sell the whole assembly. I was unable to
find just the pulley. Hope this helps someone.

I have talked to a couple of other people on here about doing frame swap or body swaps. I have done two and tried to write out a nice way of doing this. I did the swaps before finding Yotatech and wish I would of taken pictures. I figured I would put this in my thread so if others do a search on it, it might make finding this thread easier and so I can call it up quick if I need it. I havent done a 4runner but the steps would be about the same. If you can pull a motor or tranny you can swap bodies/frames. It s very doable and nothing to be afraid of.
I did the 22re's. Apparently a 3.0 and 22res frame arent interchangeable without redoing the motor mounts. I am sure everythign here would apply to a 3.0, but I havent done this so will not say for sure. 84-88 Pickup frames and 89-95 frames are not interchange able from what I have been told.
On the 84-89 4runner behind the Drivers rear tire is a wire disconnect point, for the tailgate and lights that would make separating the wires for body removal. Im sure a 90-95 4Runner would be the same, but I havent done one so cant say for sure.
Fierohinks has some pic in his thread for some ideas and what things will look like. https://www.yotatech.com/forums/f116...s-pics-228184/
Dutchbelly has some good pics of doing a Frame swap...... https://www.yotatech.com/forums/f199...ild-up-234352/
I didnt have a lift, so if you were going to leave the drive train in, there are some steps that would be different and I will try and write them up as best as I can at a later time.
First I center the Steering Wheel and remove the motor and tranny. If you have a lift and can get the body high enough this would really help, but this is how I have to do this.
Getting the Steering Wheel and wheels straight just makes it alot easier for later. When I take the cab off and put it back on is when I install and remove the Steering Rod is probably the most hardest. You may find another way, but this works for me.
Then on the frame by the right front tire you have 2 brake lines to disconnect. This is the best place to do it as it keeps the lines on the cab intact and the frame lines will stay intact. This will take care of your brake issues. ( Pic at bottom)
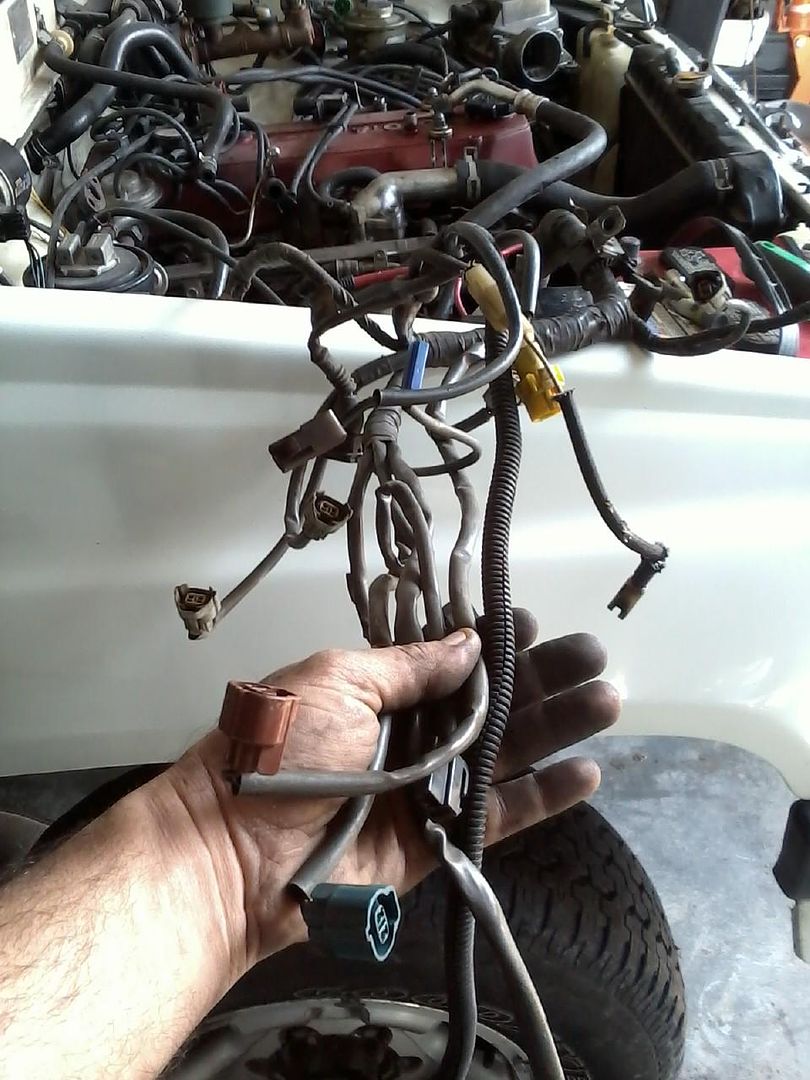
I then disconnect the Wiring harness under the Passenger side seat and this will let the cab come off with out any problems other than you front blinkers and I take the Front Bumper off just so I dont have to lift the cab so high. Leave the wiring harness to the Tail lights/ Fuel Pump on the back half of the frame til later. You can get it when you take the bed off. All of your electrical and computer wires will come with the cab. This is set up quite nice. Just mark all of your wires and such when you pull your motor. When you pull your motor, you will have taken care of alot of other steps like fuel lines.
You have 6 bolts that hold the cab to the frame. The cab and front end come off in one piece. I already have the hood off. I leave fenders, doors, and interior in. 2 bolts by the Radiator, 2 bolts behind the front tires, and 2 bolts toward the rear of the cab is all that hold the cab to the frame. You can tell them as they sit on the outside of the frame and have rubber bushings. You may have to lift your carpet to hold them with wrench to take the nut off.
You have 8-10 bolts that hold the bed on. They have a tab that sticks in the bed so you dont have to have a wrench to hold the top. You should take some PB Blaster a nite or two ahead of time before you do this as most or all of the bolts will break. They are special so you will need to get some from Toyota or the salvage. This is a good time to remove the 3 screws that hold your gas tank fill tube to the bed or body of a 4Runner. Also I have had problems of these nuts backing off when I have had a bed bolt off before so I would suggest using locktite. I use 4 concrete blocks and set the bed on these with the floor of the bed on the blocks so I dont have to worry about damaging the bed sides.
Once all of this is done, I use some concrete blocks and 4x4 wood to support the cab. If your rocker panels are in good shape you can rest it on the wood. If not you might want to support it using blocks of wood between the 4x4 and floor. I set the concrete blocks about a foot from the cab to clear the front tires. This way could be a little unstable so be careful or you might have some other way of doing this. Here is whereI get 3 other guys to help lift the cab. 2 lifting and 2 setting up the stand for the cab. The back is heavy, but the front is light. I go about a foot high off of the frame for everything to clear, but work the frame out slowly and make sure it is high enough. I back the frame out as the front part of the frame is lower than the back part.
I get the new frame with axles in them or you can just put yours in. Put the wiring harness for the back part of the truck and fuel tank in and hopefully you will have brake lines and fuel lines already on or you will get to do that too. Try and get a frame with this stuff already on It will save you a lot of time. Put your exhaust in before you move the new frame under the cab.
Before I start all of this, I try to have the new frame prepped as far as I can. Without counting motor/tranny removal and having the frame ready. I have done this in about 20 total hours using basic tools in a weekend by myself except lifting the cab and body. Cutting torch for bolts, air tools, and a lift would be soooo nice. If you can get the body high enough it would make swapping alot easier, but I dont have access to a lift so this is how I do it. The first time I did this I was intimidated, but by the time I had the old frame out I wasnt in the least bit concerened. If you can pull a motor and tranny out, you wont have any problems. You will be quite surprised when you do it. Any questions that come up, feel free to ask.
If you are going to use a lift and keep the drive train in you will need to
Disconnect your fuel line from fuel filter.
Remove your electrical lines from your injectors and sensors.
Disconnect your electrical lines from your transmission, O2 sensor and transfer case.
I mentioned it earlier, but remove 3 screws that hold your fuel tank to the bed/ body. You can remvoe the lines at the tank, but I feel this is easier.
On a 4Runner you will have to go up between the body an frame and remove 2 bolts to get the fuel filler assembly out.
These are some steps that are different from pulling the motor. Im sure there are more steps but this will get you started in the right direction.
Here is a great place to disconnect your brake and clutch line. By the Passenger front tire.
Wiring harness with tranny and tcase conrectors.
wiring harness.
Steps without having to pulldrive train.
Disconnect steering linkage at gear box or firewall
6 bolts that hold the body on.
Wiring harness all the way to the tranny and lay it over the fender.
I would pull radiator for more clearance
Brake and clutch line behind right rear front tire
Ebrake at the crossmember
I would disconnect the fuel line from the fuel filter
Remove tranny and tcase sticks so they dont get damaged.
Disconnect wring harness under cab under passenger seat.
Front bumper for easier clearance, may not be needed though.
Speedometer cable
Throttle cable
I wanted to put my SR5 Guage in and got to looking at it and wanted it cleaner. Remove the tabs that screw the cluster to the dash to get the lense off.

I used a lense cleaner to clean it up.

I am quite happy with the results. The label says to allow up to 24 hours for the lense coating to dry. Will have to wait and see final results. Either way I am stuck with it. I have it tilted to avoid a glare while taking the picture. No matter how hard I tried, just couldnt get a good pic without the glare.

Give me a day or so and I will update my SR5 guage post.

This is the correct hookup for a SR5 guage.

Can help with Erratic temp guage.
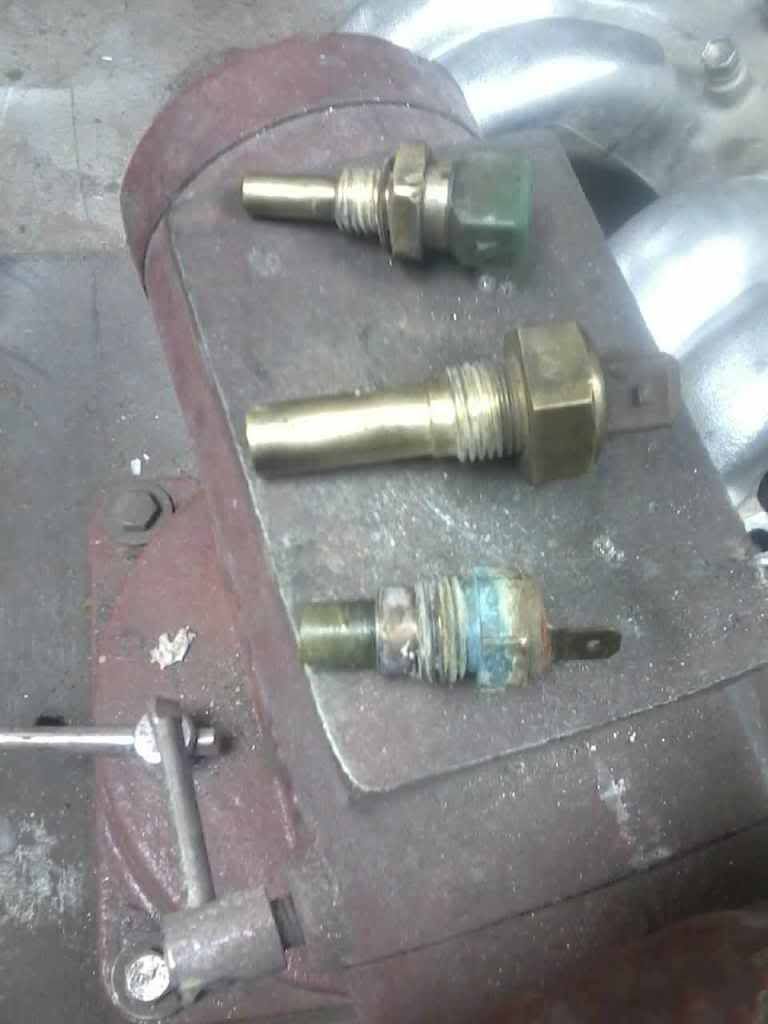
While tearing down the head, I cleaned the sensors. The top two are cleaned, but the bottom one isnt clean. This one goes to your water temp guage. I have had some gauges jumping from cold to hot. This one isnt as bad as some I have seen, Cleaning this one can solve your erratic readings. I just use a wire brush or a green scrub pad.
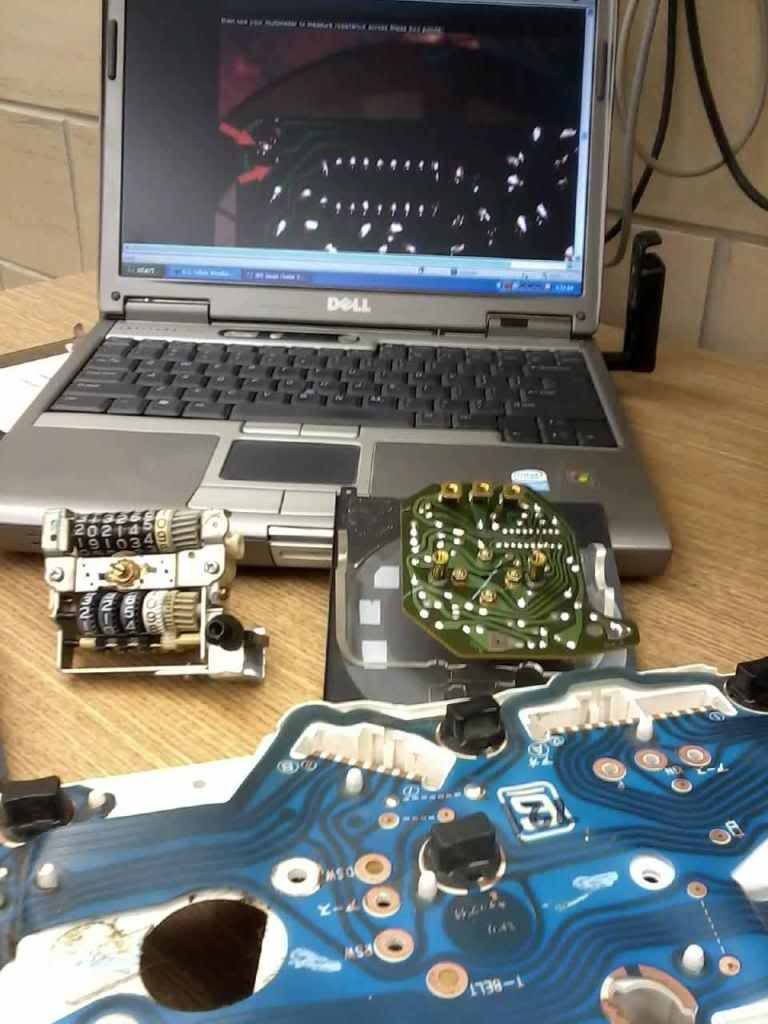
I am practicing on my flatbeds SR5 guage before trying to correct the mileage on my 86s guage and the tachometer on my wifes truck guages. The tachometer is easy when using a 3.0s guages. Just remove the screws that hold it to the cluster and you can get to the adjustments on it.
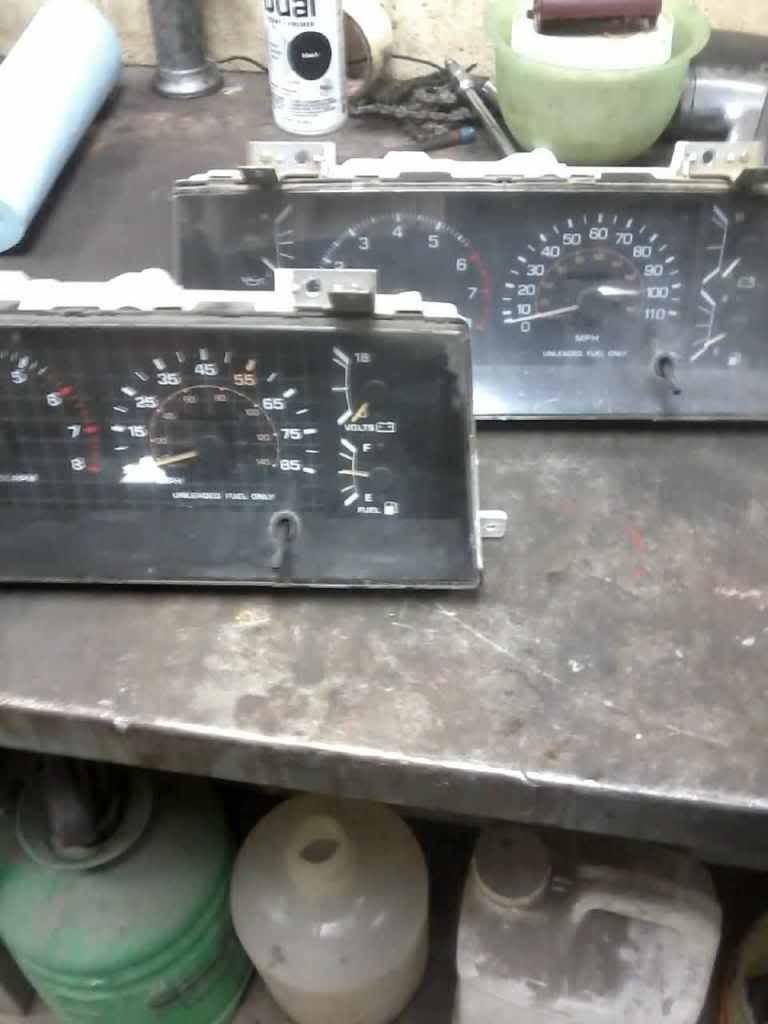
One thing I noticed is that one SR5 guage is 85mph and one is 110 mph. The 110 is for my flatbed and works great. I am not sure if my new one is going to work as it is from an 88 and I got it for my 86.
Tailgate
This is going to be my notes page for the window switch.
https://www.yotatech.com/forums/f128...runner-137310/ Link I found for 89-95 Runners.
https://www.yotatech.com/forums/f116...l#post51400485 Wiring colors.
https://www.yotatech.com/forums/f116...cement-209572/ Replacement Motor
http://www.4crawler.com/4x4/CheapTri...CommonProblems Common problems, Lots of Info
http://forum.ih8mud.com/79-95-toyota...ay-repair.html Cleaning Relays
http://www.4crawler.com/4x4/CheapTri...arWindow.shtml Troubleshooting
https://www.yotatech.com/forums/f116...cement-209572/
http://www.4crawler.com/4x4/CheapTri...arWindow.shtml This page says you can get replacement relays from Radio Shack. I will evetually try it on my old one to see if it works. Would be alot cheaper way to go. As soon as I can get some relays, I will post the results an how to solder/desolder. It is easy if you have never done this before.
I got my rear window working. Wahoo!!
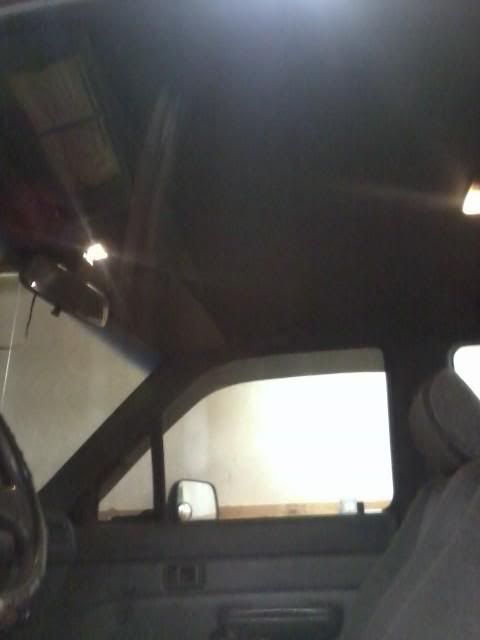
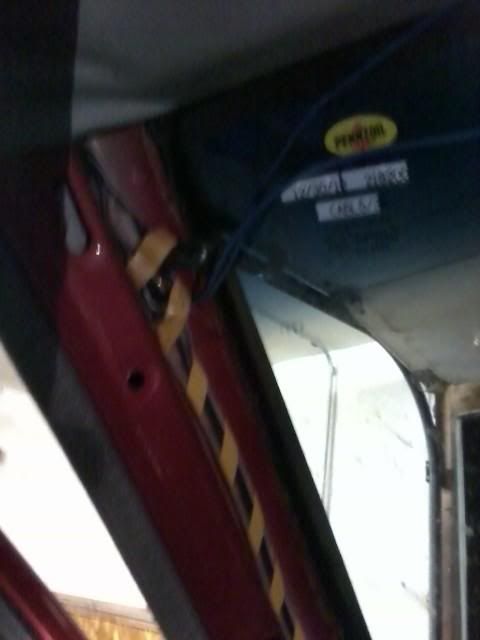
Some quick and easy test are 1. Make sure your rear wiper is in the stowed position. 2.Back gate is shut good, may even want to lean against it and try your key. 3. The plug in the drivers side corner in the back is hooked up good, by your rear windshield washer bottle. 4. That the bolt/pin on drivers side,by the roll bar is all the way in. There is a safety lock located there.
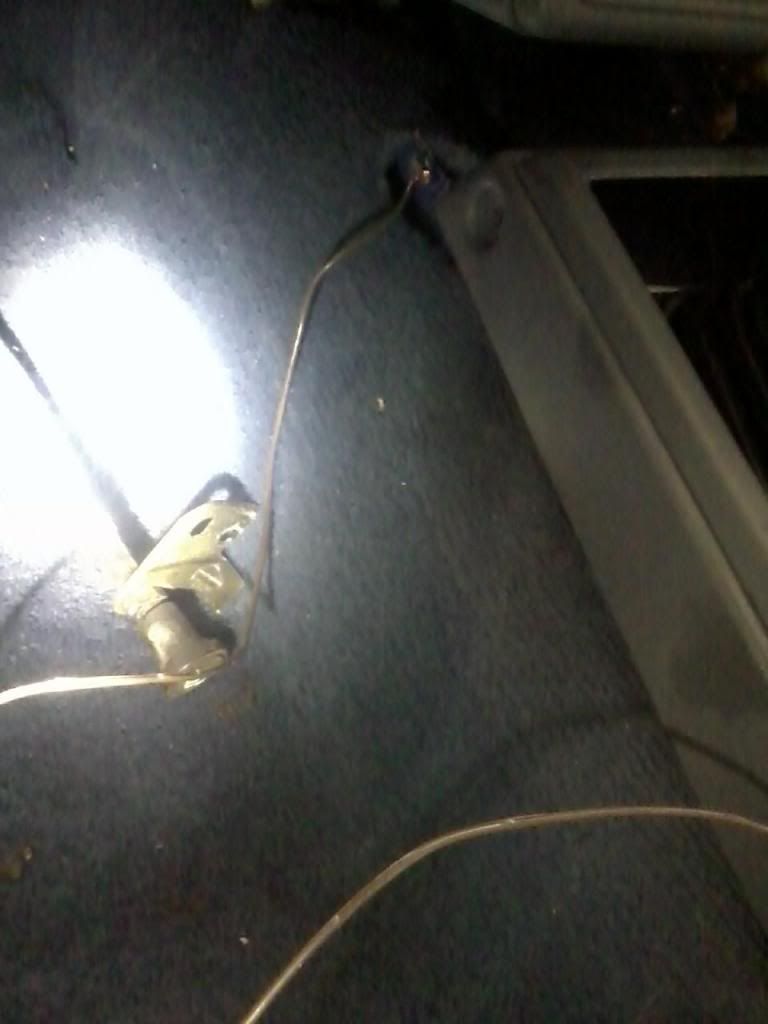
I wanted to see if my Motor was good so I ran 2 connectors right to the motor plug. It is a PITA to get that plug seperated and ran each wire to a battery. Just reverse polarity to control the direction of the window.

I could tell the motor was good right away but it was really struggling to move the window. I thought it was off track, but the metal track with rollers were pretty rusty and I just greased them.
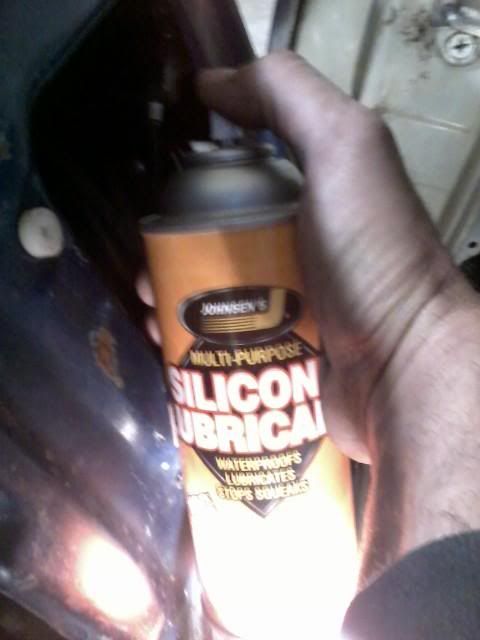
It still was struggling to move up and down, so I took some Silione Spray and got the window tracks. This made a big difference and was the biggest problem. Works great on your door windows too.
I then replaced the Window Relay Box, I got my Rear Wiper working and Defrost but no window control. Located behind the Drivers seat behind the vinyl panel. If your rear wiper and deforst work this is some indication the box is good, but a relay is in there that operates the window so you cant completely rule it out.

I then took the Switch apart. It comes apart easily if done right. First remove the gray plug. It is the light bulb. Then pull the cover away from 2 tabs on one side and then the 2 tabs on the other side.

I then washed the button with soap and water and air dried it with air hose and used electrical contact cleaner to get the corrosion, coffe, dirt and who knows what else out of there.

Here is another picture of how it should look before going back together. Make sure you dont lose the little white pin and the metal toggle piece. These are very brittle being 20 plus years old. On the rear wiper and safety lock, they are difficult to get seperated. I just take contact cleaner and hold the switch upside down and spray cleaner in there and blow it out with an air hose.

I put some links that I used to get to this point up in a previous post. The last link says you can use some relays from Radio Shack, but I havent tried it. I will later on with my old/bad relay.
Other things to look for is make sure your rear wiper is in the stow positon, the tail gate is completely closed.
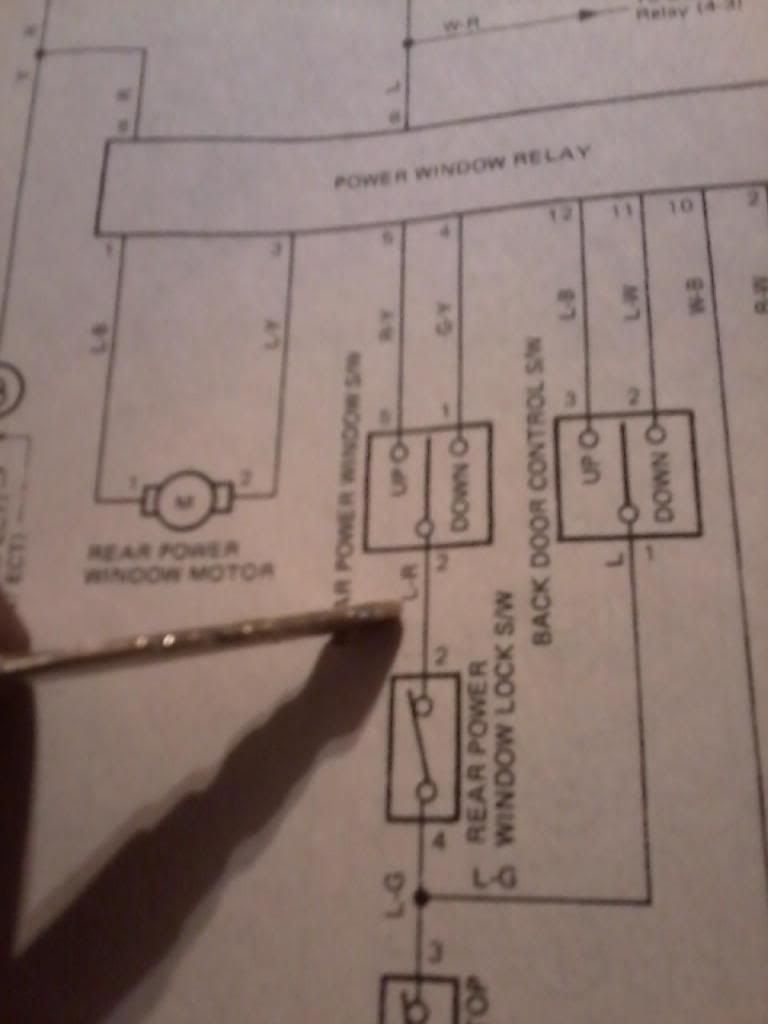
On post #361 I have a ground wire that bypasses the Cover Top Switch and Door Lock Detector Switch. #365 has a better electrical diagram view of the ground wire I by passed theses two switches.
I still havent tried the key. I didnt use my old key lock when I switched tailgates as it looks more involved then I want to get into. I will have a locksmith to make me one.
This is a switch that does give problems. I have cleaned it and it seems to be working better. I will light the Rear Door Ajar light.
Located behind driviers seat.
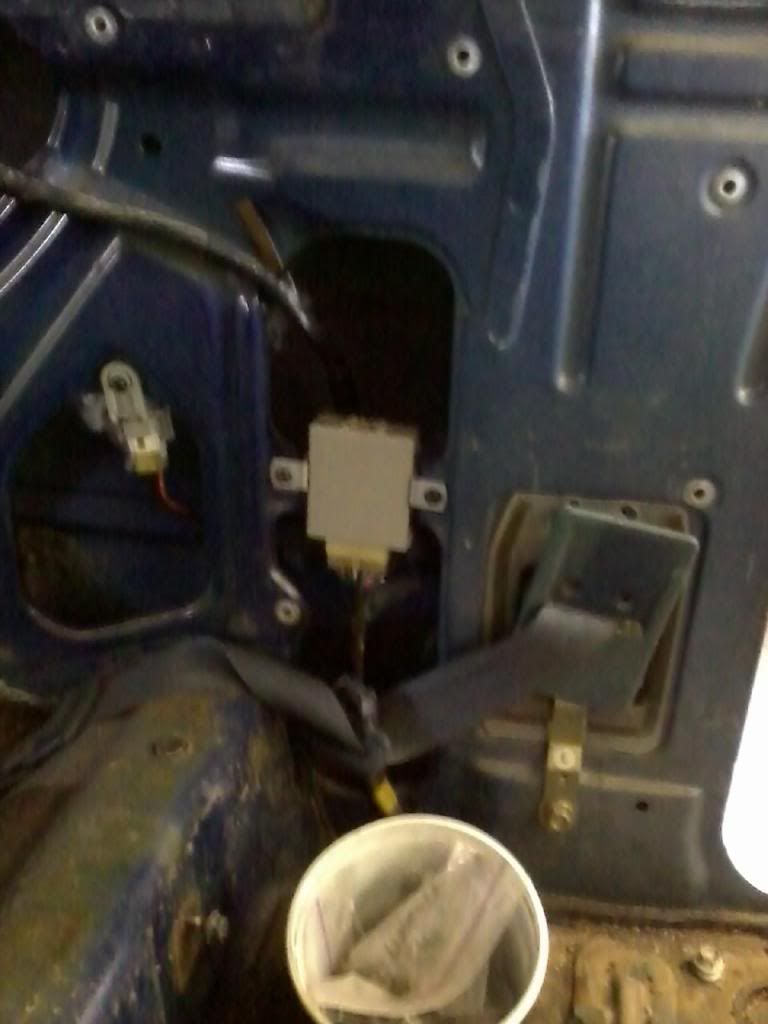
Running a ground wire from this wire on the plug, the blue wire to the place on the pic below elminates a lot of problems.

Ground to center consloe mounting tab.
The ground wire bypasses the following safety switches. Cover Top and Door Lock Detections switch. Your window will roll up with top off. This is on Page 12-23 of the Haynes Manual where the key is to the botom of the page.
Haynes "L" for Blue, "R" for Red. Key is pointing to wire.
89-95 runner tailgate reassembly, but most applies to 1st gen Runner.
[QUOTE=ChefYota4x4;51979710]Bottom line, my tailgate wouldn't even latch on the pass. side, let alone lock. This is a very common problem, from what I've learned.... And the culprits, as I've also come to glean from great Yotatechy Brothers like Terrys_87 and others is these..........
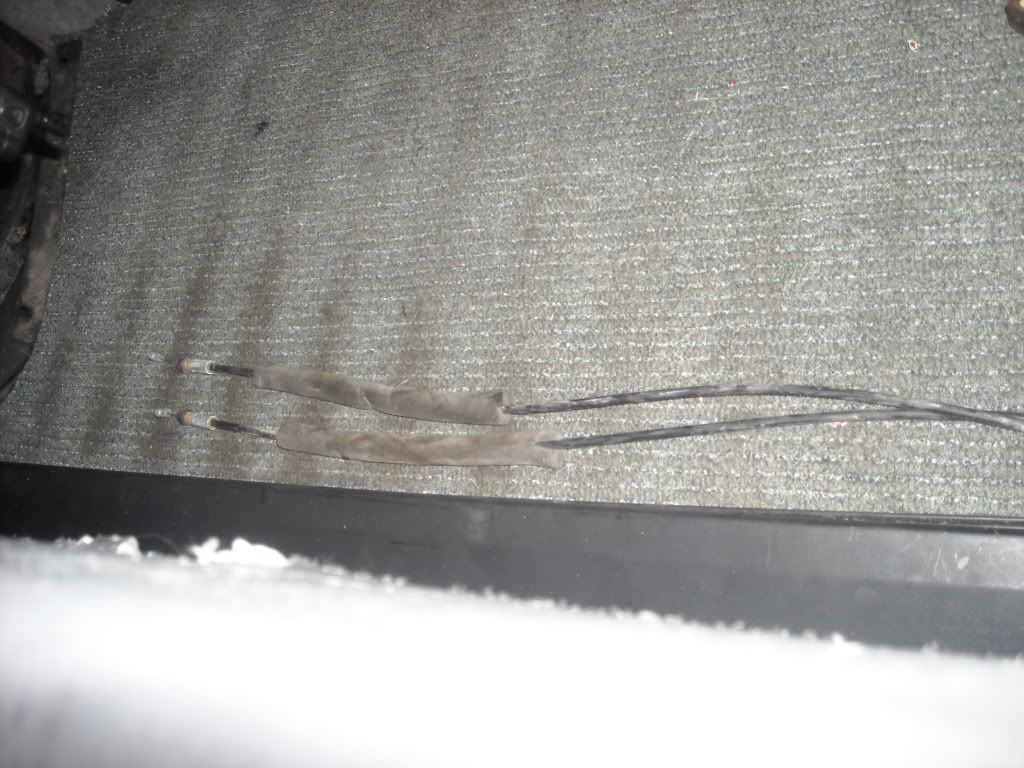
The Tailgate Latch Release/Latch Cables...........
************************************************** ********
So let's get to it..........
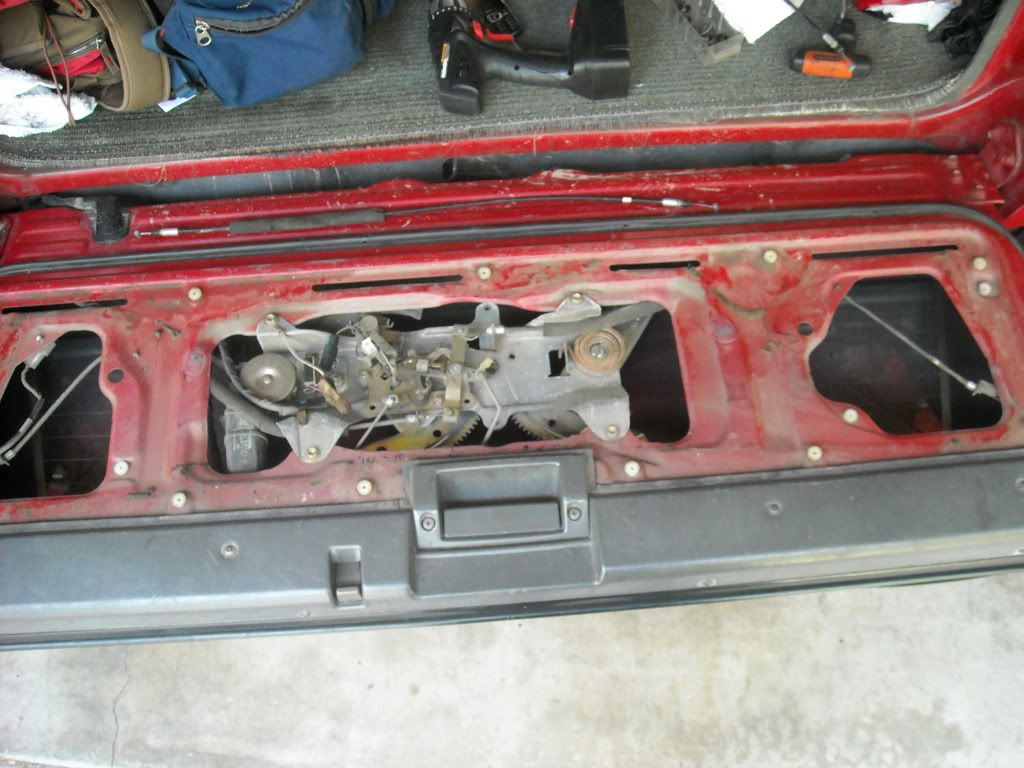
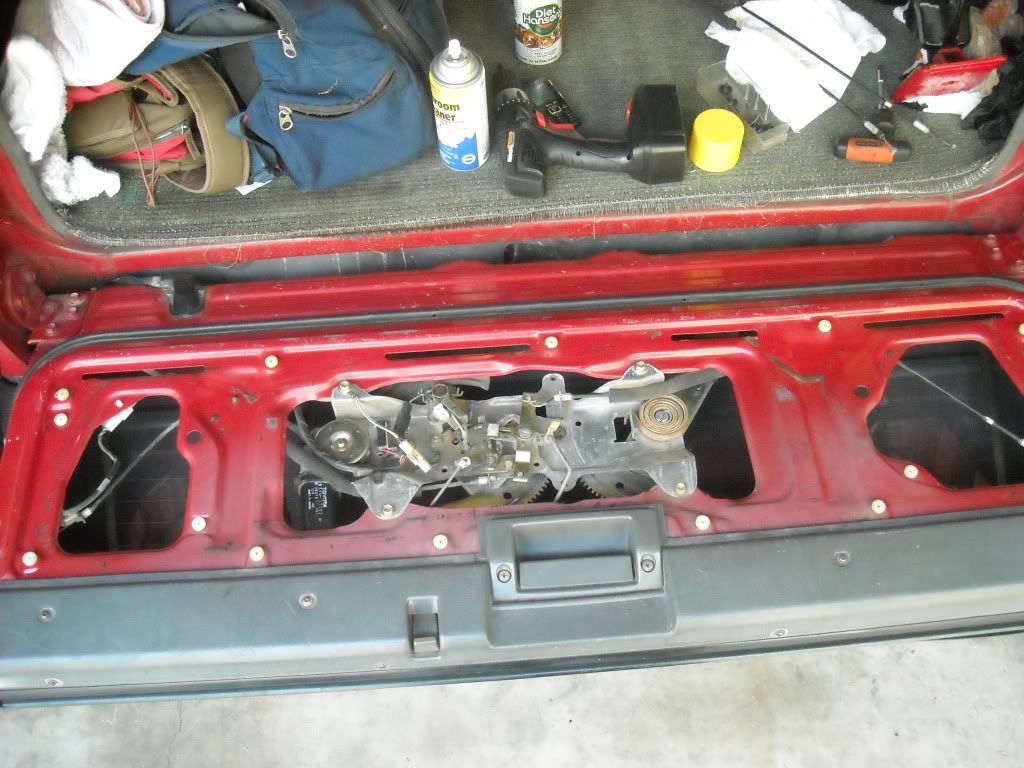
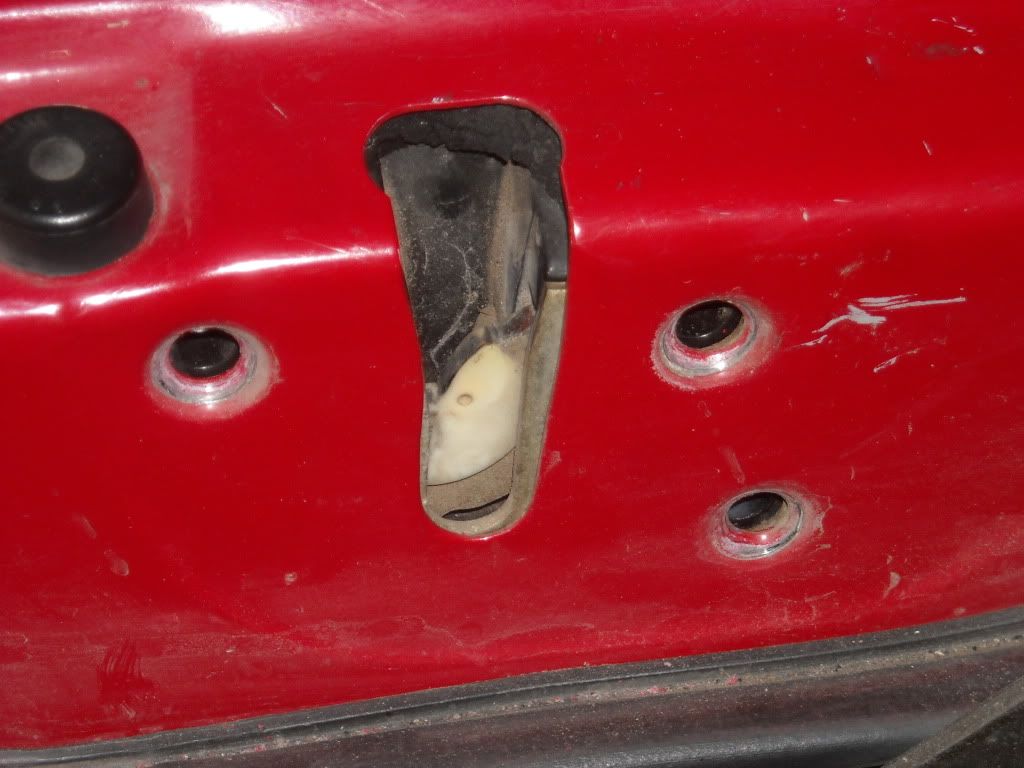
1st: Remove the Carpeted Panel, Metal Plate and then Plastic Film(The film can be brittle... Mine was solid.. Just a lil dried out on the corners. But pick a spot to start and peel it up and continue to peel it up all the way around until it's removed)...........
Mine was very dirty inside and on top.......
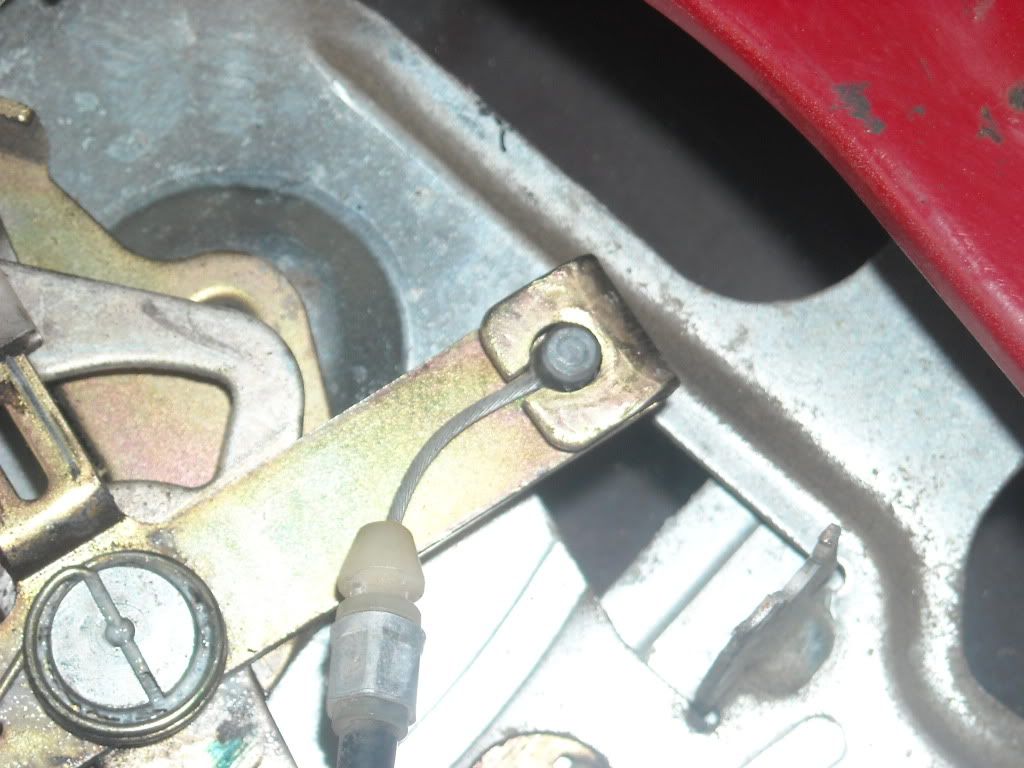
Here's a close up of the most common cable to wind up sticking/freezing up, passenger side... It can't enter the shaft to re-engage the latch mechanism...
The cable going to the driver side latch seemed to move 'OK'... but I replaced them both, for reasons I'll explain in video, more so, later(but briefly; The 1st Gen cables ARE DIFFERENT, in more than one way. They DO NOT have a rubber boot on the end that the cable slides through.... Rather, the cable itself is 'rubberized'... It rusts right through the rubber and seizes up inside the shaft/guide)........Driver side Cable.......
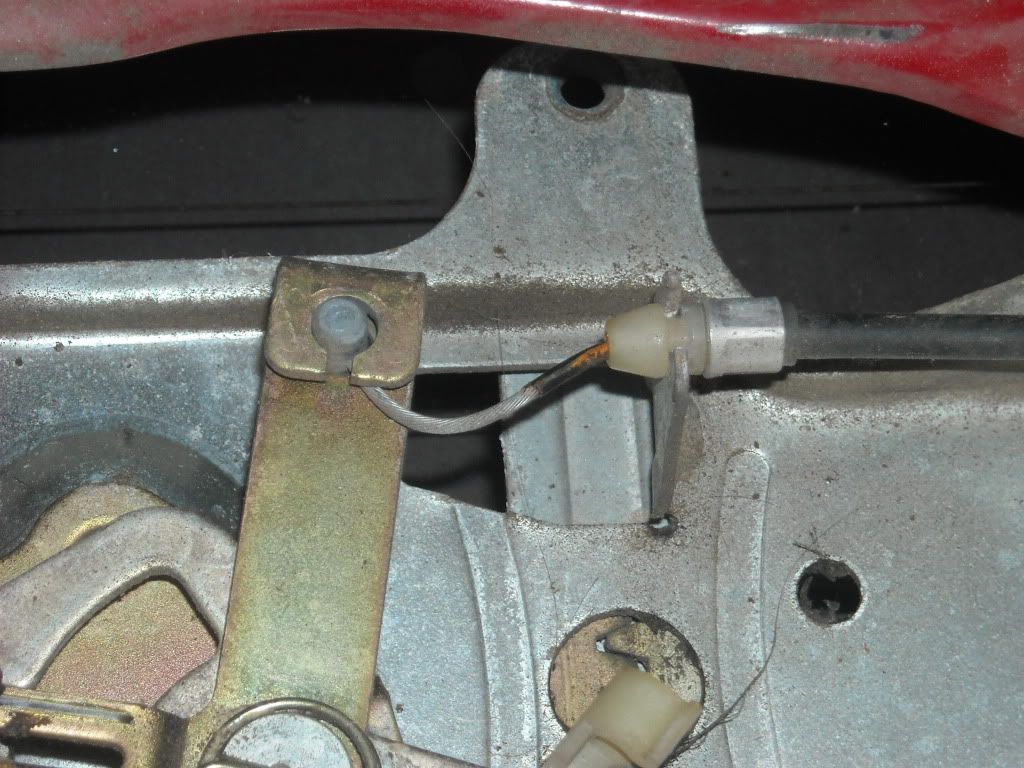
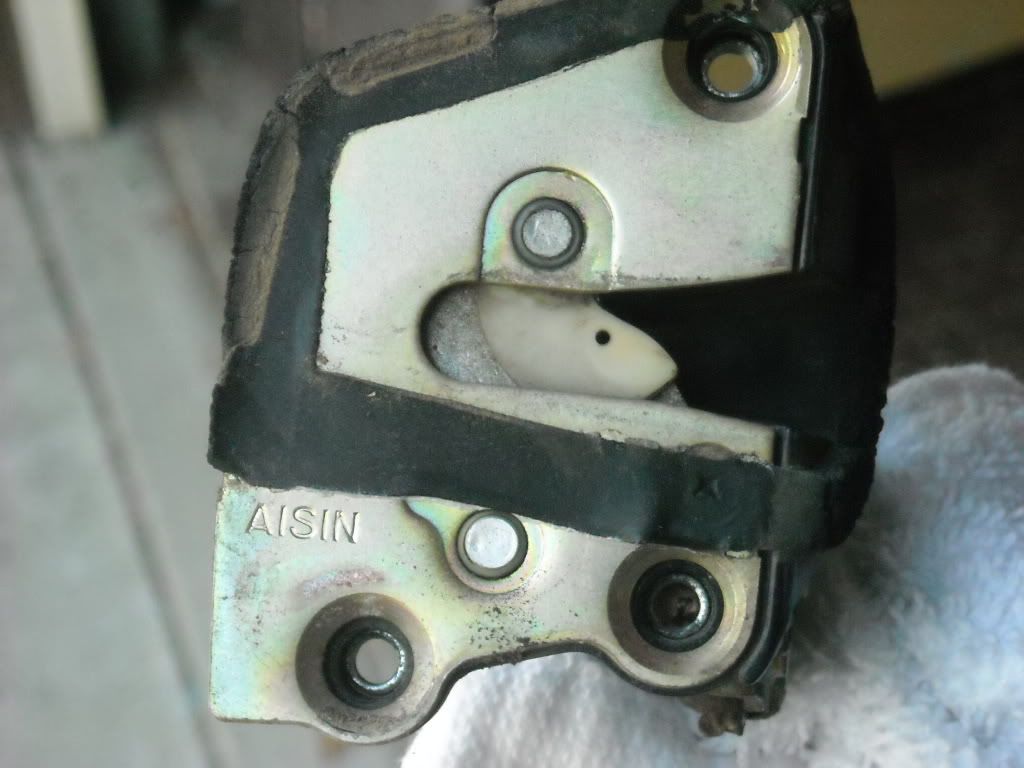
Here is the passenger side latch mechanism bracket, where the cable clips in/Second pic is the driver side one......

This is the Lock-Safety Switch Actuator in, first, the unlocked position, then locked.......
2nd: Clean up the Tailgate very well, inside I used a vacuum and on top I used some Bathroom Foaming Cleaner.........
Next, I prepared the NEW to me, 2nd Gen 4Runner Latch Release Cables by pulling off the boot and injecting silicone lubricant spray.....
BELOW, notice the difference in the 1st Gen 4Runner Cable ends(and notice the rubberizing on the cable itself, plus the boots that they use, instead, on the 2nd Gen 4Runner cables...
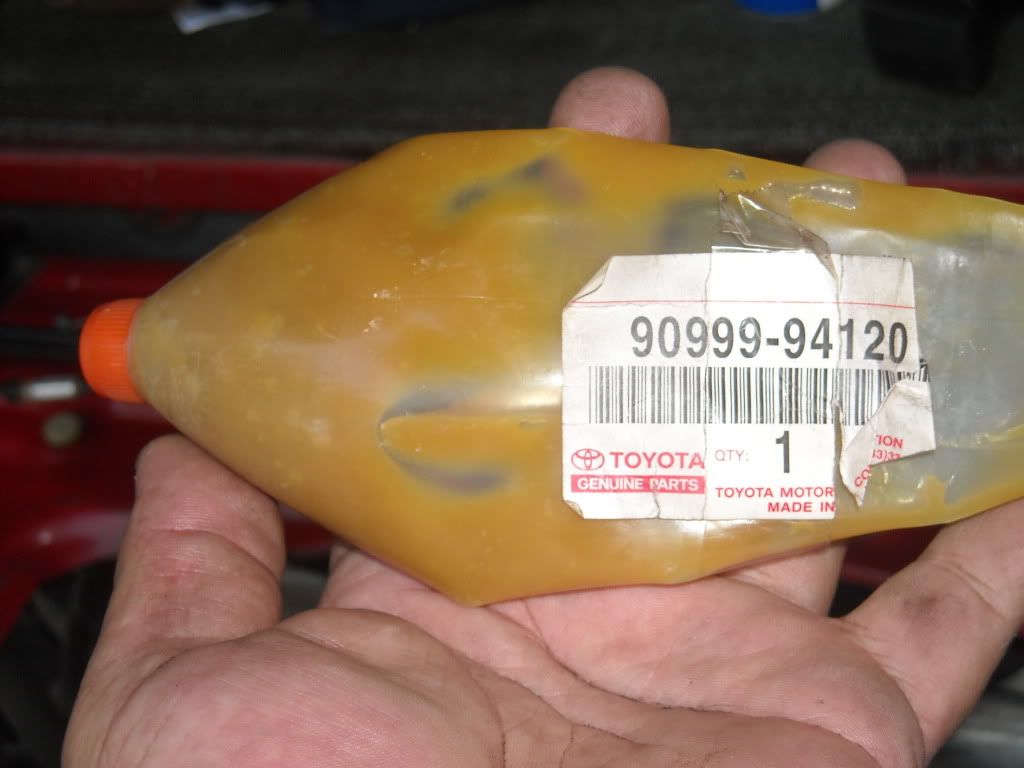
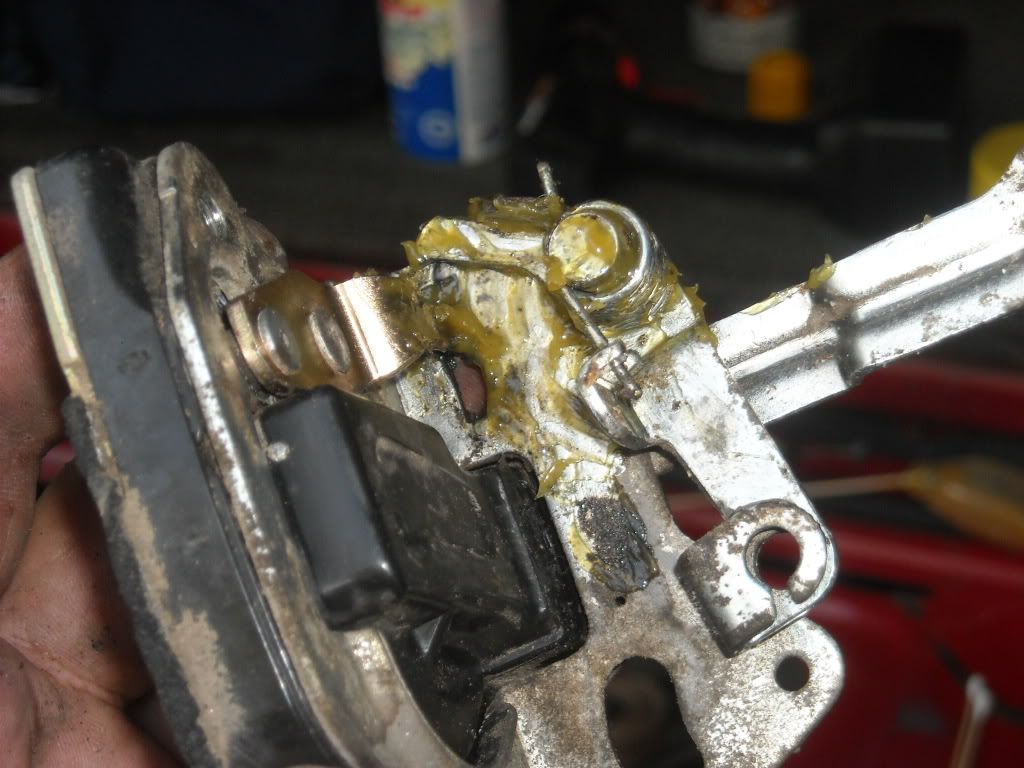
I then took some of the left over CV boot kit grease from Toyota, and used it on all the 'gliding' mechanisms and places it should be, including the latch on the driver side, which I removed and cleaned up, well.........
First pulled out the latch mechanism and removed the cable...
It was pretty nasty.. Then cleaned up and greased everything....
Then removed the other side on the Handle Cross Gear(Cross as in it looks like a Cross, haha).......
Put the latch back in..........
204- FF.. is a part number for the Power Steering Pulley. $22
http://www.densoproducts.com/Den-Aut-l1351.aspx
http://www.densoaftermarket.com/catalog/index.php
http://www.aisinaftermarket.com/English/home_eng.php
www.sparkplugs.com has been great for O2 sensors. I have a California Emissions truck and got 2 sensors for the price of one that I would of paid from a parts store. Price varies
On ebay "BackseatAuto" Part Number 76689 is good replacement latches for the sliding back glass on pickups. It is for the 1 1/2" wide latch. Around $6 and $3 shipping. My 2WD has the 3/4" wide latch and I havent had to replace it. There are 2 different sizes on these trucks.
Another site for the backglass latch http://www.dkhardware.com/product-29...ta-trucks.html
"carpartswholesale" ebay seller for fuel pumps. http://api.viglink.com/api/click?for...13464420007671
Part # 90916-03070 for Dual Stage Themostat. 4Runners with back heater can have this problem.
For your valves yes noisy is normal with the 22re...So usually what we all do is .007 and .011 COLD. Then they quite down but aren't too tight to cause issues. If you ask around most of the toyota gurus run 7-11 for valve clearance.
Hood Prop Stay Clip.... http://www.clipsandfasteners.com/Toy...s_p/a17611.htm
Hood Prop Stay Clip.... http://www.lowrangeoffroad.com/index...stay-clip.html
Hood Prop Stay Clip.. http://www.ebay.com/itm/Toyota-Picku...sories&vxp=mtr
Hood Grommet PN 53430B http://www.utoyot8.com/Picture.aspx?...ccode=&ppName=
Where to buy http://www.villagetoyotaparts.com/sh...ssembly=332649
http://www.ebay.com/itm/84-88-Toyota...4a353d&vxp=mtr
Front Bumper on Ebay ... http://www.ebay.com/itm/New-Bumper-F...0fd500&vxp=mtr
Denso Plug Wire PN# 671-4003.
Denso Plug Wires ... http://www.ebay.com/itm/250854901322...84.m1438.l2649
Front Valance .... http://www.ebay.com/itm/New-Valance-...a1b629&vxp=mtr
Tools
Spindle Nut Socket
http://www.wabfab.org/Knuckle-Servic...ypage.tpl.html
Valve Spring Compressor Tool
http://www.ebay.com/itm/Universal-Pr...-/120364836909
http://www.tooltopia.com/otc-tools-4572.aspx
I got a tank out of my parts truck and it was loaded with rust and so was the pump. I surprised the truck even ran. Filter was all plugged up. I spent quite a bit of time cleaning the tank out. First I drained it and tapped the outside with a rubber hammer to break the thick rust loose. Put a little water in to avoid sparks and put some chain and rocked it back and forth to get more loose and then I let it soak with some vinegar in it. I found this on the web. It actually came pretty clean. Have heard of using The Works toilet bowl cleaner from K Mart.
http://www.mopedarmy.com/wiki/Removi...rom_a_gas_tank Several products you can use.
http://www.ehow.com/how_4540637_remo...-gas-tank.html
http://www.vjmog.com/ftopict-3687.html
I have a friend that works in a parts store and he suggested Red Kote to coat the tank. I have coated it and am waiting for my new fuel pump to come in. I ready to get the tank in and see if this thing fires up.
I dont mess with tanks in the summer. The fumes are what are dangerous.
I bought the fuel pump off of ebay from "carpartswholesale" for $27.85 plus cheap shipping. Parts store wanted $150
This "J" line likes to get clogged. Check all of them, but most likely this one will be clogged.
New $25 dollar fuel pump. http://www.ebay.com/itm/New-Fuel-Pum...item35b6422050
Carburated in tank fuel filter.
Part number for a new intank filter is #77023-12050. On ebay it is called a TOYOTA FACTORY NIB FUEL FILTER SUCTION TUBE DIESEL. It was selling for $4.50 when I finally found it. I paid $15 at Toyota.
Depending on how bad your rust is, you may not need to do all of these steps. This is worse case scenario.
First I get it empty and tap on the out side with a rubber hammer just to cause vibrations and to break up the big chunks. Then I add a few gallons of water and drop a couple of feet of chain and rock back and forth to break up even more rust and flush out with a hose. ( Water to avoid sparks)
Then I soak with white vinegar. On this tank I just had to soak for 4 or 5 days. I would go check on it every couple of days and finally started to see some shiney metal in there. There is still some small signs of rust but nothing like it was earlier. I then flushed it out with a water hose. As of now I am just letting it dry.
I need to get some Red Kote and there are other brands as well, I just like using this brand as I am use to it. I then pour it in and roll it around and coat everything. When done, I pour out the excess and give it a few days to dry.
This works really well and between the vinegar and Red Kote will probably have less then $40 into it. You still need to coat it as there will be grit about like sand that is just nearly impossible to get out. This will stop future rust issues. Red Kote I believe says you can just seal over the rust, but I like to get as much out as possible. I try to do it right.
Here are some other links you can try.
http://www.mopedarmy.com/wiki/Removi...rom_a_gas_tank
http://www.ehow.com/how_4540637_remo...-gas-tank.html
http://www.vjmog.com/ftopict-3687.html
I will get some pics up when I coat it.
Here are some after pics. Not the best view but it is looking through the Pickup assembly and Float assembly.
[IMG]http://i1098.photobucket.com/albums/g377/Terrys87/gastank1.jpg[/IMG
Here is the Red Kote I have been talking about.
I took a high pressure air hose and blew into the tank. That is rust dust on the tank. One reason you should seal it.
Here is what it should look like when done.
Here I am checking to see if one of the fuel return lines is clear. I pop the gas cap off and you will hear air or bubbles in the tank. I have seen these return lines clogged.
Checking the other line.
Fix: How to clean an EGR and fix code 71 is below pictures.
I take a thin piece of metal and bolt it to the EGR and grind it to fit to shape. After all of the carbon that builds up in these and how bad it plugs up all of the tubing. I just dont see how this can be good for the motor. I have spent alot of time trying to get carbon out of the Plenum and still have a ways to go. I can always remove it for inspections, if we ever have to start having them.
Did get a few more parts cleaned and got the stripped Allen bolt out. So am making steady progress.
--------------------------------------------------------------------------------------------------
Fix for EGR/ Code 71
I got a couple of pictures out of order, but this should give you a good idea of what is needed to be done. You can leave the Plenum on the truck and clean the parts and hoses, I tried to explain both on and off the truck. Best is to take it off and pressure wash it.
I have ran into several EGR codes 71. I have been able to get them fixed without ever replacing one. There may come a time that I will have to replace one. To fix this problem, it will have a bunch of carbon, blocking flow of things. These EGRs usually cost $150 or more new.
2 bolts hold it to the back of the plenum and 3 to the head. Remove and clean out the little tube on the EGR for the vacuum hose and the pipes attached to the EGR. I will use a drill bit, cloth hanger and air hose. Probably could use brake cleaner or something.
This EGR is set up a little different then most but the Valve and EGR are the same as yours. You should be able to a vacuum on the hose and a vacuum on the EGR and get air to flow through(where my thumb and pointer finger is). I have a drill bit in the small tube. I usually try to take the screw out and but this one doesnt want to come out and dont want to risk breaking. A small wire will get around the bend. Get all pipes clean.
If you leave the Plenum on the truck,take a cloth hanger/ wire and clean out the back of the Plenum where the 2 bolts connect. It will have a bunch of carbon there also. I just work it with wire and air hose til I get it the best that I can.
If you take the Plenum off, Pull the Throttle Body off and take the Plenum to the carwash. The Thottle Postion Sensor is on the Throttle Body. Dont get it wet with water or cleaner. I just leave it on. You dont want the TPS giving problems. Where the EGR connects on to the Plenum, it will be very dirty. It has tubes that go through the Plenum so you wont be able to see all the way through. I take some kind of cleaner and spray into it to break up the carbon.
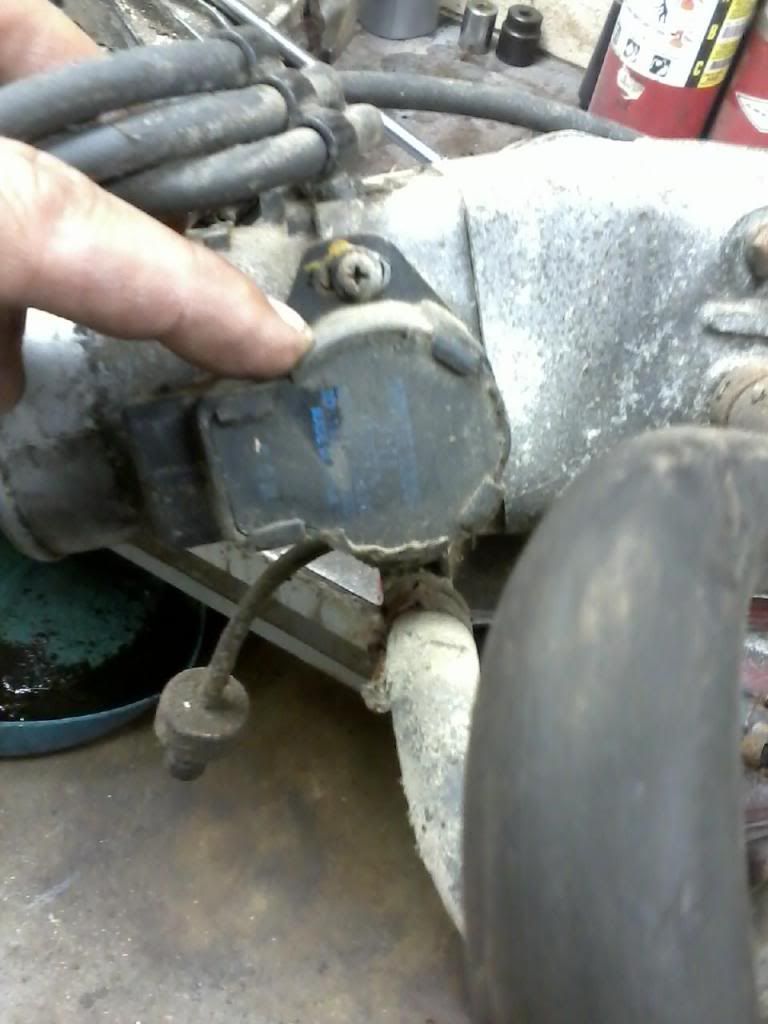
On the Brown Valve, just pop the black cap off and take an air hose and blow the paper filter clean.
All of the hose connections on the Plenum will more than likely be plugged to. Here to I use a drill bit with my fingers and get it all cleared out. Check the hoses also and make sure there is no carbon blocking them.
Here both the port and line is completely plugged with carbon. There were others plugged as well.
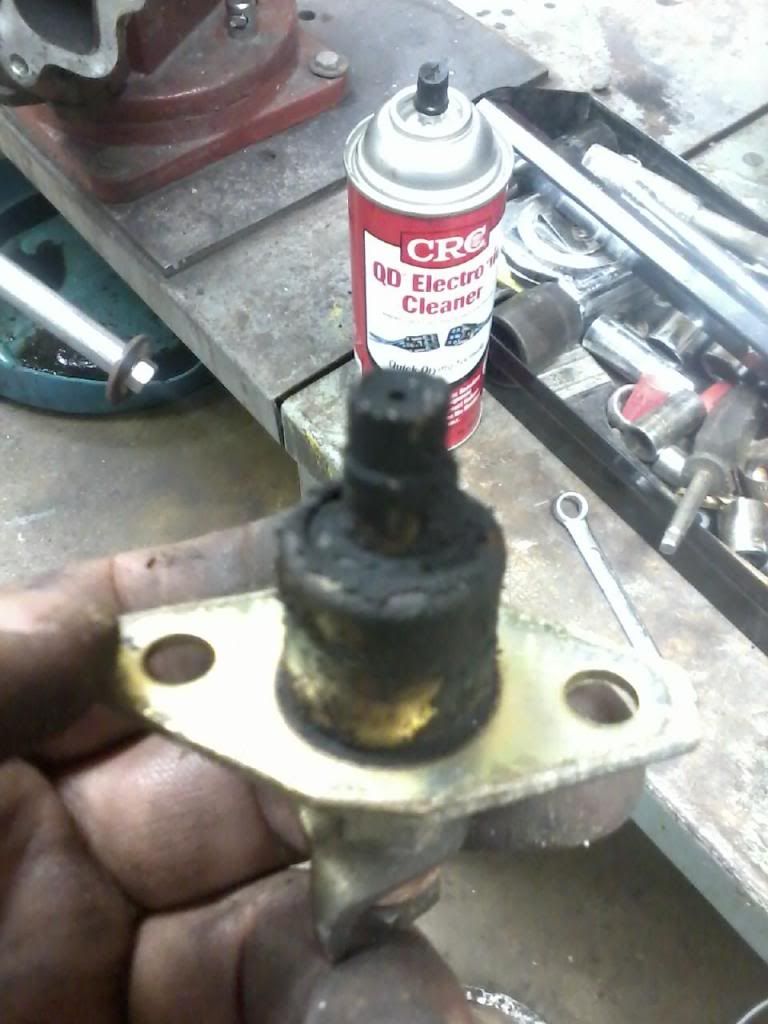
The Cold Start Injector is held on with two 10 mm bolts. The Throttle Body and Cold Start Injector gaskets usually stay on the Plenum and I just reuse the gaskets. Just be careful cleaning around them so as not to damage and you can reuse the gasket. Here is a picture of a dirty CSI. I just clean it up with a wire tooth brush. It will have a metal line connected to it. Double check when you start your truck up that it is not leaking. This is on place it will want to leak and is under a lot of pressure.
Here is a picture of the Throttle Position Sensor. You dont want to remove this from the Throttle Body or get it wet with water or chemical cleaners. Just clean around it.
This is the reason, I make a block off plate because of all of the carbon it produces. A soda can will work, I like to use a little thicker material if I can find some. Then I put a little gasket sealer around the plate and EGR just to keep from getting air leaks.
The best way to get this is to remove the Throttle Body and take the Plenum to a carwash and really wash it out good. You will be surprised at the build up in it. I can usually have this done from start to finish in about an hour to an hour and half.
In Post #42 is a poor picture of some of the build up. The Modulator on the head cover may just need taken apart and cleaned with an air hose. The Haynes manual on page 6-38 says "California Model only" for a Code #71, this pretty much applies to all trucks.
Air Injection System block off plates. LCE link to purchase >>> http://www.lceperformance.com/Air-In...-p/1045014.htm
Youtube video...
Then I removed the nut and the pulley. On the backside there is a wire clip that holds the bearing to the pulley. Remove it,
then I used a 3/4 inch socket and drove it out over a vice.
I put a little oil in side the pulley and used the vice and slowly worked it back in most of the way. Once it is flush with
the pulley I used another socket to finish getting it all the way in so as the wire clip would seat.
Here it is all cleaned and painted. The bearing was $22. Toyota wants to sell the whole assembly. I was unable to
find just the pulley. Hope this helps someone.
I have talked to a couple of other people on here about doing frame swap or body swaps. I have done two and tried to write out a nice way of doing this. I did the swaps before finding Yotatech and wish I would of taken pictures. I figured I would put this in my thread so if others do a search on it, it might make finding this thread easier and so I can call it up quick if I need it. I havent done a 4runner but the steps would be about the same. If you can pull a motor or tranny you can swap bodies/frames. It s very doable and nothing to be afraid of.
I did the 22re's. Apparently a 3.0 and 22res frame arent interchangeable without redoing the motor mounts. I am sure everythign here would apply to a 3.0, but I havent done this so will not say for sure. 84-88 Pickup frames and 89-95 frames are not interchange able from what I have been told.
On the 84-89 4runner behind the Drivers rear tire is a wire disconnect point, for the tailgate and lights that would make separating the wires for body removal. Im sure a 90-95 4Runner would be the same, but I havent done one so cant say for sure.
Fierohinks has some pic in his thread for some ideas and what things will look like. https://www.yotatech.com/forums/f116...s-pics-228184/
Dutchbelly has some good pics of doing a Frame swap...... https://www.yotatech.com/forums/f199...ild-up-234352/
I didnt have a lift, so if you were going to leave the drive train in, there are some steps that would be different and I will try and write them up as best as I can at a later time.
First I center the Steering Wheel and remove the motor and tranny. If you have a lift and can get the body high enough this would really help, but this is how I have to do this.
Getting the Steering Wheel and wheels straight just makes it alot easier for later. When I take the cab off and put it back on is when I install and remove the Steering Rod is probably the most hardest. You may find another way, but this works for me.
Then on the frame by the right front tire you have 2 brake lines to disconnect. This is the best place to do it as it keeps the lines on the cab intact and the frame lines will stay intact. This will take care of your brake issues. ( Pic at bottom)
I then disconnect the Wiring harness under the Passenger side seat and this will let the cab come off with out any problems other than you front blinkers and I take the Front Bumper off just so I dont have to lift the cab so high. Leave the wiring harness to the Tail lights/ Fuel Pump on the back half of the frame til later. You can get it when you take the bed off. All of your electrical and computer wires will come with the cab. This is set up quite nice. Just mark all of your wires and such when you pull your motor. When you pull your motor, you will have taken care of alot of other steps like fuel lines.
You have 6 bolts that hold the cab to the frame. The cab and front end come off in one piece. I already have the hood off. I leave fenders, doors, and interior in. 2 bolts by the Radiator, 2 bolts behind the front tires, and 2 bolts toward the rear of the cab is all that hold the cab to the frame. You can tell them as they sit on the outside of the frame and have rubber bushings. You may have to lift your carpet to hold them with wrench to take the nut off.
You have 8-10 bolts that hold the bed on. They have a tab that sticks in the bed so you dont have to have a wrench to hold the top. You should take some PB Blaster a nite or two ahead of time before you do this as most or all of the bolts will break. They are special so you will need to get some from Toyota or the salvage. This is a good time to remove the 3 screws that hold your gas tank fill tube to the bed or body of a 4Runner. Also I have had problems of these nuts backing off when I have had a bed bolt off before so I would suggest using locktite. I use 4 concrete blocks and set the bed on these with the floor of the bed on the blocks so I dont have to worry about damaging the bed sides.
Once all of this is done, I use some concrete blocks and 4x4 wood to support the cab. If your rocker panels are in good shape you can rest it on the wood. If not you might want to support it using blocks of wood between the 4x4 and floor. I set the concrete blocks about a foot from the cab to clear the front tires. This way could be a little unstable so be careful or you might have some other way of doing this. Here is whereI get 3 other guys to help lift the cab. 2 lifting and 2 setting up the stand for the cab. The back is heavy, but the front is light. I go about a foot high off of the frame for everything to clear, but work the frame out slowly and make sure it is high enough. I back the frame out as the front part of the frame is lower than the back part.
I get the new frame with axles in them or you can just put yours in. Put the wiring harness for the back part of the truck and fuel tank in and hopefully you will have brake lines and fuel lines already on or you will get to do that too. Try and get a frame with this stuff already on It will save you a lot of time. Put your exhaust in before you move the new frame under the cab.
Before I start all of this, I try to have the new frame prepped as far as I can. Without counting motor/tranny removal and having the frame ready. I have done this in about 20 total hours using basic tools in a weekend by myself except lifting the cab and body. Cutting torch for bolts, air tools, and a lift would be soooo nice. If you can get the body high enough it would make swapping alot easier, but I dont have access to a lift so this is how I do it. The first time I did this I was intimidated, but by the time I had the old frame out I wasnt in the least bit concerened. If you can pull a motor and tranny out, you wont have any problems. You will be quite surprised when you do it. Any questions that come up, feel free to ask.
If you are going to use a lift and keep the drive train in you will need to
Disconnect your fuel line from fuel filter.
Remove your electrical lines from your injectors and sensors.
Disconnect your electrical lines from your transmission, O2 sensor and transfer case.
I mentioned it earlier, but remove 3 screws that hold your fuel tank to the bed/ body. You can remvoe the lines at the tank, but I feel this is easier.
On a 4Runner you will have to go up between the body an frame and remove 2 bolts to get the fuel filler assembly out.
These are some steps that are different from pulling the motor. Im sure there are more steps but this will get you started in the right direction.
Here is a great place to disconnect your brake and clutch line. By the Passenger front tire.
Wiring harness with tranny and tcase conrectors.
wiring harness.
Steps without having to pulldrive train.
Disconnect steering linkage at gear box or firewall
6 bolts that hold the body on.
Wiring harness all the way to the tranny and lay it over the fender.
I would pull radiator for more clearance
Brake and clutch line behind right rear front tire
Ebrake at the crossmember
I would disconnect the fuel line from the fuel filter
Remove tranny and tcase sticks so they dont get damaged.
Disconnect wring harness under cab under passenger seat.
Front bumper for easier clearance, may not be needed though.
Speedometer cable
Throttle cable
I wanted to put my SR5 Guage in and got to looking at it and wanted it cleaner. Remove the tabs that screw the cluster to the dash to get the lense off.
I used a lense cleaner to clean it up.
I am quite happy with the results. The label says to allow up to 24 hours for the lense coating to dry. Will have to wait and see final results. Either way I am stuck with it. I have it tilted to avoid a glare while taking the picture. No matter how hard I tried, just couldnt get a good pic without the glare.
Give me a day or so and I will update my SR5 guage post.
This is the correct hookup for a SR5 guage.
Can help with Erratic temp guage.
While tearing down the head, I cleaned the sensors. The top two are cleaned, but the bottom one isnt clean. This one goes to your water temp guage. I have had some gauges jumping from cold to hot. This one isnt as bad as some I have seen, Cleaning this one can solve your erratic readings. I just use a wire brush or a green scrub pad.
I am practicing on my flatbeds SR5 guage before trying to correct the mileage on my 86s guage and the tachometer on my wifes truck guages. The tachometer is easy when using a 3.0s guages. Just remove the screws that hold it to the cluster and you can get to the adjustments on it.
One thing I noticed is that one SR5 guage is 85mph and one is 110 mph. The 110 is for my flatbed and works great. I am not sure if my new one is going to work as it is from an 88 and I got it for my 86.
Tailgate
This is going to be my notes page for the window switch.
https://www.yotatech.com/forums/f128...runner-137310/ Link I found for 89-95 Runners.
https://www.yotatech.com/forums/f116...l#post51400485 Wiring colors.
https://www.yotatech.com/forums/f116...cement-209572/ Replacement Motor
http://www.4crawler.com/4x4/CheapTri...CommonProblems Common problems, Lots of Info
http://forum.ih8mud.com/79-95-toyota...ay-repair.html Cleaning Relays
http://www.4crawler.com/4x4/CheapTri...arWindow.shtml Troubleshooting
https://www.yotatech.com/forums/f116...cement-209572/
http://www.4crawler.com/4x4/CheapTri...arWindow.shtml This page says you can get replacement relays from Radio Shack. I will evetually try it on my old one to see if it works. Would be alot cheaper way to go. As soon as I can get some relays, I will post the results an how to solder/desolder. It is easy if you have never done this before.
I got my rear window working. Wahoo!!
Some quick and easy test are 1. Make sure your rear wiper is in the stowed position. 2.Back gate is shut good, may even want to lean against it and try your key. 3. The plug in the drivers side corner in the back is hooked up good, by your rear windshield washer bottle. 4. That the bolt/pin on drivers side,by the roll bar is all the way in. There is a safety lock located there.
I wanted to see if my Motor was good so I ran 2 connectors right to the motor plug. It is a PITA to get that plug seperated and ran each wire to a battery. Just reverse polarity to control the direction of the window.
I could tell the motor was good right away but it was really struggling to move the window. I thought it was off track, but the metal track with rollers were pretty rusty and I just greased them.
It still was struggling to move up and down, so I took some Silione Spray and got the window tracks. This made a big difference and was the biggest problem. Works great on your door windows too.
I then replaced the Window Relay Box, I got my Rear Wiper working and Defrost but no window control. Located behind the Drivers seat behind the vinyl panel. If your rear wiper and deforst work this is some indication the box is good, but a relay is in there that operates the window so you cant completely rule it out.
I then took the Switch apart. It comes apart easily if done right. First remove the gray plug. It is the light bulb. Then pull the cover away from 2 tabs on one side and then the 2 tabs on the other side.
I then washed the button with soap and water and air dried it with air hose and used electrical contact cleaner to get the corrosion, coffe, dirt and who knows what else out of there.
Here is another picture of how it should look before going back together. Make sure you dont lose the little white pin and the metal toggle piece. These are very brittle being 20 plus years old. On the rear wiper and safety lock, they are difficult to get seperated. I just take contact cleaner and hold the switch upside down and spray cleaner in there and blow it out with an air hose.
I put some links that I used to get to this point up in a previous post. The last link says you can use some relays from Radio Shack, but I havent tried it. I will later on with my old/bad relay.
Other things to look for is make sure your rear wiper is in the stow positon, the tail gate is completely closed.
On post #361 I have a ground wire that bypasses the Cover Top Switch and Door Lock Detector Switch. #365 has a better electrical diagram view of the ground wire I by passed theses two switches.
I still havent tried the key. I didnt use my old key lock when I switched tailgates as it looks more involved then I want to get into. I will have a locksmith to make me one.
This is a switch that does give problems. I have cleaned it and it seems to be working better. I will light the Rear Door Ajar light.
Located behind driviers seat.
Running a ground wire from this wire on the plug, the blue wire to the place on the pic below elminates a lot of problems.
Ground to center consloe mounting tab.
The ground wire bypasses the following safety switches. Cover Top and Door Lock Detections switch. Your window will roll up with top off. This is on Page 12-23 of the Haynes Manual where the key is to the botom of the page.
Haynes "L" for Blue, "R" for Red. Key is pointing to wire.
89-95 runner tailgate reassembly, but most applies to 1st gen Runner.
[QUOTE=ChefYota4x4;51979710]Bottom line, my tailgate wouldn't even latch on the pass. side, let alone lock. This is a very common problem, from what I've learned.... And the culprits, as I've also come to glean from great Yotatechy Brothers like Terrys_87 and others is these..........
The Tailgate Latch Release/Latch Cables...........
************************************************** ********
So let's get to it..........
1st: Remove the Carpeted Panel, Metal Plate and then Plastic Film(The film can be brittle... Mine was solid.. Just a lil dried out on the corners. But pick a spot to start and peel it up and continue to peel it up all the way around until it's removed)...........
Mine was very dirty inside and on top.......
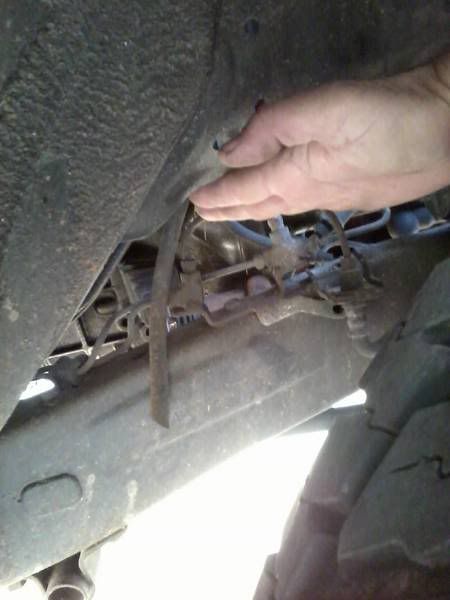
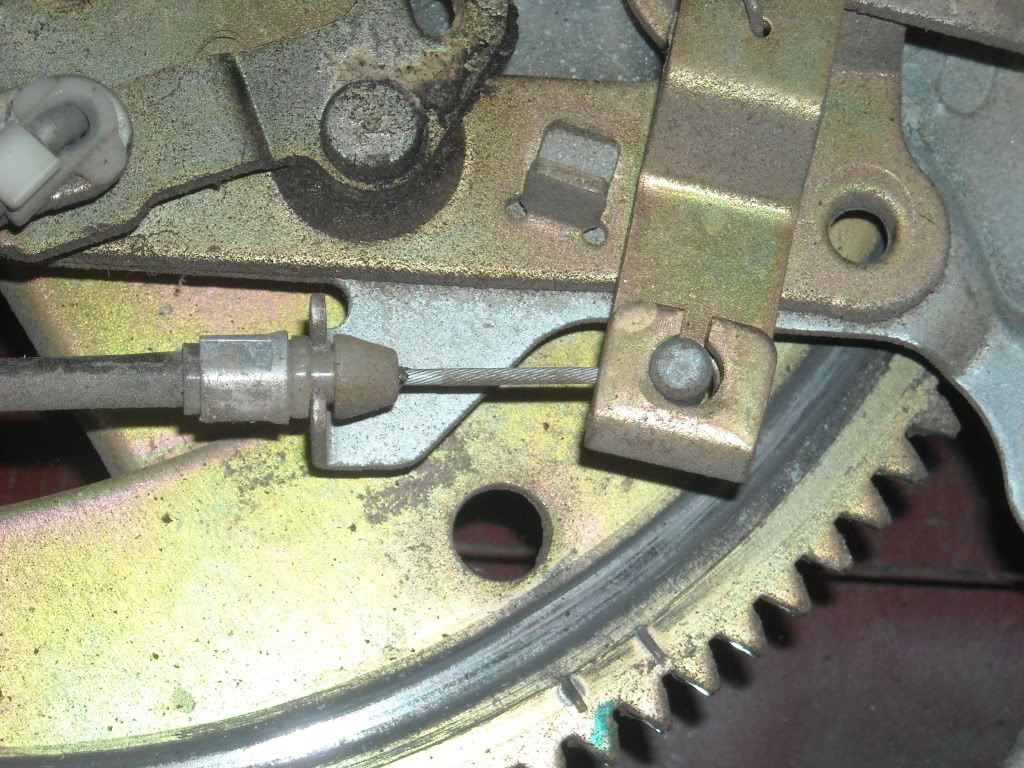
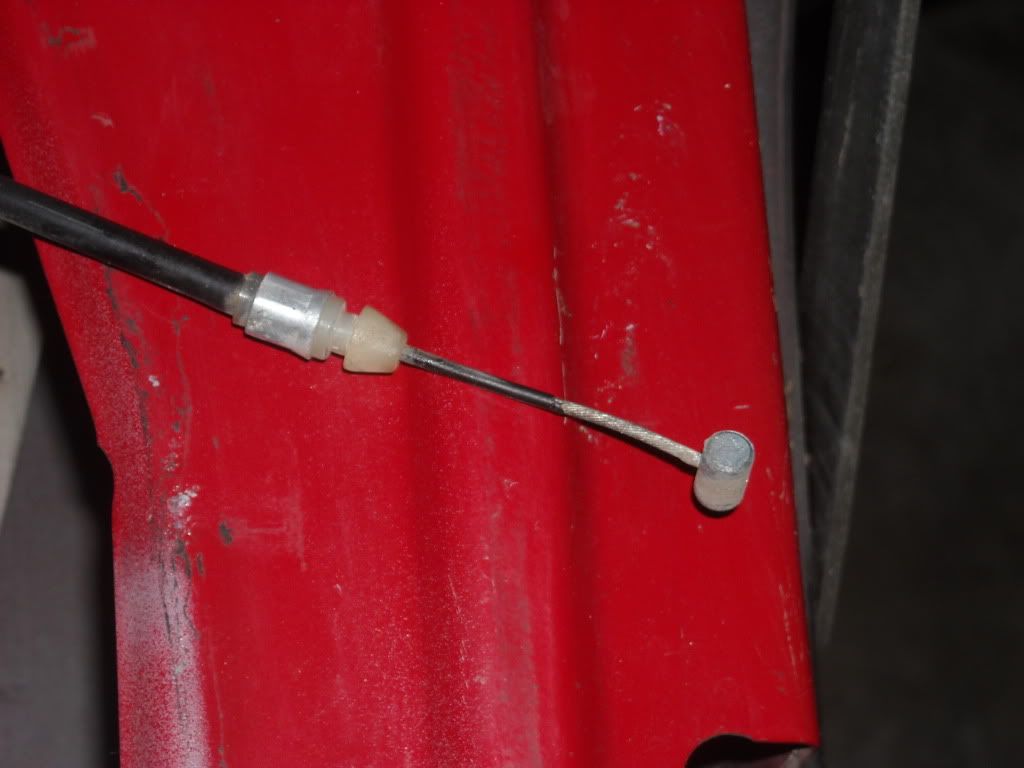
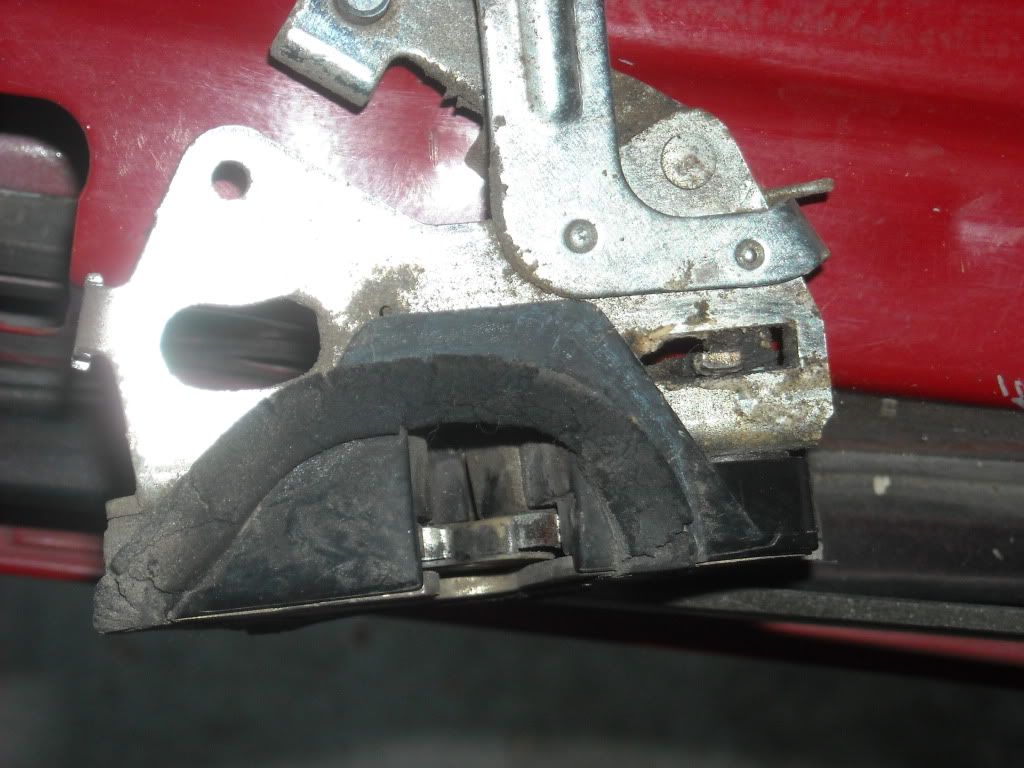
Here's a close up of the most common cable to wind up sticking/freezing up, passenger side... It can't enter the shaft to re-engage the latch mechanism...
The cable going to the driver side latch seemed to move 'OK'... but I replaced them both, for reasons I'll explain in video, more so, later(but briefly; The 1st Gen cables ARE DIFFERENT, in more than one way. They DO NOT have a rubber boot on the end that the cable slides through.... Rather, the cable itself is 'rubberized'... It rusts right through the rubber and seizes up inside the shaft/guide)........Driver side Cable.......
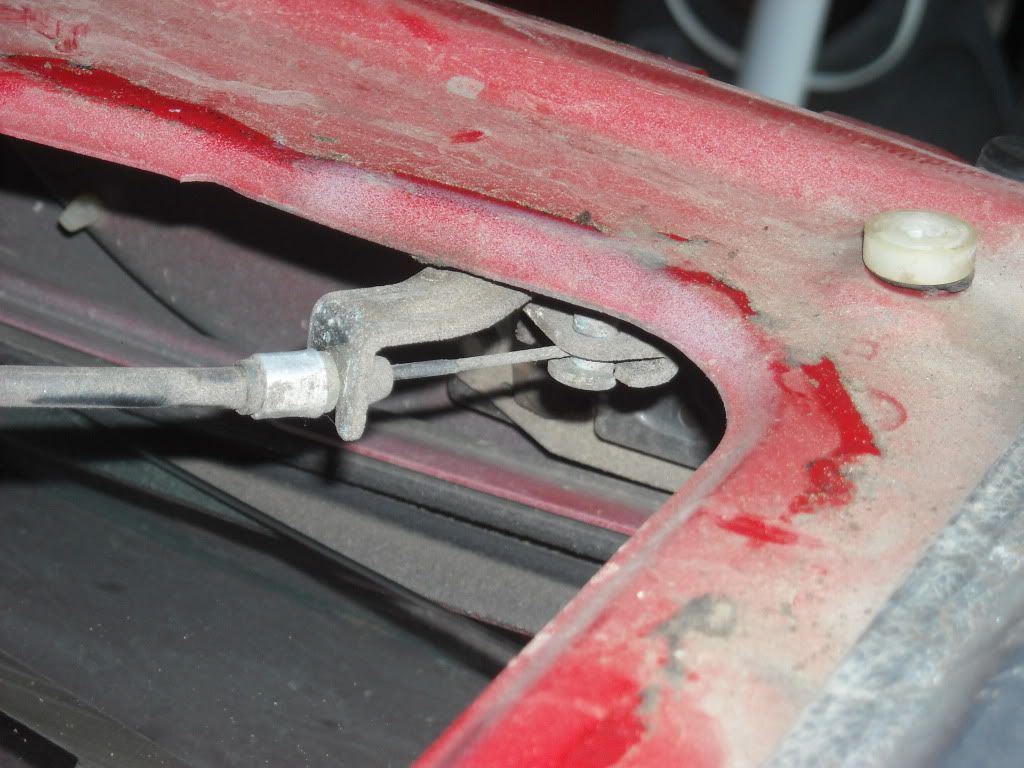
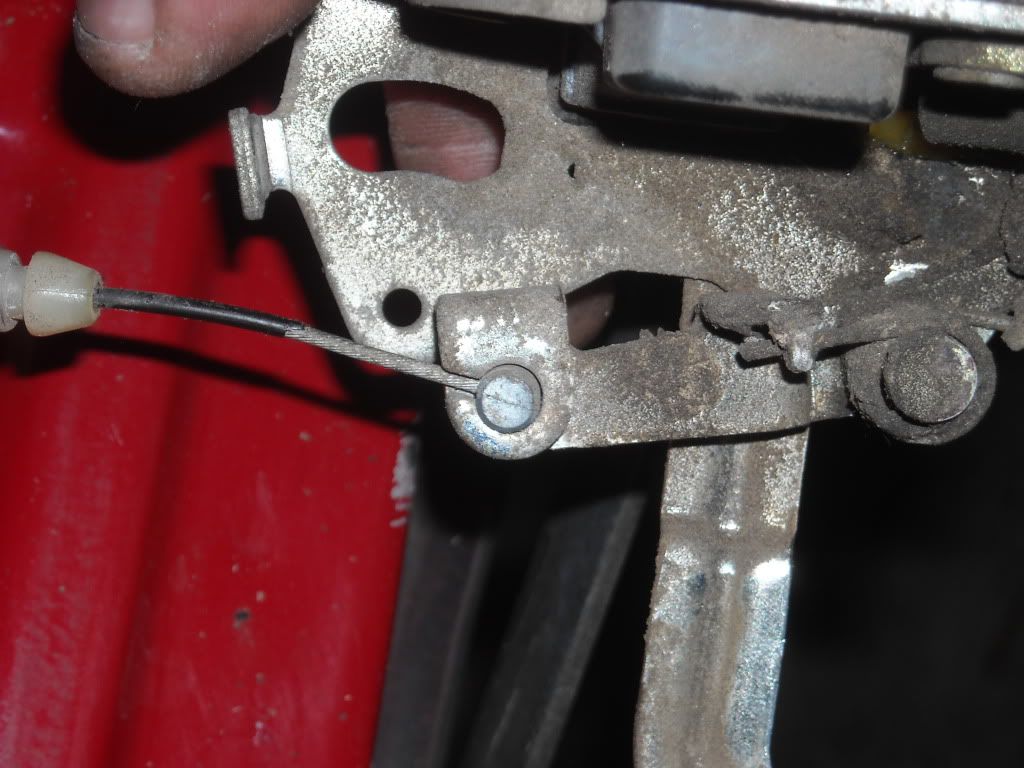
Here is the passenger side latch mechanism bracket, where the cable clips in/Second pic is the driver side one......
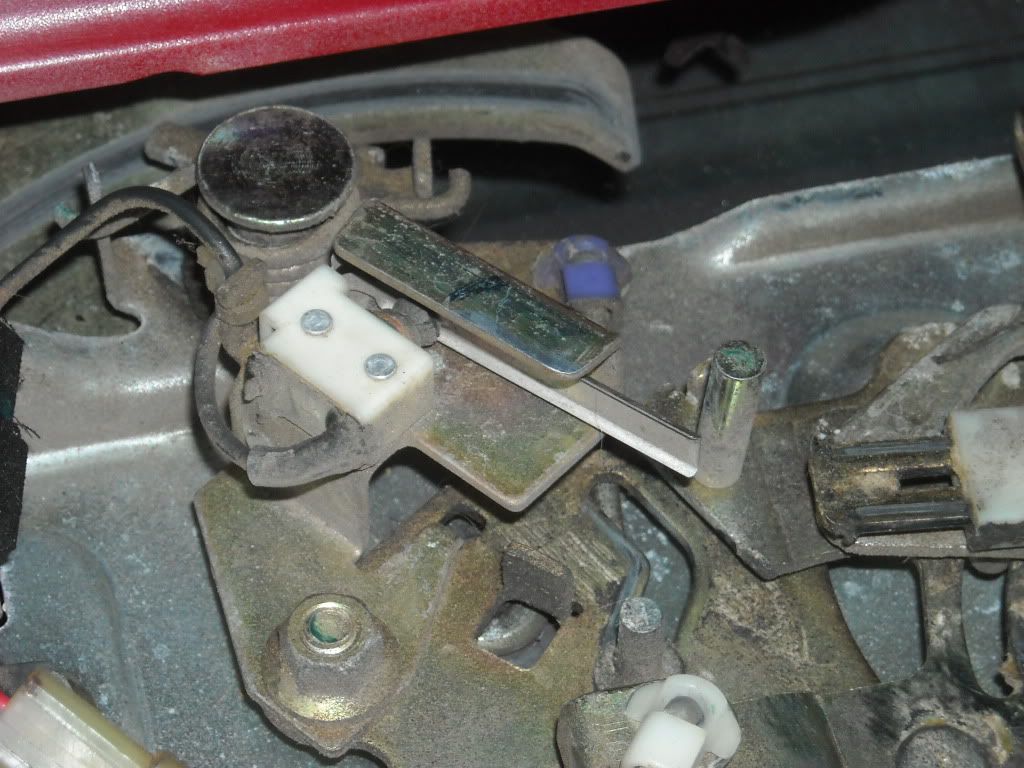
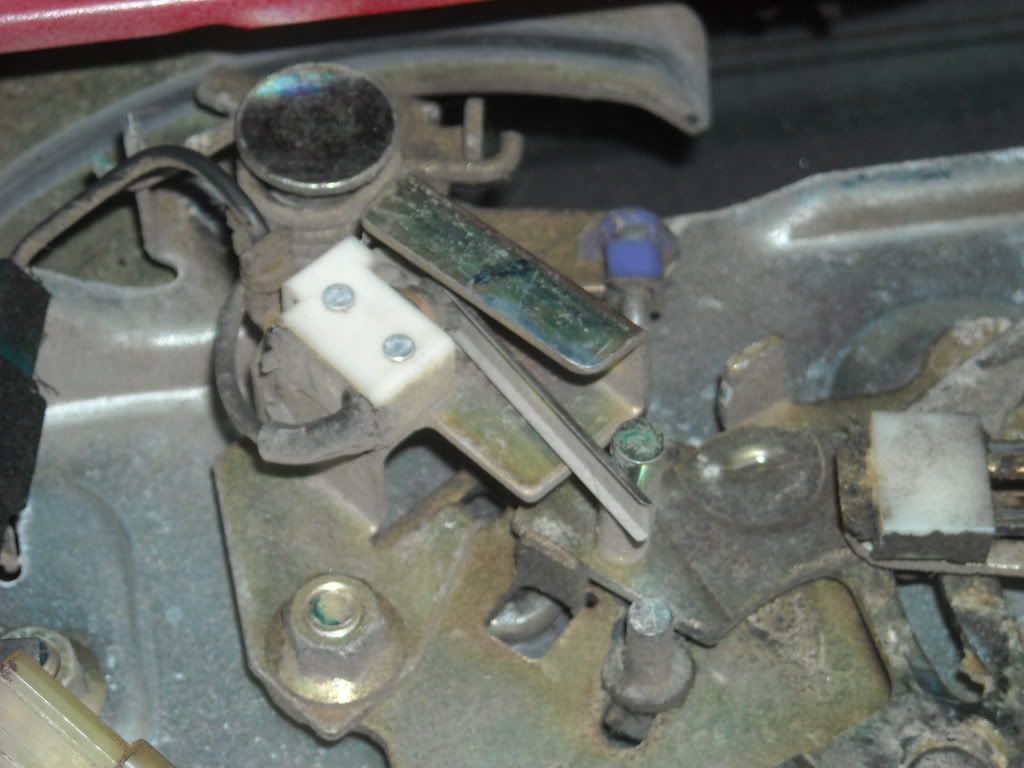
This is the Lock-Safety Switch Actuator in, first, the unlocked position, then locked.......
2nd: Clean up the Tailgate very well, inside I used a vacuum and on top I used some Bathroom Foaming Cleaner.........
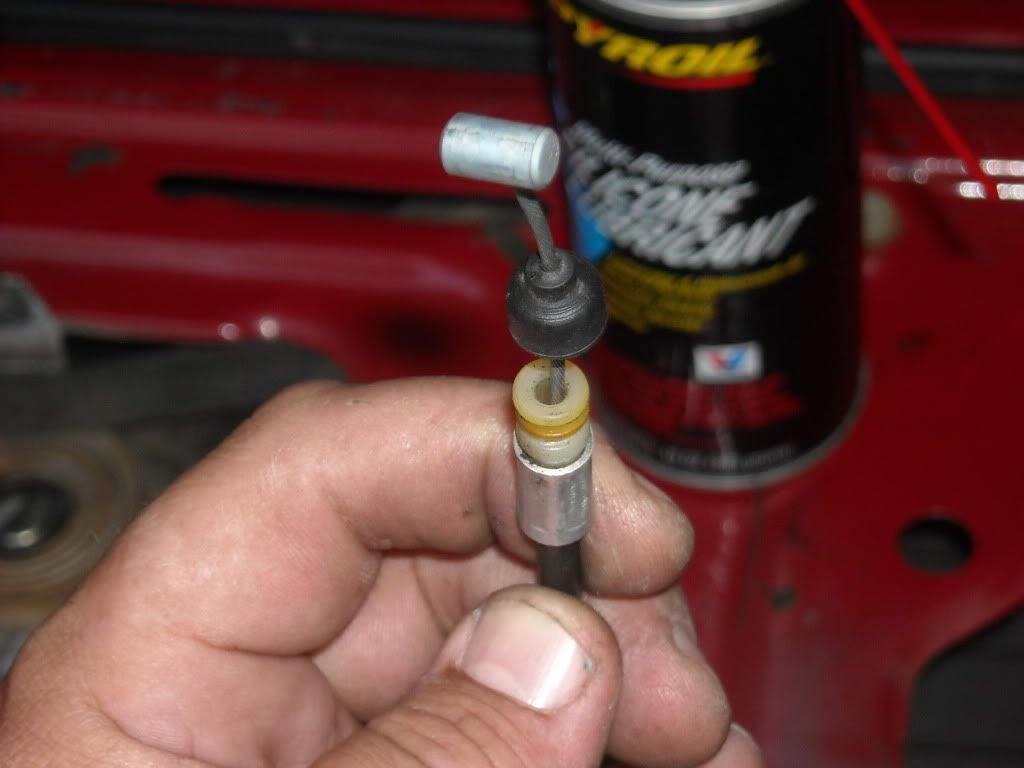
Next, I prepared the NEW to me, 2nd Gen 4Runner Latch Release Cables by pulling off the boot and injecting silicone lubricant spray.....
BELOW, notice the difference in the 1st Gen 4Runner Cable ends(and notice the rubberizing on the cable itself, plus the boots that they use, instead, on the 2nd Gen 4Runner cables...
I then took some of the left over CV boot kit grease from Toyota, and used it on all the 'gliding' mechanisms and places it should be, including the latch on the driver side, which I removed and cleaned up, well.........
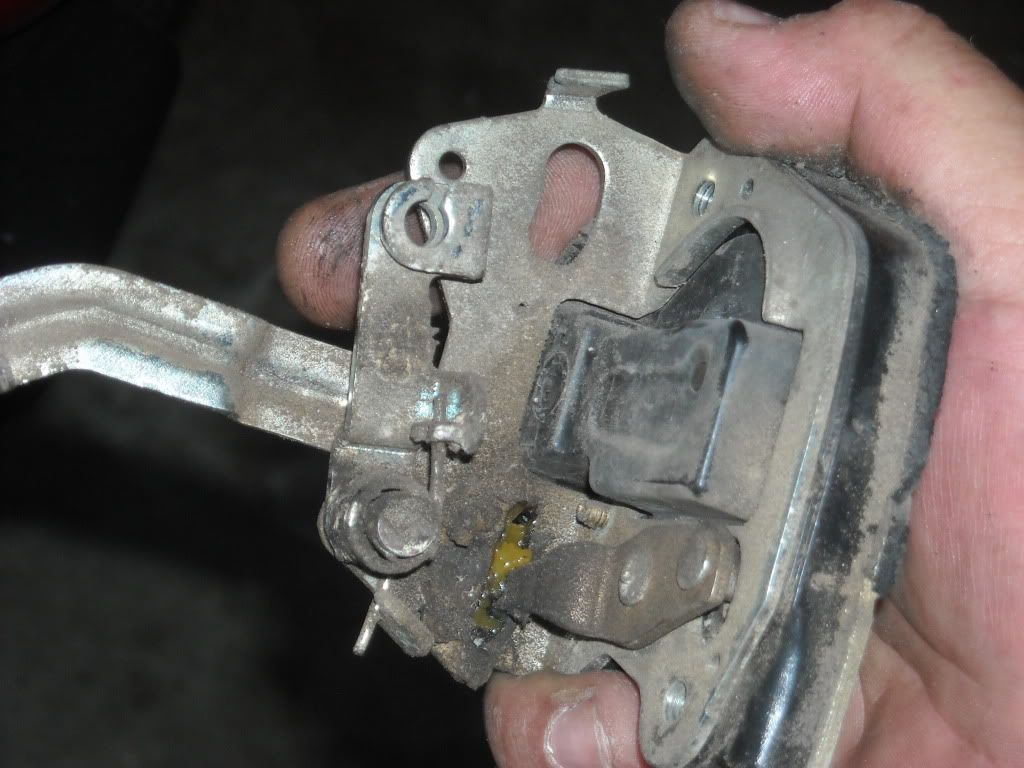
First pulled out the latch mechanism and removed the cable...
It was pretty nasty.. Then cleaned up and greased everything....
Then removed the other side on the Handle Cross Gear(Cross as in it looks like a Cross, haha).......
Put the latch back in..........
Last edited by Terrys87; Dec 14, 2012 at 05:13 AM.
Dec 9, 2012 | 10:35 AM
#363
Thread Starter
Super Moderator
iTrader: (1)
Joined: Aug 2008
Posts: 11,787
Likes: 28
From: Anderson Missouri
I am trying to combine all of the things I have found into one post but I am limited to 25 reponses.
I thought I was going to fix a problem and created another. I always got tired of hearing my door buzzer alarm and first thing I did was find it under the Steering Column.
All was fine until I noticed that I did not have a dome light when I opened the drivers door. Passenger door worked and so did the switch on the cab. First thing I thought was the door switch was bad or dirty or corroded. I checked it out and it was good.
Another problem solved because of Yotatech. Did some looking around and you have to have the door alarm in for the drivers door light to work.
Also found the cure for the alarm on YT. Just bent the tab out a little so as not to make contact. If you ever want to hear it again, it can be bent back in.
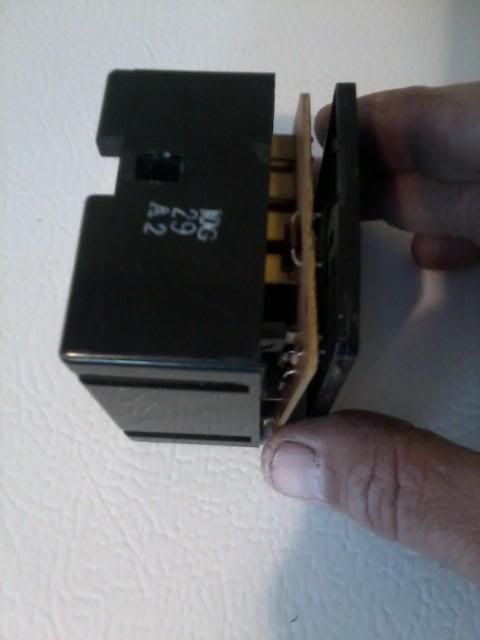
Here is the Buzzer Box under the Steering Column.
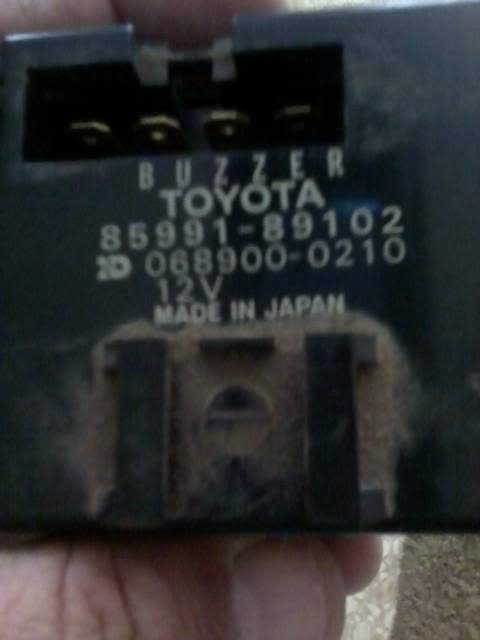
Just bend the tab out from the bottom a little bit.
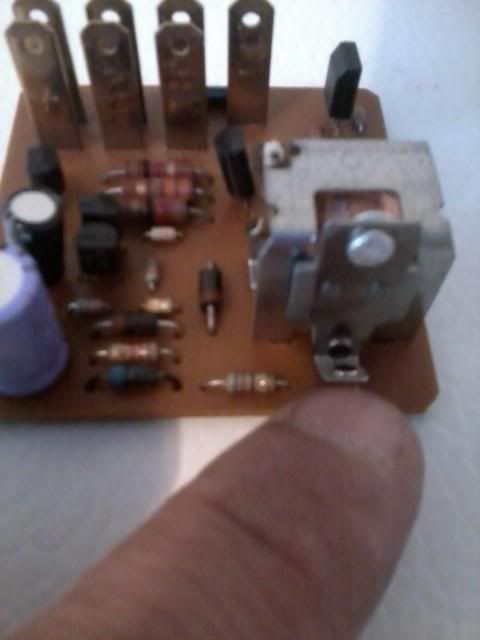
Here it is going back together. There are 2 tabs to the cover that I just pryed a pocket knife. Life is good now.
Apparently this is a fairly common problem. What I found on different threads is that a lot of the door switches and buzzers get removed. This was as far as I had to go to troubleshoot. Also I did find that by bending the tab you can control how loud the buzzer is.
I went to work on my Light Switch and Wiper delay. I plugged my old one in and the wiper delay worked. But not bright lights. I then tried to combine the 2 and was going to have cut wire and splice and didnt want to go that route.
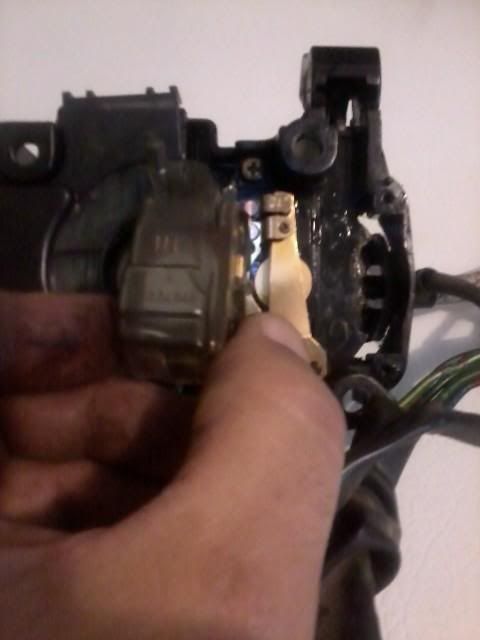
The Light Assembly I had before was from an 86 and it has another plug my 88 didnt have. I figured it was for some option mine didnt have so didnt think much about it. The white plug is what I am talking about on an 86 in this picture.

Today I got to looking at it (the white plug) and it runs to the wiper handle and I am guessing it is to the delay in the handle. So I then decided to see what I could do about my original Light assembly.
I took the Steering Wheel off. I have had mine off before and have it snug but not so tight I need a Steering Wheel Puller. If you havent had it off, dont bang on it as it will bulge the Steering shaft. Go rent a puller from the parts store. It is free.
You will need to drop the lower plastic panel and I diconnect the dimmer switch and just let it lay on the floor. Remove the Steering Wheel and the covers to the steering column.
There are 4 screws that hold the Light Switch Assembly on. They are recessed. Then disconnect the black clip that keeps all of the wire bundeled to the column and 2 screws that hold the blue connectors to the black tabs /clip.
Once I had it off, I had to take 2 screw out that hold the hazard light switch to the assembly, and set it out of the way. I then had to remove the clear plastic cover so as I could use my wife finger nail file (yeah.. she liked that idea) and went over the little copper tips on the copper layers. Just a couple of times to help make a good clean contact. Then I hit with some WD-40.
Here is a good picture of the contacts that need cleaned and more info if someone needs it.
https://www.yotatech.com/forums/f116...t-work-100088/
Put it back togther and everything works great. The 86 and 88 Light assemblys do have different part numbers on them and they interchanged and it got me thru. But it is nice having everything working as it should.
I did take my passenger kick panel off and didnt see a relay box there. Not saying it isnt, I just didnt want to pull the ECM and since I was able to test with a good wiper delay switch, I didnt need to go that far into it.
Found another link to a headlight problem I just wanted to add.
https://www.yotatech.com/forums/f116...icator-229946/
http://www.marlincrawler.com/transmi...ver-ball-seats
http://www.marlincrawler.com/tech/gu...t-installation
Washer bottle
Got another cheap fix. The washer bottle in the pic above wasnt working. The PO took the pump out of the original washer bottle.
I put this one in and with the key on, but the motor not running, I would hit the water button. Nothing happened. I could tell power was going to the washer motor as the dash lights would dim and the amp guage would move. So I knew it was getting power.
I was going to buy a new bottle and pump from the bone yard and figured I had nothing to lose. I had tried tapping on the motor with a wrench and it did not do anything.
I then ran a wire from each terminal of the battery to the connectors on the washer bottle. They will have two male connectors.
I switched polarity a couple of times and on the 3rd try, the pump motor started whirring. Plugged it in and filled with water. Everything works great.
I actually did this awhile back to my wife 91 Extended cab, and sure it would work on a runner. I will eventually post this in the cheap upgrades. But just now got around to getting it wired in. Took some investigating at a salvage yard to find the wire to tap into.
I got a dome light out of a Standard cab out of a salvage with the same interior color as my wife truck and mounted it in to where your mirror is. I just drilled a small hole to run wires along the windshield to the driverswindshield post and poped off the trim.
There is 2 wires that run along the post that I tapped into and soldered and taped up. Get the plug to the mirror and about 3 feet of the wire out of the donor truck and screw in. Easy and cheap upgrade. The dome ligh on a extended cab and 4Runner is behind you and doesnt light the floorboard up and that is where I am usually trying to find my things.
Front and Rear Dome. Not the best picture, but gives you the idea. Door and On Light work.
Where I tapped into wires.
I thought I was going to fix a problem and created another. I always got tired of hearing my door buzzer alarm and first thing I did was find it under the Steering Column.
All was fine until I noticed that I did not have a dome light when I opened the drivers door. Passenger door worked and so did the switch on the cab. First thing I thought was the door switch was bad or dirty or corroded. I checked it out and it was good.
Another problem solved because of Yotatech. Did some looking around and you have to have the door alarm in for the drivers door light to work.
Also found the cure for the alarm on YT. Just bent the tab out a little so as not to make contact. If you ever want to hear it again, it can be bent back in.
Here is the Buzzer Box under the Steering Column.
Just bend the tab out from the bottom a little bit.
Here it is going back together. There are 2 tabs to the cover that I just pryed a pocket knife. Life is good now.
Apparently this is a fairly common problem. What I found on different threads is that a lot of the door switches and buzzers get removed. This was as far as I had to go to troubleshoot. Also I did find that by bending the tab you can control how loud the buzzer is.
I went to work on my Light Switch and Wiper delay. I plugged my old one in and the wiper delay worked. But not bright lights. I then tried to combine the 2 and was going to have cut wire and splice and didnt want to go that route.
The Light Assembly I had before was from an 86 and it has another plug my 88 didnt have. I figured it was for some option mine didnt have so didnt think much about it. The white plug is what I am talking about on an 86 in this picture.
Today I got to looking at it (the white plug) and it runs to the wiper handle and I am guessing it is to the delay in the handle. So I then decided to see what I could do about my original Light assembly.
I took the Steering Wheel off. I have had mine off before and have it snug but not so tight I need a Steering Wheel Puller. If you havent had it off, dont bang on it as it will bulge the Steering shaft. Go rent a puller from the parts store. It is free.
You will need to drop the lower plastic panel and I diconnect the dimmer switch and just let it lay on the floor. Remove the Steering Wheel and the covers to the steering column.
There are 4 screws that hold the Light Switch Assembly on. They are recessed. Then disconnect the black clip that keeps all of the wire bundeled to the column and 2 screws that hold the blue connectors to the black tabs /clip.
Once I had it off, I had to take 2 screw out that hold the hazard light switch to the assembly, and set it out of the way. I then had to remove the clear plastic cover so as I could use my wife finger nail file (yeah.. she liked that idea) and went over the little copper tips on the copper layers. Just a couple of times to help make a good clean contact. Then I hit with some WD-40.
Here is a good picture of the contacts that need cleaned and more info if someone needs it.
https://www.yotatech.com/forums/f116...t-work-100088/
Put it back togther and everything works great. The 86 and 88 Light assemblys do have different part numbers on them and they interchanged and it got me thru. But it is nice having everything working as it should.
I did take my passenger kick panel off and didnt see a relay box there. Not saying it isnt, I just didnt want to pull the ECM and since I was able to test with a good wiper delay switch, I didnt need to go that far into it.
Found another link to a headlight problem I just wanted to add.
https://www.yotatech.com/forums/f116...icator-229946/
http://www.marlincrawler.com/transmi...ver-ball-seats
http://www.marlincrawler.com/tech/gu...t-installation
Washer bottle
Got another cheap fix. The washer bottle in the pic above wasnt working. The PO took the pump out of the original washer bottle.
I put this one in and with the key on, but the motor not running, I would hit the water button. Nothing happened. I could tell power was going to the washer motor as the dash lights would dim and the amp guage would move. So I knew it was getting power.
I was going to buy a new bottle and pump from the bone yard and figured I had nothing to lose. I had tried tapping on the motor with a wrench and it did not do anything.
I then ran a wire from each terminal of the battery to the connectors on the washer bottle. They will have two male connectors.
I switched polarity a couple of times and on the 3rd try, the pump motor started whirring. Plugged it in and filled with water. Everything works great.
I actually did this awhile back to my wife 91 Extended cab, and sure it would work on a runner. I will eventually post this in the cheap upgrades. But just now got around to getting it wired in. Took some investigating at a salvage yard to find the wire to tap into.
I got a dome light out of a Standard cab out of a salvage with the same interior color as my wife truck and mounted it in to where your mirror is. I just drilled a small hole to run wires along the windshield to the driverswindshield post and poped off the trim.
There is 2 wires that run along the post that I tapped into and soldered and taped up. Get the plug to the mirror and about 3 feet of the wire out of the donor truck and screw in. Easy and cheap upgrade. The dome ligh on a extended cab and 4Runner is behind you and doesnt light the floorboard up and that is where I am usually trying to find my things.
Front and Rear Dome. Not the best picture, but gives you the idea. Door and On Light work.
Where I tapped into wires.
Last edited by Terrys87; Dec 14, 2012 at 04:19 AM.
Dec 9, 2012 | 10:41 AM
#364
Thread Starter
Super Moderator
iTrader: (1)
Joined: Aug 2008
Posts: 11,787
Likes: 28
From: Anderson Missouri
Temp Guage problems
https://www.yotatech.com/forums/f116...roblems-93691/
https://www.yotatech.com/forums/f116...sender-143327/
https://www.yotatech.com/forums/f116...95-t4r-138732/
Have cleaned these for a more accurate temp guage.
While tearing down the head, I cleaned the sensors. The top two are cleaned, but the bottom one isnt clean. This one goes to your water temp guage. I have had some gauges jumping from cold to hot. This one isnt as bad as some I have seen, Cleaning this one can solve your erratic readings. I just use a wire brush or a green scrub pad.
But my antenna is broken. Tried finding one in the boneyard and it just isnt to be found. I have had to repair one like this before.
I am touching up overspray and had the Inner fender out and you are able to get to it from there. Also need to take the right kick panel off inside and above the ECU is where you can find the Antenna. Just have to work it out of the dash.
Not the best picture, but in the top picture you can see the bolt in the top half of the antenna.
I just found a bolt that threaded into the two broken pieces and cut the head off twisted them together. I have done this before and it works great.
Broken

Twisted into one fixed piece.

http://www.ae86drivingclub.com.au/fo...-22RE-4AGE-etc
http://www.4x4wire.com/toyota/mainte...nator_brushes/
FIXED!!! Mine was the Reverse Lights on the Tranny. It has a protective sleeve and depending on how the sleeve slides, it can cover the wires where they rub against the tranny leaving them exposed. Below is other fixes for this problem.
Haynes Manual page 12-11 shows what all is on this circuit.
https://www.yotatech.com/forums/f199...833/...Fusible link replacement steps.
O2 Sensor. Checked
http://www.toyotanation.com/forum/sh...ad.php?t=62388 Fuel Pump Harness Checked
https://www.yotatech.com/forums/f116...ng-fix-213466/ Fusible link Checked
http://board.marlincrawler.com/index.php?topic=58658.0
Need to check Engine, Body, Frame grounds. Possible pinched rear door wiring. Trans Reverse Light on Tranny.
https://www.yotatech.com/forums/f116...-guide-194413/ +++LINK TO CORRECT GROUNDS+++.
http://www.ncttora.com/FSM/1990-1995...c/connecto.pdf +++ 3.0 Grounds.

https://www.yotatech.com/forums/f116...roblems-93691/
https://www.yotatech.com/forums/f116...sender-143327/
https://www.yotatech.com/forums/f116...95-t4r-138732/
Have cleaned these for a more accurate temp guage.
While tearing down the head, I cleaned the sensors. The top two are cleaned, but the bottom one isnt clean. This one goes to your water temp guage. I have had some gauges jumping from cold to hot. This one isnt as bad as some I have seen, Cleaning this one can solve your erratic readings. I just use a wire brush or a green scrub pad.
But my antenna is broken. Tried finding one in the boneyard and it just isnt to be found. I have had to repair one like this before.
I am touching up overspray and had the Inner fender out and you are able to get to it from there. Also need to take the right kick panel off inside and above the ECU is where you can find the Antenna. Just have to work it out of the dash.
Not the best picture, but in the top picture you can see the bolt in the top half of the antenna.
I just found a bolt that threaded into the two broken pieces and cut the head off twisted them together. I have done this before and it works great.
Broken
Twisted into one fixed piece.
http://www.ae86drivingclub.com.au/fo...-22RE-4AGE-etc
http://www.4x4wire.com/toyota/mainte...nator_brushes/
FIXED!!! Mine was the Reverse Lights on the Tranny. It has a protective sleeve and depending on how the sleeve slides, it can cover the wires where they rub against the tranny leaving them exposed. Below is other fixes for this problem.
Haynes Manual page 12-11 shows what all is on this circuit.
https://www.yotatech.com/forums/f199...833/...Fusible link replacement steps.
O2 Sensor. Checked
http://www.toyotanation.com/forum/sh...ad.php?t=62388 Fuel Pump Harness Checked
https://www.yotatech.com/forums/f116...ng-fix-213466/ Fusible link Checked
http://board.marlincrawler.com/index.php?topic=58658.0
Need to check Engine, Body, Frame grounds. Possible pinched rear door wiring. Trans Reverse Light on Tranny.
https://www.yotatech.com/forums/f116...-guide-194413/ +++LINK TO CORRECT GROUNDS+++.
http://www.ncttora.com/FSM/1990-1995...c/connecto.pdf +++ 3.0 Grounds.
Last edited by Terrys87; Feb 7, 2013 at 06:18 AM.
Dec 9, 2012 | 03:34 PM
#365
I'm sorry, Terry.. Please forgive me for asking.... What was 'broken' that needed 'fixing'? The starter wouldn't turn over? And the reverse lights wires were grounding out, fooling the starter into 'not starting' cuz it's in gear????
If I'm way off, I'm sorry.. I'm so wiped out today... but I have had that issue with my reverse lights for so long... so it perked up the 'ears of my eyes', lol. (I know, my issue is in the wiring at the back somewhere... Seeing as I rap on the light cover and it comes on, lol... Just got me reminded of yet another thing I need to get right ) >>> TRUST ME, with all you do and choose to go through to restore these betty's.... I'M NOT complaining! lol.
Nice work and write ups, AS USUAL!
If I'm way off, I'm sorry.. I'm so wiped out today... but I have had that issue with my reverse lights for so long... so it perked up the 'ears of my eyes', lol. (I know, my issue is in the wiring at the back somewhere... Seeing as I rap on the light cover and it comes on, lol... Just got me reminded of yet another thing I need to get right
) >>> TRUST ME, with all you do and choose to go through to restore these betty's.... I'M NOT complaining! lol. Nice work and write ups, AS USUAL!
Dec 9, 2012 | 03:47 PM
#366
Wow, man! I just realized what you're doing here.... I saw a bunch of pics that looked familiar... as did my hands, hahahaha... Cool... very good of you to consolidate for all the peeps on here(and for your reference, I'm sure  )
)
I did a video on the tailgate cables, if you want it... I can give you the link.
Great job so far, man!
BTW, .... YOU ROCK! hehe.... Seriously though... You've been a God send, many times, Terry... Thanks for all you do!
)I did a video on the tailgate cables, if you want it... I can give you the link.
Great job so far, man!
BTW, .... YOU ROCK! hehe.... Seriously though... You've been a God send, many times, Terry... Thanks for all you do!
Dec 10, 2012 | 08:11 AM
#367
Thread Starter
Super Moderator
iTrader: (1)
Joined: Aug 2008
Posts: 11,787
Likes: 28
From: Anderson Missouri
Thanks Mark
I have found several fixes, upgrades, and repairs for around $25. I get Denso Wires off of ebay for about $25 dollars, rebuilt front brake calipers for $10 a piece and cleaned starter relays and the light combo switch for free.
I want to create a thread showing all of these in one thread to make it easier for others to find and for me to find as well. I know there is more out there as I will go thru junk yard mods, cheap mods as well as yours, Irab88,RAD4runner, to name a few. I will either set the record for the longest single thread or get banned, one of the two. lol
I know you have several and if you stumble into some can you post them here for me. This will take a few weeks as I have alot of improving to do on mine and more info to add to it and several other links, that I need to open up.
I am looking for $25ih or less and can be improvements, mods, and fixes. Literally I have saved $100s if not $1000s just by what I have found on YT.
Dec 10, 2012 | 10:32 AM
#368
Well, my Zuk link is a 70$ repair..... That's in my sig with all the info in the first post, IIRC, including a video. If you click on the video's it will take ya right to the youtube page/link.
Sure will... I'm going to be doing that as well.. I started, but it's just a short list in Word and Notepad thus far, lol... I should have around 50 Fixes and troubleshooting lists.... Many of them free/PYP finds... Many not so cheap, lol.
As 'they' say, "I love your work"! lol.
Sure will... I'm going to be doing that as well.. I started, but it's just a short list in Word and Notepad thus far, lol... I should have around 50 Fixes and troubleshooting lists.... Many of them free/PYP finds... Many not so cheap, lol.
As 'they' say, "I love your work"! lol.
 Dec 13, 2012 | 02:53 PM
#371
Thread Starter
Super Moderator
iTrader: (1)
Joined: Aug 2008
Posts: 11,787
Likes: 28
From: Anderson Missouri
Hello t tentech.. Im glad you liked the gauge fix. It will get blurry when you do all the steps correct but when you put on the sealer it will be clear and is still lasting. I am slowly working on making a thread that shows what I have done and found on YT for little to no cost on making these trucks better in several ways. Thank for the compliment.
Dec 14, 2012 | 01:36 AM
#372
Thread Starter
Super Moderator
iTrader: (1)
Joined: Aug 2008
Posts: 11,787
Likes: 28
From: Anderson Missouri
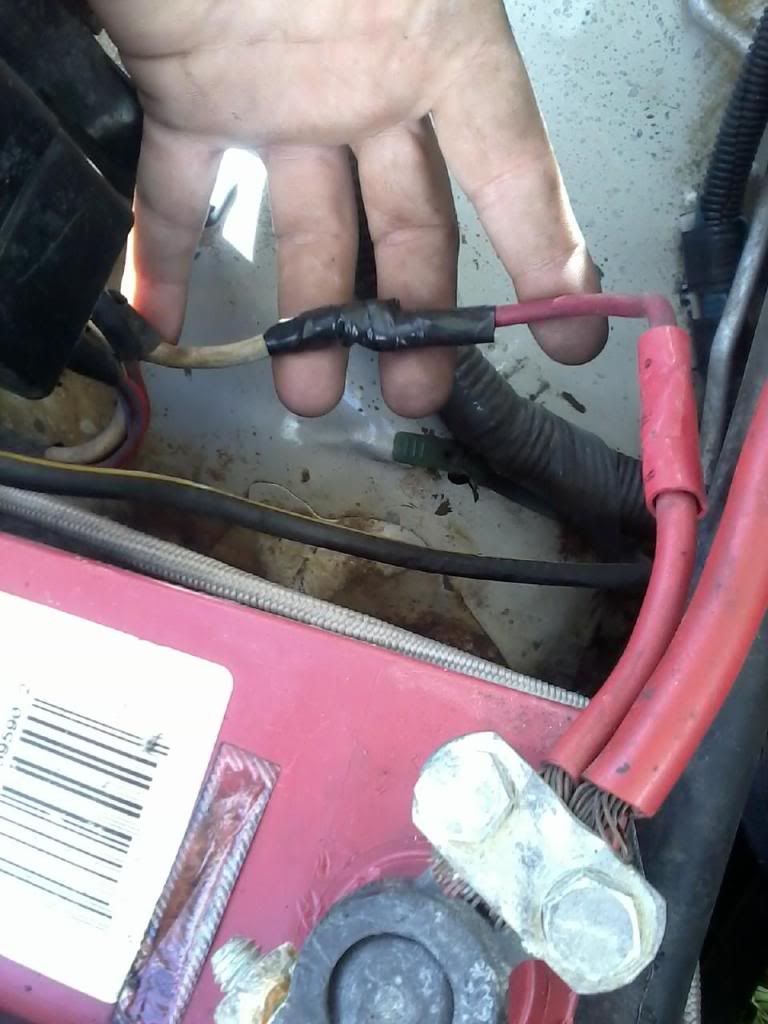
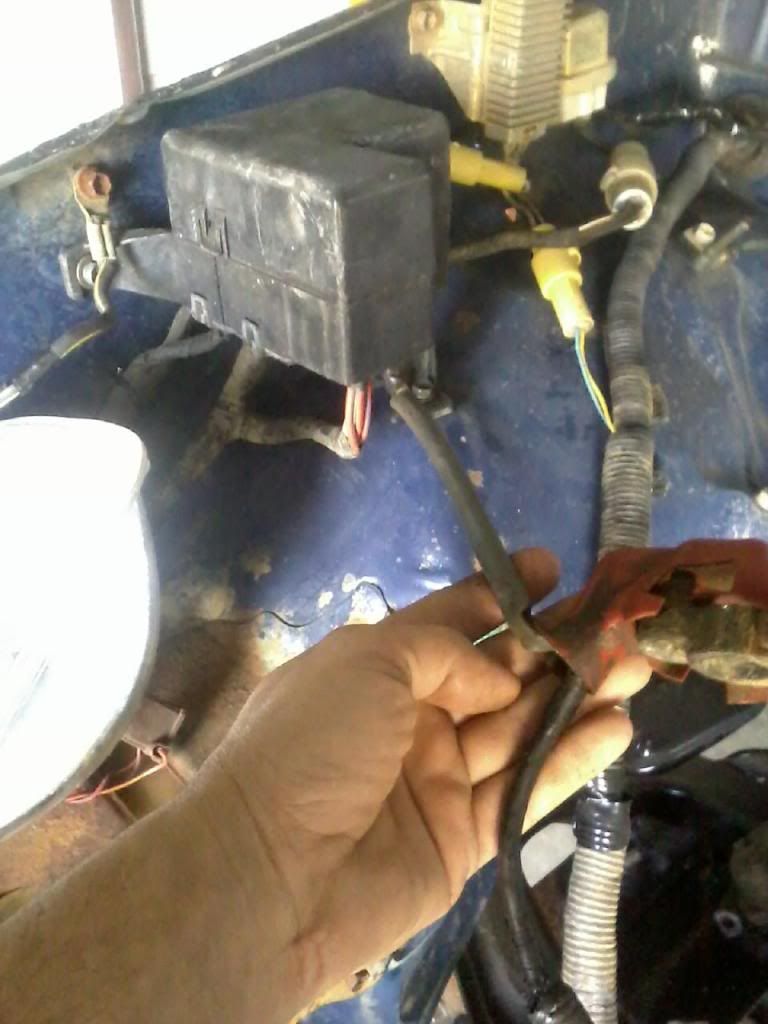
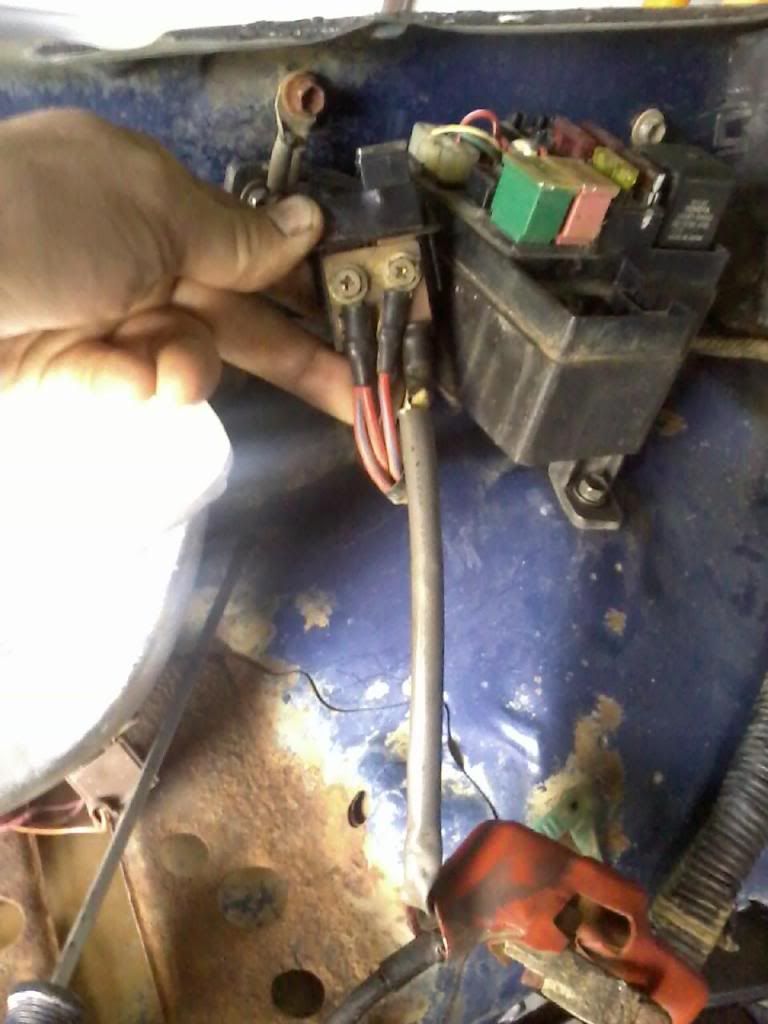
Here is a picture of the Fusible Link. It is connected to 80 amp fuse and to the positive battery cable. The white part is the actual link. Took me awhile to find this out.

Here is the Fusible link attached.
-----------------------------------------------------------------------------------------------
Here is a better update of the Fusible Link..
When I ran into this on my 88, I thought someone had did a cheap repair job, but it is actually a factory Fusible Link. Chef helped me figure this out back then. It is crimped to the Positve pigtail coming off of your Postive Post.
All of the other fuses lift up and out. The 80 Amp you have to pry this tab to the firewall and push out the bottom.
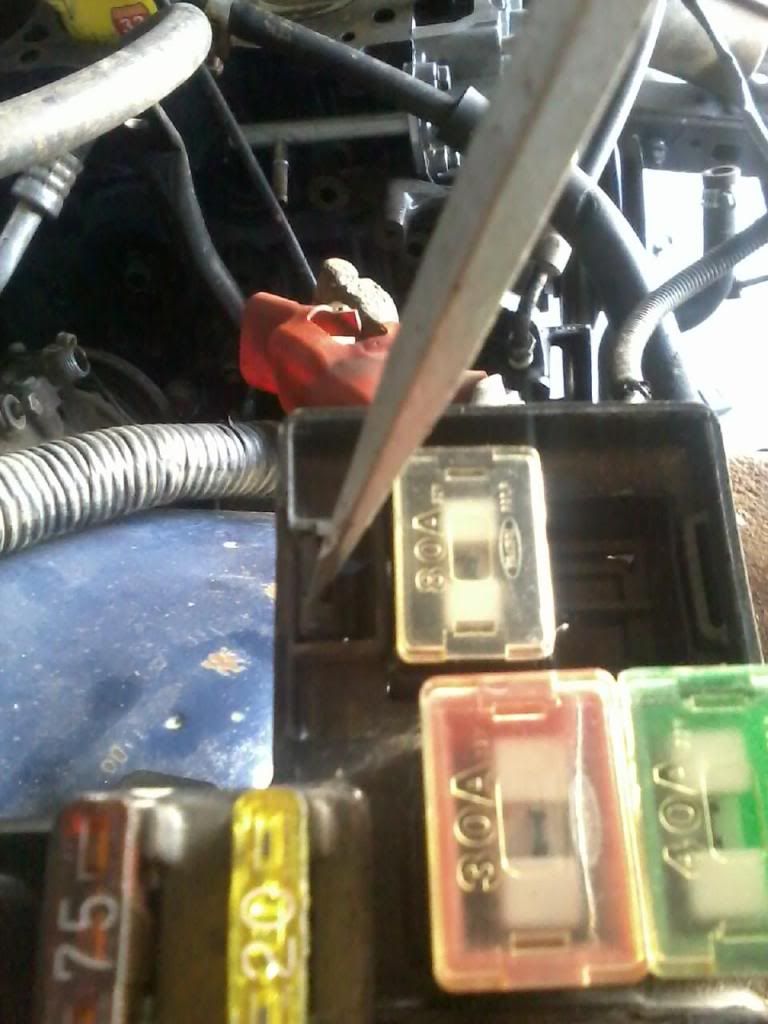
Here it is mounted to the Fuse. It mounts behind the wires. I usually have to take a 8mm socket to the screws the first time. They can be TIGHT.
I have been busy working on getting some of my parts cleaned up and organized that I got from the stripped out runner. Getting my new to me transfer case cleaned up. Still need to get seal and get it in.
A while back I was mentioning that my wifes truck water temp guage was going from half way to cold. I actually forgot about it until I drove it today and it did it again. I pulled the water temp sensor and it had green corrosion on the sensor cleaned them with a brass wire brush and then I cleaned the contacts that goes to the wire as well with electrical contact cleaner. No more problems. Stays just below half as it usually does. I knew it wasnt overheating, but still like having a guage.
Here is a picture of a dirty Temperture Sensor. I have seen worse. I chipped some of the scale build up off so you could see a difference.
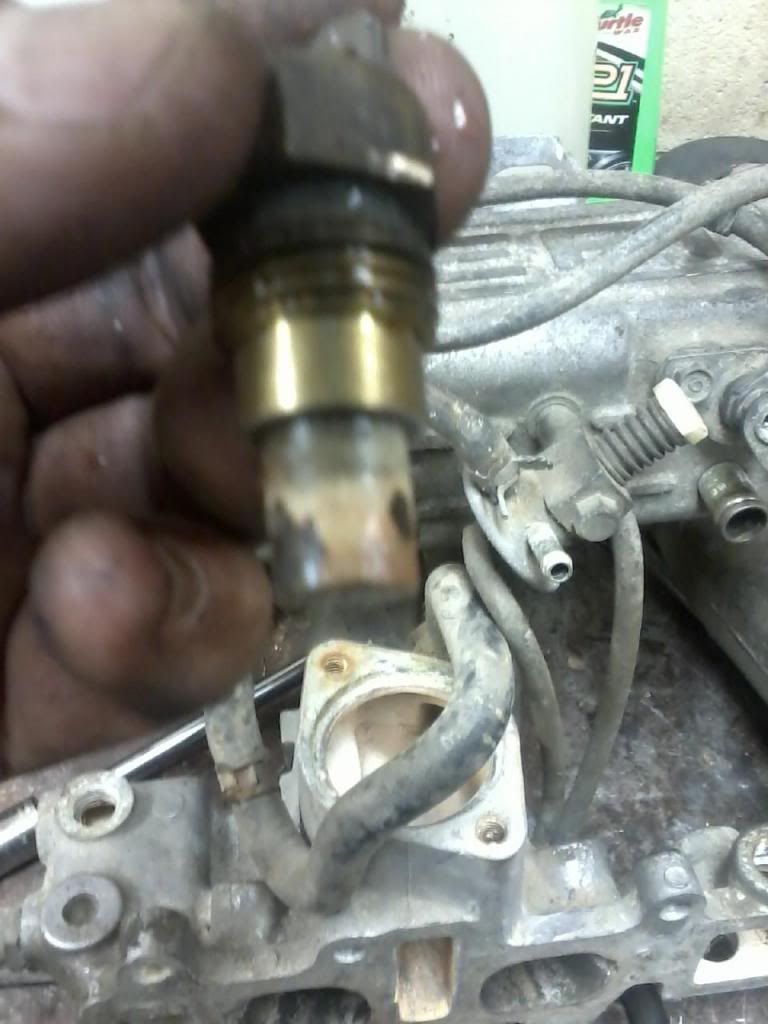
The sensor sits just below the Cold Start Injector in the Intake manifold. Uses a 17mm deepwell socket and is a 5 minute job.
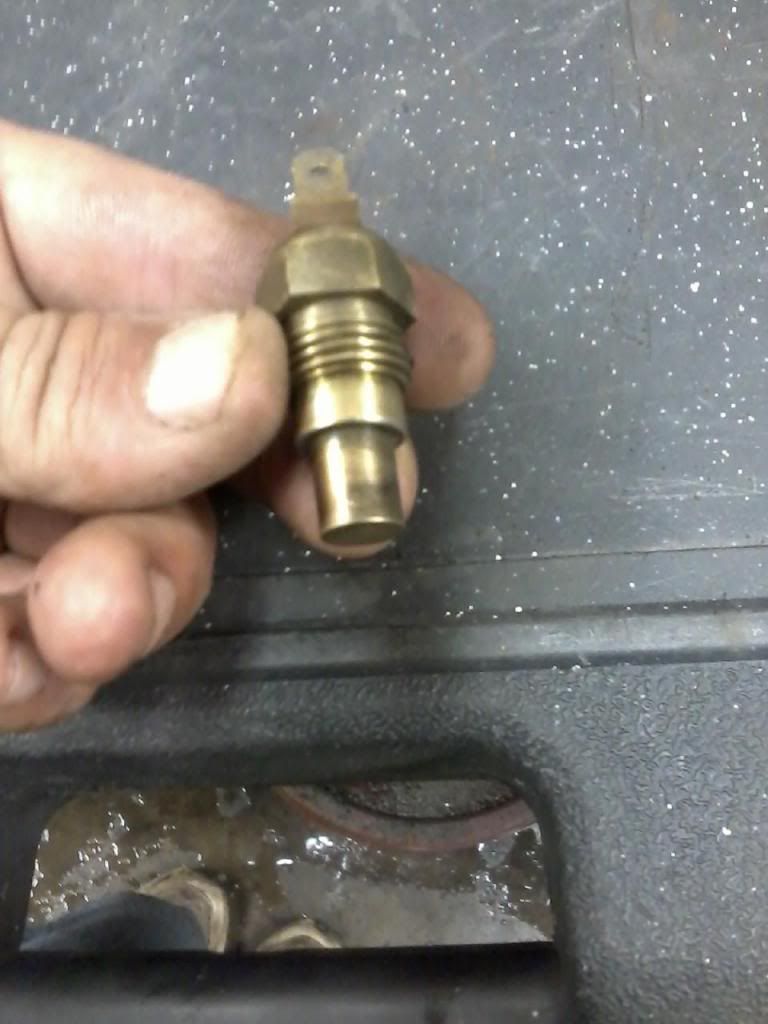
I use Gates Rubber hose PN# 20801, around $10. It comes is a "S" shaped form, but when you cut the lower part off, it looks identical to the orginal and has the larger opening coming off of the water pump and the smaller end for the horseshoe pipe.
 [/QUOTE]
Parts store will tell you this is a dealer item or they dont stock it. This hose likes to leak coming off of the water pump when it pops a hole. Gates PN#20801, just cut off where my finger is at. Alot cheaper then the dealer.
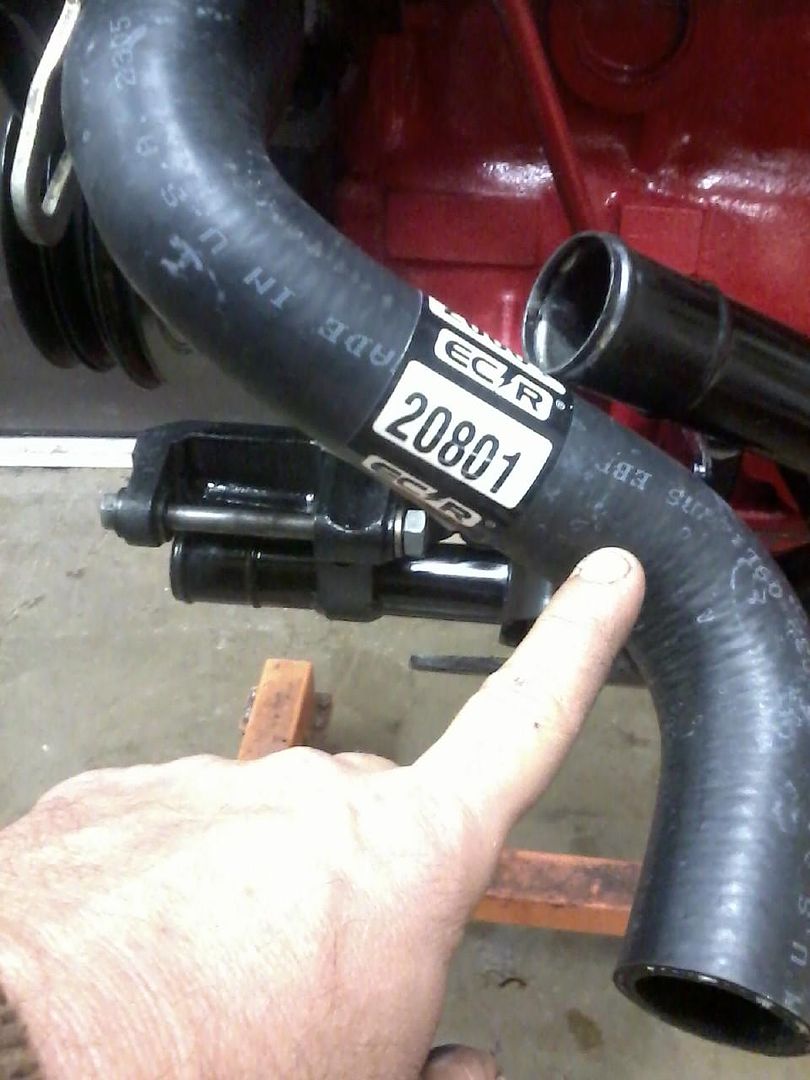
Here it is cut to length and on. I need to get some new hose clamps to finish the job.
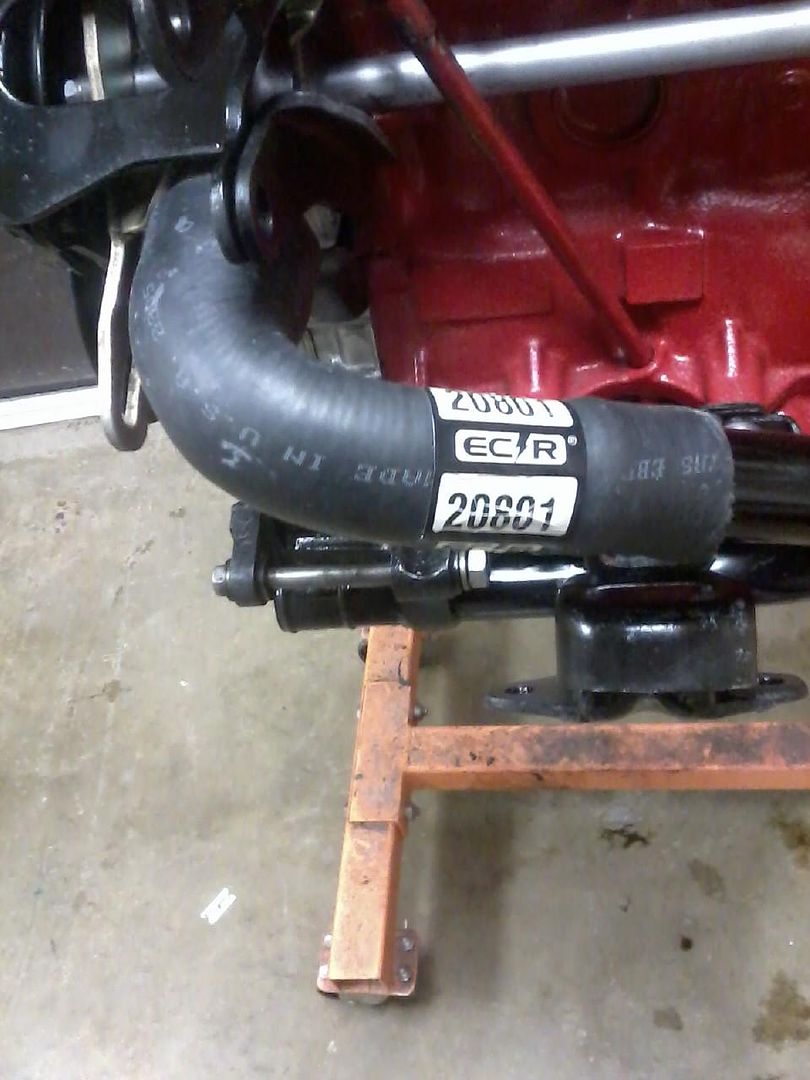
-------------------------------------------------------------------------------------
I have some extra parts and wanted to try something that wouldnt cost a whole lot. Most of us have dealt with the broken rear view mirror and trying to find one in a salvage is lucky at best and when you do, they are expensive around here. Seen some on ebay from $40 and way on up before.
You can find the rear view mirror with out the light assembly a whole easier and since I had one broken with light and 2 dummy light holders, thought I would give it a try. Only have about 45 minutes in this.
Only tools I had in this is a small drill bit, small flat blade screw driver and a bench grinder to knock off the burr.
First I drilled out the rivet from the backside and did have to use a nail to tap out the rivet. Then I would have to grind the burr off and work the top of the rivet out with the screwdriver and moved the parts over.
I am going to glue the electrical runs down with super glue and see if I can find some small screws or rivets when I go to town. I might have to find a small screw and nut for the light switch but feel this will work. When I get this 100% done I will come back and edit this page. Might even add it to my fix list.
Typical of where the mirror breaks on the mount on the right mount, top-right hand corner.
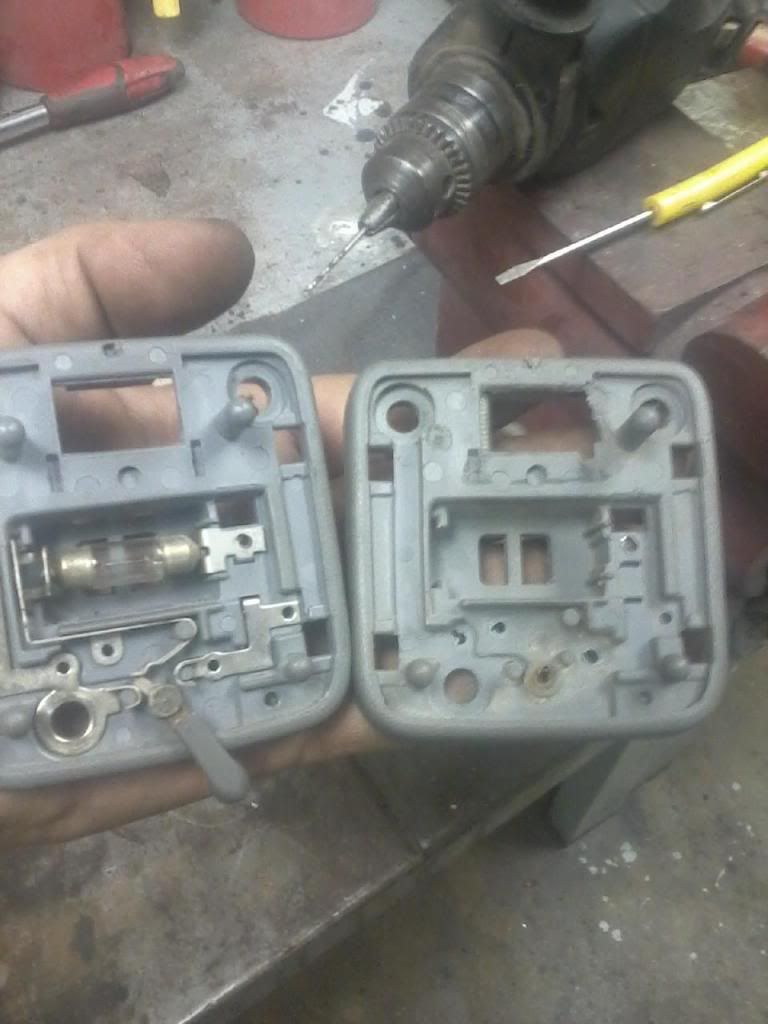
I used some brass screws and glued the back of the electrical contacts down. Put a drop of glue on the back side of the screws.
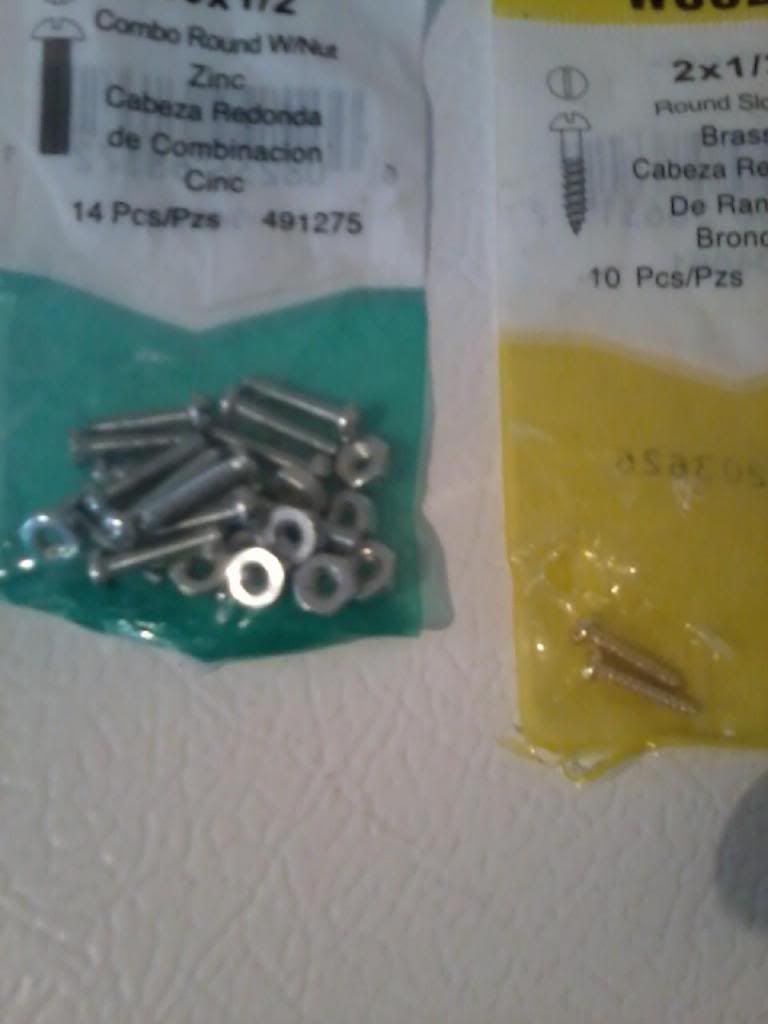
Got it working and only had about $4 and 1 hour into it. Alot cheaper then getting a new one. Just covered the light some to cut down on the glare for the pic. That bulb gets hot.

How to get Check Engine Codes. I just put this up for others. Applies to 87 and up. 86 and older is the bottom picture.
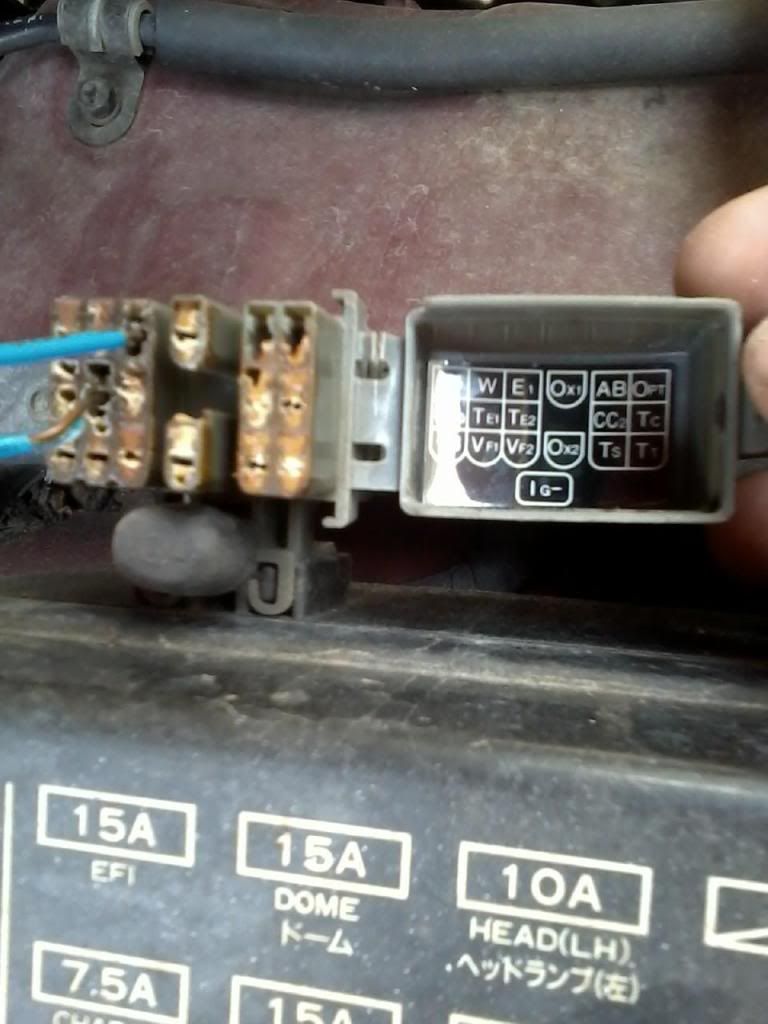
The Diagnostic port for the 85-86 is on the Drivers side inner fender and is nothing the same as the 87 and up. Here is T1 and E1 jumped. The codes and engine flashes are the same as the rest of the trucks on the dash.
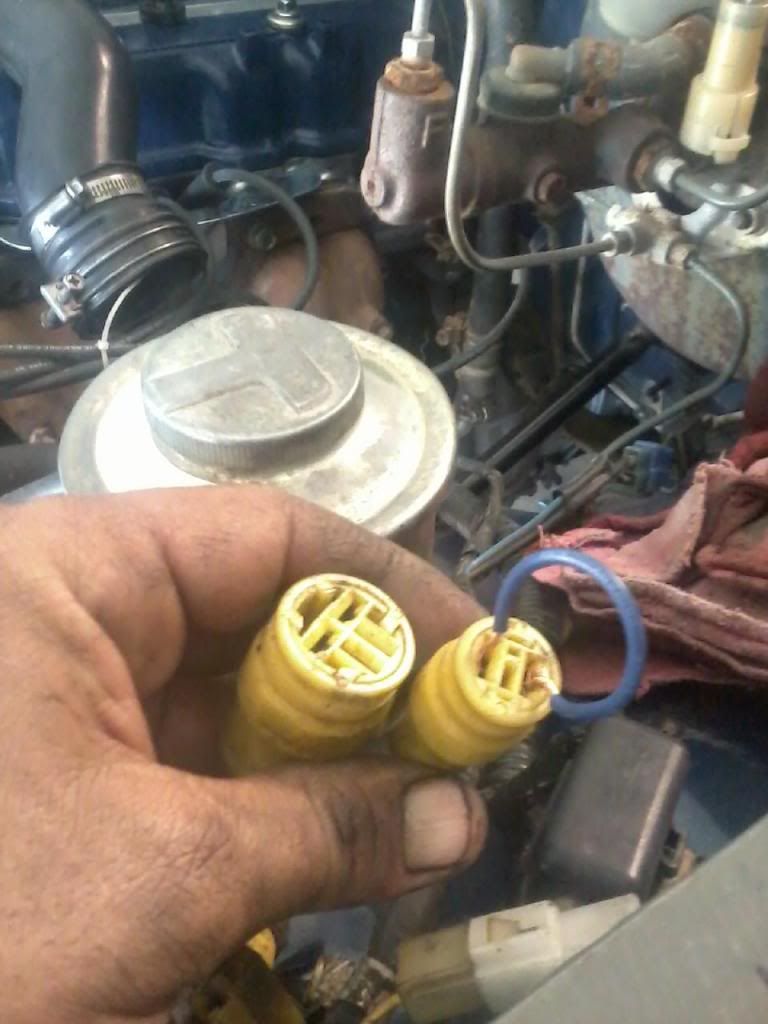
Codes...http://4crawler.com/4x4/CheapTricks/...es/index.shtml
Diagnostic Trouble Codes and Possible Causes
Original author: Jim Brink
Edited and updated by: Roger Brown
--------------------------------------------------------------------------------
Contents:
Introduction
Reading the Trouble Codes
Trouble Codes and Possible Causes
Early 22RE engines
Later 22RE engines
-------------------------------------------------------------------------------
Introduction:
All Toyota vehicles with electronic fuel injection utilize the Toyota EFI or TCCS engine management system. This system incorporates many features to enhance performance, emissions, and drive-ability. One feature is the Self Diagnostic System. The self diagnostic system monitors engine operations and when a particular sensor or input varies out of specified operating parameters, the "Check Engine" will be illuminated.
The check engine lamp alerts the driver or technician that a problem exists in the EFI/TCCS ECU or Engine Control Unit or "computer." When the check engine light is illuminated, it is indicating that a problem in the engine management system has been detected. At this time, a "code" may be stored in the ECU which pinpoints a possible component in the EFI/TCCS system. By checking the trouble codes, a possible problem could be narrowed down to a number of causes. While not an exact diagnostic tool, the check engine light and self-diagnostic system can get the individual working on his/her truck close to a possible fault, and, hopefully, to a successful repair.
Listed below are one and two digit trouble codes for the EFI/TCCS systems and possible causes. As mentioned above, this is not an exact science. Many other component failures can cause similar symptoms that can "mask" the actual cause. EFI/TCCS computer interrogation is one of the last steps to engine diagnostics. A thorough inspection of the simple items should be done prior to any computer-related repairs. Sometimes it's the simple things that will get you. In addition, use caution when working on the electrical system of your vehicle. Not only is the electrical system delicate to water, static electricity, and outright physical abuse, the ignition system puts out high voltage as well and you can be seriously injured if you do not exercise basic safety.
--------------------------------------------------------------------------------
Reading the Trouble Codes:
Reading the diagnostic trouble codes is very easy. You will need a paper clip to short the check connectors of the diagnostic connector. The diagnostic connector comes in two types. The early system is located on the inner-left fender well and is a round, green connector, usually located near the air cleaner. Simply jump the two terminals in this connector with the ignition switch in the "ON" position and the engine off. Later models, '87 and newer use a multiple terminal "DIAGNOSTIC" connector which is a small, rectangular-shaped gray "box", usually located near the right fender in the engine compartment. To get codes out of this type of connector, jump the "TE1" and "E1" terminals. Finding these terminals is easy as the inside cover of the diagnostic connector contains a schematic of the connector pin-outs. If the under hood emission decal (VECI) is still intact on your vehicle, the proper pins for this are outlined there as well.
Later-model EFI/TCCS Diagnostic Connector
The trouble codes will appear as flashes of the check engine lamp. Be sure the ignition key is on, the engine off, and your foot off of the accelerator when reading the codes.
On the early 22RE engines ('85-'87), there are only "one-digit" codes, that is the entire code will be counted out in 1 - 13 flashes.
Later model 22RE engines ('88-'95) can have two different code types may appear:
One-digit and two digit.
One digit codes have an approximate 4.5 second delay between flashes with the check engine light illuminating for about a half of a second.
Two digit codes have a 2.5 second delay between them.
For example a code two flashes the check engine lamp two times in a little over one second: I I.
If two single digit codes are stored, such as a code two and a code four, the lamp may flash as such: ....I I....I I I I. Crude examples but you get the idea.
Two digit codes are similar but will flash the lamp with the first number first and the second number last.
An example of a code twelve is I ....II and a code twenty four is I I..IIII.
--------------------------------------------------------------------------------
Trouble Codes and Possible Causes:
Early 22RE
Later 22RE
In reading the trouble code descriptions and probable causes, the most likely causes are listed first followed by less likely causes. So, you'll see "Defective ECU" listed in many codes as a probable cause. SInce it is listed last, it is the least likely cause of any of the problems. So don't assume that if you have a couple of codes that all list "Defective ECU" as a probable cause, that you have a defective ECU. Sure it is possible, but if things basically work aside from the store trouble code, your ECU is probably OK. And don't forget how the various sensors are wired up. You'll have the sensor, possibly with some wires coming off it, that in turn connects to the engine wiring harness. That is where most folks think of looking for "open" or "short" circuits. But those wires also run all the way back to the ECU where they plug in with one of the 3 large connectors. So don't forget the other end of those wires.
--------------------------------------------------------------------------------
Early 22RE engines:
CODE DESCRIPTION / PROBABLE CAUSE(S)
1 Normal operation (no code stored)
2 Open or shorted Air Flow Meter (AFM) circuit
- Defective AFM
- Defective Electronic Control Unit (ECU)
3 No signal from igniter 4 times in succession
- Defective Igniter
- Defective Main Relay circuit
- Defective ECU
4 Open or shorted Water Thermo Sensor (THW) circuit
- Defective THW
- Defective ECU
5 Open or shorted Oxygen Sensor (O2) circuit
- Lean or rich indication (with injectors full rich or full lean)
- Defective O2 sensor
- Defective ECU
6 No engine revolution sensor (Ne) signal to ECU
- Ne being over 1000 RPM in spite of no Ne signal to ECU
- Defective Igniter circuit
- Defective Igniter
- Defective distributor
- Defective ECU
7 Open or shorted Throttle Position Sensor (TPS) circuit
- Defective TPS
- Defective ECU
8 Open or shorter Air Thermo Sensor citcuit
- Defective intake air thermo sensor circuit (see AFM)
- Defective ECU
9 not used?
10 No starter switch signal for ECU w/ vehicle speed = 0 and engine RPM > 800
- Defective Vehicle Speed Sensor (VSS)
- Defecticve main relay circuit
- Defecticve igniter switch to starter circuit
- Defective ECU
11 Short circuit in Check Connector T with A/C switch ON or TPS - IDL point OFF
- Defective A/C switch
- Defective TPS circuit
- Defective TPS
- Defective ECU
12 Knock control Sensor (KS) signal has not reached judgement level in succession
- Defective KS circuit
- Defective KS
- Defective ECU
13 Knock CPU (Sensor?) faulty
Some possible causes of the above trouble codes:
Codse 3 and 6 point to the coil and ignitor, try a new one.
Another symptom is an erratic fatory tachometer, as the tach. signal comes from the ignitor circuit.
Any of the TPS codes; test out the Throttle Position Sensor both at the sensor and at the ECU connector,
Also make sure the TPS connector is tight.
Any of the AFM codes; test out the Air Flow Meter both at the sensor and at the ECU connector,
Also make sure the AFM connector is tight.
Any of the Knock Sensor codes; check the connector and wiring at the Knock Sensor, it is a shielded wire and is somewhat delicate.
--------------------------------------------------------------------------------
Later 22RE engines:
ONE-DIGIT TWO-DIGIT POSSIBLE CAUSE OF COSYMPTOM
1 NONE SYSTEM NORMAL
11 LOSS OF POWER SUPPLY TO EC
IGNITION SWITCH/CIRCUIT
-- MAIN RELAY/CIRCUIT
-- ECU
6 12 RPM SIGNAL-NO SIGNAL TO ECU FROM DISTRIBUTOR ("Ne" OR "G") AFTER ENGINE HAS BEEN CRANKED
DISTRIBUTOR/CIRCUIT
STARTER SIGNAL CIRCUIT
IGNITER/IGNITER CIRCUIT
ECU
13 SAME AS ABOVE BUT AFTER ENGINE HAS RUN AT 1,000-1,500 RPM
DISTRIBUTOR/DISTRIBUTOR CIRCUIT
ECU
3 14 IGNITION SIGNAL--NO "IGF" SIGNAL TO ECU
IGNITER/IGNITER CIRCUIT
IGNITER AND IGNITION COIL/CIRCUIT
ECU
5 21 OXYGEN SENSOR SIGNAL/OXYGEN SENSOR HEATER SIGNAL
OPEN OR SHORT IN OXYGEN SENSOR OR OXYGEN SENSOR SIGNAL
4 22 WATER TEMPERATURE SENSOR SIGNAL--OPEN OR SHORT IN WATER TEMP. SENSOR SIGNAL
WATER TEMPERATURE SENSOR CIRCUIT
WATER TEMPERATURE SENSOR
ECU
8 24 INTAKE AIR TEMPERATURE SENSOR SIGNAL--OPEN OR SHORT IN INTAKE AIR TEMP. SIGNAL
INTAKE AIR TEMPERATURE CIRCUIT
INTAKE AIR TEMPERATURE SENSOR
ECU
25 AIR/FUEL RATIO LEAN INDICATOR--LEAN SIGNAL SENT TO ECU FROM O2 SENSOR
INJECTOR FAULT(S)
FUEL PRESSURE
OXYGEN SENSOR
AIRFLOW METER OR MAP SENSOR
IGNITION
ECU
26 AIR/FUEL RATIO RICH INDICATOR
SAME AS ABOVE
COLD START INJECTOR
27 SUB-OXYGEN SENSOR CIRCUIT OR SUB-OXYGEN SENSOR HEATER CIRCUIT
SUB OXYGEN SENSOR/HEATER/CIRCUIT
ECU
28 No.2 OXYGEN SENSOR/OXYGEN SENSOR HEATER
SAME AS CODE 21
2 31 MANIFOLD AND/OR AIRFLOW METER SENSOR SIGNAL CIRCUIT
AIRFLOW METER/CIRCUIT
MANIFOLD PRESSURE SENSOR/CIRCUIT
ECU
32 AIRFLOW METER SIGNAL (VANE-TYPE)
AIRFLOW METER./CIRCUIT
ECU
14 34 TURBOCHARGER PRESSURE--ABNORMAL TURBOCHARGER PRESSURE
TURBO CHARGER
AIRFLOW METER/MANIFOLD/TURBOCHARGER PRESSURE SENSOR
INTERCOOLER SYSTEM
ECU
35 TURBOCHARGER PRESSURE SENSOR SIGNAL
TURBOCHARGER PRESSURE SENSOR
ECU
7 41 THROTTLE POSITION SENSOR SIGNAL--OPEN OR SHORT IN TPS SIGNAL
TPS SENSOR
TPS SIGNAL/CIRCUIT
ECU
9 42 VEHICLE SPEED SENSOR SIGNAL CIRCUIT--NO SPD. SIGNAL FOR SEVERAL SECONDS
WHILE VEHICLE IS OPERATED UNDER HEAVY LOAD (TPS/MAP/AIR FLOW INPUTS)
SPEED SENSOR/CIRCUIT
ECU
10 43 STARTER SIGNAL--NO "STA" SIGNAL TO ECU UNTIL ENGINE SPEED EXCEEDS 800RPM
IGNITION SWITCH/CIRCUIT
ECU
11 51 SWITCH IDL (tps) CONTACTS OFF, NEUTRAL START SWITCH OFF, A/C SWITCH "ON" SIGNAL TO ECU
WITH DIAGNOSTIC CHECK CONNECTOR SHORTED
A/C SWITCH/CIRCUIT
A/C AMPLIFIER
TPS/CIRCUIT
NEUTRAL START SWITCH/CIRCUIT
ECU
12 52 KNOCK SENSOR SIGNAL--OPEN OR SHORT IN KNOCK SENSOR SIGNAL
KNOCK SENSOR/CIRCUIT
ECU
13 53 KNOCK CONTROL SIGNAL IN ECU
ECU
71 EGR VALVE MALFUNCTION--EXHAUST GAS TEMPERATURE BELOW SPEC. FOR EGR CONTROL
EGR SYSTEM
EGR GAS TEMPERATURE SENSOR/CIRCUIT
72 AIR CONDITIONER COMPRESSOR RELAY/RELAY SIGNAL
A/C COMPRESSOR RELAY/CIRCUIT
ECU
While a lot of the possible faults in the EFI system point to the ECU itself, it should be noted that ECU failure is not common. The ECU should be replaced only as a last resort or if all diagnoses points to a bad ECU. Usually, troublesome EFI problems are a result of poor grounds, shorted wiring, and bad connections at sensors.When all else fails, carefully consult your factory repair manual. It contains more comprehensive diagnostic information and great electrical wiring diagrams.
Happy "Diagnosticating!"
Jim Brink (toytech@off-road.com) - Toyota/ASE Certified Master Automotive Technician
http://www.youtube.com/watch?v=9qEQM...ature=youtu.be
I want to post a pic of fuse locations for the drivers kick panel for others reference.
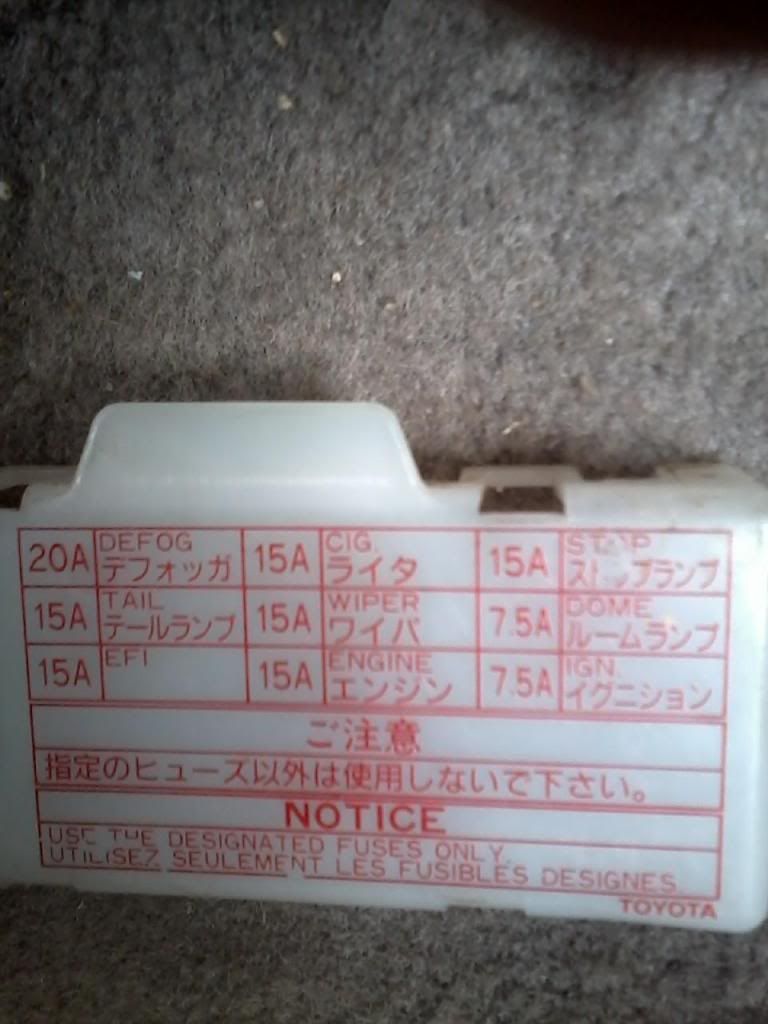
Dash Pad Replacement.
I am currently replacing my dashpad and will update my post on this as I go. It is fairly easy once you know the steps.
1.Remove Speedometer Bezel and there is a 10 mm nut that holds the left side of the dash pad in.
2. Take out the far right vent on passener side. Mine cracked bad as it was brittle.There is another 10mm nut that holds the right side of the dashpad in.
3.Take out the glovebox. 2 screws at the bottom, holds the glovebox in. There is a black strip that has a cover attached to it. Just take a flatblade screwdriver and pop out the little tabs.
4. I will get a picture below but there is a little screw that holds part of the ventilation pipe in. Take the screw out and slide the 4-5inch vent pipe out of the way(first picture). Straight above it, there is another 10mm nut that has to be removed.
5.You have 5 screws at the bottom of the dashpad that you have to take out and it is done.
Not hard at all, but if you dont know how to do it, I dont think I would of figured it out. Didnt have my manual, and thought I could wing it. YT saved the day. I will post some links that helped me out alot.
The ones that mention dashpad removal are the ones that saved my butt.
With the dashpad out of the way, it makes it easier to work on the heater control assembly. Mine is broken and it is still a pain to get to.
Notes for myself.
Black cable goes below heater core.
White/clear cable goes along top of dash to right side.
Blue cable goes to assembly under hood through firewall.
Great link to dashpad removal. https://www.yotatech.com/forums/f115...emoval-189633/
Duct that needs removed to get the center nut of dash pad. Once you remove it, straight up is the nut.
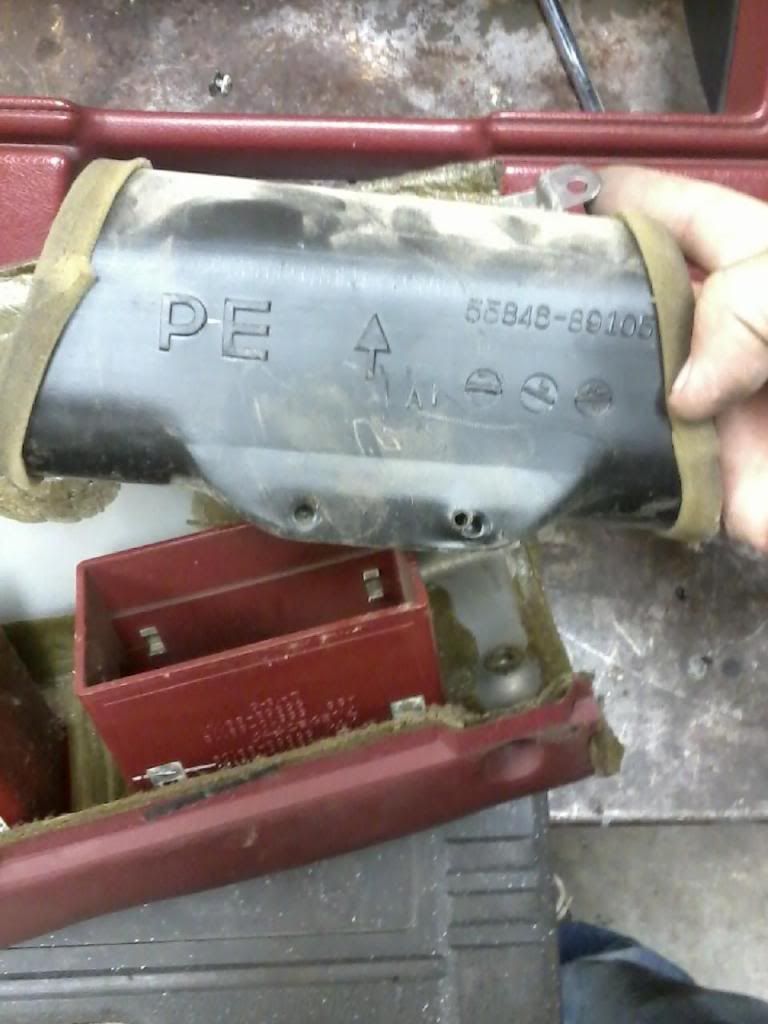
The bolt that holds the passenger side is where my finger is and the nut is for the center of the dashpad. Screwdriver tip is on the stud for where nut needs to go.
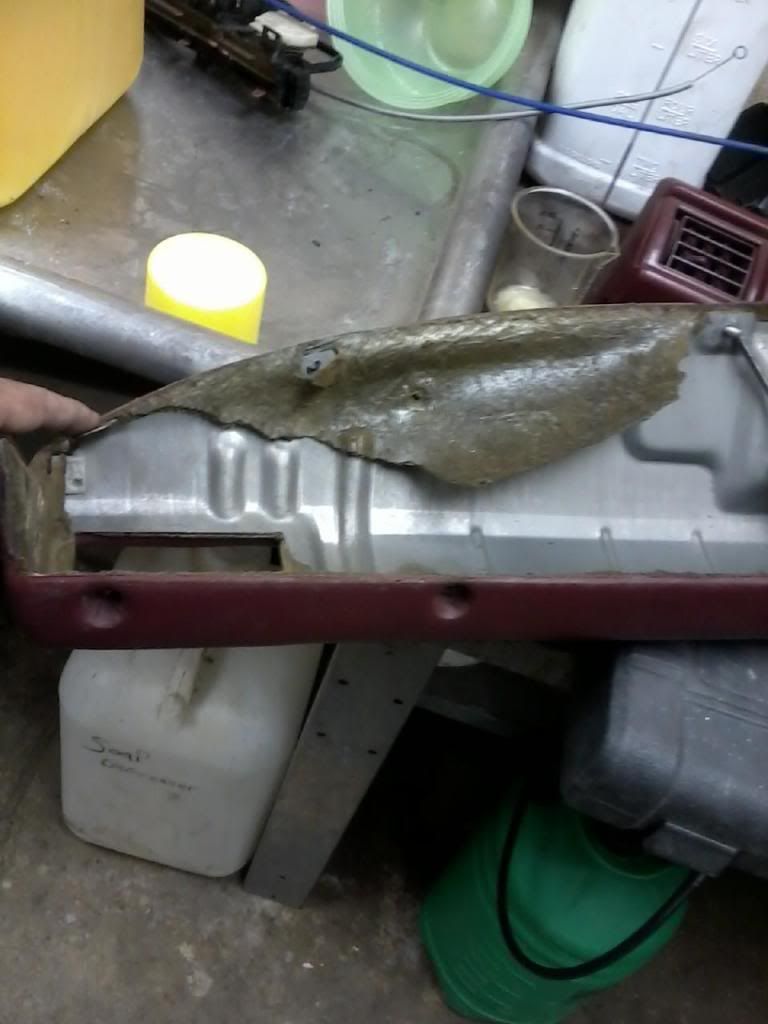
Youtube video I found that might help some.
Video I made to get the passenger vent out.
Video to get the PE pipe out and the center dashpad nut.
Most likely broken part on heater control. Once the dash pad is off, there is a single screw that holds the double plastic vent that needs to be removed to make a little more room to get the heater control assembly out. I pulled the whole assembly and cables out together making sure not to get any sharp bends in the cable. I was able to pull the cables from the right side and then the right side of the assembly and the the left side of the assembly and then left cables.
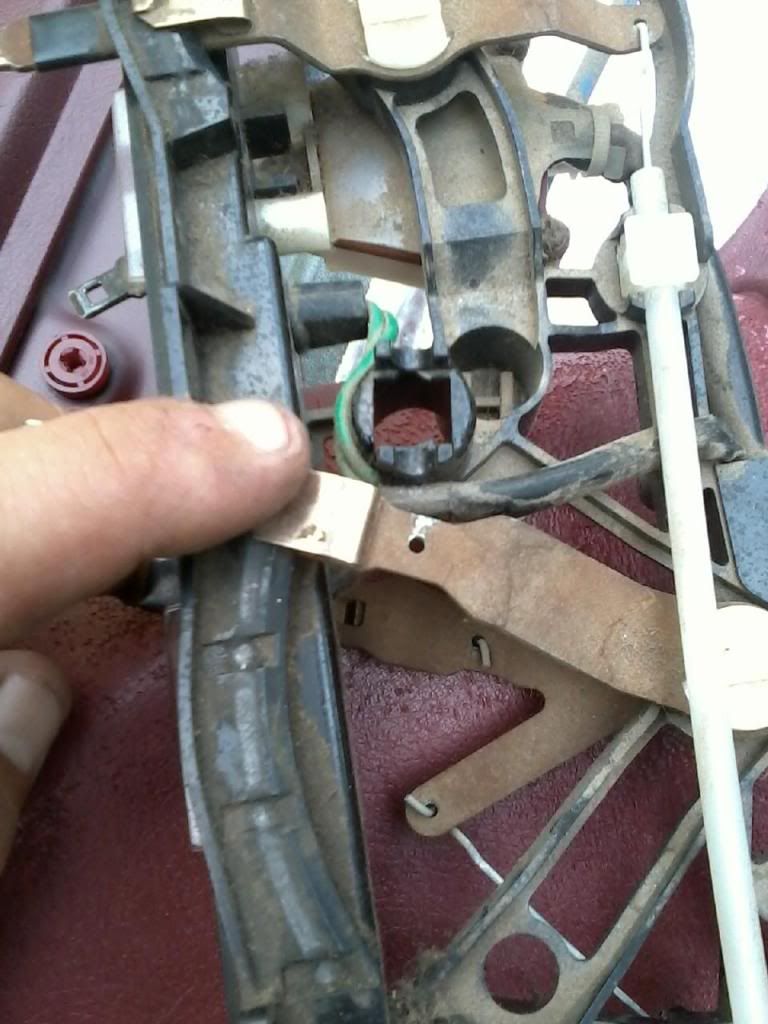
Here is what I am replacing. The cracked one is orginal color. The back one was gray and I used interior paint on it. Both have Armorall on them.
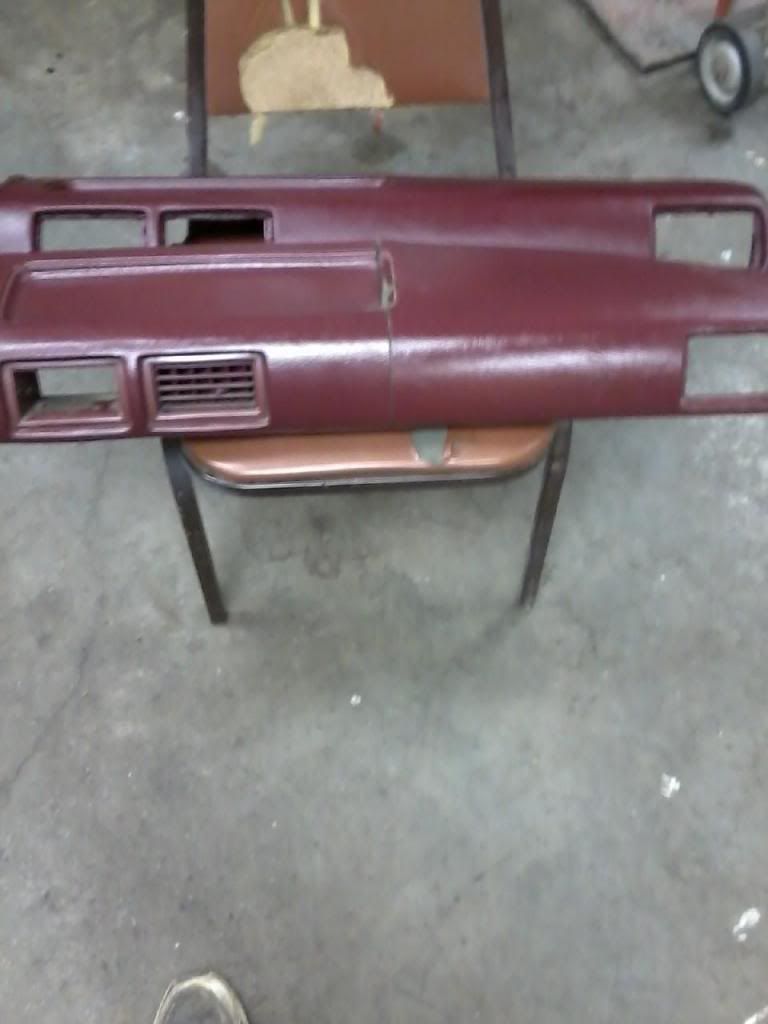
Here is the Fusible link attached.
-----------------------------------------------------------------------------------------------
Here is a better update of the Fusible Link..
When I ran into this on my 88, I thought someone had did a cheap repair job, but it is actually a factory Fusible Link. Chef helped me figure this out back then. It is crimped to the Positve pigtail coming off of your Postive Post.
All of the other fuses lift up and out. The 80 Amp you have to pry this tab to the firewall and push out the bottom.
Here it is mounted to the Fuse. It mounts behind the wires. I usually have to take a 8mm socket to the screws the first time. They can be TIGHT.
I have been busy working on getting some of my parts cleaned up and organized that I got from the stripped out runner. Getting my new to me transfer case cleaned up. Still need to get seal and get it in.
A while back I was mentioning that my wifes truck water temp guage was going from half way to cold. I actually forgot about it until I drove it today and it did it again. I pulled the water temp sensor and it had green corrosion on the sensor cleaned them with a brass wire brush and then I cleaned the contacts that goes to the wire as well with electrical contact cleaner. No more problems. Stays just below half as it usually does. I knew it wasnt overheating, but still like having a guage.
Here is a picture of a dirty Temperture Sensor. I have seen worse. I chipped some of the scale build up off so you could see a difference.
The sensor sits just below the Cold Start Injector in the Intake manifold. Uses a 17mm deepwell socket and is a 5 minute job.
I use Gates Rubber hose PN# 20801, around $10. It comes is a "S" shaped form, but when you cut the lower part off, it looks identical to the orginal and has the larger opening coming off of the water pump and the smaller end for the horseshoe pipe.
[/QUOTE]Parts store will tell you this is a dealer item or they dont stock it. This hose likes to leak coming off of the water pump when it pops a hole. Gates PN#20801, just cut off where my finger is at. Alot cheaper then the dealer.
Here it is cut to length and on. I need to get some new hose clamps to finish the job.
-------------------------------------------------------------------------------------
I have some extra parts and wanted to try something that wouldnt cost a whole lot. Most of us have dealt with the broken rear view mirror and trying to find one in a salvage is lucky at best and when you do, they are expensive around here. Seen some on ebay from $40 and way on up before.
You can find the rear view mirror with out the light assembly a whole easier and since I had one broken with light and 2 dummy light holders, thought I would give it a try. Only have about 45 minutes in this.
Only tools I had in this is a small drill bit, small flat blade screw driver and a bench grinder to knock off the burr.
First I drilled out the rivet from the backside and did have to use a nail to tap out the rivet. Then I would have to grind the burr off and work the top of the rivet out with the screwdriver and moved the parts over.
I am going to glue the electrical runs down with super glue and see if I can find some small screws or rivets when I go to town. I might have to find a small screw and nut for the light switch but feel this will work. When I get this 100% done I will come back and edit this page. Might even add it to my fix list.
Typical of where the mirror breaks on the mount on the right mount, top-right hand corner.
I used some brass screws and glued the back of the electrical contacts down. Put a drop of glue on the back side of the screws.
Got it working and only had about $4 and 1 hour into it. Alot cheaper then getting a new one. Just covered the light some to cut down on the glare for the pic. That bulb gets hot.
How to get Check Engine Codes. I just put this up for others. Applies to 87 and up. 86 and older is the bottom picture.
The Diagnostic port for the 85-86 is on the Drivers side inner fender and is nothing the same as the 87 and up. Here is T1 and E1 jumped. The codes and engine flashes are the same as the rest of the trucks on the dash.
Codes...http://4crawler.com/4x4/CheapTricks/...es/index.shtml
Diagnostic Trouble Codes and Possible Causes
Original author: Jim Brink
Edited and updated by: Roger Brown
--------------------------------------------------------------------------------
Contents:
Introduction
Reading the Trouble Codes
Trouble Codes and Possible Causes
Early 22RE engines
Later 22RE engines
-------------------------------------------------------------------------------
Introduction:
All Toyota vehicles with electronic fuel injection utilize the Toyota EFI or TCCS engine management system. This system incorporates many features to enhance performance, emissions, and drive-ability. One feature is the Self Diagnostic System. The self diagnostic system monitors engine operations and when a particular sensor or input varies out of specified operating parameters, the "Check Engine" will be illuminated.
The check engine lamp alerts the driver or technician that a problem exists in the EFI/TCCS ECU or Engine Control Unit or "computer." When the check engine light is illuminated, it is indicating that a problem in the engine management system has been detected. At this time, a "code" may be stored in the ECU which pinpoints a possible component in the EFI/TCCS system. By checking the trouble codes, a possible problem could be narrowed down to a number of causes. While not an exact diagnostic tool, the check engine light and self-diagnostic system can get the individual working on his/her truck close to a possible fault, and, hopefully, to a successful repair.
Listed below are one and two digit trouble codes for the EFI/TCCS systems and possible causes. As mentioned above, this is not an exact science. Many other component failures can cause similar symptoms that can "mask" the actual cause. EFI/TCCS computer interrogation is one of the last steps to engine diagnostics. A thorough inspection of the simple items should be done prior to any computer-related repairs. Sometimes it's the simple things that will get you. In addition, use caution when working on the electrical system of your vehicle. Not only is the electrical system delicate to water, static electricity, and outright physical abuse, the ignition system puts out high voltage as well and you can be seriously injured if you do not exercise basic safety.
--------------------------------------------------------------------------------
Reading the Trouble Codes:
Reading the diagnostic trouble codes is very easy. You will need a paper clip to short the check connectors of the diagnostic connector. The diagnostic connector comes in two types. The early system is located on the inner-left fender well and is a round, green connector, usually located near the air cleaner. Simply jump the two terminals in this connector with the ignition switch in the "ON" position and the engine off. Later models, '87 and newer use a multiple terminal "DIAGNOSTIC" connector which is a small, rectangular-shaped gray "box", usually located near the right fender in the engine compartment. To get codes out of this type of connector, jump the "TE1" and "E1" terminals. Finding these terminals is easy as the inside cover of the diagnostic connector contains a schematic of the connector pin-outs. If the under hood emission decal (VECI) is still intact on your vehicle, the proper pins for this are outlined there as well.
Later-model EFI/TCCS Diagnostic Connector
The trouble codes will appear as flashes of the check engine lamp. Be sure the ignition key is on, the engine off, and your foot off of the accelerator when reading the codes.
On the early 22RE engines ('85-'87), there are only "one-digit" codes, that is the entire code will be counted out in 1 - 13 flashes.
Later model 22RE engines ('88-'95) can have two different code types may appear:
One-digit and two digit.
One digit codes have an approximate 4.5 second delay between flashes with the check engine light illuminating for about a half of a second.
Two digit codes have a 2.5 second delay between them.
For example a code two flashes the check engine lamp two times in a little over one second: I I.
If two single digit codes are stored, such as a code two and a code four, the lamp may flash as such: ....I I....I I I I. Crude examples but you get the idea.
Two digit codes are similar but will flash the lamp with the first number first and the second number last.
An example of a code twelve is I ....II and a code twenty four is I I..IIII.
--------------------------------------------------------------------------------
Trouble Codes and Possible Causes:
Early 22RE
Later 22RE
In reading the trouble code descriptions and probable causes, the most likely causes are listed first followed by less likely causes. So, you'll see "Defective ECU" listed in many codes as a probable cause. SInce it is listed last, it is the least likely cause of any of the problems. So don't assume that if you have a couple of codes that all list "Defective ECU" as a probable cause, that you have a defective ECU. Sure it is possible, but if things basically work aside from the store trouble code, your ECU is probably OK. And don't forget how the various sensors are wired up. You'll have the sensor, possibly with some wires coming off it, that in turn connects to the engine wiring harness. That is where most folks think of looking for "open" or "short" circuits. But those wires also run all the way back to the ECU where they plug in with one of the 3 large connectors. So don't forget the other end of those wires.
--------------------------------------------------------------------------------
Early 22RE engines:
CODE DESCRIPTION / PROBABLE CAUSE(S)
1 Normal operation (no code stored)
2 Open or shorted Air Flow Meter (AFM) circuit
- Defective AFM
- Defective Electronic Control Unit (ECU)
3 No signal from igniter 4 times in succession
- Defective Igniter
- Defective Main Relay circuit
- Defective ECU
4 Open or shorted Water Thermo Sensor (THW) circuit
- Defective THW
- Defective ECU
5 Open or shorted Oxygen Sensor (O2) circuit
- Lean or rich indication (with injectors full rich or full lean)
- Defective O2 sensor
- Defective ECU
6 No engine revolution sensor (Ne) signal to ECU
- Ne being over 1000 RPM in spite of no Ne signal to ECU
- Defective Igniter circuit
- Defective Igniter
- Defective distributor
- Defective ECU
7 Open or shorted Throttle Position Sensor (TPS) circuit
- Defective TPS
- Defective ECU
8 Open or shorter Air Thermo Sensor citcuit
- Defective intake air thermo sensor circuit (see AFM)
- Defective ECU
9 not used?
10 No starter switch signal for ECU w/ vehicle speed = 0 and engine RPM > 800
- Defective Vehicle Speed Sensor (VSS)
- Defecticve main relay circuit
- Defecticve igniter switch to starter circuit
- Defective ECU
11 Short circuit in Check Connector T with A/C switch ON or TPS - IDL point OFF
- Defective A/C switch
- Defective TPS circuit
- Defective TPS
- Defective ECU
12 Knock control Sensor (KS) signal has not reached judgement level in succession
- Defective KS circuit
- Defective KS
- Defective ECU
13 Knock CPU (Sensor?) faulty
Some possible causes of the above trouble codes:
Codse 3 and 6 point to the coil and ignitor, try a new one.
Another symptom is an erratic fatory tachometer, as the tach. signal comes from the ignitor circuit.
Any of the TPS codes; test out the Throttle Position Sensor both at the sensor and at the ECU connector,
Also make sure the TPS connector is tight.
Any of the AFM codes; test out the Air Flow Meter both at the sensor and at the ECU connector,
Also make sure the AFM connector is tight.
Any of the Knock Sensor codes; check the connector and wiring at the Knock Sensor, it is a shielded wire and is somewhat delicate.
--------------------------------------------------------------------------------
Later 22RE engines:
ONE-DIGIT TWO-DIGIT POSSIBLE CAUSE OF COSYMPTOM
1 NONE SYSTEM NORMAL
11 LOSS OF POWER SUPPLY TO EC
IGNITION SWITCH/CIRCUIT
-- MAIN RELAY/CIRCUIT
-- ECU
6 12 RPM SIGNAL-NO SIGNAL TO ECU FROM DISTRIBUTOR ("Ne" OR "G") AFTER ENGINE HAS BEEN CRANKED
DISTRIBUTOR/CIRCUIT
STARTER SIGNAL CIRCUIT
IGNITER/IGNITER CIRCUIT
ECU
13 SAME AS ABOVE BUT AFTER ENGINE HAS RUN AT 1,000-1,500 RPM
DISTRIBUTOR/DISTRIBUTOR CIRCUIT
ECU
3 14 IGNITION SIGNAL--NO "IGF" SIGNAL TO ECU
IGNITER/IGNITER CIRCUIT
IGNITER AND IGNITION COIL/CIRCUIT
ECU
5 21 OXYGEN SENSOR SIGNAL/OXYGEN SENSOR HEATER SIGNAL
OPEN OR SHORT IN OXYGEN SENSOR OR OXYGEN SENSOR SIGNAL
4 22 WATER TEMPERATURE SENSOR SIGNAL--OPEN OR SHORT IN WATER TEMP. SENSOR SIGNAL
WATER TEMPERATURE SENSOR CIRCUIT
WATER TEMPERATURE SENSOR
ECU
8 24 INTAKE AIR TEMPERATURE SENSOR SIGNAL--OPEN OR SHORT IN INTAKE AIR TEMP. SIGNAL
INTAKE AIR TEMPERATURE CIRCUIT
INTAKE AIR TEMPERATURE SENSOR
ECU
25 AIR/FUEL RATIO LEAN INDICATOR--LEAN SIGNAL SENT TO ECU FROM O2 SENSOR
INJECTOR FAULT(S)
FUEL PRESSURE
OXYGEN SENSOR
AIRFLOW METER OR MAP SENSOR
IGNITION
ECU
26 AIR/FUEL RATIO RICH INDICATOR
SAME AS ABOVE
COLD START INJECTOR
27 SUB-OXYGEN SENSOR CIRCUIT OR SUB-OXYGEN SENSOR HEATER CIRCUIT
SUB OXYGEN SENSOR/HEATER/CIRCUIT
ECU
28 No.2 OXYGEN SENSOR/OXYGEN SENSOR HEATER
SAME AS CODE 21
2 31 MANIFOLD AND/OR AIRFLOW METER SENSOR SIGNAL CIRCUIT
AIRFLOW METER/CIRCUIT
MANIFOLD PRESSURE SENSOR/CIRCUIT
ECU
32 AIRFLOW METER SIGNAL (VANE-TYPE)
AIRFLOW METER./CIRCUIT
ECU
14 34 TURBOCHARGER PRESSURE--ABNORMAL TURBOCHARGER PRESSURE
TURBO CHARGER
AIRFLOW METER/MANIFOLD/TURBOCHARGER PRESSURE SENSOR
INTERCOOLER SYSTEM
ECU
35 TURBOCHARGER PRESSURE SENSOR SIGNAL
TURBOCHARGER PRESSURE SENSOR
ECU
7 41 THROTTLE POSITION SENSOR SIGNAL--OPEN OR SHORT IN TPS SIGNAL
TPS SENSOR
TPS SIGNAL/CIRCUIT
ECU
9 42 VEHICLE SPEED SENSOR SIGNAL CIRCUIT--NO SPD. SIGNAL FOR SEVERAL SECONDS
WHILE VEHICLE IS OPERATED UNDER HEAVY LOAD (TPS/MAP/AIR FLOW INPUTS)
SPEED SENSOR/CIRCUIT
ECU
10 43 STARTER SIGNAL--NO "STA" SIGNAL TO ECU UNTIL ENGINE SPEED EXCEEDS 800RPM
IGNITION SWITCH/CIRCUIT
ECU
11 51 SWITCH IDL (tps) CONTACTS OFF, NEUTRAL START SWITCH OFF, A/C SWITCH "ON" SIGNAL TO ECU
WITH DIAGNOSTIC CHECK CONNECTOR SHORTED
A/C SWITCH/CIRCUIT
A/C AMPLIFIER
TPS/CIRCUIT
NEUTRAL START SWITCH/CIRCUIT
ECU
12 52 KNOCK SENSOR SIGNAL--OPEN OR SHORT IN KNOCK SENSOR SIGNAL
KNOCK SENSOR/CIRCUIT
ECU
13 53 KNOCK CONTROL SIGNAL IN ECU
ECU
71 EGR VALVE MALFUNCTION--EXHAUST GAS TEMPERATURE BELOW SPEC. FOR EGR CONTROL
EGR SYSTEM
EGR GAS TEMPERATURE SENSOR/CIRCUIT
72 AIR CONDITIONER COMPRESSOR RELAY/RELAY SIGNAL
A/C COMPRESSOR RELAY/CIRCUIT
ECU
While a lot of the possible faults in the EFI system point to the ECU itself, it should be noted that ECU failure is not common. The ECU should be replaced only as a last resort or if all diagnoses points to a bad ECU. Usually, troublesome EFI problems are a result of poor grounds, shorted wiring, and bad connections at sensors.When all else fails, carefully consult your factory repair manual. It contains more comprehensive diagnostic information and great electrical wiring diagrams.
Happy "Diagnosticating!"
Jim Brink (toytech@off-road.com) - Toyota/ASE Certified Master Automotive Technician
http://www.youtube.com/watch?v=9qEQM...ature=youtu.be
I want to post a pic of fuse locations for the drivers kick panel for others reference.
Dash Pad Replacement.
I am currently replacing my dashpad and will update my post on this as I go. It is fairly easy once you know the steps.
1.Remove Speedometer Bezel and there is a 10 mm nut that holds the left side of the dash pad in.
2. Take out the far right vent on passener side. Mine cracked bad as it was brittle.There is another 10mm nut that holds the right side of the dashpad in.
3.Take out the glovebox. 2 screws at the bottom, holds the glovebox in. There is a black strip that has a cover attached to it. Just take a flatblade screwdriver and pop out the little tabs.
4. I will get a picture below but there is a little screw that holds part of the ventilation pipe in. Take the screw out and slide the 4-5inch vent pipe out of the way(first picture). Straight above it, there is another 10mm nut that has to be removed.
5.You have 5 screws at the bottom of the dashpad that you have to take out and it is done.
Not hard at all, but if you dont know how to do it, I dont think I would of figured it out. Didnt have my manual, and thought I could wing it. YT saved the day. I will post some links that helped me out alot.
The ones that mention dashpad removal are the ones that saved my butt.
With the dashpad out of the way, it makes it easier to work on the heater control assembly. Mine is broken and it is still a pain to get to.
Notes for myself.
Black cable goes below heater core.
White/clear cable goes along top of dash to right side.
Blue cable goes to assembly under hood through firewall.
Great link to dashpad removal. https://www.yotatech.com/forums/f115...emoval-189633/
Duct that needs removed to get the center nut of dash pad. Once you remove it, straight up is the nut.
The bolt that holds the passenger side is where my finger is and the nut is for the center of the dashpad. Screwdriver tip is on the stud for where nut needs to go.
Youtube video I found that might help some.
Video I made to get the passenger vent out.
Video to get the PE pipe out and the center dashpad nut.
Most likely broken part on heater control. Once the dash pad is off, there is a single screw that holds the double plastic vent that needs to be removed to make a little more room to get the heater control assembly out. I pulled the whole assembly and cables out together making sure not to get any sharp bends in the cable. I was able to pull the cables from the right side and then the right side of the assembly and the the left side of the assembly and then left cables.
Here is what I am replacing. The cracked one is orginal color. The back one was gray and I used interior paint on it. Both have Armorall on them.
Last edited by Terrys87; Oct 28, 2013 at 12:14 AM.
Dec 14, 2012 | 01:50 AM
#373
Thread Starter
Super Moderator
iTrader: (1)
Joined: Aug 2008
Posts: 11,787
Likes: 28
From: Anderson Missouri
I have been wanting my Runner to be as useful as possible and came up with the idea to add more storage (for junk..lol) and took some door pockets off of a 2nd gen runner as I dont have alot to choose from here in this part of the country.
I took a door pocket and had to take a cut off wheel and knock down the tall tabs. On the Runner I pulled it from it was only being held by 4 screws. Haynes Manual has a great descrition for getting your door panel off.
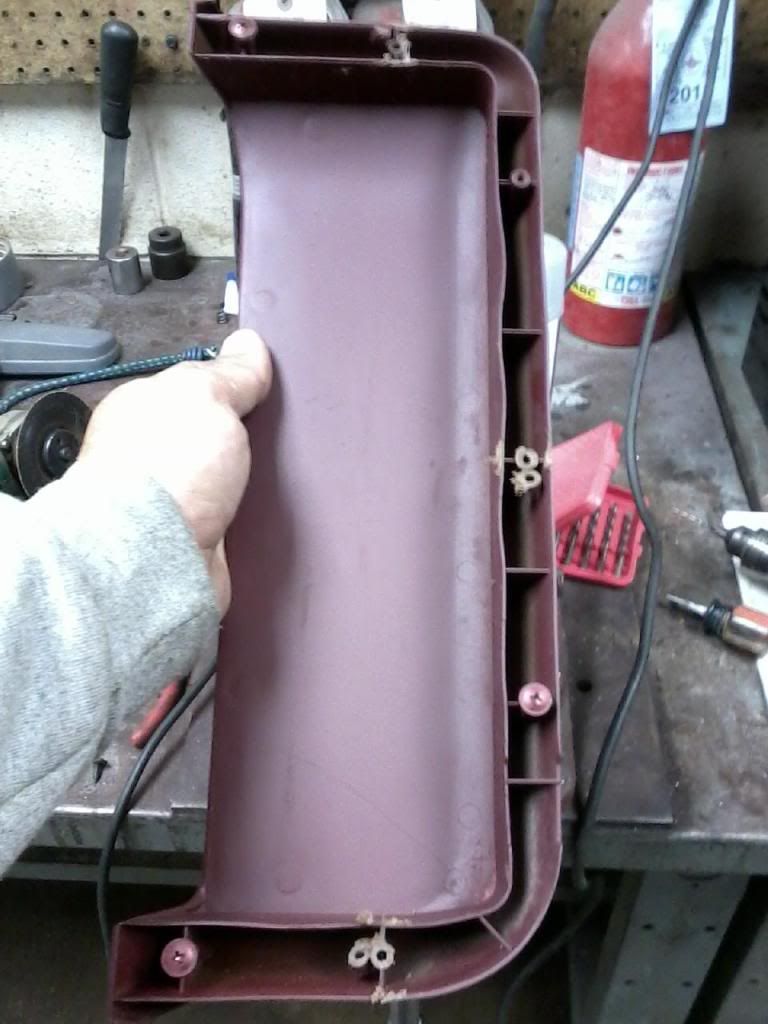
I then figured where I wanted it and put a dab of weater seal on the screw holes and set it where I wanted it so as to know where to make the screw holes. I used about the smallest drill bit I had and made a small hole and ran the screws in from the back side then mounted it to the door panel.
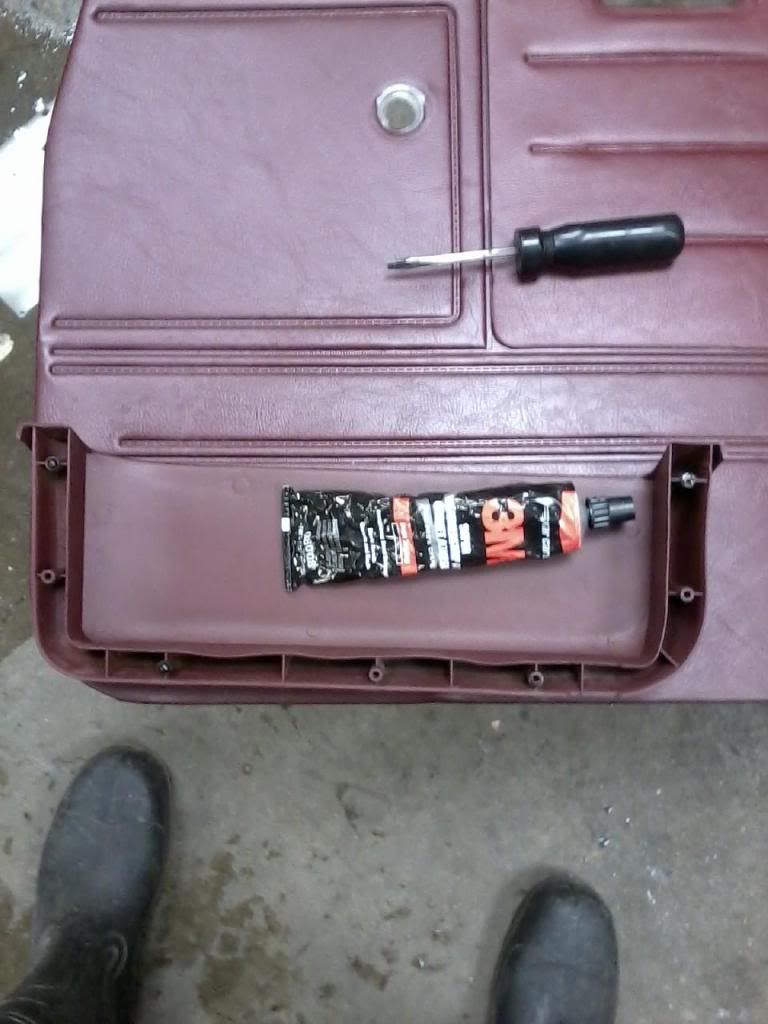
Here it is done and is the way the 2nd gen was mounted. Wont take heavy items but will work for what I need. I got it off of a brown truck and did have to paint it.
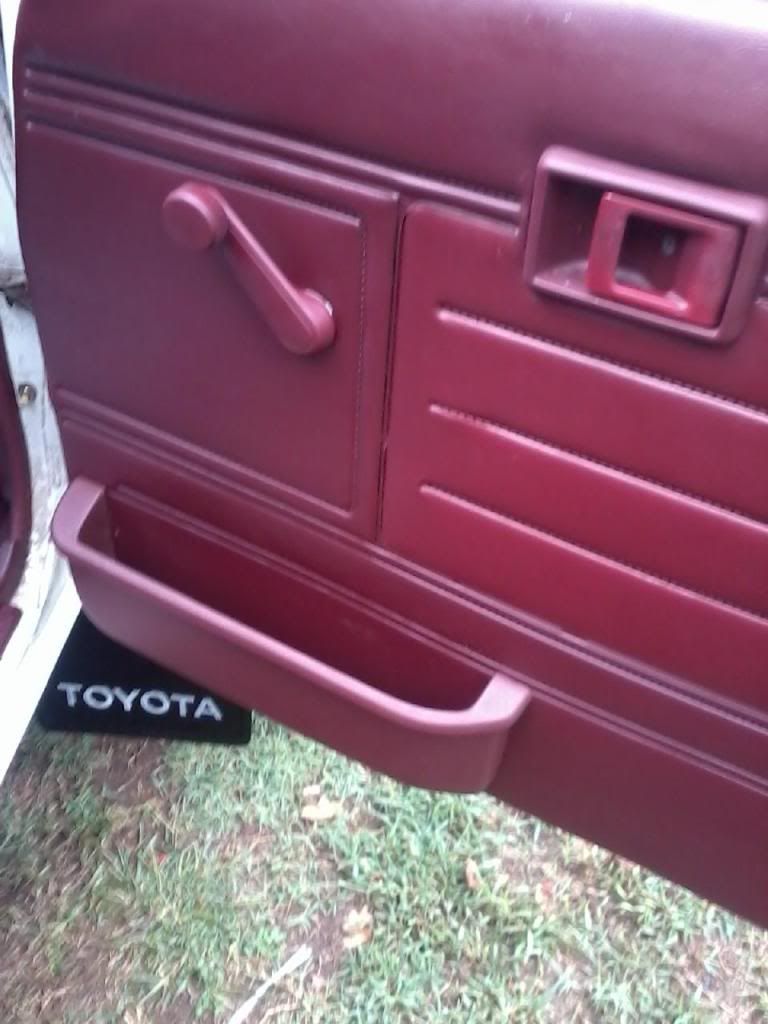
While in the boneyard awhile back, I found some side pockets for th rear passengers. I always seen to get the plain jane trucks and like looking for what else they had to offer and upgrade mine.
Dont know what I really needed them for but still like the idea of having them. I was apprehensive about cutting and possibly destroying some good panels, but figured since I was taking the chance, may as well as go big, so I used a cutoff wheel. It worked GREAT!! It is the only way to do it and get a good clean cut. I was going to use a razor knife, but am glad I decided to be brave.
I marked the backside and using the cutoff wheel, I was allowing for a tight fit and room for error and did have to go back and knock out some a little at a time.

Here they are done. I need to paint the buckets and will do that later today. Still need to do some repair on the hard plastic panels as mine are really brittle and get it all finished up. Still need to wire my rear speakers in and this should be the last time I need to have the panels off. Bad cell phone pics, but will work I guess.

Here is how I am repairing my rear panels and also I used this stuff with a dab of glue around the edges of the pockets to help hold them to the side panels. I used the cutoff wheel and knocked off the tabs that are located on the edge of the side pockets trim. No way am I good enough to match the holes to the panles.

I have been working on getting the trim pieces that I had been missing replaced. Some were broken or cracked so had to make due with what I could get.
I worked on my side trims. One was broke and another cracked in the same place about to break. I super glued them and then put some 2 part epoxy on the back for more stability.
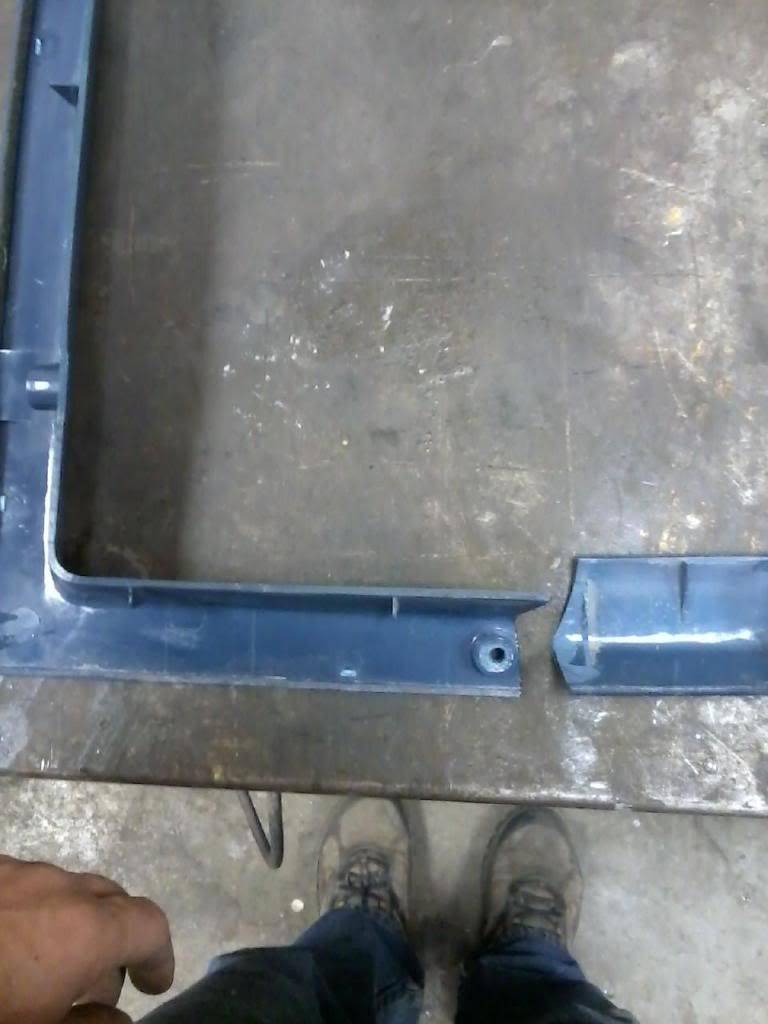
Here is what I used. I have them painted. It is really solid now. Crack still shows, but it better then it was.
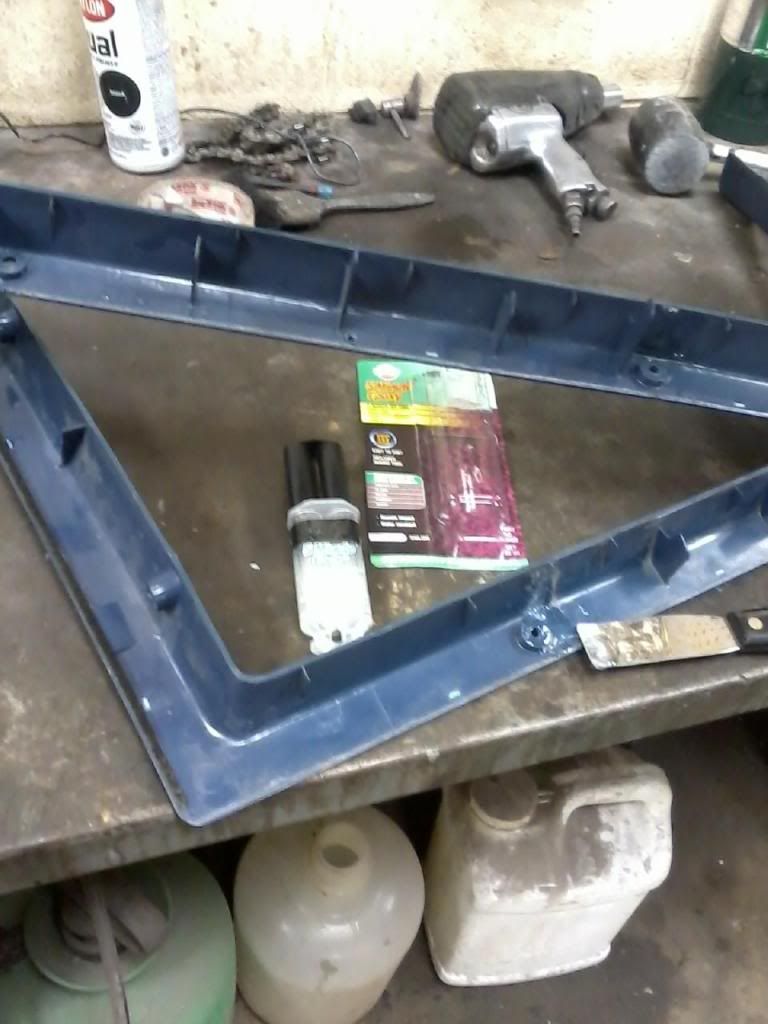
Got my mudflap on awhile back and finally got it painted up like the rest. I got alot of road grime on the body that will need some rubbing compound to get off.
I just got done changing the oil and filter, and the time befor that, I had it done. I dont like the way the drain bolt twisted into the pan. It didnt feel stripped but it used to spin all the way in til it bottomed out. Grrr...
Waiting for the repaired and painted pieces to dry and will be getting them back in today, also got my rear speakers hooked up. When I put all of the trim in it should be the last time.
The only trim I am missing is the 4 pieces that cover the back seats til brackets. The ones I got each had a broken clip, but will live without those for awhile.
I talked to my friend today, and soon as we can get a chance we are going to swap out my tcase. I have been pricing seat upholstry and WOW!!!, I think I found a new career. That stuff is expensive. So for now I am looking for some seat covers off of ebay or something. I think I want to get the sport look.
It is getting down to detail work and there is actually quite a bit of small things to do. I can see the finish line, but just cant quite reach it.
Parts Stores sell this if you want to try and bring back to life, didnt see different colors. But think it would look good if they had colors to the body.

Here is what I have to deal with, Pickins is slim around here.

Here is what I used to fix. Works great.

I got my tail light conversion kit, still need to get it installed and need a drop hitch. I do alot of pulling. Its PN# 43315.
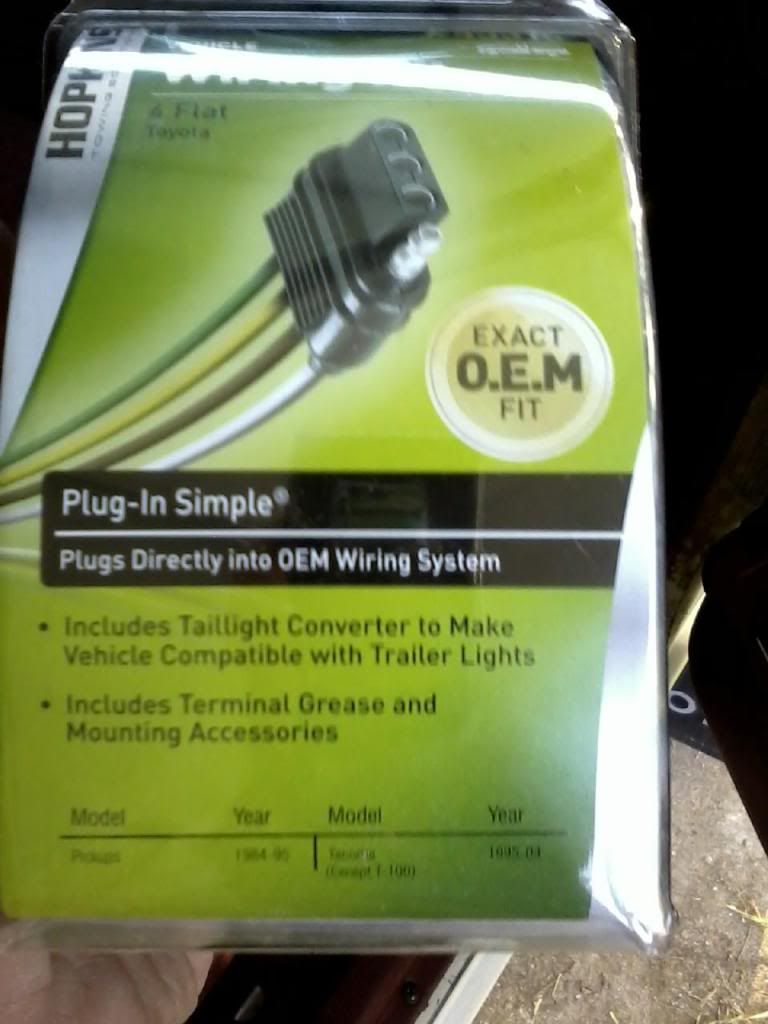
Adding a maplight. Will update when I finish on my 86.
I had the windshield out and so I peeled the headliner back a little and slid it in. Then put the trimming back in to hold the liner back in place.
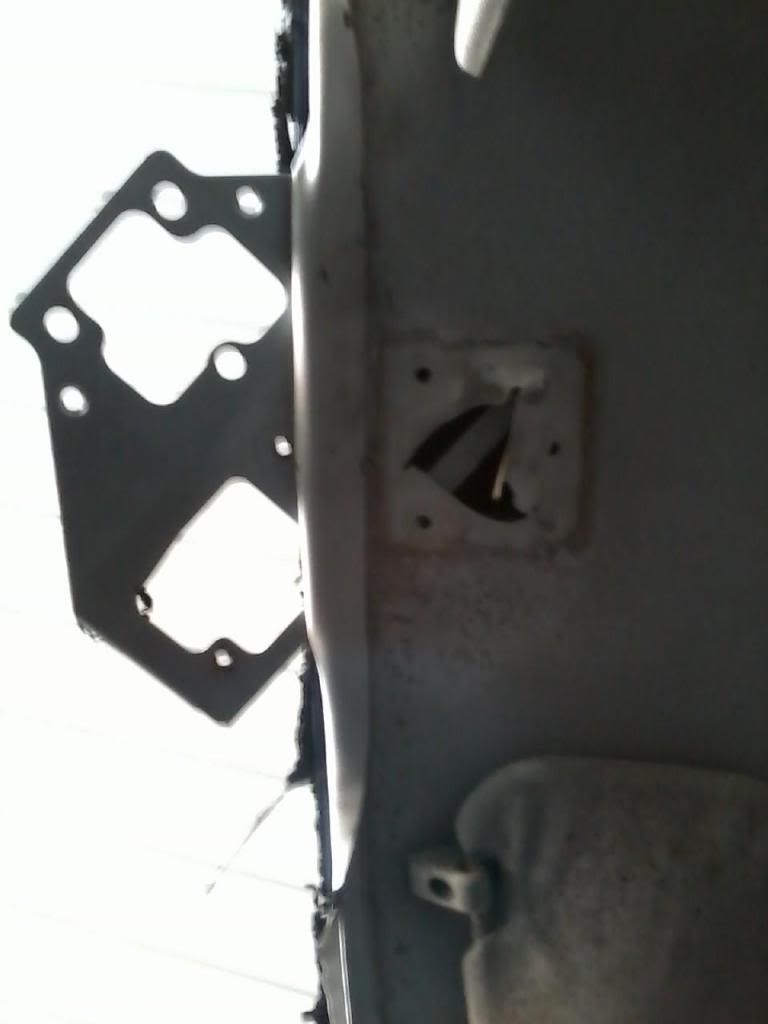
Then where the mirror goes I usd the mirror screws to hold it so I could cut the liner for the recess for the light assembly.
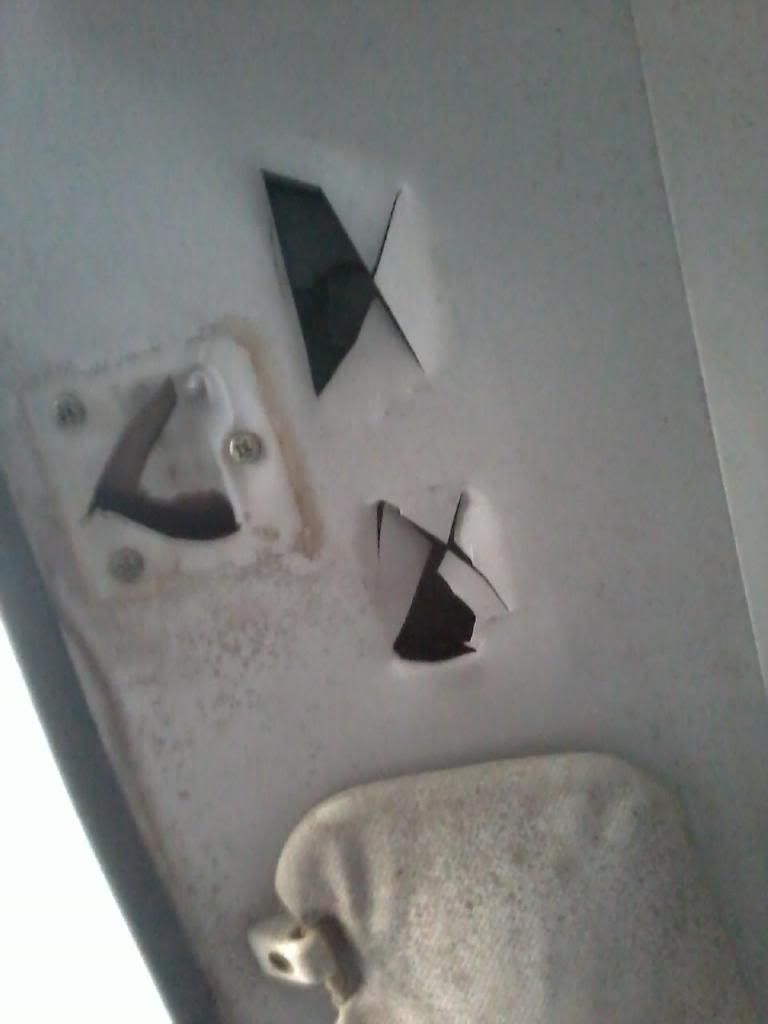
Here it is mounted. I still need to run the wiring. I have always added a standard cab pick up to my 4runners or extended cab trucks as the light that mounts in the center isnt much use for the driver. I run the wire to the top left corner for electrical. I show this in my 88 build and when I do it on this one I will update it. Been cleaning the headliner and have aways to go.
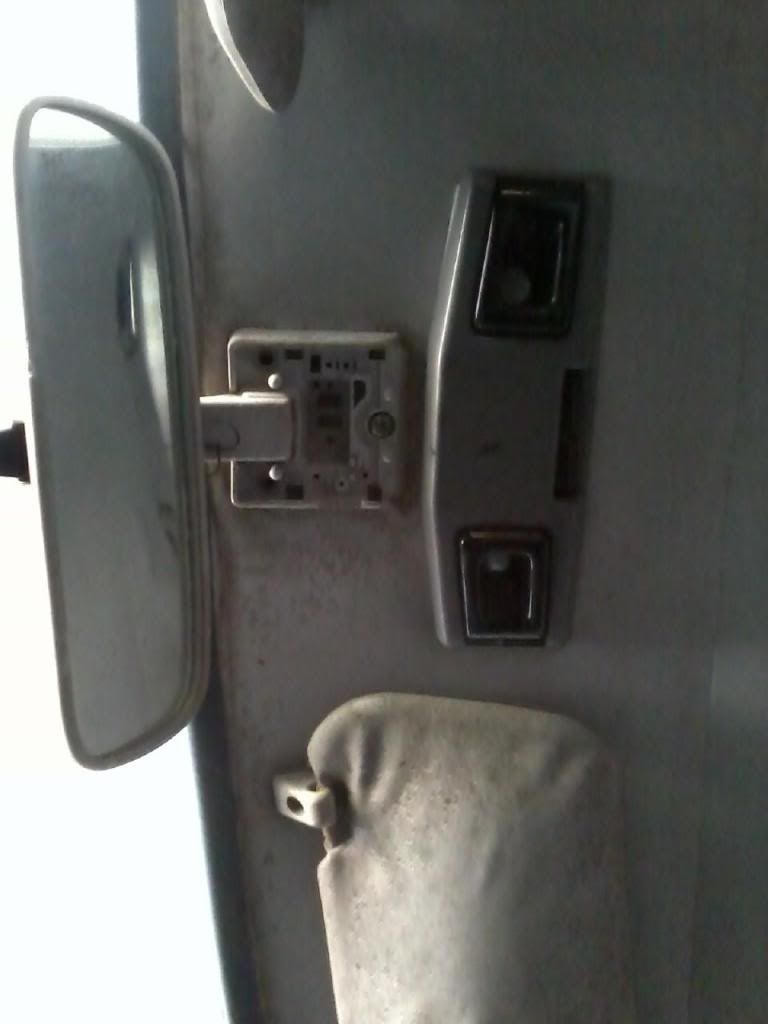
The SR5s have a maplight and rear overhead light. I plan on wiring it and will have 3 lights. Map,Overhead and Mirror light. I take a standard cab light and add it to an extended cab or 4Runner and it is really useful. Most boneyard have standard cabs and most will be missing or broken. If I have to use a broken one, I just move the guts from a broken to a dummy plug. I did this as a spare for the 88, but now I will move the red spare to my white dummy for a mirror.
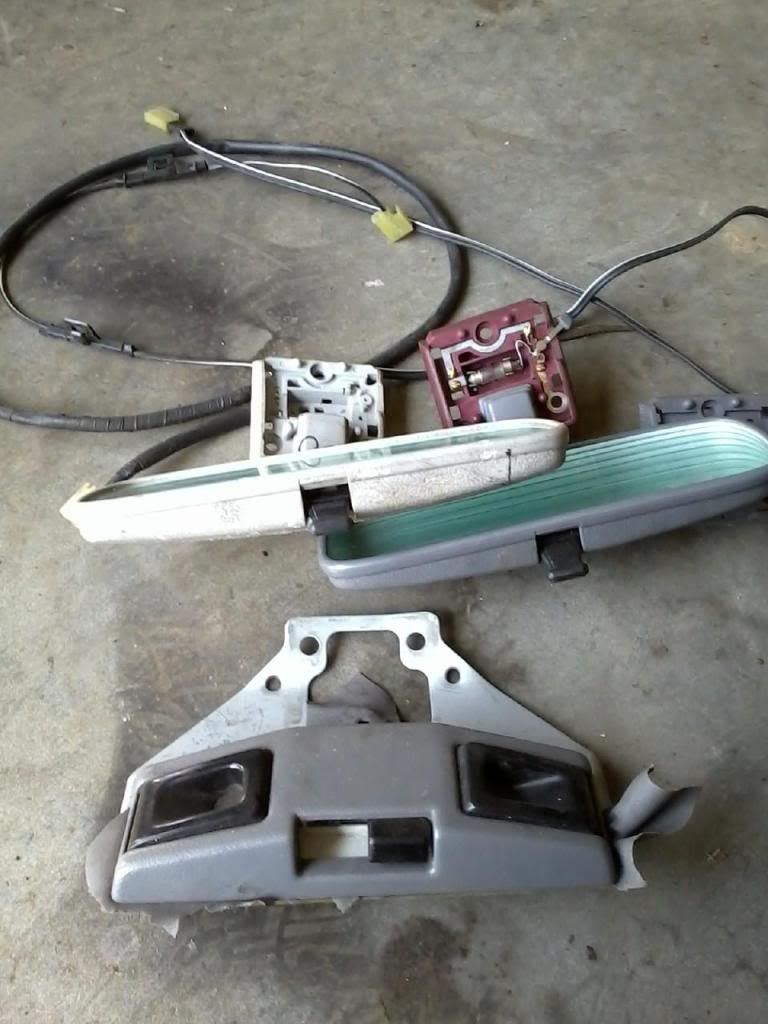
This is going to be my Fuel Injector notes page. FIXED!!! The connections will pass a resistance check, but wont let voltage fire the injectors. Remove the clips and splice,solder,and shrink wrap wire connection. I then wrapped splice with electrical tape.
Good wiring diagram........... https://www.yotatech.com/forums/f115...e-help-178975/

Different Injectors.............https://www.yotatech.com/forums/f116...ectors-127606/

Correct Ground Locations.... https://www.yotatech.com/forums/f116...-guide-194413/
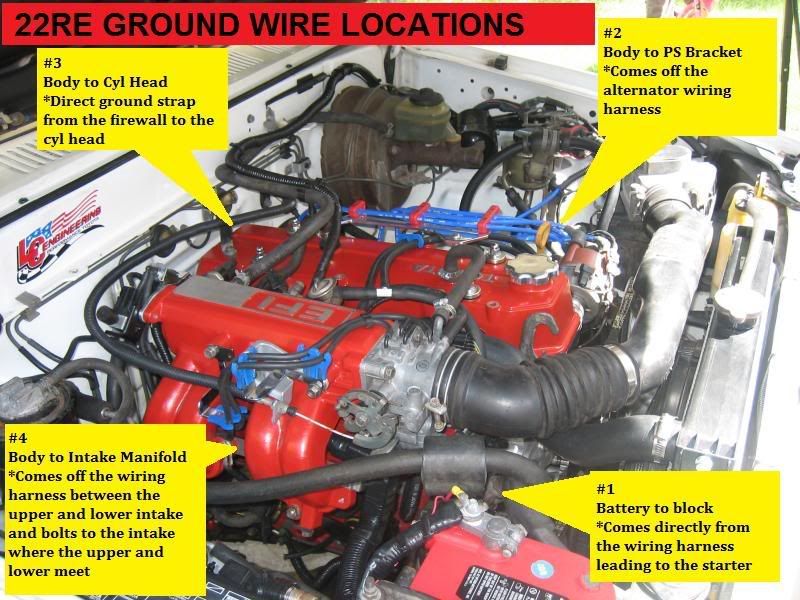
Pinout for ECU.... .............. http://media.photobucket.com/image/1...outdiagram.jpg

Add Ground to ECU by Trailgear.. Link I found on Trailgear no longer works. I just ran a ground wire from the external part of the case to a good ground on the body.
Redo wire connections.
Check all grounds........................................... .................................................. .........................Checked Grounds from above link.
Check wire harness ground on intake manifold.......................................... .......................................Checked Good
Check Solenoid Resistor. Haynes page 4-10 13.22b............................................ .............................Tested Good, supposed to have 2-3 Ohms, I have 3 Ohms.
Check EFI Main Relay Haynes page 4-9................................................. ........................................Tested Good Supposed to have 60-80, I have 71 Ohms.
Ohms for 86 Injectors are 1.5-3.0 all others are listed on Haynes page 4-2................................................. .....All tested 3 Ohms.
Run resistance checks on harness........................................... .................................................. ...Ran resistance test and passed, believe connections wont pass proper voltage.
#10 and #20 are apparently the ground pins on ECU. Hoping not have to go that far.
Here is something I found on Toyota Nation. Sounds alot like my problem.
[quote]I found the problem!!! The ECU and Igniter are not component that fail very often, the problem is the wire. The main engine harness contains two wires from the ECU that are spliced and split into 4 wires at the injectors. For some reason Toyota decided to splice this circuit inside the largest portion of the wire bundle. The problem with this is that where the two wires (white with blue tracer, and white with red tracer) from the ECU are spliced with the four wires from the injectors(same colors as above), the insulation is removed exposing the copper conductor to potential corrosion and breakage. Upon inspection, these wires may appear to be fine, and may even ring out when tested with a continuity meter, but in my case, the corrosion had progressed beneath the wire insulation for 8-10 inches, and compromised the copper and it's ability to carry the pulse signal to ground through the ECU circuit.
The fix is to remove the tape and protective coating from the main harness between the intake manifold and the fuse box under the hood, you may notice green corrosion on the wires in question where the mechanical crimp splice is made. 10-12 inches of these wires may need to be removed and replaced with new copper conductors. Both sets of conductors from the injectors are common, so you'll need to figure out how to properly connect the two leads from the ECU to the 4 leads from the injectors. In my case I trimmed the wire back until I had good continuity to both ends, and soldered new leads on, encasing them in 3M scothcote electrical coating and heat shrink insulated tubing.
My 87 4Runner runs like a charm. I still can't believe Toyota engineered it that way, but this fix is much cheaper than replacing igniters and ECU's. Hope this helps anyone/everyone. [Quote}
Here is a problem. The crimp can look good but needs replaced.
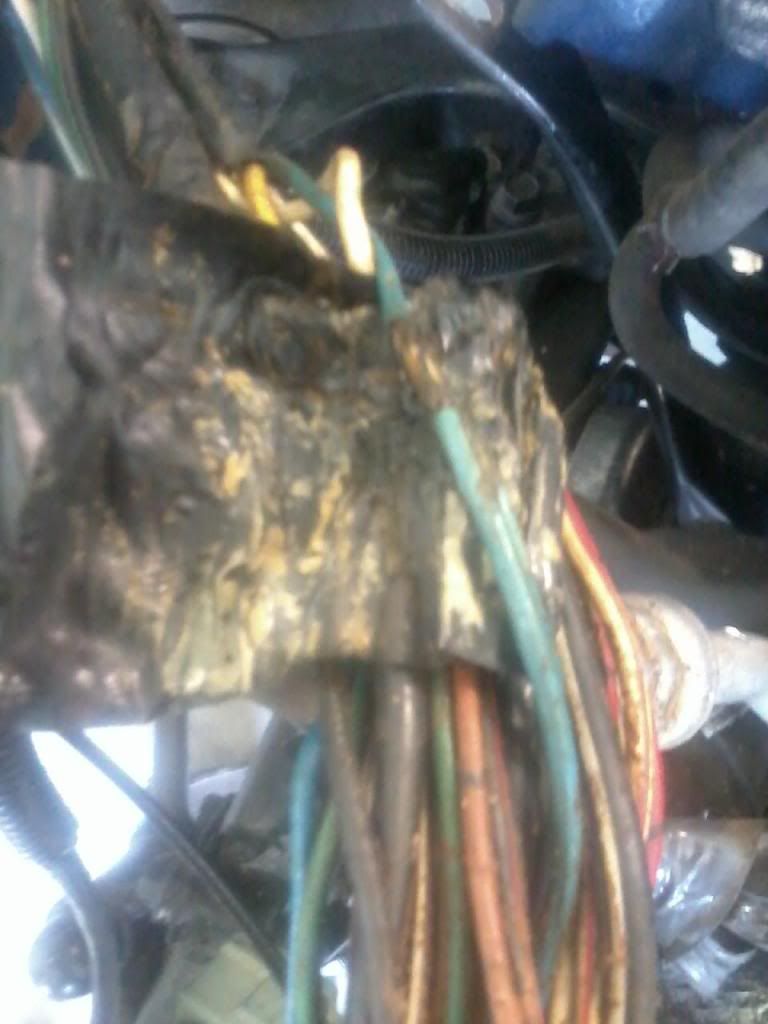
Earlier today I was looking on Craigslist and someone had some blinker covers for sale saying they had the factory clear coat on them. For some reason, I never thought of clear coating mine and since I just got one recently thought what could it hurt.
In the past I always used rubbing compound and gave them a good waxing. That helped but usually have to go back and do it again every so often. I am going to give this a try. It helps to add a newer look to the truck and will be doing my other covers like this.
I have a 89-95 tail light cover that I am going to practice on and see how it turns out.
Faded as most are.
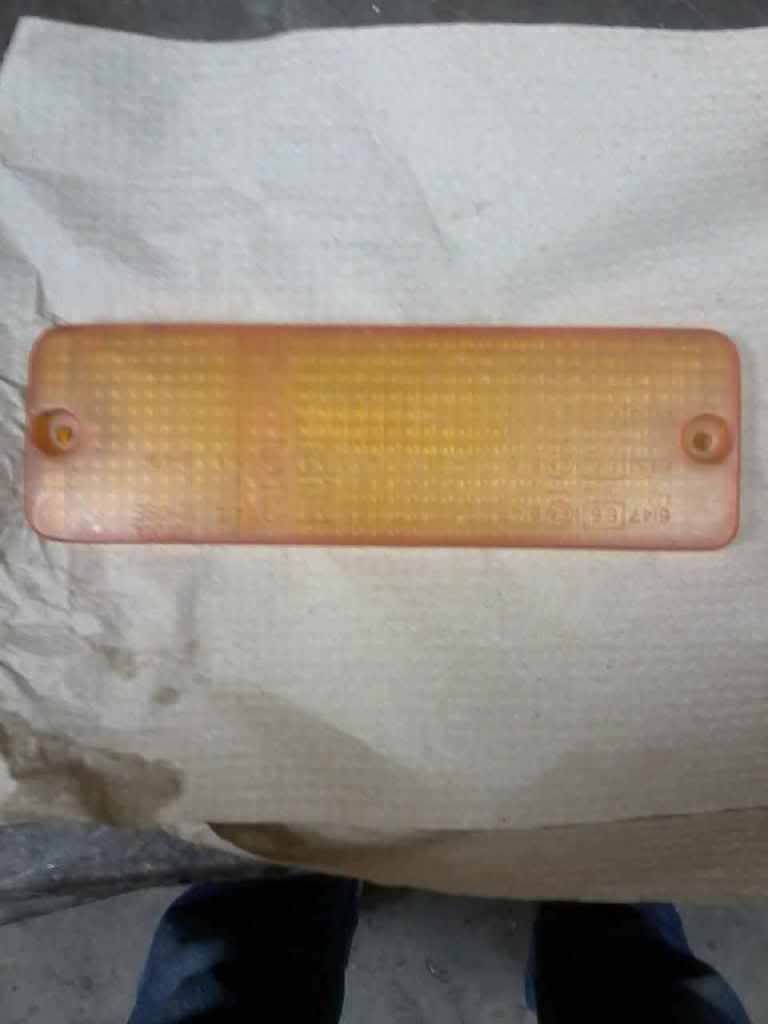
Cleared and looking newer.
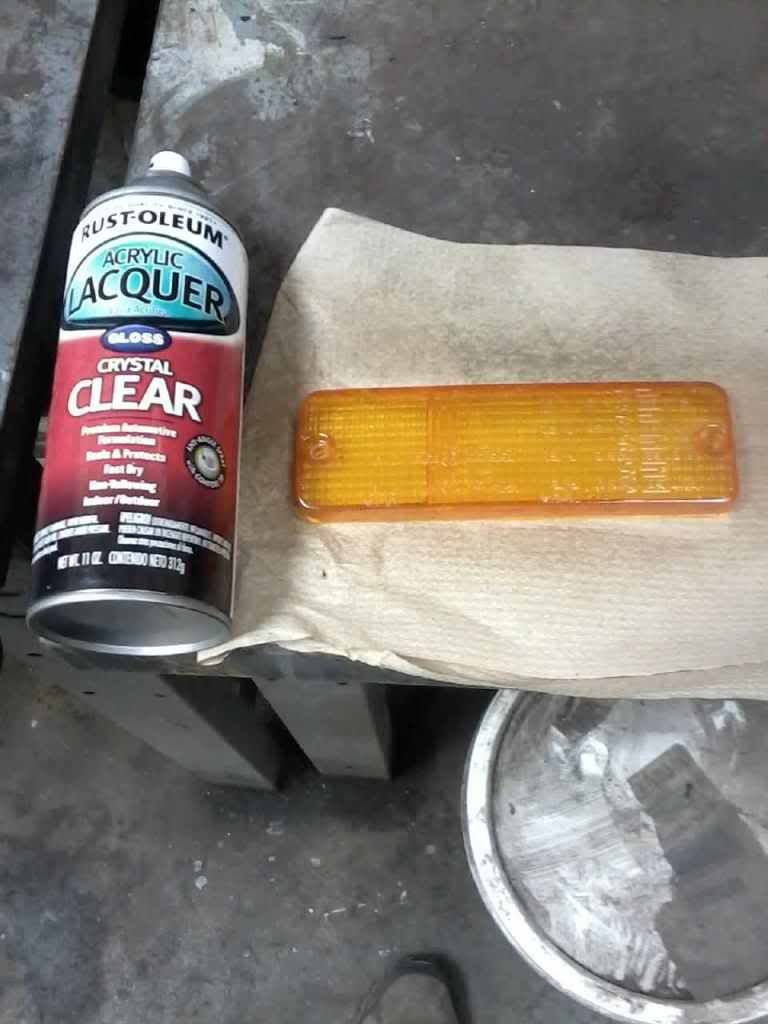
wanted to see how it would look clear coating a tail light off of a 89-95 tail light. It helped it out alot. It looks alot better in person. I put a light coat on the inside of the lense also.
Before
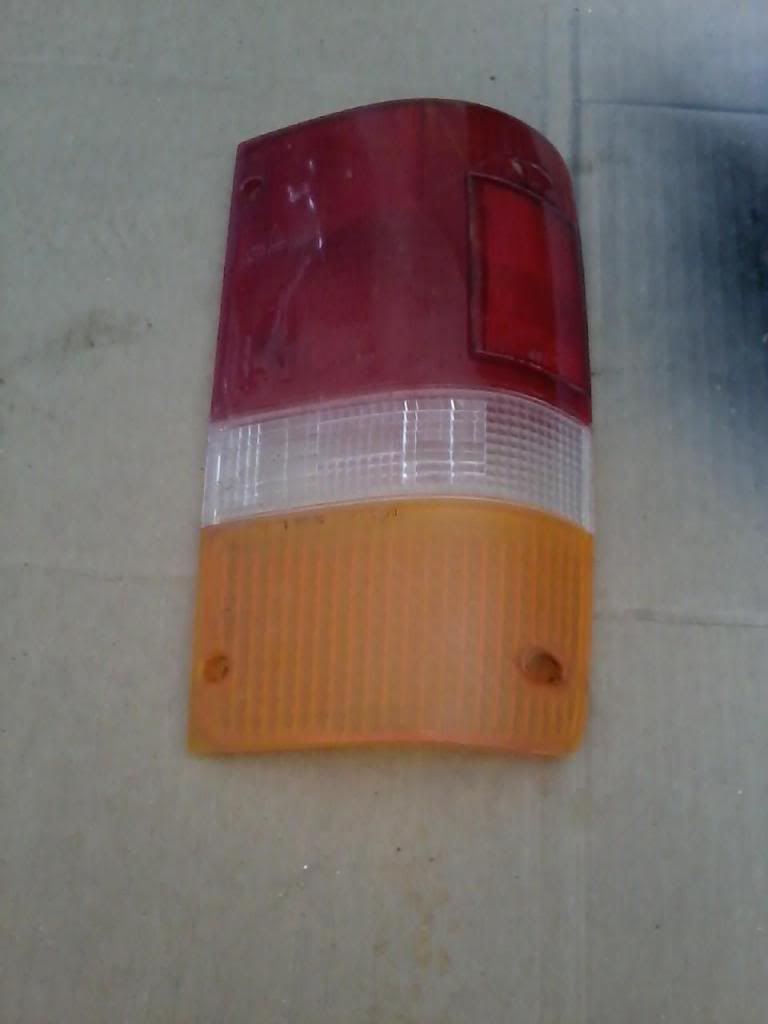
After
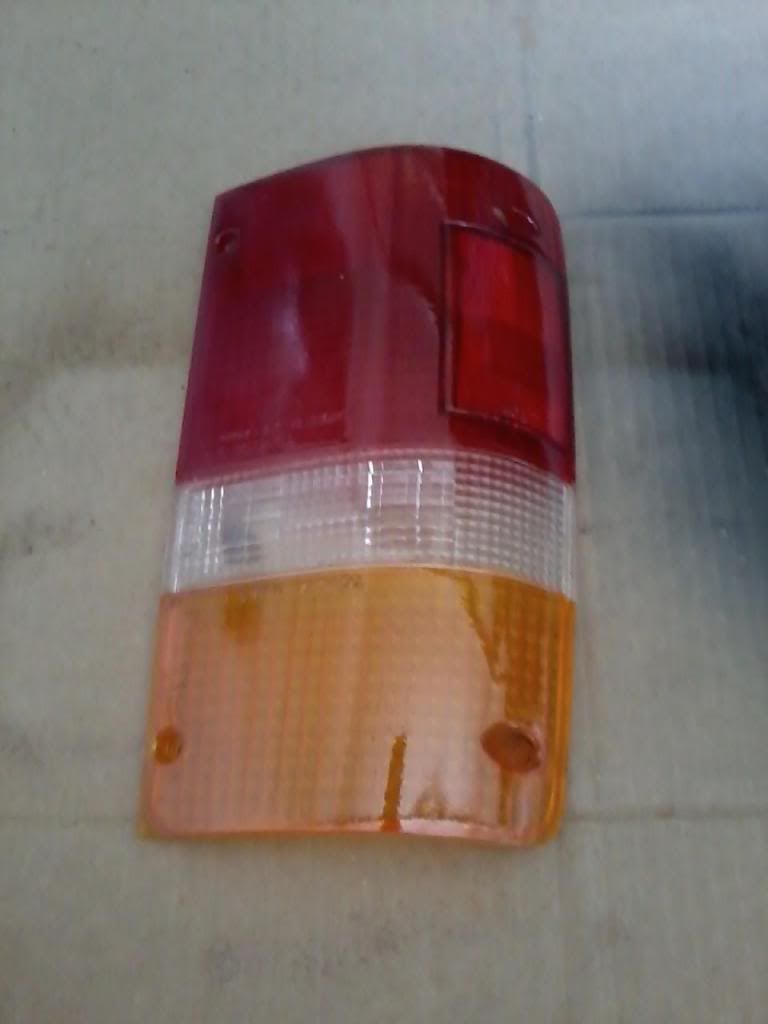
I took a door pocket and had to take a cut off wheel and knock down the tall tabs. On the Runner I pulled it from it was only being held by 4 screws. Haynes Manual has a great descrition for getting your door panel off.
I then figured where I wanted it and put a dab of weater seal on the screw holes and set it where I wanted it so as to know where to make the screw holes. I used about the smallest drill bit I had and made a small hole and ran the screws in from the back side then mounted it to the door panel.
Here it is done and is the way the 2nd gen was mounted. Wont take heavy items but will work for what I need. I got it off of a brown truck and did have to paint it.
While in the boneyard awhile back, I found some side pockets for th rear passengers. I always seen to get the plain jane trucks and like looking for what else they had to offer and upgrade mine.
Dont know what I really needed them for but still like the idea of having them. I was apprehensive about cutting and possibly destroying some good panels, but figured since I was taking the chance, may as well as go big, so I used a cutoff wheel. It worked GREAT!! It is the only way to do it and get a good clean cut. I was going to use a razor knife, but am glad I decided to be brave.
I marked the backside and using the cutoff wheel, I was allowing for a tight fit and room for error and did have to go back and knock out some a little at a time.
Here they are done. I need to paint the buckets and will do that later today. Still need to do some repair on the hard plastic panels as mine are really brittle and get it all finished up. Still need to wire my rear speakers in and this should be the last time I need to have the panels off. Bad cell phone pics, but will work I guess.
Here is how I am repairing my rear panels and also I used this stuff with a dab of glue around the edges of the pockets to help hold them to the side panels. I used the cutoff wheel and knocked off the tabs that are located on the edge of the side pockets trim. No way am I good enough to match the holes to the panles.
I have been working on getting the trim pieces that I had been missing replaced. Some were broken or cracked so had to make due with what I could get.
I worked on my side trims. One was broke and another cracked in the same place about to break. I super glued them and then put some 2 part epoxy on the back for more stability.
Here is what I used. I have them painted. It is really solid now. Crack still shows, but it better then it was.
Got my mudflap on awhile back and finally got it painted up like the rest. I got alot of road grime on the body that will need some rubbing compound to get off.
I just got done changing the oil and filter, and the time befor that, I had it done. I dont like the way the drain bolt twisted into the pan. It didnt feel stripped but it used to spin all the way in til it bottomed out. Grrr...
Waiting for the repaired and painted pieces to dry and will be getting them back in today, also got my rear speakers hooked up. When I put all of the trim in it should be the last time.
The only trim I am missing is the 4 pieces that cover the back seats til brackets. The ones I got each had a broken clip, but will live without those for awhile.
I talked to my friend today, and soon as we can get a chance we are going to swap out my tcase. I have been pricing seat upholstry and WOW!!!, I think I found a new career. That stuff is expensive. So for now I am looking for some seat covers off of ebay or something. I think I want to get the sport look.
It is getting down to detail work and there is actually quite a bit of small things to do. I can see the finish line, but just cant quite reach it.
Parts Stores sell this if you want to try and bring back to life, didnt see different colors. But think it would look good if they had colors to the body.
Here is what I have to deal with, Pickins is slim around here.
Here is what I used to fix. Works great.
I got my tail light conversion kit, still need to get it installed and need a drop hitch. I do alot of pulling. Its PN# 43315.
Adding a maplight. Will update when I finish on my 86.
I had the windshield out and so I peeled the headliner back a little and slid it in. Then put the trimming back in to hold the liner back in place.
Then where the mirror goes I usd the mirror screws to hold it so I could cut the liner for the recess for the light assembly.
Here it is mounted. I still need to run the wiring. I have always added a standard cab pick up to my 4runners or extended cab trucks as the light that mounts in the center isnt much use for the driver. I run the wire to the top left corner for electrical. I show this in my 88 build and when I do it on this one I will update it. Been cleaning the headliner and have aways to go.
The SR5s have a maplight and rear overhead light. I plan on wiring it and will have 3 lights. Map,Overhead and Mirror light. I take a standard cab light and add it to an extended cab or 4Runner and it is really useful. Most boneyard have standard cabs and most will be missing or broken. If I have to use a broken one, I just move the guts from a broken to a dummy plug. I did this as a spare for the 88, but now I will move the red spare to my white dummy for a mirror.
This is going to be my Fuel Injector notes page. FIXED!!! The connections will pass a resistance check, but wont let voltage fire the injectors. Remove the clips and splice,solder,and shrink wrap wire connection. I then wrapped splice with electrical tape.
Good wiring diagram........... https://www.yotatech.com/forums/f115...e-help-178975/
Different Injectors.............https://www.yotatech.com/forums/f116...ectors-127606/
Correct Ground Locations.... https://www.yotatech.com/forums/f116...-guide-194413/
Pinout for ECU.... .............. http://media.photobucket.com/image/1...outdiagram.jpg
Add Ground to ECU by Trailgear.. Link I found on Trailgear no longer works. I just ran a ground wire from the external part of the case to a good ground on the body.
Redo wire connections.
Check all grounds........................................... .................................................. .........................Checked Grounds from above link.
Check wire harness ground on intake manifold.......................................... .......................................Checked Good
Check Solenoid Resistor. Haynes page 4-10 13.22b............................................ .............................Tested Good, supposed to have 2-3 Ohms, I have 3 Ohms.
Check EFI Main Relay Haynes page 4-9................................................. ........................................Tested Good Supposed to have 60-80, I have 71 Ohms.
Ohms for 86 Injectors are 1.5-3.0 all others are listed on Haynes page 4-2................................................. .....All tested 3 Ohms.
Run resistance checks on harness........................................... .................................................. ...Ran resistance test and passed, believe connections wont pass proper voltage.
#10 and #20 are apparently the ground pins on ECU. Hoping not have to go that far.
Here is something I found on Toyota Nation. Sounds alot like my problem.
[quote]I found the problem!!! The ECU and Igniter are not component that fail very often, the problem is the wire. The main engine harness contains two wires from the ECU that are spliced and split into 4 wires at the injectors. For some reason Toyota decided to splice this circuit inside the largest portion of the wire bundle. The problem with this is that where the two wires (white with blue tracer, and white with red tracer) from the ECU are spliced with the four wires from the injectors(same colors as above), the insulation is removed exposing the copper conductor to potential corrosion and breakage. Upon inspection, these wires may appear to be fine, and may even ring out when tested with a continuity meter, but in my case, the corrosion had progressed beneath the wire insulation for 8-10 inches, and compromised the copper and it's ability to carry the pulse signal to ground through the ECU circuit.
The fix is to remove the tape and protective coating from the main harness between the intake manifold and the fuse box under the hood, you may notice green corrosion on the wires in question where the mechanical crimp splice is made. 10-12 inches of these wires may need to be removed and replaced with new copper conductors. Both sets of conductors from the injectors are common, so you'll need to figure out how to properly connect the two leads from the ECU to the 4 leads from the injectors. In my case I trimmed the wire back until I had good continuity to both ends, and soldered new leads on, encasing them in 3M scothcote electrical coating and heat shrink insulated tubing.
My 87 4Runner runs like a charm. I still can't believe Toyota engineered it that way, but this fix is much cheaper than replacing igniters and ECU's. Hope this helps anyone/everyone. [Quote}
Here is a problem. The crimp can look good but needs replaced.
Earlier today I was looking on Craigslist and someone had some blinker covers for sale saying they had the factory clear coat on them. For some reason, I never thought of clear coating mine and since I just got one recently thought what could it hurt.
In the past I always used rubbing compound and gave them a good waxing. That helped but usually have to go back and do it again every so often. I am going to give this a try. It helps to add a newer look to the truck and will be doing my other covers like this.
I have a 89-95 tail light cover that I am going to practice on and see how it turns out.
Faded as most are.
Cleared and looking newer.
wanted to see how it would look clear coating a tail light off of a 89-95 tail light. It helped it out alot. It looks alot better in person. I put a light coat on the inside of the lense also.
Before
After
Last edited by Terrys87; Dec 25, 2012 at 08:30 AM.
Dec 14, 2012 | 02:15 AM
#374
Thread Starter
Super Moderator
iTrader: (1)
Joined: Aug 2008
Posts: 11,787
Likes: 28
From: Anderson Missouri
My impact wrench stopped working. It comes apart easily enough. Hoping a good cleaning will get it working again.

Diff Breather Extention.
22re Plenum fitting, 3/8th fuel line and the axle vent. I did use hose clamps but posted the pic to get the idea across. I ran it up to my gas tank which is higher then any water I will ever go thru. I have seen it ran up the rear tail light like habs link shows. Also it should work for the front diff and will eventually run mine up the fire wall or something similar.
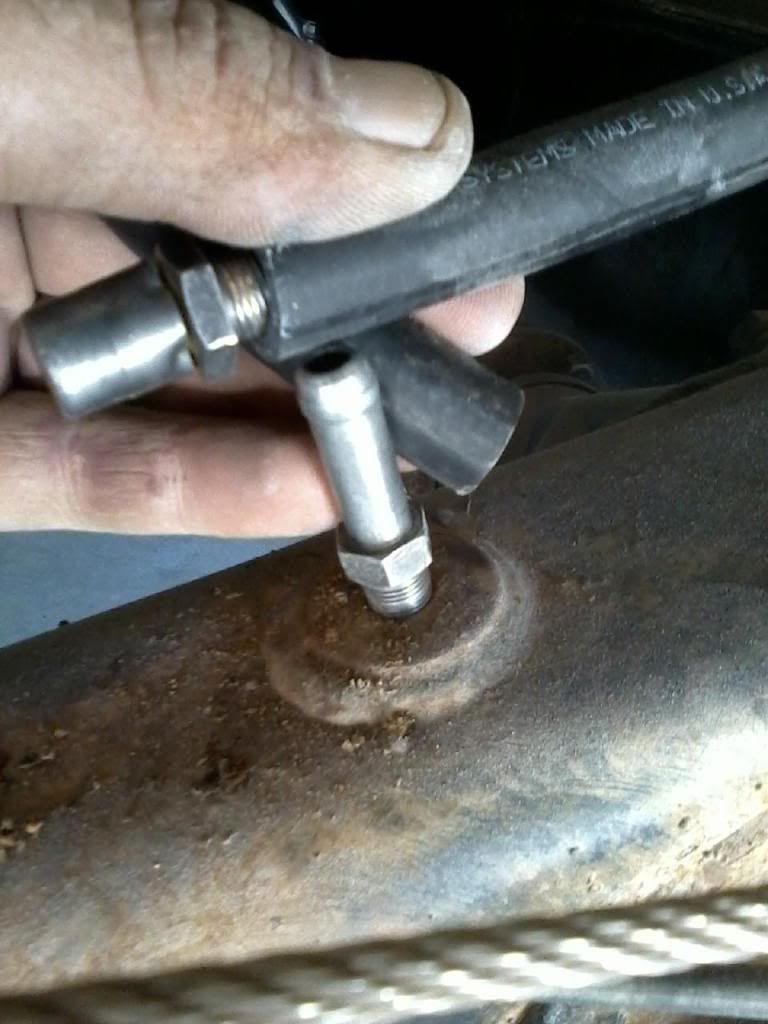
This is going to be my Front axle info post. I have been going and updating my 88 Runner Build on the 1st page.
Cone washer removal.
Seals
I like this video for solid axles.
...eature=relatedToyota Junk Yards...https://www.yotatech.com/forums/f199...-yards-149035/
Rear Dome link... https://www.yotatech.com/forums/f199.../index198.html
Rear Seal Replacement... https://www.yotatech.com/forums/f199...90/index2.html
Vacuum Line link.>>>>> http://www.pirate4x4.com/forum/showthread.php?t=579557
Steering gear box links.
http://128.83.80.200/TACO/box.html
https://www.yotatech.com/forums/f199...cement-194025/
Brake upgrade... http://www.expeditionportal.com/foru...4Runner-Brakes
__________________
Like Mark said put the water line on THEN the fuel filter. This is a rookie mistake and I will admit that I have done it in the past as well. You do it one time and have to redo alot of things to do it right and especially after it is in the truck, you wont do it again.
Pipe then Fuel Filter assembly.

I have seen these filters put on backwards. The arrow is fuel flow, the fuel comes from the tank to the front side of the filter and from the back side of the filter to the fuel rail. I have seen different styles of filters, but pay attention to the fuel flow and not necessarily by the lip on the fuel filter.

This pipe is such a pain and likes to leak that I even put a little silicone just to try to get a good seal. A big pain to get to when in the truck. Rubber seal is in its cutout in the manifold, just not easily seen.

You are supposed to wrap the Cold Start Injector Timing switch, I did all of mine.

Parts store will tell you this is a dealer item or they dont stock it. This hose likes to leak coming off of the water pump when it pops a hole. Gates PN#20801, just cut off where my finger is at. Alot cheaper then the dealer.
Here it is cut to length and on. I need to get some new hose clamps to finish the job.
Seal is dry and hardened. Reason for leak. I have a seal for the dizzy cap as well on order for Toyota.

Replaced with a seal from Orielly for .96 cents. The old one will most likely break when you go to remove it. One less oil leak now.

When doing regular maintainace, change the PVC and I change the PVC Grommet as well as it will harden up and wont let the PVC come out or break and fall into the head. I change both out at the same time.

Identifying different year 22r motors.
I got my Timing Chain on and had to replace the Timing Cover due to it being worn. I tried to use a early model 22r and they wont interchange. Thought I would put some info up to help others identify what they may have.
84 and older. 22r has no dimples/circles and the number "2" on it. Twistedyota got it right on the height thing, see the last picture for a good example. I also tried to mark which bolt holes for removing the timing cover on down the road when I have to do a chain again. Hope it wont burn off but it if does I tried to come up with an easier way. Never can remember which bolts they are.
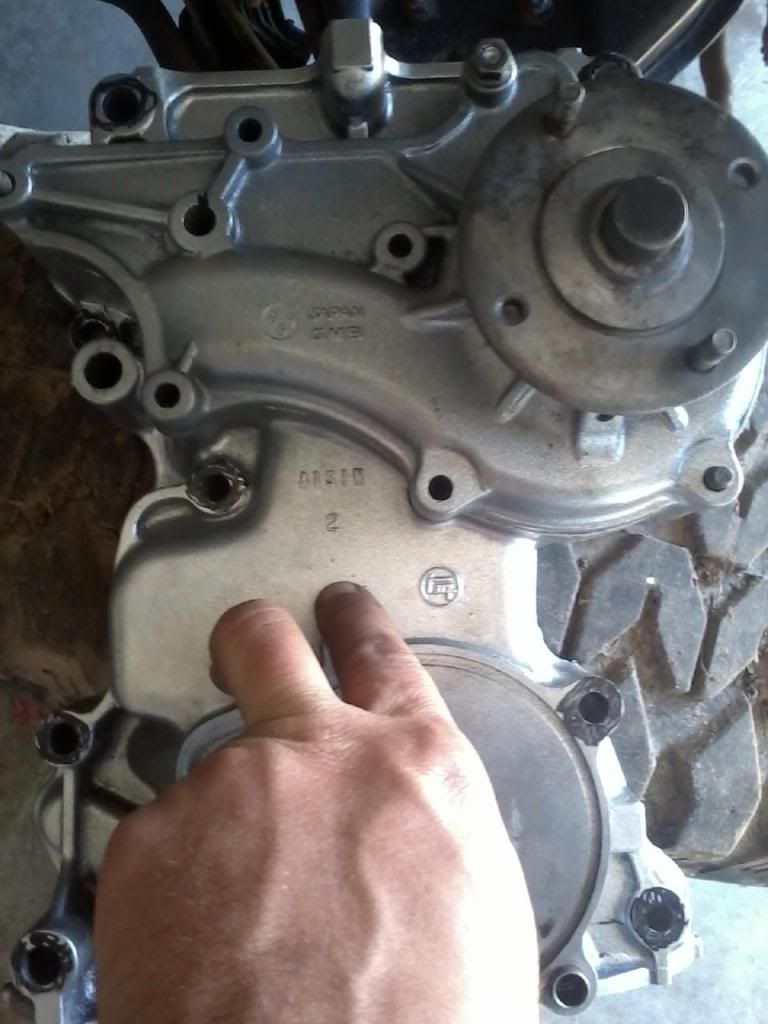
22re has "6k" and dimples/circles. 85 and up.

Here is what I am talking about on the 1/8th inch height. I used a lockwasher to help show how much of a difference. This cover is 22r. Seems like the oil pump bolts were to short. Hope this will save some one some trouble. It is an early model 22r timing cover on a newer 22re block.

Videos 86 build Post 403
have a tough time with rear brakes. Mostly notes for me. I will go and put these videos in other parts of my build.
Other Videos
Rear Seal
....Rear Pinion Seal
89-95 Runner rear window
....Solid axle seal removal
Removing Crankshaft bolt.
..........Diff Breather extenders
........Steering Stops
....Remove/ Install Hubs
.......Fuel Injector cleaning
The tab that connects the end cap to the bumper usually gets broken off and then the end cap comes up missing. Now I just drill a whole and use carriage bolts that are just a little larger then what is in the rest of the bumper, that it looks like it is factory. Most wont know the difference and I would rather have the end cap with carriage bolts instead of it missing.
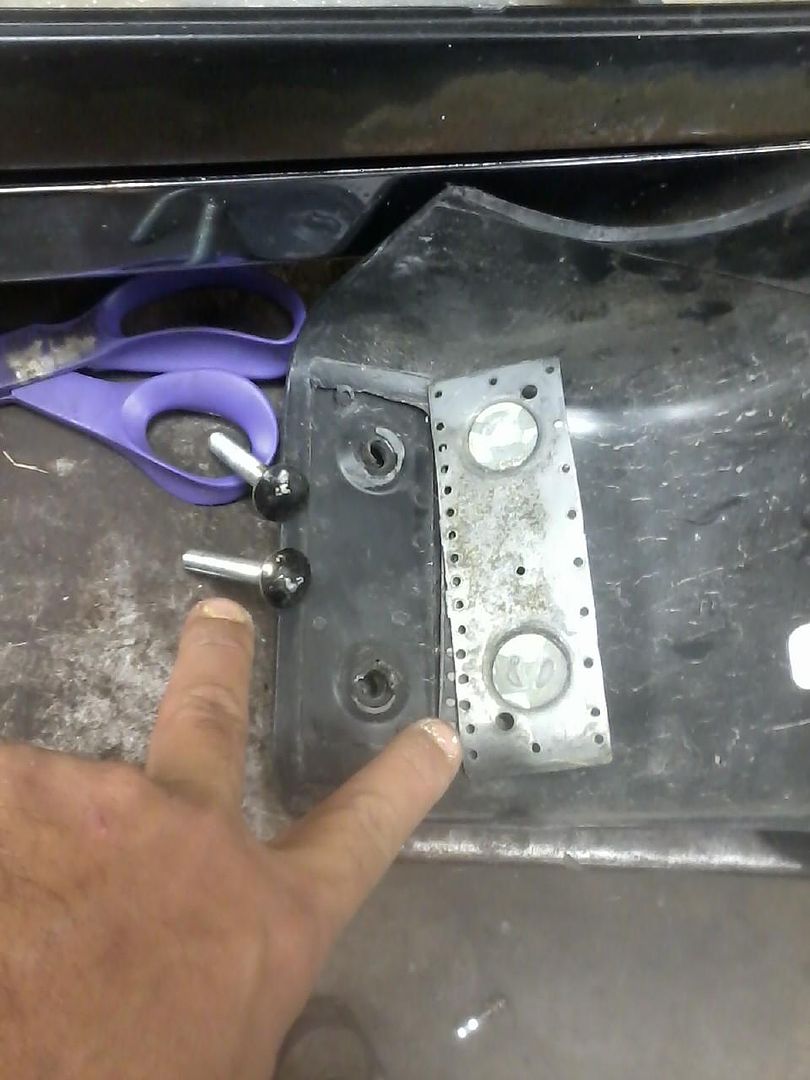
The right one is with it bolted loosely in place as I need to get some trim paint and mount the bumper tomorrow. The left side is the piece that usually seperates from the end cap. I just throw the metal tab away as I have tried several different glues and none really work that I have tried.

Got a lot done. Most of it was cleaning. The spare set I had for the left and right side are both frozen in good. I ordered a seal kit for $10, but for $35 I could of gotten a whole replacement caliper and you need a core or they will charge you nother $35. I wanted to save a few bucks and the challenge of doing it myself but would recommend just replacing the caliper.
I took the one off of my runner and it only had one piston stuck. I used C clamps to keep the pistons that I wanted to stay in and then used an air hose to force the piston out. Keep your fingers out of the way as when it does release, the piston will come out with alot of force. I then took a red brillo pad and cleaned the surface of the piston. I eventually did this to all 4 pistons in the caliper.
My caliper looked bad, but it cleaned up nice with a wire brush. Top part is what the bottom half looked like as well. Where my finger is pointing is the main seal that can be a pain to swap out. I left it in and didnt swap it out and ran test on the pistons and no air would leak out. Will test it with fluid when I have the wife or kids home to help bleed the brakes.
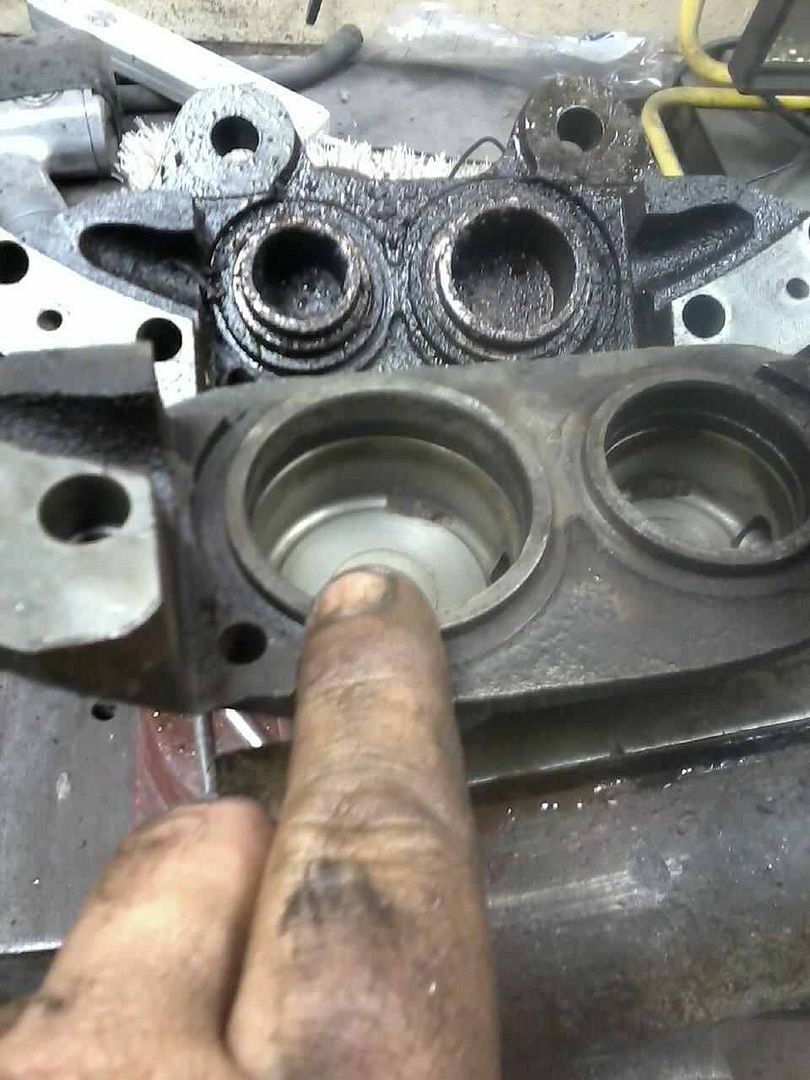
I then used a cylinder hone and cleaned the cylinder out.
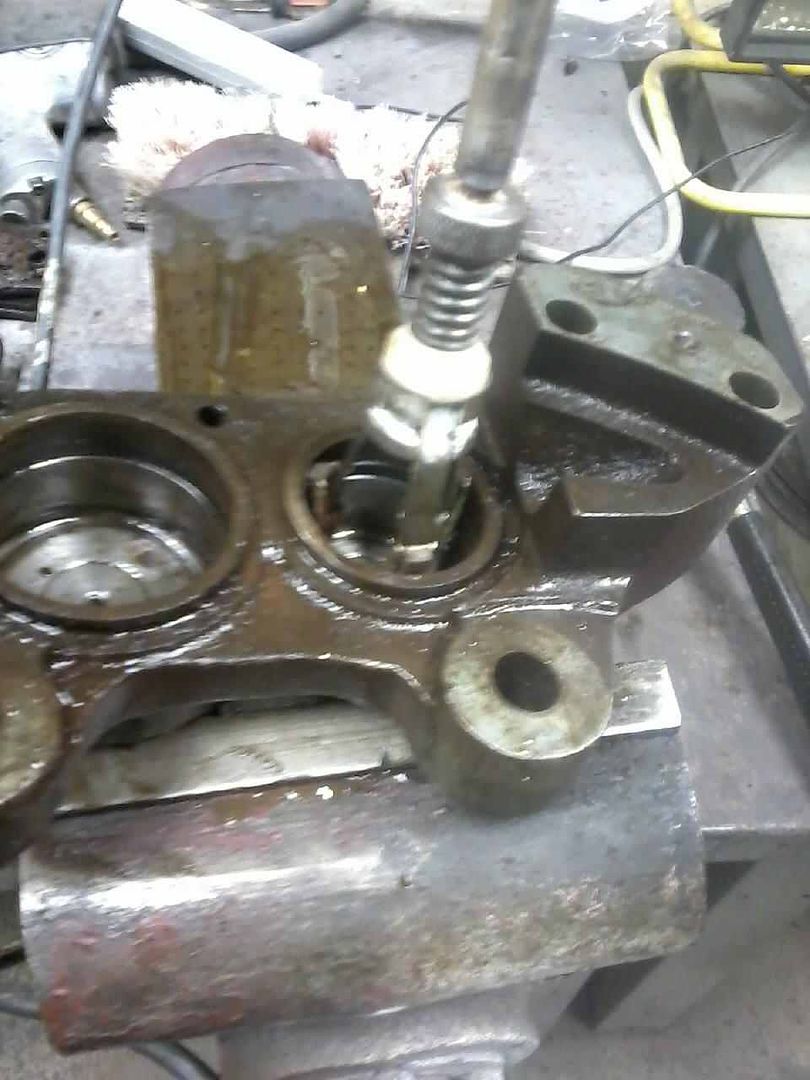
I did replace the dust covers on the pistons. Getting the wire clamp at the bottom of the piston area was made easier by lubing them with WD-40.
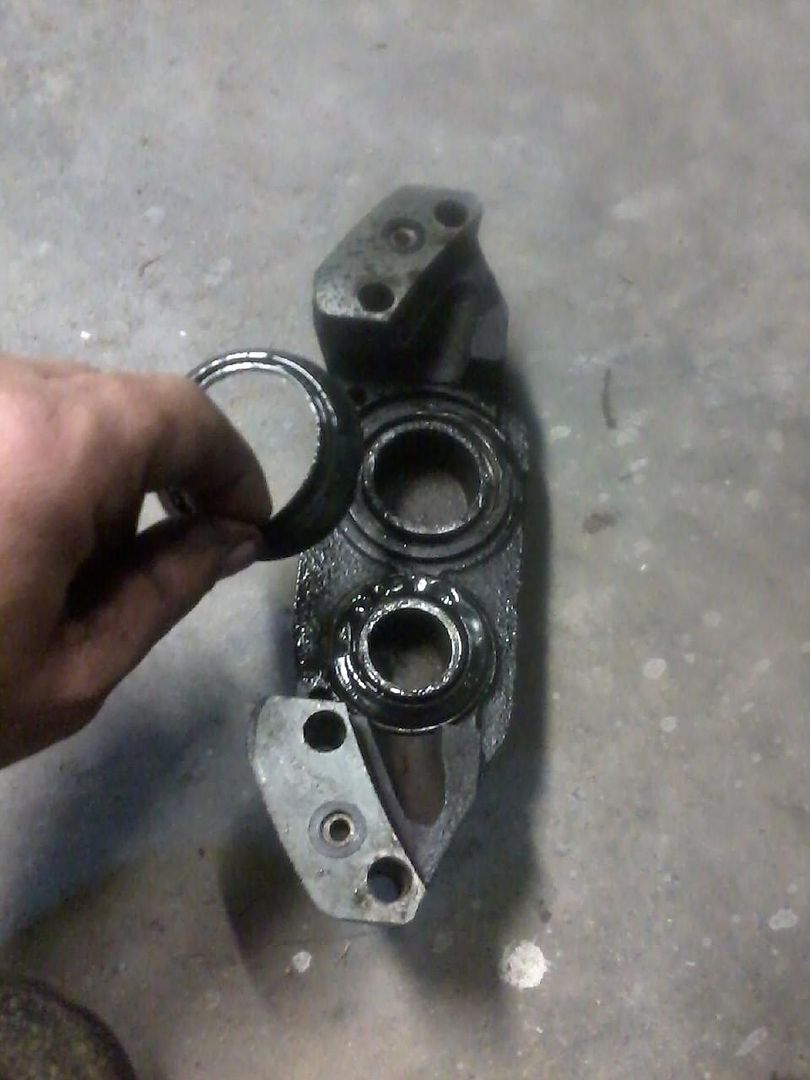
Here is the caliper and axle all cleaned and ready to go. It is actually on the truck now. Didnt get any pics of it on.
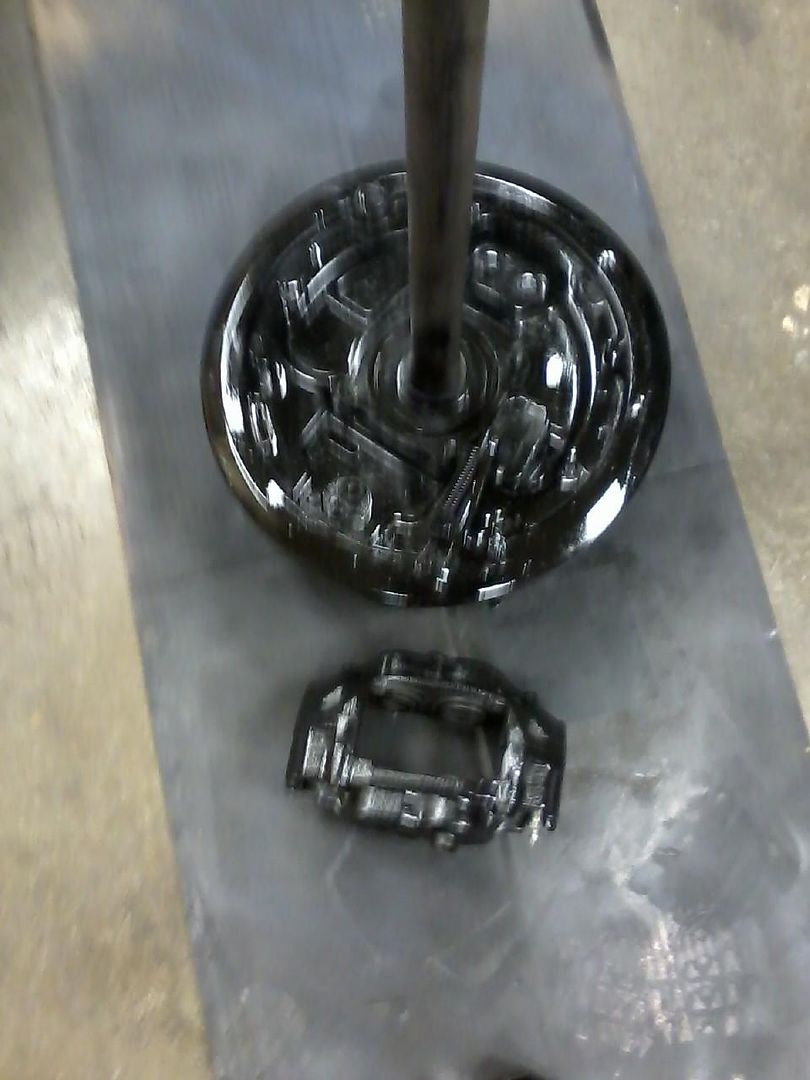
My left front brake caliper is dragging so I thought I would just pull on out of the shed and do a quick swap. That isnt going to work. The replacement caliper is in bad shape, but years ago, I used to rebuild them. Not as bad as you may think. That is if you can still get the seal kits for them. I do have a little honer to clean the walls out with.
Here is the replacement caliper. Just 4 bolts hold it together.

Here it is disassembled. Just hone the cylinder and replace the seal is what used to come in the rebuild kits. The black o rings seal against the area where my finger is.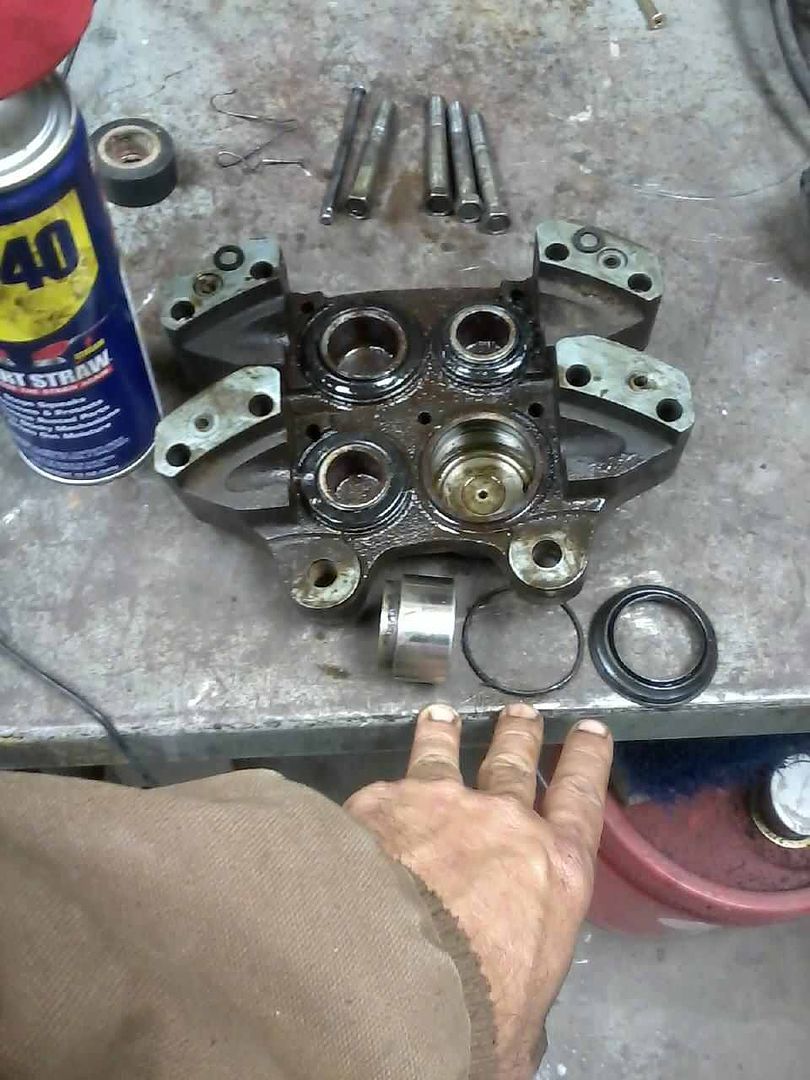
These little seals are all that seals the two pieces of the caliper together. I have the caliper soaking in WD40 and will hit them with an air hose again to get the pistons out. They look bad, but usually clean up nice with a little time and patience. My finger is showing how much it is plugged up. I try to once a year or so to flush all of the old brake fluid out to avoid alot of this mess.
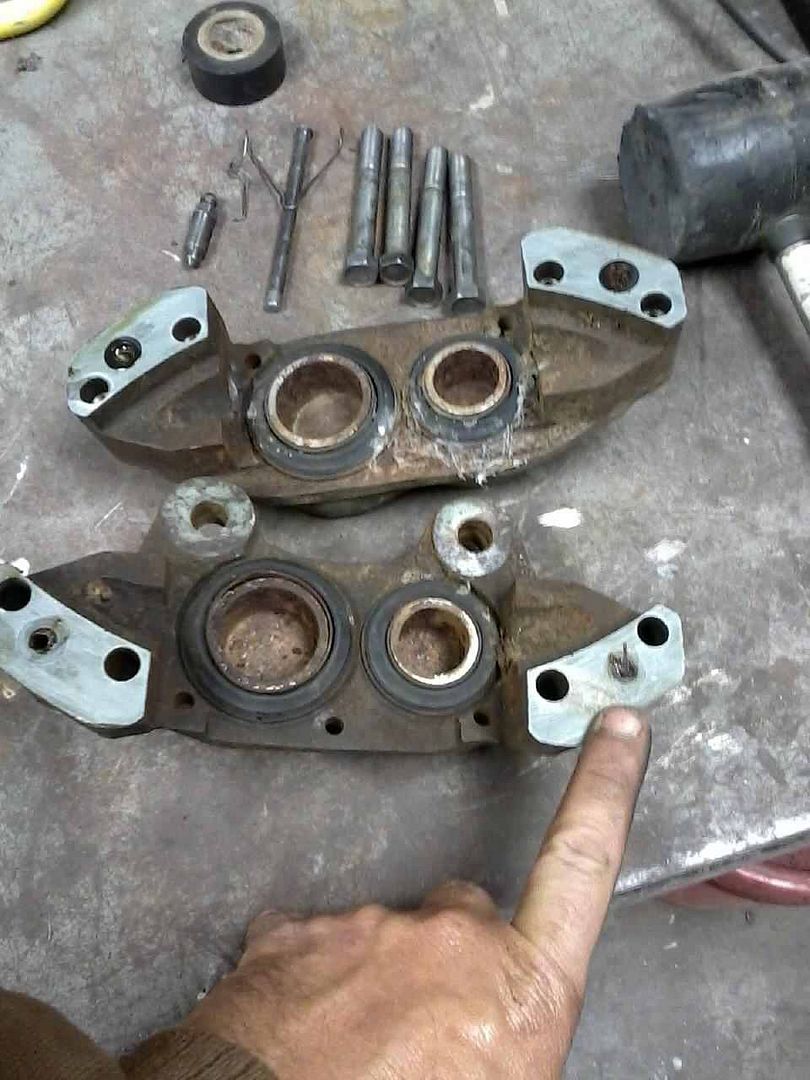
Diff Breather Extention.
22re Plenum fitting, 3/8th fuel line and the axle vent. I did use hose clamps but posted the pic to get the idea across. I ran it up to my gas tank which is higher then any water I will ever go thru. I have seen it ran up the rear tail light like habs link shows. Also it should work for the front diff and will eventually run mine up the fire wall or something similar.
This is going to be my Front axle info post. I have been going and updating my 88 Runner Build on the 1st page.
Cone washer removal.
Seals
I like this video for solid axles.
Rear Dome link... https://www.yotatech.com/forums/f199.../index198.html
Rear Seal Replacement... https://www.yotatech.com/forums/f199...90/index2.html
Vacuum Line link.>>>>> http://www.pirate4x4.com/forum/showthread.php?t=579557
Steering gear box links.
http://128.83.80.200/TACO/box.html
https://www.yotatech.com/forums/f199...cement-194025/
Brake upgrade... http://www.expeditionportal.com/foru...4Runner-Brakes
__________________
Like Mark said put the water line on THEN the fuel filter. This is a rookie mistake and I will admit that I have done it in the past as well. You do it one time and have to redo alot of things to do it right and especially after it is in the truck, you wont do it again.
Pipe then Fuel Filter assembly.
I have seen these filters put on backwards. The arrow is fuel flow, the fuel comes from the tank to the front side of the filter and from the back side of the filter to the fuel rail. I have seen different styles of filters, but pay attention to the fuel flow and not necessarily by the lip on the fuel filter.
This pipe is such a pain and likes to leak that I even put a little silicone just to try to get a good seal. A big pain to get to when in the truck. Rubber seal is in its cutout in the manifold, just not easily seen.
You are supposed to wrap the Cold Start Injector Timing switch, I did all of mine.
Parts store will tell you this is a dealer item or they dont stock it. This hose likes to leak coming off of the water pump when it pops a hole. Gates PN#20801, just cut off where my finger is at. Alot cheaper then the dealer.
Here it is cut to length and on. I need to get some new hose clamps to finish the job.
Seal is dry and hardened. Reason for leak. I have a seal for the dizzy cap as well on order for Toyota.
Replaced with a seal from Orielly for .96 cents. The old one will most likely break when you go to remove it. One less oil leak now.
When doing regular maintainace, change the PVC and I change the PVC Grommet as well as it will harden up and wont let the PVC come out or break and fall into the head. I change both out at the same time.
Identifying different year 22r motors.
I got my Timing Chain on and had to replace the Timing Cover due to it being worn. I tried to use a early model 22r and they wont interchange. Thought I would put some info up to help others identify what they may have.
84 and older. 22r has no dimples/circles and the number "2" on it. Twistedyota got it right on the height thing, see the last picture for a good example. I also tried to mark which bolt holes for removing the timing cover on down the road when I have to do a chain again. Hope it wont burn off but it if does I tried to come up with an easier way. Never can remember which bolts they are.
22re has "6k" and dimples/circles. 85 and up.
Here is what I am talking about on the 1/8th inch height. I used a lockwasher to help show how much of a difference. This cover is 22r. Seems like the oil pump bolts were to short. Hope this will save some one some trouble. It is an early model 22r timing cover on a newer 22re block.
Videos 86 build Post 403
have a tough time with rear brakes. Mostly notes for me. I will go and put these videos in other parts of my build.
Other Videos
The tab that connects the end cap to the bumper usually gets broken off and then the end cap comes up missing. Now I just drill a whole and use carriage bolts that are just a little larger then what is in the rest of the bumper, that it looks like it is factory. Most wont know the difference and I would rather have the end cap with carriage bolts instead of it missing.
The right one is with it bolted loosely in place as I need to get some trim paint and mount the bumper tomorrow. The left side is the piece that usually seperates from the end cap. I just throw the metal tab away as I have tried several different glues and none really work that I have tried.
Got a lot done. Most of it was cleaning. The spare set I had for the left and right side are both frozen in good. I ordered a seal kit for $10, but for $35 I could of gotten a whole replacement caliper and you need a core or they will charge you nother $35. I wanted to save a few bucks and the challenge of doing it myself but would recommend just replacing the caliper.
I took the one off of my runner and it only had one piston stuck. I used C clamps to keep the pistons that I wanted to stay in and then used an air hose to force the piston out. Keep your fingers out of the way as when it does release, the piston will come out with alot of force. I then took a red brillo pad and cleaned the surface of the piston. I eventually did this to all 4 pistons in the caliper.
My caliper looked bad, but it cleaned up nice with a wire brush. Top part is what the bottom half looked like as well. Where my finger is pointing is the main seal that can be a pain to swap out. I left it in and didnt swap it out and ran test on the pistons and no air would leak out. Will test it with fluid when I have the wife or kids home to help bleed the brakes.
I then used a cylinder hone and cleaned the cylinder out.
I did replace the dust covers on the pistons. Getting the wire clamp at the bottom of the piston area was made easier by lubing them with WD-40.
Here is the caliper and axle all cleaned and ready to go. It is actually on the truck now. Didnt get any pics of it on.
My left front brake caliper is dragging so I thought I would just pull on out of the shed and do a quick swap. That isnt going to work. The replacement caliper is in bad shape, but years ago, I used to rebuild them. Not as bad as you may think. That is if you can still get the seal kits for them. I do have a little honer to clean the walls out with.
Here is the replacement caliper. Just 4 bolts hold it together.
Here it is disassembled. Just hone the cylinder and replace the seal is what used to come in the rebuild kits. The black o rings seal against the area where my finger is.
These little seals are all that seals the two pieces of the caliper together. I have the caliper soaking in WD40 and will hit them with an air hose again to get the pistons out. They look bad, but usually clean up nice with a little time and patience. My finger is showing how much it is plugged up. I try to once a year or so to flush all of the old brake fluid out to avoid alot of this mess.
Last edited by Terrys87; Dec 14, 2012 at 05:37 AM.
Dec 14, 2012 | 03:12 AM
#375
YotaTech Milestone-Two Millionth Post
Joined: Jan 2009
Posts: 12,009
Likes: 122
From: Northeast Pennsylvania
wow.
no. wowee wow wow!!
have been quite neglectful in keeping up with the build threads of the people who stood by me with my build and Joe's build. but life got pretty busy there for a bit and once I lose traction with these build threads it's VERY hard to get back up to speed.
just went from page 2 to right now. I read a lot of it and enjoyed the pics. you stress me the hell out with all that wiring and painting. and just when I though I was doing well, I got on this page (even noted a pic of my motor on there).
anyways, hope all is well with you, I still have to catch up with Jason's stuff and Mark.
Dec 20, 2012 | 05:11 AM
#376
Thread Starter
Super Moderator
iTrader: (1)
Joined: Aug 2008
Posts: 11,787
Likes: 28
From: Anderson Missouri
1984Toyota22RE.jpg

1984Toyota22RECal...
1984Toyota22REFed...

1985-86Toyota22RC

1985-86Toyota22RF

1985-87Toyota22RE

1986-88Toyota22RT

1987Toyota22R.jpg

1988Toyota22RCali...
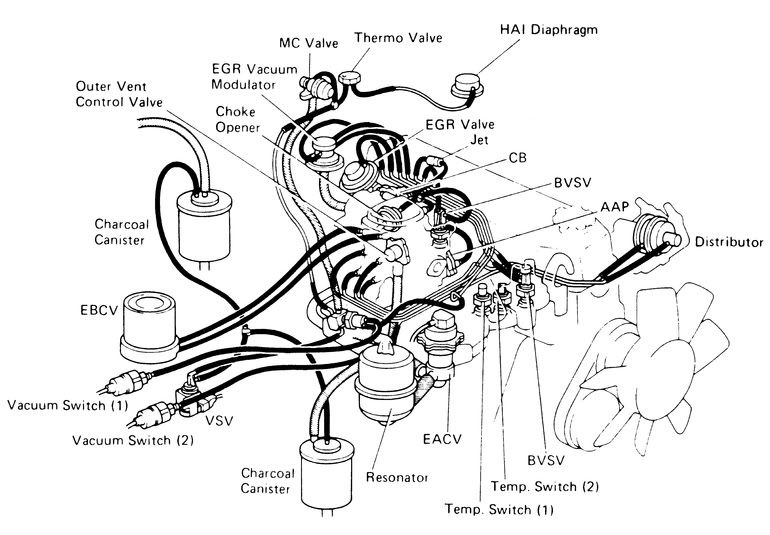
1988Toyota22RE.jpg
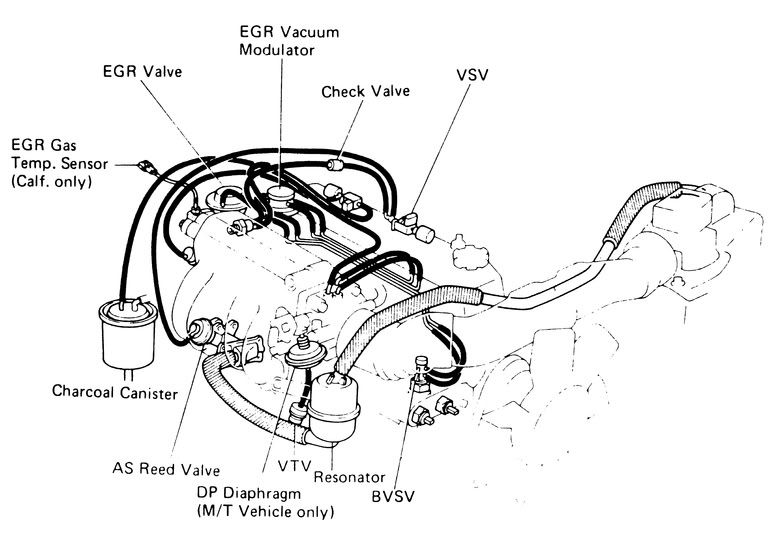
1988Toyota22RFede...
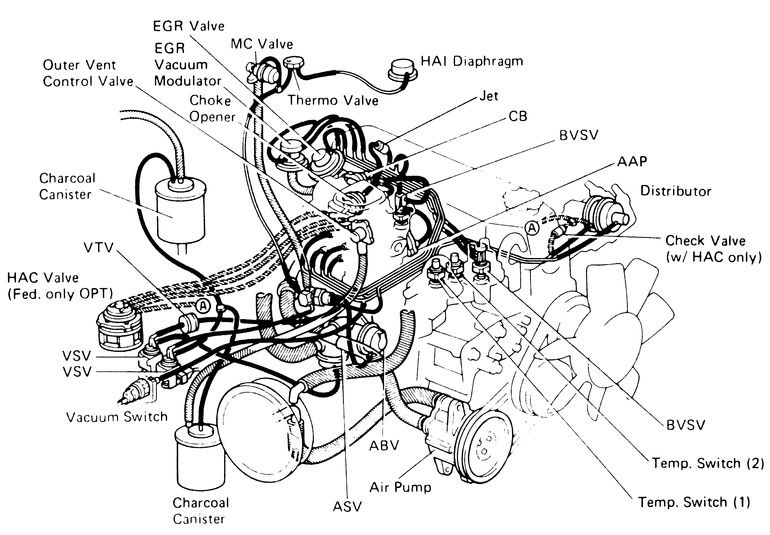
1984Toyota22RECal...
1984Toyota22REFed...
1985-86Toyota22RC
1985-86Toyota22RF
1985-87Toyota22RE
1986-88Toyota22RT
1987Toyota22R.jpg
1988Toyota22RCali...
1988Toyota22RE.jpg
1988Toyota22RFede...
Last edited by Terrys87; May 28, 2015 at 03:00 AM.
Dec 20, 2012 | 08:25 AM
#377
Nice works, wish I could say the same for me. I'm so busy with other things during the day, I haven't found the time to continue on with my runner.
On the brake issue and usually any fluid in the vehicles, I usually try to stay with the same brand. sometimes the issue is when you start to mix brands such as motor oils, each brand has its own make (additives) and sometime mixing them does more harm in the long run than good. that has been my practice from past episodes.
Thank goodness I have my 86 runner sitting and can visually match vacuum hoses and electrical connections as I put back everything in the 87 4runner.
Dec 20, 2012 | 06:20 PM
#380

Registered User
Joined: Jun 2011
Posts: 54
Likes: 0
From: Aberdeen, SD
Thanks Jason..I am going to try and get the info from the guys that did it for me. I am sure others will want the info. I am doing it my other projects as well.
Thanks Cyberhorn..We are high tech in this area. It looks like it off to the races when the smoke stacks are going on it.
Hello Mark..Probably not the way you do BBQ. It is actually pretty good eating there. They need a bigger lobby though as it is small.
Thanks Ed..I spent 2 or 3 hours getting all of the old glue out and it had rust every where in it. I will try to get all of the info I can for you and post it.
Hello 1986 yota4x4..I dont mind you asking. One reason I like posting my builds is to show that they can be done reasonably cheap. He charged me $159 for the windshield and $12 for the gasket. The gasket is on a roll, so dont know if he did it by the foot or what. It was $175 when all was said and done. If you have it done, I would suggest cleaning the window channel yourself to save a few bucks. They will charge for the time needed to do that. I will post below what all I did. They also sealed or killed the rust as well.
What a bargain! Here where I live, I've been quoted $350 installed to replace the windshield on my 88. Kind of a captive audience in this area. I wanted to try and install the windshield myself, but they won't sell me the items to do it because I'm not a business. Giving me some BS about liability. The supplier is just looking out for the body shops in the area.


