
Stanz's 1986 4Runner
 Aug 29, 2012 | 08:02 PM
#41
Thread Starter

Joined: Nov 2011
Posts: 687
Likes: 19
From: Portland, OR
Thanks. Just picked up a digital outside temp gauge that I'm going to work into where the old power antenna switch was. Just need to first find a way to step the voltage down from 12v to 5v for it.
Aug 30, 2012 | 11:06 AM
#42
Registered User
iTrader: (2)
Joined: Dec 2009
Posts: 2,159
Likes: 7
From: Pleasanton, CA - SF Bay Area
Looking great...love the cargo area, that's what I want to do with mine. What did you use to fasten the diamond plate...rivet nuts? Are the holes quarter inch where the side panels mount?
 Sep 26, 2012 | 02:19 PM
#44
Registered User
Joined: Jul 2012
Posts: 28
Likes: 0
From: Florida
Plasti-dip?
Hi Stan, Have you tried "plasti-dip?" I have used it on a small scale and found it durable, but seen some crazy folks paint an entire car exterior with it. It peels off when you want it to... Just a thought, as I am slowly working on my 4Runner interior. Cheers!
Bob
Bob
 Sep 26, 2012 | 05:37 PM
#45
Thread Starter
Joined: Nov 2011
Posts: 687
Likes: 19
From: Portland, OR
I have not tried it but I am perfectly happy with SEM. My plastics all look and feel OEM new.
Sep 27, 2012 | 06:35 AM
#48
Thread Starter
Joined: Nov 2011
Posts: 687
Likes: 19
From: Portland, OR
http://www.superbrightleds.com/morei...ate-light/250/
Mount them on a small piece of metal or plastic first then hot glue to the bottom side of the seat belt pocket.
Mount them on a small piece of metal or plastic first then hot glue to the bottom side of the seat belt pocket.

 Oct 2, 2012 | 07:59 PM
#52
Thread Starter
Joined: Nov 2011
Posts: 687
Likes: 19
From: Portland, OR
Oct 15, 2012 | 06:30 PM
#54
Thread Starter
Joined: Nov 2011
Posts: 687
Likes: 19
From: Portland, OR
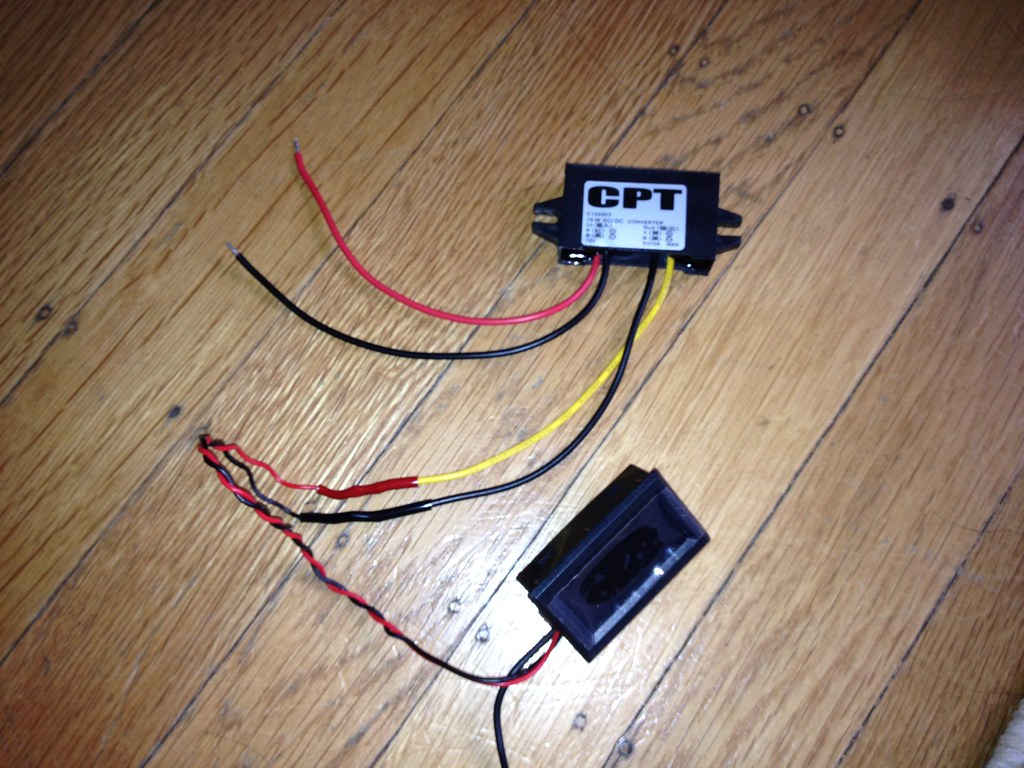
The temp gauge is meant for a desktop computer (hence the 5v)...
Temp gauge came from ebay: search for "digital thermometer temperature meter gauge pc mod new"
5V step down came from Amazon:
Temp gauge came from ebay: search for "digital thermometer temperature meter gauge pc mod new"
5V step down came from Amazon:
Oct 15, 2012 | 10:24 PM
#55
Thread Starter
Joined: Nov 2011
Posts: 687
Likes: 19
From: Portland, OR
http://www.napaonline.com/Catalog/Ca...088_0361190952
I don't recall what size the hole are on the side panels. I discovered that with a speaker hole and jack area cut out, I was able to reach behind the panel enough to use the furniture bolts (painted black) below with nuts and washers:

To secure the bottoms of the panels (where factory clips used to be), I placed a small block of wood on the inside of the panel. As I tightened it down with wood screws, it squeezed the lower lip inside the bed edge making it nice and snug.
Oct 15, 2012 | 10:41 PM
#57
Registered User
iTrader: (2)
Joined: Dec 2009
Posts: 2,159
Likes: 7
From: Pleasanton, CA - SF Bay Area
I used these to attach the diamond plate to the rear seats. The plastic screws weren't getting tight enough and kept snapping, so I swapped them out for metal screws:
http://www.napaonline.com/Catalog/Ca...088_0361190952

I don't recall what size the hole are on the side panels. I discovered that with a speaker hole and jack area cut out, I was able to reach behind the panel enough to use the furniture bolts (painted black) below with nuts and washers:
To secure the bottoms of the panels (where factory clips used to be), I placed a small block of wood on the inside of the panel. As I tightened it down with wood screws, it squeezed the lower lip inside the bed edge making it nice and snug.
http://www.napaonline.com/Catalog/Ca...088_0361190952
I don't recall what size the hole are on the side panels. I discovered that with a speaker hole and jack area cut out, I was able to reach behind the panel enough to use the furniture bolts (painted black) below with nuts and washers:
To secure the bottoms of the panels (where factory clips used to be), I placed a small block of wood on the inside of the panel. As I tightened it down with wood screws, it squeezed the lower lip inside the bed edge making it nice and snug.
Carriage bolts, nice! Thank you
Oct 16, 2012 | 08:14 AM
#58
Where'd you route the sensor for your external thermometer?
Also, do you know the temperature range of the thermometer you're using? It looks like on the top increments that it won't go below freezing.
Thanks,
Andy
Also, do you know the temperature range of the thermometer you're using? It looks like on the top increments that it won't go below freezing.
Thanks,
Andy
Last edited by andlours; Oct 16, 2012 at 08:34 AM.
Oct 17, 2012 | 08:33 PM
#60
Stanz, ... the panels are SICK! I will have to use the 1/2"(actually .41" in reality) panel to support/act as a box in a way for my 10" JL Sub.... LOVE having it... BUT, don't want to box in there anymore if I can help it. RAD4runner and I are doing several mods, including lighting and stuff.. Anything you have to add, PLEASE, smack me down some nuggets of your experience on the panel stuff, ya? You're using more of a project board, right? I couldn't tell by the pic... It's 1/4" Birch?
NICE! LOVE THE RIG!!!!
NICE! LOVE THE RIG!!!!


