
Stanz's 1986 4Runner
 Oct 24, 2012 | 10:26 AM
#81
Wow, way to hold them to their word, man!  Line-X is always the BEST, from everything I've read, regarding 'liner'... SOLID stuff!
BTW, sorry bout that last post being so hard to understand, hahaha. It's just been crazy trying to figure out what to do with all the contours, etc. I love the idea of the wadding, that was brilliant, and it sounds like it's working well for ya. Curious.... I was just speaking over that body drain spot right there in the bottom of that pocket... Is it still there under all your added stuff? Obviously you've put stuff that's not water absorbing/that's non-permeable... And there's no washer fluid bag or leaky jack over there, like I had... So no worries about it... any condensation would just drain right back out.
Where did you mount the amp back there?
PS> That lil tab on the bottom, in between the roll bars, with what appears to have a bolt in it... What is that for on the passenger side? Mine on the driver side had the tire lowering thing pulled onto the outside of it when I pulled the panel.. But no plastic clip like a hood kickstand clip, ya know? It's kinda curved back, and there's no screw in mine. Just curious what is is and why there's one on the passenger side, too, ya know?
Line-X is always the BEST, from everything I've read, regarding 'liner'... SOLID stuff! BTW, sorry bout that last post being so hard to understand, hahaha. It's just been crazy trying to figure out what to do with all the contours, etc. I love the idea of the wadding, that was brilliant, and it sounds like it's working well for ya. Curious.... I was just speaking over that body drain spot right there in the bottom of that pocket... Is it still there under all your added stuff? Obviously you've put stuff that's not water absorbing/that's non-permeable... And there's no washer fluid bag or leaky jack over there, like I had... So no worries about it... any condensation would just drain right back out.
Where did you mount the amp back there?
PS> That lil tab on the bottom, in between the roll bars, with what appears to have a bolt in it... What is that for on the passenger side? Mine on the driver side had the tire lowering thing pulled onto the outside of it when I pulled the panel.. But no plastic clip like a hood kickstand clip, ya know? It's kinda curved back, and there's no screw in mine. Just curious what is is and why there's one on the passenger side, too, ya know?
 Oct 24, 2012 | 08:06 PM
#84
Thread Starter
Joined: Nov 2011
Posts: 688
Likes: 22
From: Portland, OR
Wow, way to hold them to their word, man! Line-X is always the BEST, from everything I've read, regarding 'liner'... SOLID stuff!
BTW, sorry bout that last post being so hard to understand, hahaha. It's just been crazy trying to figure out what to do with all the contours, etc. I love the idea of the wadding, that was brilliant, and it sounds like it's working well for ya. Curious.... I was just speaking over that body drain spot right there in the bottom of that pocket... Is it still there under all your added stuff? Obviously you've put stuff that's not water absorbing/that's non-permeable... And there's no washer fluid bag or leaky jack over there, like I had... So no worries about it... any condensation would just drain right back out.
Where did you mount the amp back there?
PS> That lil tab on the bottom, in between the roll bars, with what appears to have a bolt in it... What is that for on the passenger side? Mine on the driver side had the tire lowering thing pulled onto the outside of it when I pulled the panel.. But no plastic clip like a hood kickstand clip, ya know? It's kinda curved back, and there's no screw in mine. Just curious what is is and why there's one on the passenger side, too, ya know?
Line-X is always the BEST, from everything I've read, regarding 'liner'... SOLID stuff! BTW, sorry bout that last post being so hard to understand, hahaha. It's just been crazy trying to figure out what to do with all the contours, etc. I love the idea of the wadding, that was brilliant, and it sounds like it's working well for ya. Curious.... I was just speaking over that body drain spot right there in the bottom of that pocket... Is it still there under all your added stuff? Obviously you've put stuff that's not water absorbing/that's non-permeable... And there's no washer fluid bag or leaky jack over there, like I had... So no worries about it... any condensation would just drain right back out.
Where did you mount the amp back there?
PS> That lil tab on the bottom, in between the roll bars, with what appears to have a bolt in it... What is that for on the passenger side? Mine on the driver side had the tire lowering thing pulled onto the outside of it when I pulled the panel.. But no plastic clip like a hood kickstand clip, ya know? It's kinda curved back, and there's no screw in mine. Just curious what is is and why there's one on the passenger side, too, ya know?
For the drain, when I got my rig the drain hole was wide open and rear was filling up with water kicked up from the tires. The OEM fix from the dealer is a round dot decal, that didn't last. I got two large fender washers, some silicone and a bolt. Sealed it up perfectly. You shouldn't need that open to the outside.
The amp is a relatively small one, it's mounted to a small board which is then zip tied to a brace inside the cargo area just forward of my rear 6.5 in speakers. The trim panels conceal it. I made sure it had enough room to breath in there and added that vent you saw to let some air in and out.
That tab you see in the pics is the bottom mounting tab forthe factory rear speakers. Should be a tab on each side. It got in the way of my new speakers so I pulled it off (by hand) -- not a very solid bracket.
Oct 24, 2012 | 11:57 PM
#85
Ah hahhhhhhh, .... hahaha. I was laughing when i read that. I should have guessed that. I wonder why my Jack/Spare lowering rod was wedged in there, Hmmmmmmm  ...... Anyway, I getcha on the rest.
I have everything I need to mount the SUB in the rear, between the speakers.. But just not sure I want to just yet. Gonna toss a few things around in the old tired nugget... Then see if I wanna spare that panel or elsewhere. I like having the precise box... And thinking about it, I had always camped with NO roof storage or Hitch Carrier.. Now I have both(the roof rack WILL get done as I wrap up the interior.)... So my box doesn't technically need to get in the way.. And when the top is off... I like, depending on where I'm going, being able to pull out my 6x9's(they're in boxes too) and sub and leave em in the garage, ya know?
I DO love the idea though.. and it wouldn't be something so difficult to undo, ya know? (IOW, if I wasn't pleased with it, I could always pull it out and slap it back in the box)... I already made the templates for the wood that would be placed in there on Loctite 3x Sealer(a sound guy I know swears by that or Butyl... and I aint spending "BUTYL MONEY" on this, ya feel me? hahaha.
Again, Stanz... JUST A GREAT job you've done with this rig! Thanks for all your input, man! (and patience hahaha)
...... Anyway, I getcha on the rest. I have everything I need to mount the SUB in the rear, between the speakers.. But just not sure I want to just yet. Gonna toss a few things around in the old tired nugget... Then see if I wanna spare that panel or elsewhere. I like having the precise box... And thinking about it, I had always camped with NO roof storage or Hitch Carrier.. Now I have both(the roof rack WILL get done as I wrap up the interior.)... So my box doesn't technically need to get in the way.. And when the top is off... I like, depending on where I'm going, being able to pull out my 6x9's(they're in boxes too) and sub and leave em in the garage, ya know?
I DO love the idea though.. and it wouldn't be something so difficult to undo, ya know? (IOW, if I wasn't pleased with it, I could always pull it out and slap it back in the box)... I already made the templates for the wood that would be placed in there on Loctite 3x Sealer(a sound guy I know swears by that or Butyl... and I aint spending "BUTYL MONEY" on this, ya feel me? hahaha.
Again, Stanz... JUST A GREAT job you've done with this rig! Thanks for all your input, man! (and patience
hahaha)
Dec 15, 2012 | 01:37 PM
#86
Thread Starter
Joined: Nov 2011
Posts: 688
Likes: 22
From: Portland, OR
A minor setback once again, but I think I finally resolved it for good. In the spring I noticed I had water coming in from the firewall/cowl area. I had eliminated my new windshield as a possible cause and pinpointed the leak location somewhere deep inside the cowl, beyond where you can see or feel.
At the time, I believed I had fixed it by flushing out the cowl and then letting Miracle Paint (by Bill Hirsch), similar to POR 15, ooze through the cowl, coating it and sealing up whatever small crack or hole I had.
Well last weekend I woke to find that my driver side floor (carpet less than 6 months old) had over a quart of standing water on it -- no exaggeration.
I decided that this time I was willing to do some cutting to get up close to the actual spot and kill it for good.
I removed the fender and cut out and enlarged the drain opening on the driver side cowl. It didn't take long to find what I had suspected -- a failed seam in the cowl.
The black paint in this pic is what I had let ooze in the first time. The white residue is the failed seam sealer I found and the source of the leak:
http://www.flickr.com/photos/72188695@N05/8276209056/
I then chipped out as much of the old seam sealer I could and then hit it some new sealer and then top coated it with POR 15. I then spent the next six hours with a portable heater and heat gun speeding up the drying process so that I could get it dry enough to survive spending the rest of the weekend outside in the rain.
Here's a pic it all sealed up and painted with a heater on it:
http://www.flickr.com/photos/72188695@N05/8275143213/
Last edited by stanz; Dec 15, 2012 at 05:13 PM.
Dec 29, 2012 | 09:26 PM
#88
Thread Starter
Joined: Nov 2011
Posts: 688
Likes: 22
From: Portland, OR
Here's an upgrade I did a few weeks ago and finally got around to posting...
It's always bugged me that my stock front turn signals are only visible head on in the bumper. I've seen several folks on here and other forums do some interesting conversions to make their corner indicators also function as turn signals. I was considering doing that until I found these combo dual bulb corner indicator and turn signal lenses on ebay from Singapore. I've learned that these were standard equipment in rigs in Asia and Australia, perhaps elsewhere:
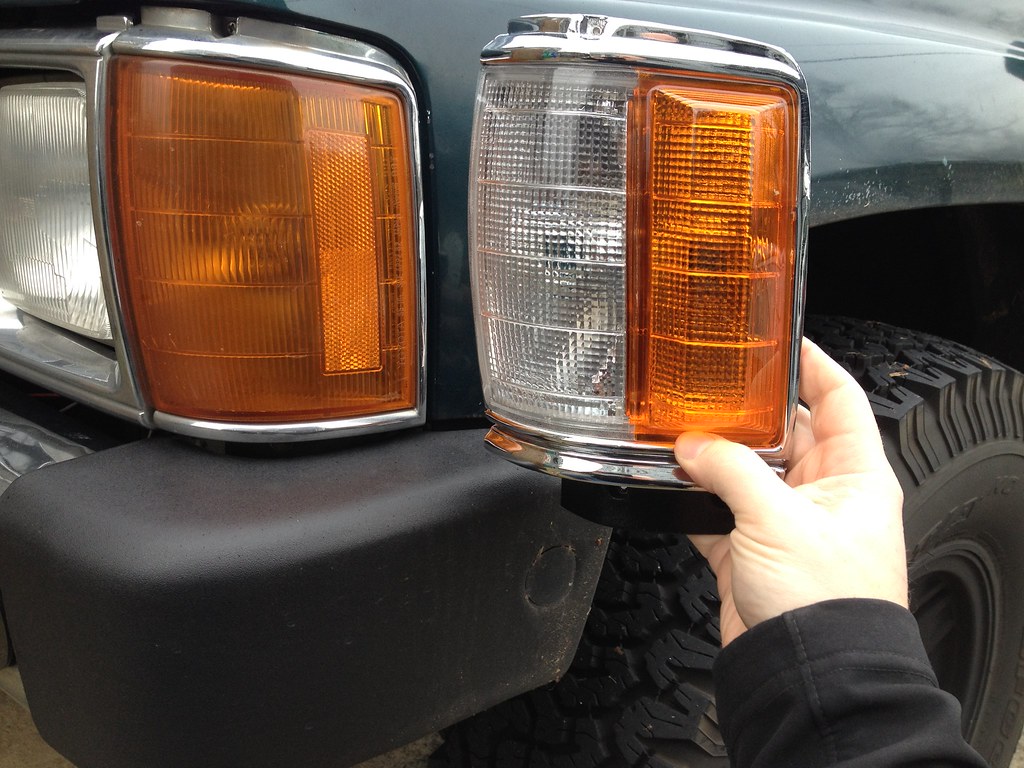
The ebay listing said that they were for 2wd, trucks only and were not compatible with US models. I studied the photos closely and it appeared that the dimensions and mounting locations were all the same and the only thing I would need to do is wire another bulb.
When they arrived in the mail, my suspicions were correct. They were a direct bolt on with the exception of rewiring. Here's a view of the back:
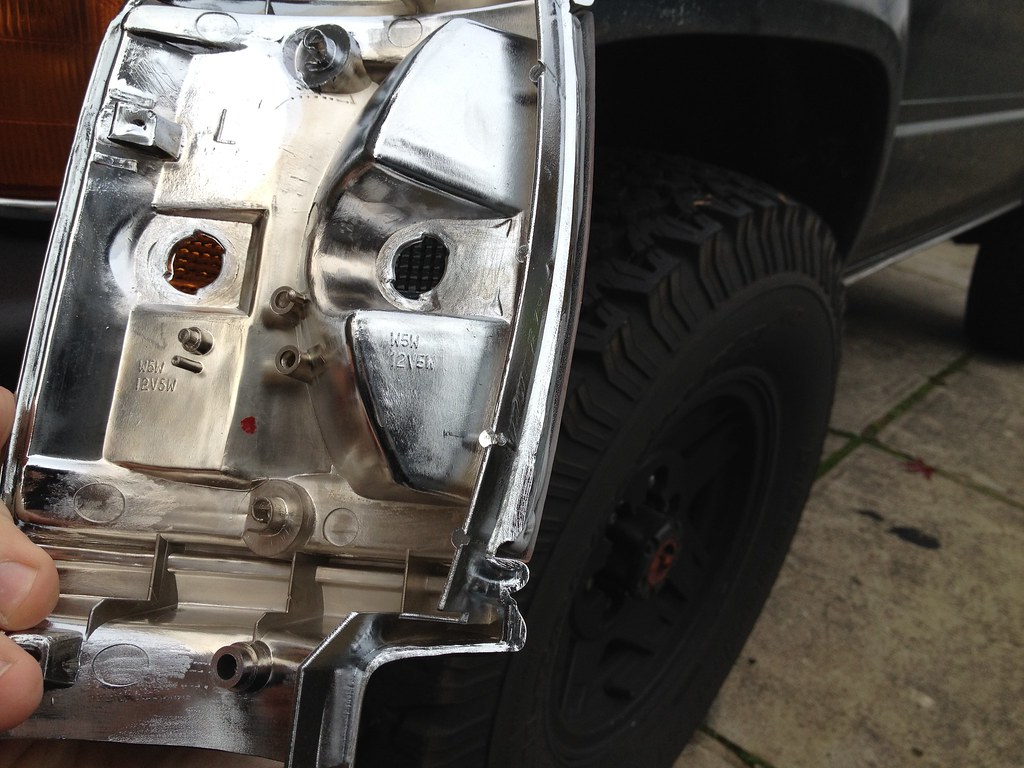
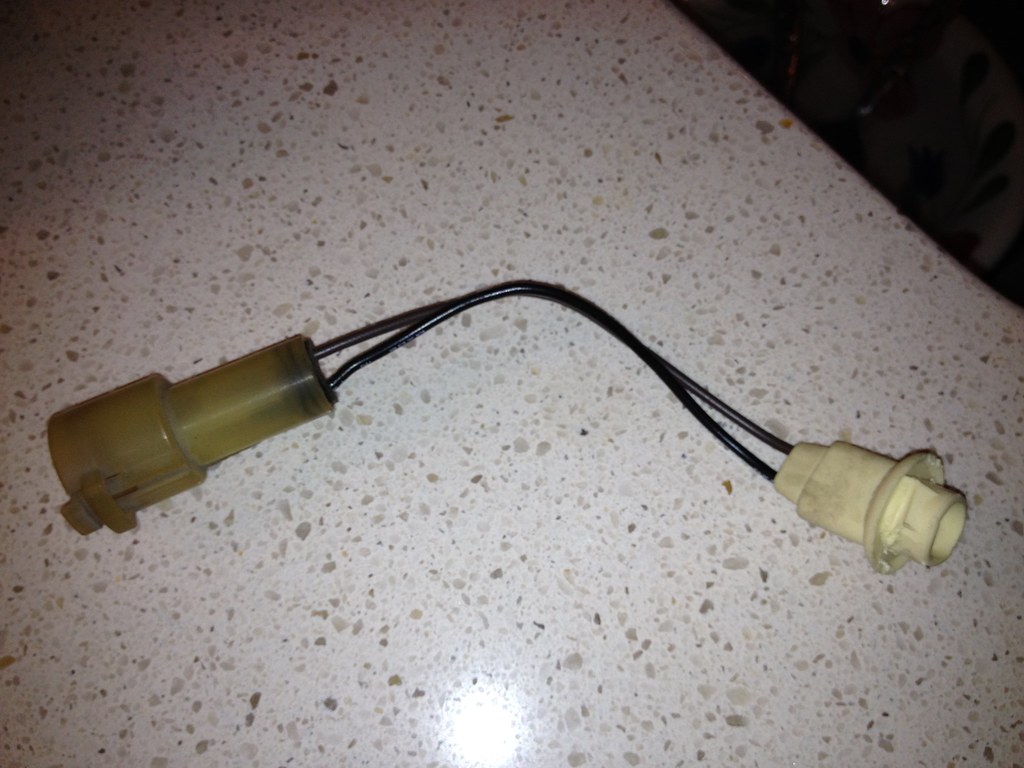
The first thing I learned is that my existing OEM corner indicator socket was not compatible with the new lens. It looks close and I tried to trim it but even the mounting depths were different.
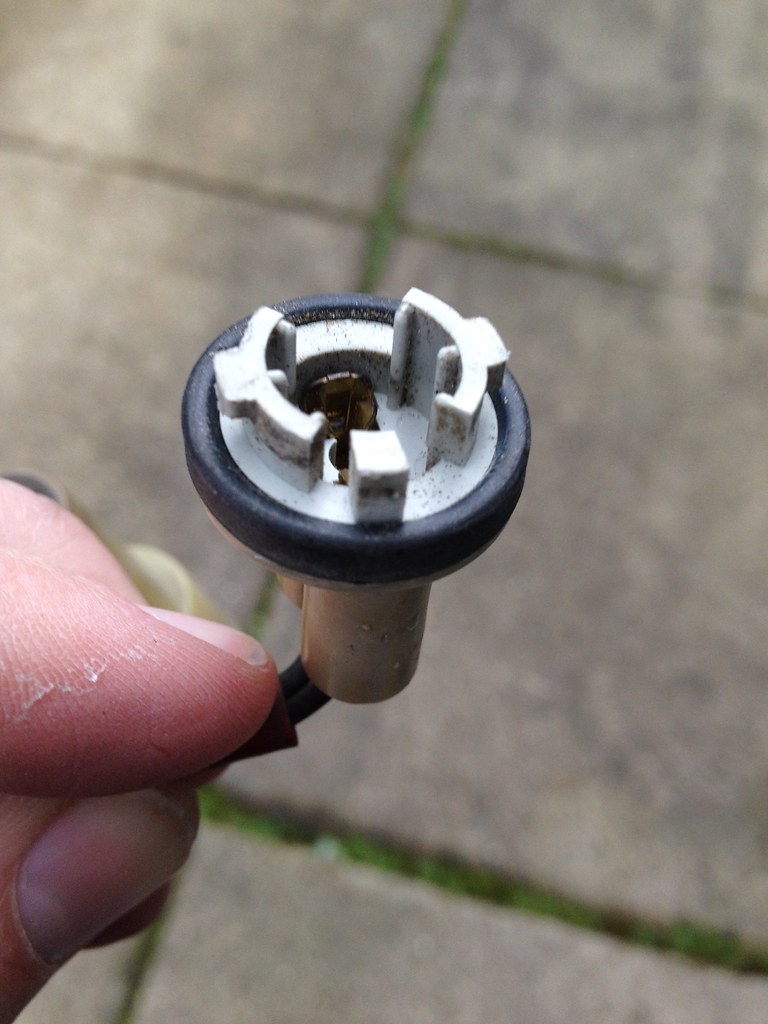
After scouring a few part stores, I couldn't find any off the shelf sockets that were a direct fit. I did however find that GM pigtails for 194s were close and that some creative dremeling could get them to work.
The OEM socket:
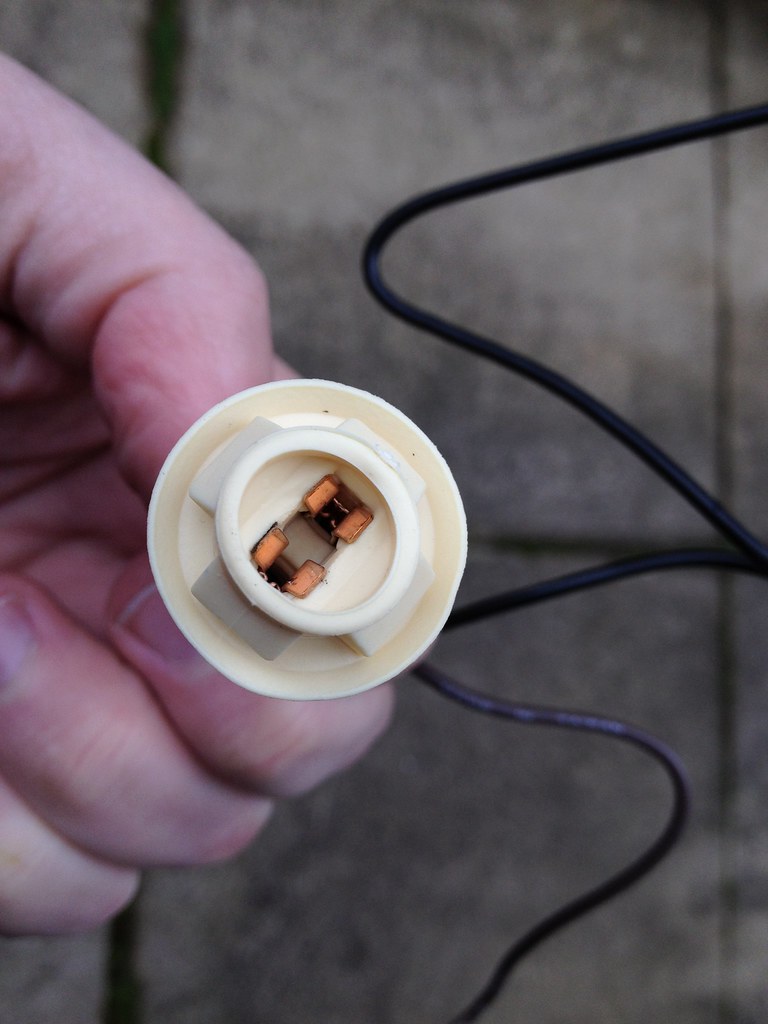
A GM socket before grinding down:
Rewiring was a simple as opening up the OEM corner socket harness plug and soldering in the GM pigtail for the one set and then tapping the other set of pigtails into the turn signals in the bumper.
Here's the OEM harness with the GM socket:
Here's the finished product:
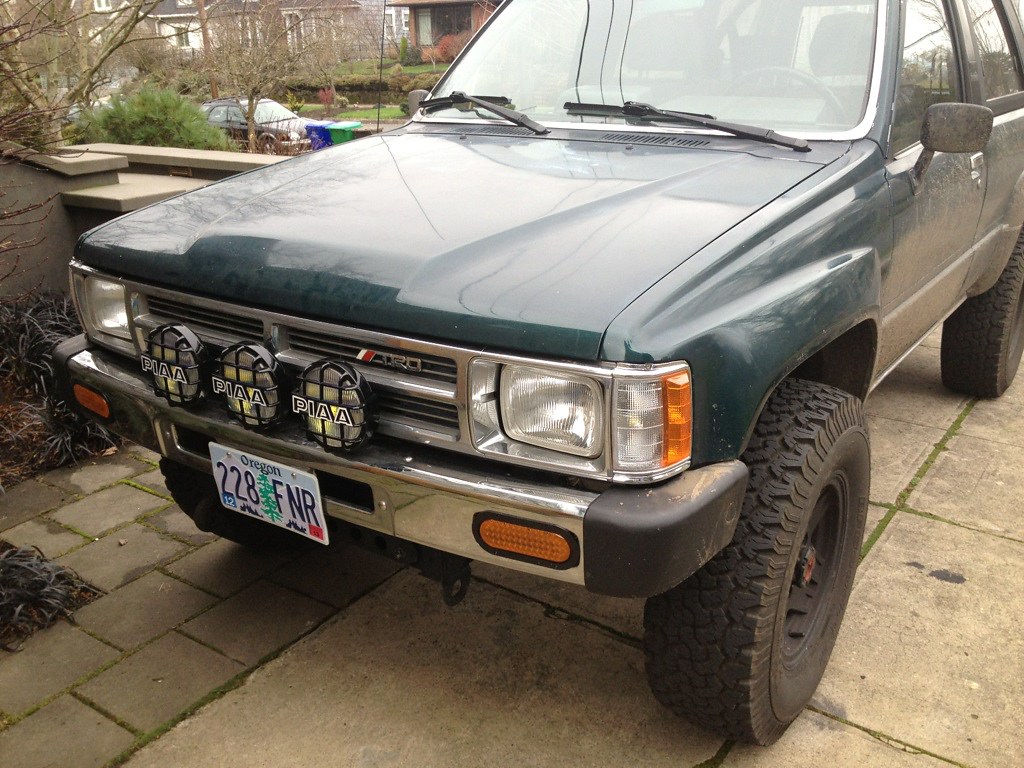
I also like how the turn signal bumps out a bit from the white part of the lens:
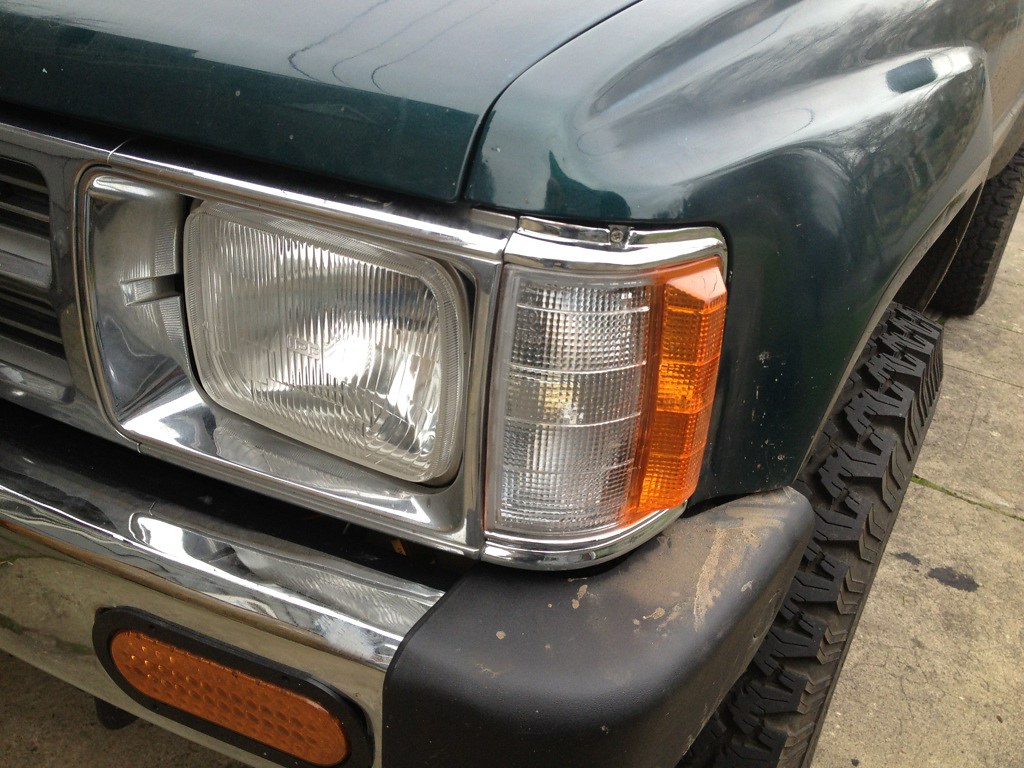
Really happy with the install. They work perfectly!
It's always bugged me that my stock front turn signals are only visible head on in the bumper. I've seen several folks on here and other forums do some interesting conversions to make their corner indicators also function as turn signals. I was considering doing that until I found these combo dual bulb corner indicator and turn signal lenses on ebay from Singapore. I've learned that these were standard equipment in rigs in Asia and Australia, perhaps elsewhere:
The ebay listing said that they were for 2wd, trucks only and were not compatible with US models. I studied the photos closely and it appeared that the dimensions and mounting locations were all the same and the only thing I would need to do is wire another bulb.
When they arrived in the mail, my suspicions were correct. They were a direct bolt on with the exception of rewiring. Here's a view of the back:
The first thing I learned is that my existing OEM corner indicator socket was not compatible with the new lens. It looks close and I tried to trim it but even the mounting depths were different.
After scouring a few part stores, I couldn't find any off the shelf sockets that were a direct fit. I did however find that GM pigtails for 194s were close and that some creative dremeling could get them to work.
The OEM socket:
A GM socket before grinding down:
Rewiring was a simple as opening up the OEM corner socket harness plug and soldering in the GM pigtail for the one set and then tapping the other set of pigtails into the turn signals in the bumper.
Here's the OEM harness with the GM socket:
Here's the finished product:
I also like how the turn signal bumps out a bit from the white part of the lens:
Really happy with the install. They work perfectly!
 Dec 30, 2012 | 07:55 AM
#91
Thread Starter
Joined: Nov 2011
Posts: 688
Likes: 22
From: Portland, OR
http://bit.ly/Vj3sS5
Dec 30, 2012 | 08:00 AM
#92
Thread Starter
Joined: Nov 2011
Posts: 688
Likes: 22
From: Portland, OR
They're also abundant on eBay.com.au: http://shop.mobileweb.ebay.com.au/se...0&isNewKw=true
 Dec 30, 2012 | 10:58 AM
#94

Registered User
Joined: Mar 2012
Posts: 10
Likes: 0
From: Melbourne, Australia
It's funny how we want things that others have just because they have them.
I'm from Australia and those indicators are on my 4Runner but I've just bought a pair of the US spec. ones without the parker light!
I'm from Australia and those indicators are on my 4Runner but I've just bought a pair of the US spec. ones without the parker light!
Dec 30, 2012 | 11:00 AM
#95
Thread Starter
Joined: Nov 2011
Posts: 688
Likes: 22
From: Portland, OR

 Feb 6, 2013 | 11:49 PM
#99
Thread Starter
Joined: Nov 2011
Posts: 688
Likes: 22
From: Portland, OR
Feb 7, 2013 | 09:23 AM
#100
Registered User
Joined: Mar 2008
Posts: 705
Likes: 19
From: Colorado


