When you click on links to various merchants on this site and make a purchase, this can result in this site earning a commission. Affiliate programs and affiliations include, but are not limited to, the eBay Partner Network.
Thanks a lot, guys!
Makes sense about the space. I think that's a big nut between mount and transfer case. Tightening that nut would compress the rubber.
Yes, I noticed the crack. No rubber separation yet, but good to watch.
Originally Posted by Damion812
I think the space may be normal but it looks like the tranny mount is done anyhow, the crack. Check to see if the rubber is connected anymore. ...JB weld ...
Please post how your work goes and tips for when it's time for me/others to replace.
Originally Posted by jbtvt
I've always left the mount attached to the trans... full rebuild though. What went wrong with the trans to require a rebuild anyway, and at how many miles?
Gap looks normal ... see if it separates but I bet it's still ok.
Around 227,700 miles, started hearing strange sounds. Yota brothers' educated guess was input shaft bearing. Being in Dallas on my Route 66 Trip (post here), I figured best t have it rebuilt there before I drove back to So Cal - Also less expensive than in California
Originally Posted by SomedayJ
We have the same gap in our 4Rs Ray, I can post a pic this afternoon if that helps.
Last edited by RAD4Runner; 04-05-2019 at 11:56 AM.
Replaced Valve Cover Gasket, Half-Moons and Grommet-Nuts
Replaced Valve Cover Gasket, Half-Moons and Grommet-Washers
In 2013, I paid the Truck Shop at Miramar Road, San Diego, CA to rebuild my engine. Soon after the rebuild, I noticed that there was an oil leak, including some seepage around the valve cover gasket. Mr James Ederer, proprietor suggested that I monitored it so I did. Less than a year later, while my truck was on the lift for an alternator replacement at Ace Electric in San Diego, I inspected the engine and found oil dripping from under the front main seal. I reported to The Truck Shop and replaced the main bearing seal / fixed the leak under warranty (4 years later, I would find one of the bolts securing the oil pump flange stripped).
OIL SEEPAGE UNDER FRONT MAIN SEAL, OBSERVED EARLY NOVEMBER 2014. WAS REPAIRED UNDER WARRANTY.
Later, I still saw oil seepage around the valve cover gasket, but it was already past warranty and Mr Ederer dismissed the seepage as "the nature of the beast". I noticed, however, that the grommet-nuts on valve cover seemed cracked and brittle. I did not have time to address that until today.
When I took the grommet-washers, I confirmed that they were indeed cracked and brittle.
VALVE COVER GROMMET-NUTS INSTALLED BY THE TRUCK SHOP IN 2013 WERE CRACKED AND SEEMED BRITTLE. I CONFIRMED ON 8 APRIL 2019. THE ABOVE DO NOT LOOK LIKE 5-YEAR OLD GROMMET-WASHERS. No compression effect for a proper seal.
Upon removal of the valve cover, I found the valve cover seal also brittle. This does not look like 5-year old seal.
Here is the illustrated parts breakdown with part numbers:
This is the replacement kit I used from LC Engineering:
I did replacement procedure as Alexman Videos did it. I used Permatex Ultra-Grey sealant
I NOTICED THAT THE TOP OF HALF-MOON WAS NOT WAS STICKING OUT ABOVE THE SEAL SURFACE BEFORE VALVE COVER WAS INSTALLED.
I think this is normal? Yes, I applied sealant at the corners of the half-moons.
I do not have torque specs for the nuts so I just tightened until the rubber mushroomed under BUT not wider than the metal cap of the grommet. I'm letting sealant cure for at least 24 hours before starting the truck.
Last edited by RAD4Runner; 04-08-2019 at 10:08 PM.
When I replaced the valve cover gasket set on my Truck a few years ago, the half-moon seals looked just like yours in the picture. I used the Fel-Pro valve cover gasket set.
They do squish down when the valve cover nuts are tightened.
I have no leaks so far! (Well, no leaks from the valve cover area at least... )
I don't know if the OEM half-moon seals do the same thing but I suspect they do.
I had the same question about the half moon seals when rebuilding my engine. I learned it is normal. I did the same thing you did, permatex ultra grey, and I think the torque spec on the acorn nuts is something like 12 ft-lbs but don't quote me on that.
I haven't run the engine yet to see if it leaks, but at least we will have two data points!
(Note that I still need to pull my valve cover off to hot adjust the valves, we will see if i need to reapply the rtv)
I have some seepage there so I'm bookmarking "Replacing Transfer Case Rear Oil Seal" For easy reference.
This is probably gonna be my next essential "drive-train reliability" project. https://www.yotatech.com/forums/f116...l#post51898126
I'm glad you shared this. It's on my list as well. Now that I went through it I realized that I ordered the wrong seal. A quick look at LCE and it looks like the front and rear output shaft seals my be the same. I'll probably get both.
Incident Report: Roof-top Tent Fail Not Serious Just Funny
Incident Report: Roof-top Tent Fail Not Serious Just Funny
Had a grand time in Death Valley. I rode shotgun on my friend's Jeep to save on gas and so I can take take pics and vids more freely.
Titus Canyon, to Ubehebe Crater, to roadside camp on Racetrack Playa a couple of miles south of the crater. Next day, we drove to Tea Kettle Junction, Racetrack Playa, and got to Homestake Dry Camp early for snacks, siesta and a relaxed evening.
I slept on ground as usual. Late at night strong gusts of wind woke me up, but no worries. Then more gusts and it started to drizzle. As I walked toward my friend's Jeep to sleep under his awning, he called me from his Front Runner RTT.
The wind* had blown the floor overhang and folded it up. The ladder swung against the RTT cover that is left draped from the roof rack and got caught in its folds. In that configuration, my friend could not reach and free the ladder! He could have exited through the zippered window, but since I was already down below, I just helped him free the ladder and bring the floor back to horizontal.
One potential preventive would be to tie a guy-line from ladder hinge to rock slider.
This fixes the poor wiring design on early Toyota trucks, while retaining the switched-ground system that will allow Truck-lites to plug-and-play into the first-generation 4Runner and those with similar headlight housing and circuits.
To minimize additional parts I rewired the headlight circuit, instead of buying or making an add-on h4 conversion harness.
Still To Do: Still debating what to do with high-beam indicator. Long story.
hi ray. so, i have a solution for the dash high-beam indicator. as you know, after reading your posts, i installed a headlight relay in my 4r too (about 5 years ago). like you, i was disappointed to lose the dash indicator function. it isn't as elegant as the rewire that roger (4crawler) describes, but it works.
i ordered a LED miniture wedge base bulb from superbrightleds.com, and replaced the factory incandescent high-beam indicator light. WLED-CWLX: 194 LED bulb - 1 high power LED - miniature wedge base. just need to install it oriented for correct polarity, but the dash indicator is now visible in daylight using this bulb.
I know this is an old thread but just wanted to give my thanks to everyone here. This mod saved me a ton of time and money. Went through 2 starters and lots of headache with relays and such. Found this mod and got it done in 30 mins and cranked better than I've ever heard her crank before! Thanks again everybody!
Originally Posted by RAD4Runner
Even after I cleaned my starter relay contacts, and after months of being able to start with no issues, the "C.O.R. Click-only" problem struck again. I reviewed the schematic and found the electrical engineering blunder explained here.
Below is the clean and robust fix for the starting (cranking) circuit wiring flaw. No additional or replacement parts, except for wire and an optional kill switch.
AFFECTED MODELS:
May 1986 to 1988 4Runners and trucks with 22R-E 1989-1992 4Runner V6, and 1989-1990 Pickup V6 Thanks, DrCreosote, for sharing your schematic.
Would appreciate if members with different year-models could verify theirs as well.
Trucks made before May 1986 may not have the starter relay so this does not apply.
1986-1988 trucks/4Runners with auto transmission do not have starter relay, either. Click-only problem may also occur on them.
Examples:
Those made earlier than May Like richiegrich's Feb, and KidV's do not have starter relay.
For these models, I highly recommend adding a properly-wired starter relay.
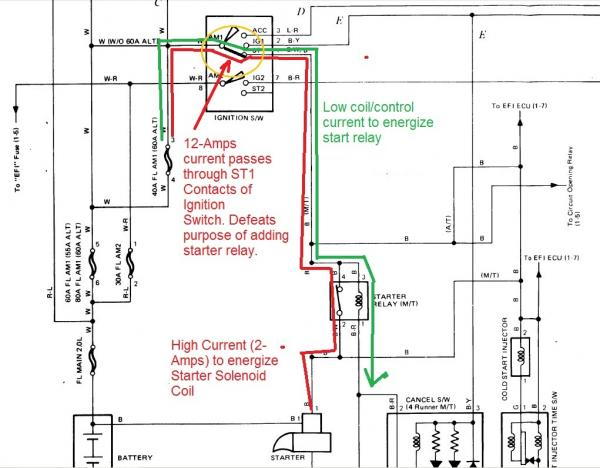
High current (12-Amps) to energize starter solenoid passes through ST1 contacts of ignition switch. This puts unnecessary stress on switch contacts, cause pitting, high resistance, too much voltage drop (solenoid not getting enough voltage), and defeats purpose of adding the relay in the first place.
Because solenoid contacts do not completely close, they will be arcing and/or heating up unnecessarily (like bad connection between power cord plug for electric flatiron makes plug and wire hot), hastening their demise.
To verify if your stock wiring needs this fix refer to this with notes on how circuit without flaw should work:
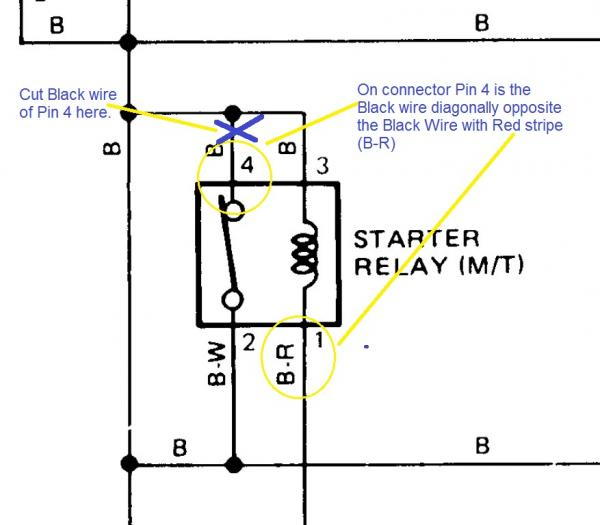
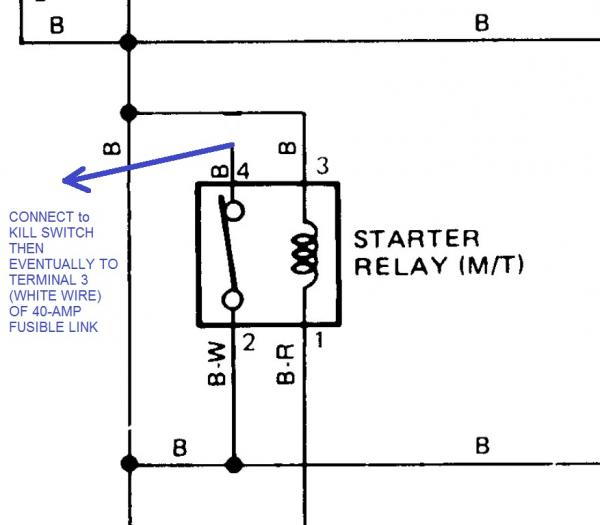
To correct:
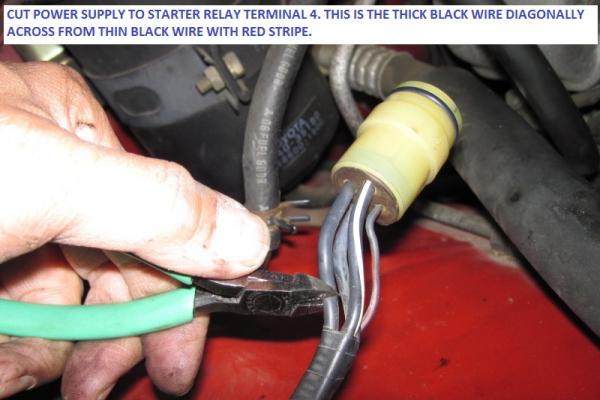
Cut wire to pin 4 of starter relay here:
Picture here:
Insulate end on harness. This will not connect to anything anymore.
It should like this now.
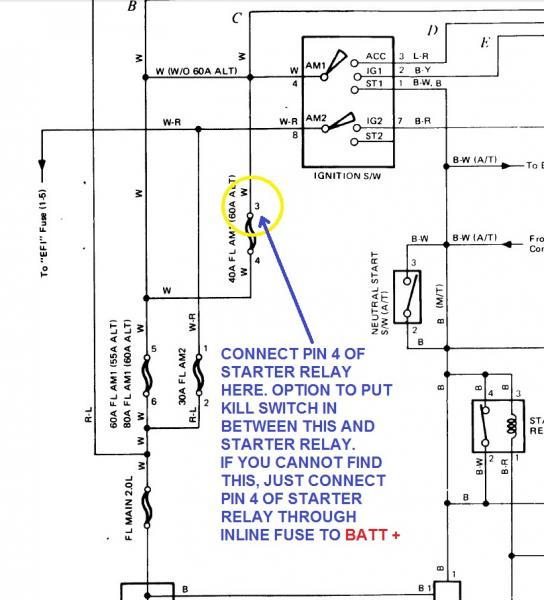
To find Pin3, look for terminal of 40-Amp fuse that connects to 80A Fusible link. This is terminal 4. Terminal 3 is the opposite terminal. To verify that you have the right Pin3 of FL, measure voltage there. With 40-Amp fuse installed, you should get 12V. Remove 40-amp fuse, you should get no voltage.
Connect (crimp or crimp PLUS solder) wire from Start relay Pin 4 to Terminal 3 of FL.
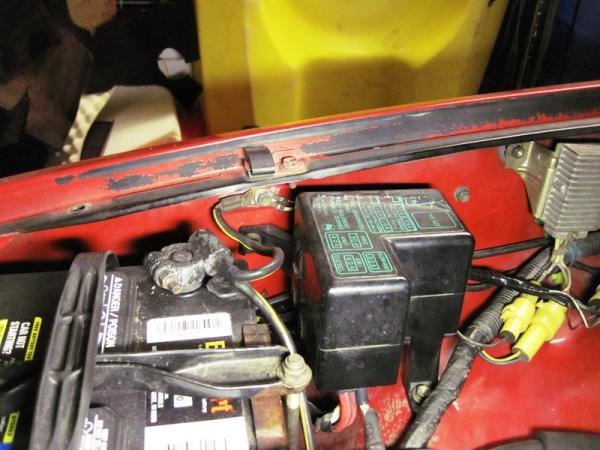
Fusible Link is in this fuse block:
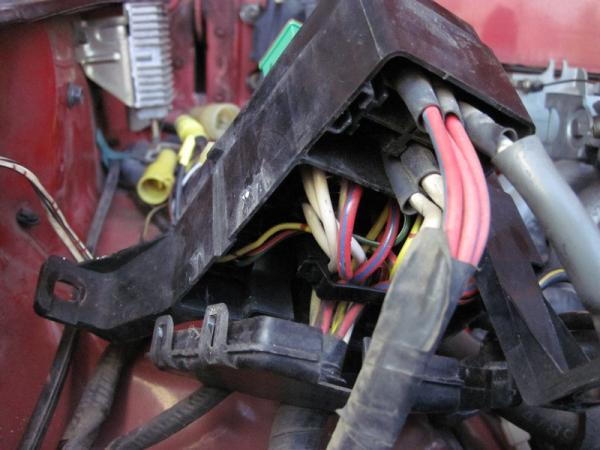
Terminal 3 is accessible from bottom.
IIRC, this picture shows Terminal 3 removed so I can tap into it. Verify it is Pin3, such that when you remove FL you do not get +12V, and you get +12V when FL is re-installed.
When you make a tap, make sure you have both mechanical & electrical integrity (i.e., crimp OR wrap around existing wire then solder).
It would be nice to insert a kill switch in wire between FL and start relay. Hide it and don't post where you put it here (duh!). Bonus is that kill switch will interrupt power in the extremely rare case that starter relay contacts get welded in closed position. Final circuit should look like this- simple, robust:
NOTE: An alternative, so you would not need to dig into fuse block, is connect Pin 4 of starter relay to a AWG 12 wire to a fuse directly connected to battery positive.
I know this is an old thread but just wanted to give my thanks to everyone here. This mod saved me a ton of time and money. Went through 2 starters and lots of headache with relays and such. Found this mod and got it done in 30 mins and cranked better than I've ever heard her crank before! Thanks again everybody!
We're always happy to help Yota brethren, Eric.
Mind telling us what truck model-year-engine-transmission and trim you have? We'd like to ascertain which models are affected.
Cheers!
Starting Ruby Tuesday for first time after 3 months...
1986 4RUNNER SAT IN-OP FOR 3 MONTHS WHILE I WAS ON VACATION...
When I got back November 2...
Three-second to build up fuel pressure, Then Ta-da- VROOM!
 04-04-2019, 10:56 PM


 )
)