
Rear oil seal on transfer case
 Nov 27, 2010 | 06:47 AM
#22

Thread Starter
Registered User
Joined: Sep 2010
Posts: 137
Likes: 0
Nope haven't driven it yet. This is what it looks like, except it has some green paint around the exterior rim.
http://www.napaonline.com/Search/Det...+50070+2070015
http://www.napaonline.com/Search/Det...+50070+2070015
Nov 28, 2010 | 10:11 PM
#23

Registered User
Joined: Mar 2009
Posts: 359
Likes: 2
From: Kenai, AK
I went through quite a bit of hassle getting the correct seal for the front output shaft on my truck a couple weeks ago. The only way I got the correct seal from NAPA was to take in the old one and they cross referenced to the new PN which I filed away!
Mine was also metal with a thin coating of rubber all the way around. Having said that, the pinion seal I replaced on my Dodge Ram 2500 and the wheel bearing seal I replaced on my Toyota were metal on metal, I wondered the same thing but both held.
I believe its simply the tolerances involved, the press fit is so tight that the "gaps" between the two metals are smaller than the long chain molecules of the gear oil. Thats purely an educated guess however.
Mar 12, 2012 | 08:48 PM
#26
Registered User
Joined: Mar 2007
Posts: 210
Likes: 4
From: Santa Cruz, CA
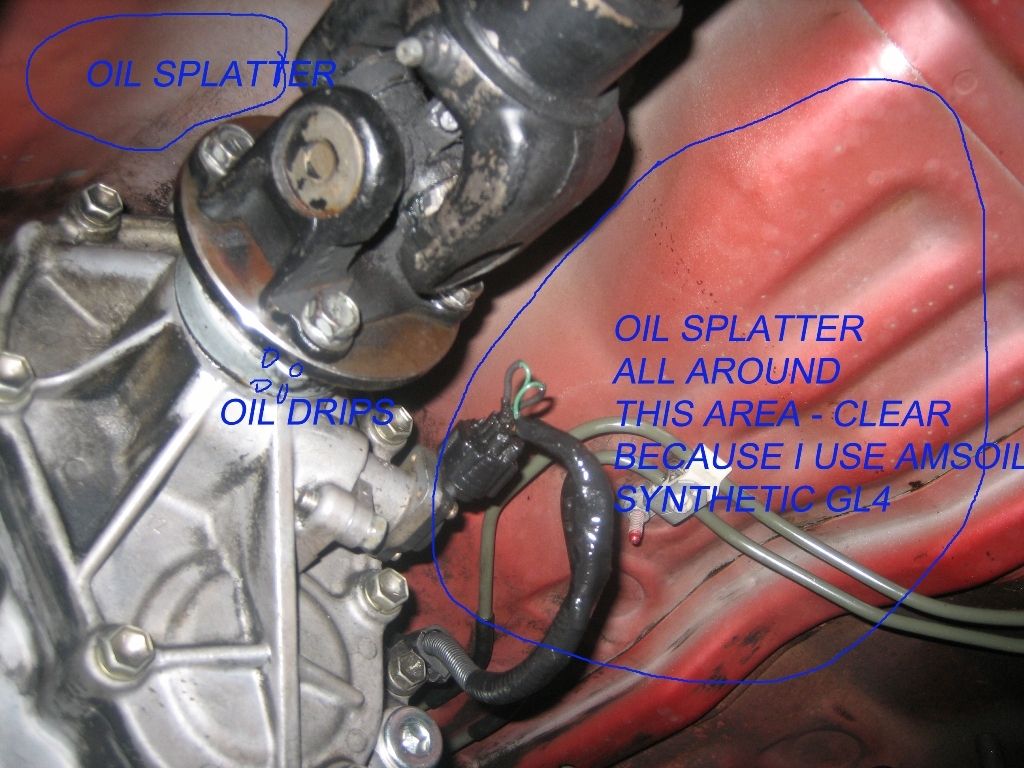
Do you have any pictures / active link images of the gasket used for replacement? I've had this business sprayin' all over my Cat for too long!
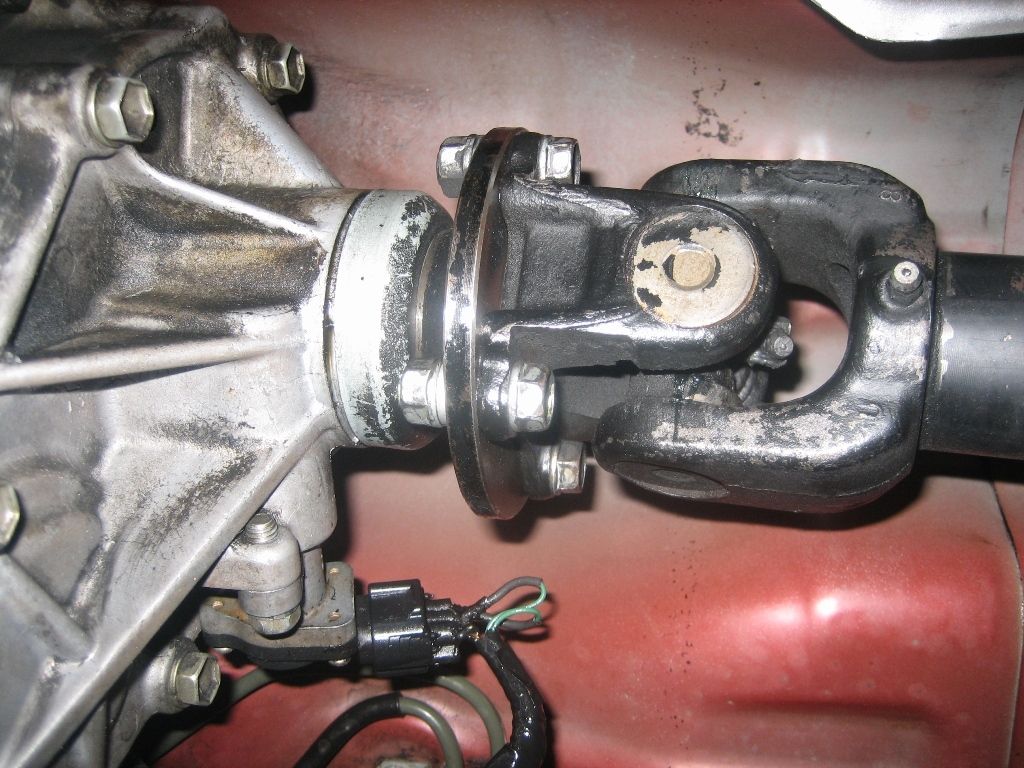
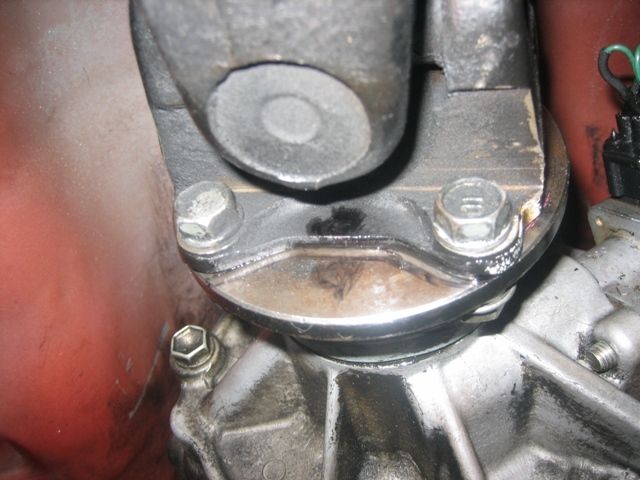
Did yours look like this?
AND...
 Mar 13, 2012 | 05:04 AM
#27
Mar 19, 2012 | 04:34 PM
#29
Registered User
Joined: Mar 2007
Posts: 210
Likes: 4
From: Santa Cruz, CA
You're a Wizard!
I'm going to drop the driveline this week or the next, depending on what Bay Area weather decides to do...
...any idea which seal it is? I'm assuming the 'rear companion oil seal'.
Furthermore, when I do pull the 30mm Bolt behind the driveline... should i expect a deluge of 75w-90 to come at me?
Thank you again for the reply!
Mar 19, 2012 | 06:00 PM
#30
Registered User
Joined: Jan 2007
Posts: 6,106
Likes: 27
a. Replace the small seal in the companion flange if it's a chain drive transfer case.
or
b. Apply a fresh bead of FIPG/RTV in the prescribed location if it's a gear drive transfer case(which it appears to be).
Reinstall the nut, and you're done.
2. No. Maybe a few drops, definitely not a deluge.
Mar 19, 2012 | 07:35 PM
#31
Registered User
Joined: Mar 2007
Posts: 210
Likes: 4
From: Santa Cruz, CA
...Ah the Infamous Mud Hippy!! Many Blessings! I'll be on this come the 'morrow!

http://www.youtube.com/watch?v=vu6WXLQT5r8
http://www.youtube.com/watch?v=vu6WXLQT5r8
 Mar 21, 2012 | 07:46 PM
#33
Registered User
Joined: Mar 2007
Posts: 210
Likes: 4
From: Santa Cruz, CA
Many Thanks To WaskillyWabbit, Mudhippy, Mudpig and The OP for getting this thread so far!
Here's the results of my work today, along with a little DIY instruction for all those who might need to do this in the future... (toastyjosh, I'm looking at you!)
(Step 1)
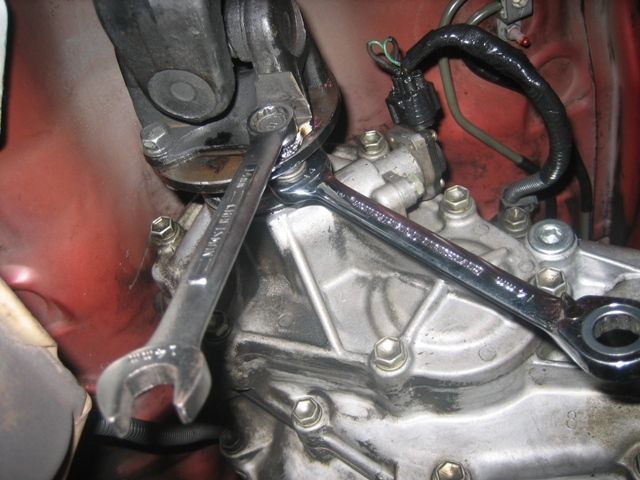
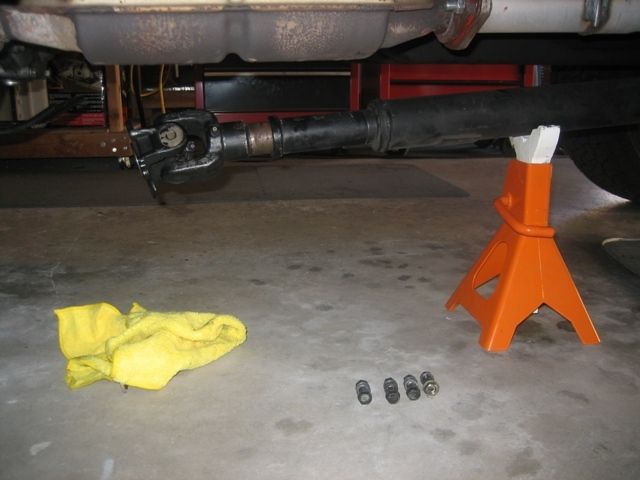
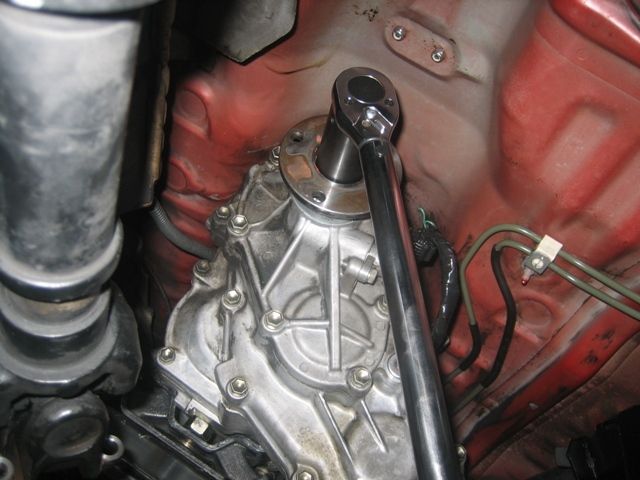
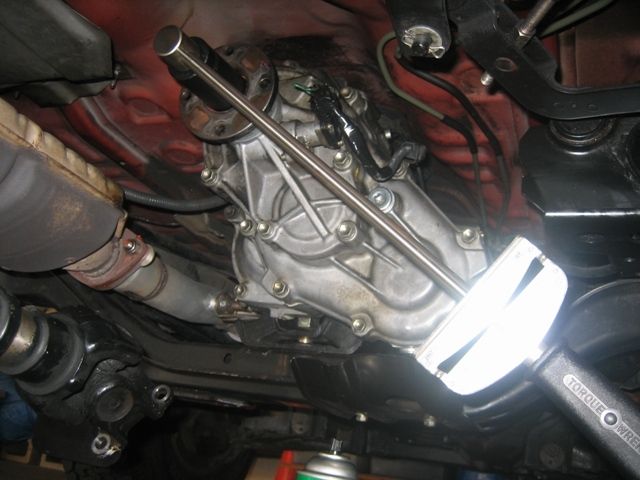
Remove the 4 14mm Bolts (Torque Value 54 lb/ft) holding the rear prop shaft, put onto jack stand... (you need to put the truck in gear for this)
(Step 2)
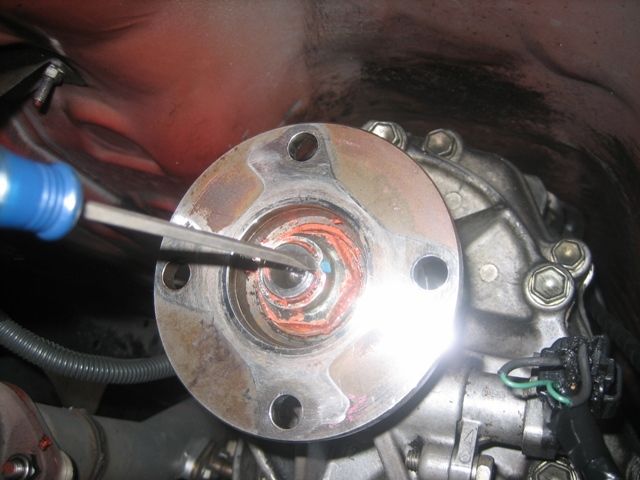
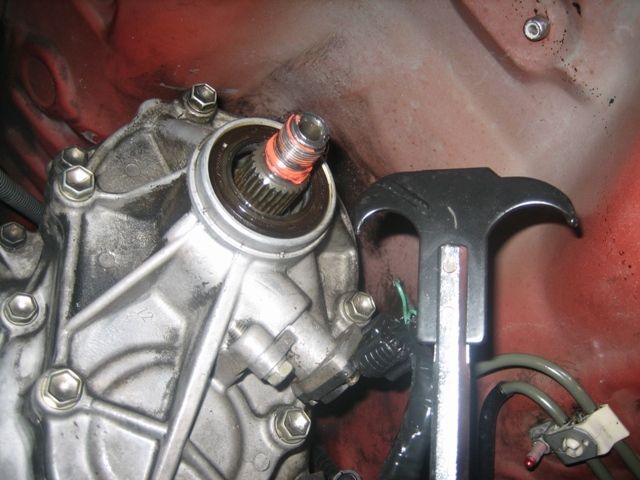
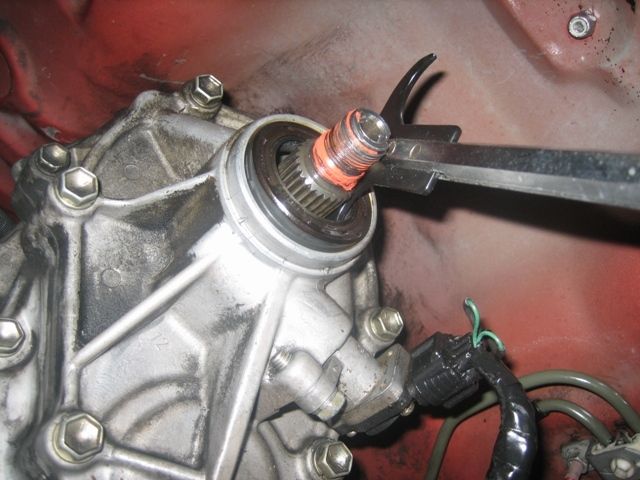
Unstake the 30mm nut, use a screwdriver, takes some time, but you're able to do it. Keep the truck in gear for this, otherwise the flange will just spin around.
(Note: the FSM says this is a non-reusable part, but you can, just clean it really good!)
(Step 3)
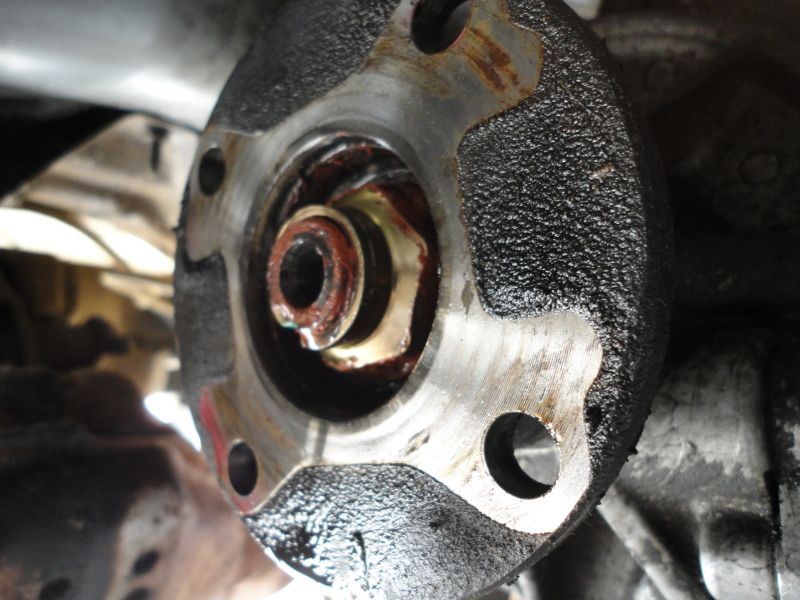
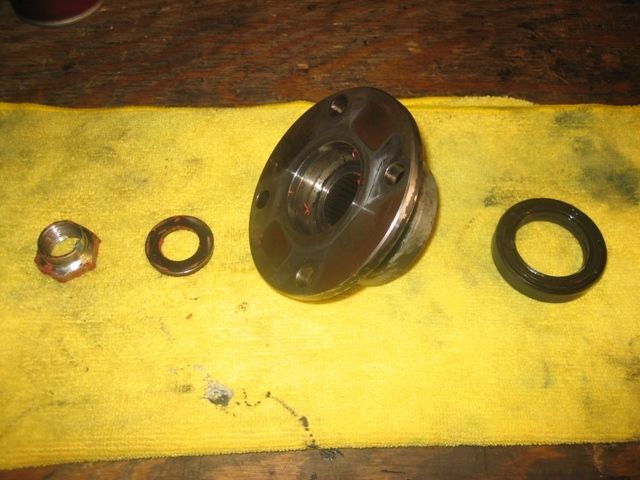
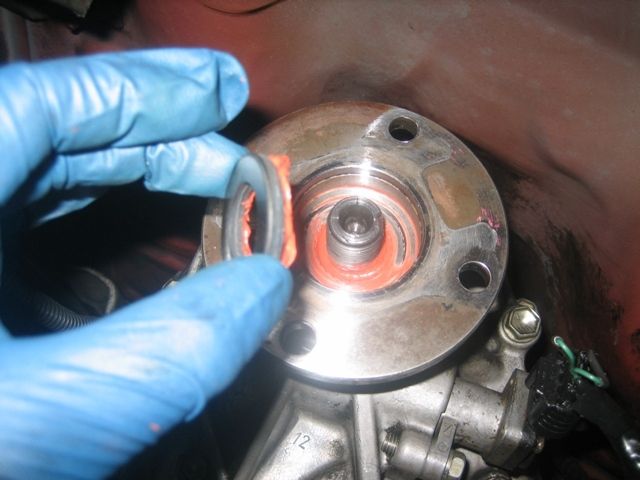
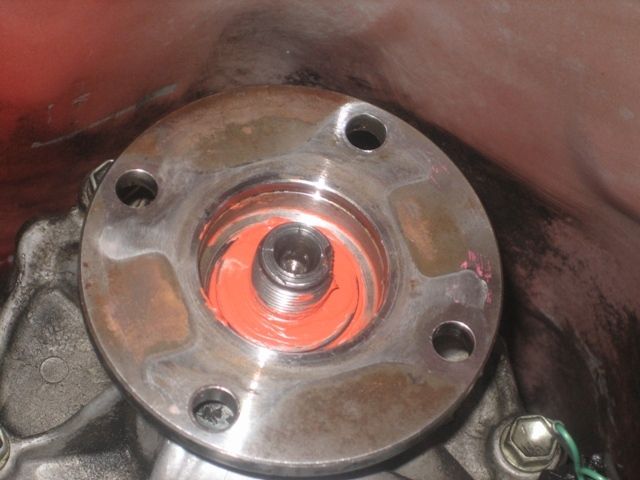
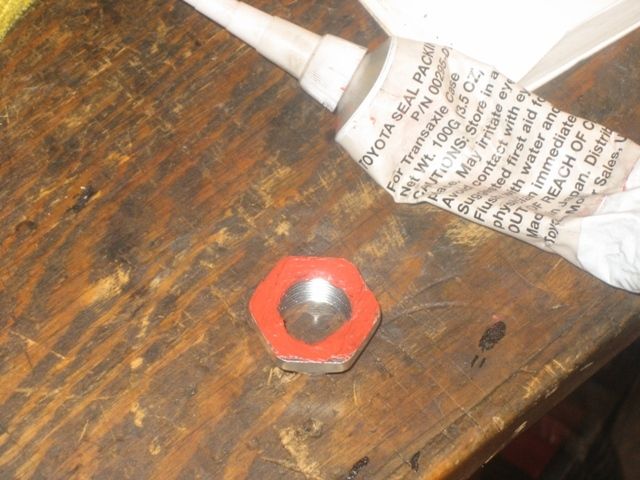
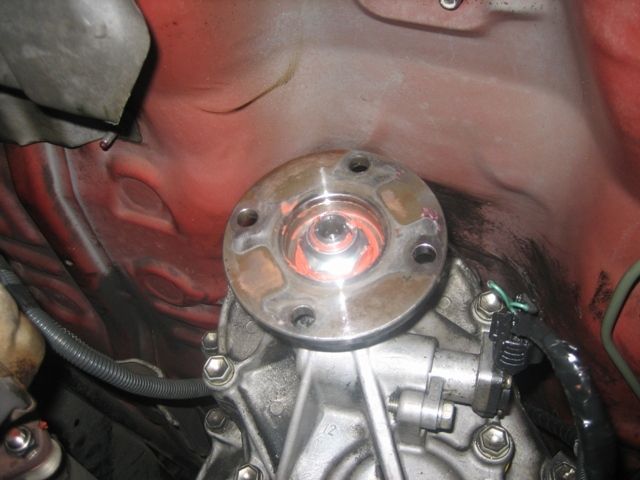
Remove the 30mm Nut and the Washer behind it. (Torque Value 90 lb/ft), clean these parts and the now removable companion flange. and get yourself some good RTV.
VVV That what I used VVV
http://www.pirate4x4.com/tech/billav...w/IMG_3951.jpg
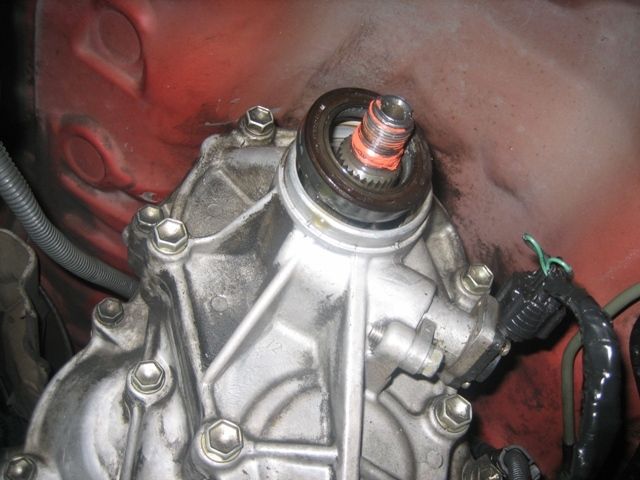
(Step 4)
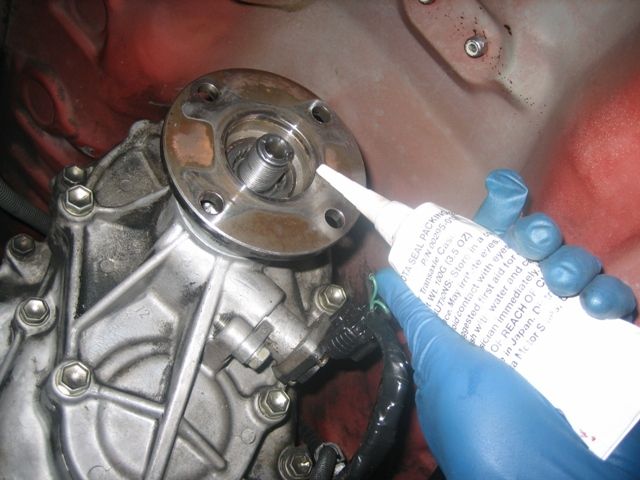
Apply the RTV to the External or Seal side of the CLEANED Companion flange, Apply to BOTH sides of the CLEANED Washer, and Apply to the REAR side of the Nut, and Torque to specification.
(Step 5)
Reattach the 4x14mm bolts to 54 lb/ft each.
(Step 6)
Take a drive.

The light of 1000 suns for all you who've helped me get this bugger fixed !
Here's the results of my work today, along with a little DIY instruction for all those who might need to do this in the future... (toastyjosh, I'm looking at you!)
(Step 1)
Remove the 4 14mm Bolts (Torque Value 54 lb/ft) holding the rear prop shaft, put onto jack stand... (you need to put the truck in gear for this)
(Step 2)
Unstake the 30mm nut, use a screwdriver, takes some time, but you're able to do it. Keep the truck in gear for this, otherwise the flange will just spin around.
(Note: the FSM says this is a non-reusable part, but you can, just clean it really good!)
(Step 3)
Remove the 30mm Nut and the Washer behind it. (Torque Value 90 lb/ft), clean these parts and the now removable companion flange. and get yourself some good RTV.
VVV That what I used VVV
http://www.pirate4x4.com/tech/billav...w/IMG_3951.jpg
(Step 4)
Apply the RTV to the External or Seal side of the CLEANED Companion flange, Apply to BOTH sides of the CLEANED Washer, and Apply to the REAR side of the Nut, and Torque to specification.
(Step 5)
Reattach the 4x14mm bolts to 54 lb/ft each.
(Step 6)
Take a drive.
The light of 1000 suns for all you who've helped me get this bugger fixed !
Mar 22, 2012 | 11:18 AM
#34
Registered User
Joined: Mar 2007
Posts: 210
Likes: 4
From: Santa Cruz, CA
Correction: It's now leaking worse than before. Somehow the whole assembly is pouring out 75w-90 oil... Seriously?
Back under the truck I go...
Back under the truck I go...
Last edited by waskillywabbit; Mar 22, 2012 at 11:21 AM. Reason: Watch the language please
Mar 26, 2012 | 09:00 PM
#36
Registered User
iTrader: (4)
Joined: May 2010
Posts: 720
Likes: 16
From: People's Republic of California
Can you post up a part no. or photo of the box of the seal you purchased? I think I need to do the same thing. It doesn't look bad at all in the photos, it actually looks clean, but that's because I wipe it down every other night so it doesn't drip onto the driveway.
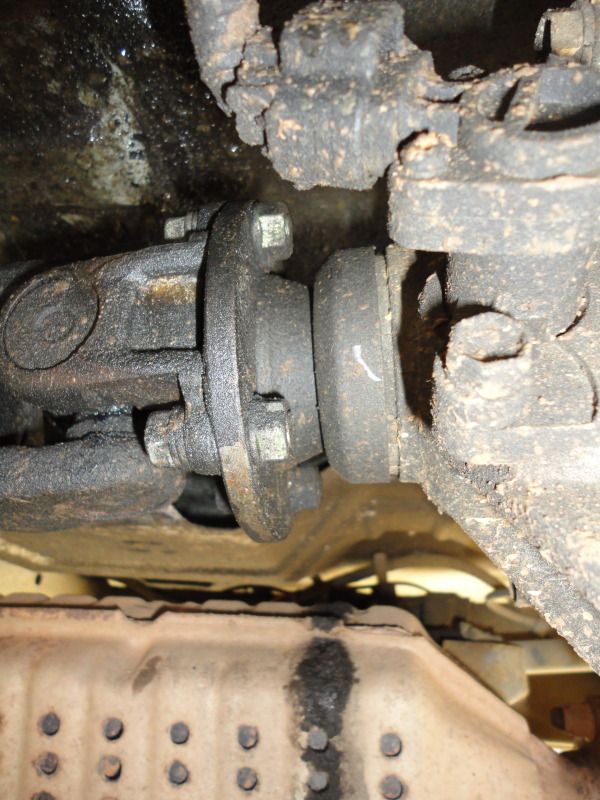
I think what I marked with the stars is the seal and nut/washer you were referring to. If so, then I can get the dealer part number from the site.
Mudhippy - Is putting the fipg/sealant in the manual or is that your own trick?
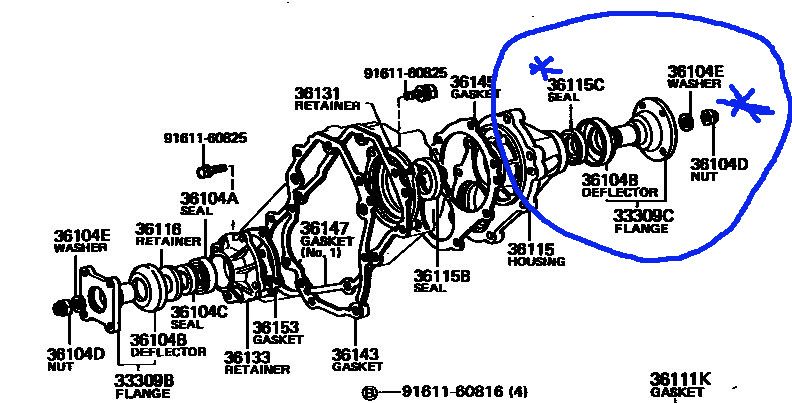
I think what I marked with the stars is the seal and nut/washer you were referring to. If so, then I can get the dealer part number from the site.
Mudhippy - Is putting the fipg/sealant in the manual or is that your own trick?
Apr 4, 2012 | 07:25 PM
#37
Registered User
iTrader: (4)
Joined: May 2010
Posts: 720
Likes: 16
From: People's Republic of California
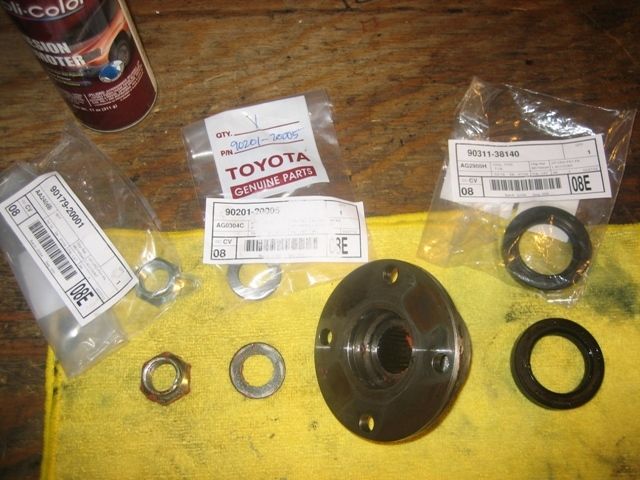
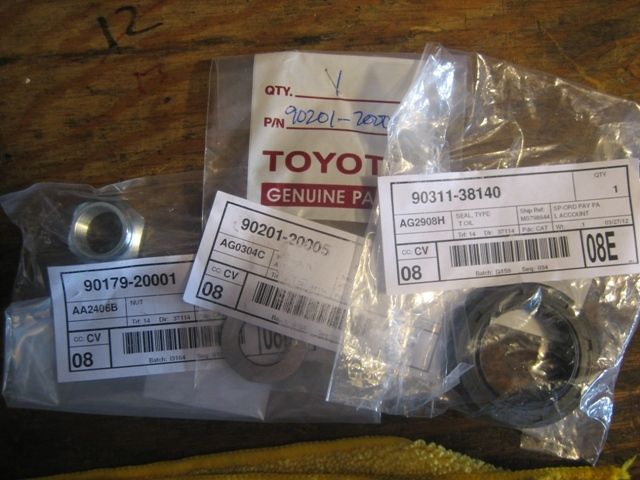
No reply earlier, but figured it out. For future "searchers", the diagram above is correct and the three parts noted (Washer, Nut, Seal) are the ones you will need (part numbers are below). Took about 2 1/2 hours while taking photos. Here's a little how to for anyone in the future. Done on a 1992 Pick-up with a 22RE W56 Transmission.
1. As someone stated earlier, I put the tranny in gear, locked the hubs, and put it in L4. Set the parking break.
2. I put a little mark so I could generally know the bolt holes were matched up the same way when I removed it. (don't know if you need to or not)
3. Using two 14mm wrenches and a ratchet and 14mm socket I removed the bolts.
4. Used a jack stand to hold the shaft up and in place.
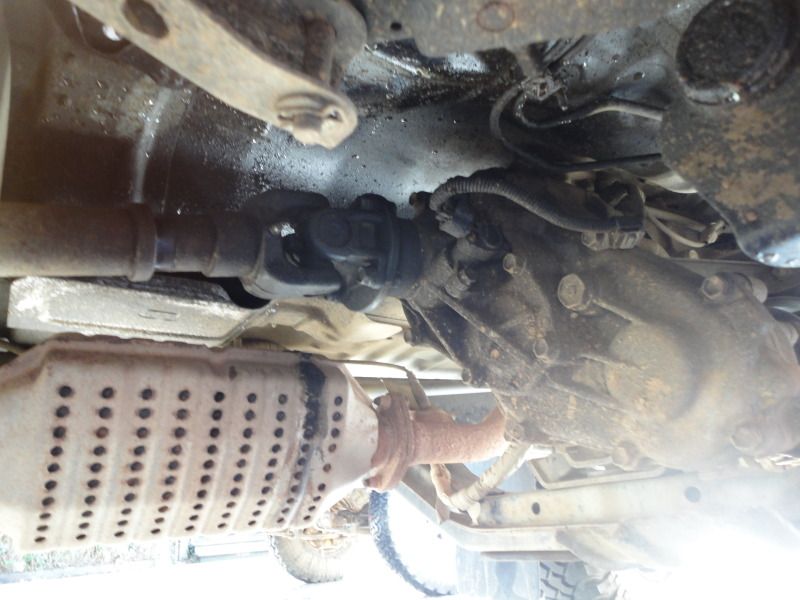
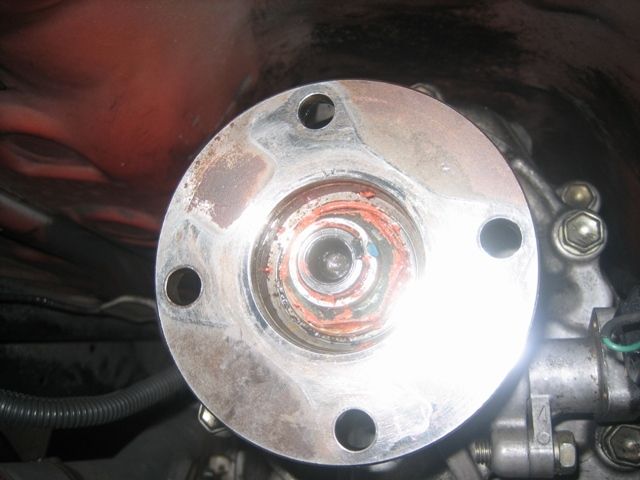
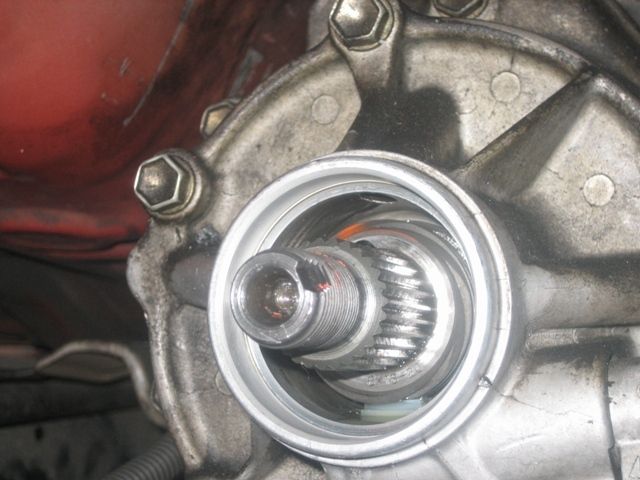
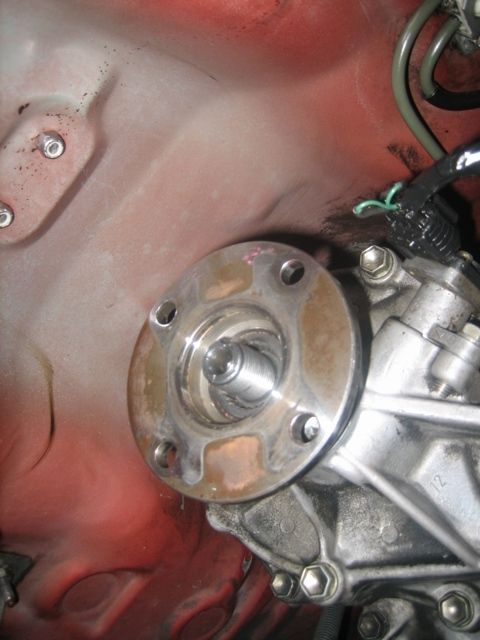
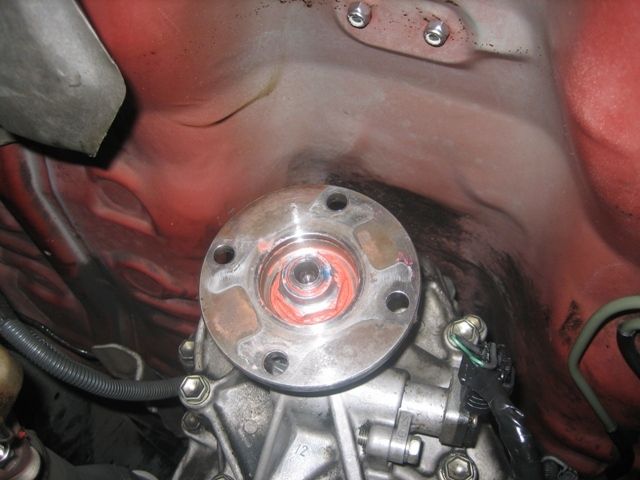
5. This is how it looks after removing the shaft.

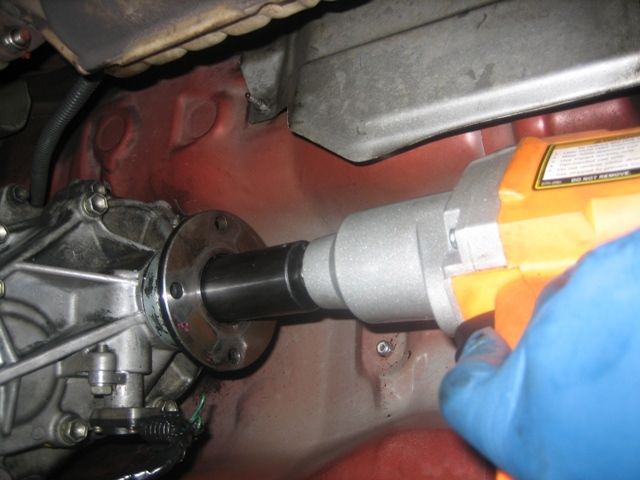
6. Using a small blade screw driver I undid the stake in the nut as best I could. Then used an impact wrench and 30MM socket it came off real easily.
7. Then grab a screw driver or a tiny pry bar and get the washer out.

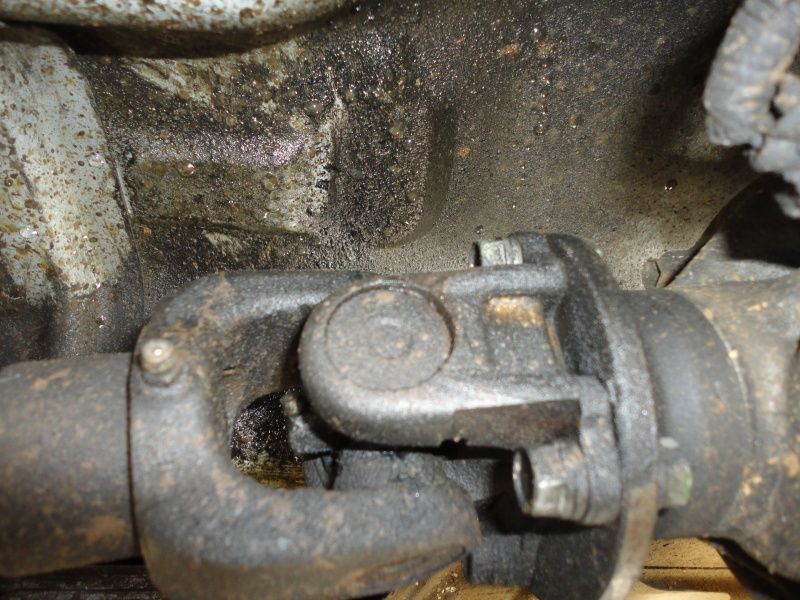
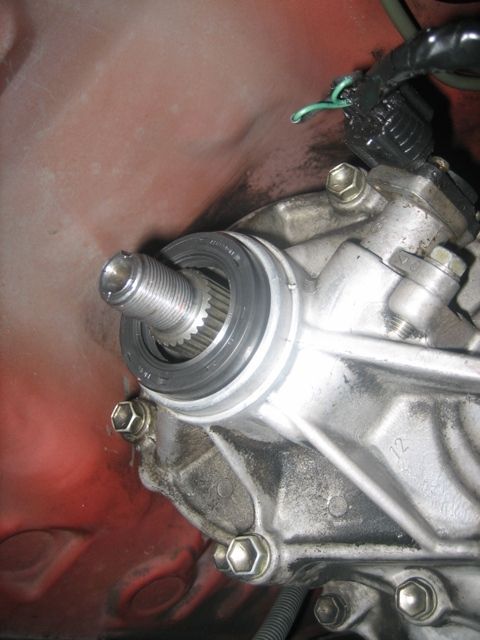
8. Then wiggle/pull off the companion flange. (A little fluid will come out so have a rag handy directly below it)

9. Now get the seal out. I used a little seal puller. Have your rag handy directly below because more fluid will drip out.
10. Here are the four parts you've just removed. Also, you can see the part numbers of the OEM replacement parts. The nut and washer were definitely re-usable, but since I already bought new ones I used them and kept the old ones as spares. The approximate price of the items from the dealer are: Seal - $6.50, Nut - $4.30, Washer - $2.20
11. Using a brass brush and carb cleaner, I cleaned all the old toyota red fipg off of the companion flange.
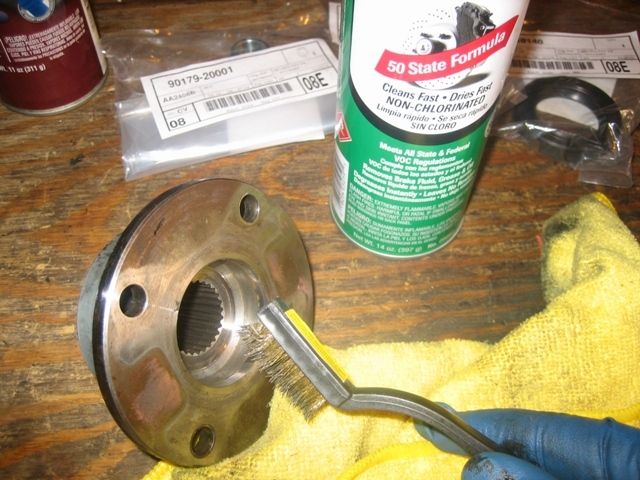
12. Cleaned off all the old fipg from the...whatever you call it.
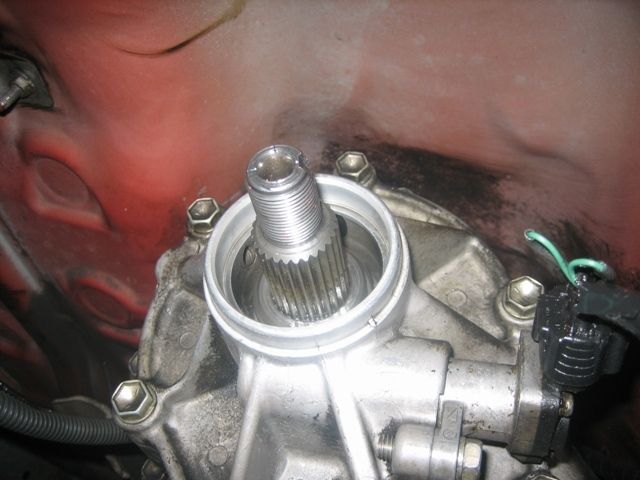
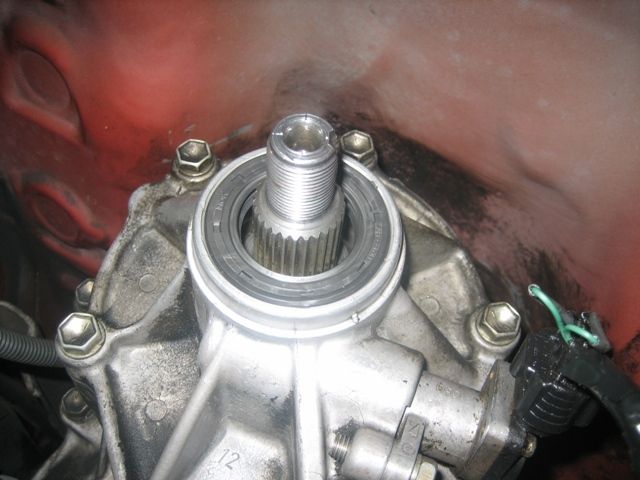
13. Here's a good shot of the area where you stake the nut so you know what you're dealing with. It's actually a pretty big divot.
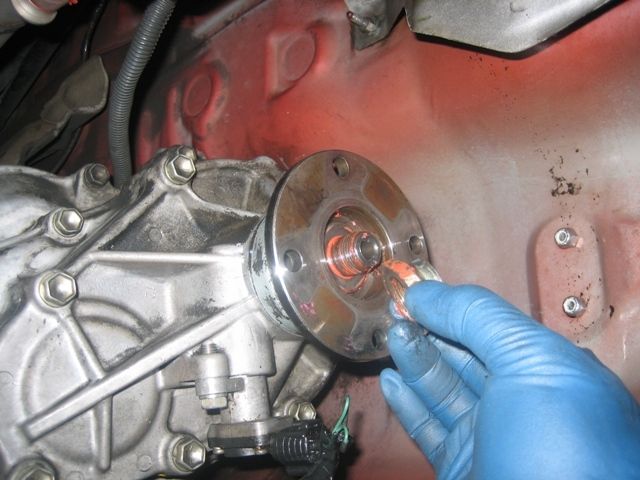
14. Put the new seal in using a big socket or carefully tapping it in evenly with whatever you have. Don't forget to put some grease on the inside, I did so had to use a brush to coat it.
15. I put some grease on the companion flange area that meets the new seal. On mine you could see the two lines from from the seal as it spins around it but there wasn't a groove. Then put it in the same general way you pulled it out.
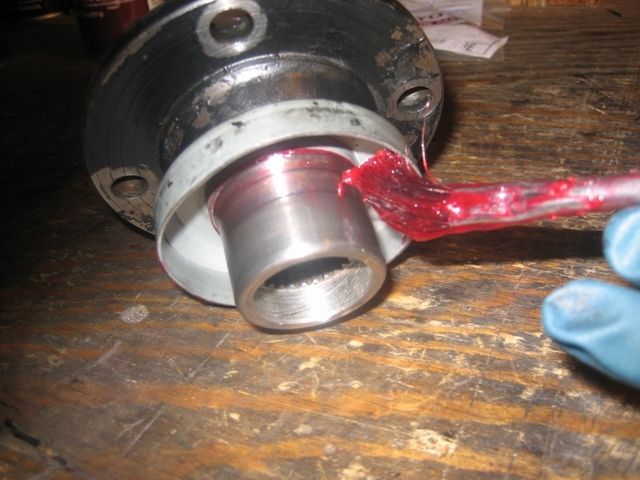
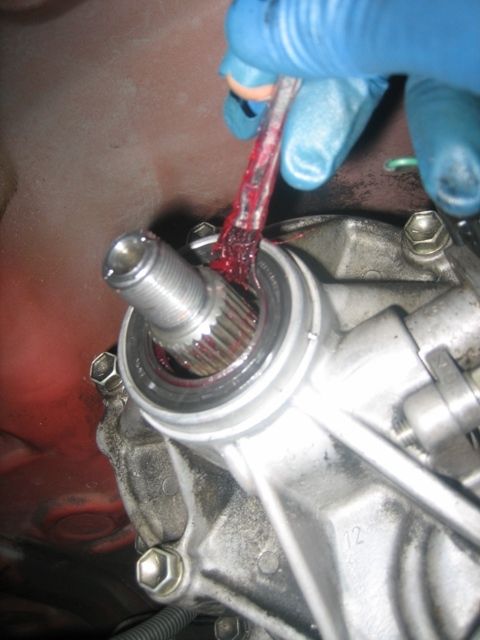
16. Grab your toyota red fipg (or whatever you're going to use) and put a good amount inside that concave area that's created by the companion flange and the spindle thingy.
17. Grab the washer and put some fipg on side that goes on first (more or less just packing more fipg in the same area. Then I put some on the other side of the washer and the back side of the nut. In hindsight, I don't think putting more fipg on the washer or nut matters much, but someone mentioned it earlier so I did.
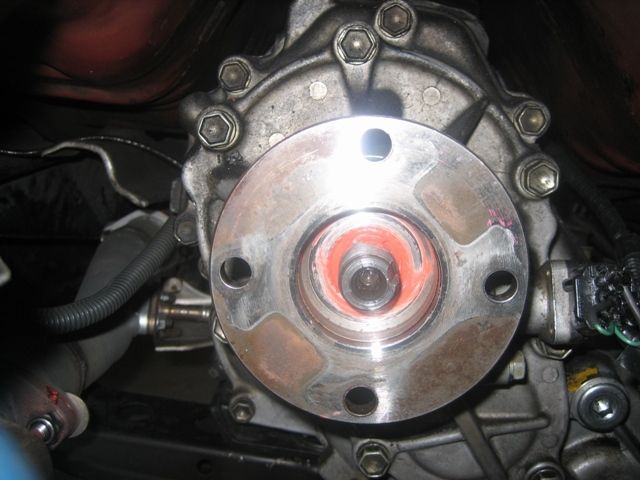
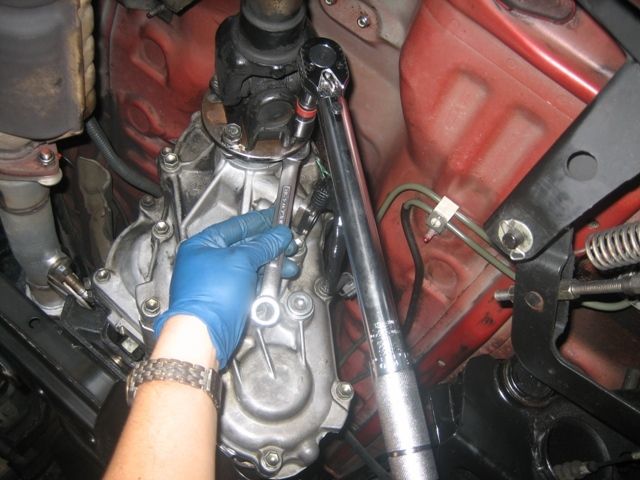
18. Grab your torque wrench and the 30MM socket and torque to 90 FT LBS.
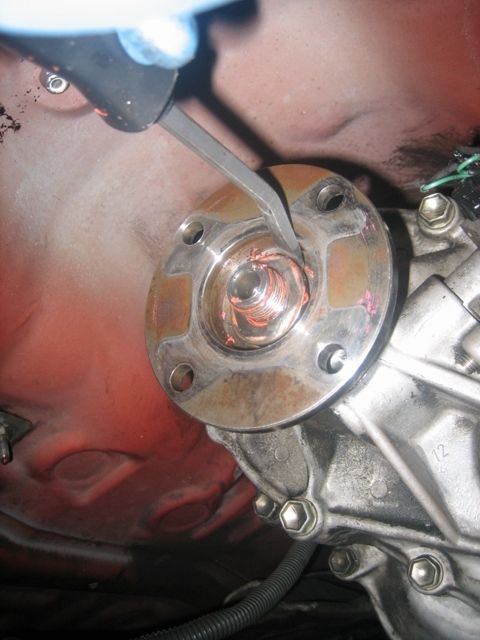
19. Now stake the new nut or re-stake the old nut. I had a hard time because of the angle I had, but managed to get it done ok. I also squirted in some loctite for good measure.
20. Now put the shaft back in place and the four bolts. Torque to 54 FT LBS. I have other vehicles to drive so I let the fipg dry for over 24 hours before driving. I don't know how long you need to wait, if any.
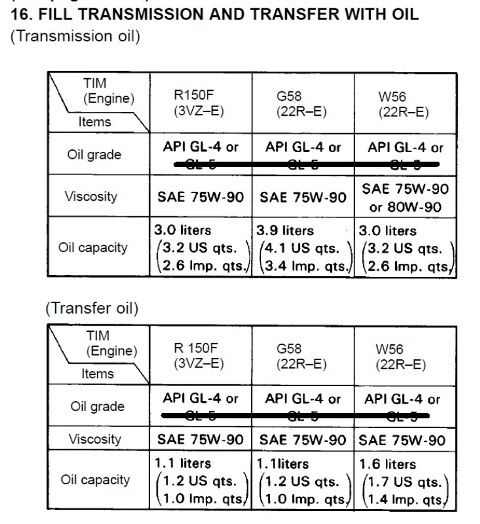
If you need to replace the fluid that was lost during the leak, the below is from the online pickup manual (Page MT-24). I lined out the "GL 5" since most agree that GL 4 is the way to go. Some popular synthetic brands that are used are Amsoil, Redline, and Royal Purple.
If I did something wrong please correct me and I'll put it in the thread so nobody else screws up!
1. As someone stated earlier, I put the tranny in gear, locked the hubs, and put it in L4. Set the parking break.
2. I put a little mark so I could generally know the bolt holes were matched up the same way when I removed it. (don't know if you need to or not)
3. Using two 14mm wrenches and a ratchet and 14mm socket I removed the bolts.
4. Used a jack stand to hold the shaft up and in place.
5. This is how it looks after removing the shaft.
6. Using a small blade screw driver I undid the stake in the nut as best I could. Then used an impact wrench and 30MM socket it came off real easily.
7. Then grab a screw driver or a tiny pry bar and get the washer out.
8. Then wiggle/pull off the companion flange. (A little fluid will come out so have a rag handy directly below it)
9. Now get the seal out. I used a little seal puller. Have your rag handy directly below because more fluid will drip out.
10. Here are the four parts you've just removed. Also, you can see the part numbers of the OEM replacement parts. The nut and washer were definitely re-usable, but since I already bought new ones I used them and kept the old ones as spares. The approximate price of the items from the dealer are: Seal - $6.50, Nut - $4.30, Washer - $2.20
11. Using a brass brush and carb cleaner, I cleaned all the old toyota red fipg off of the companion flange.
12. Cleaned off all the old fipg from the...whatever you call it.
13. Here's a good shot of the area where you stake the nut so you know what you're dealing with. It's actually a pretty big divot.
14. Put the new seal in using a big socket or carefully tapping it in evenly with whatever you have. Don't forget to put some grease on the inside, I did so had to use a brush to coat it.
15. I put some grease on the companion flange area that meets the new seal. On mine you could see the two lines from from the seal as it spins around it but there wasn't a groove. Then put it in the same general way you pulled it out.
16. Grab your toyota red fipg (or whatever you're going to use) and put a good amount inside that concave area that's created by the companion flange and the spindle thingy.
17. Grab the washer and put some fipg on side that goes on first (more or less just packing more fipg in the same area. Then I put some on the other side of the washer and the back side of the nut. In hindsight, I don't think putting more fipg on the washer or nut matters much, but someone mentioned it earlier so I did.
18. Grab your torque wrench and the 30MM socket and torque to 90 FT LBS.
19. Now stake the new nut or re-stake the old nut. I had a hard time because of the angle I had, but managed to get it done ok. I also squirted in some loctite for good measure.
20. Now put the shaft back in place and the four bolts. Torque to 54 FT LBS. I have other vehicles to drive so I let the fipg dry for over 24 hours before driving. I don't know how long you need to wait, if any.
If you need to replace the fluid that was lost during the leak, the below is from the online pickup manual (Page MT-24). I lined out the "GL 5" since most agree that GL 4 is the way to go. Some popular synthetic brands that are used are Amsoil, Redline, and Royal Purple.
If I did something wrong please correct me and I'll put it in the thread so nobody else screws up!
Last edited by Grego92; Apr 6, 2012 at 05:14 PM.
Apr 4, 2012 | 07:38 PM
#38
Registered User
Joined: Nov 2008
Posts: 2,306
Likes: 8
From: Cheyenne, Wyoming
Good job, one of the best step by steps I've seen.
Have you done the rear pinion yet? I had my rear pinion leaking so I did that and the one you just showcased. Same exact thing pretty much.
I ran into the same thing with the nuts and washers. Mine were both reuseable also.
Have you done the rear pinion yet? I had my rear pinion leaking so I did that and the one you just showcased. Same exact thing pretty much.
I ran into the same thing with the nuts and washers. Mine were both reuseable also.
Apr 6, 2012 | 09:37 AM
#40

Registered User
Joined: Apr 2012
Posts: 46
Likes: 0
From: burks falls ont canada
humm this is good info
i have to do the same got a leck at the rear shaft after the tranfer case too
there seem to be a strong vib coming from some where underthere
im deaf but a cant pin point where it is
so i been watching it and it lecking more ,,, so my question is ,, is there a bearing there ? be hind the seal?
wish i can take pics for this
93 t100 4x4 reg cab long box 31.5 3.0 slow with 404 000 km on her running like a champ


