
Morph

 Sep 15, 2009 | 05:15 AM
#84
Thread Starter
Contributing Member
Joined: Apr 2004
Posts: 5,464
Likes: 6
From: Arvada, Colorado
Thanks man!
Thanks! Yeah, the sliders are my favorite. And they work GREAT too.
I'm not sold on the front bumper yet, so I may redo parts of it. Not sure I like the tube, and not sure I like the wings. I'll have to see.
I'm not sold on the front bumper yet, so I may redo parts of it. Not sure I like the tube, and not sure I like the wings. I'll have to see.
 Sep 16, 2009 | 11:51 AM
#86
Thread Starter
Contributing Member
Joined: Apr 2004
Posts: 5,464
Likes: 6
From: Arvada, Colorado
A couple more pics from last weekend that were just emailed to me:
A sequence of the climb. I was all stoked because the truck was just crawling along, and then...WHOA! That doesn't feel good, BRAKES!
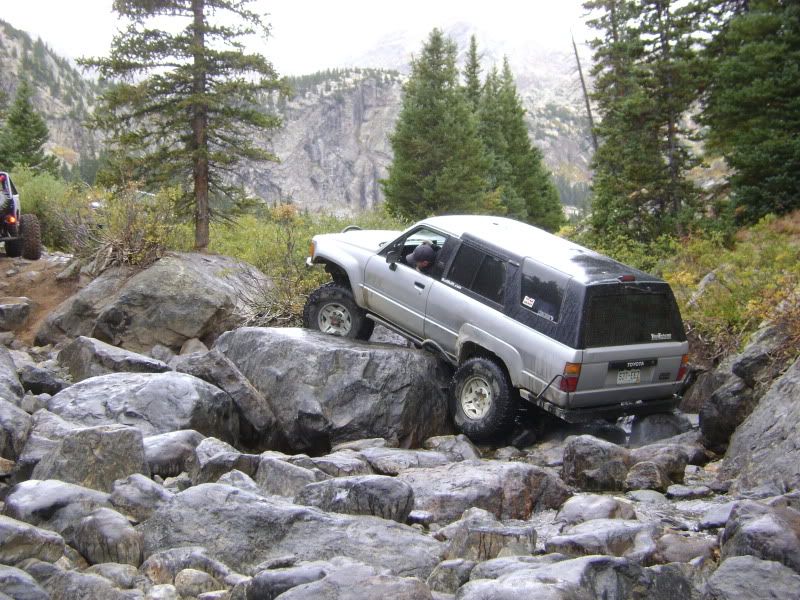
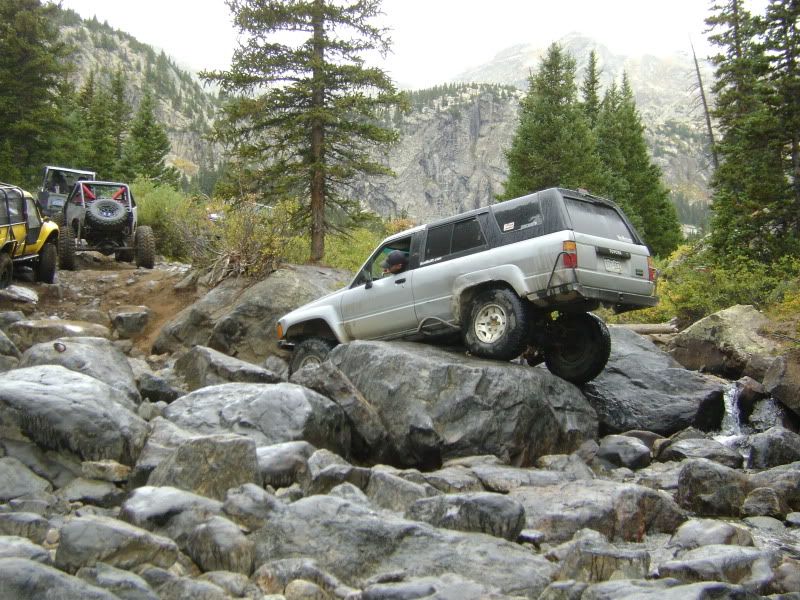
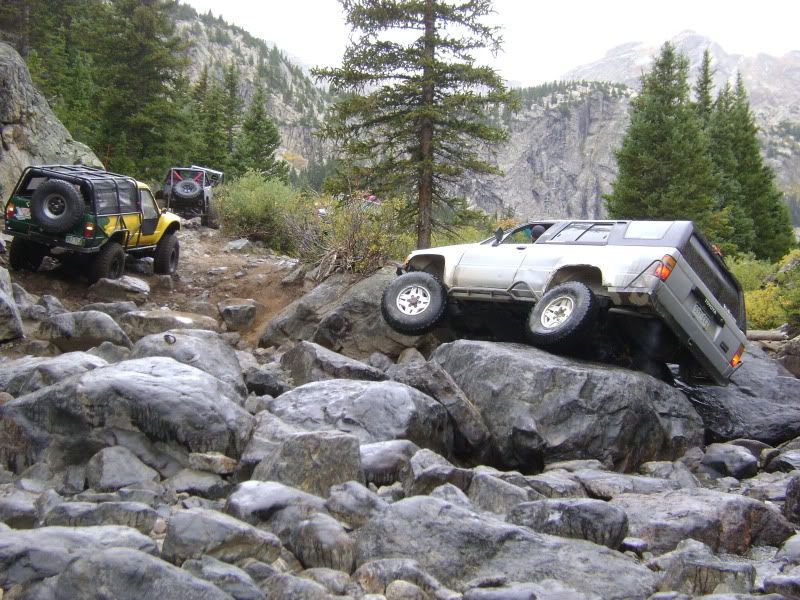
A sequence of the climb. I was all stoked because the truck was just crawling along, and then...WHOA! That doesn't feel good, BRAKES!
Dec 9, 2009 | 09:57 PM
#90
Registered User
Joined: Aug 2005
Posts: 420
Likes: 0
From: PDX, Oregon
Actually mate, the LTB's are 34"+X10.50 and the SSR (wich is a radial tire) is a 35+X10.50... LTB's go like stink in the loose muck and the big knobs grab rocks pretty well too (had a set on an old XJ years back). THe SSR is a great compromise between a full on Swamper and a Radial/Road friendly tire. They're loud as, b ut they balance and ride pretty well for a big heavy mud tire.
Personaly...THe KM2's are just calling to meif only they made 35x10.50 KM2's I'd probably have a "trail use only" set for the 4Runner.
Anyway, Beautiful truck mate. She sure is a mutant, but it still looks so clean and dare say stock-ish even. I love it.
Cheers
Dave
Personaly...THe KM2's are just calling to meif only they made 35x10.50 KM2's I'd probably have a "trail use only" set for the 4Runner.
Anyway, Beautiful truck mate. She sure is a mutant, but it still looks so clean and dare say stock-ish even. I love it.
Cheers
Dave
Dec 10, 2009 | 07:11 AM
#93
Contributing Member
Joined: Sep 2005
Posts: 5,400
Likes: 0
From: Clear Lake City, TX
No music on this video (stupid youtube) But AxleIke is in it!
http://www.youtube.com/watch?v=tjaMOgS72Aw
Then our friend Nate did that same rock as Isaac and got high centered
http://www.youtube.com/watch?v=wcoZemO7F2w
Dec 10, 2009 | 07:24 AM
#94
Thread Starter
Contributing Member
Joined: Apr 2004
Posts: 5,464
Likes: 6
From: Arvada, Colorado
Actually mate, the LTB's are 34"+X10.50 and the SSR (wich is a radial tire) is a 35+X10.50... LTB's go like stink in the loose muck and the big knobs grab rocks pretty well too (had a set on an old XJ years back). THe SSR is a great compromise between a full on Swamper and a Radial/Road friendly tire. They're loud as, b ut they balance and ride pretty well for a big heavy mud tire.
Personaly...THe KM2's are just calling to meif only they made 35x10.50 KM2's I'd probably have a "trail use only" set for the 4Runner.
Anyway, Beautiful truck mate. She sure is a mutant, but it still looks so clean and dare say stock-ish even. I love it.
Cheers
Dave
Personaly...THe KM2's are just calling to meif only they made 35x10.50 KM2's I'd probably have a "trail use only" set for the 4Runner.
Anyway, Beautiful truck mate. She sure is a mutant, but it still looks so clean and dare say stock-ish even. I love it.
Cheers
Dave
Thanks! My old man got plasma now too, so thats a lot more fun. Too bad he got it right AFTER I finished this section of the build.
Come on down, you'll have a good time. Someone around town can put you up for a few days, and we'll head up and camp and wheel!
Dec 10, 2009 | 07:25 AM
#95
Thread Starter
Contributing Member
Joined: Apr 2004
Posts: 5,464
Likes: 6
From: Arvada, Colorado
To be fair, that same trip as Nate got high centered, I got high centered as well. That was before this morph. Now, if Nate had a Flatbelly, he'd have as easy a time as me! LOL! And Nate has made that line too, just over to the right a bit more, but not much.
Dec 10, 2009 | 07:46 AM
#96
Contributing Member
Joined: Sep 2005
Posts: 5,400
Likes: 0
From: Clear Lake City, TX

And Isaac, I can't wait till the rebuild is ready. Let Troy and I know how we can help!
 Dec 13, 2009 | 08:29 AM
#97
Thread Starter
Contributing Member
Joined: Apr 2004
Posts: 5,464
Likes: 6
From: Arvada, Colorado
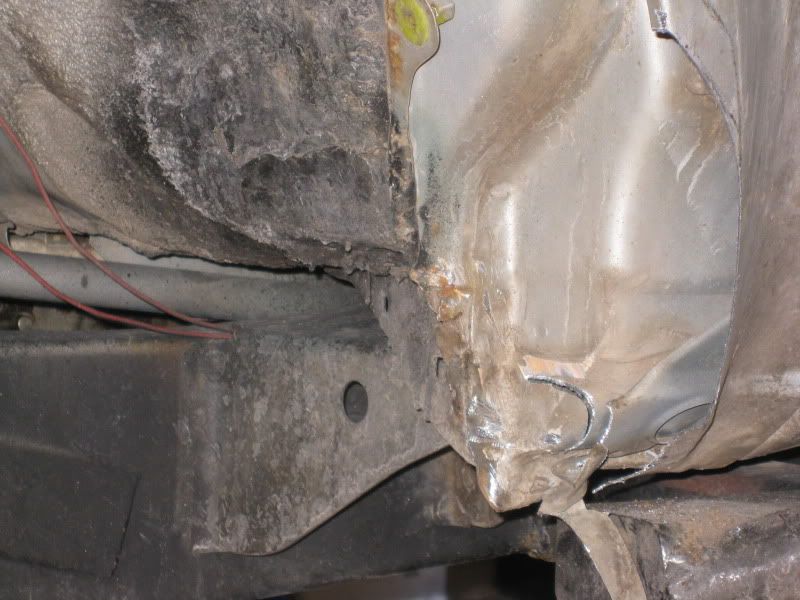
Started working on clearing the new tires today...WOW. They hit a lot of stuff.
The most obvious was the fenders themselves, at the back.
So, I got to trimming:
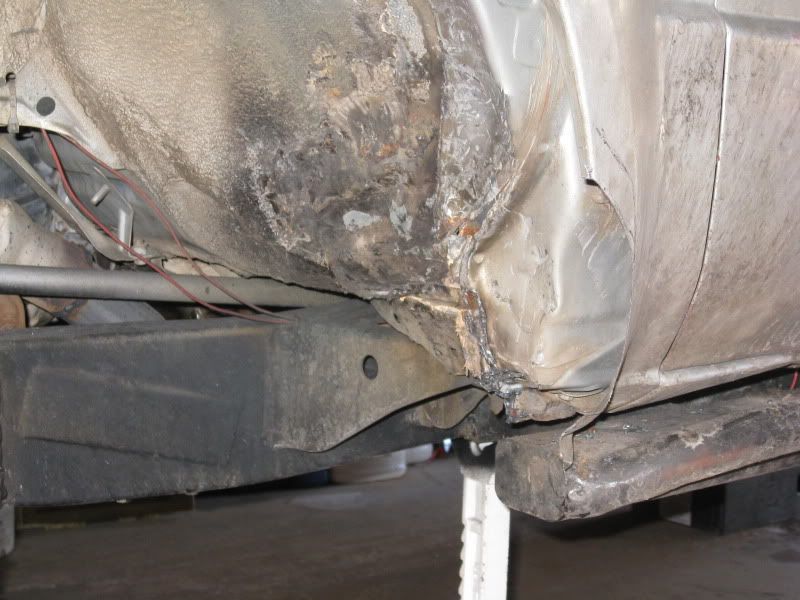
I started with a sawzall to make a clean cut without messing up the paint too much:
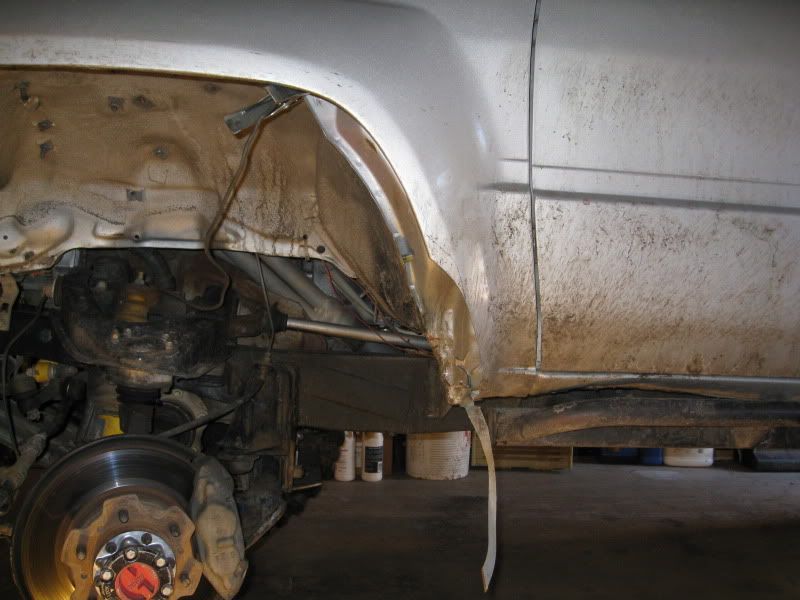
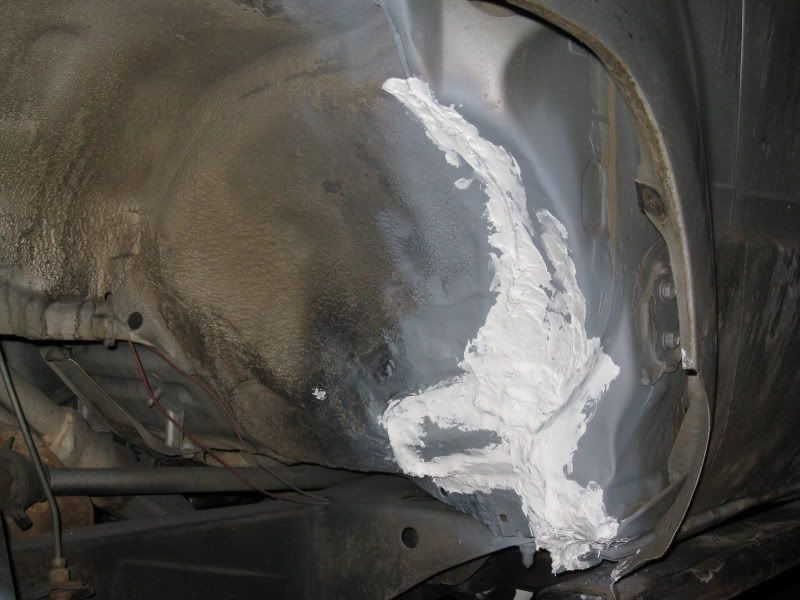
Then I got out the plasma and took off the pinch weld only, and then pounded the two halves of the inner fender together. I pounded the inner most part of the fender back first, and then pounded the outter part over that, which makes about a 3/4" overlap. Also took out the lower part of the rocker weld there, and pounded the lower section of the fender back in a bit too:
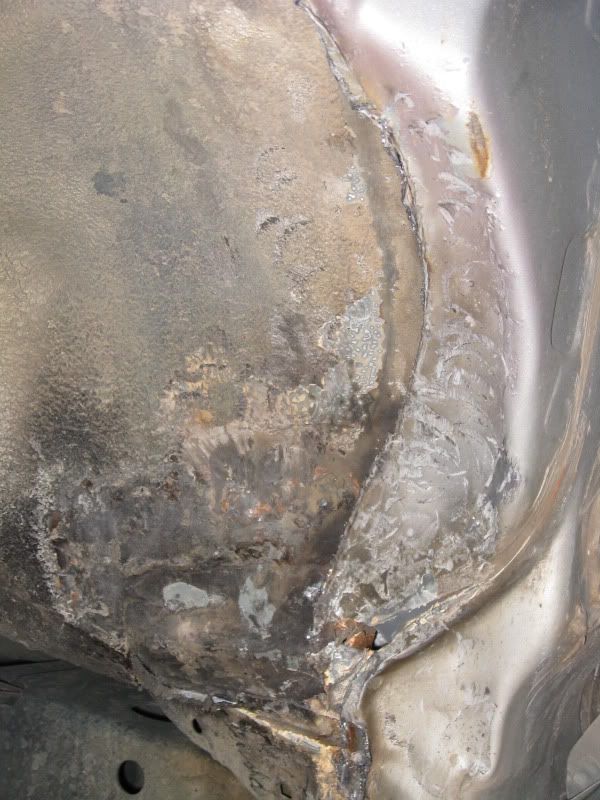
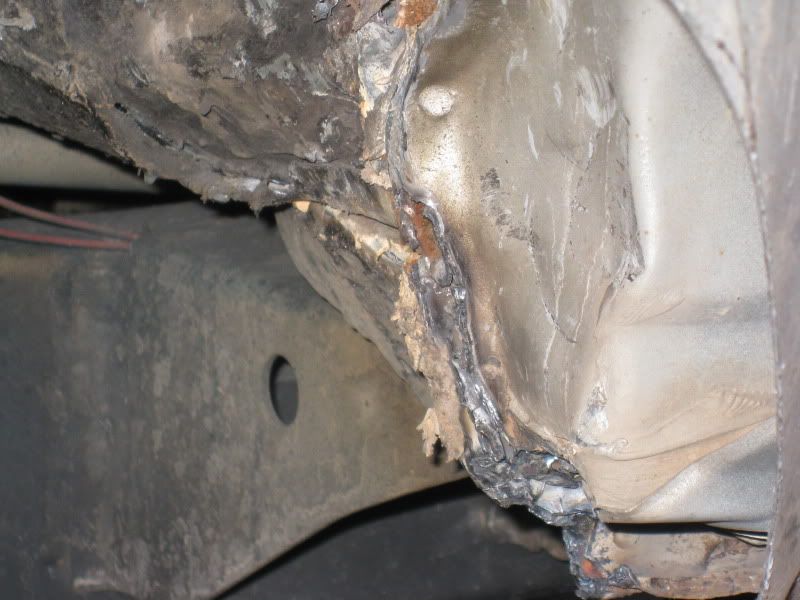
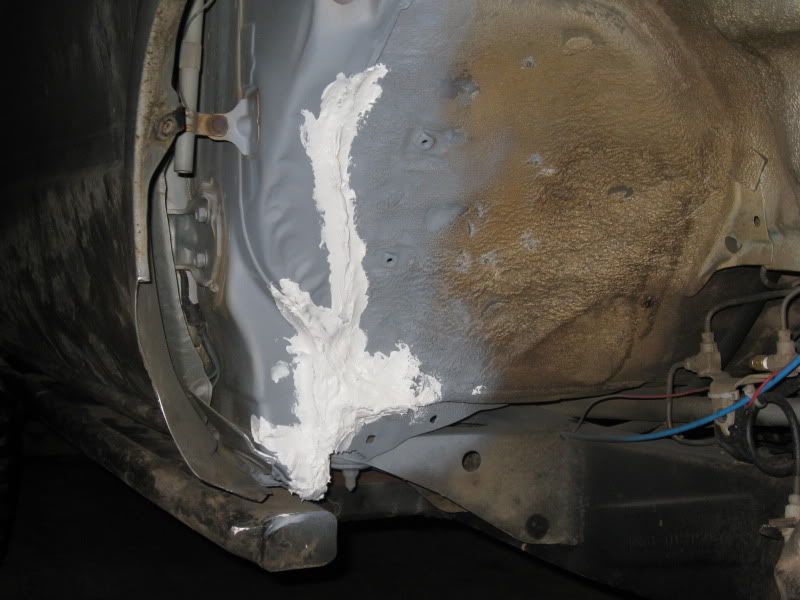
I then cleaned everything reall well, etch-primered everything, and when that was dry I put in a bunch of 3M Autobody seam sealant. This stuff worked really well on my tranny tunnel, and I like it a lot.
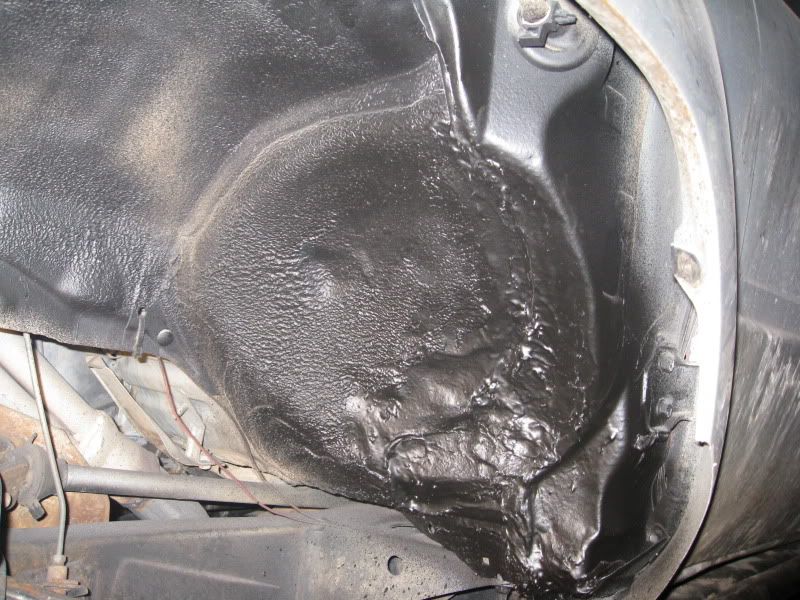
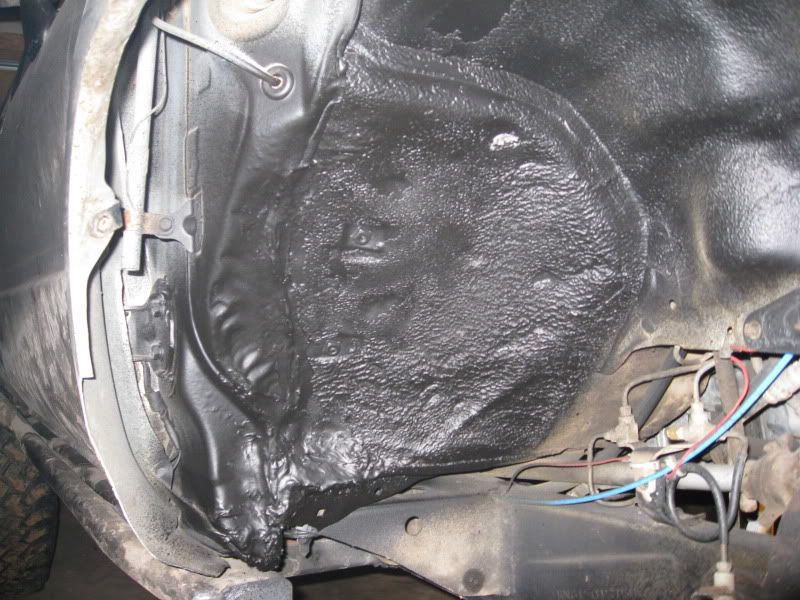
I did the same on the passenger side, but only took a shot of the finished product because I was pushing to get it done so the sealant could set up over night so that I can put the undercoating on it tommorow.
Tomorrow I'm going to work on the upper A-arms, which rub at full droop only.
And, to boot, my idler, which I put brand new bushings into just a few weeks ago, and haven't wheeled on at all, is now REALLY shot again. My new steering set up is going to be my very next project.
The most obvious was the fenders themselves, at the back.
So, I got to trimming:
I started with a sawzall to make a clean cut without messing up the paint too much:
Then I got out the plasma and took off the pinch weld only, and then pounded the two halves of the inner fender together. I pounded the inner most part of the fender back first, and then pounded the outter part over that, which makes about a 3/4" overlap. Also took out the lower part of the rocker weld there, and pounded the lower section of the fender back in a bit too:
I then cleaned everything reall well, etch-primered everything, and when that was dry I put in a bunch of 3M Autobody seam sealant. This stuff worked really well on my tranny tunnel, and I like it a lot.
I did the same on the passenger side, but only took a shot of the finished product because I was pushing to get it done so the sealant could set up over night so that I can put the undercoating on it tommorow.
Tomorrow I'm going to work on the upper A-arms, which rub at full droop only.
And, to boot, my idler, which I put brand new bushings into just a few weeks ago, and haven't wheeled on at all, is now REALLY shot again. My new steering set up is going to be my very next project.
Dec 13, 2009 | 09:35 PM
#100
Thread Starter
Contributing Member
Joined: Apr 2004
Posts: 5,464
Likes: 6
From: Arvada, Colorado
Finished up all 4 fenders today and one a-arm.
Didn't get pics of the rear.
First thing I did was undercoat:
Then I cut out the back part of my rear fenders so that they match up with my bumpers, and seam sealed them. I'm going to to more work to them at a later date, just didn't want them to tear up the tires.
Then I went to work on the a-arm. I was a bit pressed for time, so I only got the driver side done, because I wanted to take my time and make sure it was beefed in.
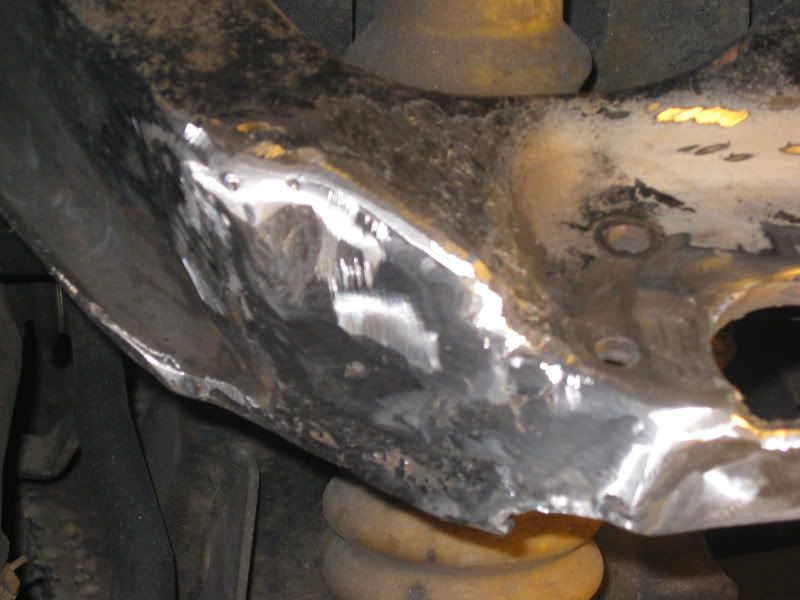
For starters, a quick shot of the arm after I cut off the lip, so I could accurately see where it was rubbing:
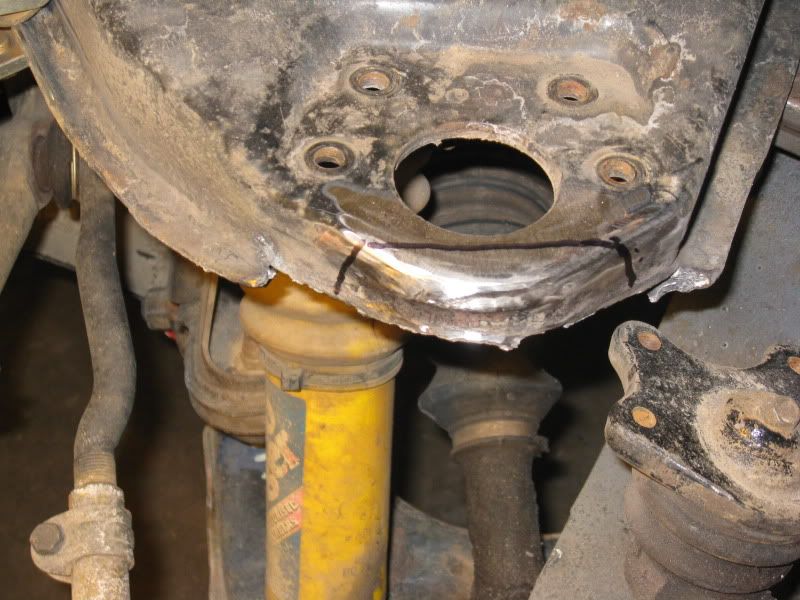
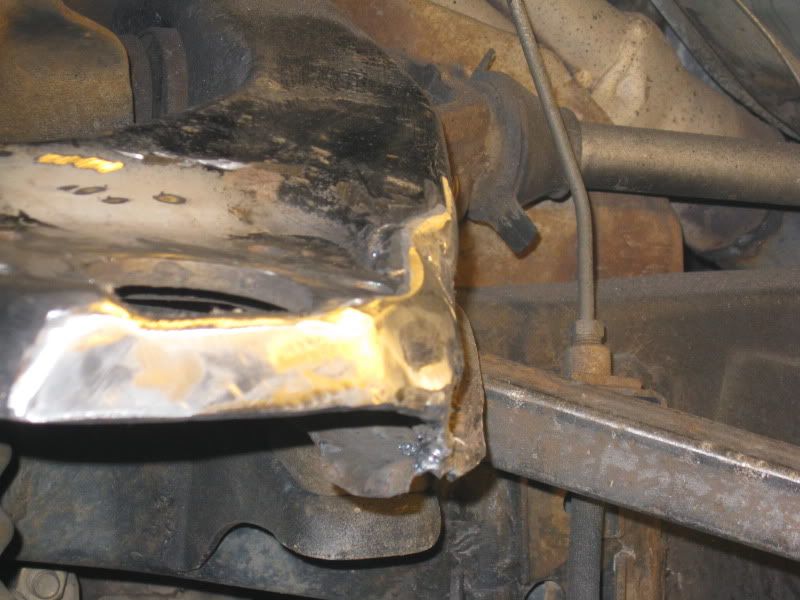
When I finished with the plasma, and checked for tire fitment, It looked like this:
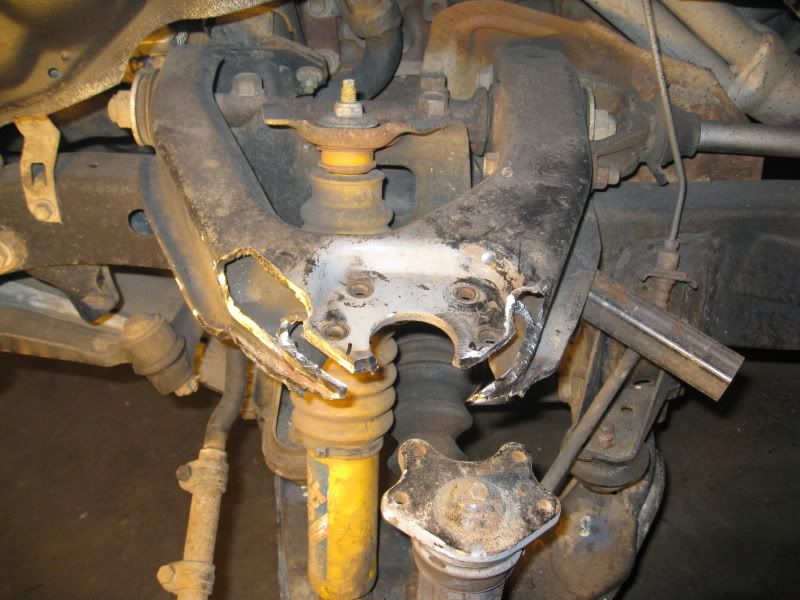
From there, I was busy cutting and fitting, and forgot to grab more pictures. I used 1/4" plate to fill in the sides, and 3/16" around the front area, and a piece of 1/8" across the gap. I used these various thicknesses, because the front area was where most of the rubbing occured, and a test fit of the tire with 1/4" up there still rubbed. Its plenty strong, just not overkill, though, I'm finding that overkill is almost never a bad thing in wheeling. But, its what was going to work.
I also had to significantly modify my ball joint spacer. Not really a big deal because the bolt surfaces are between balljoint and the a-arm, and I left plenty of material to maintain the integrity of the spacer.
Here is a shot after partial "cutting".
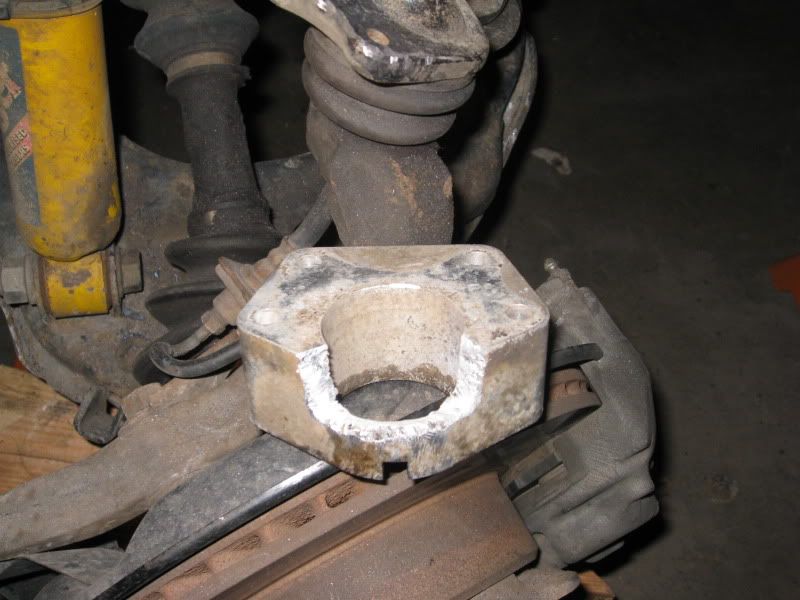
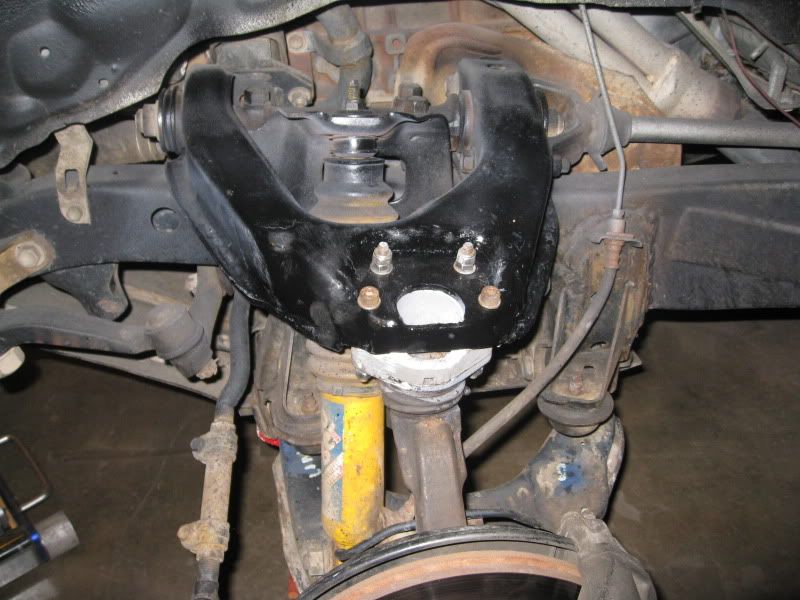
Here is the smooth ground finished product:
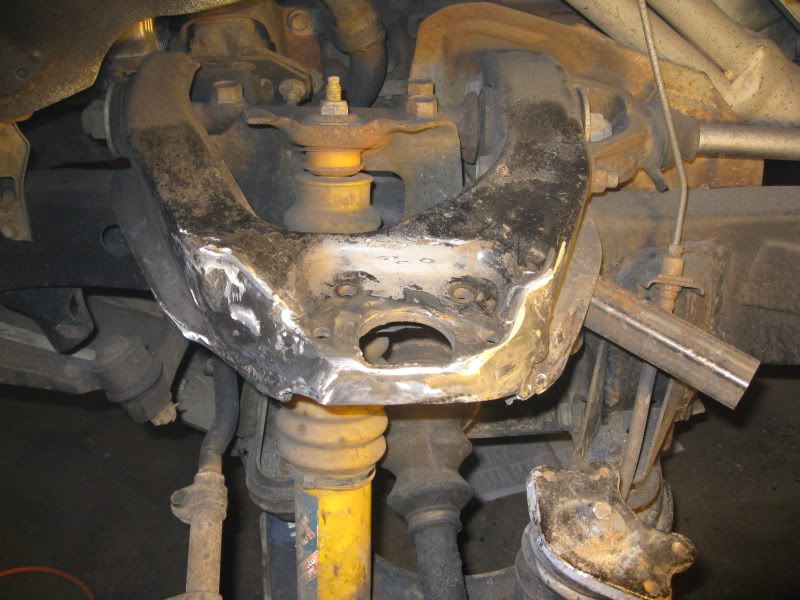
And after primer and paint:
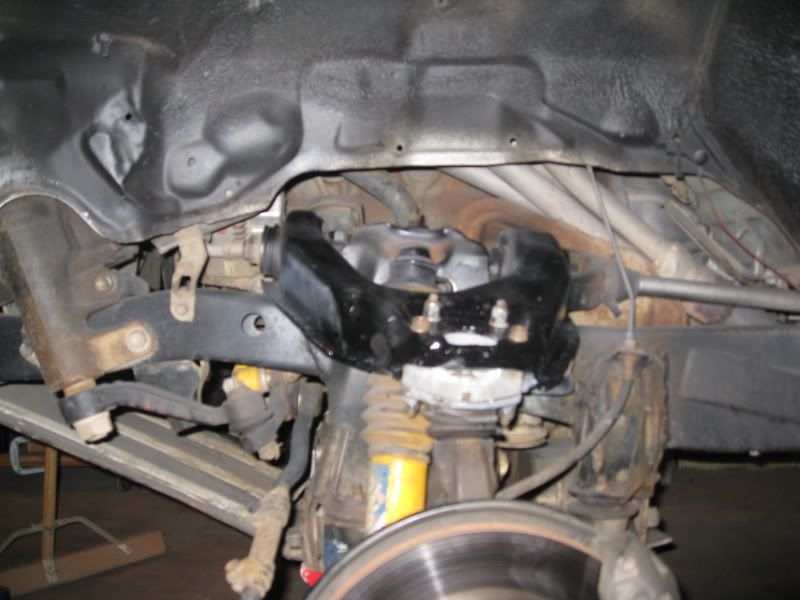
I checked before putting everything back on the ground, and it rubs the top of the rearward allen bolt on the ball joint spacer. I'm going to see if I can find a hex head to go there, and it should be rub free!
Didn't get pics of the rear.
First thing I did was undercoat:
Then I cut out the back part of my rear fenders so that they match up with my bumpers, and seam sealed them. I'm going to to more work to them at a later date, just didn't want them to tear up the tires.
Then I went to work on the a-arm. I was a bit pressed for time, so I only got the driver side done, because I wanted to take my time and make sure it was beefed in.
For starters, a quick shot of the arm after I cut off the lip, so I could accurately see where it was rubbing:
When I finished with the plasma, and checked for tire fitment, It looked like this:
From there, I was busy cutting and fitting, and forgot to grab more pictures. I used 1/4" plate to fill in the sides, and 3/16" around the front area, and a piece of 1/8" across the gap. I used these various thicknesses, because the front area was where most of the rubbing occured, and a test fit of the tire with 1/4" up there still rubbed. Its plenty strong, just not overkill, though, I'm finding that overkill is almost never a bad thing in wheeling. But, its what was going to work.
I also had to significantly modify my ball joint spacer. Not really a big deal because the bolt surfaces are between balljoint and the a-arm, and I left plenty of material to maintain the integrity of the spacer.
Here is a shot after partial "cutting".
Here is the smooth ground finished product:
And after primer and paint:
I checked before putting everything back on the ground, and it rubs the top of the rearward allen bolt on the ball joint spacer. I'm going to see if I can find a hex head to go there, and it should be rub free!


