
James Dean's 1993 4Runner Build-Up Thread
 Sep 6, 2009 | 10:51 AM
#1
Thread Starter
Contributing Member
Joined: Nov 2005
Posts: 606
Likes: 4
From: Tucson, AZ
James Dean's 1993 4Runner Build-Up Thread
I've been searching for an older truck or 4Runner I could fix up and display my factory replacement graphics on. As most know it's hard to find an older truck and even more difficult to find an older 4Runner that someone is selling that doesn't have something major wrong with it. That's because if you have a good Toyota, you keep a good Toyota. They usually get passed between family members or get sold to friends. My quest was finally fulfilled in Aprill of 07 thanks to a Service Writer at Desert Toyota who was selling a 93 4Runner. She bought it 3 years ago with a blown motor and put in a factory short block, along with multiple other parts and services to get it road worthy. The new motor has 50,000 miles now (just a baby). Hopefully a good starting point for the JDC "4Runner Project Build". I'm going to be fixing the minor dents and dings and then re-painting it. Fix a few other things and make some changes and upgrades. Below you will see the changes along with tips I found or used to accomplish my transformation.
Here are some pics of it when I first acquired it.
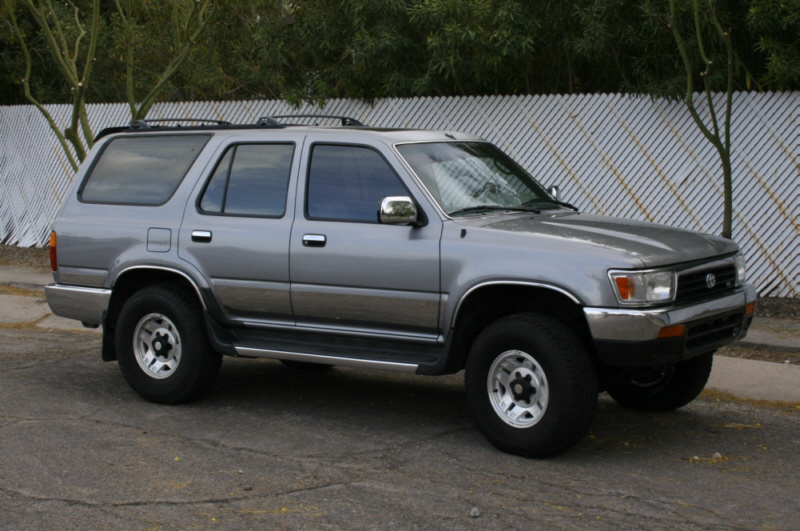

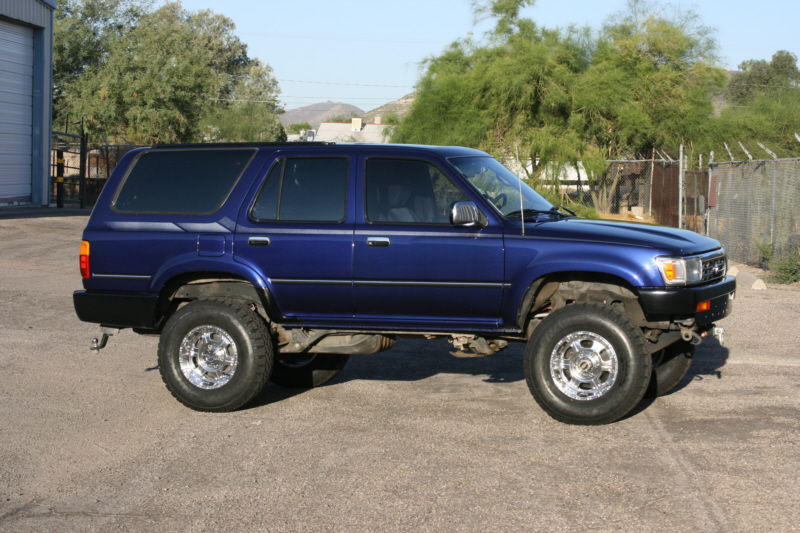
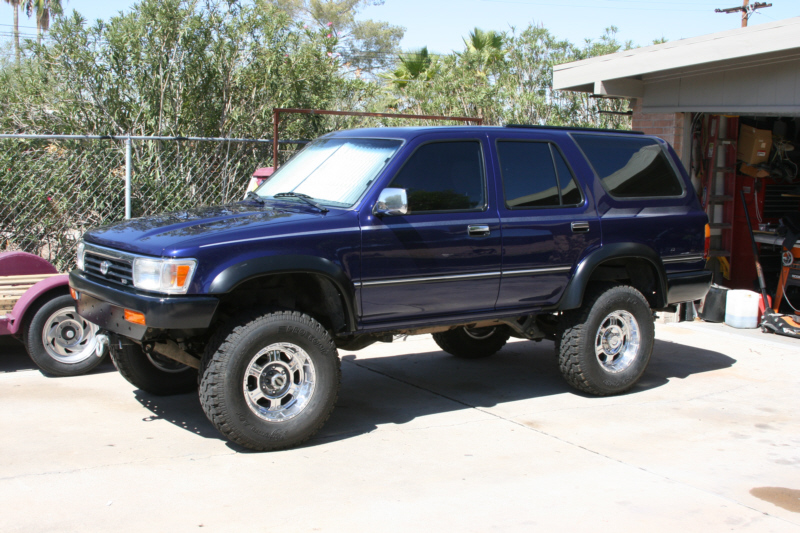
Overall in nice shape. A few dings and dents, typical sagging rear end ad dying paint job.
Here are some pics of it when I first acquired it.
Overall in nice shape. A few dings and dents, typical sagging rear end ad dying paint job.
 Sep 6, 2009 | 11:11 AM
#3
Thread Starter
Contributing Member
Joined: Nov 2005
Posts: 606
Likes: 4
From: Tucson, AZ
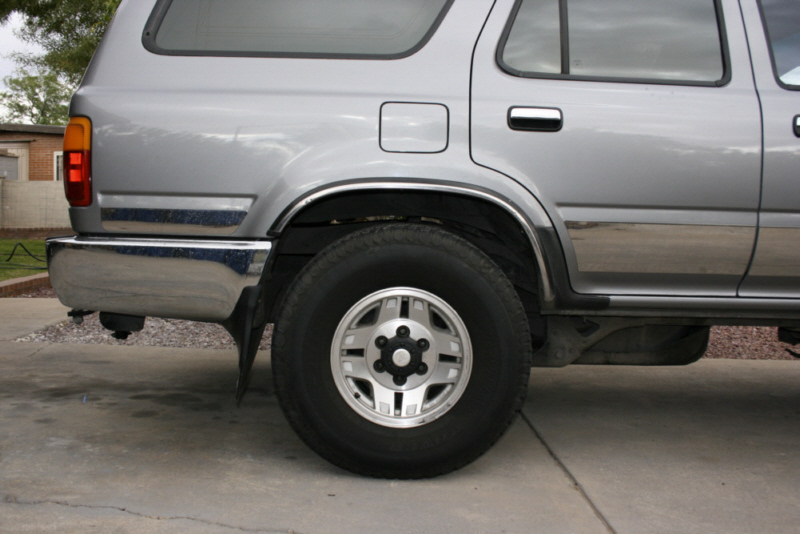
Suspension Changes
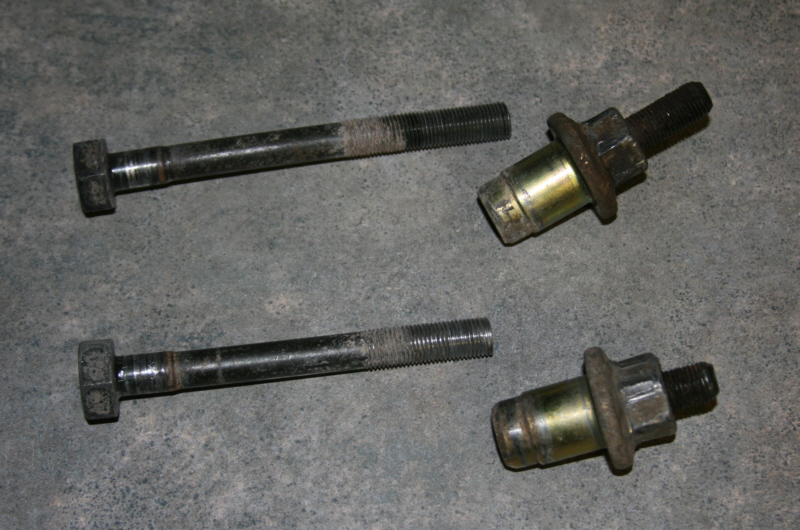
My first order of business was to correct the ever famous sagging suspension, especially in the rear. I didn't want to do a full 4" lift with a kit or a SAS, I just wanted a more rugged, beefier stance. Plus have more load capacity. I ordered Old Man Emu's Torsion Bars and 901 Heavy Duty rear coils springs from 4X4 Connection. The coils give 1.5" of lift and add 350lbs. load capacity over the factory coils. Upon realizing the 3-3.5" lift the new coils springs provided over the worn out originals, I then ordered 1.5" Upper Control Arm Spacers from 4Crawler Offroad to put in at the same time as the new OME torsion Bars. I didn't want to achieve my front lift by cranking up the torsion bars. I found the easiest way to R & R the passenger side torsion bar, was to remove the front skid plate and slide the bar forward out the front, between the steering linkage and the steering stabilizer. The driver side comes out with little problems out the back. Be prepared for the torsion bar adjusting bolts to break. Despite spraying with lubricants for 3 days previous, mine snapped after about 10 turns. Toyota part #s: Bolt 90101-12159, Nut 90179-12074. I figured it wouldn't hurt to have new bolts anyway. I applied anti-seize on all threads and pivot points to prevent breakage again. Both companies (4X4 Connection and 4Crawler Offroad) response and help to my order and questions was awesome. Parts shipped and arrived as promised, one of my biggest pet peeves. Nothing worse than being told something is in stock, but they meant in China.

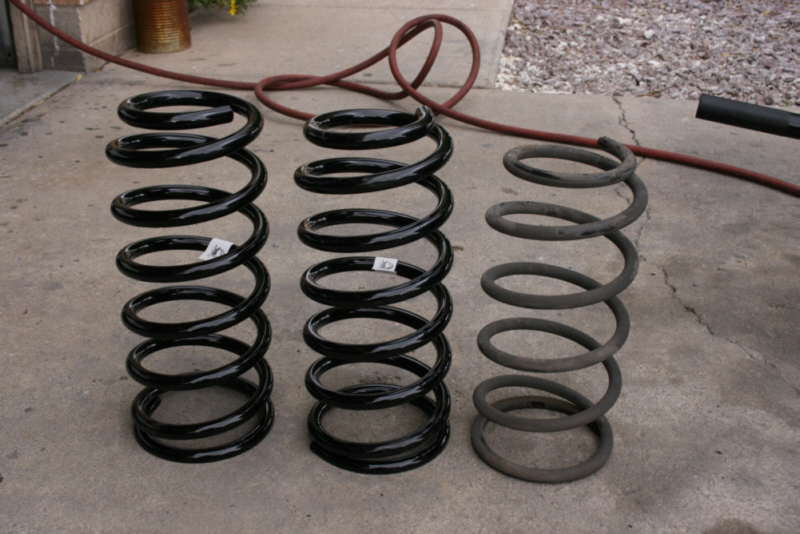

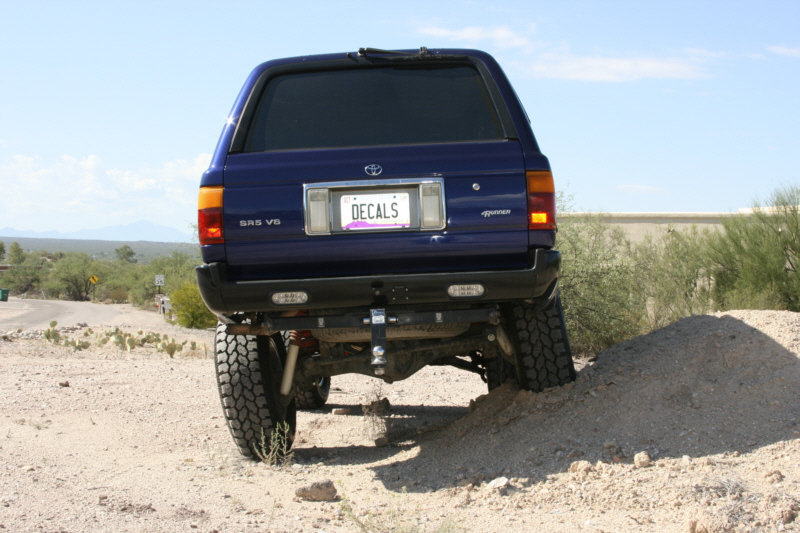
To help correct the offset rear end is a panhard bar drop bracket from 4Crawler Offroad. I had a 5" difference between my frame mount and axle mount for the bar, so a 4" drop bracket should correct the majority of my offset. I fabricated a bracket to reposition the rear brake proportioning sensor arm up the 2" to bring it back to the stock ride height position for more accurate braking. I immediately noticed a difference to a more even stop instead of the previous dive the front used to make. I plan on making a new adjustable panhard bar to finish correcting the 3/8" offset of my rear end. It's hard to do a proper 4wheel alignment with the back off center.

I was able to achieve 15.75" clearance from rim to wheel well up front and 15" from rim to wheel well in the back. Easily 1.5" - 2" higher than when it was new on the lot. The ride although a little stiffer, is still smooth with better handling than with the worn out original springs and bars. I was able to get the torsion bars, springs, spacers and drop bracket including S&H for under $500.
After my even, beefy stance was achieved with my lift I worried about what added weight with gear and towing would do for my look. So back to Desert Rat for a pair of Air Lift Air Bags. Part # 60812 is supposed to give 1000lbs. of leveling lift. Although this job can be done with one person, Jerry from ProLine Graphics dropped by to assist me. After disconnecting the shocks, brake lines, upper links, sway bar and Panhard Bar the coil springs slid out for the bag install. A little soap on the bags makes for a easy install into the coils. After drilling and deburring a 3/4" hole in the center of the perch for the airline, the install was no different than the removal, only backwards. I ran the lines up the lower link to the frame mount for the Schrader valve, a temp location till I install a air pump, tank and control system. With the max of 35lbs in the bags they gave me almost an inch of lift with no apparent effect on ride quality or feel.


The air bags as well as my future lockers will receive there O2 from an onboard air system in the next section. Here's how it sits after the coil and TB change.


To help correct the offset rear end is a panhard bar drop bracket from 4Crawler Offroad. I had a 5" difference between my frame mount and axle mount for the bar, so a 4" drop bracket should correct the majority of my offset. I fabricated a bracket to reposition the rear brake proportioning sensor arm up the 2" to bring it back to the stock ride height position for more accurate braking. I immediately noticed a difference to a more even stop instead of the previous dive the front used to make. I plan on making a new adjustable panhard bar to finish correcting the 3/8" offset of my rear end. It's hard to do a proper 4wheel alignment with the back off center.
I was able to achieve 15.75" clearance from rim to wheel well up front and 15" from rim to wheel well in the back. Easily 1.5" - 2" higher than when it was new on the lot. The ride although a little stiffer, is still smooth with better handling than with the worn out original springs and bars. I was able to get the torsion bars, springs, spacers and drop bracket including S&H for under $500.
After my even, beefy stance was achieved with my lift I worried about what added weight with gear and towing would do for my look. So back to Desert Rat for a pair of Air Lift Air Bags. Part # 60812 is supposed to give 1000lbs. of leveling lift. Although this job can be done with one person, Jerry from ProLine Graphics dropped by to assist me. After disconnecting the shocks, brake lines, upper links, sway bar and Panhard Bar the coil springs slid out for the bag install. A little soap on the bags makes for a easy install into the coils. After drilling and deburring a 3/4" hole in the center of the perch for the airline, the install was no different than the removal, only backwards. I ran the lines up the lower link to the frame mount for the Schrader valve, a temp location till I install a air pump, tank and control system. With the max of 35lbs in the bags they gave me almost an inch of lift with no apparent effect on ride quality or feel.
The air bags as well as my future lockers will receive there O2 from an onboard air system in the next section. Here's how it sits after the coil and TB change.
Last edited by James Dean; Sep 7, 2009 at 08:00 AM.
Sep 6, 2009 | 11:31 AM
#4
Thread Starter
Contributing Member
Joined: Nov 2005
Posts: 606
Likes: 4
From: Tucson, AZ
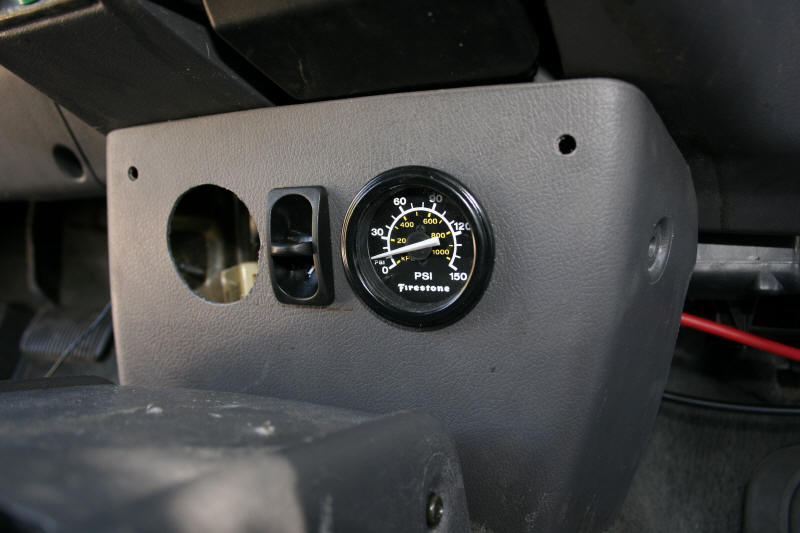
Onboard Air with Tank
The heart of my on-board air system is two Viair 480c pump and 2.5 gallon tank from Arnott Air Products. This feeds to a Firestone pneumatic controller and gauge thru 1/4" airlines and compression fittings provided by Michigan Truck Spring. I cut a second hole for a tank pressure gauge in addition to my bag psi gauge. This allows me to have both control over my air bags in my coil springs for ride height and leveling, as well as to have a quick release fitting on both sides of my ride for tire filling after crawling. The combination of a 100% duty cycle pump at 100psi and a 2.5 gallon tank makes quick time out of returning my 31s to road pressure after crawlin or filling my Zodiac in San Carlos. This also provides me with more than enough air if and when I install lockers.
After building a tray that would hold my Deep Cycle battery from General Power and my ViAir pump, I mounted it to the floor with 1/4"X20 Rivnuts and tapered head machine screws. Predrilled holes in the tray will allow for a HD hold down strap to keep that juice in place during those bouncy rides.


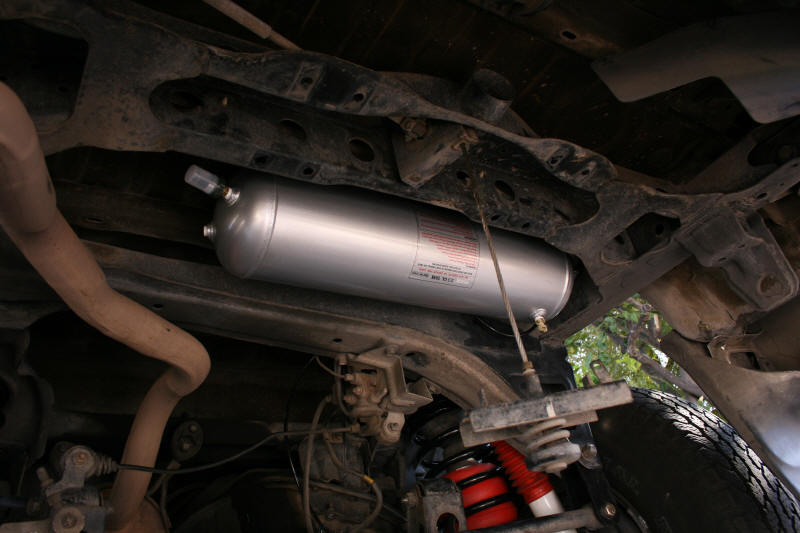

After building a tray that would hold my Deep Cycle battery from General Power and my ViAir pump, I mounted it to the floor with 1/4"X20 Rivnuts and tapered head machine screws. Predrilled holes in the tray will allow for a HD hold down strap to keep that juice in place during those bouncy rides.
Last edited by James Dean; Sep 6, 2009 at 11:33 AM.
Sep 6, 2009 | 11:35 AM
#5
Thread Starter
Contributing Member
Joined: Nov 2005
Posts: 606
Likes: 4
From: Tucson, AZ
Extended Brake Lines
In conjunction with my lift, small as it may be, I noticed the brake lines having an issue (being too short), mainly the rear. To the net I went. Although may companies list extended lines, I got mine from Trail Gear. When I opened the box they came in, I was amazed at the beauty and quality. Stainless steel braided lines covered in clear with billet ends. A definite upgrade in looks and performance. As you can see in the pics below the originals are just too short. Even in the sitting position they are barely long enough.
First remove old brake line. Then remove the nuts that hold the proportioning valve in place and slide bracket out. Cut angle tab off, clean up cut and drill hole for new brake line restraint. Insert a 5/16" X 3/4" bolt to hold new bracket. Re-install bracket. Finish off by installing new brake line. I looped my line so as to not rub on any body or suspension parts. Of coarse you will need to bleed and add brake fluid.


First remove old brake line. Then remove the nuts that hold the proportioning valve in place and slide bracket out. Cut angle tab off, clean up cut and drill hole for new brake line restraint. Insert a 5/16" X 3/4" bolt to hold new bracket. Re-install bracket. Finish off by installing new brake line. I looped my line so as to not rub on any body or suspension parts. Of coarse you will need to bleed and add brake fluid.
Last edited by James Dean; Sep 6, 2009 at 12:02 PM.
Sep 6, 2009 | 12:13 PM
#6
Thread Starter
Contributing Member
Joined: Nov 2005
Posts: 606
Likes: 4
From: Tucson, AZ
Manual Hub Swap
For several reasons I've decided to switch from my ADD (Auto Differential Disconnect) factory hubs to a set of Warn Premium Hubs (Part# 28761). First, it saves your CV joints and boots by not turning all the time, especially with a lifted vehicle it puts a greater angle and stress on them. Second, if anything up front breaks on the trail, you can unlock for the drive home, instead of the tow truck ride home. Third and most debatable, I'm hoping for a little more efficiency and power on the street. You will need Spindle Nut Conversion kit (Part# 29918) if you have Auto Hubs, but you will NOT need it if you have ADD.
Toyota switched from Auto Hubs to ADD hubs in 89 for trucks and 90 for 4Runners. This was great since the whole "back up on the trail" thing and you were not in 4wheel drive anymore with the Auto Hubs sucked. However, with ADD, your whole front axle, diff and front driveline, all turn, all the time. Can't help to think there's a little drag there. Just remember to drive in 4Wheel drive at least once a month to keep everything up front lubricated.
Although you don't need to take the wheels off, I did anyway. Remove dust cup, then axle bolt and spacer (washer), next remove acorn nuts and locking cones and drive flange. Install Manuel hub base with washers and acorn nuts and tighten to specs. Replace axle bolt and washer. Install hub cap assemble with gasket in correct place and tighten socket cap screws. Verify that your hubs engage and disengage. The whole job to me less than 30 minutes including taking the pictures.


Trending Topics
Sep 6, 2009 | 03:23 PM
#8
Thread Starter
Contributing Member
Joined: Nov 2005
Posts: 606
Likes: 4
From: Tucson, AZ
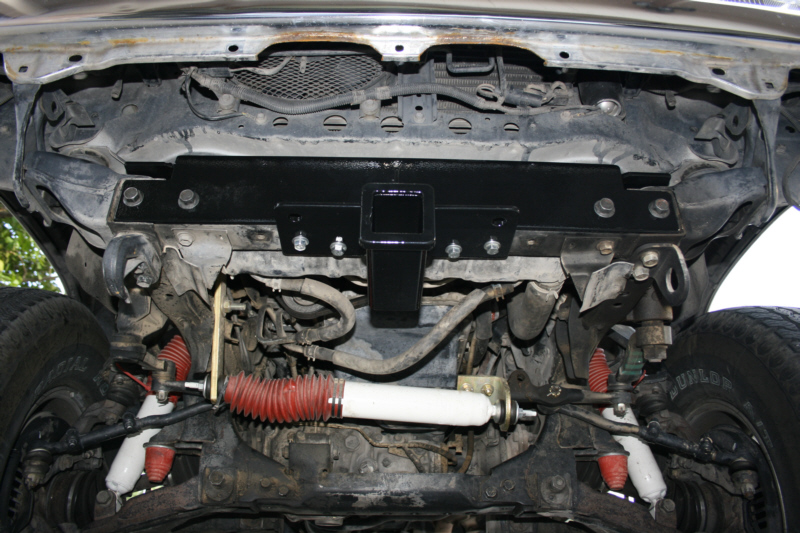
Front Bumper Mods and 2" Receiver
Since my lower front bumper valence was damaged when I got my 4Runner, I decided to remove it and make a custom one that included a 2" receiver. I believe the metal upper bumper looks fine from the side without the lower valence, so my build will just be in the center section up front. This will provide extra tire clearance and greater inclination angle.
The receiver bracket mounts to the frame where the bumper push rings normally bolt to and 6 other pre-existing threaded holes and 2 non-threaded holes in the frame. Yes a total of 10 mounting locations. The front receiver is positioned at the same height that the rear factory receiver is. This bracket is made from 1/4" steel and has a 2" receiver hitch and reinforcement gussets with link holes. More than enough for forward boat launches, towing or a wench cradle. Trimming a 1/4" off the top of the skip plate in the center and a notch for the receiver is required for the receiver bracket to clear on IFS models. I added a Transmission cooler because the receiver blocks some of the air that flow accross the bottom of the radiator (where the stock cooler is located).
The valance mounts to the bumper where the old plastic one originally mounted. Drilled holes for greater cooling and looks. This new valance stays in the center of the upper bumper and does not wrap around the sides. This provides more approach angle as well as more tire clearance. Valance is made from 1/8" steel and is black powder coated.
Sep 6, 2009 | 03:33 PM
#9
Thread Starter
Contributing Member
Joined: Nov 2005
Posts: 606
Likes: 4
From: Tucson, AZ
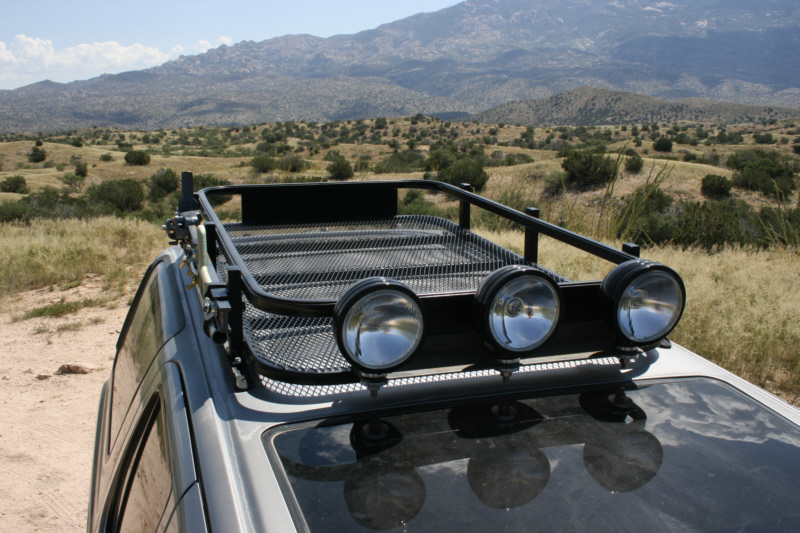
Heavy Duty Safari Basket Roof Rack
After removing the factory cross bars I made a basket rack the will hold my jack on one side and some leverage bars, shovel or pick on the other side. Made from 16 gauge 1" square tubing provides plenty of strength while remaining light weight. The bottom has 3 support cross-bars and is decked with 1/2 expanded metal. The front has a light mount that holds 3 KC's. The outer 2 have a driving pattern while the center is a spot. The combination of the 2 types makes for a well lit area in front of you.


Sep 7, 2009 | 05:03 AM
#12
Thread Starter
Contributing Member
Joined: Nov 2005
Posts: 606
Likes: 4
From: Tucson, AZ
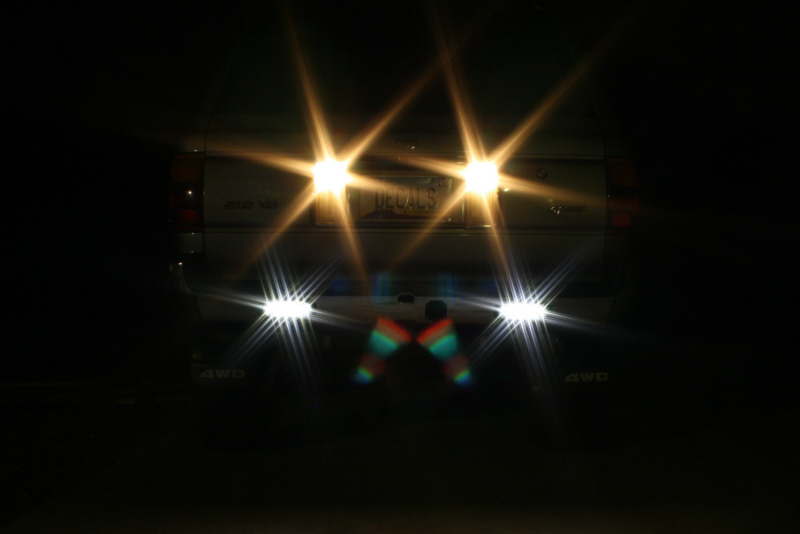
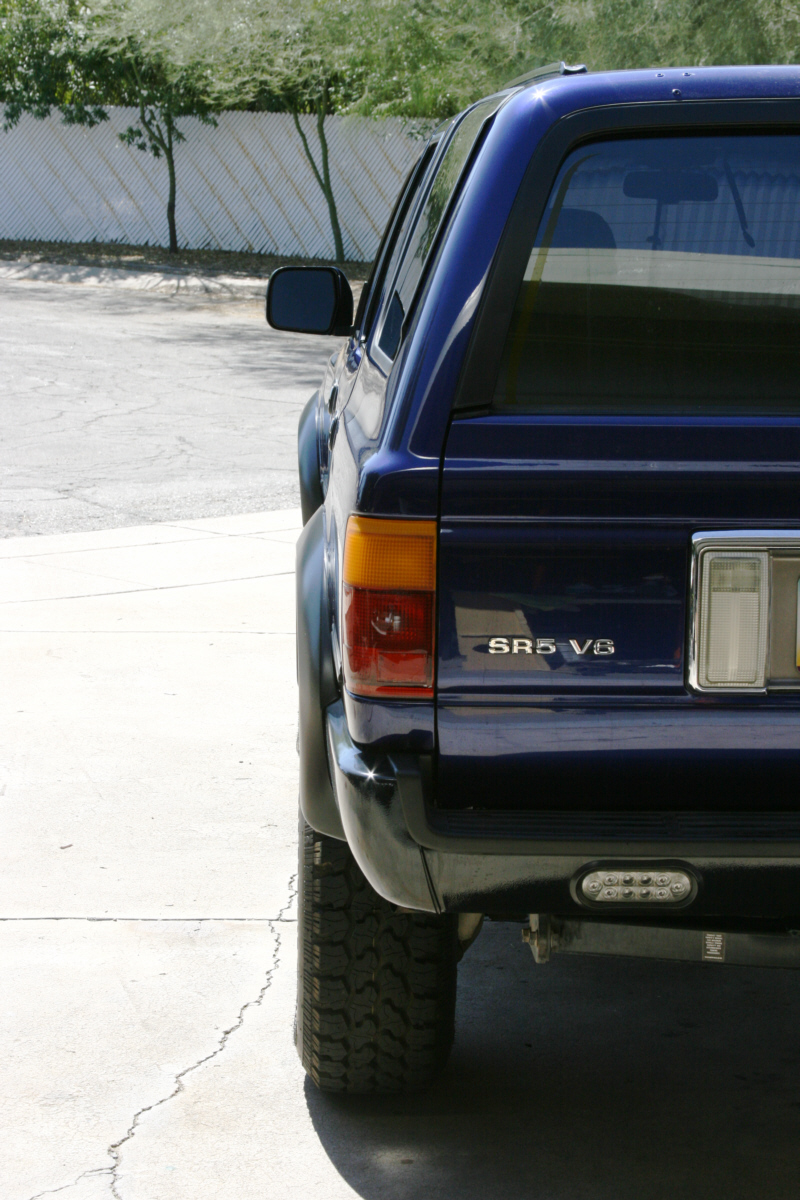
Rear Bumper Lights
As most are aware the rear back-up lights on the 2nd Generation 4Runners don't provide that much light, especially if your vehicle is lifted. So I thought I would add a little extra by inserting some white LED lights into the rear bumper. I didn't want to mount lights below the bumper because experience has shown me they usually get broken or twisted. Now granted, these don't provide the amount of light an off-road or KC light would, but they give off a cleaner and brighter light than the ones that are higher in the tailgate. They are also aimed down just a little because of the angle of the bumper. The lights I chose are from a trailer / truck supplier.
I started by finding the area behind the bumper where the "Y" mounting bracket would allow for the back of the light to fit. Then I made paper template from the mounting bracket that came with the light. Cut the opening with a die grinder and cleaned up the radius with a rotary grinder. After the hole was cut I inserted the rubber trim ring and then the light. Since these are LED's and have very little draw I was able to tie in directly to my reverse lights. These lights also help light the area for my backup camera which is mounted in the middle of my bumper just under the spare tire crank hole ( not in these pics). I initially went with the 10 LED version for cost reasons, however I plan to switch to the much brighter 20 LED version as soon as I wrangle up the cash. At that time I will move the 10's around to the sides of the bumper for more side lighting while backing up or night crawlin.


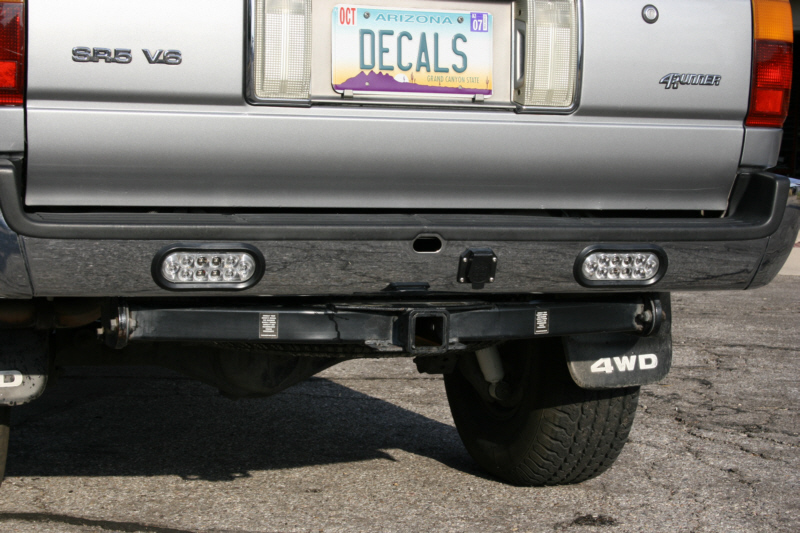
Here's what they look like now that my bumper is powder coated.

Here are a couple night shots.


I started by finding the area behind the bumper where the "Y" mounting bracket would allow for the back of the light to fit. Then I made paper template from the mounting bracket that came with the light. Cut the opening with a die grinder and cleaned up the radius with a rotary grinder. After the hole was cut I inserted the rubber trim ring and then the light. Since these are LED's and have very little draw I was able to tie in directly to my reverse lights. These lights also help light the area for my backup camera which is mounted in the middle of my bumper just under the spare tire crank hole ( not in these pics). I initially went with the 10 LED version for cost reasons, however I plan to switch to the much brighter 20 LED version as soon as I wrangle up the cash. At that time I will move the 10's around to the sides of the bumper for more side lighting while backing up or night crawlin.
Here's what they look like now that my bumper is powder coated.
Here are a couple night shots.
Sep 7, 2009 | 05:10 AM
#13
Thread Starter
Contributing Member
Joined: Nov 2005
Posts: 606
Likes: 4
From: Tucson, AZ
Powder Coated Bumpers
Since my chrome bumpers had some damage (scratches, minor dents and dings) I figured I would hammer and dolly them out and powder coat them hammer tone black. After the dents were fixed we ran a 80 grit pad over the chrome to rough the surface for better adhesion being careful not to bust through the chrome anywhere. This textured black finish gives it a tougher stance plus hides the minor imperfections of the repairs. Joe at Tucson Spraying Technologies did a beautiful job basing and clear coating the finish. After finding a bracket from a salvage yard to replace one of my rear brackets that was bent (and not replaced) from a previous repair (and owner), Don and I installed the new bracket and bumpers.

I'm going to pull my rear receiver hitch and have it hammertoned black to match.
I'm going to pull my rear receiver hitch and have it hammertoned black to match.
Sep 7, 2009 | 05:19 AM
#14
Thread Starter
Contributing Member
Joined: Nov 2005
Posts: 606
Likes: 4
From: Tucson, AZ
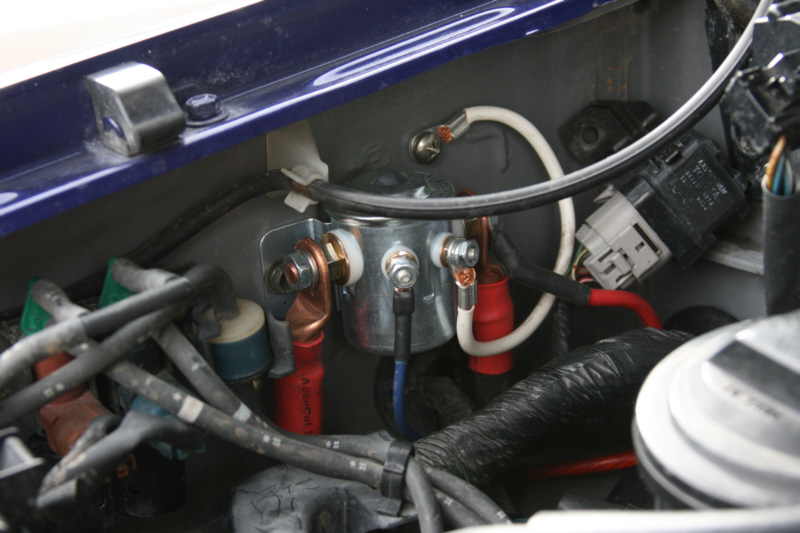
Dual Battery Electrical Upgrade
With my off road lights, air pump, stereo/gps and other accessories I thought it would be a good idea to have a dual battery system. Leaving the front battery is a 2/0 cable that is controlled by a Cole Hersee constant/heavy duty solenoid, which continues to the rear Deep Cycle battery. All cable ends are fitted with crimp terminals and adhesive sealed shrink tube. Solenoid can be switched on, off or with ignition. This allows for chillin all day listening to the tunes or showing a slide show at a car/truck show without affecting your starting/engine battery. The standard position is on with the ignition, allowing for charging of rear battery while engine is running. If rear battery is depleted, solenoid can be turned off for engine starting without putting a drain on the system. If front battery gets drained or has a problem the solenoid can be turned on for engine starting and/or power.

It all gets covered by this cabinet. Once the boxes are completed I will cut the side quarter trim panels so that they look like it was made that way.

It all gets covered by this cabinet. Once the boxes are completed I will cut the side quarter trim panels so that they look like it was made that way.
Last edited by James Dean; Sep 7, 2009 at 05:24 AM.
Sep 7, 2009 | 05:36 AM
#15
Thread Starter
Contributing Member
Joined: Nov 2005
Posts: 606
Likes: 4
From: Tucson, AZ
Remote Oil Filter
As everyone is well aware, most vehicles have the oil filter in the strangest location and worst angle. This results in a contortionist act and dripping oil everywhere. The 2nd Gen 4Runner is no exception. To avoid having to remove the skid plate and clean up a bunch of oil on every change, I am installing a remote oil filter kit by Hayden. Part #291. The kit comes with everything you need except for hose and a PH8 (Ford) filter. The added hose length and added filter size will increase oil capacity and hopefully a lower oil temperature a little.
I made an oval hole in the inner fender well just above the lips. I ran both hoses inside a radiator hose to protect them from the fender as well as the frame edge under the P/S gearbox. I still have some minor adjustments to make as well as a shield to protect the filter from debris. I can now do an oil change in about 5 minutes with no mess.


I made an oval hole in the inner fender well just above the lips. I ran both hoses inside a radiator hose to protect them from the fender as well as the frame edge under the P/S gearbox. I still have some minor adjustments to make as well as a shield to protect the filter from debris. I can now do an oil change in about 5 minutes with no mess.
Sep 11, 2009 | 08:08 PM
#16

Registered User
Joined: Dec 2008
Posts: 53
Likes: 0
From: British Coumbia
ill get you a pic of the dual filter setup i put on last weekend. basically same spot. i put my standing upright though. that way i dont get those dry starts after an oil change. or so they say anyway. do you have another thread of when you painted that 4runner? i recognize it maybe,..... but only because the color. its the only one iv ever seen like that. looks good though
Sep 27, 2009 | 02:38 PM
#17
Thread Starter
Contributing Member
Joined: Nov 2005
Posts: 606
Likes: 4
From: Tucson, AZ
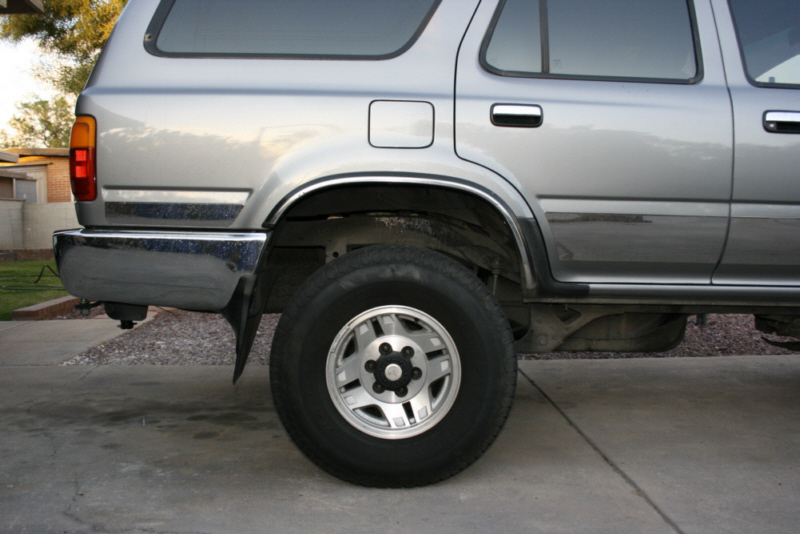
Wheels, Tires and Flares
I have finally just about wore down the tires that came on my 4Runner when I bought it. So some new shoes and socks are going on soon. I like the new ProComp Extreme A/T's. They have a look between All Terrains and a Mud tire. They also have a 40,000 mile tread warranty. Their 265/75/16 comes in a LT with a load rating of E. Think I'll wrap them around some ProComp Polished 16X8 1089's. With the tires riding at 31.6" (instead of 29.5") it should fill in those wheels wells better, give me a little boost over them rocks and not put too much of an extra load on my motor. All in all, I think it will be a good combo with the 1.5-2" lift I have.
After my new wheels and tires were mounted, it was definitely time to install my Bushwacker fender flares that I had bought a year ago. Although there fit was pretty good, there are always minor things that need to be trimmed from the edges to insure a fug snit. First order of business was to hold them in place to see where to trim. After trimming, the edge molding supplied with the flares was attatched, they were final ready for install. A 1/2" wide strip of 3M Urethane Paint Protection film was also installed where the flare makes contact with the vehicle to protect the paint.


After my new wheels and tires were mounted, it was definitely time to install my Bushwacker fender flares that I had bought a year ago. Although there fit was pretty good, there are always minor things that need to be trimmed from the edges to insure a fug snit. First order of business was to hold them in place to see where to trim. After trimming, the edge molding supplied with the flares was attatched, they were final ready for install. A 1/2" wide strip of 3M Urethane Paint Protection film was also installed where the flare makes contact with the vehicle to protect the paint.
Last edited by James Dean; Sep 28, 2009 at 05:48 AM.
Sep 29, 2009 | 07:51 PM
#19
Registered User
Joined: Sep 2009
Posts: 2
Likes: 0
From: Hottest place you can imagine!
Pretty sweet looking ride there Mr. Dean. I appreciate someone who has the attention to detail as you do. Keep us posted with new progress pics.
You should paint the flares the color the truck. Looks great!
D
You should paint the flares the color the truck. Looks great!
D
Last edited by Richard8971; Sep 29, 2009 at 07:55 PM.
Sep 29, 2009 | 08:02 PM
#20
Contributing Member
Joined: Dec 2006
Posts: 3,607
Likes: 2
From: maryland
Hey James the biggest issue with them fender flares is they catch to much rock and gravel and keep it in them causing the fenders to rot out faster. I would if I were you run a bead of black silicone around the edges of them where rocks and dirt could get in to help stop as much of it as possible and keep them fender wells in the shape their in now for years to come.


