
J&Hfab's 1993 Pickup Build-Up Thread
 Nov 17, 2011 | 10:22 AM
#21
Glad to see you saved a nice old truck. Really looks to be in great condition overall. Like RPM8080 says. We are having the same problem here. They are getting shipped south. It is getting difficult to find these more and more eachday.
 Nov 17, 2011 | 03:30 PM
#24
Registered User
Joined: Feb 2010
Posts: 301
Likes: 0
From: Southern California
We have a similar issue out here in so-cal. Youll see a yota towing another yota filled to the brim with yota parts in the bed all heading to mexico. It breaks my heart.
Nov 17, 2011 | 03:54 PM
#25
Registered User
Joined: Mar 2009
Posts: 1,169
Likes: 0
From: (LSD) Lower Slower Delaware
Thanks for the offer, funny, I have three yards near my house, and don't see many Toyota. I was talking to a guy that works on toyota's and states that a large numbers of toyota (pickups) are being shipped out of Wilmington Delaware on ships to south america, They like Toyota 4X4 down south.
Nov 18, 2011 | 06:11 AM
#26
Thread Starter
Registered User

Joined: Nov 2011
Posts: 152
Likes: 0
From: yucaipa ca
yeah its true you see toyotas going south on the 10 fwy all the time it sucks....
so I got bored last night and installed some lights and did the ADD delete in the front diff
http://www.flickr.com/photos/69769561@N02/6356571757/http://www.flickr.com/photos/69769561@N02/6356571757/ by http://www.flickr.com/people/69769561@N02/, on Flickr
here are the lights its just something to hold me over until i get my new bumper
now on to the add delete... It was very easy to do this and it only took me about a half hour... The hardest part was putting the unit back on the diff without messing up the rtv seal but mine seems to be working great... Here are some pics of the process
http://www.flickr.com/photos/69769561@N02/6342607799/http://www.flickr.com/photos/69769561@N02/6342607799/ by http://www.flickr.com/people/69769561@N02/, on Flickr
This is the start so the first thing you do is pull the vaccum lines off and the plug that is on the front of the add unit
http://www.flickr.com/photos/69769561@N02/6343359954/http://www.flickr.com/photos/69769561@N02/6343359954/ by http://www.flickr.com/people/69769561@N02/, on Flickr
Then you pull the four mounting bolts for the add unit and remove it from the front end
http://www.flickr.com/photos/69769561@N02/6342608361/http://www.flickr.com/photos/69769561@N02/6342608361/ by http://www.flickr.com/people/69769561@N02/, on Flickr
http://www.flickr.com/photos/69769561@N02/6343358534/http://www.flickr.com/photos/69769561@N02/6343358534/ by http://www.flickr.com/people/69769561@N02/, on Flickr
Then you just clean it up the pieces and move then the fork and the collar over to lock it into 4wd... if u have trouble gettin the collar to slide over the gear i found that if you lock the driver side tire and spin it a little it will move until you can get it to slide on...
http://www.flickr.com/photos/69769561@N02/6342609321/http://www.flickr.com/photos/69769561@N02/6342609321/ by http://www.flickr.com/people/69769561@N02/, on Flickr
I used a hose clamp to keep the part from sliding back out of 4wd
http://www.flickr.com/photos/69769561@N02/6342609735/http://www.flickr.com/photos/69769561@N02/6342609735/ by http://www.flickr.com/people/69769561@N02/, on Flickr
then u put on your rtv and put it back togeather
http://www.flickr.com/photos/69769561@N02/6343359954/http://www.flickr.com/photos/69769561@N02/6343359954/ by http://www.flickr.com/people/69769561@N02/, on Flickr
then you hook up the lines and plug and you all done
http://www.flickr.com/photos/69769561@N02/6343360400/http://www.flickr.com/photos/69769561@N02/6343360400/ by http://www.flickr.com/people/69769561@N02/, on Flickr
Jan 30, 2012 | 03:42 PM
#28
Thread Starter
Registered User
Joined: Nov 2011
Posts: 152
Likes: 0
From: yucaipa ca
Hey everyone its been awhile since i have posted because ive been being lazy... so a few updates on the truck... ive been driving it since november and its amazing everything works great so far no problems at all... the biggest complaint I have about the truck is the gas mileage it gets... on the streets it does amazing i can go to work and back for 2 weeks on one tank but with the gearing and only having 31s on the truck it does terrible on the freeway like around 10mpg.... the motor is tachin 3250rpm at 60mph but i still love it lol.. im gonna post some pics in a few min of the first wheeling trip and some other random ones so enjoy
Jan 30, 2012 | 04:16 PM
#29
Thread Starter
Registered User
Joined: Nov 2011
Posts: 152
Likes: 0
From: yucaipa ca
http://www.flickr.com/photos/69769561@N02/6350042701/http://www.flickr.com/photos/69769561@N02/6350042701/ by http://www.flickr.com/people/69769561@N02/, on Flickr
just a random pick of me and my buddies truck and runner sittin in my yard right after i got my truck on the road...
http://www.flickr.com/photos/69769561@N02/6342392457/http://www.flickr.com/photos/69769561@N02/6342392457/ by http://www.flickr.com/people/69769561@N02/, on Flickr
i just like this one lol
Now a couple from its first wheeling trip it was just a little one in moreno valley by where we live
http://www.flickr.com/photos/69769561@N02/6342398403/http://www.flickr.com/photos/69769561@N02/6342398403/ by http://www.flickr.com/people/69769561@N02/, on Flickr
http://www.flickr.com/photos/69769561@N02/6342406359/http://www.flickr.com/photos/69769561@N02/6342406359/ by http://www.flickr.com/people/69769561@N02/, on Flickr
http://www.flickr.com/photos/69769561@N02/6342400527/http://www.flickr.com/photos/69769561@N02/6342400527/ by http://www.flickr.com/people/69769561@N02/, on Flickr
http://www.flickr.com/photos/69769561@N02/6342402533/http://www.flickr.com/photos/69769561@N02/6342402533/ by http://www.flickr.com/people/69769561@N02/, on Flickr
http://www.flickr.com/photos/69769561@N02/6343154298/http://www.flickr.com/photos/69769561@N02/6343154298/ by http://www.flickr.com/people/69769561@N02/, on Flickr
http://www.flickr.com/photos/69769561@N02/6342419079/http://www.flickr.com/photos/69769561@N02/6342419079/ by [url=http://www.flick
[ame=http://www.flickr.com/photos/69769561@N02/6342420821/]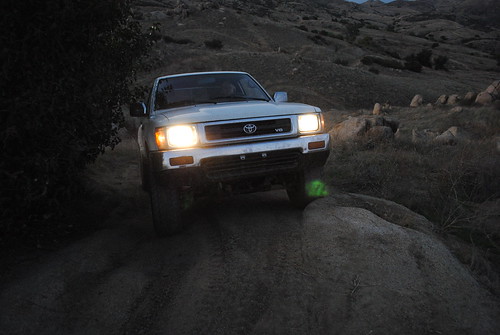 [/ame]
http://www.flickr.com/photos/69769561@N02/6342420821/ by http://www.flickr.com/people/69769561@N02/, on Flickrr.com/people/69769561@N02/]J&Hfab[/ame], on Flickr
http://www.flickr.com/photos/69769561@N02/6343172556/http://www.flickr.com/photos/69769561@N02/6343172556/ by http://www.flickr.com/people/69769561@N02/, on Flickr
just a random pick of me and my buddies truck and runner sittin in my yard right after i got my truck on the road...
http://www.flickr.com/photos/69769561@N02/6342392457/http://www.flickr.com/photos/69769561@N02/6342392457/ by http://www.flickr.com/people/69769561@N02/, on Flickr
i just like this one lol
Now a couple from its first wheeling trip it was just a little one in moreno valley by where we live
http://www.flickr.com/photos/69769561@N02/6342398403/http://www.flickr.com/photos/69769561@N02/6342398403/ by http://www.flickr.com/people/69769561@N02/, on Flickr
http://www.flickr.com/photos/69769561@N02/6342406359/http://www.flickr.com/photos/69769561@N02/6342406359/ by http://www.flickr.com/people/69769561@N02/, on Flickr
http://www.flickr.com/photos/69769561@N02/6342400527/http://www.flickr.com/photos/69769561@N02/6342400527/ by http://www.flickr.com/people/69769561@N02/, on Flickr
http://www.flickr.com/photos/69769561@N02/6342402533/http://www.flickr.com/photos/69769561@N02/6342402533/ by http://www.flickr.com/people/69769561@N02/, on Flickr
http://www.flickr.com/photos/69769561@N02/6343154298/http://www.flickr.com/photos/69769561@N02/6343154298/ by http://www.flickr.com/people/69769561@N02/, on Flickr
http://www.flickr.com/photos/69769561@N02/6342419079/http://www.flickr.com/photos/69769561@N02/6342419079/ by [url=http://www.flick
[ame=http://www.flickr.com/photos/69769561@N02/6342420821/]
[/ame]http://www.flickr.com/photos/69769561@N02/6342420821/ by http://www.flickr.com/people/69769561@N02/, on Flickrr.com/people/69769561@N02/]J&Hfab[/ame], on Flickr
http://www.flickr.com/photos/69769561@N02/6343172556/http://www.flickr.com/photos/69769561@N02/6343172556/ by http://www.flickr.com/people/69769561@N02/, on Flickr
 Rumor has it that someone has new suspension and tires?
Mar 13, 2012 | 06:28 PM
Rumor has it that someone has new suspension and tires?
Mar 13, 2012 | 06:28 PM
#32
Thread Starter
Registered User
Joined: Nov 2011
Posts: 152
Likes: 0
From: yucaipa ca
ok well im way behind with posting for the truck so here goes I got some carpet for my truck for 15 bucks from pick a part it was in pretty good shape and im happy its all in and installed it helped with road noise so much
http://www.flickr.com/photos/69769561@N02/6792655453/http://www.flickr.com/photos/69769561@N02/6792655453/ by http://www.flickr.com/people/69769561@N02/, on Flickr
http://www.flickr.com/photos/69769561@N02/6792654605/http://www.flickr.com/photos/69769561@N02/6792654605/ by http://www.flickr.com/people/69769561@N02/, on Flickr
http://www.flickr.com/photos/69769561@N02/6792653679/http://www.flickr.com/photos/69769561@N02/6792653679/ by http://www.flickr.com/people/69769561@N02/, on Flickr
http://www.flickr.com/photos/69769561@N02/6792652847/http://www.flickr.com/photos/69769561@N02/6792652847/ by http://www.flickr.com/people/69769561@N02/, on Flickr
The next thing on the list of things to do was to get the truck smogged. When I went to have done the machine kept getting a dillution error which ment that there was an exhaust leak because too much air was getting into the line so I ran down to a place called randys exhaust shop in fontana ca and they hooked me up with a cat back 3in piping with a flowmaster for $180 and they did it in under an hour those guys were awesome I suggest them to anyone in the area.
Before:
http://www.flickr.com/photos/69769561@N02/6792716561/http://www.flickr.com/photos/69769561@N02/6792716561/ by http://www.flickr.com/people/69769561@N02/, on Flickr
http://www.flickr.com/photos/69769561@N02/6792707391/http://www.flickr.com/photos/69769561@N02/6792707391/ by http://www.flickr.com/people/69769561@N02/, on Flickr
After:
http://www.flickr.com/photos/69769561@N02/6792708249/http://www.flickr.com/photos/69769561@N02/6792708249/ by http://www.flickr.com/people/69769561@N02/, on Flickr
The truck sounds pretty awesome but the best part is that when I went back to have it resmogged the told me he had been trying to call me because he found a hole in his smog line so my truck prob woulda passed so oh well but at least my truck sounds good now
Mar 13, 2012 | 07:09 PM
#33
Thread Starter
Registered User
Joined: Nov 2011
Posts: 152
Likes: 0
From: yucaipa ca
next up was the Zuk mod I went down to kartek in corona and purchased a set of eibach springs they were 14x2.5x125#
http://www.flickr.com/photos/69769561@N02/6834805516/http://www.flickr.com/photos/69769561@N02/6834805516/ by http://www.flickr.com/people/69769561@N02/, on Flickr
on the way home I stopped at auto zone and rented a spring compresser
and i got out the saw and que the music
http://www.flickr.com/photos/69769561@N02/6981002053/http://www.flickr.com/photos/69769561@N02/6981002053/ by http://www.flickr.com/people/69769561@N02/, on Flickr
http://www.flickr.com/photos/69769561@N02/6980957507/http://www.flickr.com/photos/69769561@N02/6980957507/ by http://www.flickr.com/people/69769561@N02/, on Flickr
http://www.flickr.com/photos/69769561@N02/6834831222/http://www.flickr.com/photos/69769561@N02/6834831222/ by http://www.flickr.com/people/69769561@N02/, on Flickr
http://www.flickr.com/photos/69769561@N02/6980958021/http://www.flickr.com/photos/69769561@N02/6980958021/ by http://www.flickr.com/people/69769561@N02/, on Flickr
all in all it only took about an hour and a half so it was pretty simple and it gave me 2 and 1/2 inches of lift for around 115 bucks
Mar 15, 2012 | 12:47 PM
#34
Registered User
Joined: Jan 2007
Posts: 1,987
Likes: 0
From: Chico Republic, NOR*CAL
Awesome man! I really like your buddy's 2 door runner as well. You have the 3.0 right? I have a flowmaster 40 as well but my setup is all 2.25" piping. I wanna know how yours does with back pressure and sound with 3" piping. You have 3" going from the cat to the muffler, and then to the tail? I have always heard of doing 2.25" from the cat to the muffler and then out to 2.5". A review would be nice since I'm about to get new exhaust.
Mar 16, 2012 | 08:19 AM
#35
Thread Starter
Registered User
Joined: Nov 2011
Posts: 152
Likes: 0
From: yucaipa ca
Thanks man ill be putting up some pics of how m.y truck looks now hopefully later today... But as for the exhaust i went out and remesured it and its 2.5 in piping not 3 but it works and sounds great i dont have any back pressure issues at all
Mar 16, 2012 | 03:44 PM
#38
Thread Starter
Registered User
Joined: Nov 2011
Posts: 152
Likes: 0
From: yucaipa ca
so for the next set of goodies i got were my ball joint spacers and new shocks all around for the truck
http://www.flickr.com/photos/69769561@N02/6980959477/http://www.flickr.com/photos/69769561@N02/6980959477/ by http://www.flickr.com/people/69769561@N02/, on Flickr
I also changed the upper and lower ball joints because the boots were torn on both sides of the truck and switched to the ultra low bump stops...
now onto the few pics i took while i did it..
http://www.flickr.com/photos/69769561@N02/6834832124/http://www.flickr.com/photos/69769561@N02/6834832124/ by http://www.flickr.com/people/69769561@N02/, on Flickr
http://www.flickr.com/photos/69769561@N02/6834832800/http://www.flickr.com/photos/69769561@N02/6834832800/ by http://www.flickr.com/people/69769561@N02/, on Flickr
Here is how both sides looked with the tires off and a 2x4 shoved into the uca to hold it up
http://www.flickr.com/photos/69769561@N02/6980972571/http://www.flickr.com/photos/69769561@N02/6980972571/ by http://www.flickr.com/people/69769561@N02/, on Flickr
Pulling everything apart
http://www.flickr.com/photos/69769561@N02/6980973063/http://www.flickr.com/photos/69769561@N02/6980973063/ by http://www.flickr.com/people/69769561@N02/, on Flickr
This is what the cut I made looked like on both side(dont worry i cleaned up the edeges before i put the spacers in)
http://www.flickr.com/photos/69769561@N02/6834845580/http://www.flickr.com/photos/69769561@N02/6834845580/ by http://www.flickr.com/people/69769561@N02/, on Flickr
all back togeather!
http://www.flickr.com/photos/69769561@N02/6834846202/http://www.flickr.com/photos/69769561@N02/6834846202/ by http://www.flickr.com/people/69769561@N02/, on Flickr
this was how the truck sat for about a week then it got its new rims and tires
Mar 16, 2012 | 03:53 PM
#39
Thread Starter
Registered User
Joined: Nov 2011
Posts: 152
Likes: 0
From: yucaipa ca
now onto the rims and tires !
!
I traded a guy in forest falls for the rims i gave him my set of rims off my silverado that was going to scrap and he gave me 5 of these rims so i was super stoked, Ive had them for a bout 4 months and was waiting to buy my new tires and just put them on
http://www.flickr.com/photos/69769561@N02/6980974793/http://www.flickr.com/photos/69769561@N02/6980974793/ by http://www.flickr.com/people/69769561@N02/, on Flickr
before:
http://www.flickr.com/photos/69769561@N02/6350042701/http://www.flickr.com/photos/69769561@N02/6350042701/ by http://www.flickr.com/people/69769561@N02/, on Flickr
After:
http://www.flickr.com/photos/69769561@N02/6980975273/http://www.flickr.com/photos/69769561@N02/6980975273/ by http://www.flickr.com/people/69769561@N02/, on Flickr
http://www.flickr.com/photos/69769561@N02/6834847702/http://www.flickr.com/photos/69769561@N02/6834847702/ by http://www.flickr.com/people/69769561@N02/, on Flickr
!I traded a guy in forest falls for the rims i gave him my set of rims off my silverado that was going to scrap and he gave me 5 of these rims so i was super stoked, Ive had them for a bout 4 months and was waiting to buy my new tires and just put them on
http://www.flickr.com/photos/69769561@N02/6980974793/http://www.flickr.com/photos/69769561@N02/6980974793/ by http://www.flickr.com/people/69769561@N02/, on Flickr
before:
http://www.flickr.com/photos/69769561@N02/6350042701/http://www.flickr.com/photos/69769561@N02/6350042701/ by http://www.flickr.com/people/69769561@N02/, on Flickr
After:
http://www.flickr.com/photos/69769561@N02/6980975273/http://www.flickr.com/photos/69769561@N02/6980975273/ by http://www.flickr.com/people/69769561@N02/, on Flickr
http://www.flickr.com/photos/69769561@N02/6834847702/http://www.flickr.com/photos/69769561@N02/6834847702/ by http://www.flickr.com/people/69769561@N02/, on Flickr
Sep 4, 2012 | 05:49 PM
#40
Thread Starter
Registered User
Joined: Nov 2011
Posts: 152
Likes: 0
From: yucaipa ca
It's been awhile since I posted on here but I'm starting up again because my pickup is about to get some shiny new parts including bumpers and sliders I'm going to make at my buddies fab shop a bulldog 8000lb winch 2hid offroading lights a 10" rigid led bar and a Aussie locker so it should be a busy few weeks and I would apriceate any ideas on the bumpers etc


