
Baby Beast Morph 2


 Mar 29, 2011 | 09:25 PM
#124
Thread Starter
Contributing Member
Joined: Apr 2004
Posts: 5,464
Likes: 6
From: Arvada, Colorado
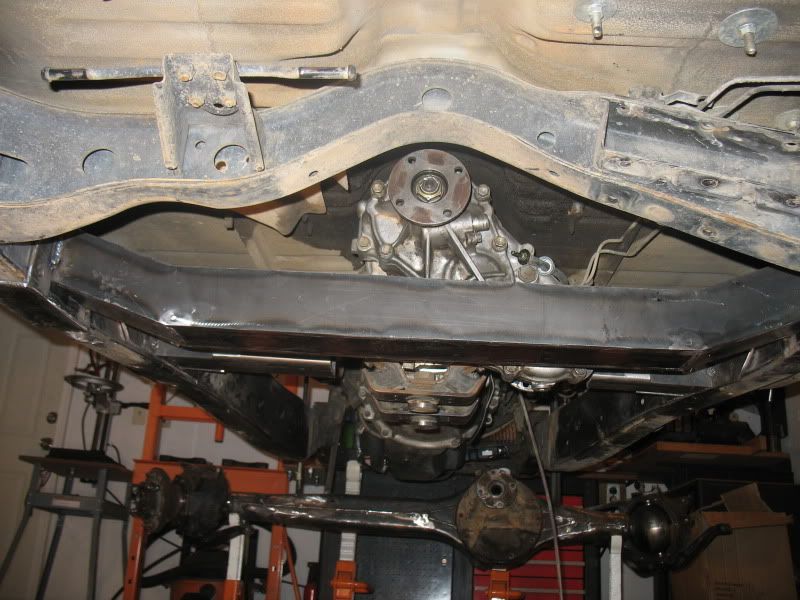
I had no issue with the IFS, but there were a lot of things I learned over the years and through my build that I wanted to implement into the truck, but would be stuck redoing. This opportunity plopped in my lap, so I went for it. The SA was a bonus due to already having the axle and the built diff coming up for sale for so cheap.
I'm still all about the IFS. I think it is a great system and can easily be modified for 95% of trails out there and be reasonably reliable up to a 35" tire.
LOL>
No. I will finish as much of the front as possible before moving to the rear. So far, I have an axle (97 runner to help with the new width in the front), coil springs (full set of FJ80 springs...I'll see what fits best and has an appropriate spring rate), a diff ( my 8" rear ARB out of the 87), and that's it. It will be a 4 link and beyond that, I haven't done any more thinking.
thanks!
Mar 29, 2011 | 09:26 PM
#125
Thread Starter
Contributing Member
Joined: Apr 2004
Posts: 5,464
Likes: 6
From: Arvada, Colorado
Super frustrating finale to the weekend. Spent a bunch of time on wedding things, and misc house work that ate into truck time.
Also, managed to fry a GFCI box by overloading the circuit. Turns out, these things are POS's. Ah well, took me FOREVER to figure that out, but once I did, I was back in action.
I picked up a new air compressor, as the craftsman was putting out tons of water= quick destruction of electrodes and tips on the plasma= no go. Got a 30 gal belt drive, and a better drier. MUCH BETTER, and much quieter.
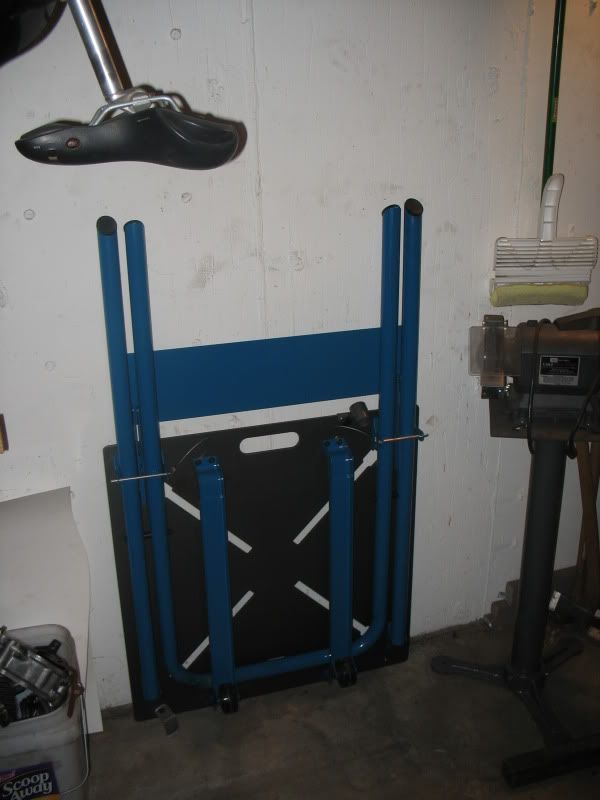
I also picked up Miller's new Mobile Arcstation. This thing is sweet. Great welding table with notches for clamps, and folds up to fit into an already over stuffed garage:

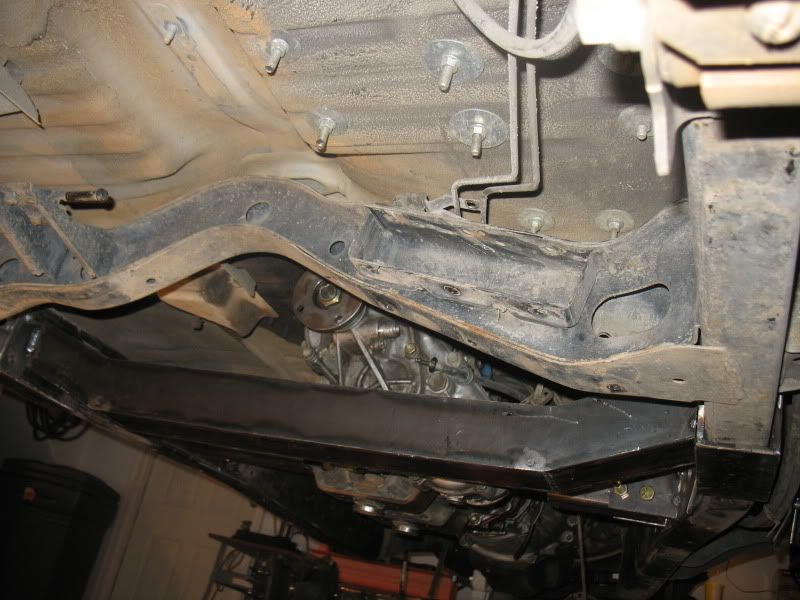
Yesterady I got all of the old xmember brackets cut off, as well as the torsion bar mounts. Took a long time, and managed to get a nice slag burn through my double wall carharts, just below where my leather's stop. That resulted in some clenched teeth and hopping around (on my back) , which resulted in a smack of the head into the transfercase output, which resulted in howling and cursing. Not one of my finest moments, but, alas, I topped it today.
Anyway, after I got everything cut off and gouged out, I only had a few minutes of grinding, and then a few minutes with a stripping disk to clean the frame.
Today I got my invitations addressed (amazingly there are now INNER envelopes to label. And I thought cars had a lot of parts. I do what I'm told.).
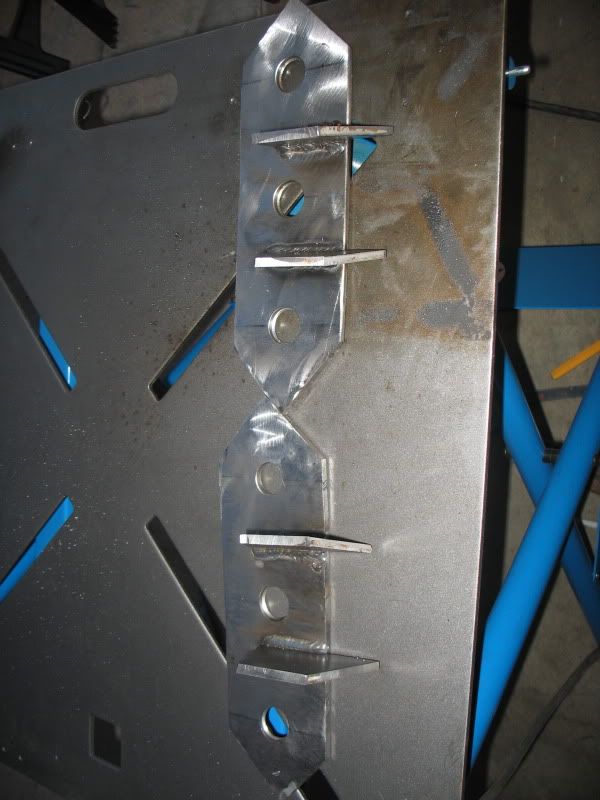
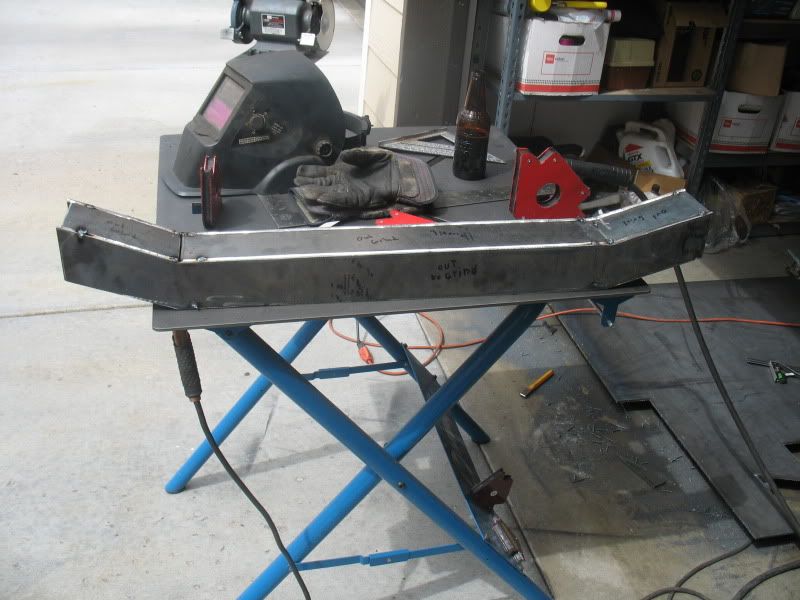
I ALSO got my frame plates cut out, and the crossmember brackets made up. Now I need to position everything, and drill the brackets and crossmember:
All 1/4". They will be further braced and gusseted later.
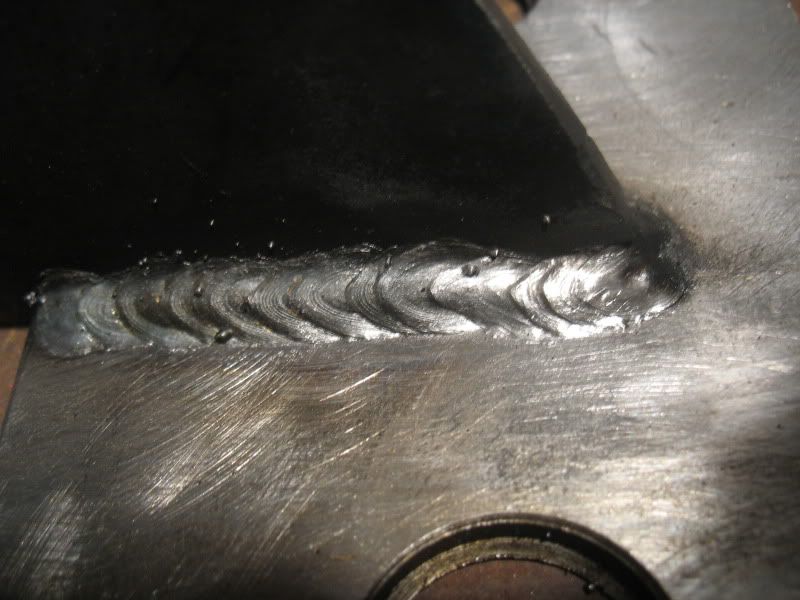
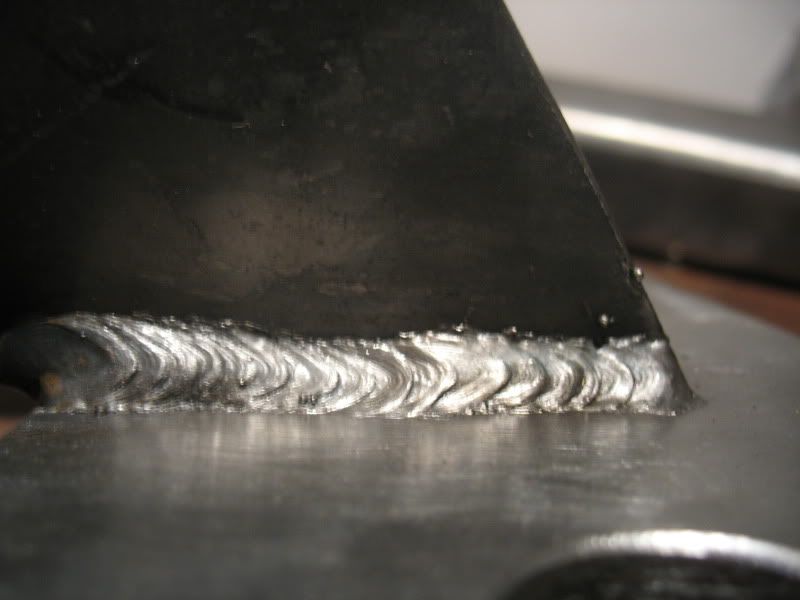
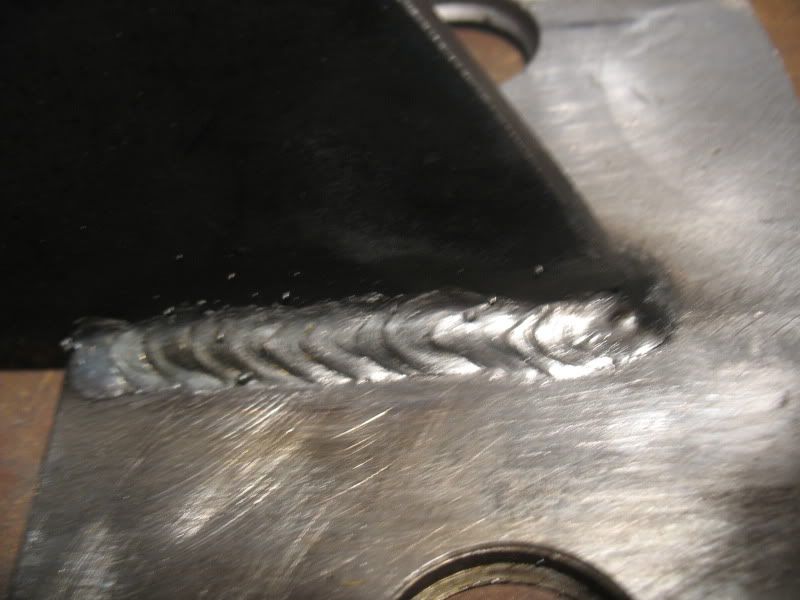
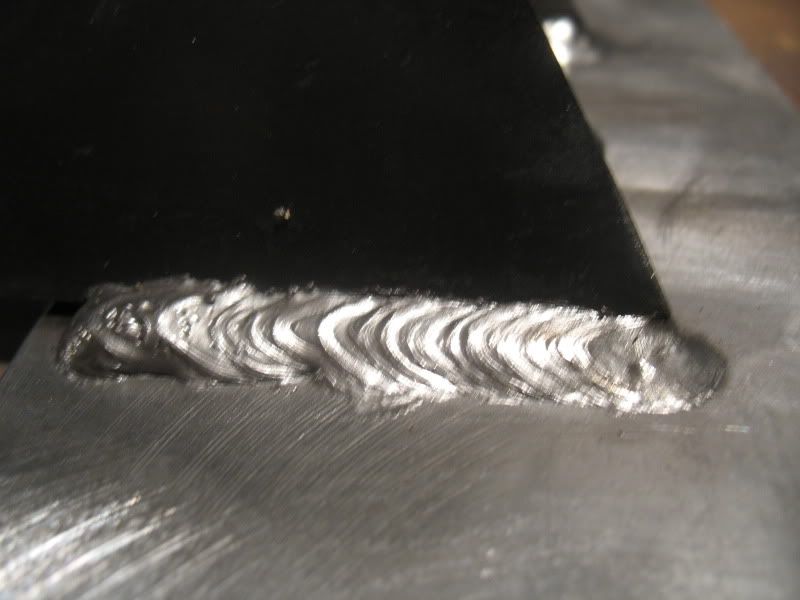
I've been practicing a bit. Still need to get stand off control down. I move the arc in and and out too much.
Here are a few of the sorta better ones:
I mentioned that I topped the back dance/head smack today. I lit myself on fire. Yep. I was tacking things into place under the truck and focusing on keeping the measurements correct, when I started to feel warm. I ignored it. Then I started to feel hot. I thought I was too close to my halogen work lamp, so I lifted up my helmet, and realized that my left hip was on fire. I got it out, but it burned through my carharts, the pocket and blackened my boxer shorts. WAY to close to the family jewels for comfort, and it looks like a nice sunburn now.
Note to self: WEAR LEATHERS EVEN IF TACKING THINGS INTO PLACE.
So, a sucky weekend with not much done and two painful incidents.
Also, managed to fry a GFCI box by overloading the circuit. Turns out, these things are POS's. Ah well, took me FOREVER to figure that out, but once I did, I was back in action.
I picked up a new air compressor, as the craftsman was putting out tons of water= quick destruction of electrodes and tips on the plasma= no go. Got a 30 gal belt drive, and a better drier. MUCH BETTER, and much quieter.
I also picked up Miller's new Mobile Arcstation. This thing is sweet. Great welding table with notches for clamps, and folds up to fit into an already over stuffed garage:
Yesterady I got all of the old xmember brackets cut off, as well as the torsion bar mounts. Took a long time, and managed to get a nice slag burn through my double wall carharts, just below where my leather's stop. That resulted in some clenched teeth and hopping around (on my back) , which resulted in a smack of the head into the transfercase output, which resulted in howling and cursing. Not one of my finest moments, but, alas, I topped it today.
Anyway, after I got everything cut off and gouged out, I only had a few minutes of grinding, and then a few minutes with a stripping disk to clean the frame.
Today I got my invitations addressed (amazingly there are now INNER envelopes to label. And I thought cars had a lot of parts. I do what I'm told.).
I ALSO got my frame plates cut out, and the crossmember brackets made up. Now I need to position everything, and drill the brackets and crossmember:
All 1/4". They will be further braced and gusseted later.
I've been practicing a bit. Still need to get stand off control down. I move the arc in and and out too much.
Here are a few of the sorta better ones:
I mentioned that I topped the back dance/head smack today. I lit myself on fire. Yep. I was tacking things into place under the truck and focusing on keeping the measurements correct, when I started to feel warm. I ignored it. Then I started to feel hot. I thought I was too close to my halogen work lamp, so I lifted up my helmet, and realized that my left hip was on fire. I got it out, but it burned through my carharts, the pocket and blackened my boxer shorts. WAY to close to the family jewels for comfort, and it looks like a nice sunburn now.
Note to self: WEAR LEATHERS EVEN IF TACKING THINGS INTO PLACE.
So, a sucky weekend with not much done and two painful incidents.
Apr 24, 2011 | 08:16 PM
#128
Thread Starter
Contributing Member
Joined: Apr 2004
Posts: 5,464
Likes: 6
From: Arvada, Colorado
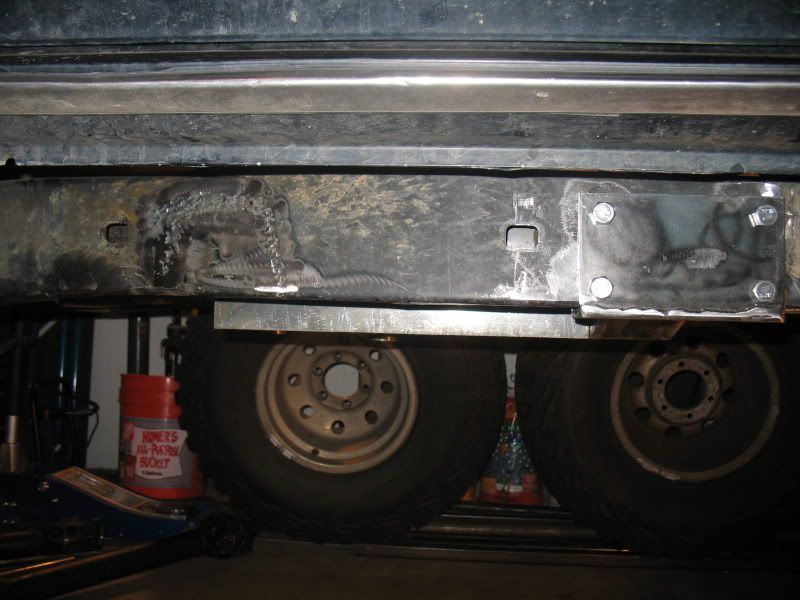
Had a fairly productive weekend. I picked up a 4'x4' piece of 1/4" plate, which I can barely lift, but managed to get situated on my floor so I could cut pieces from it.
I then began building the rear crossmember of my subframe. It will bolt to the frame using 1/2" hardware, through the frame.
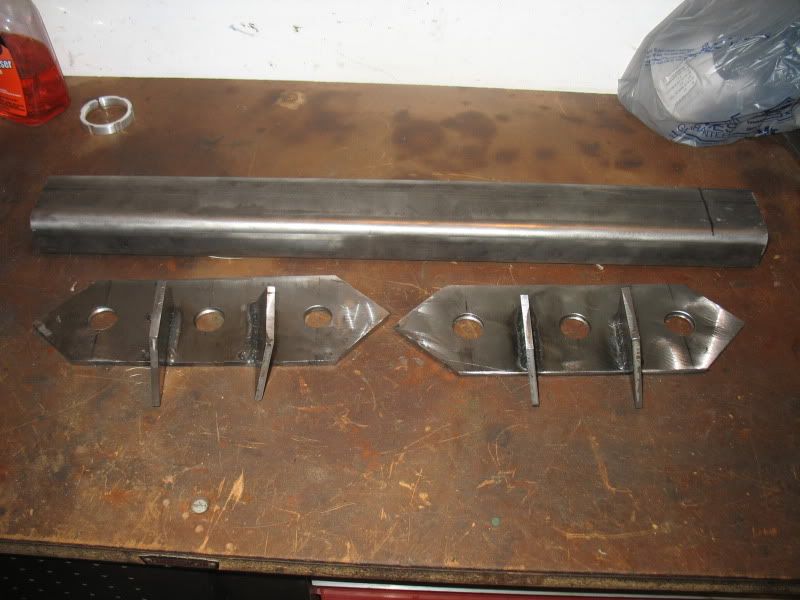
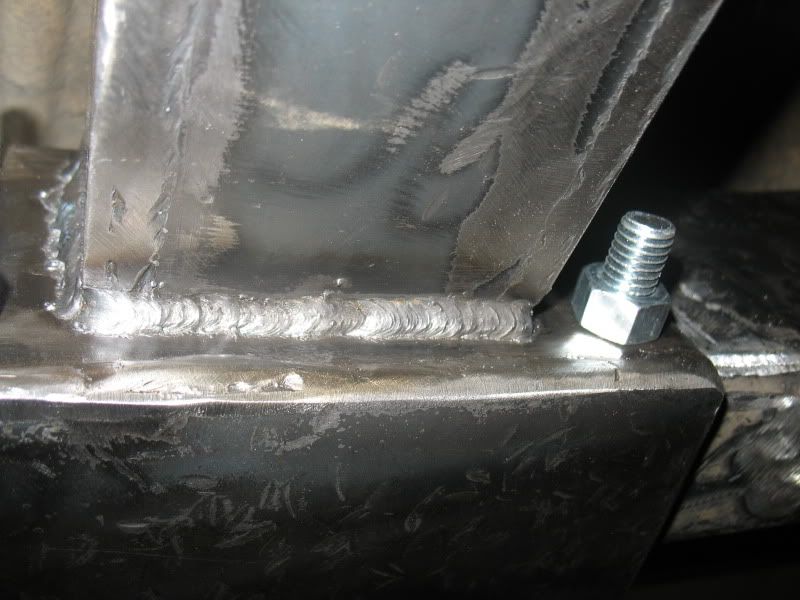
This took almost the whole weekend, but it was worth it. I built two frame attachment brackets, and then tacked this monster up:
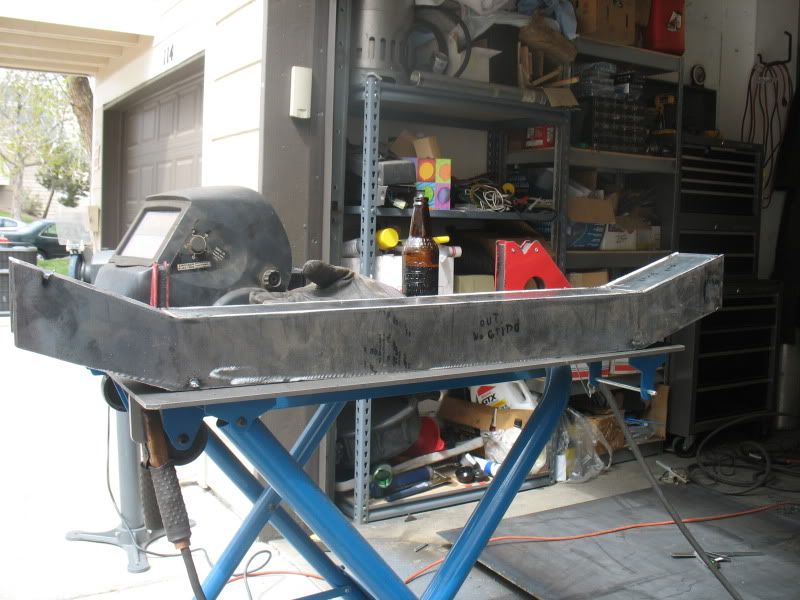
I know it isn't the best form to grind welds smooth, but I needed good, flat surfaces to mount brackets and the like to, so I smoothed everything out to keep it easy to weld brackets to. I beveled all the edges, so the welds sat in nice and deep, giving me plenty of weld left to hold everything together.
Here it is under the truck:
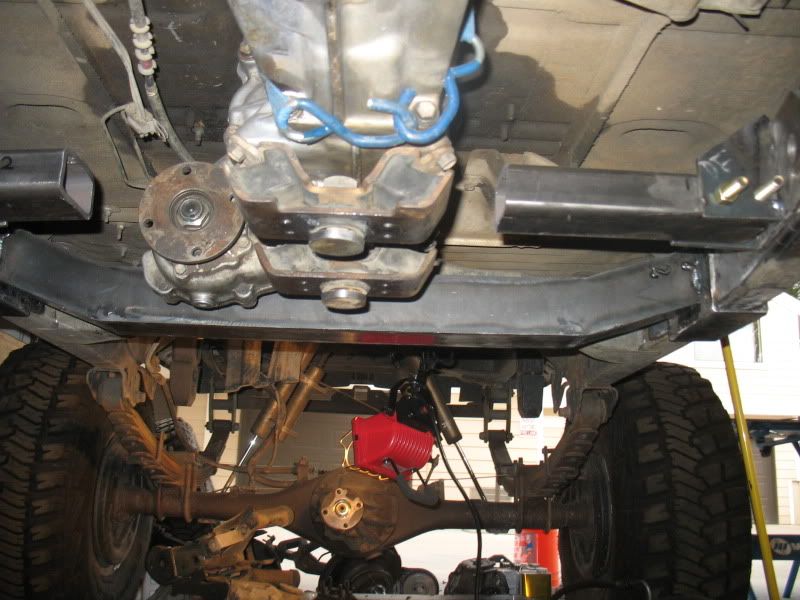
My dilemma is whether or not to sleeve the frame. On the one hand, it will keep the frame from having any issues with compression from the bolts, but I think the 1/4" plate will take care of that. Because of the flush mount on the brackets holding this thing down, I will need to smooth out any welding done, meaning that the lateral strength of the sleeves won't be that good. I've got some reading to do.
I then began building the rear crossmember of my subframe. It will bolt to the frame using 1/2" hardware, through the frame.
This took almost the whole weekend, but it was worth it. I built two frame attachment brackets, and then tacked this monster up:
I know it isn't the best form to grind welds smooth, but I needed good, flat surfaces to mount brackets and the like to, so I smoothed everything out to keep it easy to weld brackets to. I beveled all the edges, so the welds sat in nice and deep, giving me plenty of weld left to hold everything together.
Here it is under the truck:
My dilemma is whether or not to sleeve the frame. On the one hand, it will keep the frame from having any issues with compression from the bolts, but I think the 1/4" plate will take care of that. Because of the flush mount on the brackets holding this thing down, I will need to smooth out any welding done, meaning that the lateral strength of the sleeves won't be that good. I've got some reading to do.
Apr 24, 2011 | 09:21 PM
#131
Registered User
Joined: Oct 2009
Posts: 1,560
Likes: 1
From: Santa Cruz, CA
Local shop here wanted 250. They basically are trying to charge for the whole sheet 4x8 sheet and then just chop you off your piece. Almost worth it to just order the whole sheet so they can't do that. I think MAYBE the trick is to ask for a quote on a 4x8 sheet before a 4x4 sheet. Haven't tried that yet, but might just work.
Apr 24, 2011 | 09:51 PM
#132
Registered User
Joined: Nov 2009
Posts: 1,965
Likes: 0
From: Bailey, Colorado
Lookin good as always. Are ya gonna have it ready for the Jambo? I would love to see this thing in person after the SAS. Where did you go for the steel? I usually use Den Col off of Washington and I70.
Apr 25, 2011 | 07:06 AM
#133
Thread Starter
Contributing Member
Joined: Apr 2004
Posts: 5,464
Likes: 6
From: Arvada, Colorado
I normally go to K&K surplus, but I have been pretty slammed at work, so I stopped by Armor Steel up in boulder where I work.
May 2, 2011 | 09:13 PM
#134
Thread Starter
Contributing Member
Joined: Apr 2004
Posts: 5,464
Likes: 6
From: Arvada, Colorado
Lots of work, not much to show for it.
Got the frame drilled, and sleeved. That took a long time. Getting everything lined up properly, and then getting the bolts to go through. Takes forever.
Picked up a second grinder to avoid having to undo disks to change what I'm doing. I also started using a 7" flap disk on my grinder. I LOVE it. Those big flap disks last a LOT longer, and really rip through material when you need to.
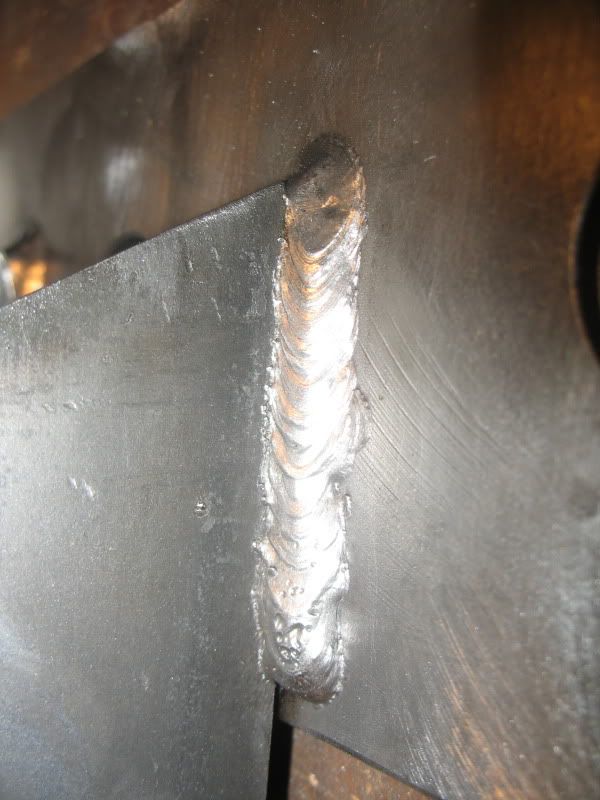
Got the crossmember welded to the frame brackets. Starting to get a bit better on some of the welds. Some are less consistent than others.
Here's a better one:
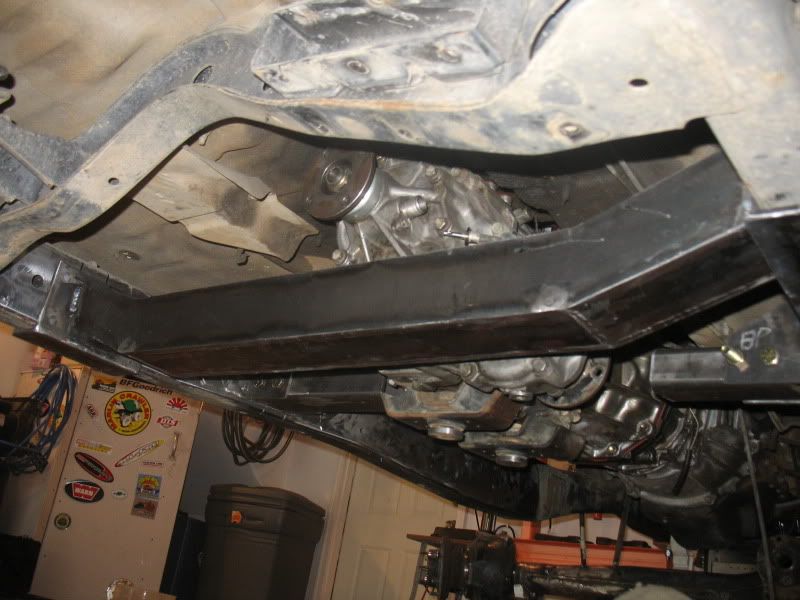
After that, I got the front mounts welded up, and tacked up to the frame. I then cut out, and began working on, connecting pieces, that will form the subframe. The lower front link mounts will tie into the front of these (which is why they are hanging down), and the skid plate will attach to all of this, and the transfercase mounts.
Couple of shots of where it sits:
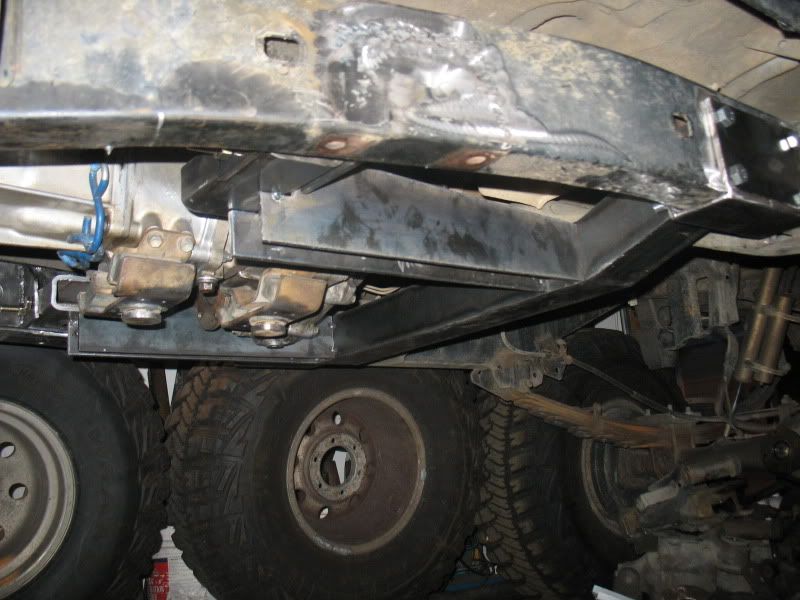
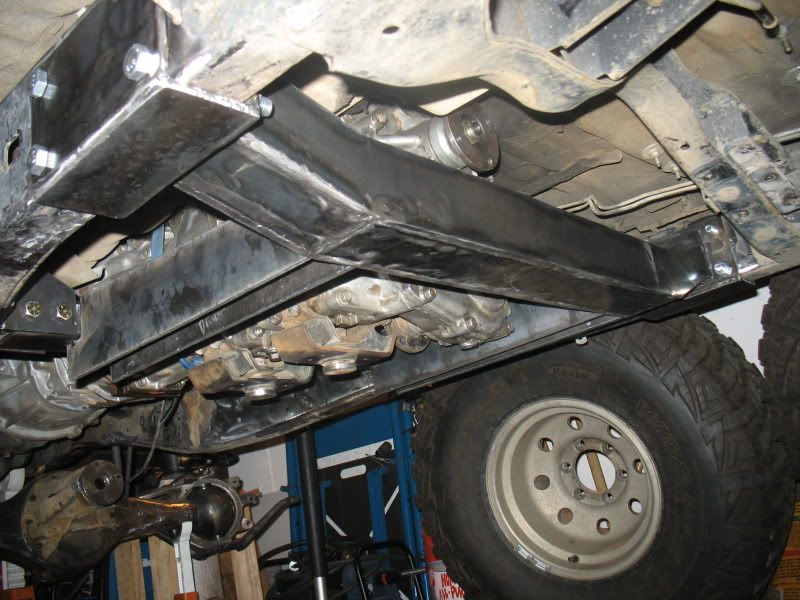
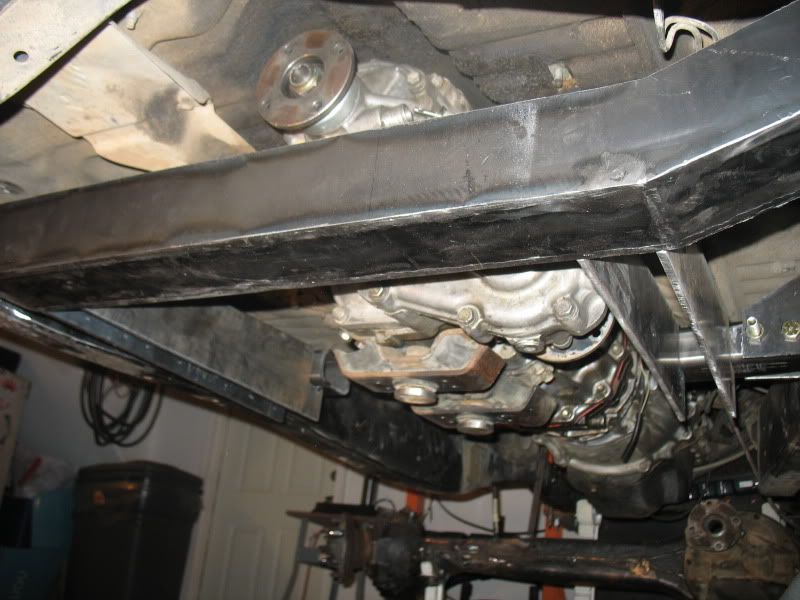
And a shot of how things are starting to look underneath the frame. Not a flat belly, but should be plenty smooth for sliding over stuff.
Got the frame drilled, and sleeved. That took a long time. Getting everything lined up properly, and then getting the bolts to go through. Takes forever.
Picked up a second grinder to avoid having to undo disks to change what I'm doing. I also started using a 7" flap disk on my grinder. I LOVE it. Those big flap disks last a LOT longer, and really rip through material when you need to.
Got the crossmember welded to the frame brackets. Starting to get a bit better on some of the welds. Some are less consistent than others.
Here's a better one:
After that, I got the front mounts welded up, and tacked up to the frame. I then cut out, and began working on, connecting pieces, that will form the subframe. The lower front link mounts will tie into the front of these (which is why they are hanging down), and the skid plate will attach to all of this, and the transfercase mounts.
Couple of shots of where it sits:
And a shot of how things are starting to look underneath the frame. Not a flat belly, but should be plenty smooth for sliding over stuff.
Jun 25, 2011 | 04:07 PM
#137
Thread Starter
Contributing Member
Joined: Apr 2004
Posts: 5,464
Likes: 6
From: Arvada, Colorado
Back at it again after a month or so.
Anyway, I started mocking up my links. And, figured out that I was going to have to change the design a bit again.
Anyway, here is how things are going:
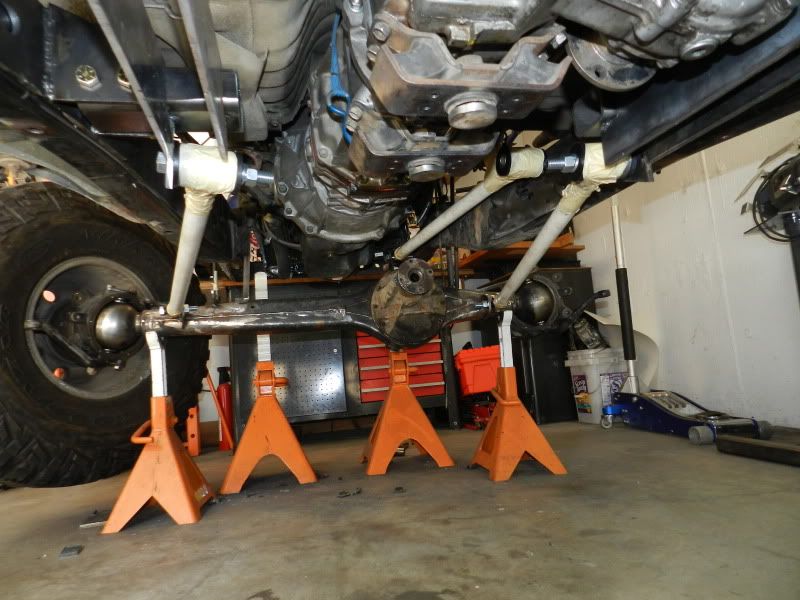
I've tried two different set ups on the passenger side and driver side. One is higher than the axle center line, the other just lower. Obviously, the higher gives better roll axis numbers, but they still aren't great.
Driver side:
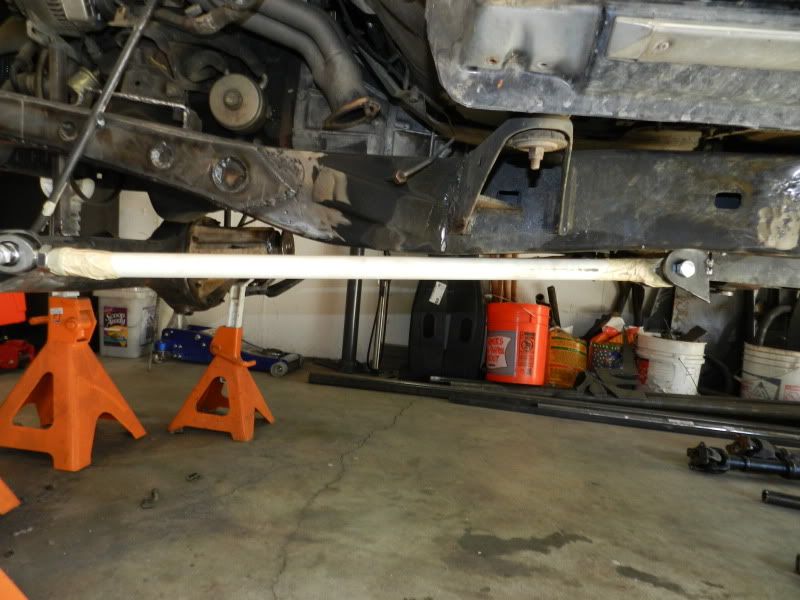

Passenger side:
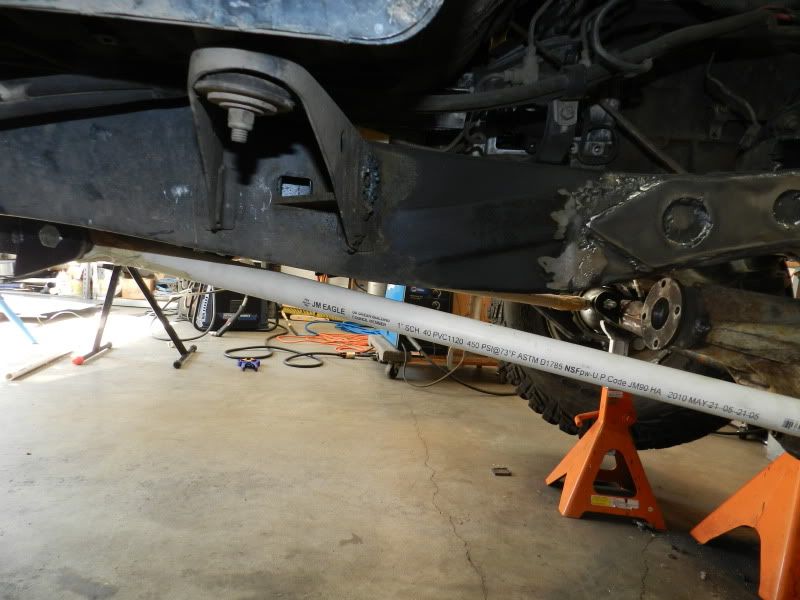
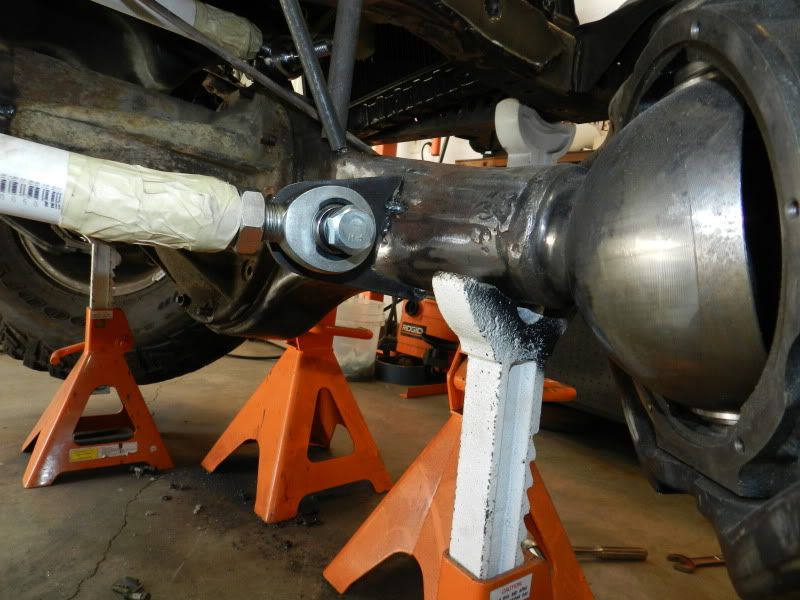
Obviously, either way will require a frame notch. I think I can make that work pretty well.
This is where the upper sits. It should clear the motor mount/motor when flexed, but we'll see.
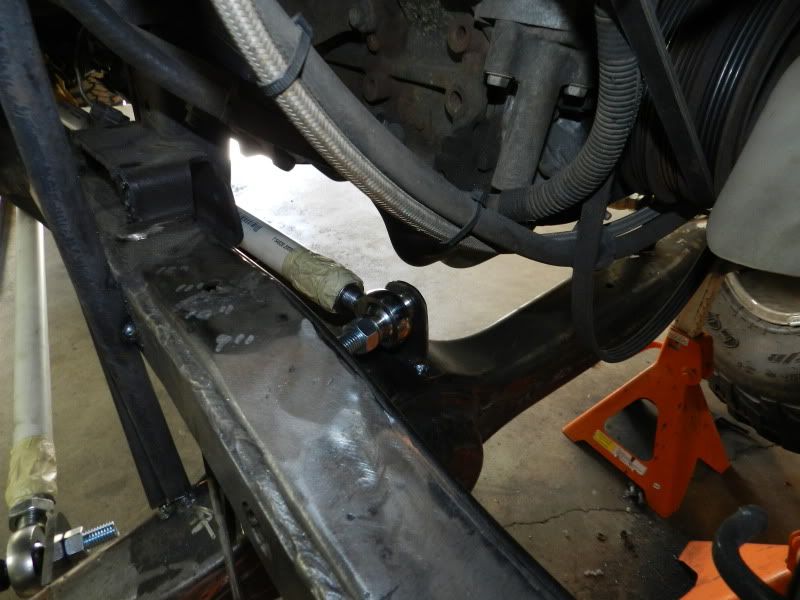
Anyway, some more pondering to do.
This is the calculator for a set up with the driverside dimensions:
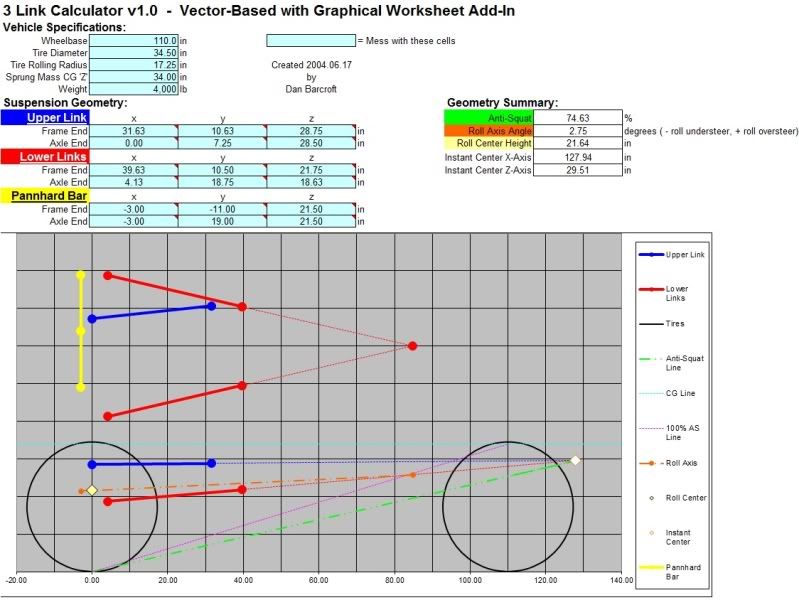
The panhard here isn't correct, but just put in there. The actual numbers will come once I get the steering box figured out. Hopefully some of that tomorrow.
Anyway, I started mocking up my links. And, figured out that I was going to have to change the design a bit again.
Anyway, here is how things are going:
I've tried two different set ups on the passenger side and driver side. One is higher than the axle center line, the other just lower. Obviously, the higher gives better roll axis numbers, but they still aren't great.
Driver side:
Passenger side:
Obviously, either way will require a frame notch. I think I can make that work pretty well.
This is where the upper sits. It should clear the motor mount/motor when flexed, but we'll see.
Anyway, some more pondering to do.
This is the calculator for a set up with the driverside dimensions:
The panhard here isn't correct, but just put in there. The actual numbers will come once I get the steering box figured out. Hopefully some of that tomorrow.
 . interesting...5th stud mod too? Please explain the theory behind this plan.
Jun 26, 2011 | 08:27 PM
. interesting...5th stud mod too? Please explain the theory behind this plan.
Jun 26, 2011 | 08:27 PM
#140
Thread Starter
Contributing Member
Joined: Apr 2004
Posts: 5,464
Likes: 6
From: Arvada, Colorado
Thanks!


