
91 Extracab Frame Up Rebuild
 Feb 20, 2012 | 07:03 PM
#181
Thread Starter
Registered User
Joined: Nov 2007
Posts: 954
Likes: 0
From: Dillsburg, PA
Before I jacked the truck up, I measured the height from the floor to the top of the fender directly above the hub. With the 33ss on, that was 42". We'll see how much more the new leafs will add.
Last edited by Cyberman; Feb 21, 2012 at 06:19 PM.
Feb 21, 2012 | 06:26 PM
#182
Thread Starter
Registered User
Joined: Nov 2007
Posts: 954
Likes: 0
From: Dillsburg, PA
Made more progress. The instructions say 2-3 days for installation. I suppose if there was more than two people working on the rig at one time, I suppose. Most of the time seems to be tearing everything down.
Before cutting on the driver's side, I unbolted the brake and gas lines, and pushed them up to the top of the frame. Then, I had some extra aluminum flashing laying around from when I built my toolbox. I tucked the flashing between the frame and the lines, so that any slag from the plasma cutter would just bounce off it.


Also, something I found out that I didn't see posted anywhere else. When I cut out the holes for the tubes, I ran into a secod piece of metal on the inside of the frame. Just a heads up, it's not just a simple hole. The second pice of metal only covers half the hole, so it needs to get cut out separately.
More pictures:


Got at least another hour of grinding to be ready for welding.
Before cutting on the driver's side, I unbolted the brake and gas lines, and pushed them up to the top of the frame. Then, I had some extra aluminum flashing laying around from when I built my toolbox. I tucked the flashing between the frame and the lines, so that any slag from the plasma cutter would just bounce off it.
Also, something I found out that I didn't see posted anywhere else. When I cut out the holes for the tubes, I ran into a secod piece of metal on the inside of the frame. Just a heads up, it's not just a simple hole. The second pice of metal only covers half the hole, so it needs to get cut out separately.
More pictures:
Got at least another hour of grinding to be ready for welding.
 Feb 22, 2012 | 04:41 PM
#184
Thread Starter
Registered User
Joined: Nov 2007
Posts: 954
Likes: 0
From: Dillsburg, PA
Feb 29, 2012 | 03:44 AM
#185
Thread Starter
Registered User
Joined: Nov 2007
Posts: 954
Likes: 0
From: Dillsburg, PA
The swap is all but buttoned up now. Only thing left is the steering stabilizer, and some paint.
There were only a few issues during the install. The first one was the centering pin on driver side spring pad wouldn't go in without a little grinding on the hole of the pad - no biggie.
The second issue was the grease fittings of the shackle kit. One of the m fell off during installation. Upon re-installation, noticed that there were hardly enough threads on them. As soon as they started to thread on the bolt, they bottomed out. I opted to get 6 new 6mm fittings that had twice as much thread.
I can say this much. The instructions say 2-3 days for install. This might be true, if you spend full days doing it, and possibly have more than one person on it. Most of the time seems to be spent tearing things down, and prepping. The actual welding and assembly could be done in a day (or maybe even 4 hours).
I was happy I had an entire week to do this though. Although it is pretty straight forward, you'll end up spending some time going over everything about 10 times to make sure you torqued everything up, and didn't miss anything.
Drove it about 60 miles yesterday. Tracks straight, and overall, not a bad ride. The 5.29s gave the extra boost it needed on the highway. Might need to look for 35s to run on the road now. I now have a usable 5th gear, but at 65 mph, it is running around 3000 RPM. Not really a big deal, since I don't normally go any faster in it.
With the old Rough Country 4" lift in the front, the height from the floor to the lip of the front fender was 42" (on 33" tires). Now, it sits around 45", but seems to be settling.
More pics:
 good work Mike!
Mar 11, 2012 | 02:56 PM
good work Mike!
Mar 11, 2012 | 02:56 PM
#188
Thread Starter
Registered User
Joined: Nov 2007
Posts: 954
Likes: 0
From: Dillsburg, PA
So, I buttoned up a few things to get ready to wheel this next weekend. Twin sticks will be here on Wednesday, so I pulled the transfer out to get that stupid little interlock pin out. The trans shifter used to go way back, even rubs the TC shifter. I cut it in two places about halfway, bended it forward, then welded a bead on both spots. Should have enough room now, but can go a little further if needed. At least it'll take 10 minutes to put the sticks in.
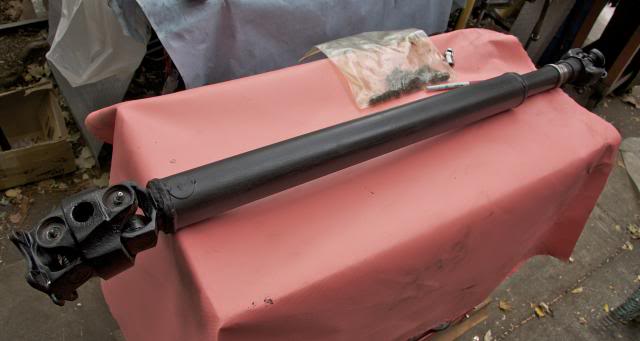
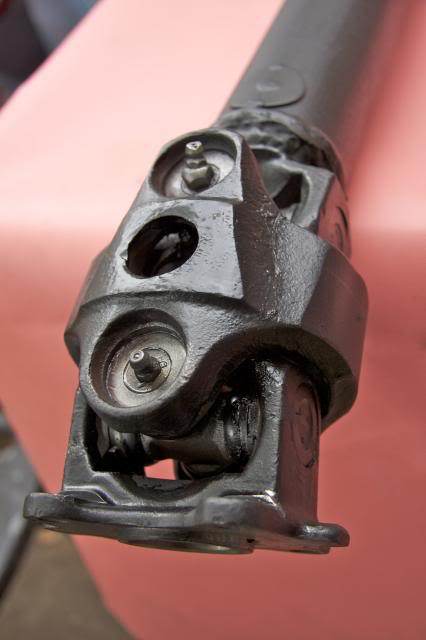
Also patched up an exhaust leak at the downpipe/manifold, put JB Weld on what I believe to be a small seep hole in the rear diff by the bracket that holds the brake line, and put a front drive shaft on. I was going to find another shaft to make into a square drive shaft. The guy I bought one from said he had no problems running a 4 cyl. front on his SAS'd Runner. Well, it's going to be iffy. At full flex on the driver side, about an inch of splines show. It's not going to stop me from taking it out, however just something for me to worry over.
At any rate, here are some poser shots.
Mar 12, 2012 | 09:34 AM
#189
Mike,
Lookes great!! You can tell your front springs are new and ther rear ones have been flexed before. In the pictures it seems like the rear is doing all the work. Once the front get broken in though you should be in great shape! Keep up the nice work! Thanks for the pictures!
Lookes great!! You can tell your front springs are new and ther rear ones have been flexed before. In the pictures it seems like the rear is doing all the work. Once the front get broken in though you should be in great shape! Keep up the nice work! Thanks for the pictures!
Jan 28, 2013 | 08:00 AM
#190
Thread Starter
Registered User
Joined: Nov 2007
Posts: 954
Likes: 0
From: Dillsburg, PA
Haven't updated in a while so here goes.
I had the truck on a wheeling trip, and broke my first birfield. All I was doing was backing up, but I was turned hard passenger, and the short side went.
Didn't have my twin sticks installed, so I had to winch myself out to get somewhere to replace it.
I just finished putting dual cases in. I went with the following (from Trail Gear).
23 spline input shaft
Dual Case Crossmember
Extended speedo cable

I already had the V6 adapter and twin sticks from when I was running a single 4.7 case.
I took the drive shafts to a local shop, where they lengthened my old IFS front shaft, and shortened the intermediate shaft of my two-piece rear. Fit like a glove and worked out really well.

When I took the truck in to get inspected, the mechanic found that the steering box was flexing on the frame. This was what was causing a bit of death wobble at 45 mph. After taking the box off, I found out that the top bracket was so loose, that I could have ripped it right off. I cut up a piece of 3/16" plate and made a reinforcement for it.

While I had the steering box off, I also decided to drill and tap it for future hydro assist. I had some extra boxes sitting in the garage, and my first attempt came out perfectly. So, I switched out the insides of the box that was on the truck into the one that I had tapped. First attempt, it leaked. Pulled it back off, and sealed it up with RTV. After taking out on the trails, realised that it still was sealed, and was gushing fluid at full lock. Wheeled with it until I ran out of fluid, and then pulled the steering belt, so the pump wouldn't burn up. Let's just say that I have a newly found fondness for power steering. After getting it home, I found out that I forgot to put the two small o-rings that go around the high pressure veins in the box. All good now.
Also, back at Christmas time, Marlin Crawler was having a $1000 wishlist giveaway. Well guess who won it? Yours truly. I got a pair of 12" Bilsteins to put in the rear, along with a set of 30 spline chromoly axels for the front. A big thanks to the guys at Marlin!
Next thing to do is install hydro assist, and finally remove the blocks from the rear, and get a real lift back there.
I had the truck on a wheeling trip, and broke my first birfield. All I was doing was backing up, but I was turned hard passenger, and the short side went.
Didn't have my twin sticks installed, so I had to winch myself out to get somewhere to replace it.
I just finished putting dual cases in. I went with the following (from Trail Gear).
23 spline input shaft
Dual Case Crossmember
Extended speedo cable
I already had the V6 adapter and twin sticks from when I was running a single 4.7 case.
I took the drive shafts to a local shop, where they lengthened my old IFS front shaft, and shortened the intermediate shaft of my two-piece rear. Fit like a glove and worked out really well.
When I took the truck in to get inspected, the mechanic found that the steering box was flexing on the frame. This was what was causing a bit of death wobble at 45 mph. After taking the box off, I found out that the top bracket was so loose, that I could have ripped it right off. I cut up a piece of 3/16" plate and made a reinforcement for it.
While I had the steering box off, I also decided to drill and tap it for future hydro assist. I had some extra boxes sitting in the garage, and my first attempt came out perfectly. So, I switched out the insides of the box that was on the truck into the one that I had tapped. First attempt, it leaked. Pulled it back off, and sealed it up with RTV. After taking out on the trails, realised that it still was sealed, and was gushing fluid at full lock. Wheeled with it until I ran out of fluid, and then pulled the steering belt, so the pump wouldn't burn up. Let's just say that I have a newly found fondness for power steering. After getting it home, I found out that I forgot to put the two small o-rings that go around the high pressure veins in the box. All good now.
Also, back at Christmas time, Marlin Crawler was having a $1000 wishlist giveaway. Well guess who won it? Yours truly. I got a pair of 12" Bilsteins to put in the rear, along with a set of 30 spline chromoly axels for the front. A big thanks to the guys at Marlin!
Next thing to do is install hydro assist, and finally remove the blocks from the rear, and get a real lift back there.
 Jul 24, 2013 | 10:08 AM
#192
Thread Starter
Registered User
Joined: Nov 2007
Posts: 954
Likes: 0
From: Dillsburg, PA
Here's another update:
Removed the blocks in the rear finally. Put a set of matching TG 3" springs, shackles, ubolt flip kit, etc. No more sagging, and it flexes nicely.

Installed 12" Bilsteins in the rear. Instead of mounting them in a /\ pattern, I opted to install them both rearward, at roughly the same angle as the stock position, but mounted above the frame.
I found an issue with my steering right before I was supposed to go out wheeling. Found that one of the steering arm studs had snapped. So, I tore down the front axle, installed my chromoly axles from Marlin, and replaced all of the top studs. I know now to make sure they are torqued (71 ft lbs.) everytime I got out.
Tapped an extra steering box that I had, and added a TG hydro assist.
Lastly, I spruced up the interior. I used a few cans of Valspar "Stone" paint from Lowes, and gave the interior a rocky look (pics follow).


Removed the blocks in the rear finally. Put a set of matching TG 3" springs, shackles, ubolt flip kit, etc. No more sagging, and it flexes nicely.
Installed 12" Bilsteins in the rear. Instead of mounting them in a /\ pattern, I opted to install them both rearward, at roughly the same angle as the stock position, but mounted above the frame.
I found an issue with my steering right before I was supposed to go out wheeling. Found that one of the steering arm studs had snapped. So, I tore down the front axle, installed my chromoly axles from Marlin, and replaced all of the top studs. I know now to make sure they are torqued (71 ft lbs.) everytime I got out.
Tapped an extra steering box that I had, and added a TG hydro assist.
Lastly, I spruced up the interior. I used a few cans of Valspar "Stone" paint from Lowes, and gave the interior a rocky look (pics follow).
Aug 25, 2013 | 07:33 AM
#195
Thread Starter
Registered User
Joined: Nov 2007
Posts: 954
Likes: 0
From: Dillsburg, PA
Finally got my thread moved to the build-up section. Just bumping this, so that subscribers know that it has moved.
Here's a pic at Rausch Creek Off Road park in Tremont, PA, going down Rock Creek.
Here's a pic at Rausch Creek Off Road park in Tremont, PA, going down Rock Creek.
Dec 5, 2013 | 05:35 PM
#196
Registered User
Joined: Apr 2009
Posts: 5,592
Likes: 24
From: Dixon, Ca
Great build cyber. Why I did not see before this I will know. I too did an SAS in I think 4/5 days or so. I too love my SAS over the old and decaying IFS. 33's and 5/29's 3000 rpm 65 mph exactly. Mine is a DD so I am not wheeling it out here yet. I need armor and lockers of some type. (Out here) as in my truck was purchased Oct 19 1987 in NH and I moved to Ca in 2009. It likes the rust free weather here. Did you have any drive line issues? Vibrations or what not? And did you fab up a square front DS. I made up my own front DS with U joints at both ends, (square). And had installed on the rear DS the CV up top.... Alls good.
Dec 6, 2013 | 04:12 AM
#197
Thread Starter
Registered User
Joined: Nov 2007
Posts: 954
Likes: 0
From: Dillsburg, PA
Before putting the duals in, the front drive shaft was a lengthened front off of a first gen Runner. After the duals, I lengthened and balanced the original IFS shaft, and shortened and balanced the front half of my two-piece rear shaft. I only had some minor vibrations from the rear, until I put the new suspension on and adjusted the pinion angle.
Although I've wheeled it almost 50 times, I could still DD this truck.
Although I've wheeled it almost 50 times, I could still DD this truck.

 Mar 22, 2014 | 04:33 AM
#200
Thread Starter
Registered User
Joined: Nov 2007
Posts: 954
Likes: 0
From: Dillsburg, PA
Yes it has. Since the truck is now more capable off road, I am taking harder lines and harder trails. I'm pretty sure it is the extra torque that the dual cases put on things that are creating other issues. One day out, I almost lost a locking hub, after shearing 5 out of 6 of the studs, along with one of the dowels. Obviously, the hub was probably loose, which was the ultimate reason. So, I find it a good idea to make sure all the suspension fasteners are torqued properly, before going off road.
I added a computer to the truck, with a 7" touch screen, and front and rear cameras, for seeing where I'm going, and also to record video. The computer plays music and video, and has GPS, weather. One of these days, I might make an inclinometer program for it.
I added a computer to the truck, with a 7" touch screen, and front and rear cameras, for seeing where I'm going, and also to record video. The computer plays music and video, and has GPS, weather. One of these days, I might make an inclinometer program for it.


