
TinMan's 1985 4Runner Build-Up Thread
 Dec 29, 2011 | 06:14 PM
#321
Thread Starter
Registered User
Joined: Jul 2009
Posts: 832
Likes: 0
From: Eastern NC
Thanks Terry, the seats do go really well with the truck. And they are very comfy. The lumbar support in the drivers seat is out of this world. My son did all the fab work for the brackets, I just welded them on, and helped to get them square in the truck.
I got my high cold idle, and slightly erratic warm idle figured out today. After trouble shooting everything I could think of, I finally put a piece of gorilla tape over the IAC hole in the throttle body. Idle is perfect now. Of course there is no cold idle up with the tape over it. I'll see if I can find a used IAC. A new one is around $230.00.
While up in VA visiting my daughter, I picked up the red 10 amp, 7" buffer, from Harbor freight. They gave it to me for the New Years days sale price because I told them I am not near a HF. I have never used a buffer before, and am a little worried about screwing up the new paint on the runner. So I decided to practice on my Son's 94. The paint on his is about shot anyway. I learned real quick to be careful around the edges, but other than that, I can not believe how well his ruck buffed out. And that buffer made waxing a real snap. The old Toyota single stage really comes back to a nice shine.
Last edited by TinMan; Dec 29, 2011 at 06:19 PM.
Dec 30, 2011 | 06:52 AM
#322
The buffer makes a difference. When you see a car or truck with that white,chalky look to it. That is one that will buff out nice. Red and silver seem to make the biggest difference.
On clear coat, if it isnt peeled off but a little pitted/rough, take some 2000 grit sandpaper and keep it wet. Go over easy on it to get a slick feel to it. Then go over it with some rubbing compound then polishing compound.
Rubbing compound is basically sandpaper in a putty. I am not a pro or anyting like that. Just learned as I go. Not brave enough to do it as a business, but have done family and friends older cars. Always got great compliments.
Spent 2 days on a Ranger pickup. Detailed the interior, slight tune up, washed the motor and some black rattle spray paint to get the frame and buffed the body. Had some time into it, but no real cost. Made a huge difference and made a descent profit off of it.
Most parts store sell a 7" foam bad that can be used on an electric drill and it will work just as good also. Not as heavy as a buffer.
On a buffer use a slow speed and keep moving. I like to keep the pad damp and stop when the polish is starting to turn dry. Just to save me some elbow grease, when it does dry, I will go over the polish real quick and light just to knock it off and keep me from having to use a towel.
I dont mess with the sharp edges. I just get close to it. Usually no one will notice and it easy to burn through the paint and get to primer real quick. On edges I will rub it by hand it if really needs it.
I have actually been trying to keep an eye out for a really faded truck that I could do again to sell to help fund my project. If you can find one that has been neglected on tune ups and buffing and have some time to invest, it can be a quick turn around. People will buy if it looks good and runs good.
In the summer when it is hot and dry for 2 or 3 days and the interior is really dirty, vacuum and presoak in Simple Green and use the soap and rinse cycle
and use a wet vac to get as much water out as possible. Then leave windows down for a few days to dry. Just watch spraying around electronics and such. That makes a big difference too.
Great job on doing your sons truck. Just gotta jump in there and do it.
Dirty

Cleaner

On clear coat, if it isnt peeled off but a little pitted/rough, take some 2000 grit sandpaper and keep it wet. Go over easy on it to get a slick feel to it. Then go over it with some rubbing compound then polishing compound.
Rubbing compound is basically sandpaper in a putty. I am not a pro or anyting like that. Just learned as I go. Not brave enough to do it as a business, but have done family and friends older cars. Always got great compliments.
Spent 2 days on a Ranger pickup. Detailed the interior, slight tune up, washed the motor and some black rattle spray paint to get the frame and buffed the body. Had some time into it, but no real cost. Made a huge difference and made a descent profit off of it.
Most parts store sell a 7" foam bad that can be used on an electric drill and it will work just as good also. Not as heavy as a buffer.
On a buffer use a slow speed and keep moving. I like to keep the pad damp and stop when the polish is starting to turn dry. Just to save me some elbow grease, when it does dry, I will go over the polish real quick and light just to knock it off and keep me from having to use a towel.
I dont mess with the sharp edges. I just get close to it. Usually no one will notice and it easy to burn through the paint and get to primer real quick. On edges I will rub it by hand it if really needs it.
I have actually been trying to keep an eye out for a really faded truck that I could do again to sell to help fund my project. If you can find one that has been neglected on tune ups and buffing and have some time to invest, it can be a quick turn around. People will buy if it looks good and runs good.
In the summer when it is hot and dry for 2 or 3 days and the interior is really dirty, vacuum and presoak in Simple Green and use the soap and rinse cycle
and use a wet vac to get as much water out as possible. Then leave windows down for a few days to dry. Just watch spraying around electronics and such. That makes a big difference too.
Great job on doing your sons truck. Just gotta jump in there and do it.
Dirty
Cleaner
Last edited by Terrys87; Dec 30, 2011 at 07:08 AM.
Dec 30, 2011 | 04:50 PM
#323
Thread Starter
Registered User
Joined: Jul 2009
Posts: 832
Likes: 0
From: Eastern NC
Thanks for the info Terry. Now I just want buff everything. I will deffinately keep my eye out for a vehicle to flip. Sounds like it might fund some of projects. I know the wife would love that. I don't know about around you , but around here used vehicles are bringing a premium. Even ones that need a lot of work. The economy is really driving up the prices on used vehicles.
Got off work early today so decided to sart cutting the paint on the old runner. 1000 and then 2000 is really smothing out the orange peal.
Then I got a call from the parts store letting me know the blower motor resistor was in.
Took off, got about a mile, and the runner started loosing power under a load. I would push in the clutch and the power would come back. Turned around and came home. Checked a few things, and took it out for a test. Same thing, except this time I got to the end of the street and it died. Won't start at all know. I just filled it up so I know it has fuel. New fuel filter at rebuild. Tank was empty and looked clean when I put it back in. Just checked about everything in the EFI system about 200 miles ago. I checked a lot of the wiring connections they all looked good. Jumped the fuel pump diagnostic and the fuel pump does not sound normal. It doesn't have the nice little humm, it has a slow little tic. I'll do some more trouble shooting tomorrow before dropping $130 on a new fuel pump.
Last edited by TinMan; Dec 30, 2011 at 04:54 PM.
Dec 31, 2011 | 09:20 PM
#324
Thread Starter
Registered User
Joined: Jul 2009
Posts: 832
Likes: 0
From: Eastern NC
Took out the fuel pump this morning. Hooked up to the battery to see if it was working. It didn't do anything, just for grins I tapped the sides with a small hammer, hooked it back up to the bat, and it fired right up. I went head and put a new per-filter on and put it back in. She is running like a champ now. Don't know how long it will last, but at least that is $130 I don't have to spend now.
I picked up some 1000 and 2000 grit sand paper, a 3m foam cutting pad, and a qt of Diamond cut 2000. Figured I would start color sanding and buffing the body. Figure I'll do it one panel at a time when I don't have anything else going on. Started on the drivers rear quarter. It took about 2 hour to color sand out real smooth. And burned throught to the primer in one area about the size of a quarter. I think it burned through because there is high spot in my body work right there. I didn't care because there is quite. Few pin holes in filler there. And I planned to fill those with glazing puddy and spray it again anyway. Then hit it with the diamond ut and the foam pad. The 2000 grit haze buffed out in a hurry. The color is just a bit lighter in the cut and buffed area. I think it is because the panel is much smoother and shinnier than the rest of the truck. The foam pad is much easier and does not cut edges as bad as wool.
Happy New Years everyone.
Dec 31, 2011 | 10:57 PM
#325
It takes a little practice on the buffer, I am really careful on the edges.
On your fuel pump, I get mine from Car Parts Wholesale on ebay. I have done the parts stores and they run about $150 and I think they are $300 at Toyota.
http://www.ebay.com/itm/New-Fuel-Pum...item35b6422050
I have fixed 2 of my trucks and 1 friends truck with these fuel pumps and not one problem at all. My 88 runner has 32,000 miles on it. It is a direct fit and has all of the same electrical connections. You would never know it was aftermarket. It is identical as to what you have. The description on the picture of the website isnt the best. Total cost is around $32 including shipping.
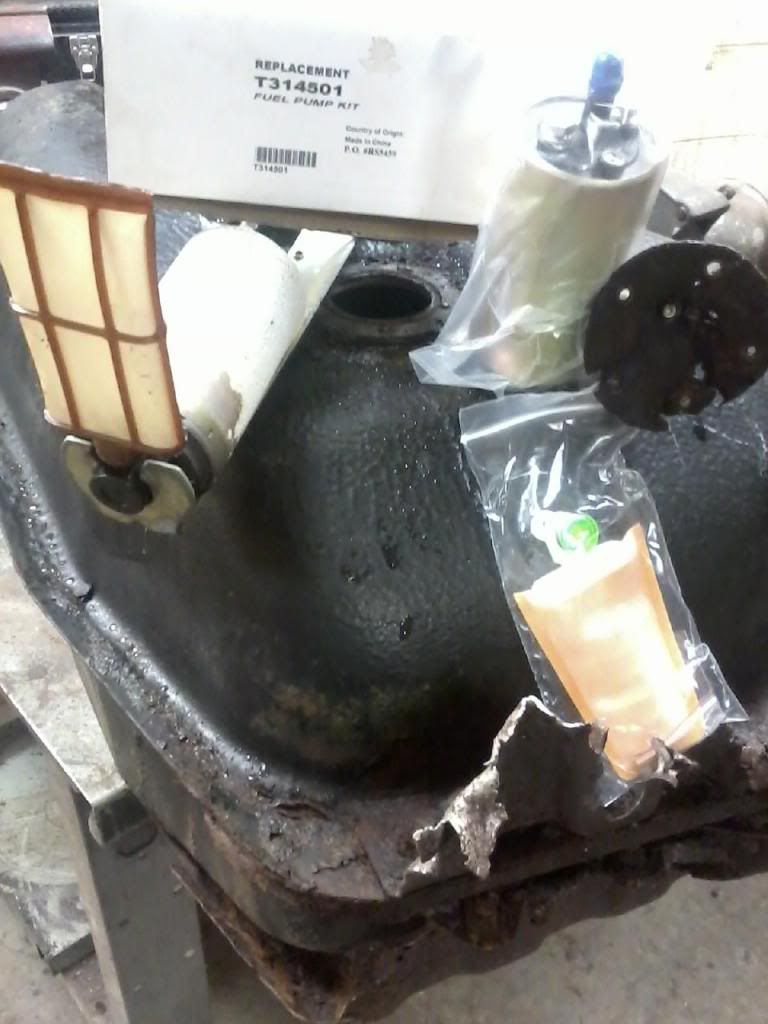
Here is a picture of one of them. Even comes with a new sock for the end of the pump and gasket.
On your fuel pump, I get mine from Car Parts Wholesale on ebay. I have done the parts stores and they run about $150 and I think they are $300 at Toyota.
http://www.ebay.com/itm/New-Fuel-Pum...item35b6422050
I have fixed 2 of my trucks and 1 friends truck with these fuel pumps and not one problem at all. My 88 runner has 32,000 miles on it. It is a direct fit and has all of the same electrical connections. You would never know it was aftermarket. It is identical as to what you have. The description on the picture of the website isnt the best. Total cost is around $32 including shipping.
Here is a picture of one of them. Even comes with a new sock for the end of the pump and gasket.
Jan 1, 2012 | 05:15 AM
#326
Thread Starter
Registered User
Joined: Jul 2009
Posts: 832
Likes: 0
From: Eastern NC
Thanks for the info on the fuel pump. That is a huge savings. That will make the wife happy.
On the buffer, are wetting the pad for compounding? And what speeds are running for compounding, waxing and buffing. I think I might be running to slow.
The spot I burned through is in the center of the panel. Right at the top of were I did some body work. I'm pretty sure I left a high spot there.
Thanks again
Jan 1, 2012 | 06:07 PM
#327
Thread Starter
Registered User
Joined: Jul 2009
Posts: 832
Likes: 0
From: Eastern NC
I thought I would post a little progress on the cut and buff of the paint job on the runner. Don't laugh, this was my first full paint job.
This is a close up of the paint.

Here is after some wet sanding with 1000/2000 and some buffing.

Here is we're I cut through with the wet sanding.

These are the supplies I have been using.
Harbor frieght buffer.

3M cutting pad. Well worth the money for an armature.

Compounds and wax. I know the wax is not the greatest.

The Meguiares diamond cut is awesome stuff, you would have to buy three different grits in the 3M to get the same results.
I didnt take any pictures of the pin holes in my filler work on that panel. I think I'm going to fill those with some glazing and then reshoot that quarter. Had planed on doing it anyway. Kinda why I tried my hand at the cut and buff on that quarter.
Later
This is a close up of the paint.
Here is after some wet sanding with 1000/2000 and some buffing.
Here is we're I cut through with the wet sanding.
These are the supplies I have been using.
Harbor frieght buffer.
3M cutting pad. Well worth the money for an armature.
Compounds and wax. I know the wax is not the greatest.
The Meguiares diamond cut is awesome stuff, you would have to buy three different grits in the 3M to get the same results.
I didnt take any pictures of the pin holes in my filler work on that panel. I think I'm going to fill those with some glazing and then reshoot that quarter. Had planed on doing it anyway. Kinda why I tried my hand at the cut and buff on that quarter.
Later
Last edited by TinMan; Jan 1, 2012 at 06:11 PM.
Jan 2, 2012 | 04:58 AM
#328
I just got a smile on my face. I know what you went through. When it is first painted, it is glossy but has orange peel. Then taking sand paper to it and loosing the gloss, you really get to thinking if you are doing it right.
You got a nice smooth painted surface and the reflection is great. You did great and it looks great. Congratulations!!
On the pinholes, sometimes I get a few and other times I dont get any. Dont know the secret on that yet. Sure is nice when you dont get any the first time.
I always use the slowest speed on my buffer, just to reduce the chance of burning through. I like Meguiars also. I have gotten away with very light orange peel and using just it and no sandpaper to get it out.
Congratulations again. You will have friends and family wanting you to do theirs soon.
Jan 12, 2012 | 07:58 PM
#329
Thread Starter
Registered User
Joined: Jul 2009
Posts: 832
Likes: 0
From: Eastern NC
Well nothing picture worthy, and have not really done much lately. Just kinda took a little break.
I did scuff the drivers side quarter, use some glazing pudy on the the pin holes in my body work. Then shot another couple coats of color on it.
I also was able to get my hood to not flap in the wind anymore. A local body shop told me to use 3M window weld to glue the hood back down. It worked like a champ. Only thing I learned when you do it don't put any weight on the hood. Just close it and let the window weld harden. I put a box with a little bit of paint supplies in it on the hood, and now the center up by the windshield is dipped down just a bit. But oh we'll I'm the o ly one that will ever notice it.
I also accumulated a few things.
Wireless 2.4g camera set, and 5.2" color monitor with image reverse. I plan to use it as a back up camera. Plan is to mount the camera and transmitter in the cover that covers the rear windshield wiper. I'm going to wire it off the back up lights that way it will turn on when I put it reverse. Don't know how I'm going to mount the monitor on the dash. Probably will just pick up some sort of window mount. I need to build two dc/dc voltage reducers. Components are cheap enough from radio shack.
Also picked up some tools from a guy at work.

Large Craftsman wrench set. Best thing $40 for the set.
Plan for this weekend is to build a rack in the cargo area like DirtCo did. Wire up, and mount the rear view camera, and finish cutting and buffing the body.
Later
I did scuff the drivers side quarter, use some glazing pudy on the the pin holes in my body work. Then shot another couple coats of color on it.
I also was able to get my hood to not flap in the wind anymore. A local body shop told me to use 3M window weld to glue the hood back down. It worked like a champ. Only thing I learned when you do it don't put any weight on the hood. Just close it and let the window weld harden. I put a box with a little bit of paint supplies in it on the hood, and now the center up by the windshield is dipped down just a bit. But oh we'll I'm the o ly one that will ever notice it.
I also accumulated a few things.
Wireless 2.4g camera set, and 5.2" color monitor with image reverse. I plan to use it as a back up camera. Plan is to mount the camera and transmitter in the cover that covers the rear windshield wiper. I'm going to wire it off the back up lights that way it will turn on when I put it reverse. Don't know how I'm going to mount the monitor on the dash. Probably will just pick up some sort of window mount. I need to build two dc/dc voltage reducers. Components are cheap enough from radio shack.
Also picked up some tools from a guy at work.
Large Craftsman wrench set. Best thing $40 for the set.
Plan for this weekend is to build a rack in the cargo area like DirtCo did. Wire up, and mount the rear view camera, and finish cutting and buffing the body.
Later
Last edited by TinMan; Jan 13, 2012 at 05:10 AM.
Jan 12, 2012 | 08:05 PM
#330
Thread Starter
Registered User
Joined: Jul 2009
Posts: 832
Likes: 0
From: Eastern NC
I forgot the "Remove before firing" straps are from some 155mm howitzer projectiles. I Plan to find a way to strap those under the sliders in a loop. That way they can be used a a step. The runner sits a little high for some to get in. One of the guys at work suggested using exhaust u-bolts. Might give it a shot and see how it looks.
Later
Later
Jan 14, 2012 | 05:53 PM
#332
Thread Starter
Registered User
Joined: Jul 2009
Posts: 832
Likes: 0
From: Eastern NC
No worries man. The 3M window weld is some pretty awesome stuff. It seals/glues really well, and remains flexible.
I picked up a passenger side mirror from the pick and pull this week. Mine was cracked. Also picked up a can of SEM bumper black to repaint some of the trim. It looks pretty good. I didnt do a real good job of getting the sanding scratches out, but the mirrors look pretty good. I'll post pics tomorrow.
Also started installing a set of Pacer universal fender flares. I don't really like the idea of putting sheet metal screws into the fender lip, but a lot of people run them and don't seem to have any problems. I don't really have to worry about road salt around here either. Once the flares are all installed the way i want, i might pull them back off and put a good bead of the window weld between them and the fender. Should help seal them up from the elements. I just need to have the tire tread covered to be legal. And the tires sticking out are really thowing stones and crap all over the body. I only got one rear wheel well done before the wife wanted to go to dinner. Again I'll post some pis tomorrow night.
Picked up some 1" tube steel for the rack in the rear. Free, you got to love good friends.
Last edited by TinMan; Jan 14, 2012 at 05:57 PM.
Jan 15, 2012 | 06:06 PM
#334
Thread Starter
Registered User
Joined: Jul 2009
Posts: 832
Likes: 0
From: Eastern NC
Thanks man, really looking forward to seeing your on the road. But I know school, family comes first for ya.
Didn't get much done today. Church then football. Hard to work fast and watch the games at the same time.
Did get the Pacer universal flares on.


They don't look to bad. Not as good as some bushwhackers would have. But they don't make any for us 1st gen runners. It really broke my heart to drill into the fenders. But next time I'm bored I'll pull then and put some seam sealer around all the screws. Should last pretty good, and keeps me legal. Now just need to figure how I'm going to mount the mud flaps.
Cut and buffed the drivers door while the mirror was off. Installed the freshly painted mirror.

The SEM bumper black really does a nice job.
Didn't get much done today. Church then football. Hard to work fast and watch the games at the same time.
Did get the Pacer universal flares on.
They don't look to bad. Not as good as some bushwhackers would have. But they don't make any for us 1st gen runners. It really broke my heart to drill into the fenders. But next time I'm bored I'll pull then and put some seam sealer around all the screws. Should last pretty good, and keeps me legal. Now just need to figure how I'm going to mount the mud flaps.
Cut and buffed the drivers door while the mirror was off. Installed the freshly painted mirror.
The SEM bumper black really does a nice job.
Jan 15, 2012 | 08:44 PM
#337
Contributing Member
Joined: Dec 2008
Posts: 2,505
Likes: 16
From: San Jose ,Ca
garage sale ! yea .. i need to get rid of some of this stuff before i go crazy and before i really start on the landcruiser. since your doing up your 4runner you should really put a 2005 taco dash in there.. dont know how it will fit but you should try .. ohh and i have one for sale 
Jan 16, 2012 | 05:19 AM
#338
Thread Starter
Registered User
Joined: Jul 2009
Posts: 832
Likes: 0
From: Eastern NC
Wow your quite the salesman. A taco dash would look pretty cool in the. And maybe not be so noisy either. But the wife has me on a short leash with money right now. We are looking to buy a house.
Jan 16, 2012 | 06:00 PM
#339
Thread Starter
Registered User
Joined: Jul 2009
Posts: 832
Likes: 0
From: Eastern NC
On to the interior. I plan to make the majority of mods, stereo etc, prior to pulling it apart for paint sound deadener and such.
Slept in for a bit, then got to work on the rack for the cargo area.

Here is how I decided to mount it to the roll bar. I went with this so that when I put it in and take it out I can just set it on the angle iron welded to the roll bar. Still need to drill some holes and bolt it down.

And some more pics


Tomorrow I'll paint it up and bolt it down.
Slept in for a bit, then got to work on the rack for the cargo area.
Here is how I decided to mount it to the roll bar. I went with this so that when I put it in and take it out I can just set it on the angle iron welded to the roll bar. Still need to drill some holes and bolt it down.
And some more pics
Tomorrow I'll paint it up and bolt it down.
Jan 17, 2012 | 04:23 AM
#340
The rack looks well built, and sure to come in handy. I just noticed that you have a fire extinguisher mounted in the back area. I used to carry one all of the time and need to get another. They have come in handy in the past. Not somuch for mine but others in the past.
How are you liking yor tires? I like the looks of the tread and for everyday driving and what I do, think they would work great for me.
How are you liking yor tires? I like the looks of the tread and for everyday driving and what I do, think they would work great for me.


