
TinMan's 1985 4Runner Build-Up Thread
 May 31, 2010 | 06:00 AM
#1
Thread Starter
Registered User
Joined: Jul 2009
Posts: 832
Likes: 0
From: Eastern NC
TinMan's 1985 4Runner Build-Up Thread
Well I thought it was about time that I started a build up thread on the old runner. planning on a lot of work to her this summer. No plans to make her a show truck. Just want to get the old runner to a point that will get another 25 years out of good use.
Up to this point I have just been doing all the maint that has been neglected. And nursing the 22re to get some more life out of it. But I think it is about gone.
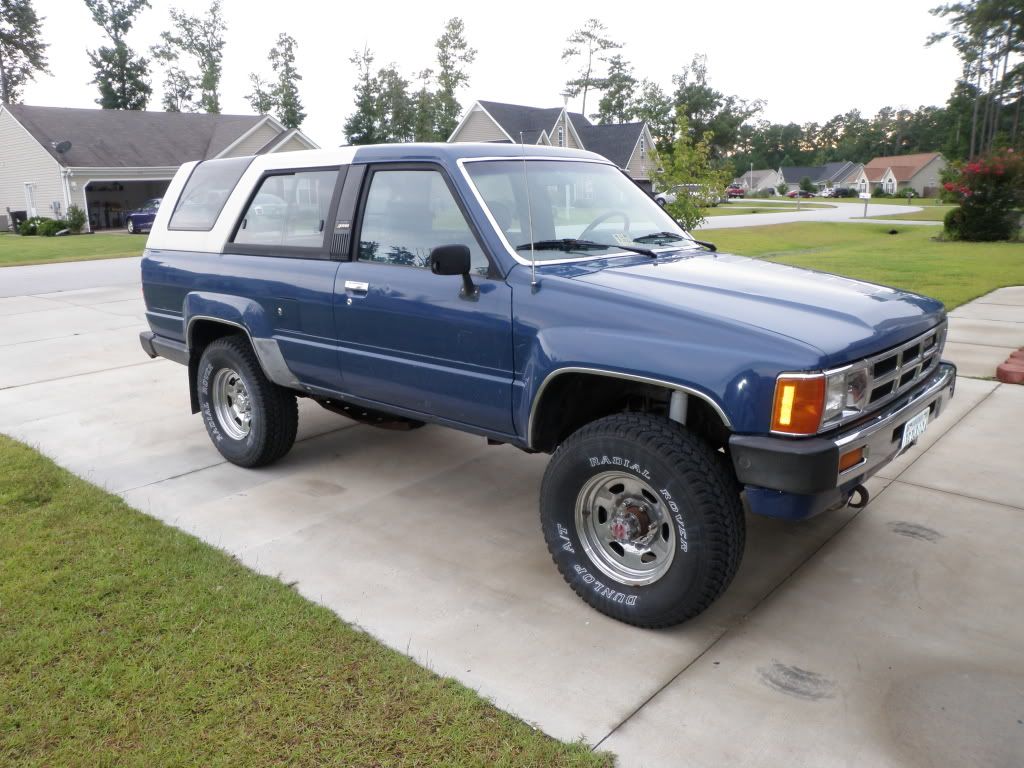
What she looked like last year this time when I brought her home.
She was pretty much stock, the motor had been replaced at one point, but I think it was a long time ago. Burned about a quart of oil every two days. Had a huge hole in the muffler and tail pipe, which let all the unburnt oil right into the cab.
First order of business was a new exhaust. Built it myself. Punched out the cat because all the oil had clogged it up, welded on 2.25" pipe back to a china knock off muffler, and out the back.
https://www.yotatech.com/forums/f115...xhaust-189185/
Then it was on to a knuckle rebuild and OME suspension.
https://www.yotatech.com/forums/f115...s-done-198141/
Then time for the heater core.

In the off time I removed all the chrome trim and welded up the body holes, filled and primered. Fixed a few dents, put a few more in. Found an area behind the drivers door, that had been hit, had about two gallons of bondo in it. Cut that out, made a new body pannel. Welded it in, filled it. That area needs more work for the filler to be straight.
Fixed as many of the little leaks as I could.
Built a rear bumper.
https://www.yotatech.com/forums/f88/...-build-207353/
Front rotors started to warp so I upgraded to the V6 rotors and calipers. One of the remans is leaking a little at the half. That is todays job, go get the new one they ordered in and replace it.
And that brings me up to know.
All this time I have been collecting parts, hoping to have enough for a complete long block to build and just do a direct swap. We'll see if that happens.
Pile of parts just back from the shop.

Everything sand blasted cleaned and ready for paint.

Some paint.


I still need to get a head. Which may take a while, beings I just spent the money I had for a head on a tubing bender. But oh well.
Plan is to build this engine and get it buttoned up. Once that is done, I am going to pull her into the garage and up onto jack stands. Pull the engine, strip down the engine bay, clean and repaint it all. While everything is out I want to clean the underside, prep it and bed liner with a good liner. Probably Herculiner. Strip the frame and POR 15. Then reassemble it all. I'm going with ford blue tractor paint from carquest. I have been playing with around here, it seems to be a very durable paint, single stage, no mixing, goes on easy and cheap. Once it is back together and running, it will be on to the outer body.
I hope to have it completed by the end of summer. That way we can really tear into the 87 pick up we have.
Stay tuned
Later
Up to this point I have just been doing all the maint that has been neglected. And nursing the 22re to get some more life out of it. But I think it is about gone.
What she looked like last year this time when I brought her home.
She was pretty much stock, the motor had been replaced at one point, but I think it was a long time ago. Burned about a quart of oil every two days. Had a huge hole in the muffler and tail pipe, which let all the unburnt oil right into the cab.
First order of business was a new exhaust. Built it myself. Punched out the cat because all the oil had clogged it up, welded on 2.25" pipe back to a china knock off muffler, and out the back.
https://www.yotatech.com/forums/f115...xhaust-189185/
Then it was on to a knuckle rebuild and OME suspension.
https://www.yotatech.com/forums/f115...s-done-198141/
Then time for the heater core.
In the off time I removed all the chrome trim and welded up the body holes, filled and primered. Fixed a few dents, put a few more in. Found an area behind the drivers door, that had been hit, had about two gallons of bondo in it. Cut that out, made a new body pannel. Welded it in, filled it. That area needs more work for the filler to be straight.
Fixed as many of the little leaks as I could.
Built a rear bumper.
https://www.yotatech.com/forums/f88/...-build-207353/
Front rotors started to warp so I upgraded to the V6 rotors and calipers. One of the remans is leaking a little at the half. That is todays job, go get the new one they ordered in and replace it.
And that brings me up to know.
All this time I have been collecting parts, hoping to have enough for a complete long block to build and just do a direct swap. We'll see if that happens.
Pile of parts just back from the shop.
Everything sand blasted cleaned and ready for paint.
Some paint.
I still need to get a head. Which may take a while, beings I just spent the money I had for a head on a tubing bender. But oh well.
Plan is to build this engine and get it buttoned up. Once that is done, I am going to pull her into the garage and up onto jack stands. Pull the engine, strip down the engine bay, clean and repaint it all. While everything is out I want to clean the underside, prep it and bed liner with a good liner. Probably Herculiner. Strip the frame and POR 15. Then reassemble it all. I'm going with ford blue tractor paint from carquest. I have been playing with around here, it seems to be a very durable paint, single stage, no mixing, goes on easy and cheap. Once it is back together and running, it will be on to the outer body.
I hope to have it completed by the end of summer. That way we can really tear into the 87 pick up we have.
Stay tuned
Later
Last edited by TinMan; Jul 24, 2010 at 06:31 PM. Reason: User name change
May 31, 2010 | 07:28 AM
#3
Thread Starter
Registered User
Joined: Jul 2009
Posts: 832
Likes: 0
From: Eastern NC
Plasti-coat Ford blue and low gloss black. My first time using plasti-coat and I really like it. Three coats of high temp primer, three of color, three of clear. Yestarday was close to 90*, and 80% humidity. I was able to redcoat every half hour. I plan to let the paint sit for about three days before final cleaning and assembly.
Jun 1, 2010 | 05:10 AM
#7
Thread Starter
Registered User
Joined: Jul 2009
Posts: 832
Likes: 0
From: Eastern NC
I went to the parts store yestarday to get the replacement passenger caliper. I noticed it was in a different box. Guy tells me they are switching providers because this manufacturer is a better quality. I say maybe that is why I have replaced these a few times under warranty. He just smiled.
Anyway, I also picked up a few consumables for the engine build.
I get home put the pass side up on a stand. Take the leaking, caliper off, get ready to put the new one on, its the wrong side. I call, they say right side will be in tomorrow. So what the heck, lets see why these things keep leaking. Took it apart, and the mating surfaces for the halves are full of burrs keeping them from meeting flat together. Took a sanding block and 400 grit, worked down the burrs, cleaned and lubed the Orings, put back together, and seems to be holding fine.
The V6 front brake upgrade is well worth doing. The cost is almost the same for origional parts replacement. The 85 MC pushes enough fluid. But you can tell 85 MC does not have a residual valve. If it has been a while since you hit the brakes, it feels just a little soft. Then on the next pump, real solid and firm. Just something to get used to until I put in a MC from a newer V6.
The garden sprayer bleeder continues to work well. Makes bleeding brakes a snap.
https://www.yotatech.com/forums/f106...leeder-211977/
My son and I went ahead and made a MC cover and hold down for the clutch MC. Worked like a champ. Replaced and bleed the fluid in the clutch MC in about 10 min.
Later
Trending Topics
Jun 1, 2010 | 06:24 PM
#8
Thread Starter
Registered User
Joined: Jul 2009
Posts: 832
Likes: 0
From: Eastern NC
Didnt get much done today, but every little bit is a step closer I guess. Not much was picture worthy. spent most of the day just cleaning out the head bolt threads. Did the Engbldr trick and cut a slot in an old head bolt. Works pretty good. Then penitrating fluid, twist the bolt in and out, blow it out, and repeat. Took about 4 hours to get it to were I could spin the bolt all down in each hole by hand. And all the threads look nice.


Since I was at the task of chasing threads I did the rest of the block. You can use the same head bolt to chase the threads in the mains. Did all the exterior threads with different taps.
Then went on to cleaning the oil passages. They werent bad, but deffinately did not hurt to clean them out.
Then a good wash of the entire block with hot water.
Put the mains in, and torqued down to check the bearing clearance.
Main bearing clearance
1. .0015"
2. .0015
3. .001"
4. .001"
5. .0015"
Thrust bearing clearance is at .001" each way.
It looks like I am at the min with all the clearances.
Then back out with the crank and plenty of assembly lube on everything.
Crank spins nicely.
The polish on the main journals was not totally like new. Still a little stains on it. It does feel really smooth. The machinest I used is really respected around here. So I did not question it.
Thats it for tonight.
Last edited by TinMan; Jun 1, 2010 at 06:26 PM.
Jun 2, 2010 | 06:23 PM
#9
Thread Starter
Registered User
Joined: Jul 2009
Posts: 832
Likes: 0
From: Eastern NC
Got the pistons in tonight. My son did everything, put the rings on, set the gaps to the right location, installed the pistons, plastigauge, assembly lube and final torque. I just told him what to do. Everything went real smooth. Once again the the rod bearings were at the min clearance. But still good. I had my son take a video of the pistons turning in the block.

Looks like the tube bender will be in this week. I did find a supplier in NC that has 1.75" .120 wall REW tube. They are 5 hours from me. Dont know if I will be able to get there until next week to get some. Stock Car Steel in Mooresville NC. Seemed like good people on the phone.
Later
Looks like the tube bender will be in this week. I did find a supplier in NC that has 1.75" .120 wall REW tube. They are 5 hours from me. Dont know if I will be able to get there until next week to get some. Stock Car Steel in Mooresville NC. Seemed like good people on the phone.
Later
 Jun 3, 2010 | 11:12 PM
#13
Registered User
iTrader: (2)
Joined: Dec 2009
Posts: 2,159
Likes: 7
From: Pleasanton, CA - SF Bay Area
Looking clean and sharp - great attention to detail.
I'm so jealous of your garage space, engine stand, workbench and tools...did I mention garage space?
Looking forward to following this!
I'm so jealous of your garage space, engine stand, workbench and tools...did I mention garage space?
Looking forward to following this!
Jun 4, 2010 | 02:05 AM
#14
Thread Starter
Registered User
Joined: Jul 2009
Posts: 832
Likes: 0
From: Eastern NC
Thanks for the compliments. I've only had a garage for a year. The best I've had before this was a small shed and carport. Always managed to keep our vehicles running with it. Since I have been in a place with a garage, I have sold just about everything that I have not used in a few years, and put the money into outfitting the garage, little out of pocket too. Just bought a HMP200 tube bender and two dies from pro-tools. It should be in today. But the wife has cut me off now. No more spending past my small allowance monthly. So things may start to move a little slower.
Last night was a slow night, my night to cook. After that I just organized some more parts for the next few steps. Got a lot of cleaning to do on bags of bolts, and a few more parts to paint.
Later
Last night was a slow night, my night to cook. After that I just organized some more parts for the next few steps. Got a lot of cleaning to do on bags of bolts, and a few more parts to paint.
Later
Jun 4, 2010 | 02:48 AM
#15
YotaTech Milestone-Two Millionth Post
Joined: Jan 2009
Posts: 12,009
Likes: 122
From: Northeast Pennsylvania
my build took forever and a day.....i think that was the best way.....for lack of money held me back, lack of knowledge and lack of courage held me back plenty.....most days i wouldn't even lay an eye on my truck.
slow and steady progress and learned everything as i did it, right or wrong. so , unless this was intended to be a weekend project or some other deadline, you are better off being deliberate and methodical......says me.
slow and steady progress and learned everything as i did it, right or wrong. so , unless this was intended to be a weekend project or some other deadline, you are better off being deliberate and methodical......says me.
Jun 5, 2010 | 03:52 AM
#16
Thread Starter
Registered User
Joined: Jul 2009
Posts: 832
Likes: 0
From: Eastern NC
Not in any hurry really. I think having a thread like this of your own does motivate you to get things done though. I would like to be done with my current goals by the end of summer. We will see if that happens. I need to get started on my sons truck also. I will say I have learned a lot on this thing. And it will allpay off when we start on his. Little things like what brand of paints I like, and how important it is to hit the recoat times. How clean ev erything everything needs to be. Thanks for the encouragement thought.
Jun 6, 2010 | 03:15 PM
#17
Thread Starter
Registered User
Joined: Jul 2009
Posts: 832
Likes: 0
From: Eastern NC
Well got some time today to work on the block a little. Still need a head though. Anyone have a good head they would part with cheap?
I wanted to button up the short block as much as I can. It is very humid here, and I dont want the internals to rust.
Hung some of the exteriors. And noticed that the bags of bolts I had taken off the timing cover, water pump and oil pump were a mess of whatever the last guy could find to put in the holes. At least he did not strip any of the threads. So tomorrow I plan to run out to Toyo and order all new bolts for the timing cover, water pump and oil pump. I also need one motor mount nut. I cant seem to find it. I am also going to order all new water passage pipes. The ones I have are almost rusted through on the ends.
I ran into my first glitch today.The right side top of the timing cover is about .005" higher than the head surface of the block. I think when I take it off to do the final fitting of the gasket I will see if I can stone it down a little. It is not up much, But I think it may be enough to cause some problems with the head gasket. I thought about leaving the timing cover bolts loose and then torquing down the head.


later
I wanted to button up the short block as much as I can. It is very humid here, and I dont want the internals to rust.
Hung some of the exteriors. And noticed that the bags of bolts I had taken off the timing cover, water pump and oil pump were a mess of whatever the last guy could find to put in the holes. At least he did not strip any of the threads. So tomorrow I plan to run out to Toyo and order all new bolts for the timing cover, water pump and oil pump. I also need one motor mount nut. I cant seem to find it. I am also going to order all new water passage pipes. The ones I have are almost rusted through on the ends.
I ran into my first glitch today.The right side top of the timing cover is about .005" higher than the head surface of the block. I think when I take it off to do the final fitting of the gasket I will see if I can stone it down a little. It is not up much, But I think it may be enough to cause some problems with the head gasket. I thought about leaving the timing cover bolts loose and then torquing down the head.
later
Last edited by TinMan; Jun 6, 2010 at 03:19 PM.
Jul 9, 2010 | 05:04 AM
#18
Thread Starter
Registered User
Joined: Jul 2009
Posts: 832
Likes: 0
From: Eastern NC
It has been a busy month, work, house, family, traveling to see more family, traveling to a funeral, so not much has really when on.
But in mocking up the timing cover I did notice that the last person to have this apart just put what ever they could find into a hole in the timing cover. So I went the dealer and ordered all new bolts for the cover, water pump and oil pump.
Durring the ordering we noticed that there are not many of each bolt left in the toyota system. So I asked the guy at the counter to print off the parts page, and then I measured each bolt to post up on here. The scans are kind of crappy. Our scanner is not that great, but here you go. The 22re bolt guide.

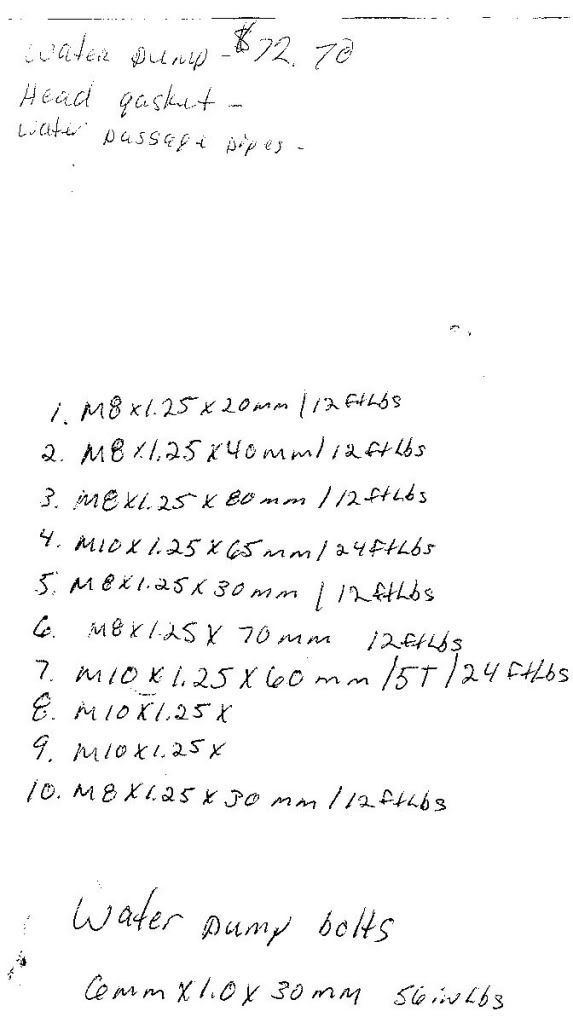
The bolt numbers on my hand printed page are the numbers on the parts copy. It is a little hard to read, but if you need it emailed to you just send me a pm. The torque specs for each bolt are also listed after the bolt size on the hand printed page.
Later
But in mocking up the timing cover I did notice that the last person to have this apart just put what ever they could find into a hole in the timing cover. So I went the dealer and ordered all new bolts for the cover, water pump and oil pump.
Durring the ordering we noticed that there are not many of each bolt left in the toyota system. So I asked the guy at the counter to print off the parts page, and then I measured each bolt to post up on here. The scans are kind of crappy. Our scanner is not that great, but here you go. The 22re bolt guide.
The bolt numbers on my hand printed page are the numbers on the parts copy. It is a little hard to read, but if you need it emailed to you just send me a pm. The torque specs for each bolt are also listed after the bolt size on the hand printed page.
Later
Last edited by TinMan; Jul 9, 2010 at 05:06 AM.
Jul 9, 2010 | 05:14 AM
#19
Thread Starter
Registered User
Joined: Jul 2009
Posts: 832
Likes: 0
From: Eastern NC
I also started building my sliders, I hope to have them on this weekend. The HMP200 works very easy, and it is nice that I can just slide it away in the corner when I dont need it. I bent them that the outside protection will go all the way to the fender flares.


I picked up the the H tube notcher, it does a pretty good job. I had to shim out the tube clamp to get the notcher centered on the clamp. but no biggy. I am going to HF again today to pick up their 1/2 low speed electric drill. It gets pretty good reveiws on the net. And using my 18v dewalt to notch the tube does not seem like it is very good for it.
Later
Jul 18, 2010 | 04:35 PM
#20
Thread Starter
Registered User
Joined: Jul 2009
Posts: 832
Likes: 0
From: Eastern NC
Finally got the sliders done at the end of last week. Once again learned a lot doing them. Lesson 1, paint them before you put them on. Wow, what a PITA to POR15 and paint once they were on. The vertical welds for the diamonds were also a challenge. Not a lot of space to get your face, and hands in there, and still be able to see. Getting to the top of the tube was also a real challenge. And I welded hotter than I normally would have. Wanted them burned in. They are definitely burned in.
I wanted sliders to be the entire length of the pinch weld, and also completely cover the flare on the fenders, which is why I used 90* for the bends in the tube. I also wanted to angle them up. But the family insisted they be flat to help them get in and out of the truck.
All in all I am very satisfied with them. Good experience, I only have about $80.00 in them and once again I learned something. But I can definitely see that it would be a whole lot faster to buy them.


Later
I wanted sliders to be the entire length of the pinch weld, and also completely cover the flare on the fenders, which is why I used 90* for the bends in the tube. I also wanted to angle them up. But the family insisted they be flat to help them get in and out of the truck.
All in all I am very satisfied with them. Good experience, I only have about $80.00 in them and once again I learned something. But I can definitely see that it would be a whole lot faster to buy them.
Later


