
1985 4runner Build
 Aug 14, 2013 | 09:18 PM
#1
Thread Starter
Registered User
Joined: Apr 2013
Posts: 72
Likes: 0
From: St joe missouri
1985 4runner Build
Hello everybody this is my first thread but here it goes.
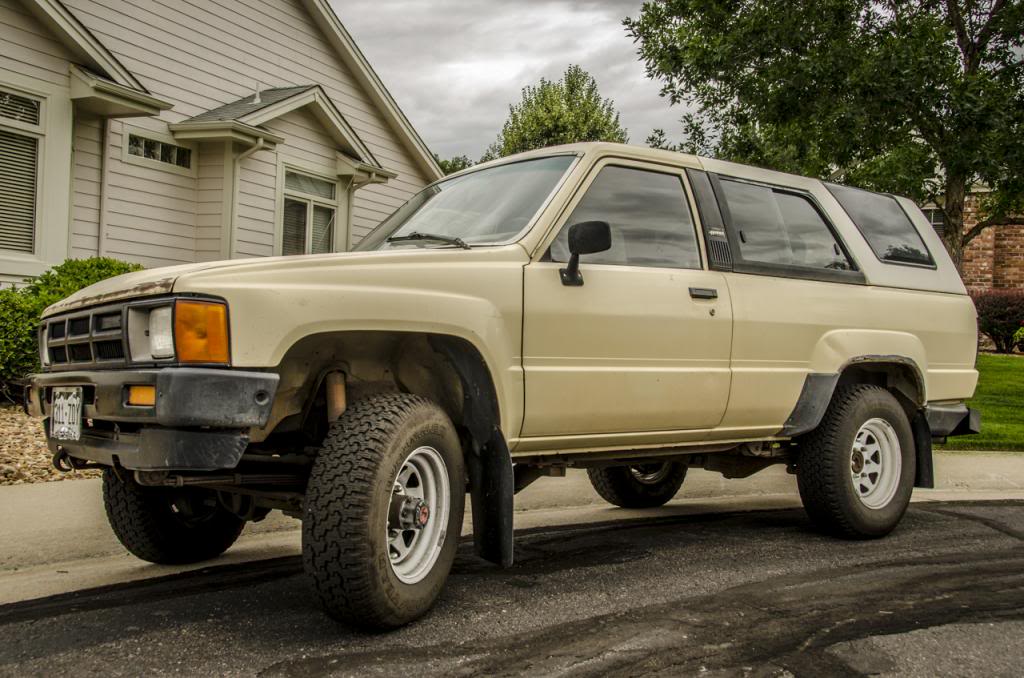
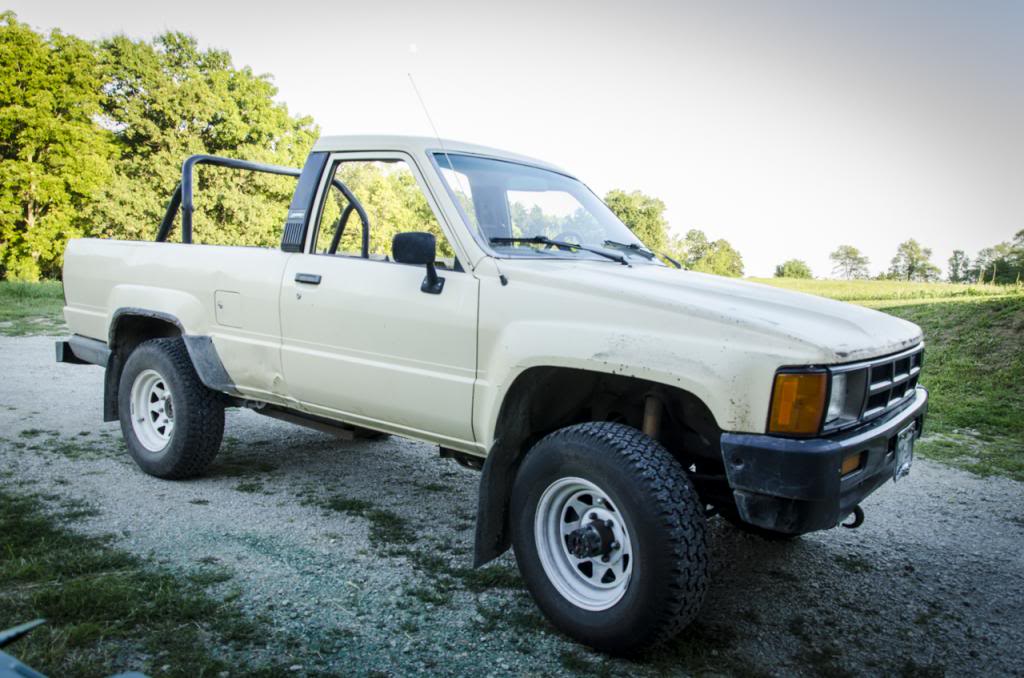
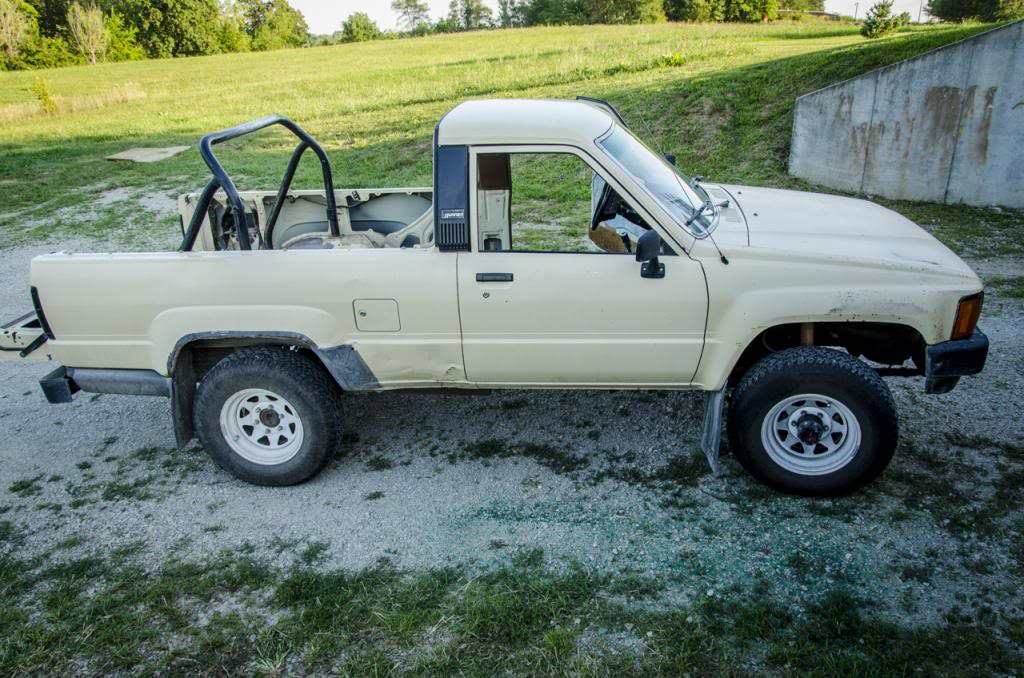
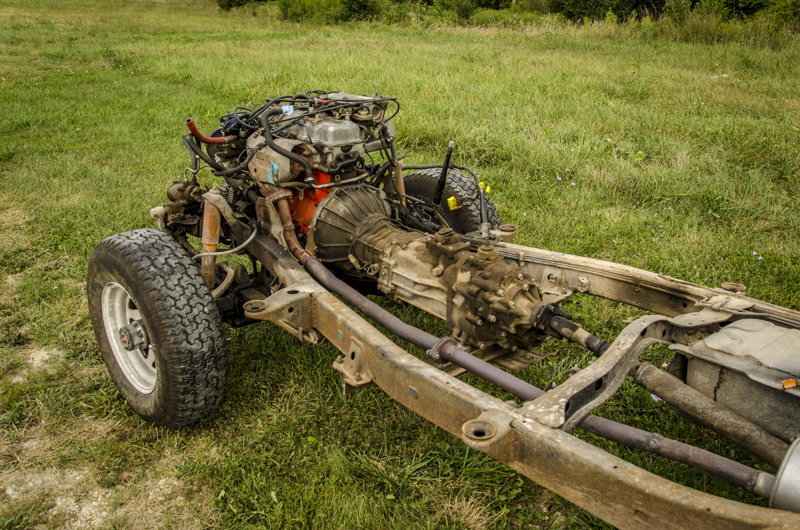
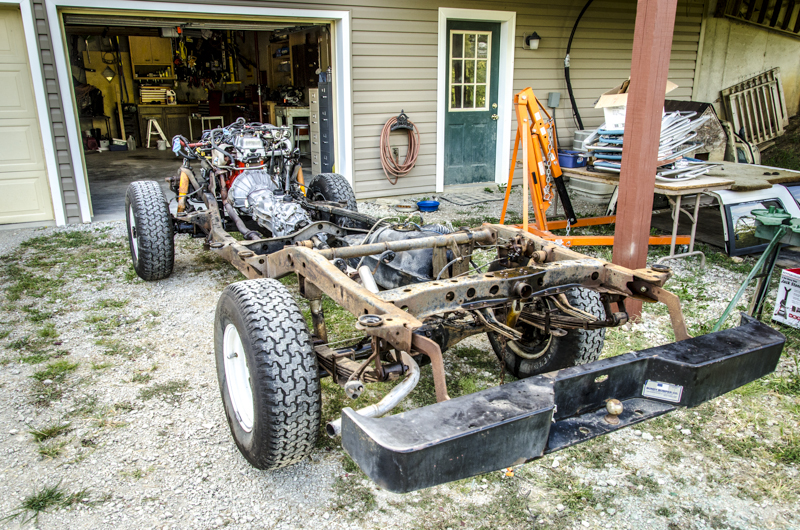
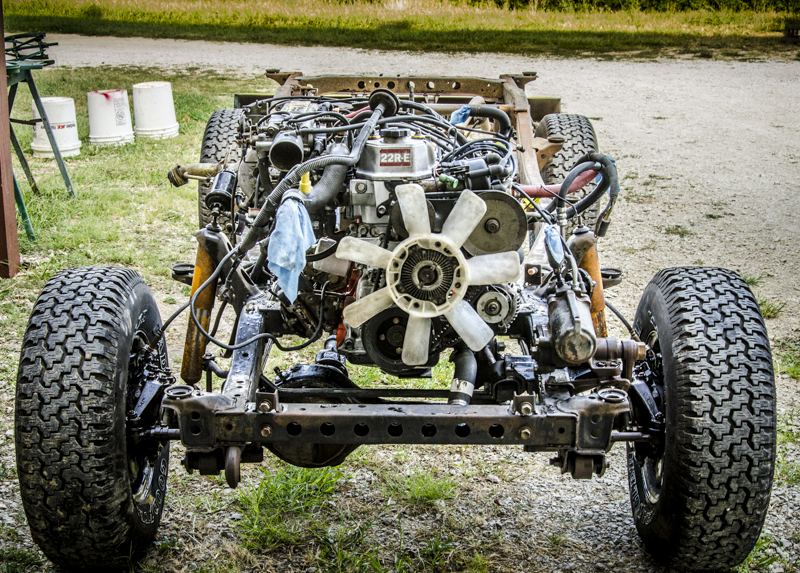
I got a 1985 4runner the other day. I plan on making it a mild trail vehicle and a daily driver. Here are some pictures of when I got it.

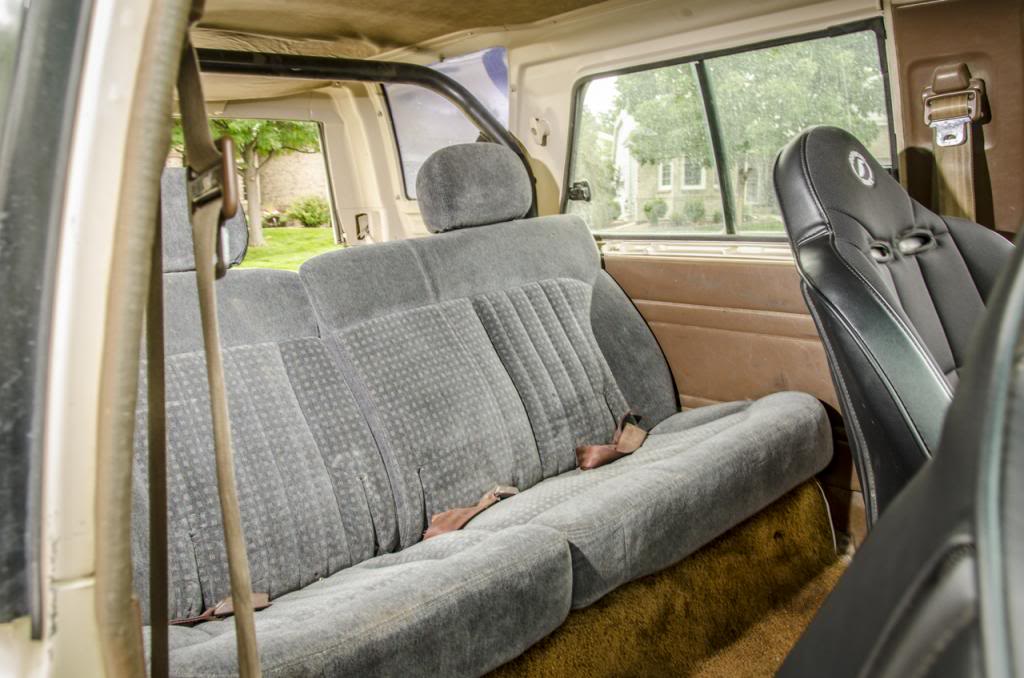
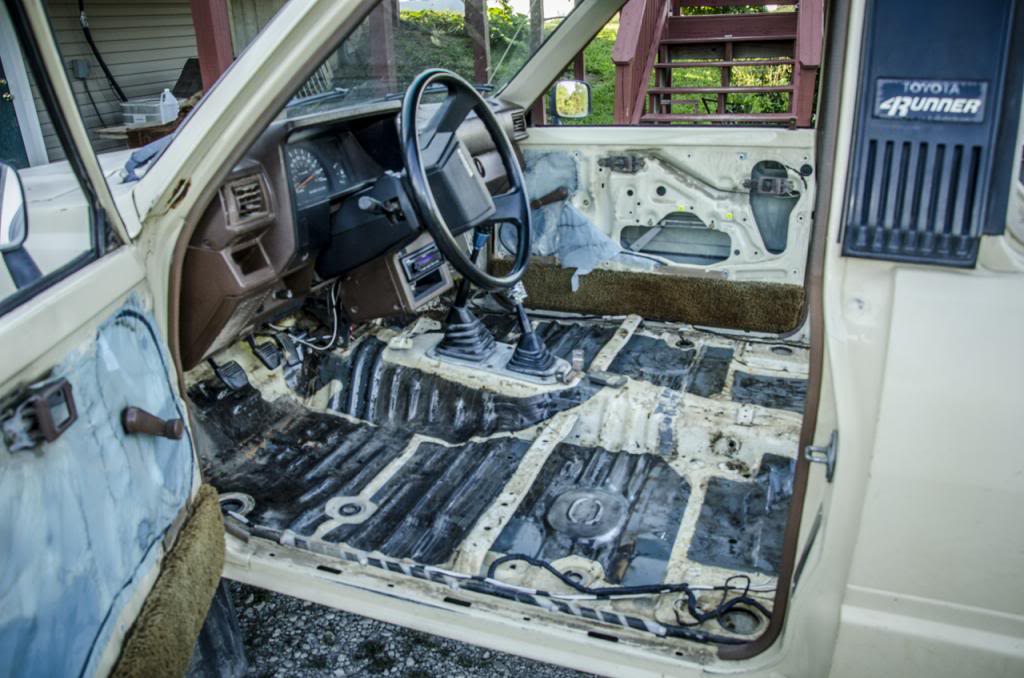
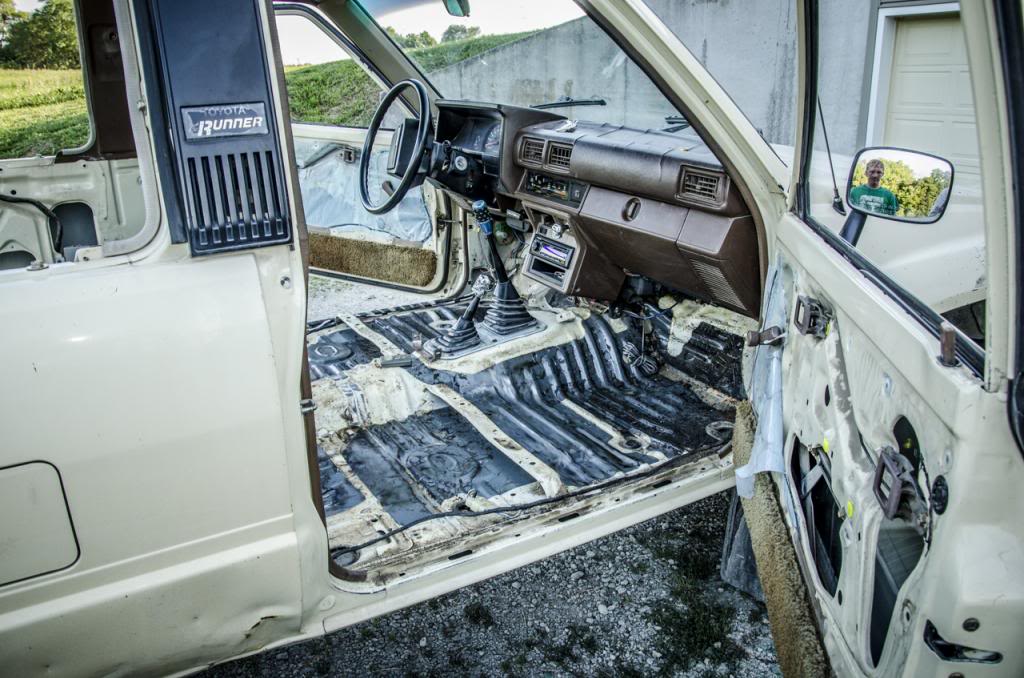
I have also started to pull all of the carpet and the seats
I am open to any suggestions you all have.
I am new to all this. This my first project truck.
I got a 1985 4runner the other day. I plan on making it a mild trail vehicle and a daily driver. Here are some pictures of when I got it.
I have also started to pull all of the carpet and the seats
I am open to any suggestions you all have.
I am new to all this. This my first project truck.
Last edited by Jacob13; Aug 15, 2013 at 09:32 AM.

 Aug 15, 2013 | 07:15 AM
#4
Thread Starter
Registered User
Joined: Apr 2013
Posts: 72
Likes: 0
From: St joe missouri
I did use the insert image button but it just asked me to enter the url for the image.
Use the "insert image" button (with the little mountain on it) instead of the "insert link" button with the globe on it to make your pictures work.
Aug 15, 2013 | 08:47 AM
#5

 Aug 15, 2013 | 09:34 AM
#6
Thread Starter
Registered User
Joined: Apr 2013
Posts: 72
Likes: 0
From: St joe missouri
Okay thank you.
I see what you did... you used the page URL not the image URL, no big deal. Go to your photobucket pages and right-click ON the picture, then click "copy image url". Then post that URL into the "insert image" pop up.
Aug 15, 2013 | 06:15 PM
#7
Thread Starter
Registered User
Joined: Apr 2013
Posts: 72
Likes: 0
From: St joe missouri
Didn't get much done today.
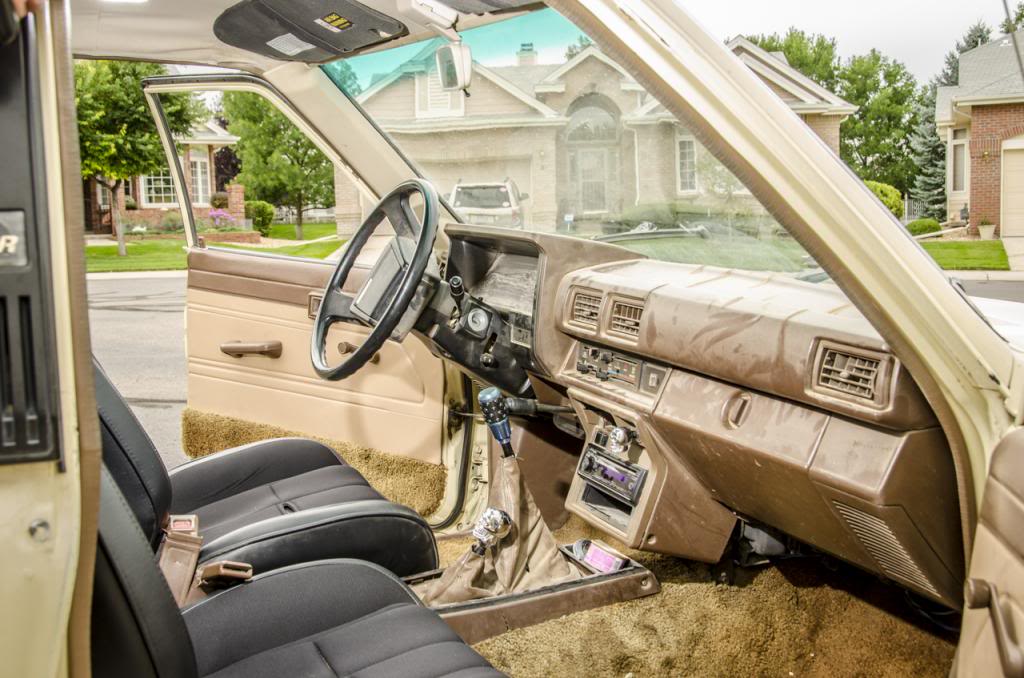
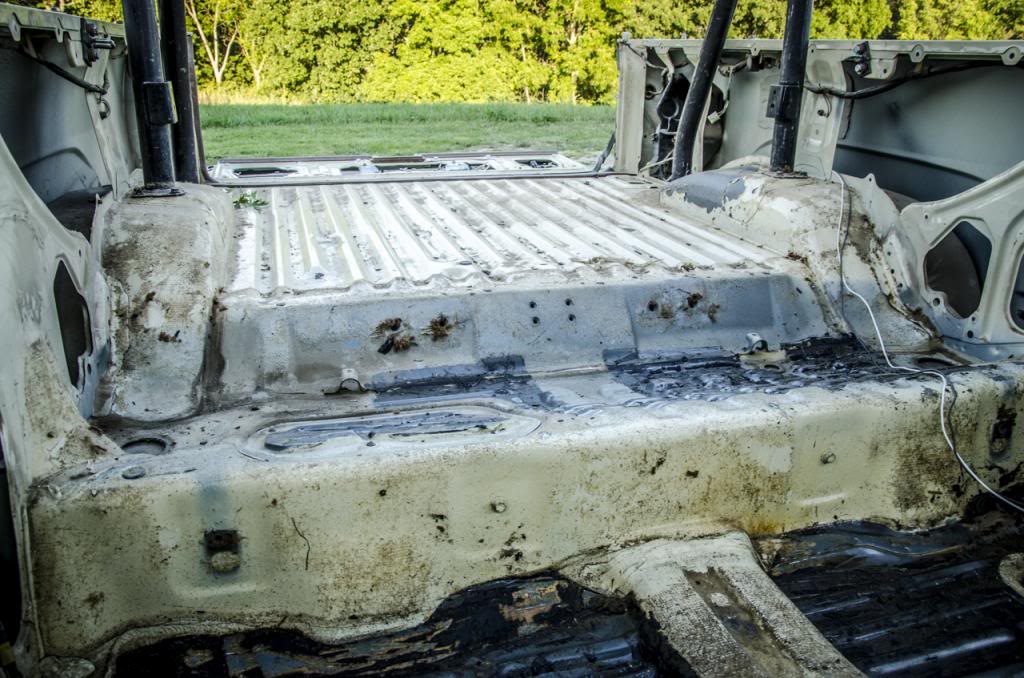
I got some more of the interior pulled out like roll bar and the door panels. I plan on taking out most of the interior. Then I will spray it with raptor liner.
I got some more of the interior pulled out like roll bar and the door panels. I plan on taking out most of the interior. Then I will spray it with raptor liner.
Trending Topics
Aug 17, 2013 | 08:45 PM
#8
Thread Starter
Registered User
Joined: Apr 2013
Posts: 72
Likes: 0
From: St joe missouri
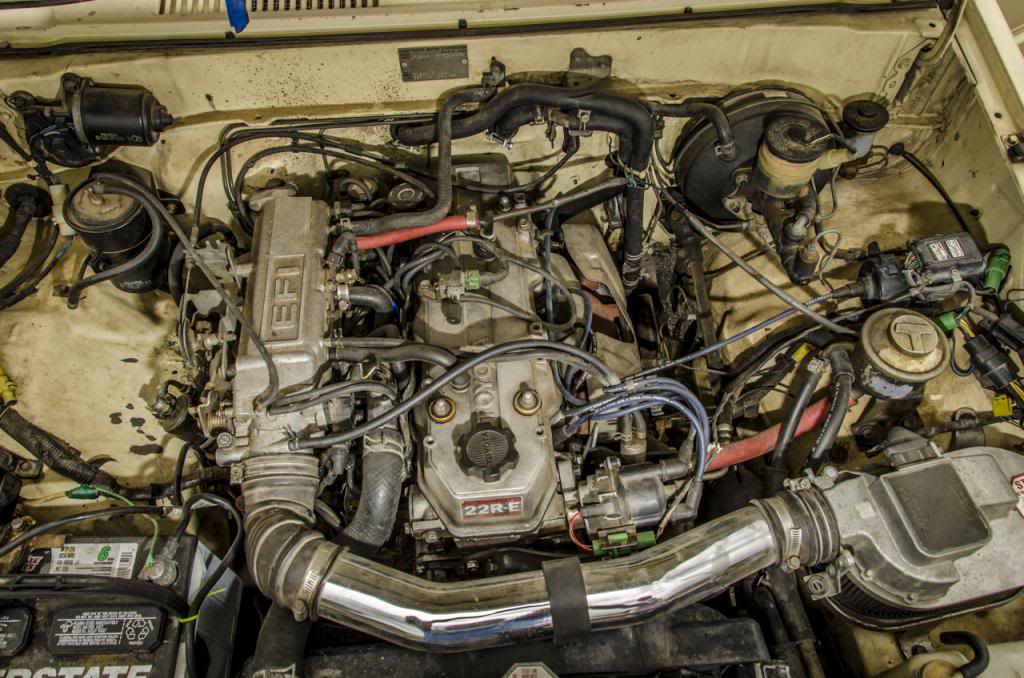
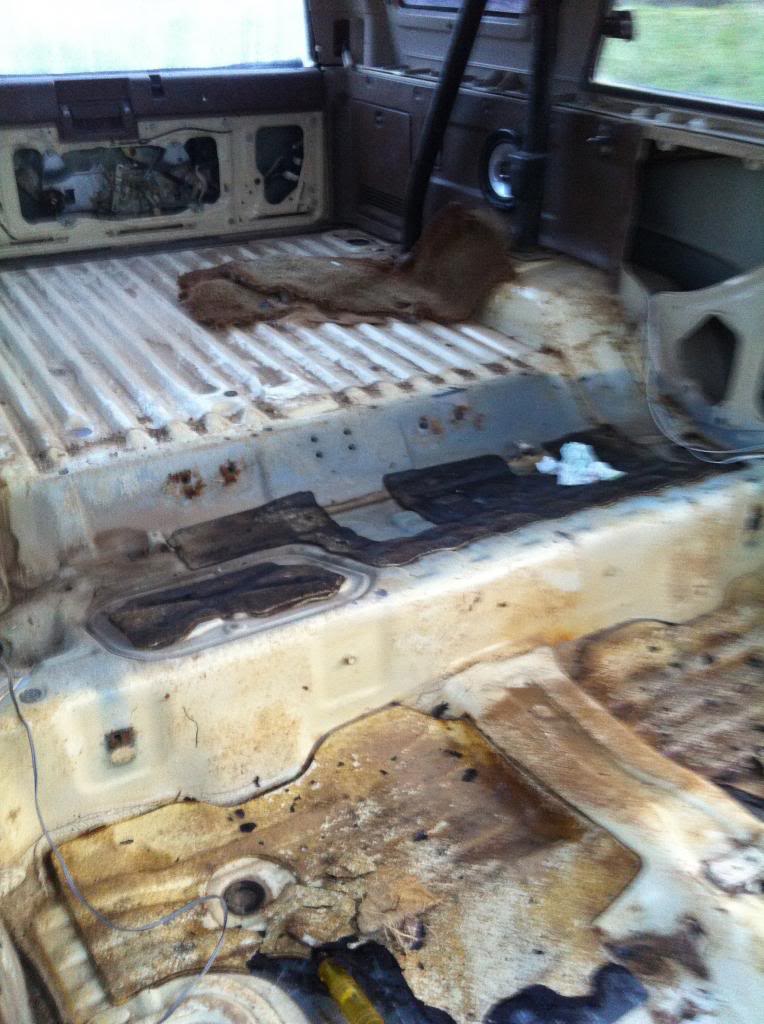
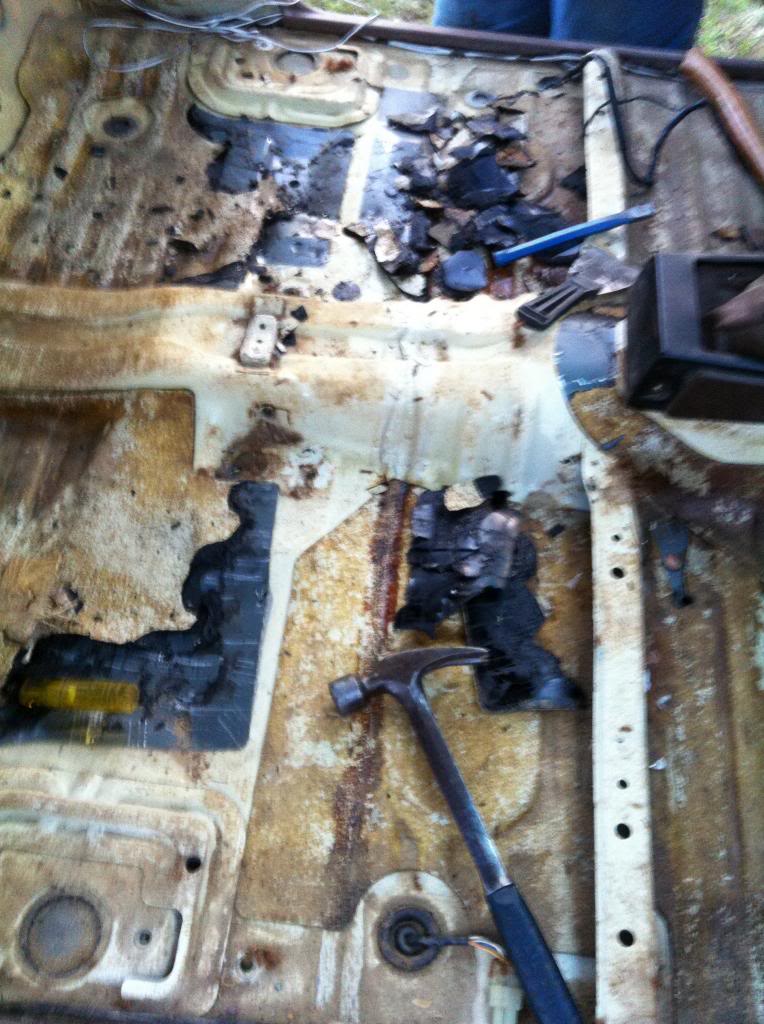
Today was a pretty nice day so i took of the top and got the rest of the factory insulator off of the floor of the 4runner. I am now prepping to spray the bed liner I got called Raptor Liner.
And here are some pictures.

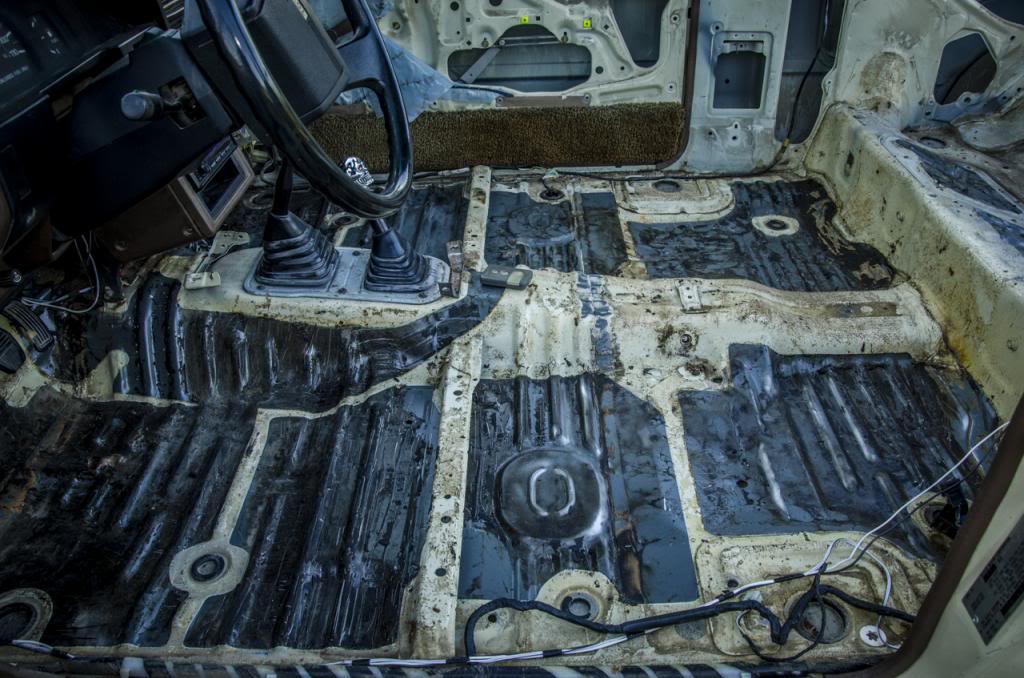
And here are some pictures.
Aug 19, 2013 | 07:34 AM
#9


Looking great. And welcome to the Forum. Alot of great people on here with a ton of knowledge.
On the raptor Liner, Make sure you PREP PREP PREP very well. Get all the grease and oil off and make sure it is scuffed well. I have used it on my Runner and it is coming up off the floor boards due to not enough prep. (I thought it was sufficient)
However, I also prepped and sprayed in on the lower half of my Body and doors and its holding there very well. I guess I did a better job of prepping there. Check out my build thread.
Aug 19, 2013 | 09:24 AM
#10
Thread Starter
Registered User
Joined: Apr 2013
Posts: 72
Likes: 0
From: St joe missouri
Looking great. And welcome to the Forum. Alot of great people on here with a ton of knowledge.
On the raptor Liner, Make sure you PREP PREP PREP very well. Get all the grease and oil off and make sure it is scuffed well. I have used it on my Runner and it is coming up off the floor boards due to not enough prep. (I thought it was sufficient)
However, I also prepped and sprayed in on the lower half of my Body and doors and its holding there very well. I guess I did a better job of prepping there. Check out my build thread.
On the raptor Liner, Make sure you PREP PREP PREP very well. Get all the grease and oil off and make sure it is scuffed well. I have used it on my Runner and it is coming up off the floor boards due to not enough prep. (I thought it was sufficient)
However, I also prepped and sprayed in on the lower half of my Body and doors and its holding there very well. I guess I did a better job of prepping there. Check out my build thread.
I am workin on the prep right now for the raptor liner. I plan on grinding the whole inside to mostly bare metal then coat it with the upol acid etch primer.
Last edited by Jacob13; Aug 19, 2013 at 09:27 AM.
Aug 19, 2013 | 04:49 PM
#12
Thread Starter
Registered User
Joined: Apr 2013
Posts: 72
Likes: 0
From: St joe missouri
Hello from southern Missouri. A great looking little runner you have. You dont see to many here in Missouri. Welcome to Yotatech.
Aug 20, 2013 | 09:50 PM
#14
Removing the body is easy on these. I have had mine off and done a few trucks. Not wanting to hijack your thread, but if you click on my 88 Runner build below, on the first page I have where to find alot of fixes on these trucks that you are bound to run into.
Here are the steps for removing the body.
Copied...
I have talked to a couple of other people on here about doing frame swap or body swaps. I have done two and tried to write out a nice way of doing this. I did the swaps before finding Yotatech and wish I would of taken pictures. I figured I would put this in my thread so if others do a search on it, it might make finding this thread easier and so I can call it up quick if I need it. I havent done a 4runner but the steps would be about the same. If you can pull a motor or tranny you can swap bodies/frames. It s very doable and nothing to be afraid of.
I did the 22re's. Apparently a 3.0 and 22res frame arent interchangeable without redoing the motor mounts. I am sure everythign here would apply to a 3.0, but I havent done this so will not say for sure. 84-88 Pickup frames and 89-95 frames are not interchange able from what I have been told.
On the 84-89 4runner behind the Drivers rear tire is a wire disconnect point, for the tailgate and lights that would make separating the wires for body removal. Im sure a 90-95 4Runner would be the same, but I havent done one so cant say for sure.
Fierohinks has some pic in his thread for some ideas and what things will look like. https://www.yotatech.com/forums/f116...s-pics-228184/
Dutchbelly has some good pics of doing a Frame swap...... https://www.yotatech.com/forums/f199...ild-up-234352/
I didnt have a lift, so if you were going to leave the drive train in, there are some steps that would be different and I will try and write them up as best as I can at a later time.
First I center the Steering Wheel and remove the motor and tranny. If you have a lift and can get the body high enough this would really help, but this is how I have to do this.
Getting the Steering Wheel and wheels straight just makes it alot easier for later. When I take the cab off and put it back on is when I install and remove the Steering Rod is probably the most hardest. You may find another way, but this works for me.
Then on the frame by the right front tire you have 2 brake lines to disconnect. This is the best place to do it as it keeps the lines on the cab intact and the frame lines will stay intact. This will take care of your brake issues. ( Pic at bottom)
I then disconnect the Wiring harness under the Passenger side seat and this will let the cab come off with out any problems other than you front blinkers and I take the Front Bumper off just so I dont have to lift the cab so high. Leave the wiring harness to the Tail lights/ Fuel Pump on the back half of the frame til later. You can get it when you take the bed off. All of your electrical and computer wires will come with the cab. This is set up quite nice. Just mark all of your wires and such when you pull your motor. When you pull your motor, you will have taken care of alot of other steps like fuel lines.
You have 6 bolts that hold the cab to the frame. The cab and front end come off in one piece. I already have the hood off. I leave fenders, doors, and interior in. 2 bolts by the Radiator, 2 bolts behind the front tires, and 2 bolts toward the rear of the cab is all that hold the cab to the frame. You can tell them as they sit on the outside of the frame and have rubber bushings. You may have to lift your carpet to hold them with wrench to take the nut off.
You have 8-10 bolts that hold the bed on. They have a tab that sticks in the bed so you dont have to have a wrench to hold the top. You should take some PB Blaster a nite or two ahead of time before you do this as most or all of the bolts will break. They are special so you will need to get some from Toyota or the salvage. This is a good time to remove the 3 screws that hold your gas tank fill tube to the bed or body of a 4Runner. Also I have had problems of these nuts backing off when I have had a bed bolt off before so I would suggest using locktite. I use 4 concrete blocks and set the bed on these with the floor of the bed on the blocks so I dont have to worry about damaging the bed sides.
Once all of this is done, I use some concrete blocks and 4x4 wood to support the cab. If your rocker panels are in good shape you can rest it on the wood. If not you might want to support it using blocks of wood between the 4x4 and floor. I set the concrete blocks about a foot from the cab to clear the front tires. This way could be a little unstable so be careful or you might have some other way of doing this. Here is whereI get 3 other guys to help lift the cab. 2 lifting and 2 setting up the stand for the cab. The back is heavy, but the front is light. I go about a foot high off of the frame for everything to clear, but work the frame out slowly and make sure it is high enough. I back the frame out as the front part of the frame is lower than the back part.
I get the new frame with axles in them or you can just put yours in. Put the wiring harness for the back part of the truck and fuel tank in and hopefully you will have brake lines and fuel lines already on or you will get to do that too. Try and get a frame with this stuff already on It will save you a lot of time. Put your exhaust in before you move the new frame under the cab.
Before I start all of this, I try to have the new frame prepped as far as I can. Without counting motor/tranny removal and having the frame ready. I have done this in about 20 total hours using basic tools in a weekend by myself except lifting the cab and body. Cutting torch for bolts, air tools, and a lift would be soooo nice. If you can get the body high enough it would make swapping alot easier, but I dont have access to a lift so this is how I do it. The first time I did this I was intimidated, but by the time I had the old frame out I wasnt in the least bit concerened. If you can pull a motor and tranny out, you wont have any problems. You will be quite surprised when you do it. Any questions that come up, feel free to ask.
If you are going to use a lift and keep the drive train in you will need to
Disconnect your fuel line from fuel filter.
Remove your electrical lines from your injectors and sensors.
Disconnect your electrical lines from your transmission, O2 sensor and transfer case.
I mentioned it earlier, but remove 3 screws that hold your fuel tank to the bed/ body. You can remvoe the lines at the tank, but I feel this is easier.
On a 4Runner you will have to go up between the body an frame and remove 2 bolts to get the fuel filler assembly out.
These are some steps that are different from pulling the motor. Im sure there are more steps but this will get you started in the right direction.
Here is a great place to disconnect your brake and clutch line. By the Passenger front tire.
Wiring harness with tranny and tcase conrectors.
wiring harness.

Steps without having to pulldrive train.
Disconnect steering linkage at gear box or firewall
6 bolts that hold the body on.
Wiring harness all the way to the tranny and lay it over the fender.
I would pull radiator for more clearance
Brake and clutch line behind right rear front tire
Ebrake at the crossmember
I would disconnect the fuel line from the fuel filter
Remove tranny and tcase sticks so they dont get damaged.
Disconnect wring harness under cab under passenger seat.
Front bumper for easier clearance, may not be needed though.
Speedometer cable
Throttle cable
Here are the steps for removing the body.
Copied...
I have talked to a couple of other people on here about doing frame swap or body swaps. I have done two and tried to write out a nice way of doing this. I did the swaps before finding Yotatech and wish I would of taken pictures. I figured I would put this in my thread so if others do a search on it, it might make finding this thread easier and so I can call it up quick if I need it. I havent done a 4runner but the steps would be about the same. If you can pull a motor or tranny you can swap bodies/frames. It s very doable and nothing to be afraid of.
I did the 22re's. Apparently a 3.0 and 22res frame arent interchangeable without redoing the motor mounts. I am sure everythign here would apply to a 3.0, but I havent done this so will not say for sure. 84-88 Pickup frames and 89-95 frames are not interchange able from what I have been told.
On the 84-89 4runner behind the Drivers rear tire is a wire disconnect point, for the tailgate and lights that would make separating the wires for body removal. Im sure a 90-95 4Runner would be the same, but I havent done one so cant say for sure.
Fierohinks has some pic in his thread for some ideas and what things will look like. https://www.yotatech.com/forums/f116...s-pics-228184/
Dutchbelly has some good pics of doing a Frame swap...... https://www.yotatech.com/forums/f199...ild-up-234352/
I didnt have a lift, so if you were going to leave the drive train in, there are some steps that would be different and I will try and write them up as best as I can at a later time.
First I center the Steering Wheel and remove the motor and tranny. If you have a lift and can get the body high enough this would really help, but this is how I have to do this.
Getting the Steering Wheel and wheels straight just makes it alot easier for later. When I take the cab off and put it back on is when I install and remove the Steering Rod is probably the most hardest. You may find another way, but this works for me.
Then on the frame by the right front tire you have 2 brake lines to disconnect. This is the best place to do it as it keeps the lines on the cab intact and the frame lines will stay intact. This will take care of your brake issues. ( Pic at bottom)
I then disconnect the Wiring harness under the Passenger side seat and this will let the cab come off with out any problems other than you front blinkers and I take the Front Bumper off just so I dont have to lift the cab so high. Leave the wiring harness to the Tail lights/ Fuel Pump on the back half of the frame til later. You can get it when you take the bed off. All of your electrical and computer wires will come with the cab. This is set up quite nice. Just mark all of your wires and such when you pull your motor. When you pull your motor, you will have taken care of alot of other steps like fuel lines.
You have 6 bolts that hold the cab to the frame. The cab and front end come off in one piece. I already have the hood off. I leave fenders, doors, and interior in. 2 bolts by the Radiator, 2 bolts behind the front tires, and 2 bolts toward the rear of the cab is all that hold the cab to the frame. You can tell them as they sit on the outside of the frame and have rubber bushings. You may have to lift your carpet to hold them with wrench to take the nut off.
You have 8-10 bolts that hold the bed on. They have a tab that sticks in the bed so you dont have to have a wrench to hold the top. You should take some PB Blaster a nite or two ahead of time before you do this as most or all of the bolts will break. They are special so you will need to get some from Toyota or the salvage. This is a good time to remove the 3 screws that hold your gas tank fill tube to the bed or body of a 4Runner. Also I have had problems of these nuts backing off when I have had a bed bolt off before so I would suggest using locktite. I use 4 concrete blocks and set the bed on these with the floor of the bed on the blocks so I dont have to worry about damaging the bed sides.
Once all of this is done, I use some concrete blocks and 4x4 wood to support the cab. If your rocker panels are in good shape you can rest it on the wood. If not you might want to support it using blocks of wood between the 4x4 and floor. I set the concrete blocks about a foot from the cab to clear the front tires. This way could be a little unstable so be careful or you might have some other way of doing this. Here is whereI get 3 other guys to help lift the cab. 2 lifting and 2 setting up the stand for the cab. The back is heavy, but the front is light. I go about a foot high off of the frame for everything to clear, but work the frame out slowly and make sure it is high enough. I back the frame out as the front part of the frame is lower than the back part.
I get the new frame with axles in them or you can just put yours in. Put the wiring harness for the back part of the truck and fuel tank in and hopefully you will have brake lines and fuel lines already on or you will get to do that too. Try and get a frame with this stuff already on It will save you a lot of time. Put your exhaust in before you move the new frame under the cab.
Before I start all of this, I try to have the new frame prepped as far as I can. Without counting motor/tranny removal and having the frame ready. I have done this in about 20 total hours using basic tools in a weekend by myself except lifting the cab and body. Cutting torch for bolts, air tools, and a lift would be soooo nice. If you can get the body high enough it would make swapping alot easier, but I dont have access to a lift so this is how I do it. The first time I did this I was intimidated, but by the time I had the old frame out I wasnt in the least bit concerened. If you can pull a motor and tranny out, you wont have any problems. You will be quite surprised when you do it. Any questions that come up, feel free to ask.
If you are going to use a lift and keep the drive train in you will need to
Disconnect your fuel line from fuel filter.
Remove your electrical lines from your injectors and sensors.
Disconnect your electrical lines from your transmission, O2 sensor and transfer case.
I mentioned it earlier, but remove 3 screws that hold your fuel tank to the bed/ body. You can remvoe the lines at the tank, but I feel this is easier.
On a 4Runner you will have to go up between the body an frame and remove 2 bolts to get the fuel filler assembly out.
These are some steps that are different from pulling the motor. Im sure there are more steps but this will get you started in the right direction.
Here is a great place to disconnect your brake and clutch line. By the Passenger front tire.
Wiring harness with tranny and tcase conrectors.
wiring harness.
Steps without having to pulldrive train.
Disconnect steering linkage at gear box or firewall
6 bolts that hold the body on.
Wiring harness all the way to the tranny and lay it over the fender.
I would pull radiator for more clearance
Brake and clutch line behind right rear front tire
Ebrake at the crossmember
I would disconnect the fuel line from the fuel filter
Remove tranny and tcase sticks so they dont get damaged.
Disconnect wring harness under cab under passenger seat.
Front bumper for easier clearance, may not be needed though.
Speedometer cable
Throttle cable
Aug 27, 2013 | 05:26 PM
#16
Thread Starter
Registered User
Joined: Apr 2013
Posts: 72
Likes: 0
From: St joe missouri
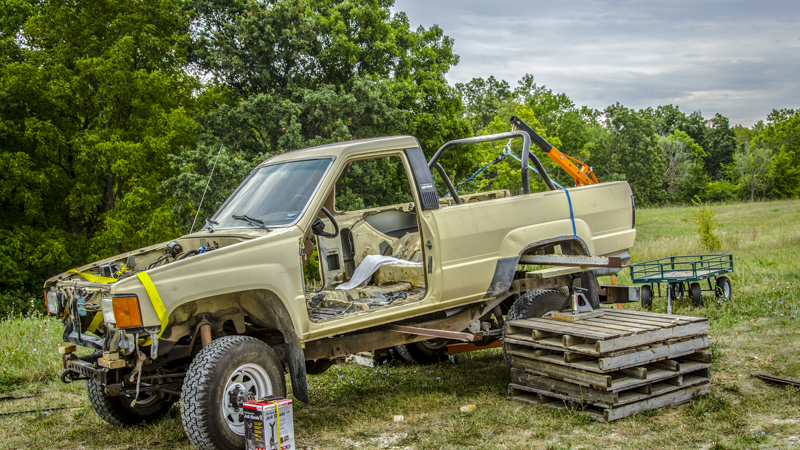
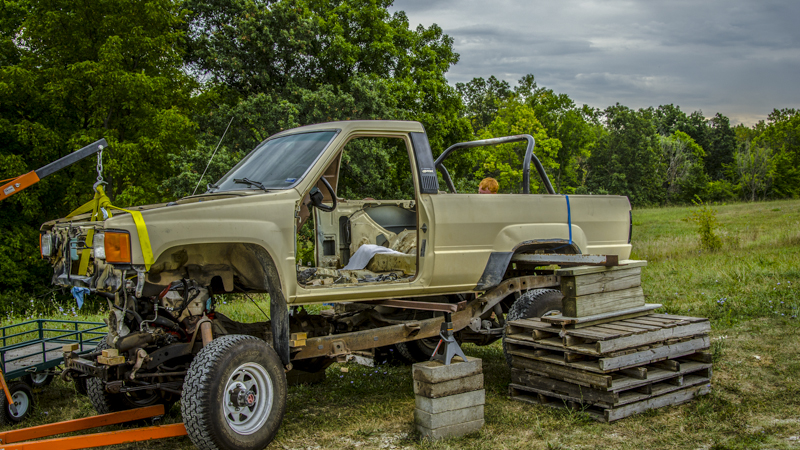
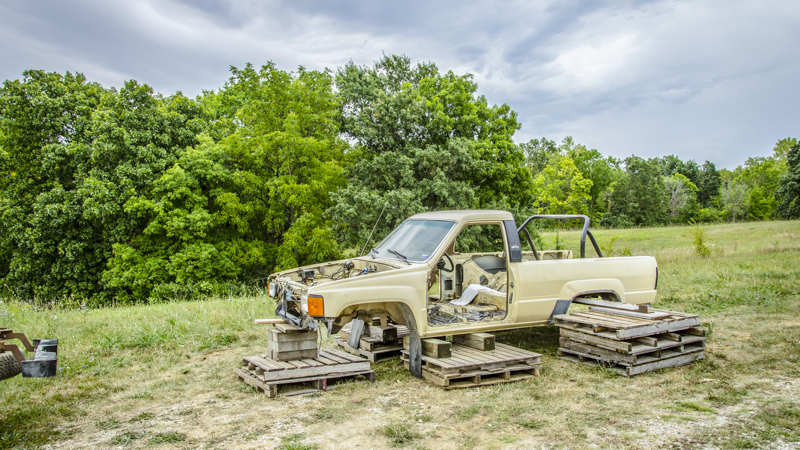
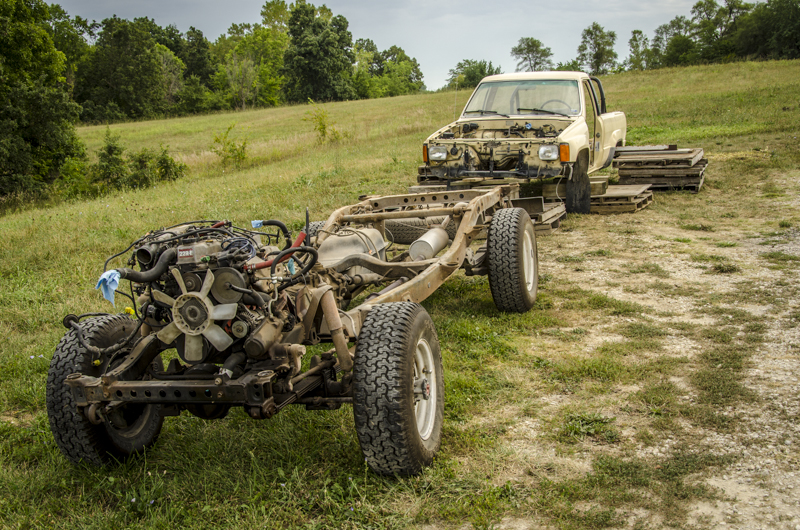
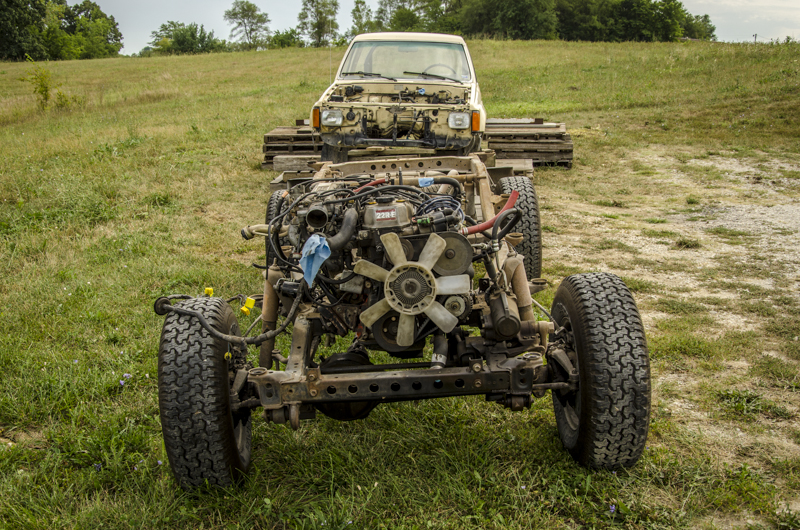
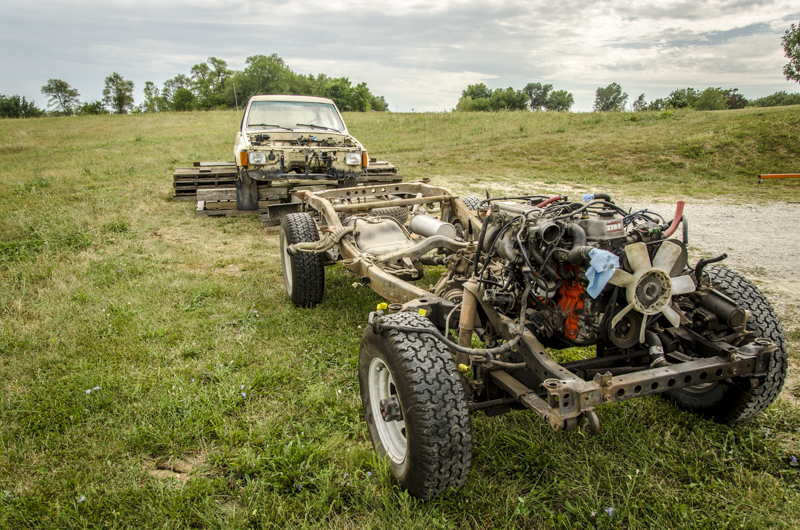
Ok I haven't done very much to my 4runner until couple days ago and I have started to pull off the body. My dad has been helping me with most of this since I am only 14. So he is the one who is taking most of the pictures. But by now I think I have got most of the lines and electrical all unplugged. I plan on keeping the engine and transmission on the frame while I pull the body.
Here are some of the picture that tell the steps that I took.
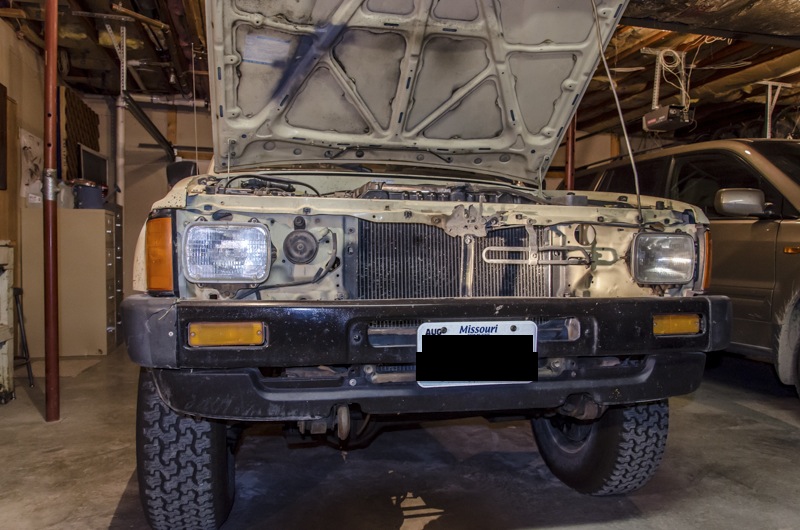
The first thing I did was take the front grill and bumper.
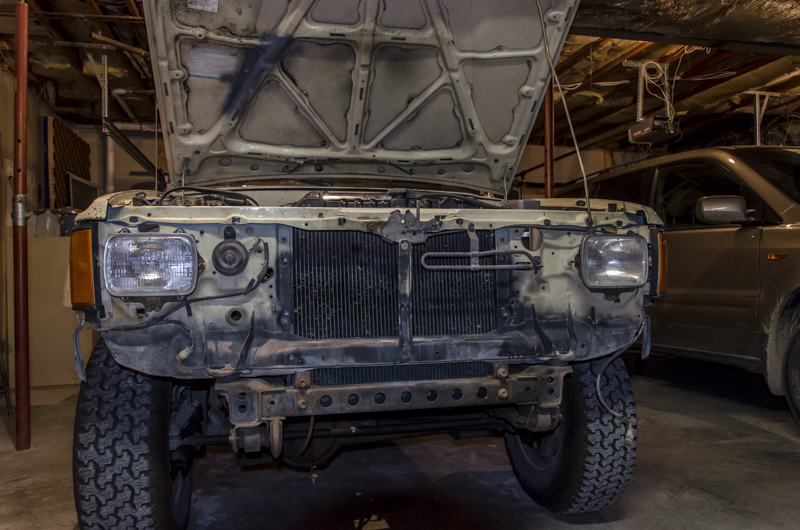
Their was just a few bolts holding these on.
Next I took the rad off by draining all the fluid through the plug on the bottom.
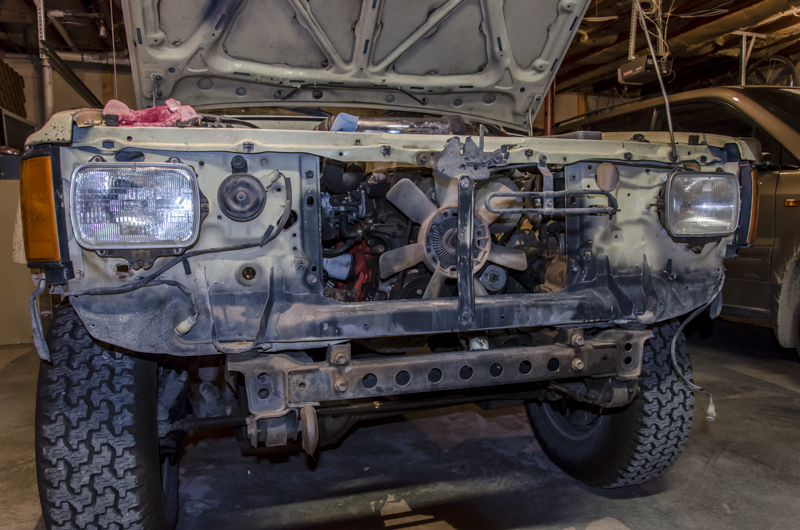
This gave me a little room to work on other things
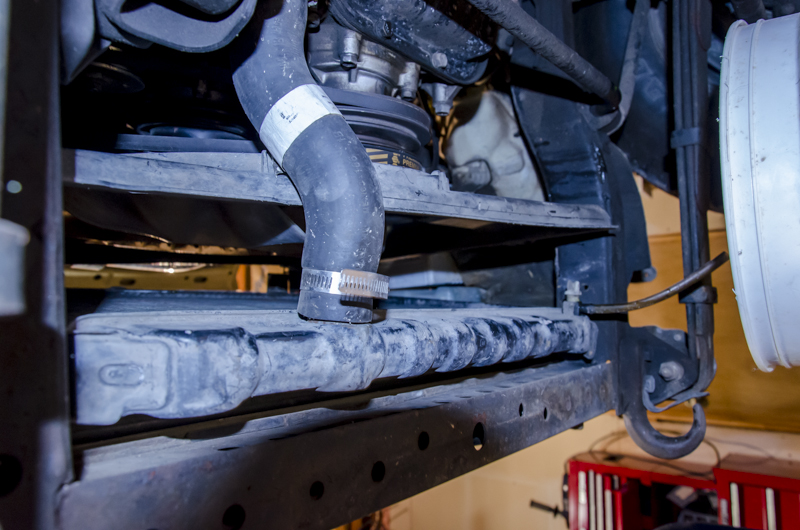
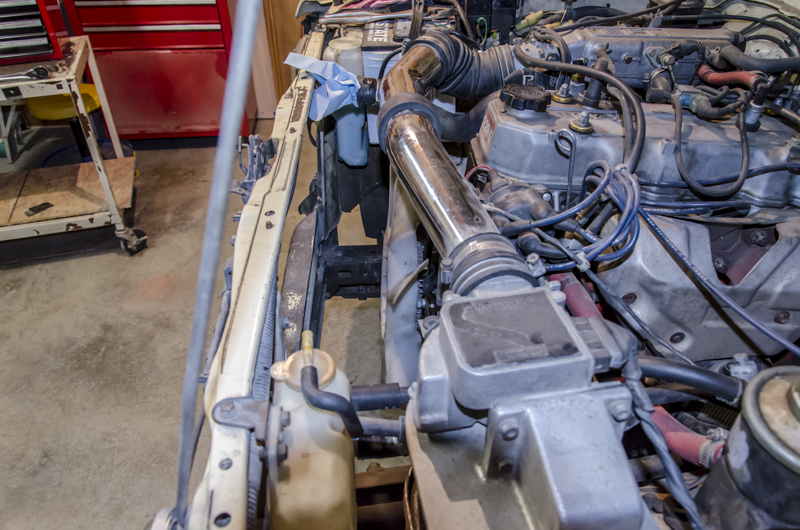
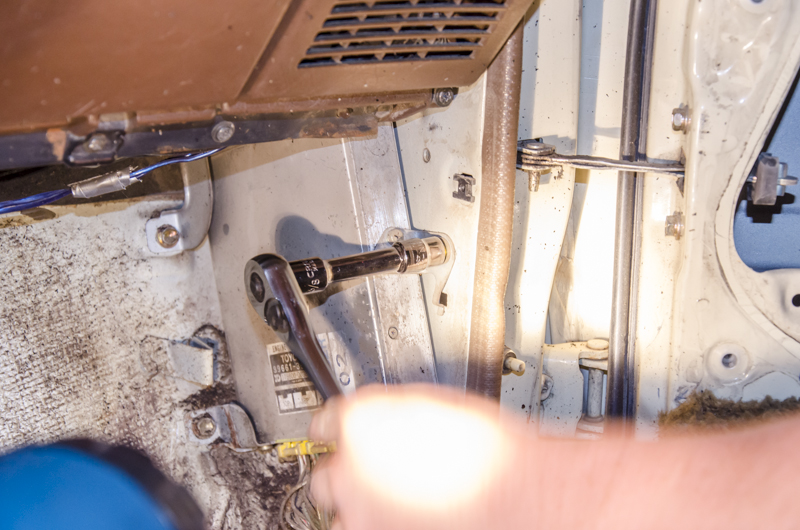
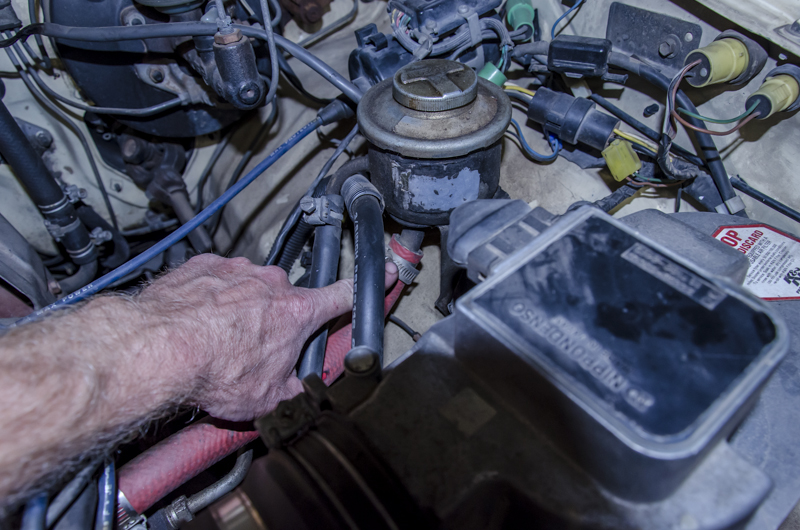
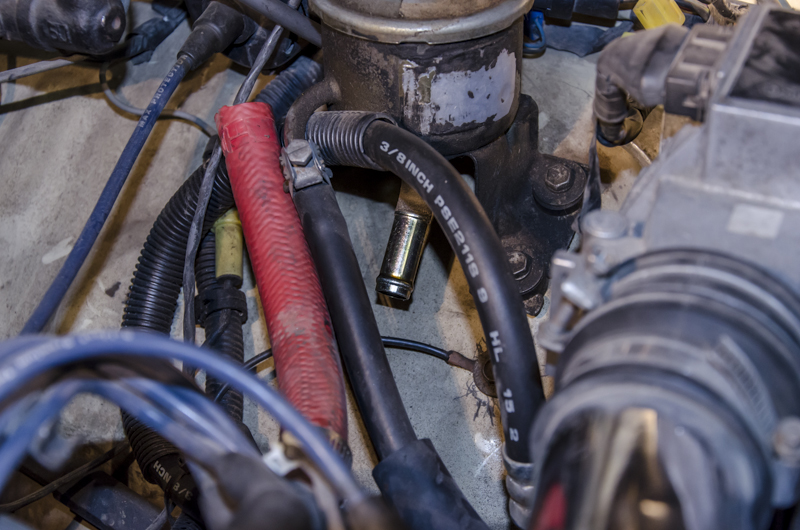
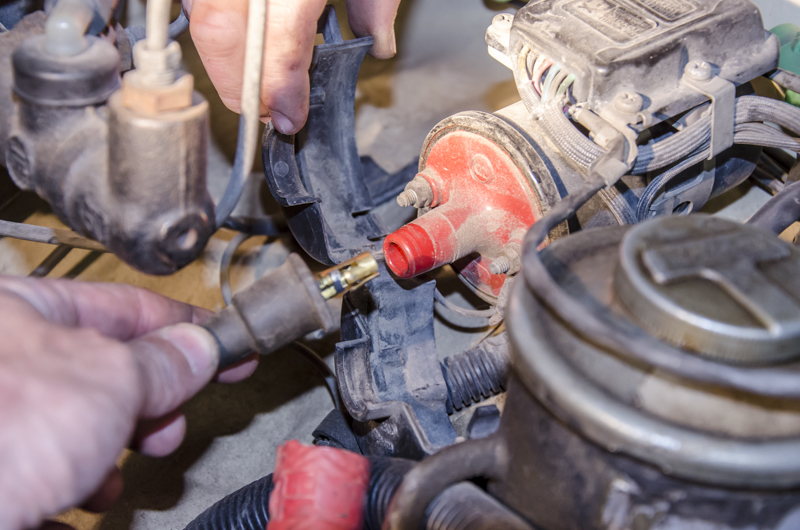
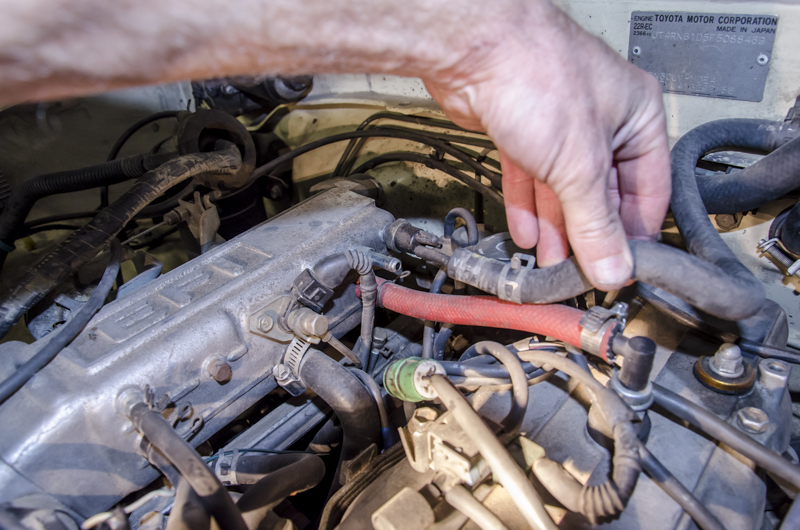
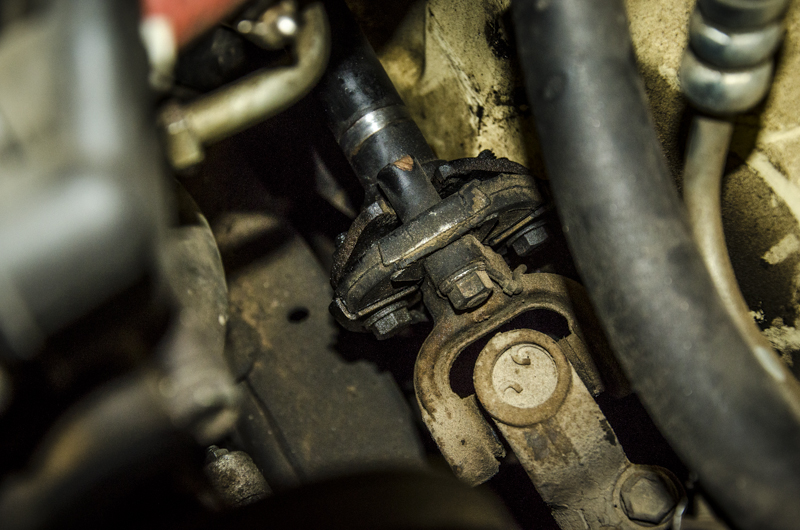
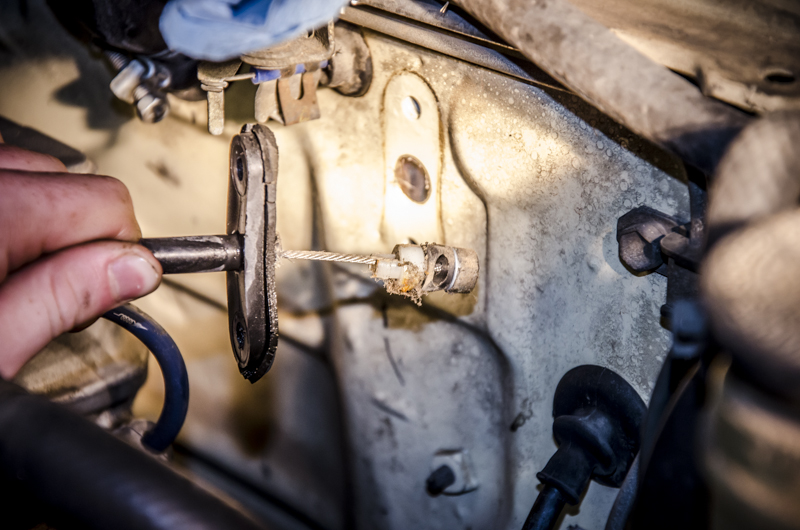
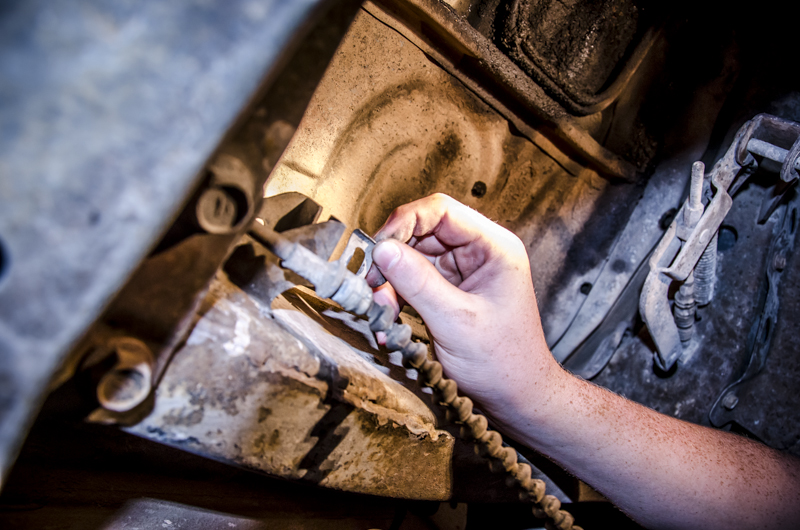
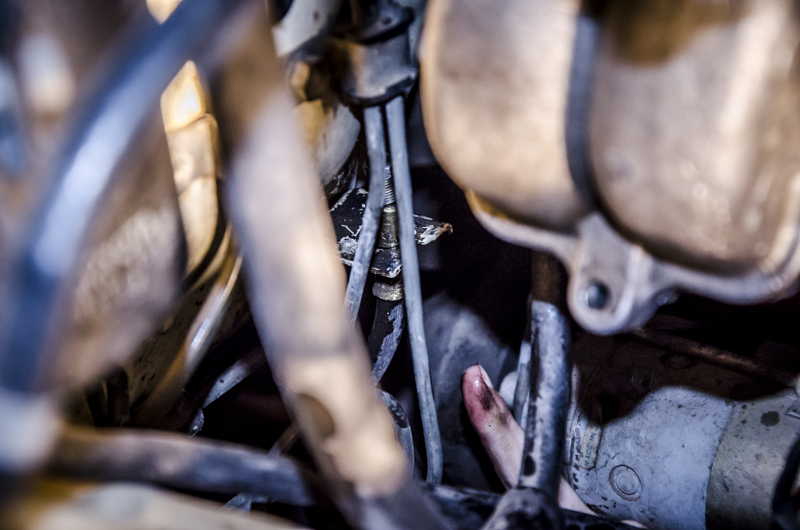
I took off the pipe going from the power steering to the gear box connected the frame.
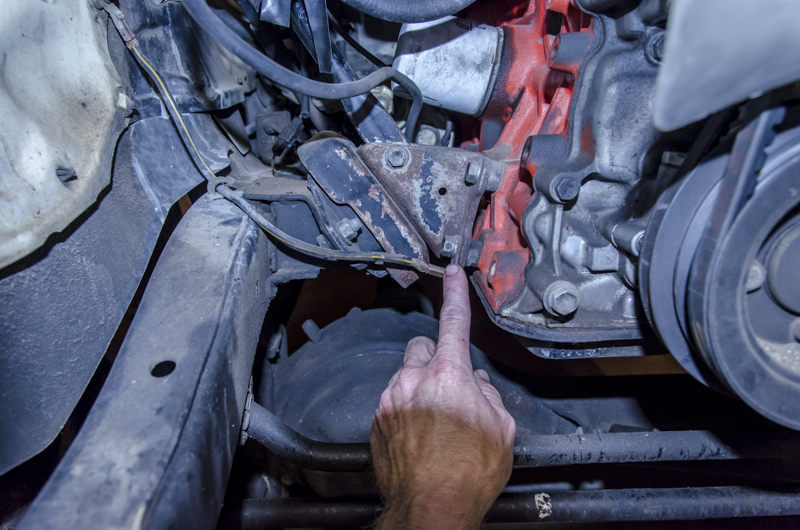
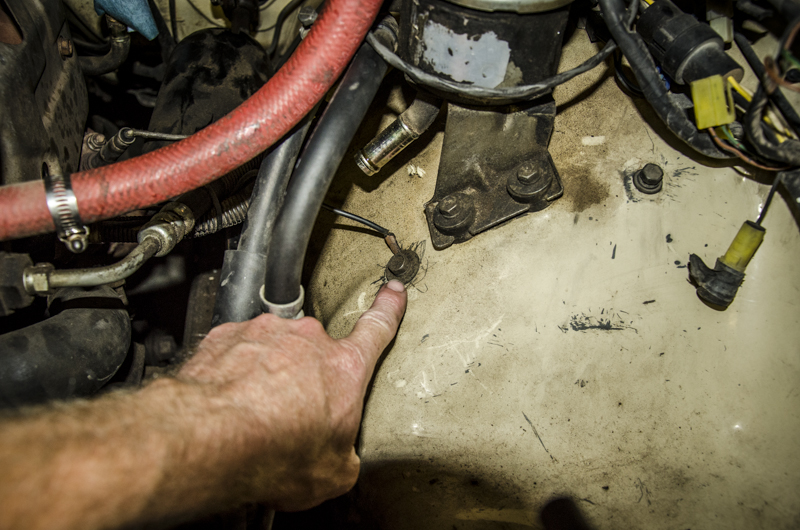
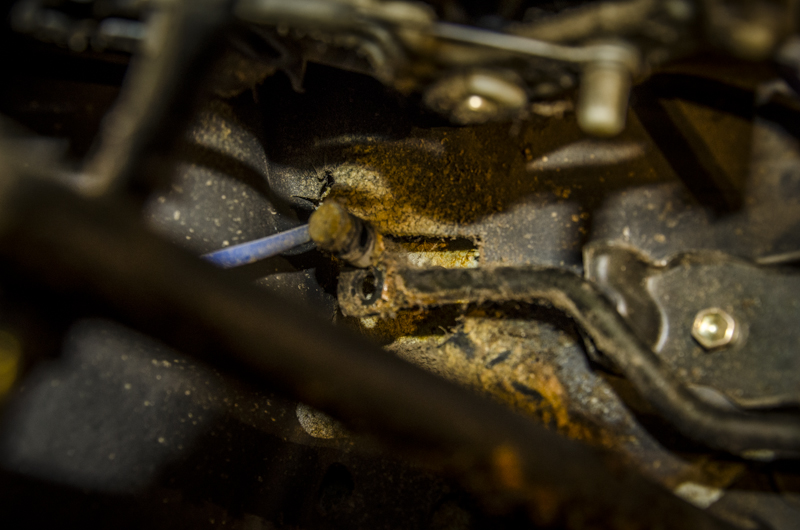
This is the ground wire connected to the engine right above the oil pan.
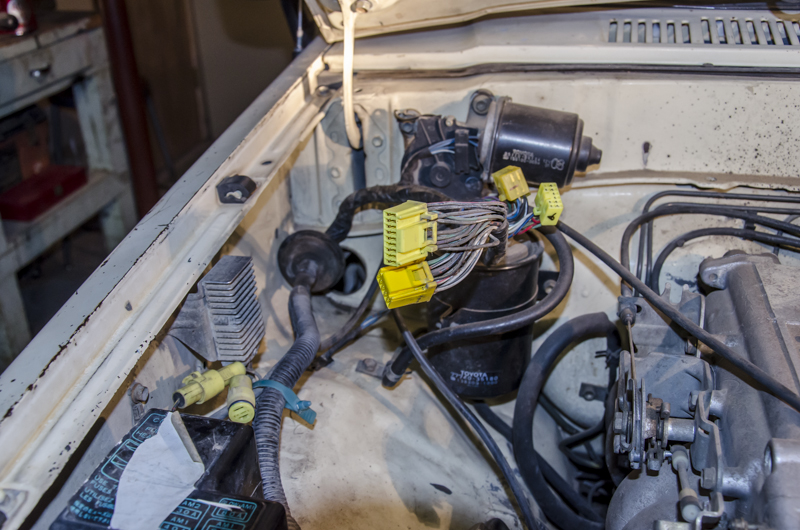
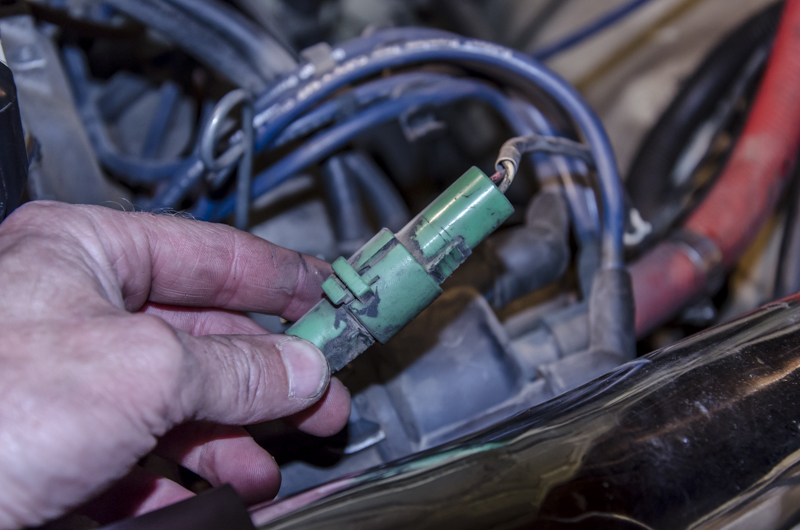
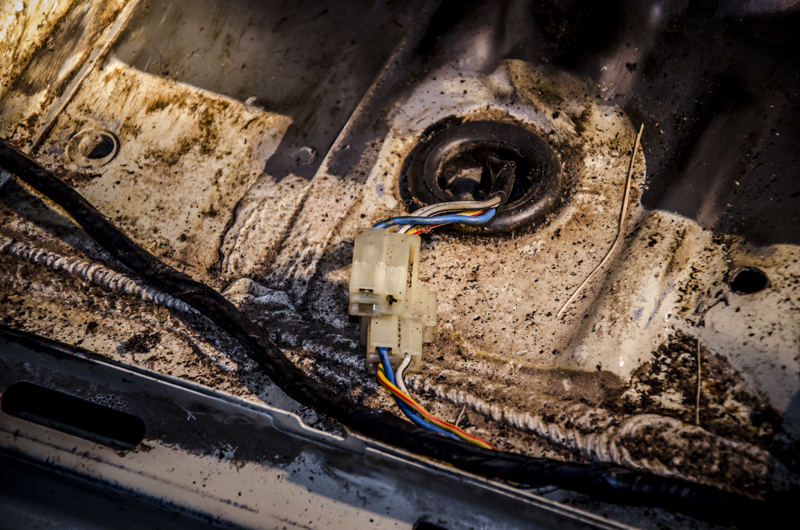
I disconnected this wire that goes to the wiring harness.
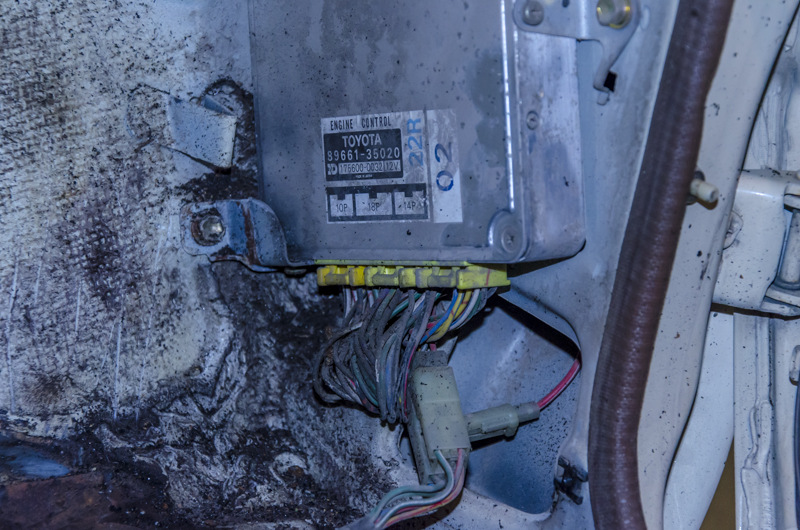
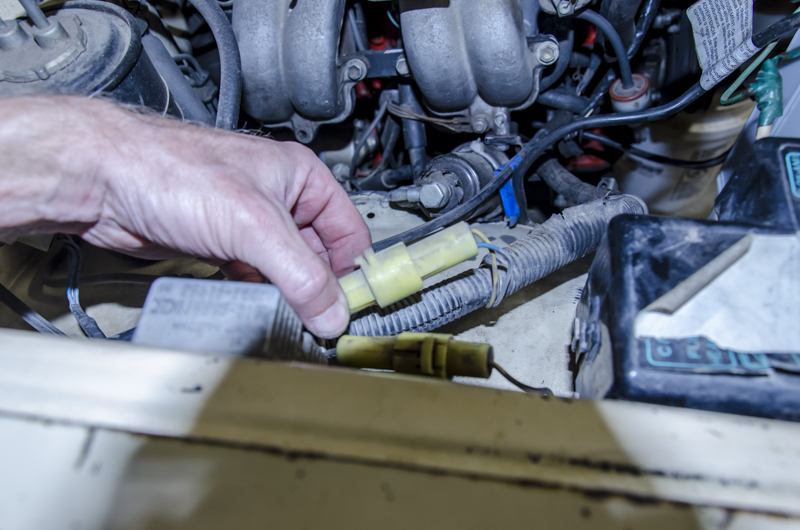
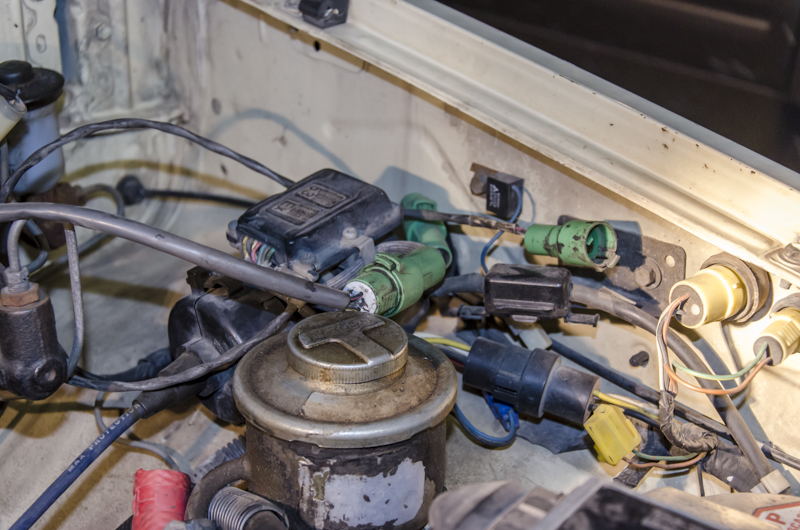
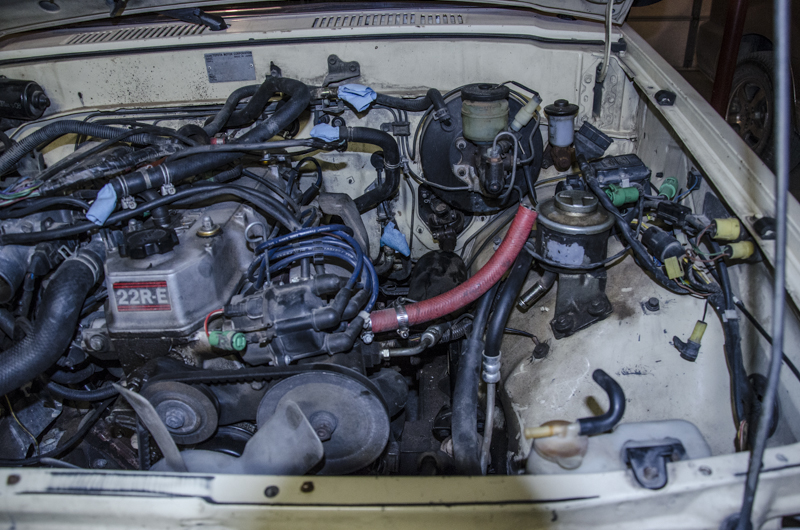
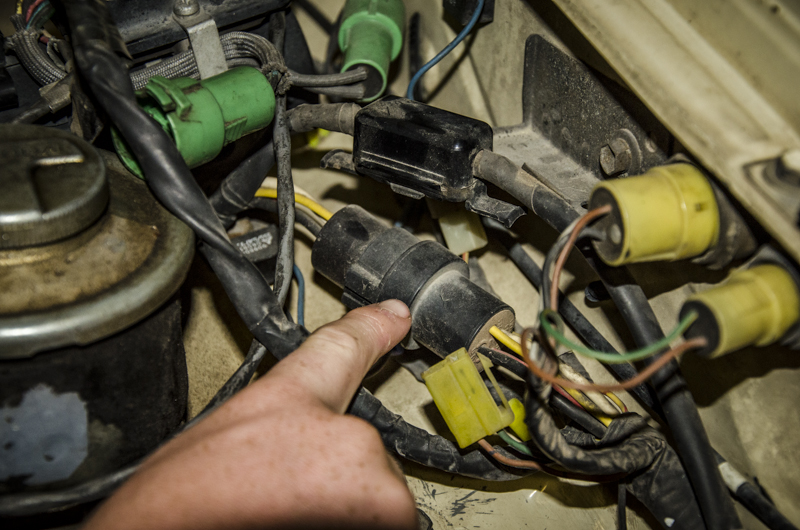
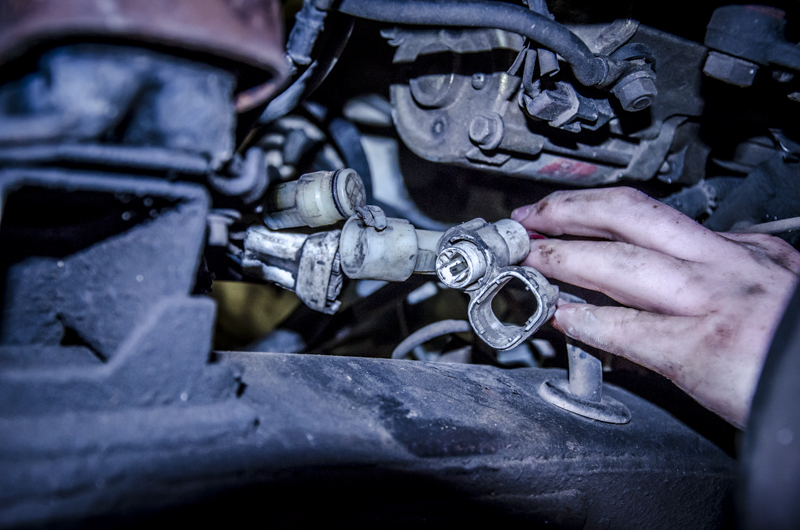
This is the ecu controlling the engine located under the dash on the passenger side.
Their is three bolts holding it on.
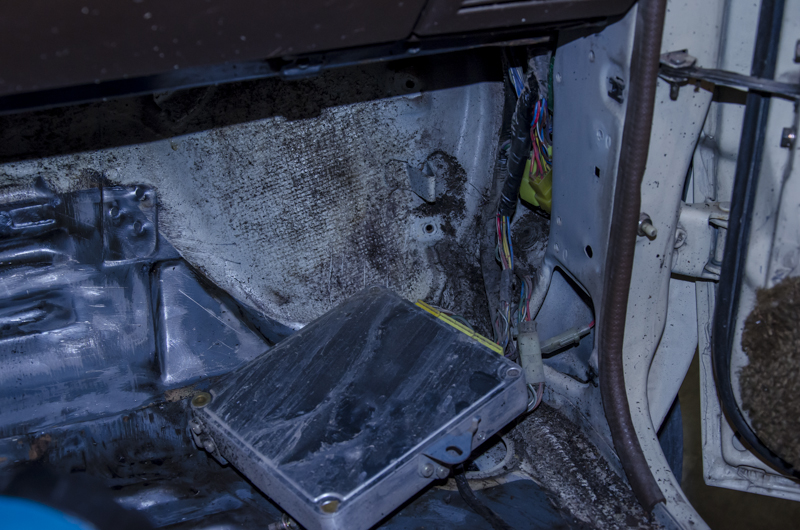
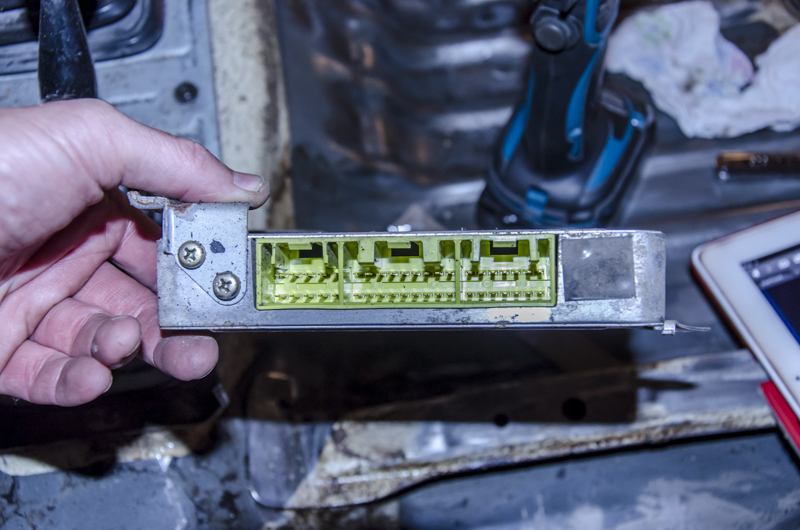
All three of the connectors are different that connect to this.

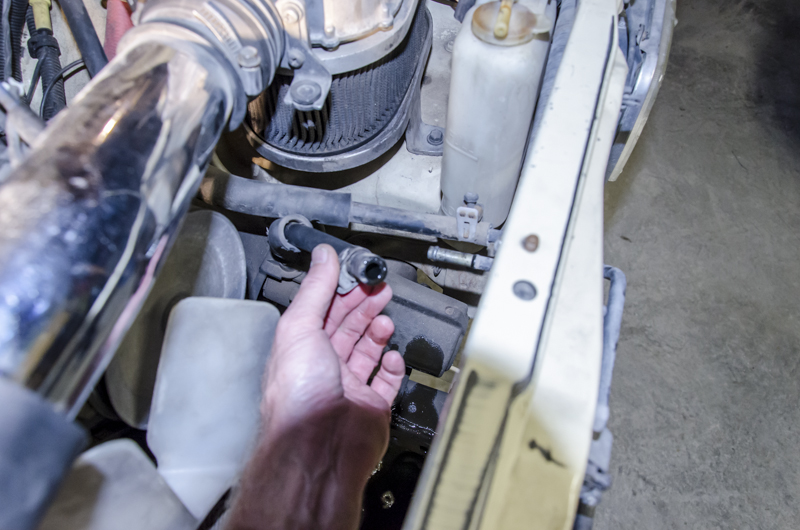
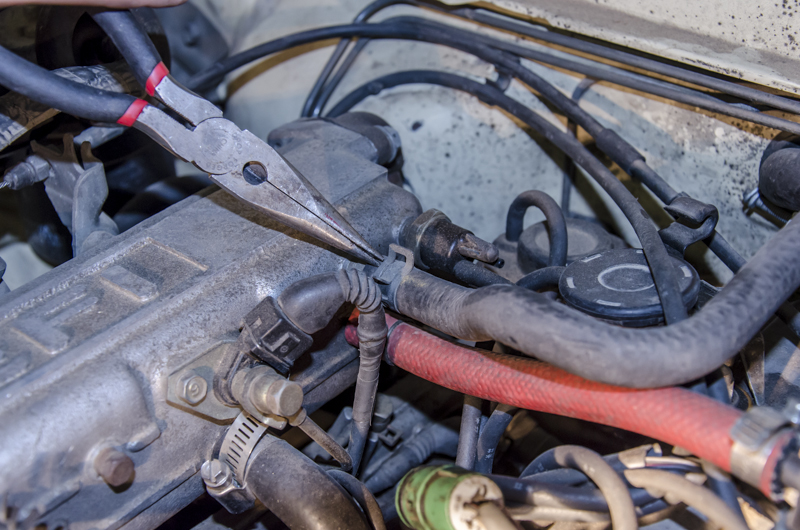
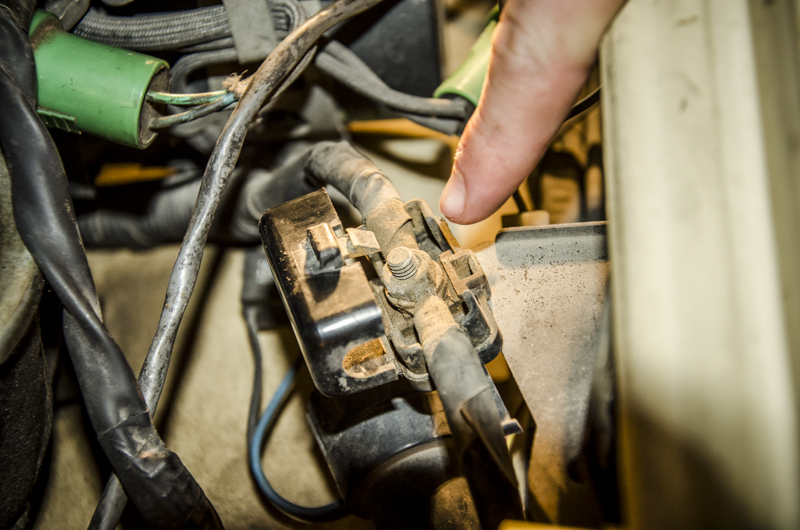
Then I pulled out the rubber grommet in the firewall.
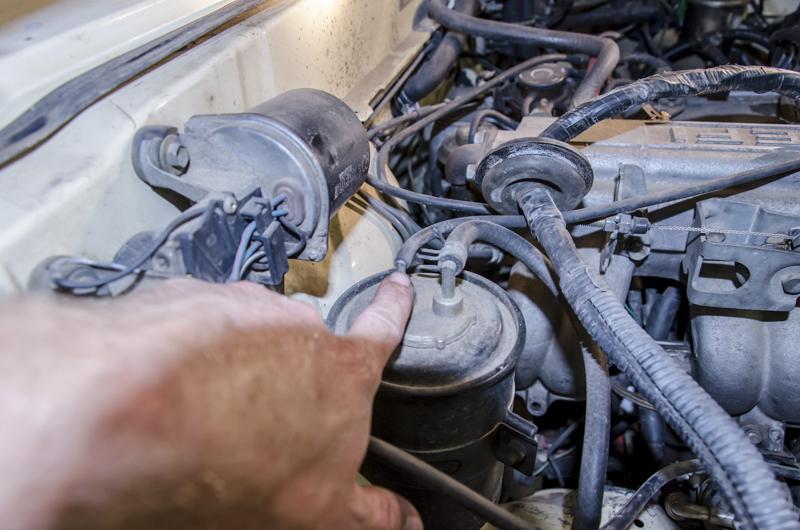
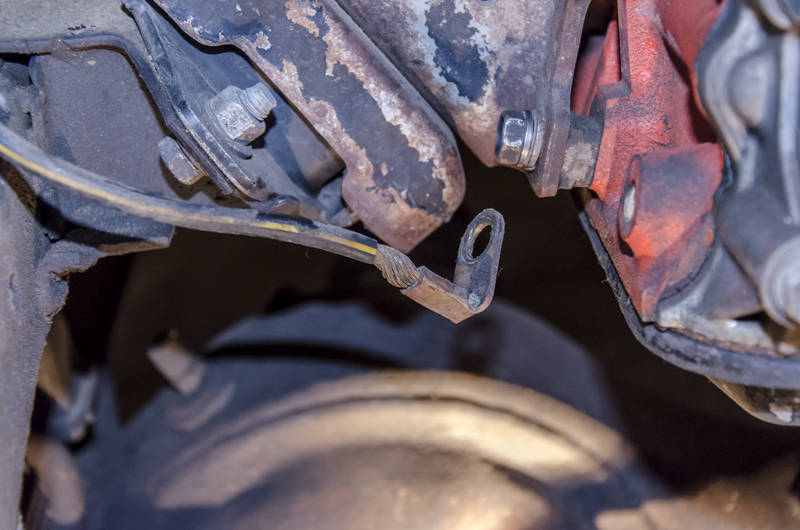
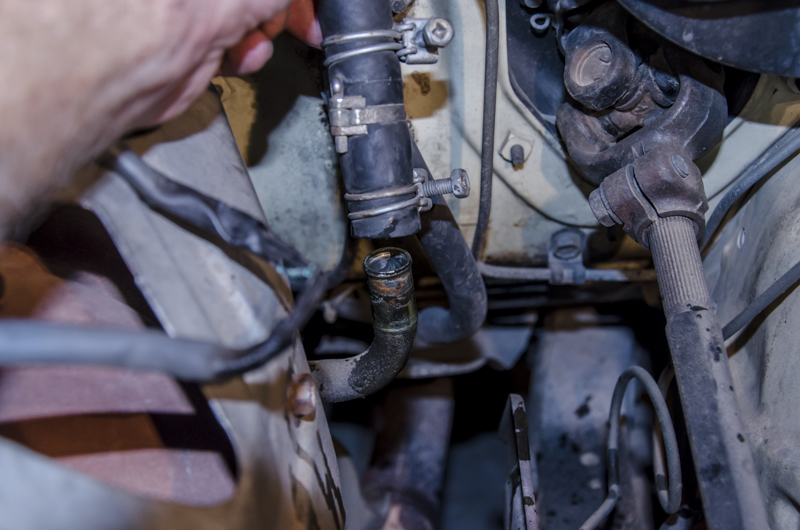
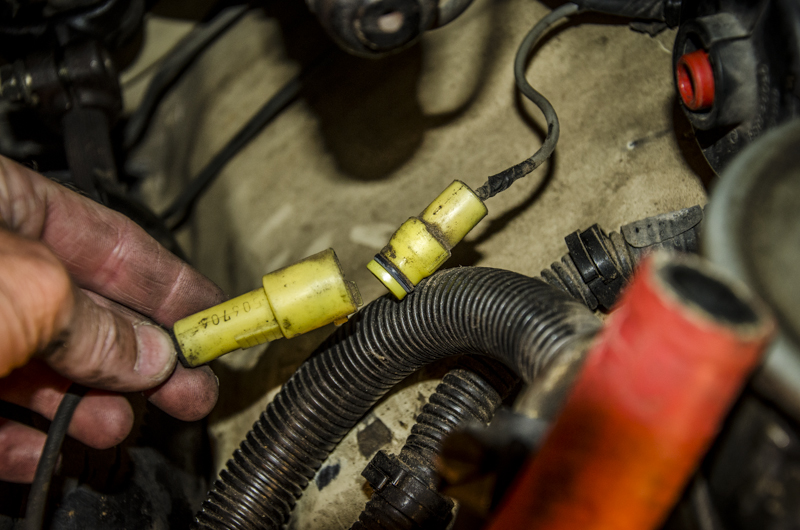
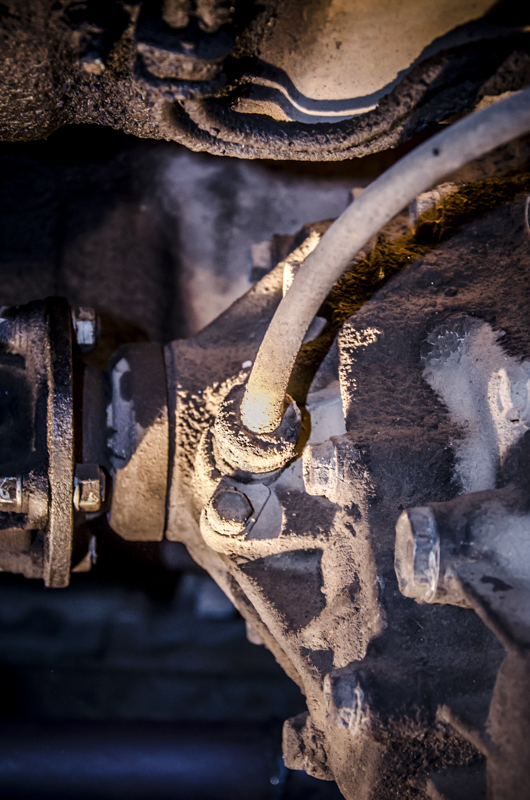
Then I disconnected this line
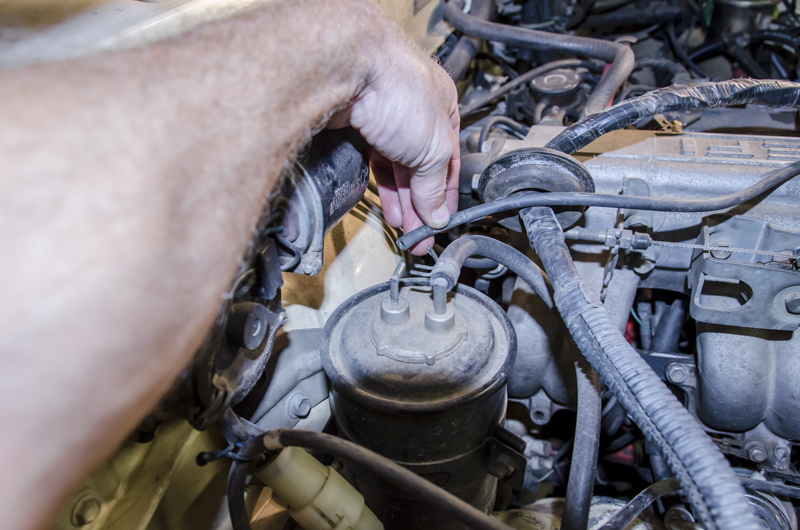
Disconnected another line running from the power steering.
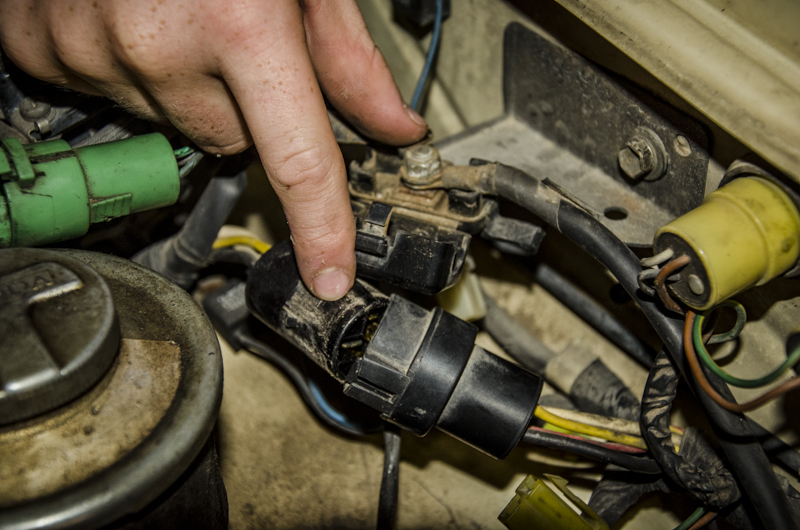
This is a cable running from the distributor to the near the coil.
Disconnected another cable from the coil.
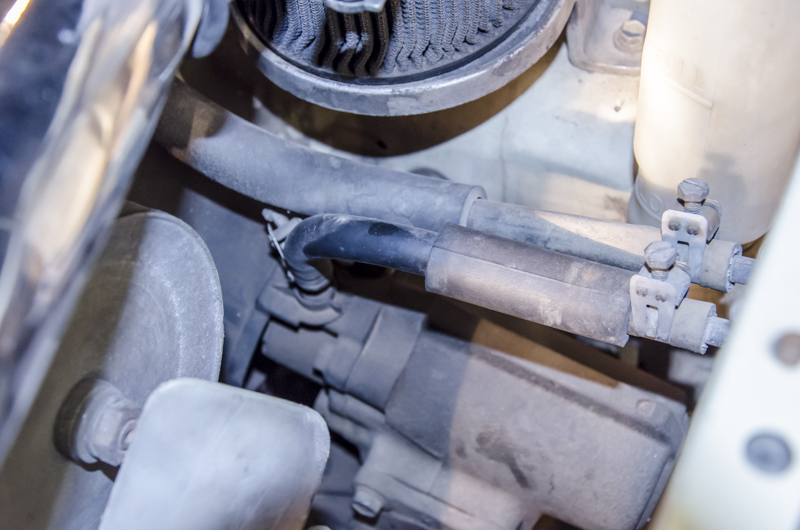
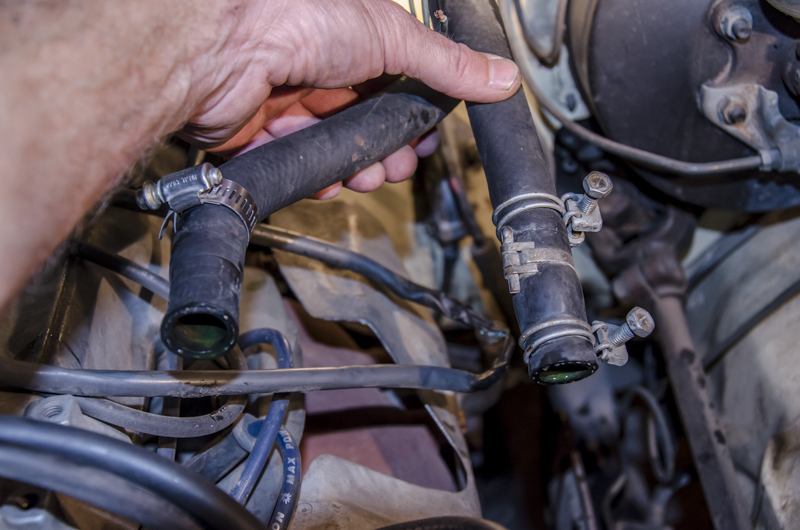
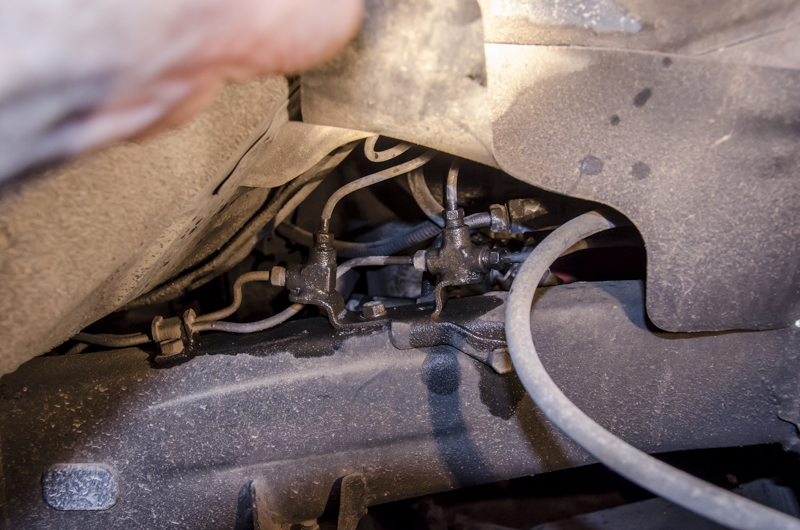
Disconnecting some of the hoses
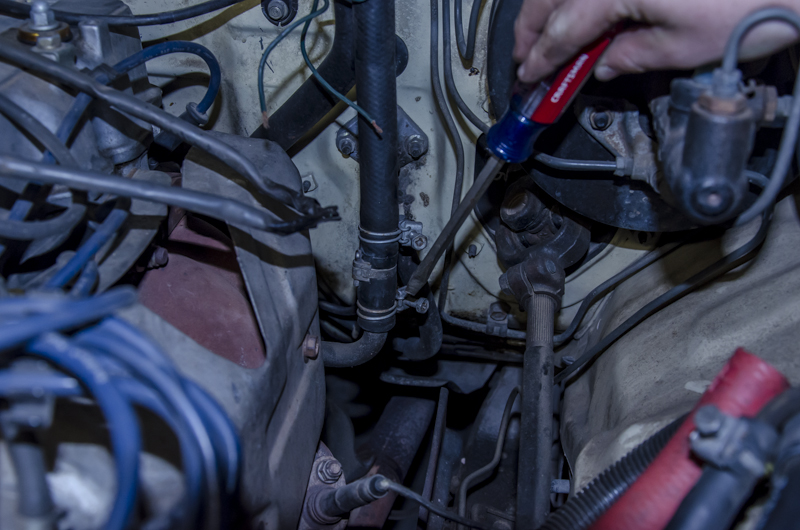
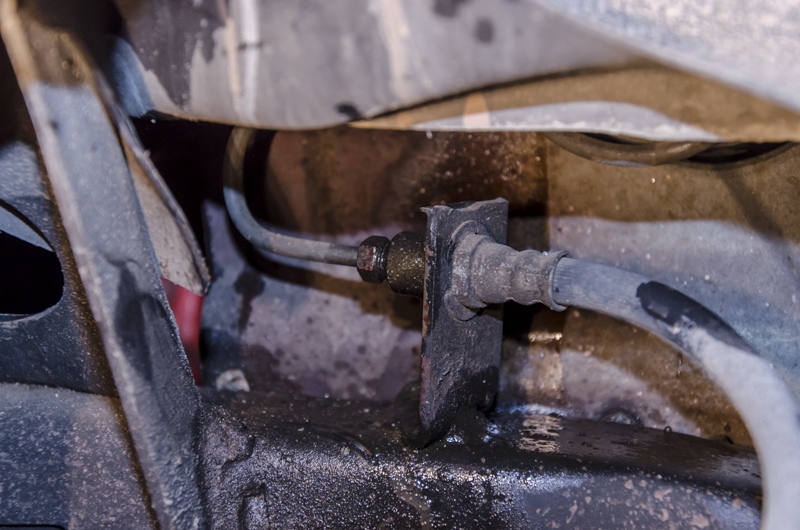
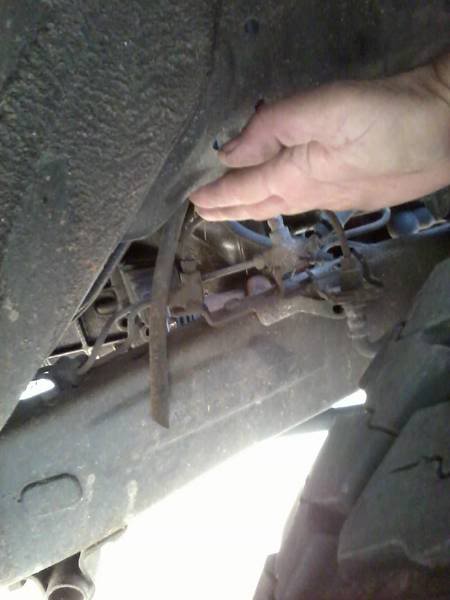
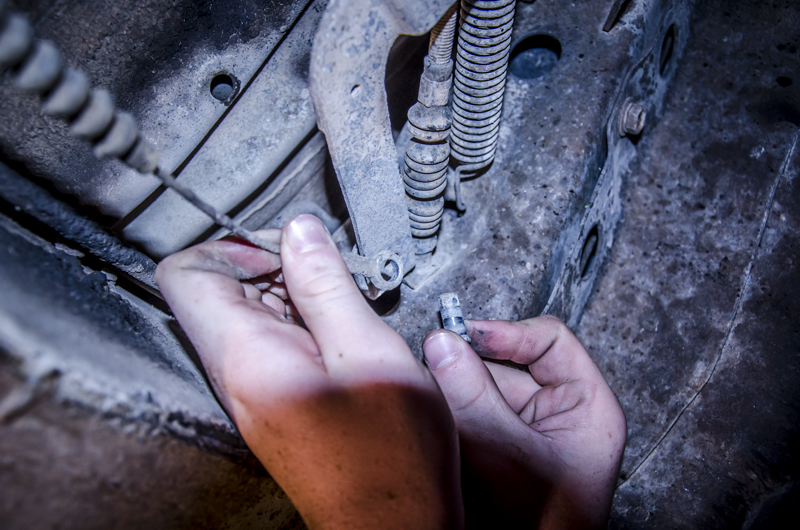
Next the break cables. I just used a regular 10mm box wrench and vice grips to get them off. This it the front drivers side.
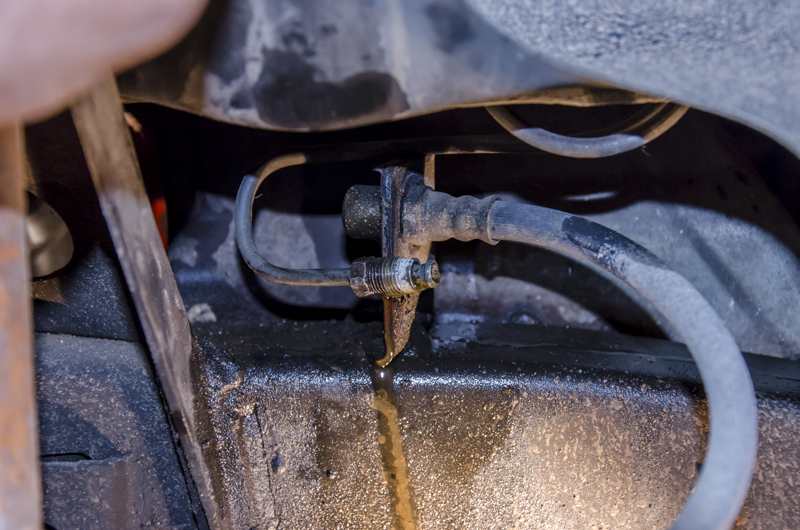
This is the front passenger side.
Next I disconnected the steering
Another ground wire on the drivers side.
Disconnected that one too.

Next the throttle cable.
To disconnect this you first have to disconnect the cable from the gas pedal. The way you do this is pull the plastic thing towards you then push the rod to the left.
Then pull it through the firewall.
This is located on the passenger side where the passenger seat would be.
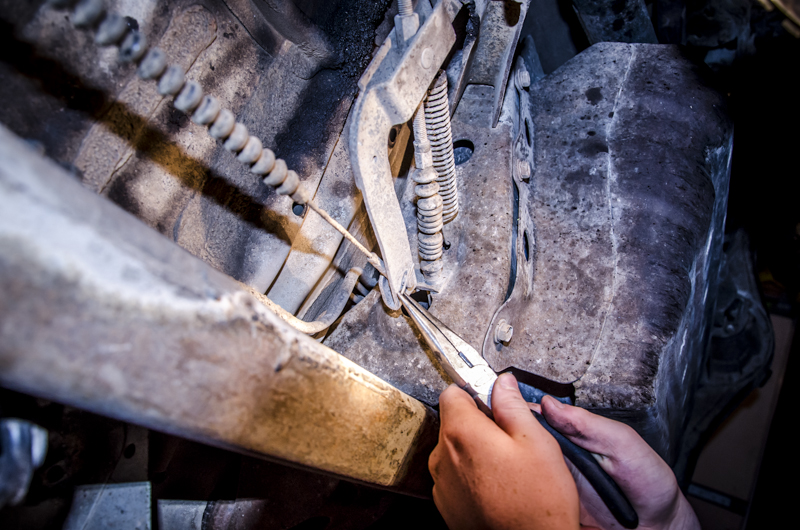
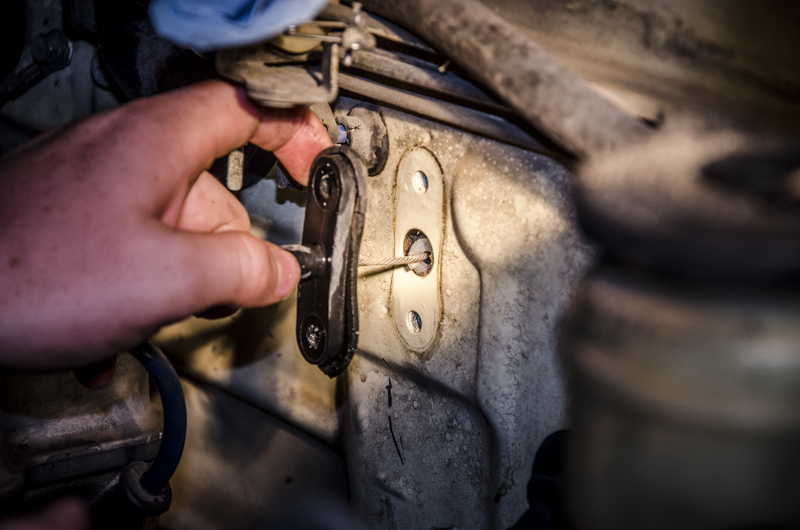
Then the ebrake.
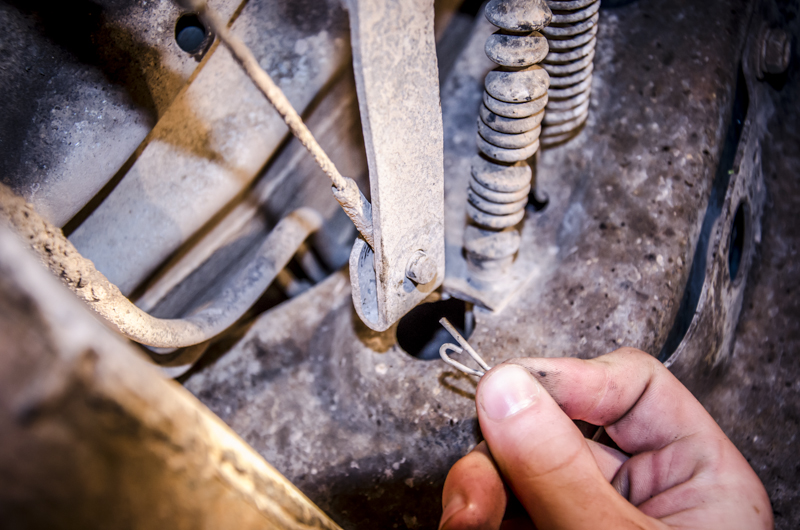
First you pull this pin.
Then their is a little slot holding the cable just pull that out.
This is a cable going down to the transmission

Some more cables
This picture is kinda hard to see but it is the clutch cable.
That is where I had stopped. If their is any thing that you think I have missed please tell me.
What I have gotten done so far cam from this forum: https://www.yotatech.com/forums/f199...ild-up-234352/
Thanks for reading
Here are some of the picture that tell the steps that I took.
The first thing I did was take the front grill and bumper.
Their was just a few bolts holding these on.
Next I took the rad off by draining all the fluid through the plug on the bottom.
This gave me a little room to work on other things
I took off the pipe going from the power steering to the gear box connected the frame.
This is the ground wire connected to the engine right above the oil pan.
I disconnected this wire that goes to the wiring harness.
This is the ecu controlling the engine located under the dash on the passenger side.
Their is three bolts holding it on.
All three of the connectors are different that connect to this.
Then I pulled out the rubber grommet in the firewall.
Then I disconnected this line
Disconnected another line running from the power steering.
This is a cable running from the distributor to the near the coil.
Disconnected another cable from the coil.
Disconnecting some of the hoses
Next the break cables. I just used a regular 10mm box wrench and vice grips to get them off. This it the front drivers side.
This is the front passenger side.
Next I disconnected the steering
Another ground wire on the drivers side.
Disconnected that one too.
Next the throttle cable.
To disconnect this you first have to disconnect the cable from the gas pedal. The way you do this is pull the plastic thing towards you then push the rod to the left.
Then pull it through the firewall.
This is located on the passenger side where the passenger seat would be.
Then the ebrake.
First you pull this pin.
Then their is a little slot holding the cable just pull that out.
This is a cable going down to the transmission
Some more cables
This picture is kinda hard to see but it is the clutch cable.
That is where I had stopped. If their is any thing that you think I have missed please tell me.
What I have gotten done so far cam from this forum: https://www.yotatech.com/forums/f199...ild-up-234352/
Thanks for reading
Aug 30, 2013 | 04:15 PM
#18
I have a 2 inch body lift. Mostly it is just the rubber body moldings and brackets to lift the bumper. Also there is another lift that is called ball joint spacers for the front, I am not sure what is used to raise the rear.
The 84/85 do tend to get overlooked. I didnt know that they existed for the longest time on forums when I first joined.
The 84/85 do tend to get overlooked. I didnt know that they existed for the longest time on forums when I first joined.
Last edited by Terrys87; Aug 30, 2013 at 04:16 PM.
Sep 1, 2013 | 09:45 AM
#19
Thread Starter
Registered User
Joined: Apr 2013
Posts: 72
Likes: 0
From: St joe missouri
Taking off the body.
Yesterday I actually started to the body of the frame. It was not an easy job to do with only 2 people and a engine hoist.
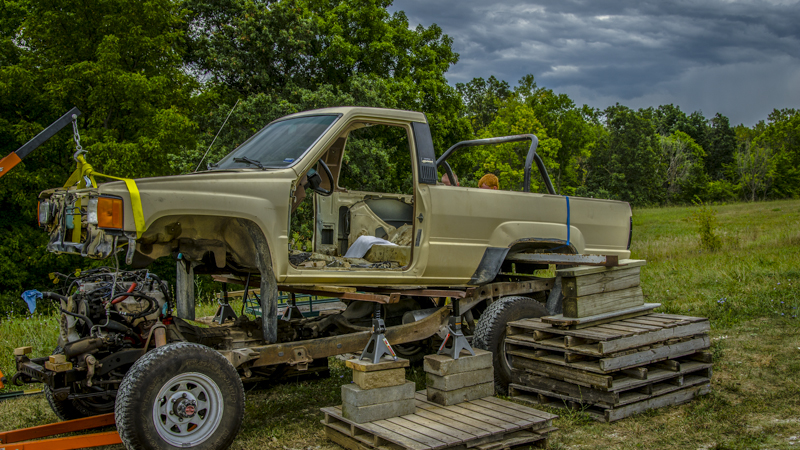

This is before I started to clean. Then we put engine degreaser on it and let it soak. Then used purple power on the rest

[YOUTUBE]http://www.youtube.com/watch?v=_xJVf...tu.be/YOUTUBE]
This is a time lapse my dad did while we where taking the body off.
Thank you Terry87 for answering my question. I was also wondering if you have ever used the old man emu suspension lift and how it rode. Also would the 86-89 kit fit on my 4runner since they don't have one specific to 85 4runners.
Also I was wondering what should I use to coat the frame.
This is before I started to clean. Then we put engine degreaser on it and let it soak. Then used purple power on the rest
[YOUTUBE]http://www.youtube.com/watch?v=_xJVf...tu.be/YOUTUBE]
This is a time lapse my dad did while we where taking the body off.
I have a 2 inch body lift. Mostly it is just the rubber body moldings and brackets to lift the bumper. Also there is another lift that is called ball joint spacers for the front, I am not sure what is used to raise the rear.
Also I was wondering what should I use to coat the frame.
Last edited by Jacob13; Sep 1, 2013 at 01:44 PM.
Sep 2, 2013 | 12:55 AM
#20
This is the kind of builds I like to see. You will find it rewarding when done knowing that you have touched about every nut and bolt when done. As far as the frame, I just paint mine and clean inside it real well with high pressure air and water and a few times a year I clean it out again. After the first time of cleaning it, it isnt to hard to keep clean after that. Otherwise I might would suggest a spray on bed liner or something similar in an aerosol can, I have never used it so not sure how that would work.
I have never used Old Man Emu but hear great things about them. I asked jason in tn and he likes them really well and has used them and suggested it. The 86 and newer is IFS and is alot different then the 85s solid axle. I can ask a few that would know that better then me and see what they suggest.
One thing I would suggest while you have it this far down is to go thru your fuel system. The fuel tanks I clean out by filling them with white vinegar and letting them soak for a few days. The return line or the fuel pump assembly is most likely gong to be clogged. Here in the midwest, the humidity really puts rust in the tanks. Be very careful with the fuel pump assembly as they are hard to find and expensive. The metal line that connects to the rubber line likes to twist if not careful.
If the fuel pump is in bad shape (most likely), you can get a fuel pump off of ebay for $25 shipped. Toyota wants $300 and parts stores want $150. The ebay pumps work great for me and I have never had a problem with them.
It looks like you are soaking the bolts that hold your tire carrier. The tire carrier assembly is most likely all rusted up. I have gotten some really bad carriers working by soaking several days in PB Blaster and then gently working the lifting assembly until it frees up. Just takes some time and paitience.
I just know them in stock condition, but if you let me know ahead of time where you are going next in your next step for parts or teardown, I will try and give you a heads up on what to look for or where to get the best parts for cheaper then the dealer or parts store in some cases.
Taking the frame off may have seemed intimidating at first, but if you had to put it back together, I bet you feel real confident about it and it would go alot quicker for you then what it did coming apart as it is still fresh on your mind and the nuts and bolts arent frozen.


