
RTT meets taco
 May 31, 2009 | 04:16 AM
#1
Thread Starter
Registered User
Joined: Apr 2008
Posts: 47
Likes: 0
RTT meets taco
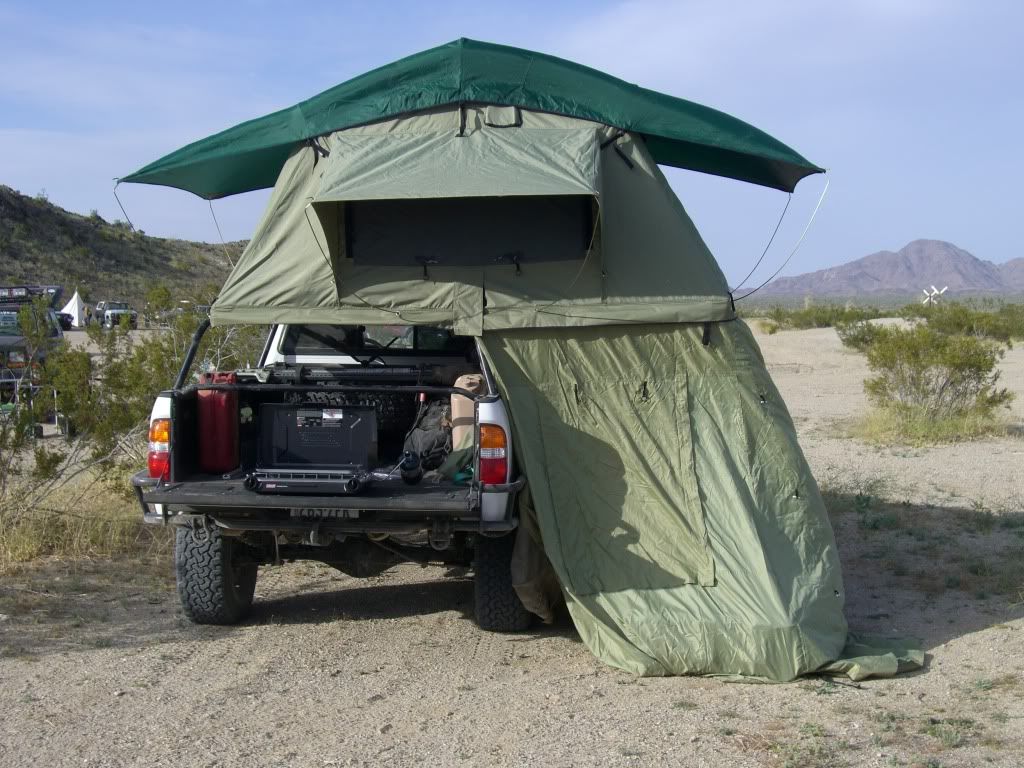
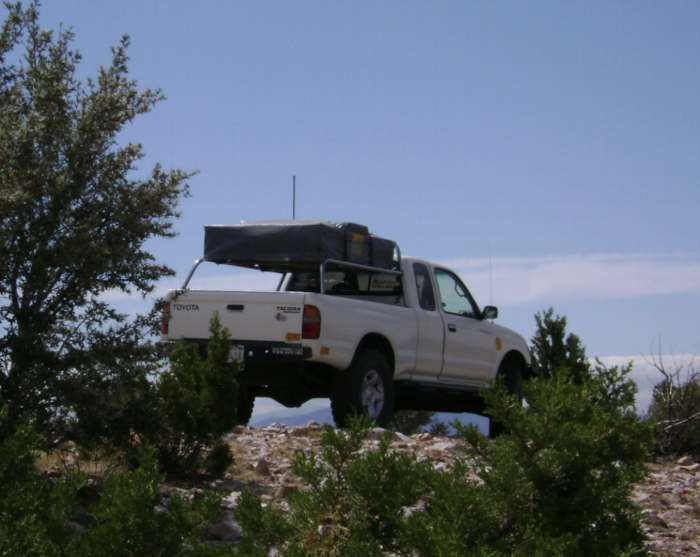
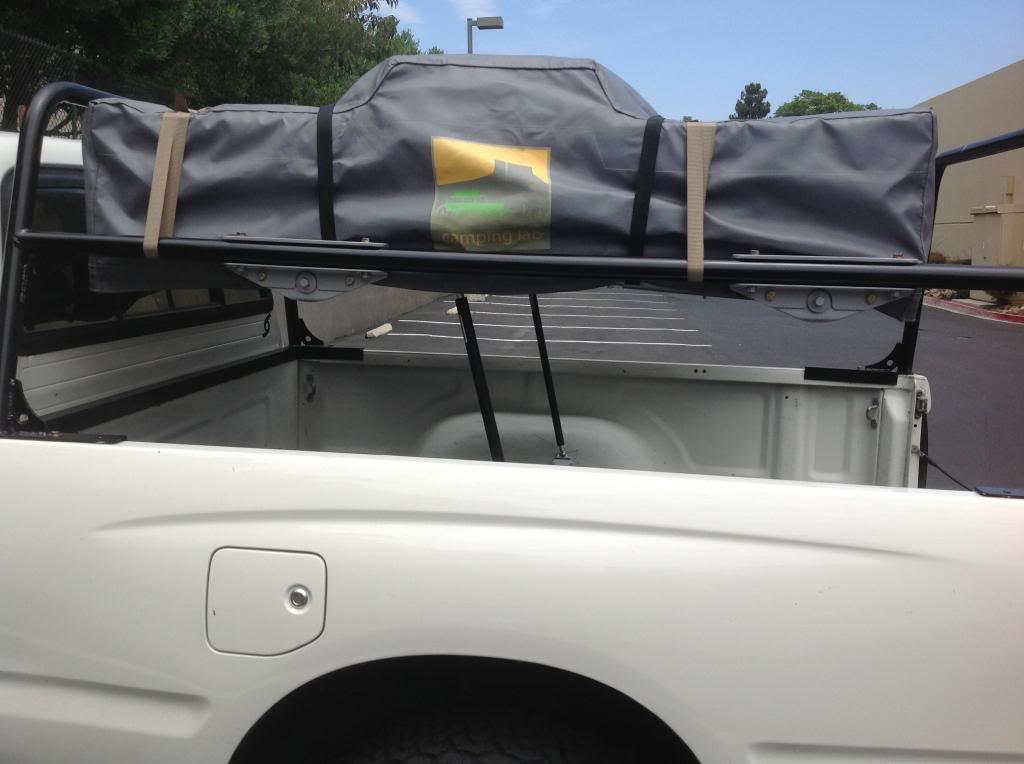
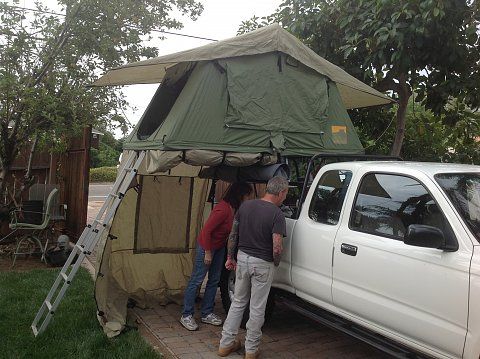
Picked up a smaller CampingLab RTT about a month ago and finally hooked up with a local fabricator who churned out this pretty cool rack to carry the tent.
Edit: 3/12/2014 - Pictures of old rack on the new owner's truck - which btw is back up for sale - This first picture reflects my initial displeasure with the RTT mounted at a lowered height - the lack of headroom in the annex / changing room...
I was inspired from other racks I found searching various forums.
1-1/2" .090 HREW tube for the basic rack structure
1"x2" 1/8"T box for the actual RTT to rack connection.
1-1/2"x2" 1/8"T angle for the bedrail connection.
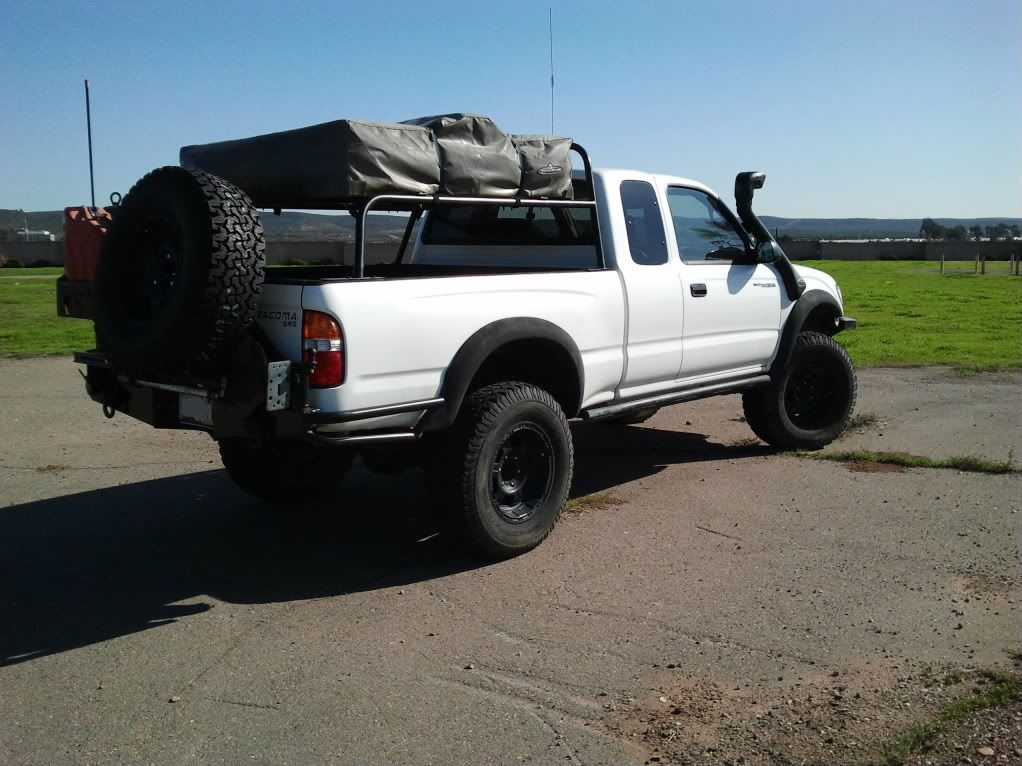
I give a lot of props to the fabricator, Brian. I had heard good things about his work. He was more than willing to take my vision and make it happen. Brian has produced a lot of high quality parts for the CT crowd and is looking to start branching out into the off-road world. He has some more pics and commentary here:
http://www.customtacos.com/forum/sho...d.php?t=133361
Pic of the old rack on my truck
Rick
Edit: 3/12/2014 - Pictures of old rack on the new owner's truck - which btw is back up for sale - This first picture reflects my initial displeasure with the RTT mounted at a lowered height - the lack of headroom in the annex / changing room...
I was inspired from other racks I found searching various forums.
1-1/2" .090 HREW tube for the basic rack structure
1"x2" 1/8"T box for the actual RTT to rack connection.
1-1/2"x2" 1/8"T angle for the bedrail connection.
I give a lot of props to the fabricator, Brian. I had heard good things about his work. He was more than willing to take my vision and make it happen. Brian has produced a lot of high quality parts for the CT crowd and is looking to start branching out into the off-road world. He has some more pics and commentary here:
http://www.customtacos.com/forum/sho...d.php?t=133361
Pic of the old rack on my truck
Rick
Last edited by pray4surf; Mar 18, 2014 at 10:59 AM.
May 31, 2009 | 06:10 AM
#3
Co-Founder/Administrator
iTrader: (1)
Joined: May 2002
Posts: 32,242
Likes: 22
From: Auburn, Washington
Very nice.
I would do the same too if I had a Tacoma, or mount it on a CanBack.
Both are good options.
I posted some cool custom rack setups for trucks in the roof top tent thread in the camping section.
I bet you will enjoy sleeping in that.
I would do the same too if I had a Tacoma, or mount it on a CanBack.
Both are good options.
I posted some cool custom rack setups for trucks in the roof top tent thread in the camping section.
I bet you will enjoy sleeping in that.
 Mar 12, 2014 | 09:01 AM
#5
Thread Starter
Registered User
Joined: Apr 2008
Posts: 47
Likes: 0
RTT/Bed Rack vers. 2.0
Thread resurrection - I'll see what I can do about the missing pics.
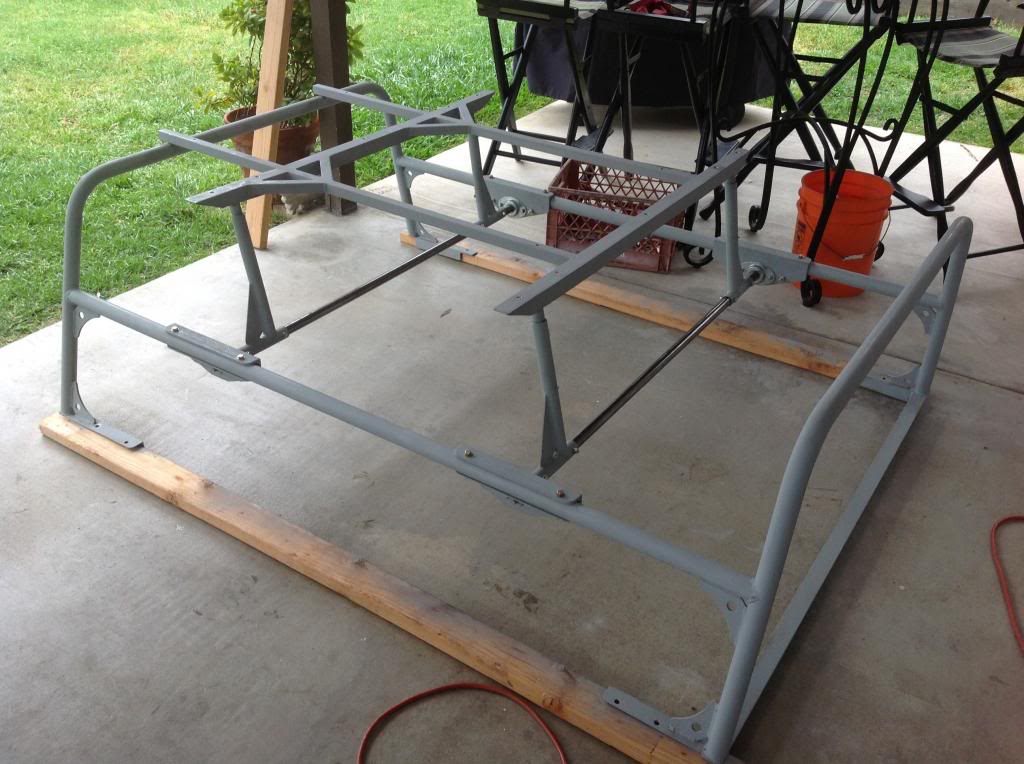
As much as I liked that first rack, I knew from during the build, I wanted to improve upon it. My first 'complaint' was the single hoop behind the cab. Originally, I wanted two hoops - at each end of the bed. IMO this makes the rack a bit more universal as I could strap longer objects to the rack - think a load of lumber from HD - or my surfboards.
Also, the established (fixed) height of the RTT bugged me - I liked having it set lower in the back for transporting / lower CoG / parking in the garage / etc.
I didn't care so much for the lack of headroom in the annex/changing room. Oh to be able to stand upright under the tent...
Ideally, I wanted to transport the RTT in a lowered position, then raise the RTT to use/deploy.
So a couple years ago, I sketched this out.
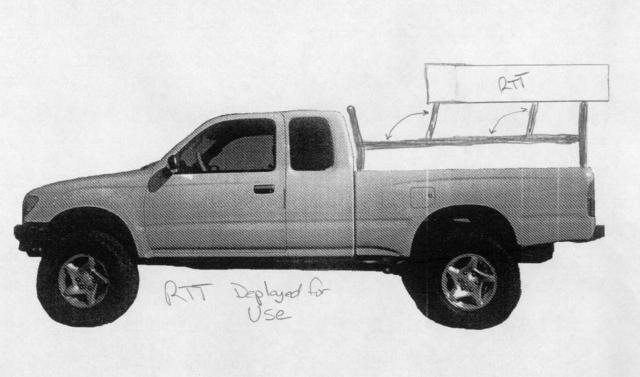
Fast forward to present time, and here you have it
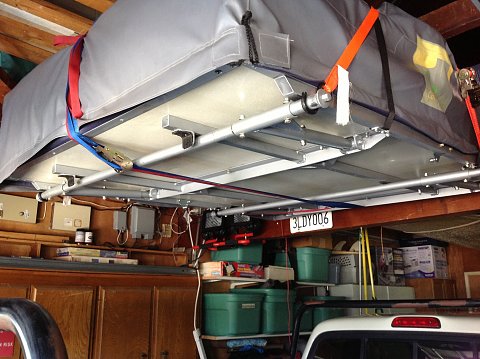
Stowed for transporting
Been some minor modifications to the strapping down the RTT
Raised for use

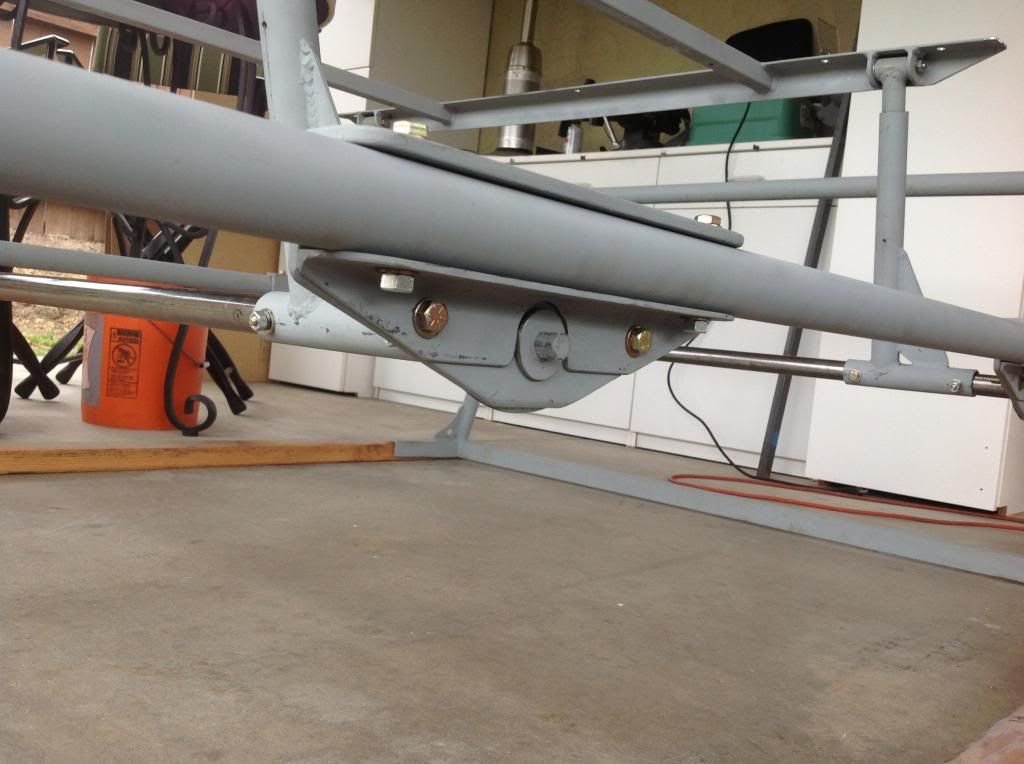
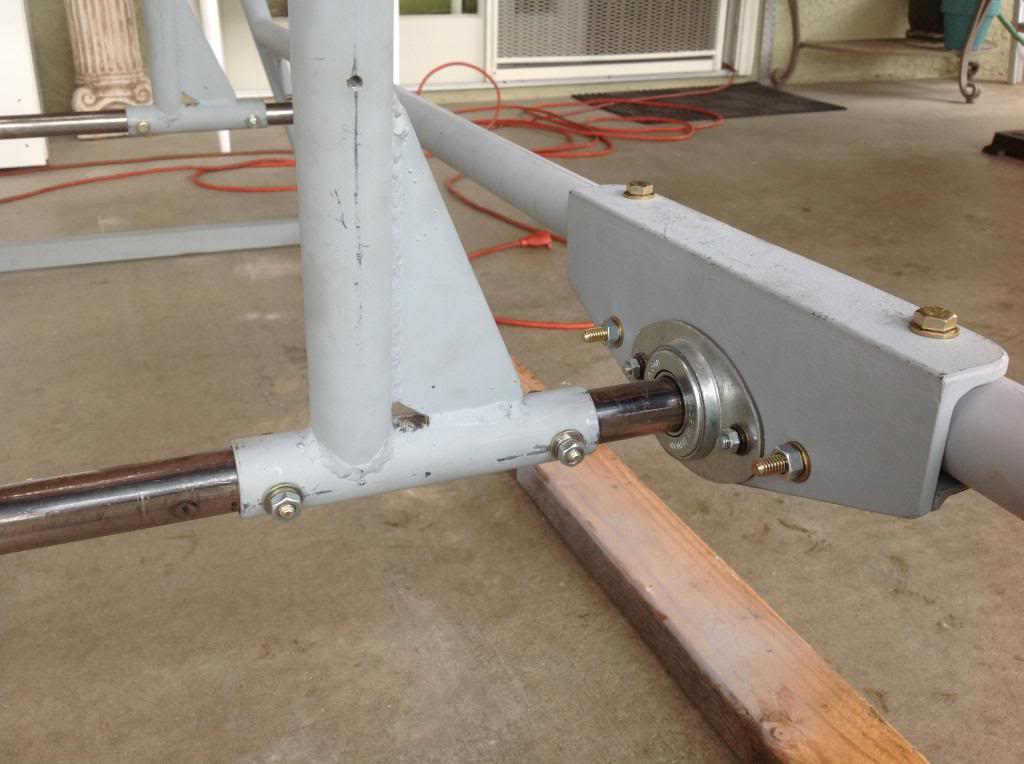
Two gas charged struts are employed to assist in raising the RTT. While I was hoping to eliminate any intrusion into the cargo area of the bed, This is pretty minimalist. Without the struts, raising/lowering the RTT was a two-person job. With the struts, raising/lowering is easily done by myself.
Interested in a cheezy video?
http://s1303.photobucket.com/user/pr...1db30.mp4.html
Some of the build/fab pics
Rack and 'carrier' for the RTT
A few close-ups of the rotating bar and the lifting struts

Deployed
And when not in use, stows neatly against the garage rafters - takes about 15 minutes to remove or install
Up next is a awning/bimini top setup - been perusing the forums for DIY canback builds for inspiration
As much as I liked that first rack, I knew from during the build, I wanted to improve upon it. My first 'complaint' was the single hoop behind the cab. Originally, I wanted two hoops - at each end of the bed. IMO this makes the rack a bit more universal as I could strap longer objects to the rack - think a load of lumber from HD - or my surfboards.
Also, the established (fixed) height of the RTT bugged me - I liked having it set lower in the back for transporting / lower CoG / parking in the garage / etc.
I didn't care so much for the lack of headroom in the annex/changing room. Oh to be able to stand upright under the tent...
Ideally, I wanted to transport the RTT in a lowered position, then raise the RTT to use/deploy.
So a couple years ago, I sketched this out.
Fast forward to present time, and here you have it
Stowed for transporting
Been some minor modifications to the strapping down the RTT
Raised for use
Two gas charged struts are employed to assist in raising the RTT. While I was hoping to eliminate any intrusion into the cargo area of the bed, This is pretty minimalist. Without the struts, raising/lowering the RTT was a two-person job. With the struts, raising/lowering is easily done by myself.
Interested in a cheezy video?
http://s1303.photobucket.com/user/pr...1db30.mp4.html
Some of the build/fab pics
Rack and 'carrier' for the RTT
A few close-ups of the rotating bar and the lifting struts
Deployed
And when not in use, stows neatly against the garage rafters - takes about 15 minutes to remove or install
Up next is a awning/bimini top setup - been perusing the forums for DIY canback builds for inspiration
Last edited by pray4surf; Mar 12, 2014 at 09:20 AM.

 Mar 17, 2014 | 10:02 AM
#7
Thread Starter
Registered User
Joined: Apr 2008
Posts: 47
Likes: 0
Using the basic rack as a beginning point, I've fabbed a couple of bows
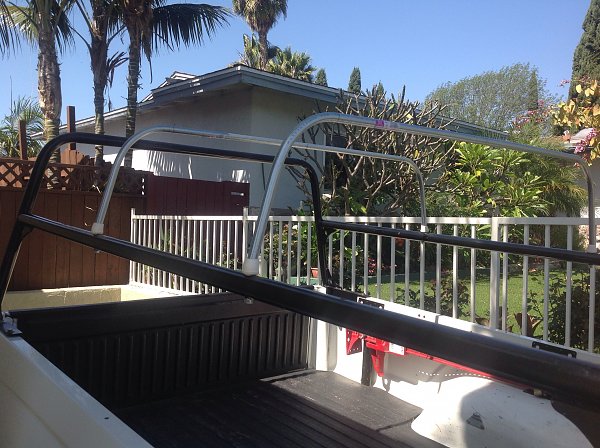
to support a small tarp. This will serve two purposes: provide a surrey/bimini-style cover and if I remove the velcro tabs on on side, I can pull the tarp over the other side and create a shade awning.
Present time - The two 1/2" emt hoops have been bent and attached to the rack. The tarp is being sewed. 14oz treated canvas. My first version started with a 6'x8' tarp (actual factory sewed dimensions 5'6" x 7'6"). Tarp material will wrap around the front/rear rack hoops and will use two-sided velcro straps to tension the fabric and secure the tarp to the rack. The sides are also secured to the rack side rails using velcro straps.
I hope to have all the sewing done this evening...

Thread
Thread Starter
Forum
Replies
Last Post
Dale Johnston
86-95 Trucks & 4Runners (Build-Up Section)
11
Oct 31, 2015 10:22 PM
Toys4parts
86-95 Trucks & 4Runners (Build-Up Section)
2
Sep 26, 2015 01:56 PM
ToyotaMD
Vehicles - Parting Out
0
Sep 22, 2015 04:49 AM


