
2.5 1JZ swap
 Feb 18, 2010 | 09:44 PM
#1
Thread Starter
Registered User
Joined: Mar 2009
Posts: 44
Likes: 0
From: Georgia
2.5 1JZ swap
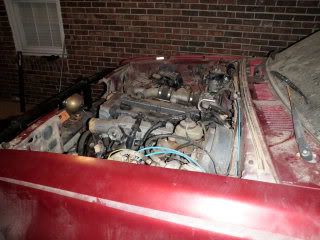
So I finally am done with school and got a little downtime from my other job and so I have gotten around to working on the truck. I am a little behind on my thread. So when I got back from Iraq my truck never ran quite right, not that the 3.0 was ever good to start with, but 8mpg's... then the trans went out so what to do... why not put in a 1JZ "I had gotten it for my 84 supra"
This is a backyard build, no fancy shop to manufacture custom parts, I want to do as much as i can with stock parts. So here we have the 3.0.
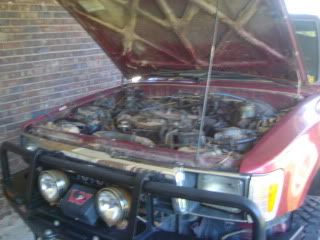
taking out a motor is tough with 6inches of lift on the truck
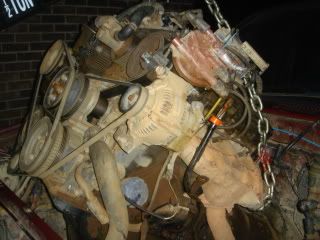
Well i put the 4runners factory ah340e (v6 auto) trans onto the 1j just to test fit. A 1jz will bolt onto it with the 1jz bell housing but the v6 auto TQ.
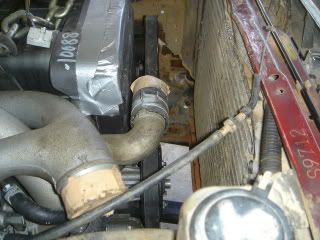
the initial fit was good, but it was way to far forward, and had to keep held up over the large front diff. The air inlet for the diff is on top so that took another 2" off my room.
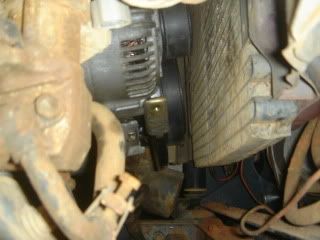
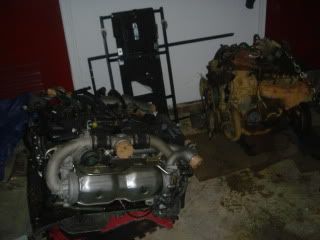
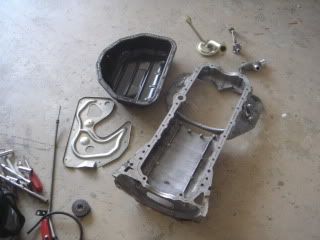
In order to solve the pan problem guys in the past have made an oil pan and pickup, well i am not that good and don't want the tube to leak and fail. so i looked at what you 7m guys do. Since this motor came from a Soarer (a jdm sc300), it had a mid sump, so i went onto Supraforums and found one of the many guys out there who bought a Aristo (gs300) 2jz for their supra, they need what i have and i needed what they have. So i even swapped a guy the upper and lower pan, pickup, windam plate, float sensor, and return tube, you and just swap the 2 oil hoses.
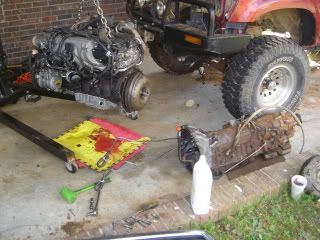
Next issue, the clearance in the front. I want this to look factory and keep the plastic grill. So, how to move it back. Again some guys have fabbed everything, in order to keep as many replaceable cheap parts, i went with this plan. Swap out parts from a 90 22re pickup. The trans cross member on the v6 is curved and the I4 is straight, also the front shaft is longer and the back shorter. So, with 50$ and 30 min in a junkyard you have another factory bolt up to slide it all back a few inches to give room for a radiator up front with some clearance and pusher fans in the front. Note: i did tap in the firewall 1/2" to 1" in a 2" wide spot where turbo #2 pipe hit.
This is a backyard build, no fancy shop to manufacture custom parts, I want to do as much as i can with stock parts. So here we have the 3.0.
taking out a motor is tough with 6inches of lift on the truck
Well i put the 4runners factory ah340e (v6 auto) trans onto the 1j just to test fit. A 1jz will bolt onto it with the 1jz bell housing but the v6 auto TQ.
the initial fit was good, but it was way to far forward, and had to keep held up over the large front diff. The air inlet for the diff is on top so that took another 2" off my room.
In order to solve the pan problem guys in the past have made an oil pan and pickup, well i am not that good and don't want the tube to leak and fail. so i looked at what you 7m guys do. Since this motor came from a Soarer (a jdm sc300), it had a mid sump, so i went onto Supraforums and found one of the many guys out there who bought a Aristo (gs300) 2jz for their supra, they need what i have and i needed what they have. So i even swapped a guy the upper and lower pan, pickup, windam plate, float sensor, and return tube, you and just swap the 2 oil hoses.
Next issue, the clearance in the front. I want this to look factory and keep the plastic grill. So, how to move it back. Again some guys have fabbed everything, in order to keep as many replaceable cheap parts, i went with this plan. Swap out parts from a 90 22re pickup. The trans cross member on the v6 is curved and the I4 is straight, also the front shaft is longer and the back shorter. So, with 50$ and 30 min in a junkyard you have another factory bolt up to slide it all back a few inches to give room for a radiator up front with some clearance and pusher fans in the front. Note: i did tap in the firewall 1/2" to 1" in a 2" wide spot where turbo #2 pipe hit.
Last edited by SupraRunner; Feb 20, 2010 at 06:04 PM.
Feb 18, 2010 | 10:18 PM
#2
Thread Starter
Registered User
Joined: Mar 2009
Posts: 44
Likes: 0
From: Georgia
So here is more from sliding it all back. here is a before and after of the a/c compressor side.
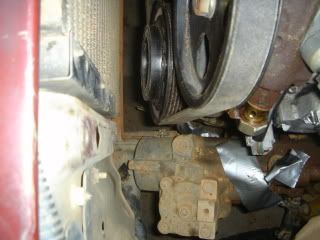

This is where i had to work the fire wall a little, and the room in the rear. It works well that the v6 and i6 have similar heater core lines position and function. The difference is that one uses a cable and the other a vacuum line to control valve.

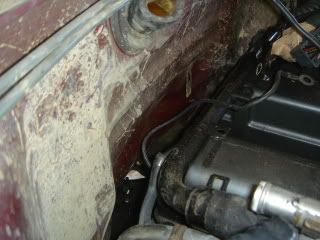
The engine sits very low when you have a 3" body lift. After putting the engine in and out a few times fighting over the upper radiator support, i finally just cut it out after i broke the timing gear cover against the lift because of the steep angle to get it into the hole with the transmission on it.
This is where i had to work the fire wall a little, and the room in the rear. It works well that the v6 and i6 have similar heater core lines position and function. The difference is that one uses a cable and the other a vacuum line to control valve.
The engine sits very low when you have a 3" body lift. After putting the engine in and out a few times fighting over the upper radiator support, i finally just cut it out after i broke the timing gear cover against the lift because of the steep angle to get it into the hole with the transmission on it.
Last edited by SupraRunner; Feb 20, 2010 at 06:06 PM.
Feb 19, 2010 | 01:06 PM
#4
Registered User
Joined: Jan 2005
Posts: 84
Likes: 0
From: columbia south carolina
What part of georgia are you in? We are almost done with a 1jz swap now. we are doing a 5speed swap though. Picked up a supra swap with the R154 and the transfer case just takes the place of the rear tail housing. Real easy stuff. After we are done with it we will be putting a 2JZ-GTE into my 4runner. Im going to stick with the supra ( well Aristo) automatic transmission with a Inchworm pre runner adapter so that I can run a gear driven case. I have done tons of 1jz and 2jz swaps in sc300's and gs300's and I figured it was about time to do a truck. The 1j fits pretty good, but we just made a custom cross member for it. I dont have a build thread on the 1j, but will be doing one for my 4runner. The 4runner is going to be a trail rig though.
Feb 19, 2010 | 07:46 PM
#5
Thread Starter
Registered User
Joined: Mar 2009
Posts: 44
Likes: 0
From: Georgia
Columbus - boomyanker
the output shaft from the 154 worked? Here is the problem i ran into>
So we all know the v6 auto had that stupid hydrolic transfer case that can not be separated, so since i had the two wheel drive a3040le auto from the soarer donor car, i just needed a seperate transfer case. So i did some reserch and found that i needed a I4's af340e, so i found a guy in tenn. with what i wanted and drove up and picked it up. It was dark and raining so i did not notice until got home that it was a 3080. Never herd of such, well so it turned out it has a non-divorceable t-case, and was actually used in isuzu aplications at the same time frame. So i tore it apart anyway and at least learned something about transmissions from my 200$ mistake. So then i found a guy on here near montgomery with what i was looking for. He also hooked me up with his interior shifter cover. This will allow me to keep a stock apearence. The shifter bolts up fine but instead of that t-case shifter there is now a nice manual shifter for the top mounted chain driven t-case.
There is a little difference in the two transmission though. One speed sensor was the magnet pass over and the other was gear driven, cant swap because the output shaft actually had the magnetic pickup on it. Oh, and the output shaft was the wrong length when you pull the tail house cover off. So... you need to rebuild the trans with the output shaft from the 4x4. Then you can bolt it on, you need to lengthen the speed sensor wire to use the pickup in the t-case. This was all working well and god until i put it in the truck. As it turns out this new manual t-case made the transmission about 2 inches longer and that made the motor cut into the available space that was in the front for the radiator to go into. So... now all that nice bolt up work that i did by swapping the cross member and the two drive shafts to push it back to give me the room now had me back at square one.
So the solution i went with was, lets make a cross member out of the two that i have that will slide it back 2" again. It was now that i decided since i was gonna make motor mounts too i should raise the drive train up too. By raising the drive line a am able to give me more room under the truck for better clearence, since the t-case is a major clearance issue
Feb 20, 2010 | 06:54 AM
#7
Thread Starter
Registered User
Joined: Mar 2009
Posts: 44
Likes: 0
From: Georgia
I was having transmission trouble to begin with, i had it rebuilt and was still giving me a lot of grief. It was half of the reason for the swap. But yes, that would have made everything a bolt up and use the parts from the truck without making a cross member. The thing is that i wanted to use the stronger transmission that came on the jz in the soarer, so i used it with the output shaft from the I4 pickup 4x4 trans, then put on the transfer case to that.
Trending Topics
Feb 20, 2010 | 01:57 PM
#8
Thread Starter
Registered User
Joined: Mar 2009
Posts: 44
Likes: 0
From: Georgia
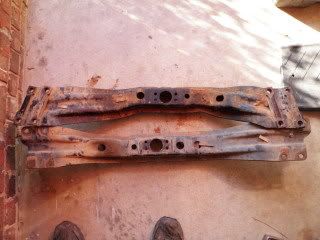
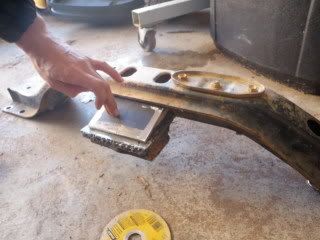
So my plan to shift it back was to cut the center part of the cross member out and mount it to 1/4 steel plate. The plate would be bolted to both and reinforced by boxing it in.
My bumper doubles as my work bench

Now please don't be to hard on me, this is my first welding job. Whats the point of these things if we don't try, and then learn as we go. It's all part of the experience.
Example: I learned that a trash can may hold your welding work great... until you set it on fire...
So i boxed it in, lets hope a full boxed support of 1/4" steel will do.
Then i sprayed everything down with bed liner.
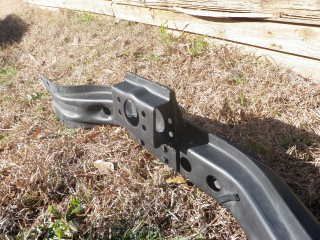
So here is the final product, with everything in. I keep my same transmission mount and it is all bolted and welded. Now i am playing more with welding and getting better, so i will pull it out and do a better job before we are all done
My bumper doubles as my work bench
Now please don't be to hard on me, this is my first welding job. Whats the point of these things if we don't try, and then learn as we go. It's all part of the experience.
Example: I learned that a trash can may hold your welding work great... until you set it on fire...
So i boxed it in, lets hope a full boxed support of 1/4" steel will do.
Then i sprayed everything down with bed liner.
So here is the final product, with everything in. I keep my same transmission mount and it is all bolted and welded. Now i am playing more with welding and getting better, so i will pull it out and do a better job before we are all done
Feb 20, 2010 | 06:02 PM
#9
Thread Starter
Registered User
Joined: Mar 2009
Posts: 44
Likes: 0
From: Georgia
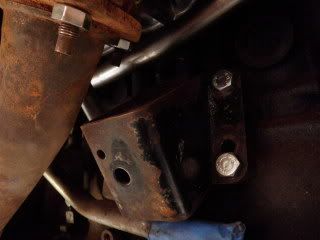
So the next part of the project was motor mounts. I tried a few different options. The first was a bracket that would bolt on the top of the factory v6 motor mount and hold the bottom of factory jz mounts. Sort of a V opened to 135 degree angle. But i did not like that option because it put the full weight being held by the welds. I wanted a way to use a factory option. I tried a set of 7m motor mounts and pulled mine off of my old 6mge. The best thing i came up with was to modify the 7m ones (drill two holes), then combined them with the factory ones from the V6. ( i ground off the alignment pin and inverted the V6 mounts and welded the lower part of them to the upper part of the 7m ones) This was done so that all the weight pushing down is outward at angle and no welds are load bearing, the only stress on the welds would be forward or rear stabilization. I know there are better options but for the novice working in his backyard, hey it works.

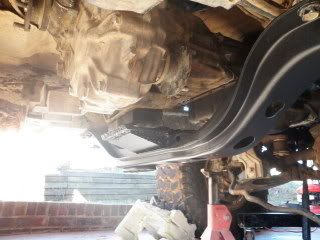
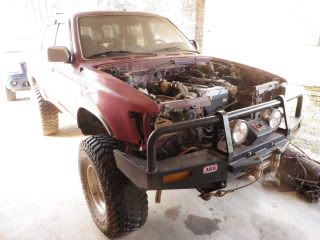
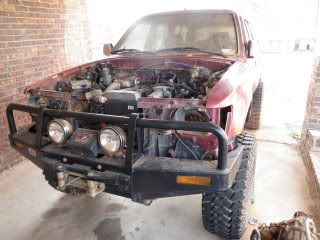
And so we finally reach that grand point when we remove the lifts and stands and we see the motor sitting in its new home.
And so we finally reach that grand point when we remove the lifts and stands and we see the motor sitting in its new home.
Feb 23, 2010 | 11:46 AM
#11
Thread Starter
Registered User
Joined: Mar 2009
Posts: 44
Likes: 0
From: Georgia
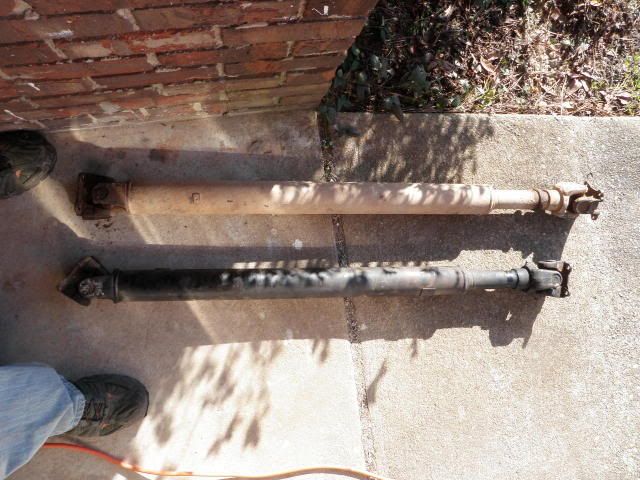
Ok, i have made the picture size bigger, i was concerned about load time, but wise trying to put a bunch of pictures. Well so i slid the transmission back, now my the drive shaft i pulled from the pickup is a little long. So now i needed to shorten it up just a little, but i still wanted it to have a little flex. I decided in order to keep things balanced right, i pulled it apart and cut an inch off of the outer sheath
Then i cut 1" off of the spline itself. You have to clean out the groves and taper the edges two.
Then i cut 1" off of the yoke. Again the groves have to be cleaned. You got to love my workbench tailgate. And a piece of metal held down by a battery for your vise.
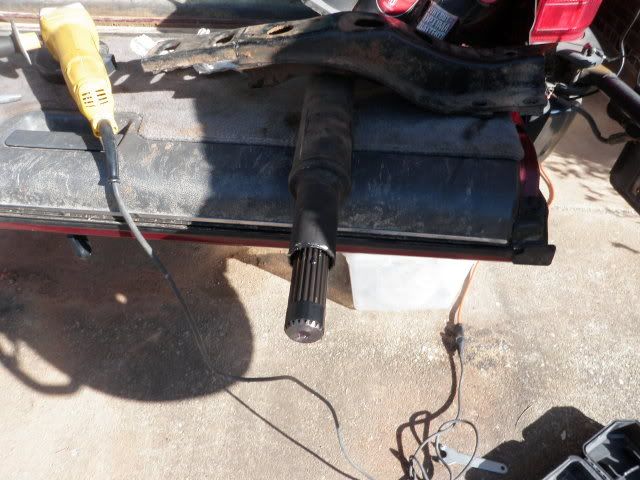
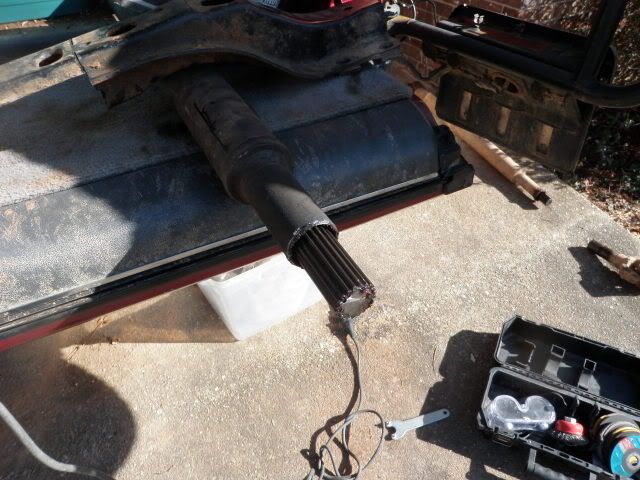
So here you can see a comparison. The muddy one is my stock v6 drive shaft, the black is from a stock I4.
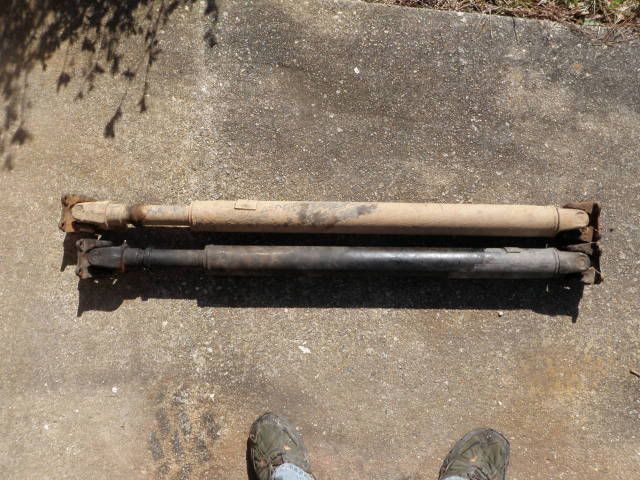
This picture shows my shortened one next the the stock V6.
Then i cut 1" off of the spline itself. You have to clean out the groves and taper the edges two.
Then i cut 1" off of the yoke. Again the groves have to be cleaned. You got to love my workbench tailgate. And a piece of metal held down by a battery for your vise.
So here you can see a comparison. The muddy one is my stock v6 drive shaft, the black is from a stock I4.
This picture shows my shortened one next the the stock V6.
Feb 23, 2010 | 11:52 AM
#12
Thread Starter
Registered User
Joined: Mar 2009
Posts: 44
Likes: 0
From: Georgia
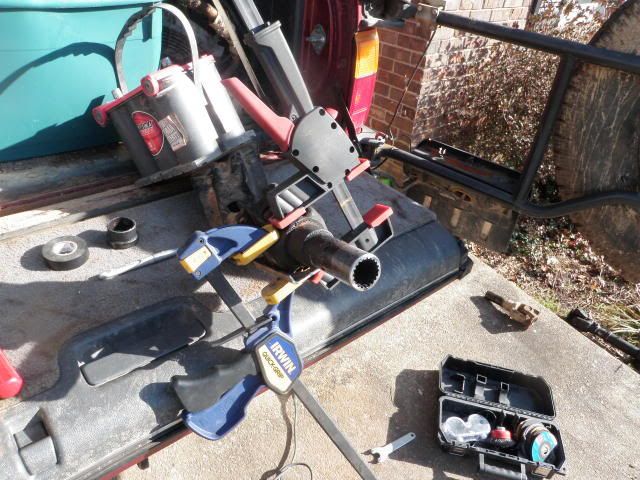
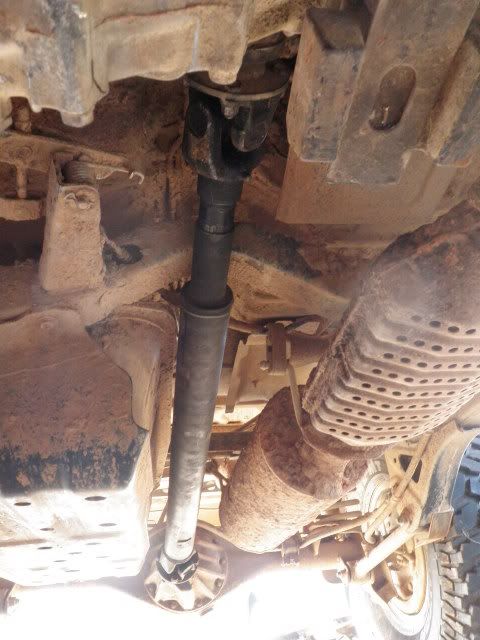
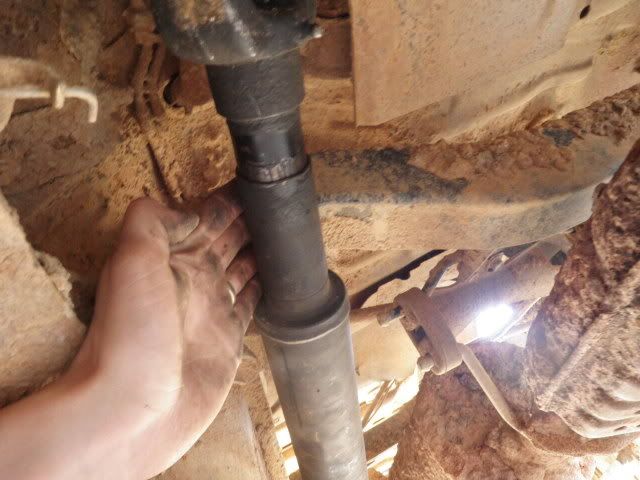
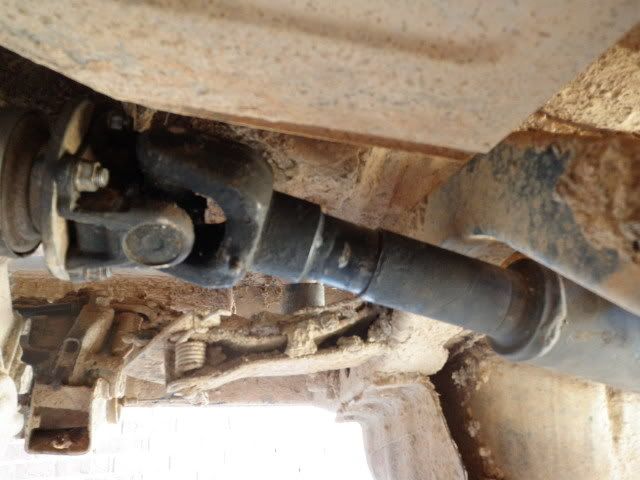
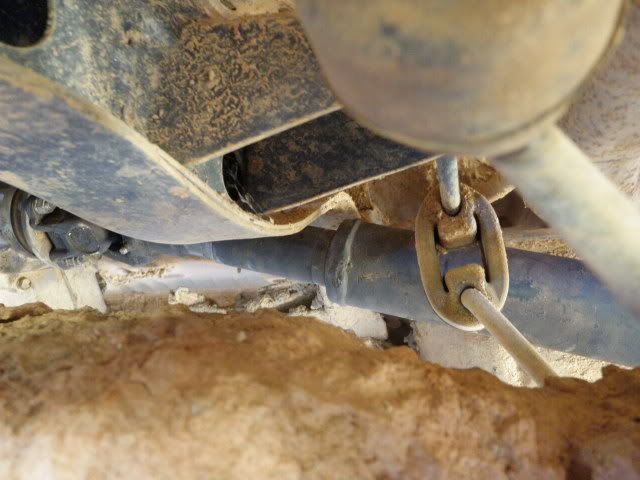
This is the final product installed and all bolted in. This was my first opportunity to see just how bad the bend at the u joint will be. When i did the drive line raise i left out one important measurement. There is a curved cross member just forward of the fuel tank. It was only by chance that it barely cleared my drive shaft.
Feb 23, 2010 | 12:07 PM
#13
Thread Starter
Registered User
Joined: Mar 2009
Posts: 44
Likes: 0
From: Georgia
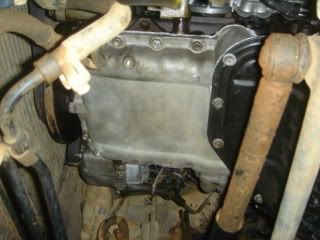
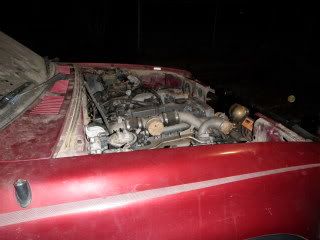
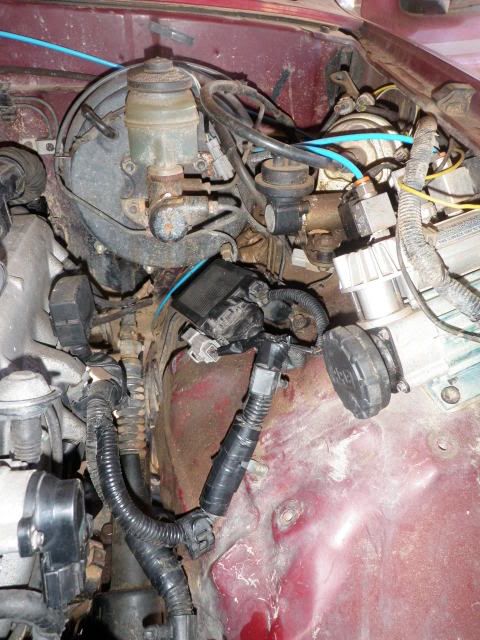
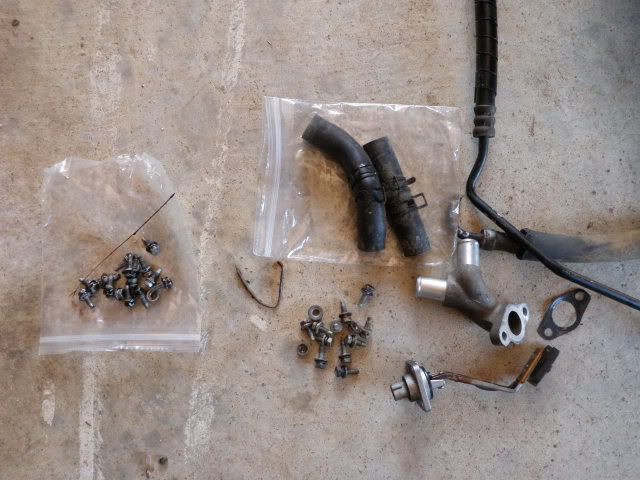
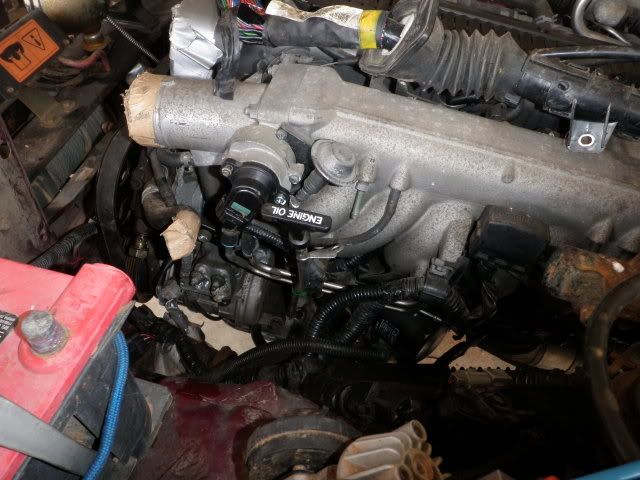
Well unfortunately i am about caught up with back dating this build. I just don't get to work on my truck very much, so updates now will be further apart. This is the work i did last week. I got the ignitor installed on the firewall. Then i had to extend the harness for the oil float sensor, and secure it. Finally i put the oil pick up tube, plate, and return line. It was at this point i realized when i swapped pans i forgot to swap the dip stick, so i just secured it to the intake manifold.

Feb 23, 2010 | 01:28 PM
#14
Registered User
Joined: Jan 2005
Posts: 84
Likes: 0
From: columbia south carolina
In your case with your transmission problems i would have done what I'm going to do. I'm glad you got it figured all out but it would have been easier to buy inchworms pre-runner adapter, and bolt it to the back of the stock 1JZ auto trans, then put a gear driven case on to that. Now the cost for that isn't the best but it would have worked. As for bolting up to that stock xmember I'm not sure. I am Planning on making my own xmember so I'm not to worried about all that.
Feb 23, 2010 | 03:45 PM
#16
Thread Starter
Registered User
Joined: Mar 2009
Posts: 44
Likes: 0
From: Georgia
My big thing in this is cost, i bought the motor a while back and i had a little money. I know these things to be done right will cost money, but right now i am working on a very small budget, so i am all about making thing work with what i have rather than buying.
My budget after the original clip now so far has been:
-200 for wrong trans
-160 for right one (good transfer case/ bad trans) and drive shafts and interior
-65 cross member and mounts
-?40? angle grinder disks and welding rods, some metal,
-110 Ebay - turbo timer, boost and air/fuel gauge, pillar pod
-55 3/16" x 8' line and compression fittings, wiring kit
+900 sold old 3vz
= 270 left
There are alot of other things i am sure i have forgot about, and them many more that i had around already, but would still have to be figured into the cost. These would be things like my electric fans, and intercooler, and lots more.
Feb 23, 2010 | 06:18 PM
#19
Thread Starter
Registered User
Joined: Mar 2009
Posts: 44
Likes: 0
From: Georgia
because all of the 2jz's that are only a few hundred more are jdm airisto motors, the usdm supra 2jz motors fully equipped run close to twice as much. This motor was bought to go into a sc300 (that had no motor in it), and the aristo is so much harder to deal with, it's wiring, the mounts are different, oil pans are different, and exhaust is different, I purchased a front clip from the soarer to just do a direct drop in swap. A year later I finally, due to life and family needs, had to chose between my projects. I have more long term use and practicality out of my truck. So i took the motor i had and ran with it. Of course at this time now all of the reasons for going 1j are irrelevant... but... that is hind sight, and that was the motor i had to work with.
Last edited by SupraRunner; Feb 23, 2010 at 06:20 PM.
Feb 24, 2010 | 12:27 PM
#20
Registered User
Joined: Jan 2005
Posts: 84
Likes: 0
From: columbia south carolina
Why do you think the Aristo wiring will be harder? They are basically the same. (Soarer & Aristo). But I do totally understand why you are doing the 1JZ. I have a couple of both motors around, so that's why I'm picking the 2JZ. It has a couple of advantages that go with it too. Our cars that we have swapped make really good power with very few mods. I'll swap out the ceramic turbos for USDM units so that I'll be able to run 18lbs of boost safely. exhaust and good intercooler and you will but down 380 to 390 RWHP through the stock automatic transmission. Then you do a couple more small things like cams, and your well over 400 to the wheels.


