
5VZ Supercharger Bypass Valve Adjustment
 Aug 24, 2010 | 05:52 PM
#1
Thread Starter
Registered User
Joined: Jan 2009
Posts: 453
Likes: 4
From: NJ - 5 miles from NYC
5VZ Supercharger Bypass Valve Adjustment
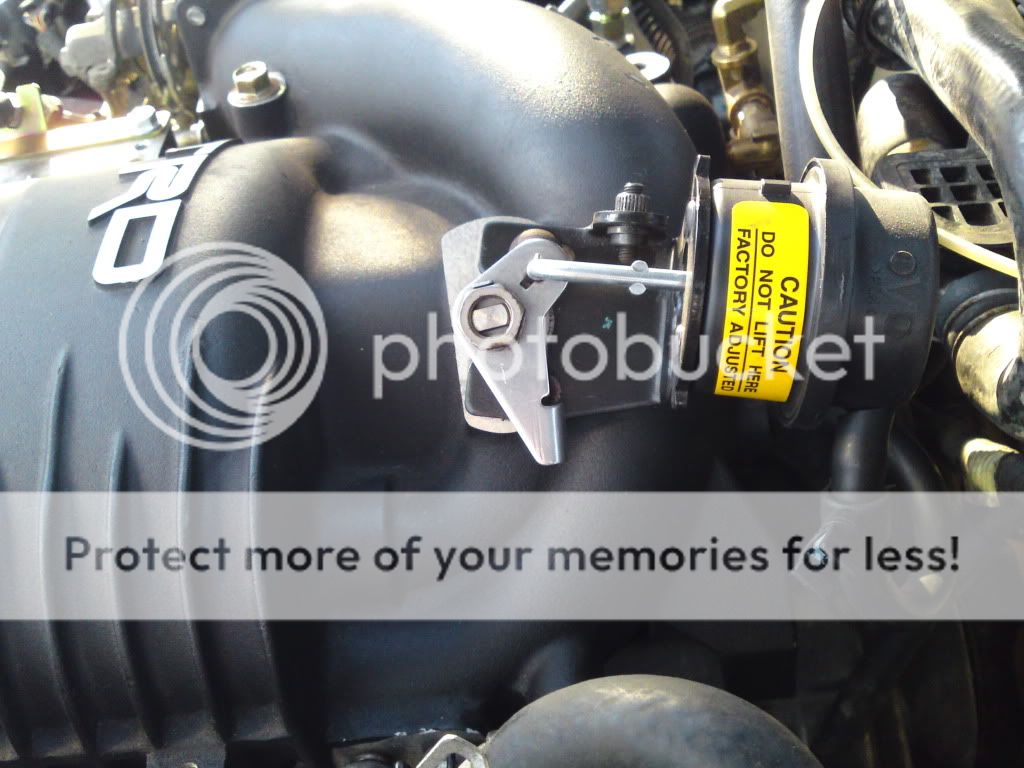
I'm getting close to getting my S/C 3.4 swap going and I noticed that the bypass valve on the S/C doesn't seem to be adjusted right. The valve when at rest doesn't touch the stop screw. It was purchased second hand so I have no "brand-new" reference. I would assume that the stop linkage should touch the stop screw at some point?
Here is a picture of the valve as it sits with engine off. This is the way it was delivered to me when purchased. Does anyone have a pict of theirs for comparison?
It looks like I could loosen the two bracket bolts and slide the entire valve in to "tighten" up the valve.
Any ideas?
Here is a picture of the valve as it sits with engine off. This is the way it was delivered to me when purchased. Does anyone have a pict of theirs for comparison?
It looks like I could loosen the two bracket bolts and slide the entire valve in to "tighten" up the valve.
Any ideas?
Aug 24, 2010 | 06:53 PM
#3
Thread Starter
Registered User
Joined: Jan 2009
Posts: 453
Likes: 4
From: NJ - 5 miles from NYC
Aug 25, 2010 | 09:40 AM
#4
mine still looks brand spankin' new, I will try and remember to take a photo of mine when I get home tonight. I know TRD makes a big point of telling us not to mess with that as it is 'pre-set' from the factory but being secondhand, who knows? I don't think you would cause any damage if you started it and see what it does. What are you using for fuel/timing control if any?
Aug 25, 2010 | 10:34 AM
#5
Thread Starter
Registered User
Joined: Jan 2009
Posts: 453
Likes: 4
From: NJ - 5 miles from NYC
mine still looks brand spankin' new, I will try and remember to take a photo of mine when I get home tonight. I know TRD makes a big point of telling us not to mess with that as it is 'pre-set' from the factory but being secondhand, who knows? I don't think you would cause any damage if you started it and see what it does. What are you using for fuel/timing control if any?
I am using the URD FTC1 w/7th injector through the EGR port for additional fueling.
 Aug 25, 2010 | 03:34 PM
#7
Thread Starter
Registered User
Joined: Jan 2009
Posts: 453
Likes: 4
From: NJ - 5 miles from NYC
I feel Ya.
Plus, the reason I went with the URD kit is two-fold. First it is designed specifically for the motor with the S/C and comes with a startup fuel/timing map, and Secondly Gadgets customer service is apparently fantastic and I can vouch for that second one so far. He was nice enough to ship the kit in pieces to me to keep my project rolling along while I waited for the control unit itself, at no addition cost.
I'll let you know how it comes out. It should be on the dyno within the next few weeks if my header bolts ever show up.

Trending Topics
 Aug 25, 2010 | 06:38 PM
#9
Thread Starter
Registered User
Joined: Jan 2009
Posts: 453
Likes: 4
From: NJ - 5 miles from NYC
Thanks
You rock Vital, thanks for coming through with those!
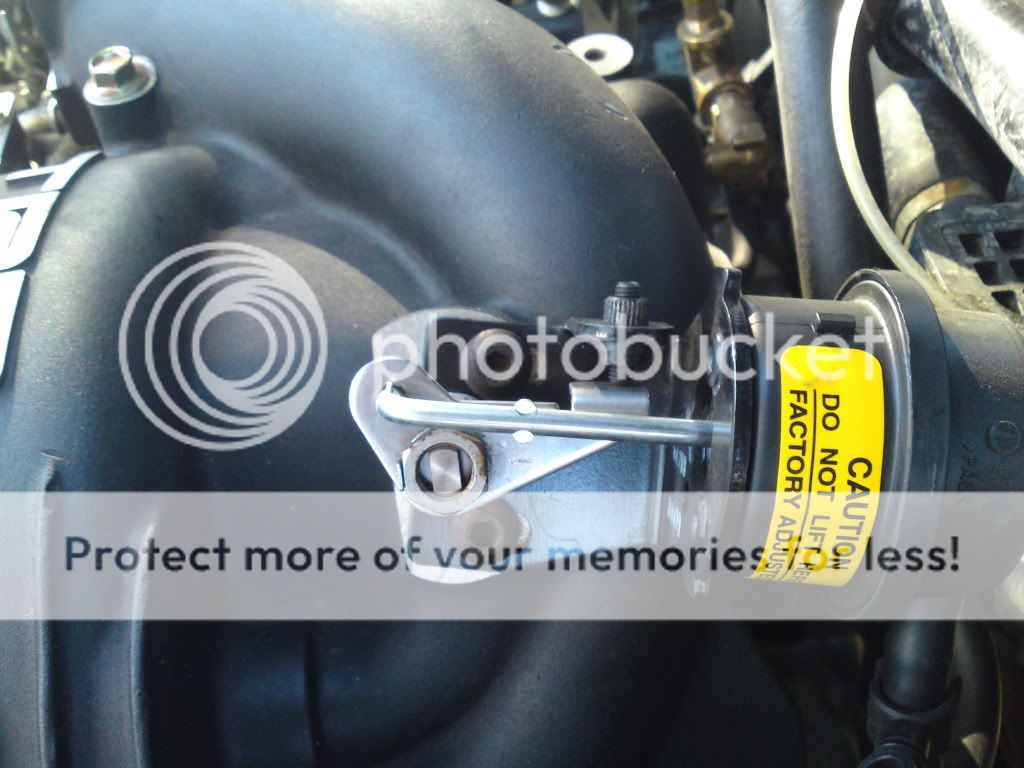
It looks like mine is adjusted in the same fashion as yours in relation to the two allen head bolts that hold the valve to the S/C housing and the relative position of the adjusting screw, etc. But for some reason when mine returns to "rest" position, the tongue on the lever that is suppossed to touch down on the stop screw is a good 1/4" away. If I try to gently push the lever towards the set screw to make it touch down it will not budge. I can only conclude that the actual valve itself internally is getting hung up and not allowing for complete closure.
I don't know what this might do to runability, but I guess I am going to find out.
Thanks again.
Aug 25, 2010 | 06:43 PM
#10
spray the adjuster with wd40, things are pretty rusty looking. Does the sc spin freely? Maybe something is caught in the valve?
Also mine looks like the valve with braket is clocked a little more clockwise than yours. Compare the gaps of the two upper mounting bolts.
Also mine looks like the valve with braket is clocked a little more clockwise than yours. Compare the gaps of the two upper mounting bolts.
Last edited by vital22re; Aug 25, 2010 at 06:46 PM.
Aug 25, 2010 | 06:56 PM
#11
Thread Starter
Registered User
Joined: Jan 2009
Posts: 453
Likes: 4
From: NJ - 5 miles from NYC
The adjuster can move freely if I want it to with the allen stop screw. I did a oil change on it on the bench before putting it on. The nose bearings were all good and the main rotor bearing felt fine as well, so I didn't go any deeper. There is a little surface rust, but it is all superficial as far as I can tell.
What sucks is I think the only way to inspect/clean/replace the valve is to pull it back off and pull the whole thing apart.
The story I was told about the supercharger is that it was pulled off a truck at 70k because of lease and was being turned back in. Then it was purchased by the fellow I bought if from where it sat for 3-4 years unused and then sold to me. It was stored in the original box in the plastic with every part on the parts list except the decals, emblems etc.
From the attention to detail of the person who packed it up leads me to believe that they genuinely had every intention of using it, or having it used again.
Aug 30, 2010 | 06:03 PM
#12
a little late but here's mine for an additional reference;
off, cold start idle
went camping this weekend in the runner, can't wait to get a 3.4 in it w/ a SC.... 3vz did the job with a fully loaded runner but ya know....
off, cold start idle
went camping this weekend in the runner, can't wait to get a 3.4 in it w/ a SC.... 3vz did the job with a fully loaded runner but ya know....
Sep 6, 2010 | 04:27 PM
#15
Thread Starter
Registered User
Joined: Jan 2009
Posts: 453
Likes: 4
From: NJ - 5 miles from NYC
Seems to be working despite the misadjustment. Once I had the motor running is seems to perform similarly to everyones pictures.
I have just one last question for anyone that might know. I have to run without a boost gauge for a week or so till my gauges show up. Is there a possibility of this valve being misadjusted creating an overboost situation? It is my understanding that the S/C with the stock pulley will only make whatever the standard boost is, unless the pulley is changed to a smaller one to spin it faster therefore creating more boost.
I just don't want to overboost the motor in the interum that I am waiting for a gauge. If this is even possible?

Thread
Thread Starter
Forum
Replies
Last Post
Blamalam
86-95 Trucks & 4Runners
22
Mar 12, 2022 07:34 AM
the1998sr5
95.5-2004 Tacomas & 96-2002 4Runners
15
Jul 14, 2020 08:35 PM
anniesball
95.5-2004 Tacomas & 96-2002 4Runners
0
Jul 29, 2015 11:46 AM
34, 5vz, actuator, adjust, alcohol, bypass, check, conversion, part, supercharger, tacoma, trd, vacuum, valve, whathappens


