

Crankshaft Pulley Bolt Stripped
 Jan 17, 2013 | 06:41 PM
#1
Thread Starter
Registered User
Joined: Mar 2012
Posts: 17
Likes: 1
From: Denver
Crankshaft Pulley Bolt Stripped
Rounded Crankshaft Pulley Bolt is OUT - See post with pictures below
--------------------------------------------------------------------------------
Changing water pump & timing belt on a 1999 4Runner, found that the crankshaft pulley bolt head is stripped...not completely but it looks bad. Socket fits on fairly tight, but before I put 200ft-lb+ of torque on it, wanted to see if anyone has run into this or check for ideas? I'm thinking about trying to put a weld or 2 between the socket and pulley washer before I try it?
Any ideas or suggestions would be appreciated.
Thanks.
Last edited by Yotawitz; Jan 21, 2013 at 06:50 AM. Reason: Problem Solved & title misleading
Jan 17, 2013 | 06:49 PM
#2
Registered User
Joined: Nov 2008
Posts: 2,306
Likes: 8
From: Cheyenne, Wyoming
The bolt flange is big and has a lot of spring pressure on the crank. I had one that was so tight a 600 ft/lb impact fell short. I had to end up taking a cut off wheel on a rotory tool and cut slits into the flange portion of the bolt. I think I put 4 slits coming off of each cornor. This releaved the spring tension on the face of the bolt and it cam right off with a 1/2 socket. The trick is not to nik the pulley in any way or it will throw your balance off.
Welding a bigger nut on the striped one is not a bad idea either...if it's that far gone. Get some good welds on there because that is a lot of torque to be prying on.
Either way your going to need a new bolt, so maybe a combination of the two will work.
Welding a bigger nut on the striped one is not a bad idea either...if it's that far gone. Get some good welds on there because that is a lot of torque to be prying on.
Either way your going to need a new bolt, so maybe a combination of the two will work.
Jan 18, 2013 | 05:14 PM
#4
Thread Starter
Registered User
Joined: Mar 2012
Posts: 17
Likes: 1
From: Denver
 Jan 19, 2013 | 12:14 AM
#5
Registered User
iTrader: (1)
Joined: Apr 2009
Posts: 13,381
Likes: 100
From: I live in New Tripoli Pa out in the woods
I would guess you mean the bolt head is rounded off?
Irwin makes these great sockets for removing rounded bolts only 3/8" drive but I have put on 3/8" to 1/2" adapters and gotten things broke loose.:jessica:
Irwin makes these great sockets for removing rounded bolts only 3/8" drive but I have put on 3/8" to 1/2" adapters and gotten things broke loose.:jessica:
Jan 19, 2013 | 05:16 AM
#7
Thread Starter
Registered User
Joined: Mar 2012
Posts: 17
Likes: 1
From: Denver
I'm thinking I may try a holesaw to cut the flange tension...just a little nervous about cutting into the pulley/balancer.
Thx for the suggestion
Trending Topics
Jan 19, 2013 | 05:19 AM
#8
Thread Starter
Registered User
Joined: Mar 2012
Posts: 17
Likes: 1
From: Denver
Thx
Jan 21, 2013 | 06:44 AM
#9
Thread Starter
Registered User
Joined: Mar 2012
Posts: 17
Likes: 1
From: Denver
Rounded Crankshaft Pulley Bolt is OUT
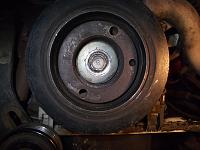
This is an alternate method for removing a rounded, stuck crankshaft pulley bolt in a 1999 4Runner with a 5VZ-FE. The engine is in the car. The radiator is out, but the AC condenser is in.
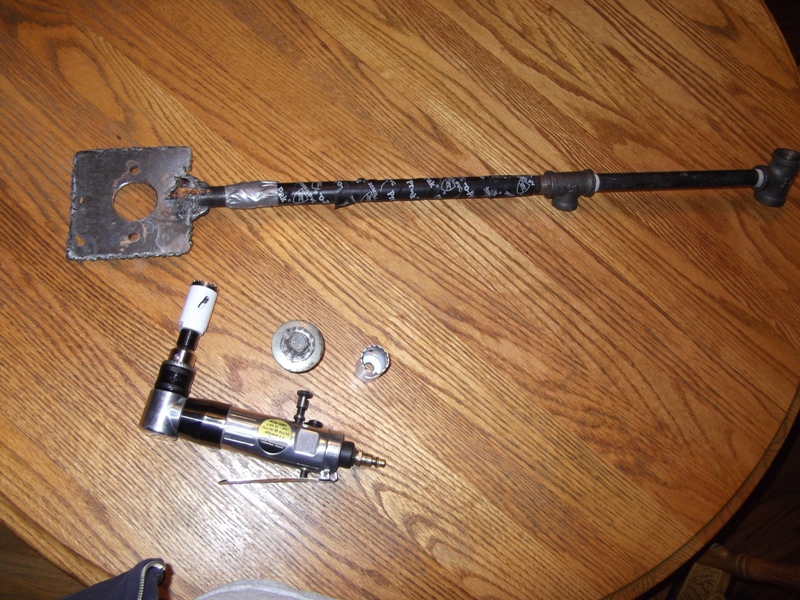
Found the 19mm crankshaft pulley bolt head mostly rounded. Built a pulley holding tool & tried it, but the 19mm socket spun & rounded the bolt head more. As snobdds recommended above, needed to relieve the bolt flange spring tension.
On the 5VZ-FE you have an access of about 2" diameter to the recessed bolt and flange. I tried a rotary tool with cut off tool but was having difficulty and knew I was probably going to trash the pulley/balancer with this method.
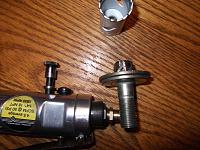
Decided to use a 1-1/8" hole saw without a pilot bit. You could probably use a pilot bit, but I didn't want to risk damaging the bolt & the 1-1/8"hole saw fits nicely around the 19mm bolt head. Once you get the initial groove started it stays pretty much in place.
Had to use a 3/8" pneumatic drill because of the limited space. It's a pretty slow process. Used 2 hole saws and some drill bits. When the holesaw would seem to stop cutting effectively, I'd take a drill bit & drill some holes in the groove.
When the groove was somewhere between 1/16 - 1/8" I decided to try a 3/8" drive impact grade damaged bolt remover. Heated up the bolt head with a blow torch & pounded the socket on. Broke a ratchet using a cheater bar and then broke a 3/8" to 1/2" converter. Took off the socket and used the holesaws & drill bits to make the cut deeper. The bolt really has a 2 part flange (see photo) for a total of about 1/4".
Was nervous about the rounded bolt head, so went almost all the way through the flange. The bolt came out pretty easy with a 1/2" drive socket and impact wrench. Below are some photos.

Found the 19mm crankshaft pulley bolt head mostly rounded. Built a pulley holding tool & tried it, but the 19mm socket spun & rounded the bolt head more. As snobdds recommended above, needed to relieve the bolt flange spring tension.
On the 5VZ-FE you have an access of about 2" diameter to the recessed bolt and flange. I tried a rotary tool with cut off tool but was having difficulty and knew I was probably going to trash the pulley/balancer with this method.
Decided to use a 1-1/8" hole saw without a pilot bit. You could probably use a pilot bit, but I didn't want to risk damaging the bolt & the 1-1/8"hole saw fits nicely around the 19mm bolt head. Once you get the initial groove started it stays pretty much in place.
Had to use a 3/8" pneumatic drill because of the limited space. It's a pretty slow process. Used 2 hole saws and some drill bits. When the holesaw would seem to stop cutting effectively, I'd take a drill bit & drill some holes in the groove.
When the groove was somewhere between 1/16 - 1/8" I decided to try a 3/8" drive impact grade damaged bolt remover. Heated up the bolt head with a blow torch & pounded the socket on. Broke a ratchet using a cheater bar and then broke a 3/8" to 1/2" converter. Took off the socket and used the holesaws & drill bits to make the cut deeper. The bolt really has a 2 part flange (see photo) for a total of about 1/4".
Was nervous about the rounded bolt head, so went almost all the way through the flange. The bolt came out pretty easy with a 1/2" drive socket and impact wrench. Below are some photos.


Last edited by Yotawitz; Jan 21, 2013 at 03:30 PM.
 Jun 12, 2016 | 05:32 AM
#11


Anybody ever try the dull chisel and 3 pound hammer method? I have had 100% success on every other stubborn bolt with a large flange washer surface but never had the opportunity to try the crank bolt.
Sep 3, 2020 | 02:00 AM
#12

Registered User
Joined: May 2020
Posts: 4
Likes: 0
From: Guam
This is an alternate method for removing a rounded, stuck crankshaft pulley bolt in a 1999 4Runner with a 5VZ-FE. The engine is in the car. The radiator is out, but the AC condenser is in.
Found the 19mm crankshaft pulley bolt head mostly rounded. Built a pulley holding tool & tried it, but the 19mm socket spun & rounded the bolt head more. As snobdds recommended above, needed to relieve the bolt flange spring tension.
On the 5VZ-FE you have an access of about 2" diameter to the recessed bolt and flange. I tried a rotary tool with cut off tool but was having difficulty and knew I was probably going to trash the pulley/balancer with this method.
Decided to use a 1-1/8" hole saw without a pilot bit. You could probably use a pilot bit, but I didn't want to risk damaging the bolt & the 1-1/8"hole saw fits nicely around the 19mm bolt head. Once you get the initial groove started it stays pretty much in place.
Had to use a 3/8" pneumatic drill because of the limited space. It's a pretty slow process. Used 2 hole saws and some drill bits. When the holesaw would seem to stop cutting effectively, I'd take a drill bit & drill some holes in the groove.
When the groove was somewhere between 1/16 - 1/8" I decided to try a 3/8" drive impact grade damaged bolt remover. Heated up the bolt head with a blow torch & pounded the socket on. Broke a ratchet using a cheater bar and then broke a 3/8" to 1/2" converter. Took off the socket and used the holesaws & drill bits to make the cut deeper. The bolt really has a 2 part flange (see photo) for a total of about 1/4".
Was nervous about the rounded bolt head, so went almost all the way through the flange. The bolt came out pretty easy with a 1/2" drive socket and impact wrench. Below are some photos.
Attachment 90451
Attachment 90452
Attachment 90453
Sep 3, 2020 | 07:25 AM
#13
Thread Starter
Registered User
Joined: Mar 2012
Posts: 17
Likes: 1
From: Denver
Sep 5, 2020 | 07:25 AM
#14
Registered User
Joined: May 2020
Posts: 4
Likes: 0
From: Guam
yes thank you and without you I wouldn�t have had the balls to even attempt. But you�re living proo it may work so why not try anyway. I�ve used the 11/8 you recommended and it�s going through but how will I know if I�ve released pressure against the pulley ? How much Deeper do I need to go? And yeah I was getting a lot of head shakes when I brought this idea up so this has got to work I tried everything 🤦🏻♂️
Sep 7, 2020 | 08:27 AM
#15
Thread Starter
Registered User
Joined: Mar 2012
Posts: 17
Likes: 1
From: Denver
UncleT, because it was a few years ago, about the best information I can give you is from the original post. My main goal was to get it off without damaging the balancer & it worked well for me. This is a couple days after your post so hopefully it worked for you. If you're still working on it, I'd just suggest to go slow and try not to get frustrated, if you get over a 1/4"-3/8" deep on the groove, I'd find the Specifications on the flange to see see how deep you can go. You're not going to reuse it anyway. You'll probably have to use damaged bolt remover socket with impact as indicated below unless you try to weld something on the bolt, but for me once the pressure was relieved it came off pretty easy from what I remember. Good luck!
Had to use a 3/8" pneumatic drill because of the limited space. It's a pretty slow process. Used 2 hole saws and some drill bits. When the holesaw would seem to stop cutting effectively, I'd take a drill bit & drill some holes in the groove.
When the groove was somewhere between 1/16 - 1/8" I decided to try a 3/8" drive impact grade damaged bolt remover. Heated up the bolt head with a blow torch & pounded the socket on. Broke a ratchet using a cheater bar and then broke a 3/8" to 1/2" converter. Took off the socket and used the holesaws & drill bits to make the cut deeper. The bolt really has a 2 part flange (see photo) for a total of about 1/4".
Was nervous about the rounded bolt head, so went almost all the way through the flange. The bolt came out pretty easy with a 1/2" drive socket and impact wrench. Below are some photos.
Sep 7, 2020 | 08:28 AM
#16
Thread Starter
Registered User
Joined: Mar 2012
Posts: 17
Likes: 1
From: Denver
UncleT, because it was a few years ago, about the best information I can give you is from the original post. My main goal was to get it off without damaging the balancer & it worked well for me. This is a couple days after your post so hopefully it worked for you. If you're still working on it, I'd just suggest to go slow and try not to get frustrated, if you get over a 1/4"-3/8" deep on the groove, I'd find the Specifications on the flange to see see how deep you can go. You're not going to reuse it anyway. You'll probably have to use damaged bolt remover socket with impact as indicated below unless you try to weld something on the bolt, but for me once the pressure was relieved it came off pretty easy from what I remember. Good luck!
Had to use a 3/8" pneumatic drill because of the limited space. It's a pretty slow process. Used 2 hole saws and some drill bits. When the holesaw would seem to stop cutting effectively, I'd take a drill bit & drill some holes in the groove.
When the groove was somewhere between 1/16 - 1/8" I decided to try a 3/8" drive impact grade damaged bolt remover. Heated up the bolt head with a blow torch & pounded the socket on. Broke a ratchet using a cheater bar and then broke a 3/8" to 1/2" converter. Took off the socket and used the holesaws & drill bits to make the cut deeper. The bolt really has a 2 part flange (see photo) for a total of about 1/4".
Was nervous about the rounded bolt head, so went almost all the way through the flange. The bolt came out pretty easy with a 1/2" drive socket and impact wrench. Below are some photos.
Had to use a 3/8" pneumatic drill because of the limited space. It's a pretty slow process. Used 2 hole saws and some drill bits. When the holesaw would seem to stop cutting effectively, I'd take a drill bit & drill some holes in the groove.
When the groove was somewhere between 1/16 - 1/8" I decided to try a 3/8" drive impact grade damaged bolt remover. Heated up the bolt head with a blow torch & pounded the socket on. Broke a ratchet using a cheater bar and then broke a 3/8" to 1/2" converter. Took off the socket and used the holesaws & drill bits to make the cut deeper. The bolt really has a 2 part flange (see photo) for a total of about 1/4".
Was nervous about the rounded bolt head, so went almost all the way through the flange. The bolt came out pretty easy with a 1/2" drive socket and impact wrench. Below are some photos.
Sep 7, 2020 | 05:29 PM
#17
Registered User
Joined: May 2020
Posts: 4
Likes: 0
From: Guam
UncleT, because it was a few years ago, about the best information I can give you is from the original post. My main goal was to get it off without damaging the balancer & it worked well for me. This is a couple days after your post so hopefully it worked for you. If you're still working on it, I'd just suggest to go slow and try not to get frustrated, if you get over a 1/4"-3/8" deep on the groove, I'd find the Specifications on the flange to see see how deep you can go. You're not going to reuse it anyway. You'll probably have to use damaged bolt remover socket with impact as indicated below unless you try to weld something on the bolt, but for me once the pressure was relieved it came off pretty easy from what I remember. Good luck!
Had to use a 3/8" pneumatic drill because of the limited space. It's a pretty slow process. Used 2 hole saws and some drill bits. When the holesaw would seem to stop cutting effectively, I'd take a drill bit & drill some holes in the groove.
When the groove was somewhere between 1/16 - 1/8" I decided to try a 3/8" drive impact grade damaged bolt remover. Heated up the bolt head with a blow torch & pounded the socket on. Broke a ratchet using a cheater bar and then broke a 3/8" to 1/2" converter. Took off the socket and used the holesaws & drill bits to make the cut deeper. The bolt really has a 2 part flange (see photo) for a total of about 1/4".
Was nervous about the rounded bolt head, so went almost all the way through the flange. The bolt came out pretty easy with a 1/2" drive socket and impact wrench. Below are some photos.
Had to use a 3/8" pneumatic drill because of the limited space. It's a pretty slow process. Used 2 hole saws and some drill bits. When the holesaw would seem to stop cutting effectively, I'd take a drill bit & drill some holes in the groove.
When the groove was somewhere between 1/16 - 1/8" I decided to try a 3/8" drive impact grade damaged bolt remover. Heated up the bolt head with a blow torch & pounded the socket on. Broke a ratchet using a cheater bar and then broke a 3/8" to 1/2" converter. Took off the socket and used the holesaws & drill bits to make the cut deeper. The bolt really has a 2 part flange (see photo) for a total of about 1/4".
Was nervous about the rounded bolt head, so went almost all the way through the flange. The bolt came out pretty easy with a 1/2" drive socket and impact wrench. Below are some photos.

Thread
Thread Starter
Forum
Replies
Last Post
TJWilly
95.5-2004 Tacomas & 96-2002 4Runners
6
Jul 31, 2015 02:05 PM


