
Changing color of gauge cluster
 Sep 29, 2011 | 05:51 PM
#1
Thread Starter
Contributing Member
Joined: Feb 2008
Posts: 12,248
Likes: 33
From: Lake City, Fl
Changing color of gauge cluster
Basically stemming from this here:
http://www.toyotanation.com/forum/sh...d.php?t=180314
All this because it bothers me that the CD player I put in the truck is blue and it doesn't match the rest of the interior at night but I really like the blue color anyway.
I ordered my LED's Tuesday, so it'll be awesome if they come in Friday or Saturday and I can actually do the mod this weekend!
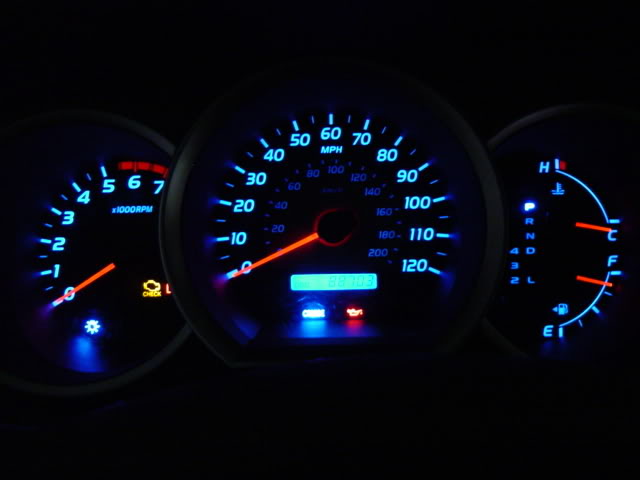
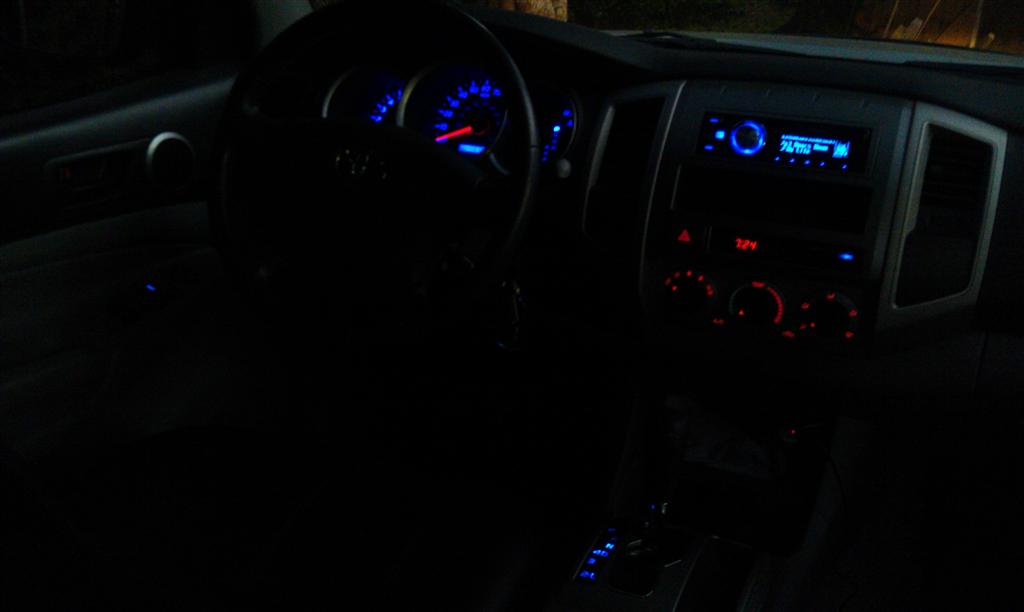
Going to be going this color scheme with a few small changes
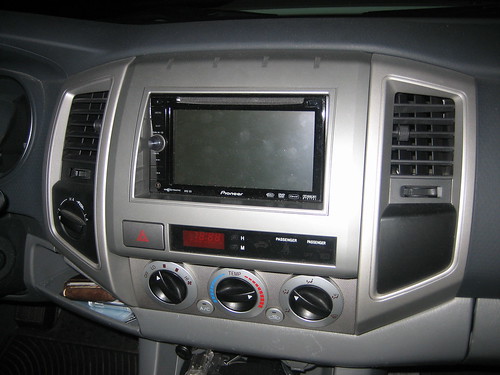
After the cluster is done, I'm going to see what's possible with the clock on the dash and the gear indicator beside the shifter. I already know what I have to do to change the color of the climate controls... not as easy as just changing some LEDs since the color is PRINTED on the dials... so I'm going to get another control assembly to experiment with, but I do have an idea.
Pics to come! Hopefully I don't completely screw it up
http://www.toyotanation.com/forum/sh...d.php?t=180314
All this because it bothers me that the CD player I put in the truck is blue and it doesn't match the rest of the interior at night
but I really like the blue color anyway.I ordered my LED's Tuesday, so it'll be awesome if they come in Friday or Saturday and I can actually do the mod this weekend!
Going to be going this color scheme with a few small changes
After the cluster is done, I'm going to see what's possible with the clock on the dash and the gear indicator beside the shifter. I already know what I have to do to change the color of the climate controls... not as easy as just changing some LEDs since the color is PRINTED on the dials... so I'm going to get another control assembly to experiment with, but I do have an idea.
Pics to come! Hopefully I don't completely screw it up
Oct 1, 2011 | 02:29 PM
#2
Thread Starter
Contributing Member
Joined: Feb 2008
Posts: 12,248
Likes: 33
From: Lake City, Fl
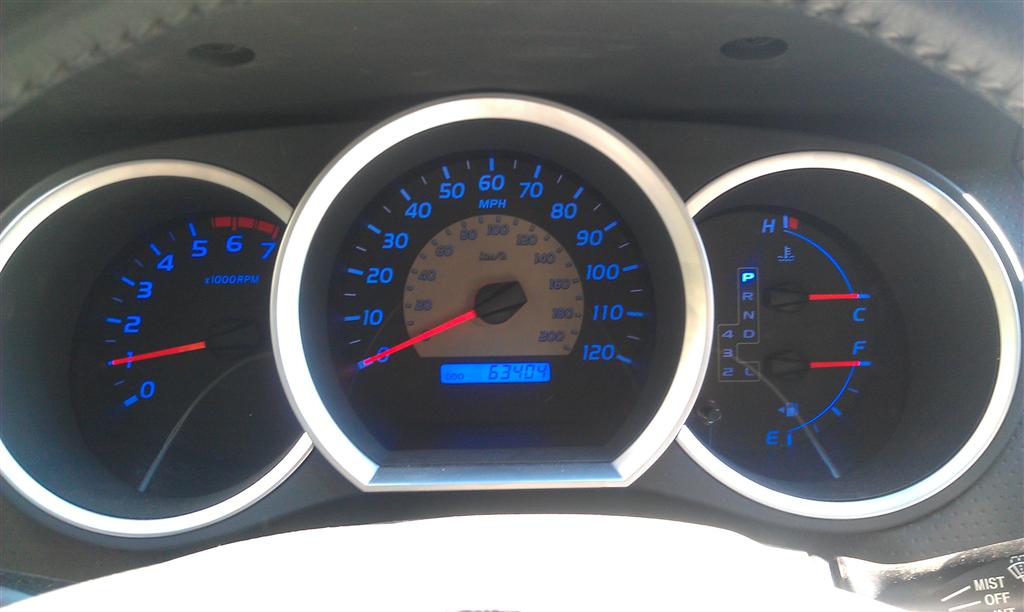
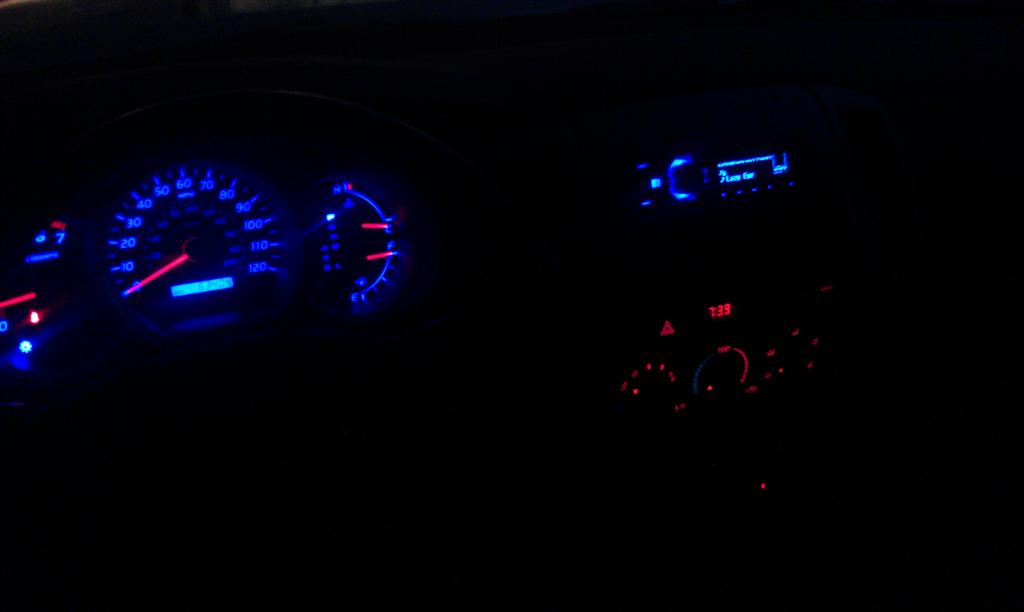
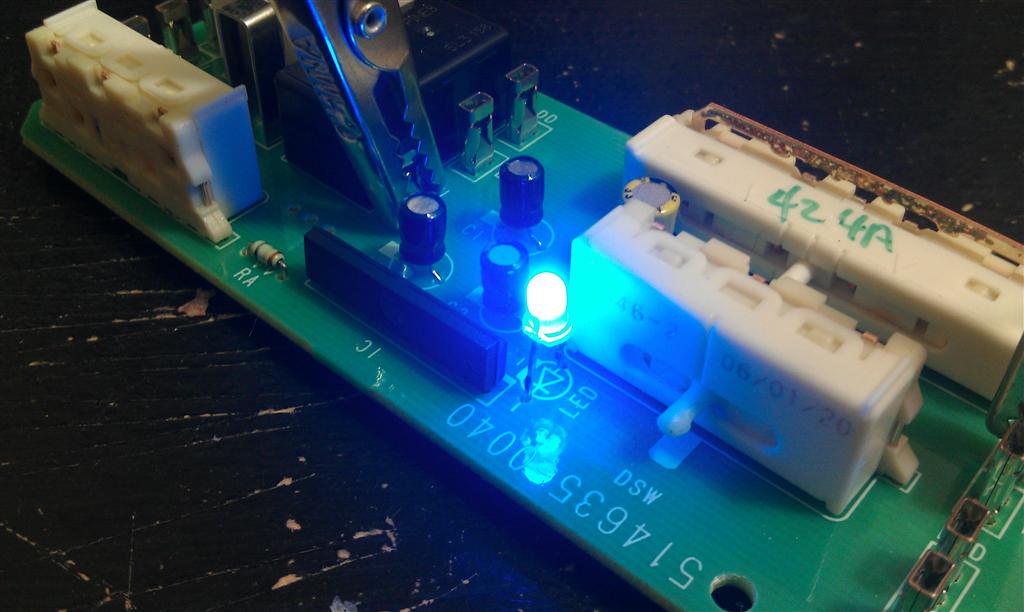
well, all done! came out really well, but I need to wait until it gets dark to see the full effect
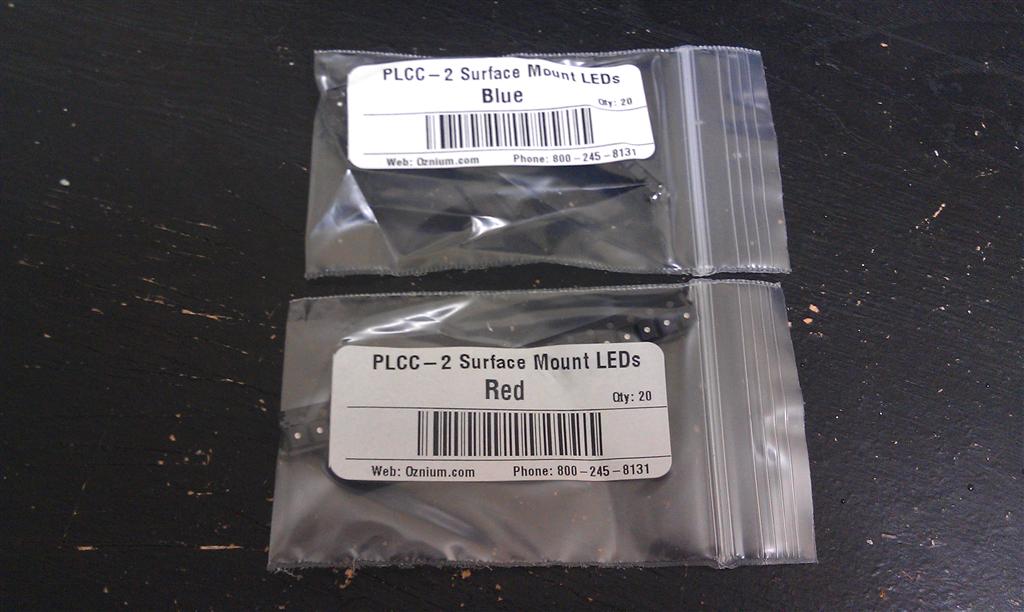
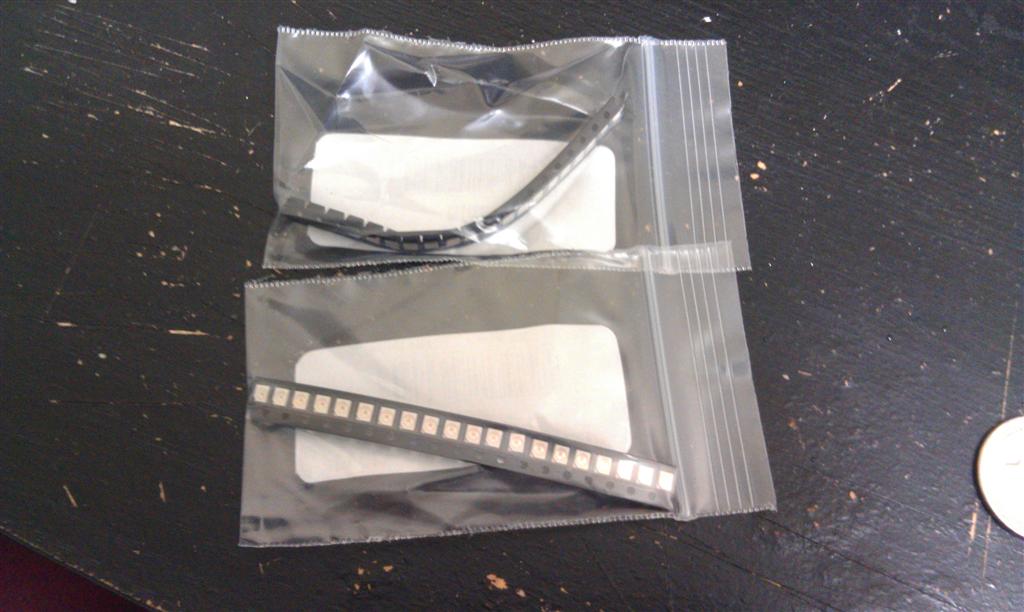
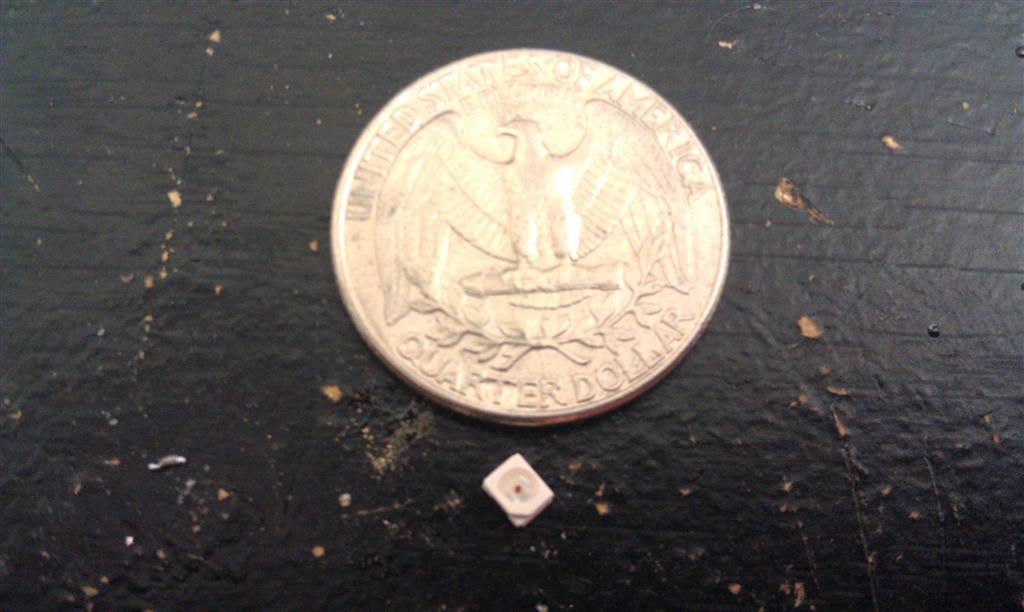
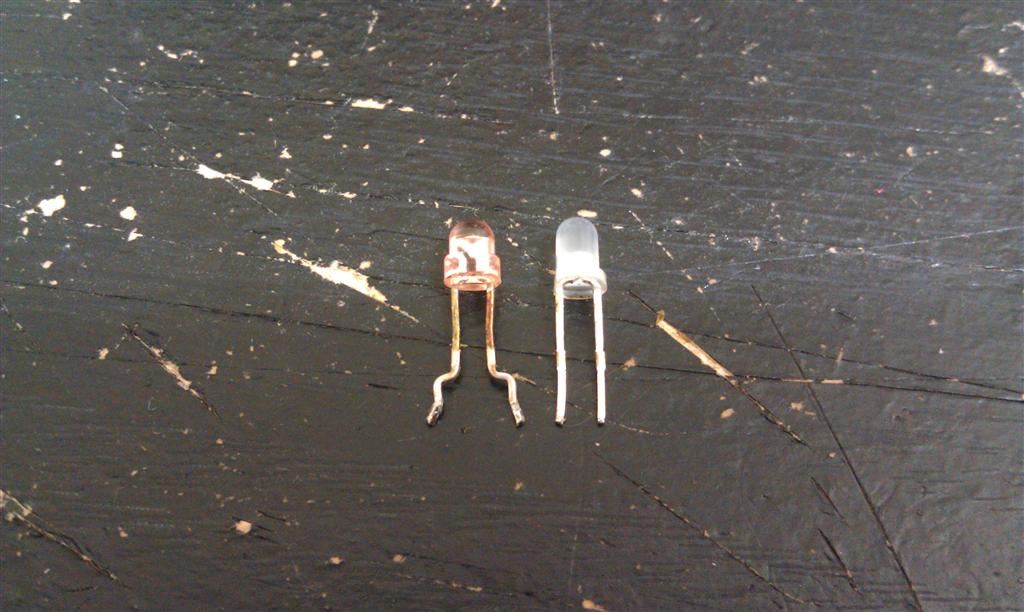
bust out the tweezers, these LEDs are TINY!
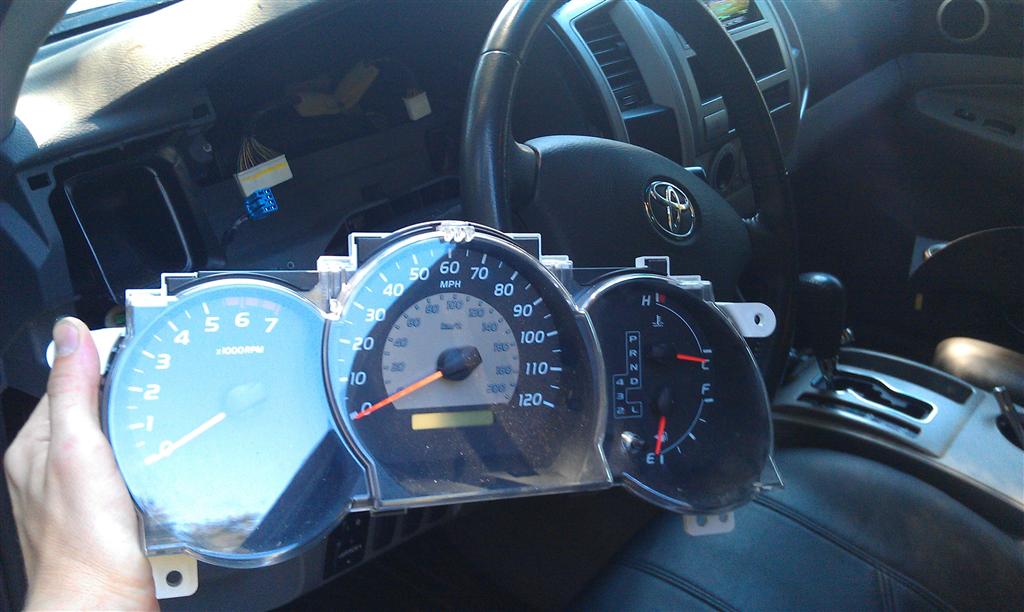
plug in anf test before reassembly and installing
looking pretty good! should look killer once the sun goes down!
bust out the tweezers, these LEDs are TINY!
plug in anf test before reassembly and installing
looking pretty good! should look killer once the sun goes down!

 Oct 1, 2011 | 06:24 PM
#4
Thread Starter
Contributing Member
Joined: Feb 2008
Posts: 12,248
Likes: 33
From: Lake City, Fl
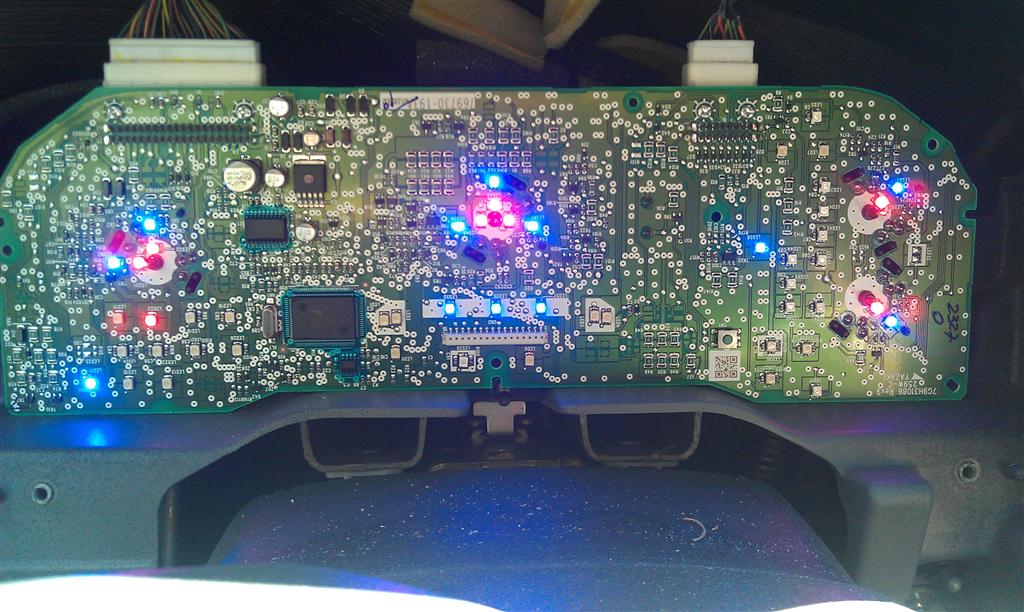
yep, a steady hand and a pencil tip soldering iron. most people say to use a low wattage iron with these surface mounted LEDs, but personally I crank my iron up to the max of 50 watts it's capable of and it makes the soldering MUCH easier in my opinion. the solder join only takes 1 or 2 seconds so you're not on the LED or the board long enough to cause damage, assuming you know how to solder efficiently 
here's a few more photos after it got completely dark out
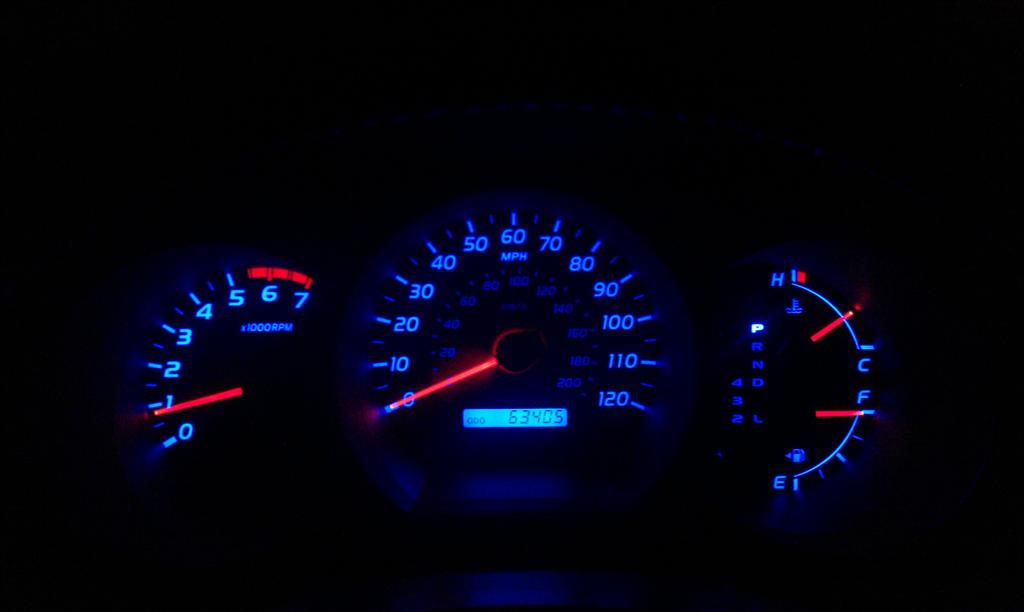
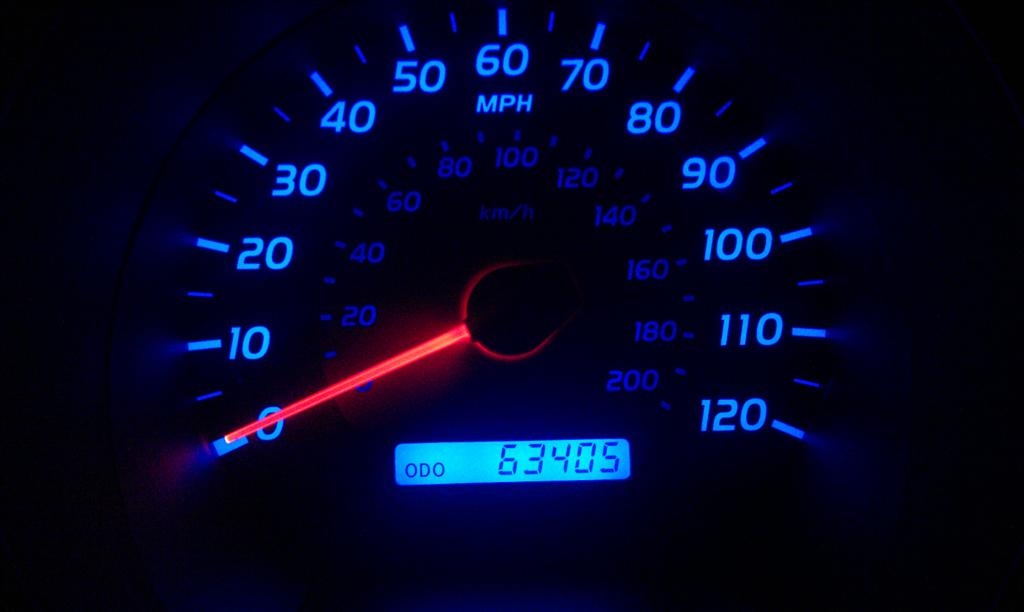
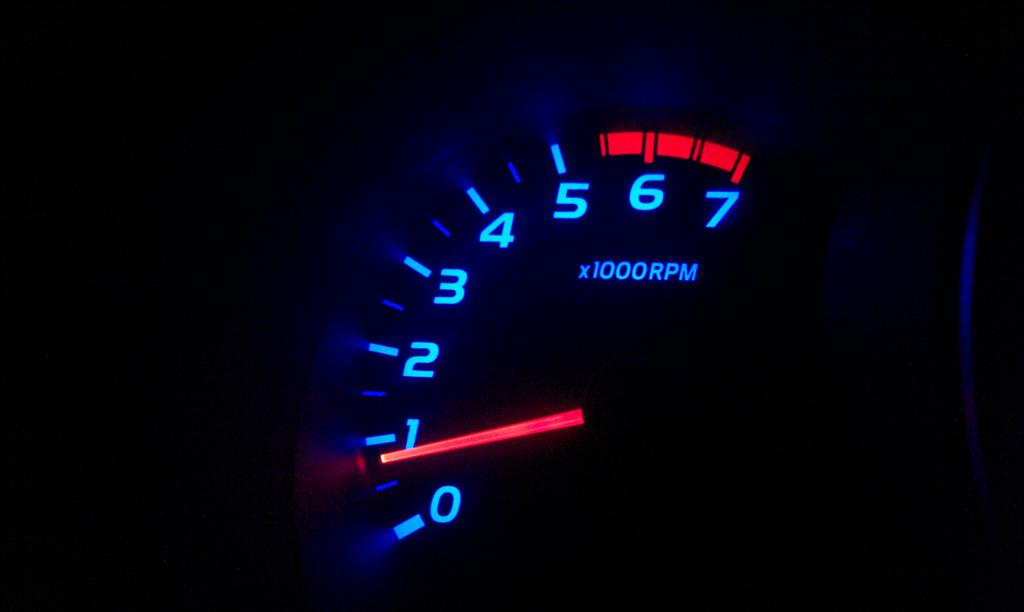

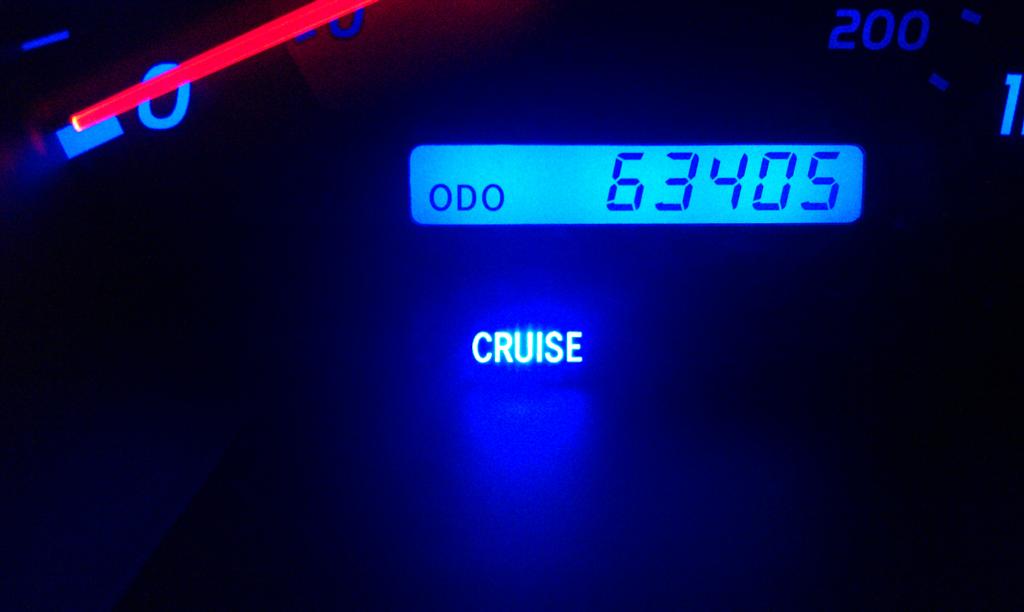
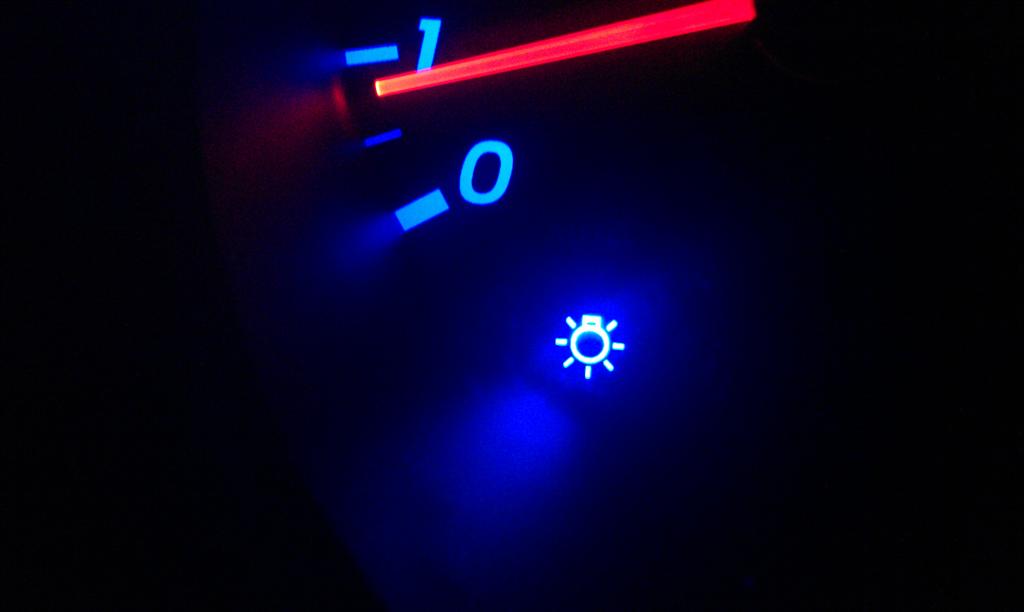
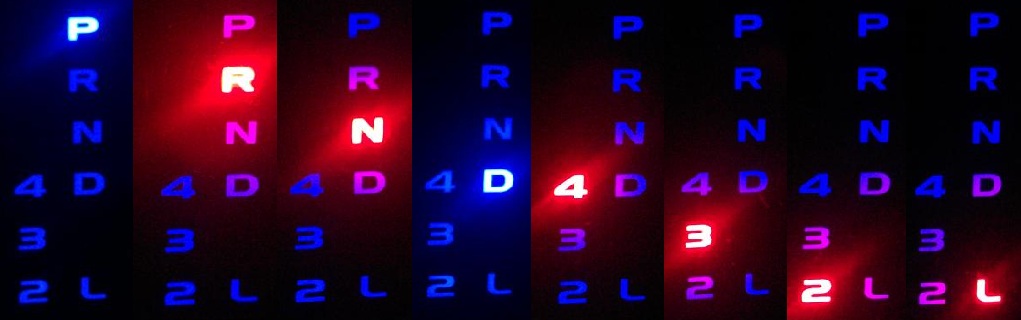
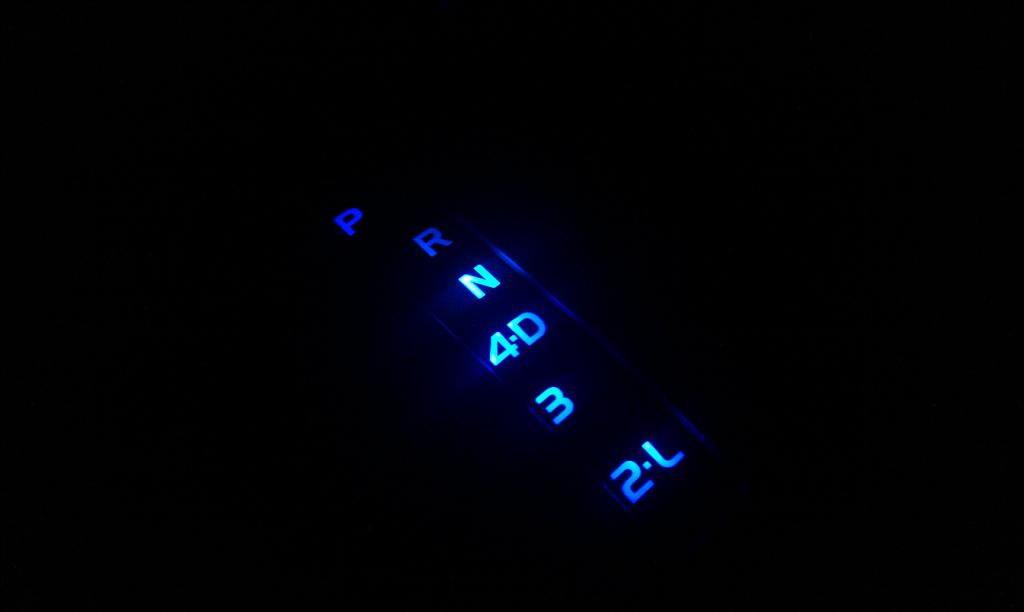
I also changed some LEDs that stay on a lot like the cruise indicator and the headlights indicator (I also changed the bright lights on indicator to blue and the low fuel light to red, but I didn't take a photo). I also changed ALL of the gear selection indicators. Park and drive are blue, the rest are red.
now I just need to start on the center of the dash... have no idea if the clock can even be done; I have to take it apart and see how it works
I did whip up something for the floor shifter indicator, but it was just a quick little trial thing and it really didn't come out all that great...
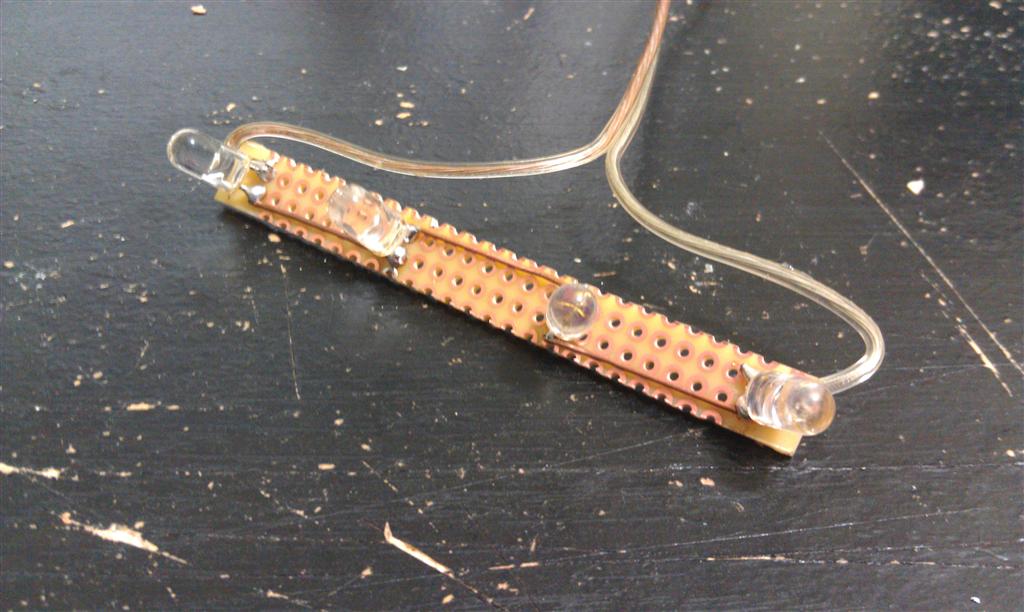
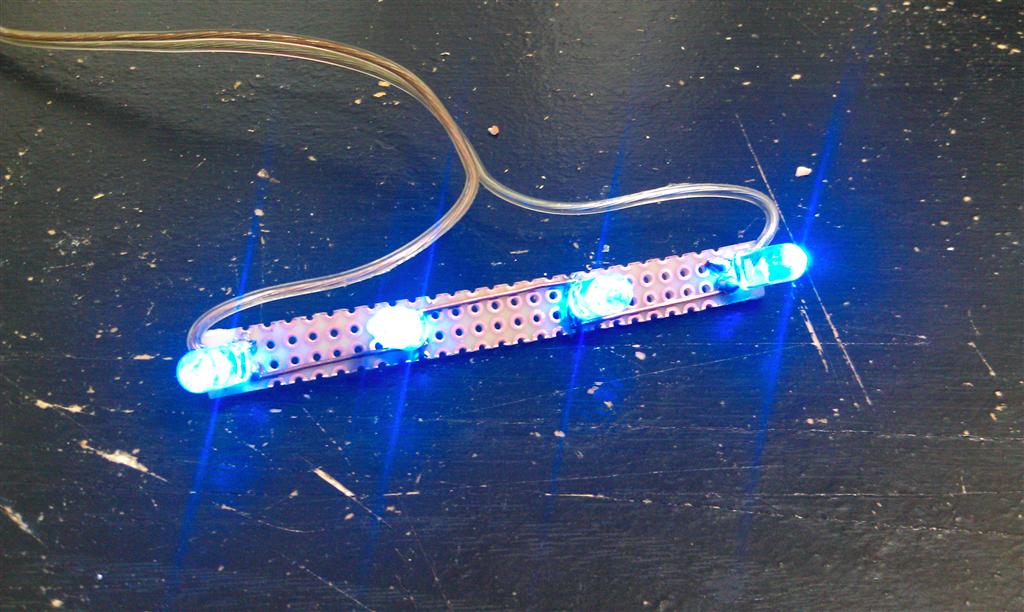
at first I tried to fit the board I made up in longways like it was made, but the LEDs stuck up too high and wouldn't let the cover go all the way on... so I broke the board in half and managed to get it to fit
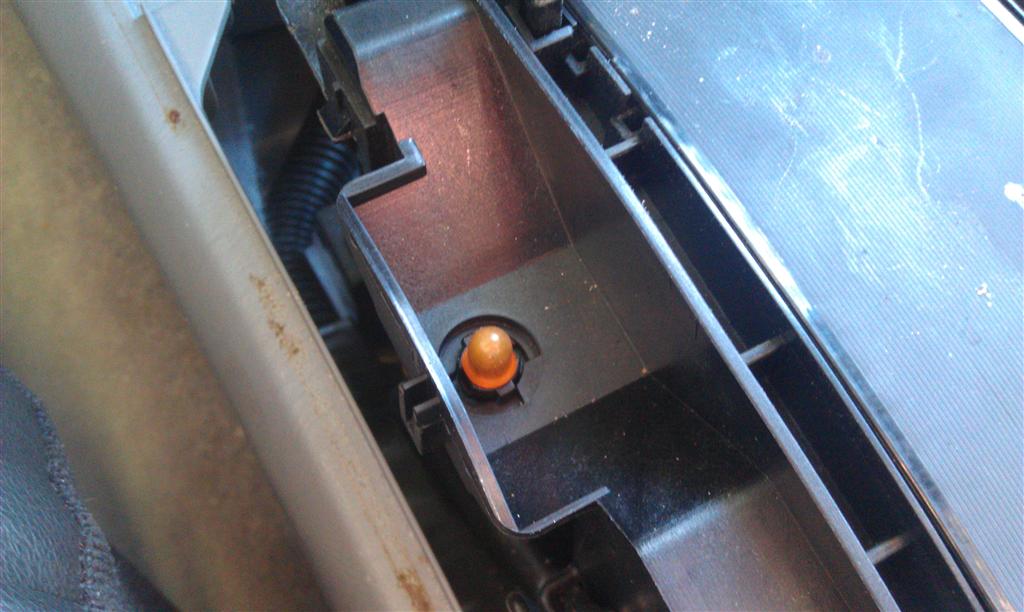
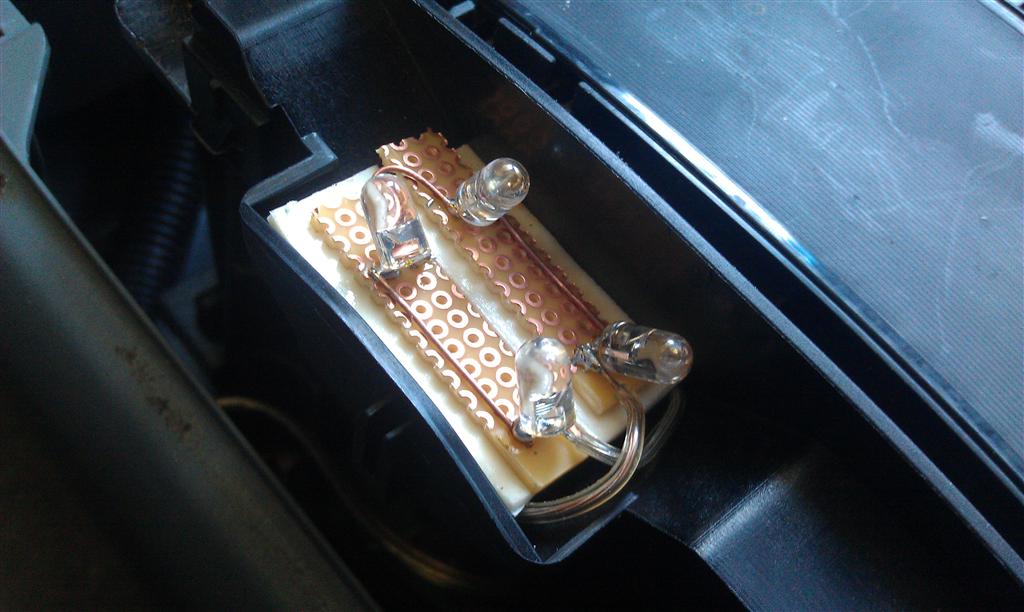
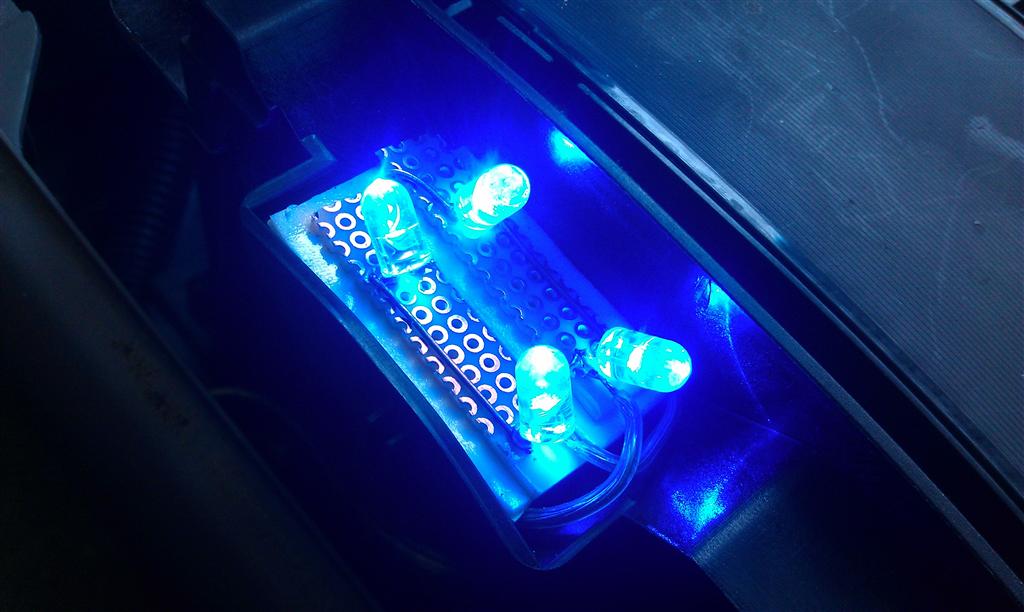
but the light is a little blotchy... so I'm going to have to play with some other ides. at least this light is easy to get to
here's a few more photos after it got completely dark out
I also changed some LEDs that stay on a lot like the cruise indicator and the headlights indicator (I also changed the bright lights on indicator to blue and the low fuel light to red, but I didn't take a photo). I also changed ALL of the gear selection indicators. Park and drive are blue, the rest are red.
now I just need to start on the center of the dash... have no idea if the clock can even be done; I have to take it apart and see how it works
I did whip up something for the floor shifter indicator, but it was just a quick little trial thing and it really didn't come out all that great...
at first I tried to fit the board I made up in longways like it was made, but the LEDs stuck up too high and wouldn't let the cover go all the way on... so I broke the board in half and managed to get it to fit
but the light is a little blotchy... so I'm going to have to play with some other ides. at least this light is easy to get to
Last edited by iamsuperbleeder; Oct 1, 2011 at 06:28 PM.
Oct 2, 2011 | 08:35 PM
#5
Thread Starter
Contributing Member
Joined: Feb 2008
Posts: 12,248
Likes: 33
From: Lake City, Fl
changed some more today
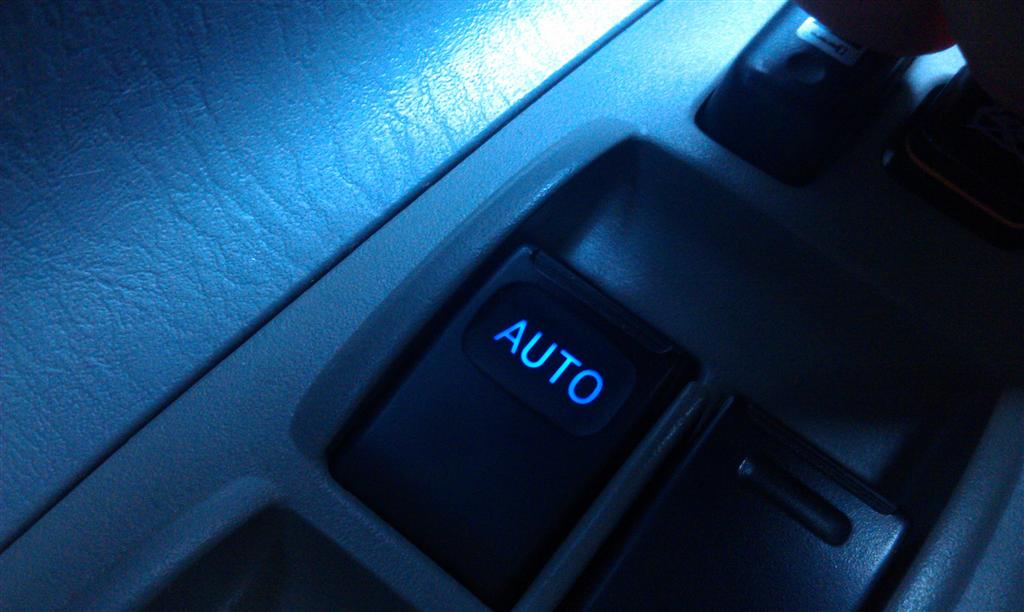
"AUTO" lettering on driver's side window switch
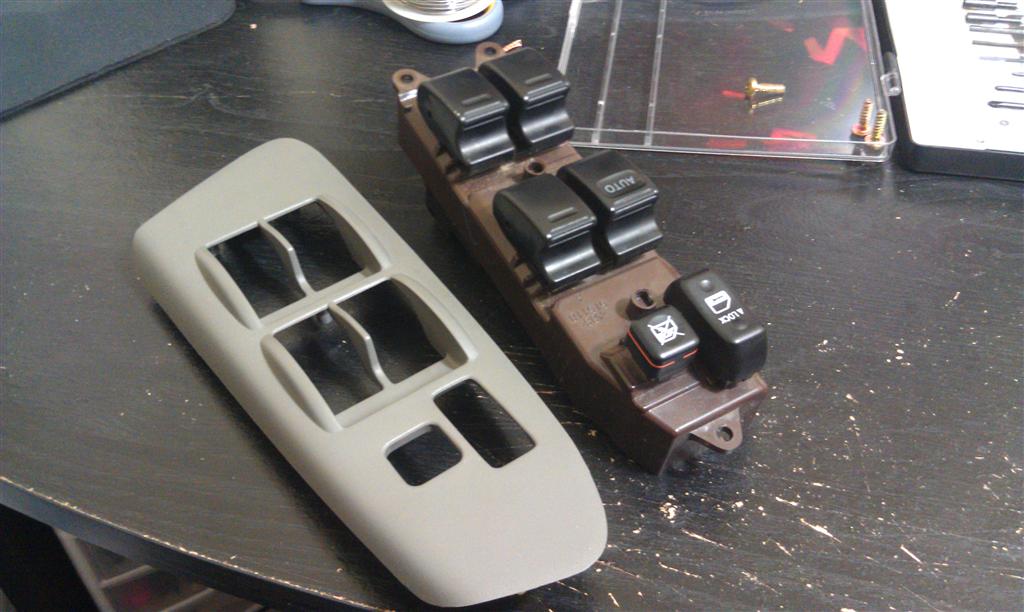
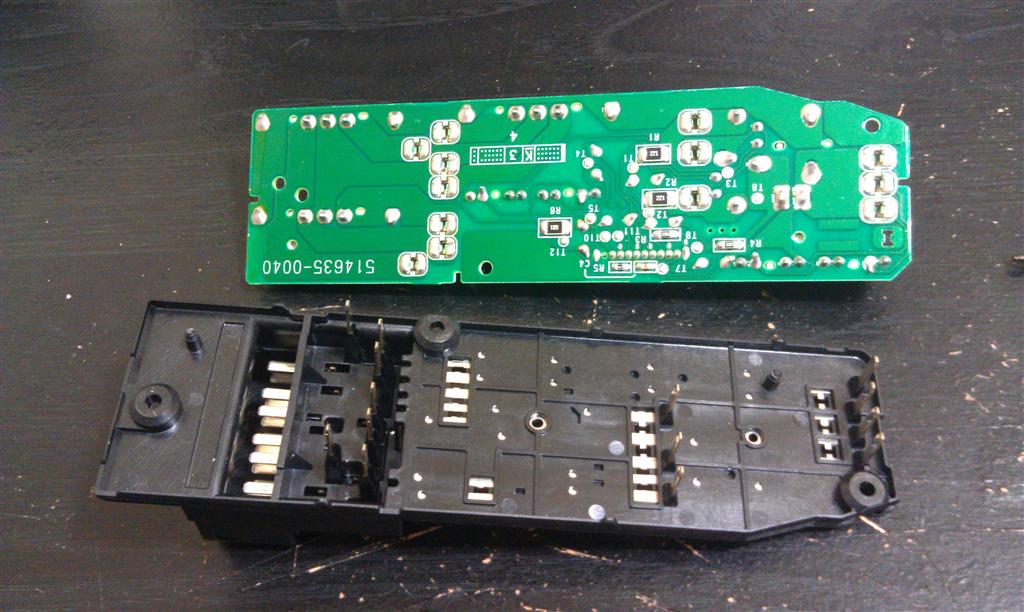
before:
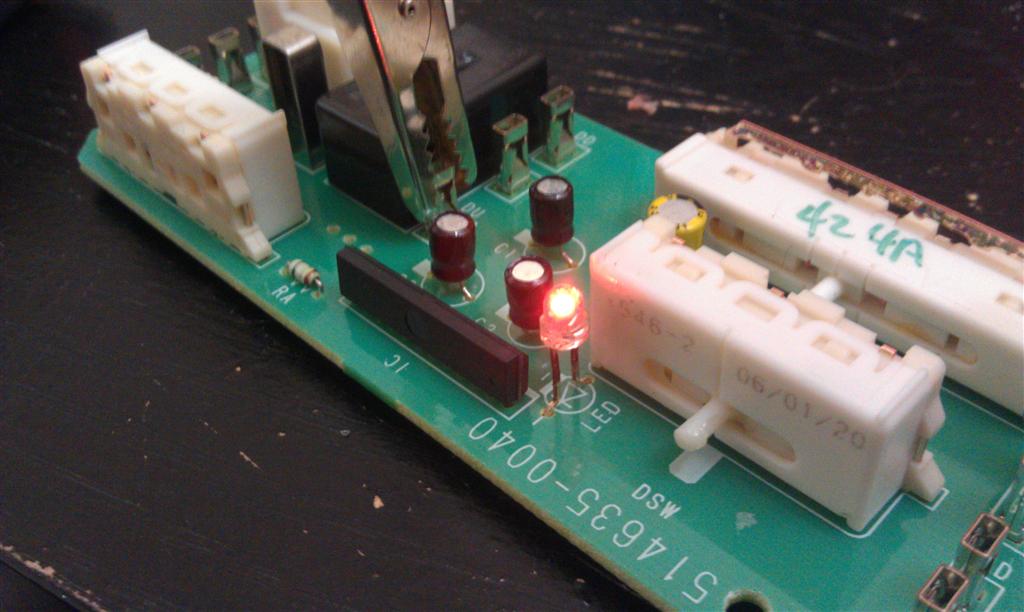
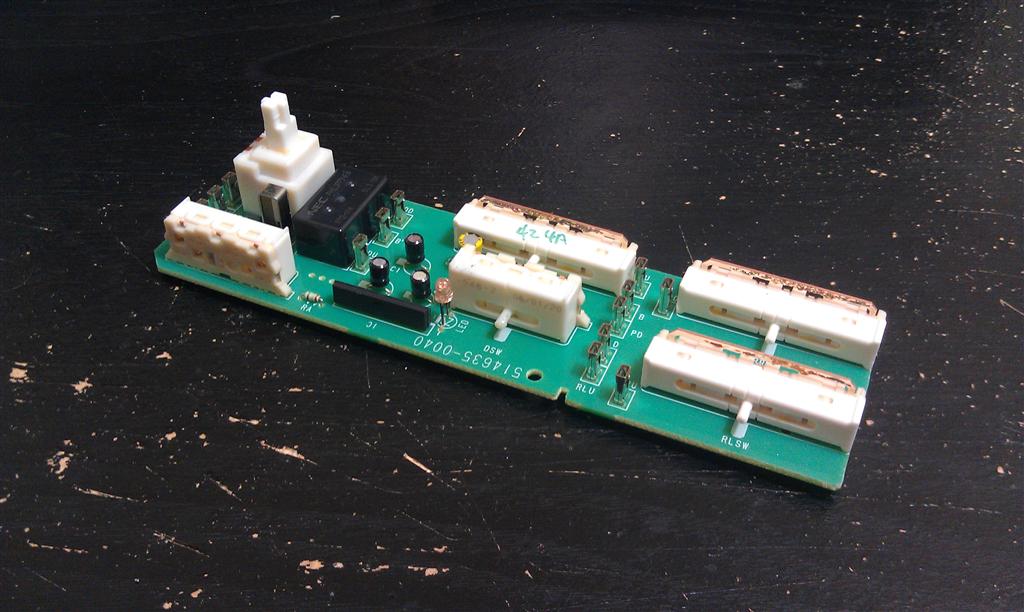
out with the old, in with the new. a blue LED pulled from a broken cell phone charger this why you NEVER just throw away your old electronics!
also changed the LEDs in the center display to the right of the clock
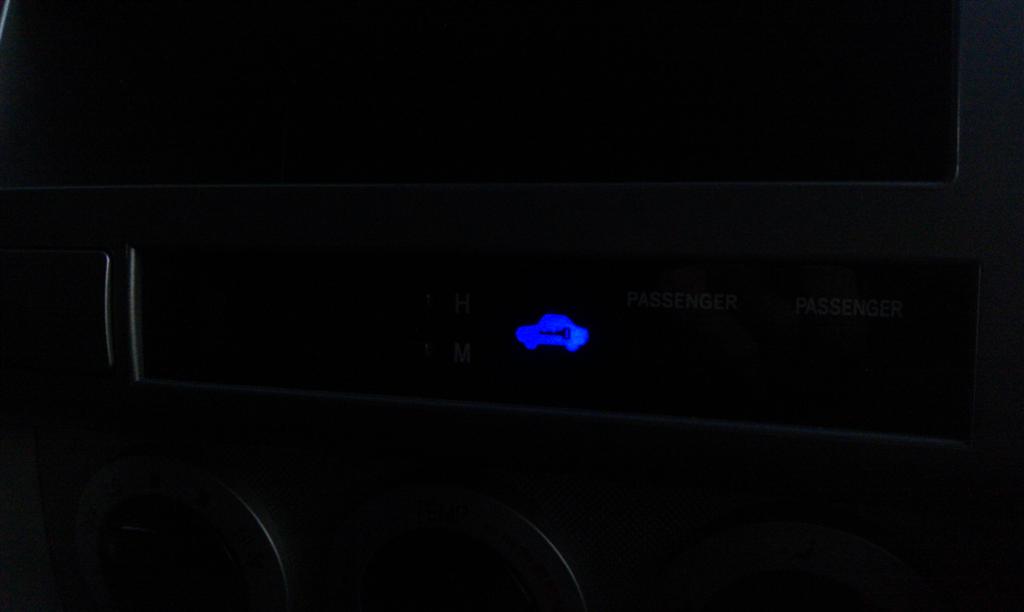
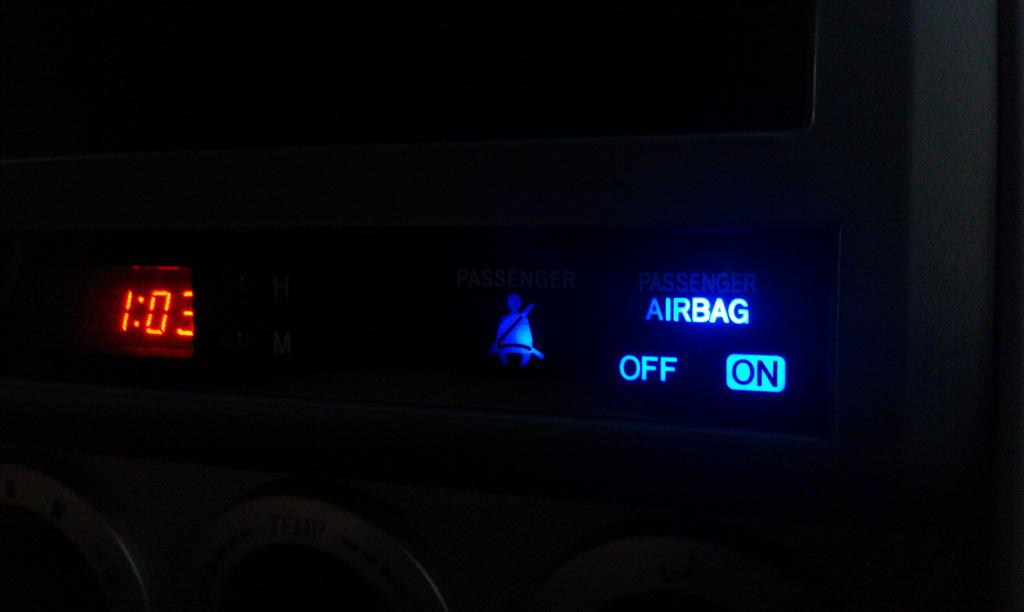
the clock itself is going to be a bit tricky though...
the numbers light up a greenish color behind the screen, so I should be able to get the blue color I'm looking for with a blue light filtering film
BUT, the red/orange coloring film is built into the plastic display cover in front of it... so I'm going to have to make up some sort of plexiglass cover to replace the factory one... which is not going to be very easy as you could probably imagine but I have an idea and might try it soon

so if it weren't for that darn clock and AC control, I'd be all blue!
"AUTO" lettering on driver's side window switch
before:
out with the old, in with the new. a blue LED pulled from a broken cell phone charger
this why you NEVER just throw away your old electronics!also changed the LEDs in the center display to the right of the clock
the clock itself is going to be a bit tricky though...
the numbers light up a greenish color behind the screen, so I should be able to get the blue color I'm looking for with a blue light filtering film
BUT, the red/orange coloring film is built into the plastic display cover in front of it... so I'm going to have to make up some sort of plexiglass cover to replace the factory one... which is not going to be very easy as you could probably imagine
but I have an idea and might try it soonso if it weren't for that darn clock and AC control, I'd be all blue!
Oct 3, 2011 | 05:10 AM
#6
see about getting a new vacuum florescent display (vfd) on ebay. there are bunches out there, and most of them are blue.
might be too big, but thought i'd post it anyway
http://www.ebay.com/itm/ILC4-5-7L-VF...item48422cfa8e
might be too big, but thought i'd post it anyway
http://www.ebay.com/itm/ILC4-5-7L-VF...item48422cfa8e
Last edited by irab88; Oct 3, 2011 at 05:13 AM.
Oct 3, 2011 | 07:36 AM
#7
Registered User
Joined: Apr 2007
Posts: 1,458
Likes: 5
From: ATL!
wow! this looks great. nice work!
i can only offer an opinion, that since you've already got the "critical" items in red, you can certainly leave the clock red too.
it would stand out against the blue, just like your gauge needles, emergency triangle, and R + low gear numbers. once you finish the a/c controls, i think it would look perfect. and for a passenger, finding the clock or emergency flasher has never been easier!
you could also do a photoshop tweak to your last picture to "see it" before you start cutting that clock face up.
Trending Topics
Oct 3, 2011 | 05:21 PM
#8
Thread Starter
Contributing Member
Joined: Feb 2008
Posts: 12,248
Likes: 33
From: Lake City, Fl
Well the clock may become useless here soon. I MAY be getting a new double din CD/DVD/Nav unit from a buddy at work which I would LOVE because then I could take this aggravating Garmin out of my window... that I hardly use anyway
but anywho, it's a Pioneer D3. found a photo of one installed in an 08 Taco on the interwebs
apparently you can change the backlighting colors on it, so I'll be able to match the blue. PLUS, it has a clock that stays on the screen when in use, so there wont be a need for the factory one SO, I may just take it out. Luckily the clock portion actually disconnects and is removable by itself, so I'll probably do that and maybe find a use for the open space there. maybe a switch or something, or possibly a good spot for an adjustment dial for an amp in the future
which I would LOVE because then I could take this aggravating Garmin out of my window... that I hardly use anyway but anywho, it's a Pioneer D3. found a photo of one installed in an 08 Taco on the interwebs
apparently you can change the backlighting colors on it, so I'll be able to match the blue. PLUS, it has a clock that stays on the screen when in use, so there wont be a need for the factory one
SO, I may just take it out. Luckily the clock portion actually disconnects and is removable by itself, so I'll probably do that and maybe find a use for the open space there. maybe a switch or something, or possibly a good spot for an adjustment dial for an amp in the future
Oct 3, 2011 | 06:30 PM
#9
there's also the option of completely removing the red clock and replacing it with a blue led one
http://cgi.ebay.com/ebaymotors/12V-B...item3cbbe1772c
http://cgi.ebay.com/ebaymotors/12V-B...item3cbbe1772c
Oct 3, 2011 | 06:57 PM
#10
Thread Starter
Contributing Member
Joined: Feb 2008
Posts: 12,248
Likes: 33
From: Lake City, Fl
there's also the option of completely removing the red clock and replacing it with a blue led one
http://cgi.ebay.com/ebaymotors/12V-B...item3cbbe1772c
http://cgi.ebay.com/ebaymotors/12V-B...item3cbbe1772c
Oct 6, 2011 | 09:46 AM
#12
Registered User
Joined: Apr 2007
Posts: 1,458
Likes: 5
From: ATL!
Well the clock may become useless here soon. I MAY be getting a new double din CD/DVD/Nav unit from a buddy at work which I would LOVE because then I could take this aggravating Garmin out of my window... that I hardly use anyway
but anywho, it's a Pioneer D3. found a photo of one installed in an 08 Taco on the interwebs
apparently you can change the backlighting colors on it, so I'll be able to match the blue. PLUS, it has a clock that stays on the screen when in use, so there wont be a need for the factory one SO, I may just take it out. Luckily the clock portion actually disconnects and is removable by itself, so I'll probably do that and maybe find a use for the open space there. maybe a switch or something, or possibly a good spot for an adjustment dial for an amp in the future
which I would LOVE because then I could take this aggravating Garmin out of my window... that I hardly use anyway but anywho, it's a Pioneer D3. found a photo of one installed in an 08 Taco on the interwebs
apparently you can change the backlighting colors on it, so I'll be able to match the blue. PLUS, it has a clock that stays on the screen when in use, so there wont be a need for the factory one
SO, I may just take it out. Luckily the clock portion actually disconnects and is removable by itself, so I'll probably do that and maybe find a use for the open space there. maybe a switch or something, or possibly a good spot for an adjustment dial for an amp in the future it looks like the perfect place to retrofit a set of dashboard cup holders from a 90s 4Runner, the best cupholder design** ever invented in the whole wide world!!!!!!!!!

**i'm kidding! plz don't attempt this at home or anywhere
Dec 11, 2011 | 12:19 PM
#13

Registered User
Joined: Dec 2011
Posts: 9
Likes: 0
From: Northern CA
'03 4 Runner HVAC etc LED bulb id
For anyone or iamsuperbleeder, Hello, new to site, am trying to find out if you can help me ID the leds for my '03 4 Runner's HVAC/4WD/Rear window & hazard button ? Already have accessed them and measured them with tape measure but SBL's only lists inches in 0.000 form. Can post pics of how to access all of these + info I got from another site.
Dealership is no help really and I want to replace with brightest I can and am trying to avoid having to buy all 3 sizes and just eliminate the wrong ones and have to send them back, if possible.
So if anyone out there can offer up any suggestions I would greatly appreciate it. Current sizes I've got with standard tape measure are 3/8"dia. more or less for all the bases and anywhere from 3/8" to 1/2" to 3/4" base to tip depending on bulb. Twist & lock ones as well almost all have a phillips head on bottom of base Also some bulbs have a colored tip-not a sleeve or cap, just the tips. Want to switch out all for blue, esp the LCD so I can see info and tell what is on when using headlights during the day since turning on headlights dims all of the above. Why Toyota did that I'll never know. If you go to SBLeds and hit the more info you'll see what I mean, the right measuring tool would help of course just thought someone might know from doing their own.
Thank you,
SeanCeltiad
Last edited by SeanCeltiad; Dec 11, 2011 at 08:37 PM. Reason: To clarify sizes of bulbs
Dec 11, 2011 | 03:40 PM
#14
Thread Starter
Contributing Member
Joined: Feb 2008
Posts: 12,248
Likes: 33
From: Lake City, Fl
well it's more than likely either going to be a 3mm (like the LED pictured about in the window switch), a 5mm (the ones pictured above that I used in my gear shifter indicator), or a surface mount (the ones used in the cluster)
any photos of said LED you're trying to replace? I can probably tell you right away
any photos of said LED you're trying to replace? I can probably tell you right away
Dec 11, 2011 | 08:45 PM
#15
Registered User
Joined: Dec 2011
Posts: 9
Likes: 0
From: Northern CA
LED's
Thank you, only pics with the back of panels and bulbs in but I plan to take them out and take pics as well, they basically look like the pics you ? showed for the ones you just redid the bulbs but used the same base, but if I can save myself the hassle and just buy the entire base with bulb I'd rather do that. I've gotta work tomorrow but will try to get to them on Tues. since I've got some time off and would be a good way/time to do the replace.
Thanks for the reply iamsuperbleeder and I'll keep checking back, gotta hit the sack, mail delivery starts early.
SeanCeltiad
Thanks for the reply iamsuperbleeder and I'll keep checking back, gotta hit the sack, mail delivery starts early.
SeanCeltiad
Jan 22, 2012 | 10:18 AM
#16
Registered User
Joined: Dec 2011
Posts: 9
Likes: 0
From: Northern CA
Can you tell me the wire.....
well it's more than likely either going to be a 3mm (like the LED pictured about in the window switch), a 5mm (the ones pictured above that I used in my gear shifter indicator), or a surface mount (the ones used in the cluster)
any photos of said LED you're trying to replace? I can probably tell you right away
any photos of said LED you're trying to replace? I can probably tell you right away
Thank you for any help, Sean
Last edited by SeanCeltiad; Jan 22, 2012 at 10:58 AM. Reason: Correct mistake
Dec 4, 2013 | 01:20 PM
#17
Registered User
Joined: Dec 2011
Posts: 9
Likes: 0
From: Northern CA
Hey Iamsuperbleeder, hope you are still here. I was told that in order to adjust my parking brake, which I drove with it set for I don't know how many miles, was raining and had music playing so I didn't hear the thump thump sound, anyway I was told that to adjust it back to 5-7 clicks instead of having to press the pedal all the way to the floor to work, that I had to go thru the center console and the storage box to get to the adjusting nut. I am hoping you or anybody can tell me where/how to start the removal of the console and box. I'm guessing that it's held in place by tabs like the a/c section is when I swapped out for the leds, and thank you all for the pics and how to on that one. I'm hoping that you can tell me how/where to expect the tabs to be, pics would be great. It was over at 120 platform that I was told this, the storage box w a/c vents on the back has to be removed to get to the hex screw that will get at the adjusting nut. Is this correct and is this going to be a major endeavor ? Thank you for any help, Sean-I have an 2003 4Rnr SR5 4WD.

Thread
Thread Starter
Forum
Replies
Last Post
Esibnitsud
86-95 Trucks & 4Runners
11
Jul 30, 2015 08:21 PM
88yodabasket
86-95 Trucks & 4Runners
15
Jul 13, 2015 01:32 PM
Poncho0206
95.5-2004 Tacomas & 96-2002 4Runners
3
Jul 10, 2015 06:21 PM


