
Surface Mount LED Backup Light Install - Lots of Pics!
 Aug 20, 2010 | 08:52 PM
#1
Thread Starter
Registered User
Joined: Dec 2007
Posts: 710
Likes: 2
From: Santa Rosa, CA
Surface Mount LED Backup Light Install - Lots of Pics!
A while back I posted up some info on some surface mount LED backup lights that are intended for over the road trucks. My idea was to install them on the tailgate of my '89 first gen 4Runner. They seemed to be the best compromise on location versus light output, as all of the other locations I could think of for a standard type light were damage prone.
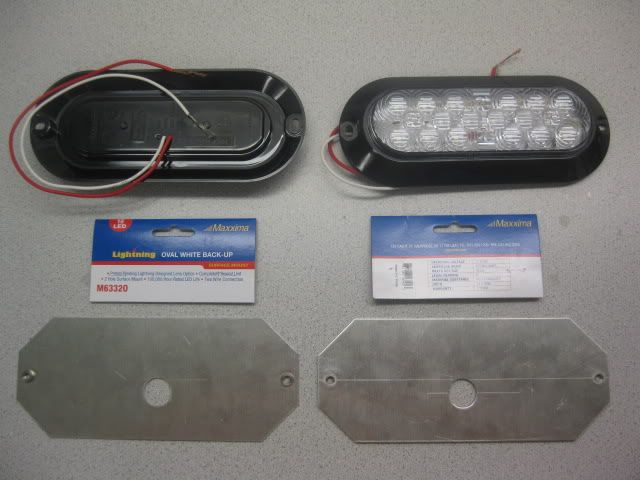
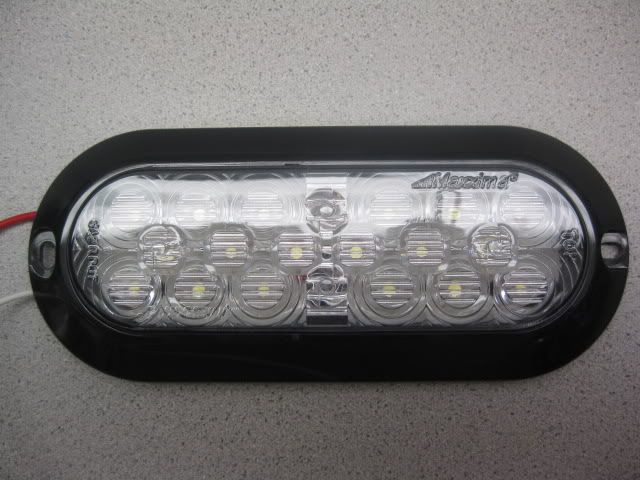
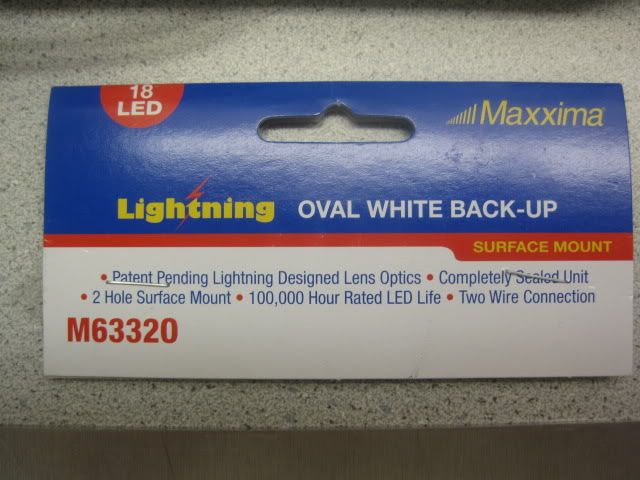
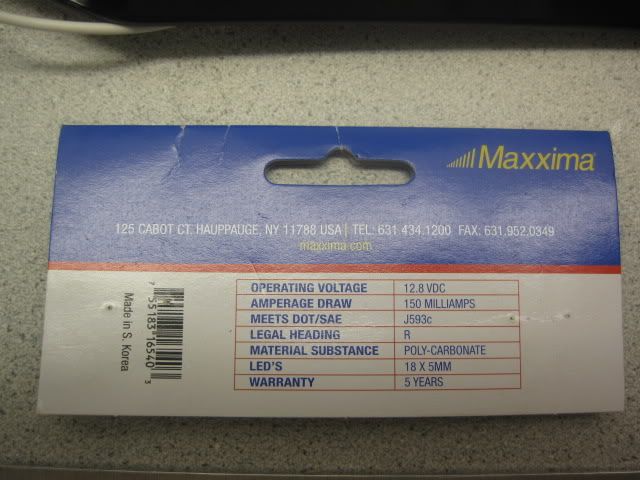
The lights I bought are made by Maxxima. They have Qty: 18, 5 mm diameter LED's in each light. There are two mounting slots in the frame, one is horizontal, one is vertical. The wiring comes out of the back of the body of the light, it is a completely sealed unit.
Maxxima website:
http://www.maxxima.com/products/prod...-Up/view/.html
I bought them at a website called Truck-N-Tow ($38.99 ea), they specialize in parts and accessories for over the road trucks (free shipping coupons are on the web):
http://www.truckntow.com/pc-24931-14...ount-oval.aspx
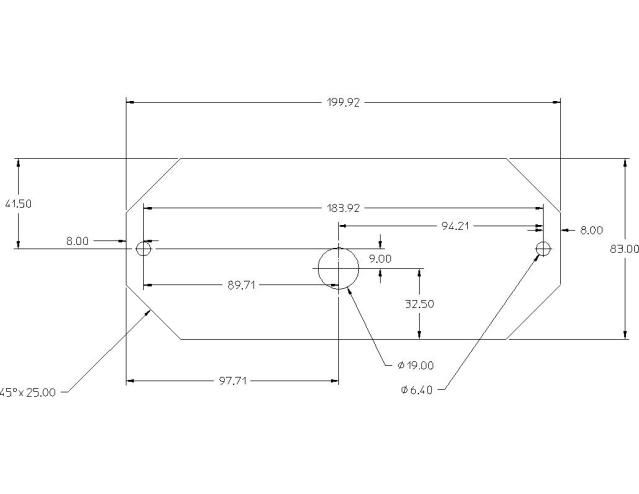
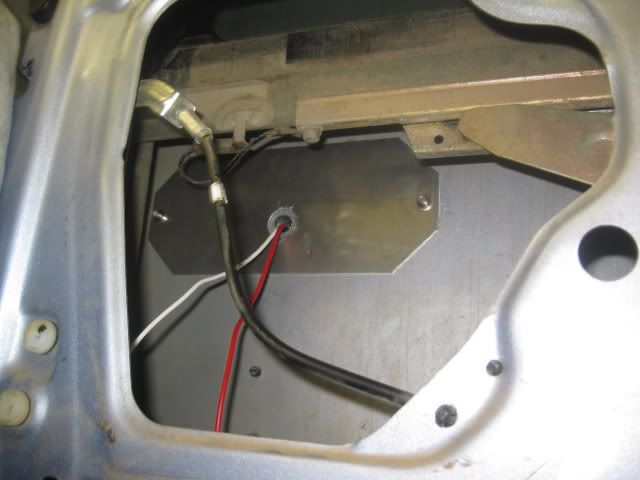
My idea was to use a nut plate on the inside of the tailgate to screw the lights into. I would also drill a hole in the tailgate for the wires to pass through. I put a grommet in this hole to protect the wires from the sheetmetal. The nut plate is 2 mm thick aluminum sheet (5052-H32) with two M5 stainless PEM nuts pressed into it. I made a 2D drawing of the nut plate, if anyone wants one. Pics of the lights and the nut plates:
Drawing of the nutplate, in metric, just to throw everyone for a loop (I work in metric all day, so it is how my mind works):
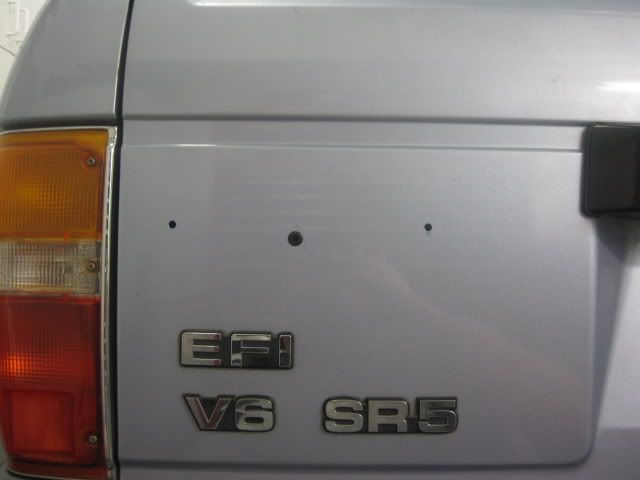
The hardest part of this mod was to drill holes in a perfectly good tailgate. Hitting it with the center punch made me wince each time. Who in their right mind just drills holes in their tailgate???
After I did the first hole, in for a dime, in for a dollar... The center hole below has the grommet installed in it, for the wires to pass through:
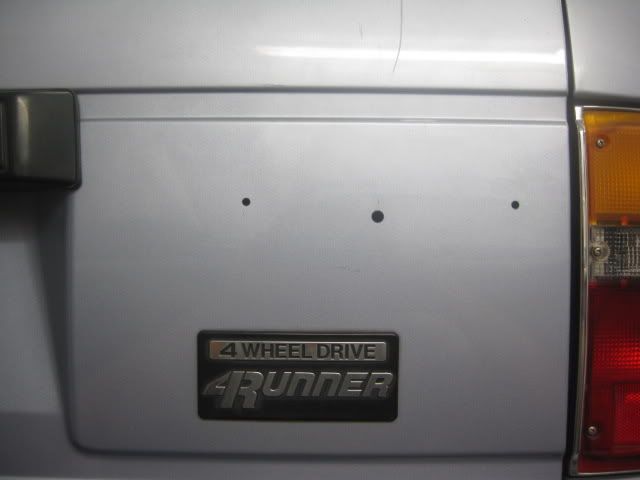
Other side:
This pic shows the nutplate installed inside the tailgate of the Runner. The idea was to have a good mechanical connection without having to install hardware in the thin tailgate skin. Also, I was able to slather on a good layer of silicon sealant around each hole so that I had there would not be a water leakage path (not that water doesn't come by the window seal anyway).
And, here are the lights installed:
So, that was the easy part...wiring them was a bit more of a job. What I wanted was for them to come on when I was in reverse. I also wanted to turn both sets of backup lights on, the stock ones in the tail lights and the new surface mount LED's, with a switch on the dash. Also, I measured the voltage at the stock lights with the engine running, and it was only 10.8V. The stock wiring had a large voltage drop through it. The output on these lights is voltage dependant, so, the higher the voltage at the light, the more output.
I took one of the lights to work and hooked it up to a DC power supply. I measured the current draw at a range of voltages. As the voltage increased, the current draw went up, and the light output stepped up considerably. Here is what I measured:
Voltage / Current draw (mA)
12.0 / 124
12.5 / 147
13.0 / 169
13.5 / 193
14.0 / 218
Picture of my dash switches, I am using the one on the right for the backup lights:
What I did was run a hot tap from my disribution block in the engine compartment to a relay in the kick panel in the driver's side footwell and then all the way back to the backup lights on the tailgate. I hooked two triggers up to this relay. One from the stock reverse switch and one from my manual dash switch. I tapped into the reverse circuit in the wire bundle that runs down out of the kick panel on the driver's side. The wire that supplies voltage to the stock backup lights is in that bundle. I found it in the wiring diagram. I spliced into that wire so that it would trigger the relay to turn on the LED backup lights when in reverse. I also hooked up the output from my dash switch to the same trigger input on the relay. The upside to this approach is that when you turn on the dash switch, it triggers the relay with 12V, but it also feeds 12 V back down the reverse switch trigger and out to the stock backup lights. I got to turn those on for free and only had to use one relay to do it. The downside was that when you put it in reverse, the 12V from the reverse switch would flood back up to the dash switch and turn on the light in the switch. To fix that, I put a diode in line from the dash switch so that current could only flow from the switch to the relay, not back uphill.
By running a 12ga hot tap off of the battery and through the relay, I was able to get 13.5 V at the lights on the tailgate, versus the stock wiring at 10.8 V.
Pic of the relay, I did not photo document much of the wiring, as it was a lot of cutting, soldering, and shrink wrapping (there are enough pics in this thread):
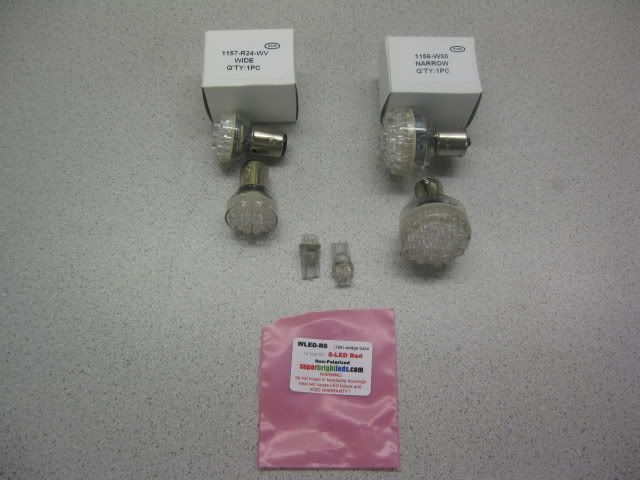
And, since I was going to all this trouble, I did Roger's (4Crawler) LED light upgrade to the stock lamps. I replaced the backup lights and the stop/running lights with LED bulbs from superbrightleds.com:
Rogers write up:
http://www.4crawler.com/4x4/CheapTricks/LEDs/index.html
Bulbs:
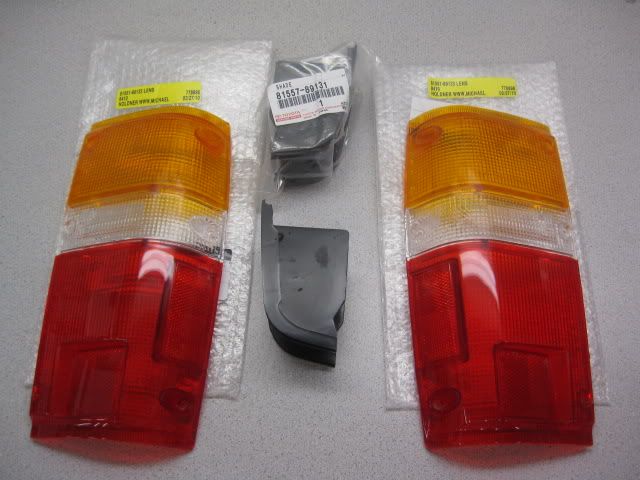
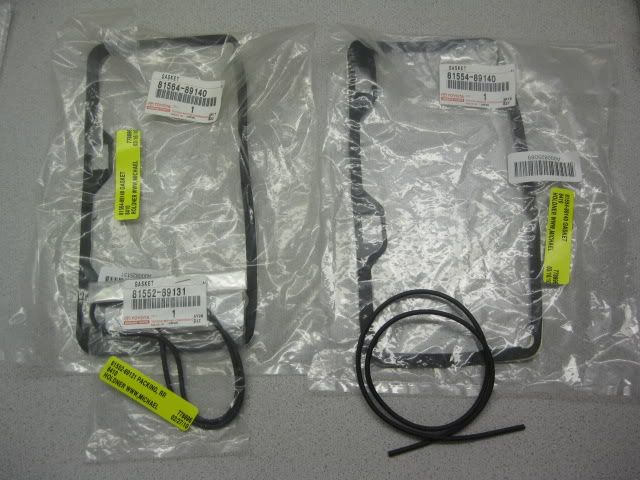
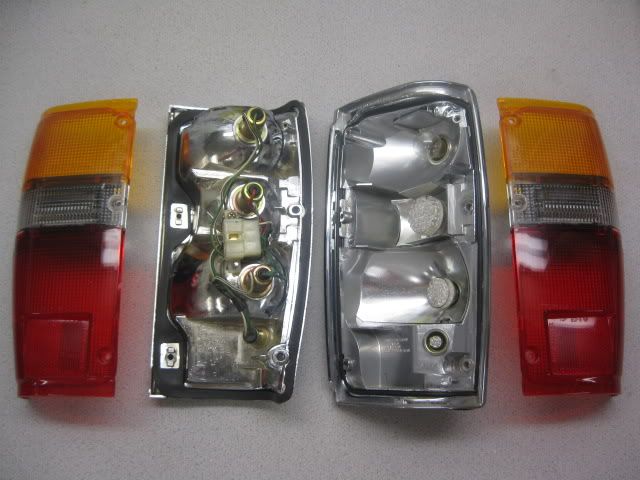
While I was in there, I put all new gaskets on the tail lights with new lenses, which I bought from the Toyota of Dallas internet site:
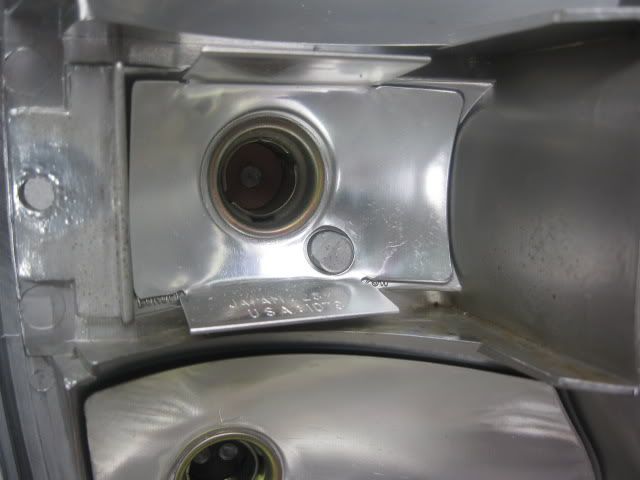
To fit the rather large LED backup bulbs in the tail lamp, I had to grind off a post in the housing a bit to clear the bulb:
And, the bulbs/gaskets installed in the tail lamps:
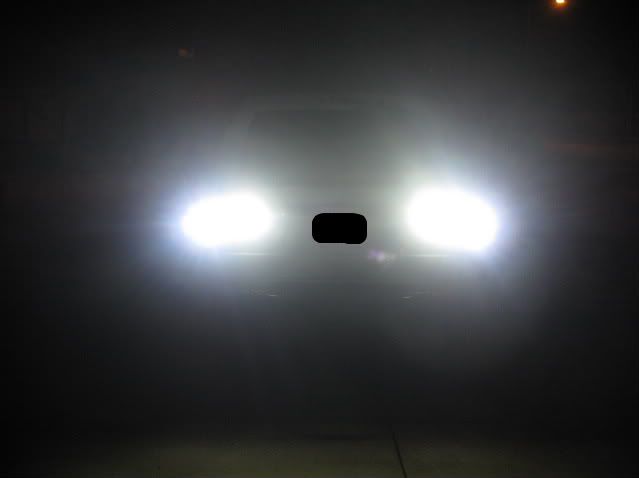
And finally, how do they work? Without a flash on the camera:
With a flash on the camera:
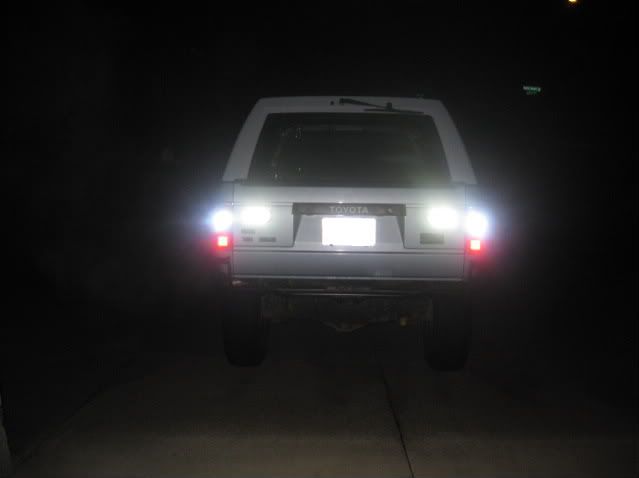
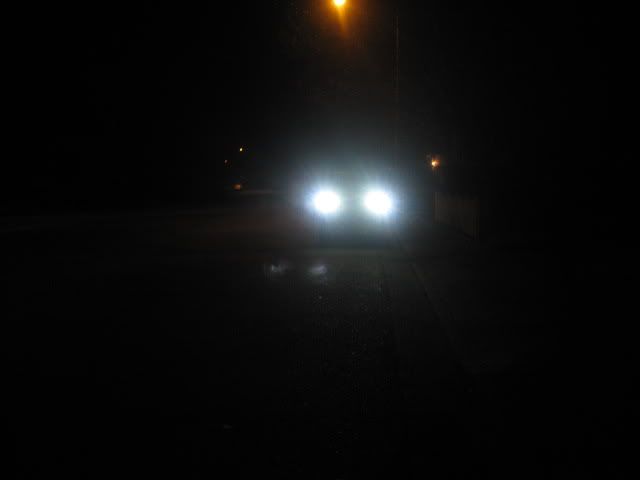
And a further away shot, without a flash:
The pictures don't really show how bright the combination is. All together, they throw a ton of light, especially out in the woods at night. They should never burn out on me, as they seldom get used, and are very durable. It was a bit of work to install and wire, but the results are pretty cool.
Thoughts on the mod?
(sorry for the long post, lots of pics)
Mike
The lights I bought are made by Maxxima. They have Qty: 18, 5 mm diameter LED's in each light. There are two mounting slots in the frame, one is horizontal, one is vertical. The wiring comes out of the back of the body of the light, it is a completely sealed unit.
Maxxima website:
http://www.maxxima.com/products/prod...-Up/view/.html
I bought them at a website called Truck-N-Tow ($38.99 ea), they specialize in parts and accessories for over the road trucks (free shipping coupons are on the web):
http://www.truckntow.com/pc-24931-14...ount-oval.aspx
My idea was to use a nut plate on the inside of the tailgate to screw the lights into. I would also drill a hole in the tailgate for the wires to pass through. I put a grommet in this hole to protect the wires from the sheetmetal. The nut plate is 2 mm thick aluminum sheet (5052-H32) with two M5 stainless PEM nuts pressed into it. I made a 2D drawing of the nut plate, if anyone wants one. Pics of the lights and the nut plates:
Drawing of the nutplate, in metric, just to throw everyone for a loop (I work in metric all day, so it is how my mind works):
The hardest part of this mod was to drill holes in a perfectly good tailgate. Hitting it with the center punch made me wince each time. Who in their right mind just drills holes in their tailgate???
After I did the first hole, in for a dime, in for a dollar... The center hole below has the grommet installed in it, for the wires to pass through:
Other side:
This pic shows the nutplate installed inside the tailgate of the Runner. The idea was to have a good mechanical connection without having to install hardware in the thin tailgate skin. Also, I was able to slather on a good layer of silicon sealant around each hole so that I had there would not be a water leakage path (not that water doesn't come by the window seal anyway).
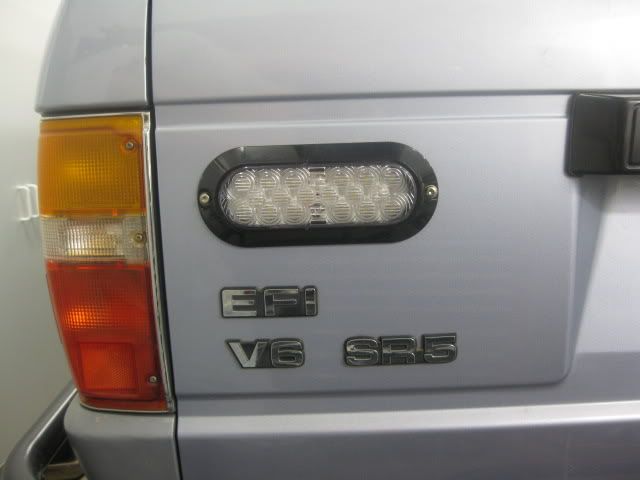
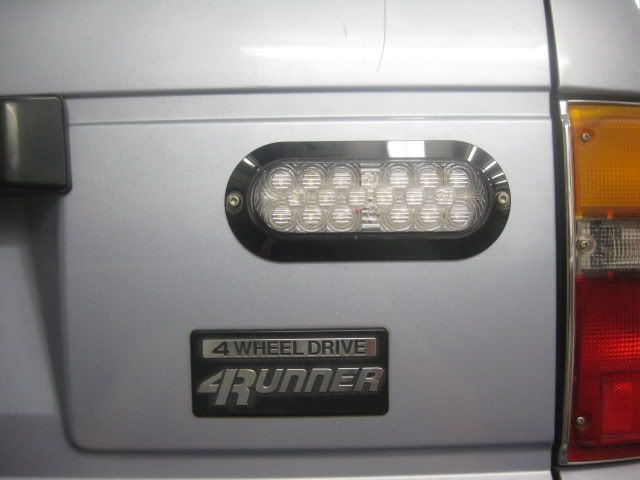
And, here are the lights installed:
So, that was the easy part...wiring them was a bit more of a job. What I wanted was for them to come on when I was in reverse. I also wanted to turn both sets of backup lights on, the stock ones in the tail lights and the new surface mount LED's, with a switch on the dash. Also, I measured the voltage at the stock lights with the engine running, and it was only 10.8V. The stock wiring had a large voltage drop through it. The output on these lights is voltage dependant, so, the higher the voltage at the light, the more output.
I took one of the lights to work and hooked it up to a DC power supply. I measured the current draw at a range of voltages. As the voltage increased, the current draw went up, and the light output stepped up considerably. Here is what I measured:
Voltage / Current draw (mA)
12.0 / 124
12.5 / 147
13.0 / 169
13.5 / 193
14.0 / 218
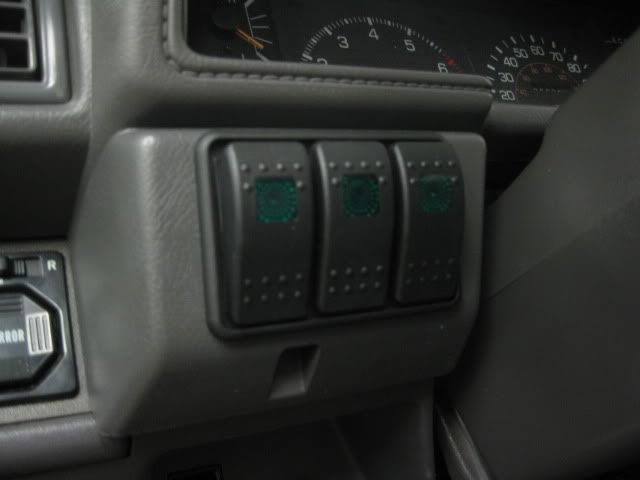
Picture of my dash switches, I am using the one on the right for the backup lights:
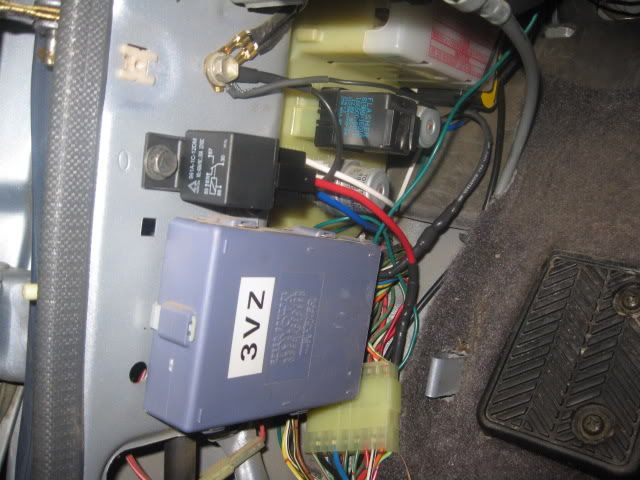
What I did was run a hot tap from my disribution block in the engine compartment to a relay in the kick panel in the driver's side footwell and then all the way back to the backup lights on the tailgate. I hooked two triggers up to this relay. One from the stock reverse switch and one from my manual dash switch. I tapped into the reverse circuit in the wire bundle that runs down out of the kick panel on the driver's side. The wire that supplies voltage to the stock backup lights is in that bundle. I found it in the wiring diagram. I spliced into that wire so that it would trigger the relay to turn on the LED backup lights when in reverse. I also hooked up the output from my dash switch to the same trigger input on the relay. The upside to this approach is that when you turn on the dash switch, it triggers the relay with 12V, but it also feeds 12 V back down the reverse switch trigger and out to the stock backup lights. I got to turn those on for free and only had to use one relay to do it. The downside was that when you put it in reverse, the 12V from the reverse switch would flood back up to the dash switch and turn on the light in the switch. To fix that, I put a diode in line from the dash switch so that current could only flow from the switch to the relay, not back uphill.
By running a 12ga hot tap off of the battery and through the relay, I was able to get 13.5 V at the lights on the tailgate, versus the stock wiring at 10.8 V.
Pic of the relay, I did not photo document much of the wiring, as it was a lot of cutting, soldering, and shrink wrapping (there are enough pics in this thread):
And, since I was going to all this trouble, I did Roger's (4Crawler) LED light upgrade to the stock lamps. I replaced the backup lights and the stop/running lights with LED bulbs from superbrightleds.com:
Rogers write up:
http://www.4crawler.com/4x4/CheapTricks/LEDs/index.html
Bulbs:
While I was in there, I put all new gaskets on the tail lights with new lenses, which I bought from the Toyota of Dallas internet site:
To fit the rather large LED backup bulbs in the tail lamp, I had to grind off a post in the housing a bit to clear the bulb:
And, the bulbs/gaskets installed in the tail lamps:
And finally, how do they work? Without a flash on the camera:
With a flash on the camera:
And a further away shot, without a flash:
The pictures don't really show how bright the combination is. All together, they throw a ton of light, especially out in the woods at night. They should never burn out on me, as they seldom get used, and are very durable. It was a bit of work to install and wire, but the results are pretty cool.
Thoughts on the mod?
(sorry for the long post, lots of pics)
Mike
Last edited by OutlawMike; Aug 26, 2010 at 08:00 AM. Reason: Added Nut Plate Drawing
Aug 20, 2010 | 09:20 PM
#4
Nice! I may have to do something similar. I have fogs mounted on my canopy that run off a relay thats switched by the reverse light switch. But when the canopy is off... atleast having the led's in the tail lamps would be killer.
Aug 20, 2010 | 09:30 PM
#5
Registered User
Joined: Jan 2008
Posts: 11,338
Likes: 120
From: Austin, Texas
I mean, he did say he used 4Crawlers instructions for the led lights in the tail lights. We all know 4Crawler has great documentation.
Read:
http://www.4crawler.com/4x4/CheapTricks/index.shtml
Its there, trust me, took me 30 seconds to find.
 Aug 20, 2010 | 09:35 PM
#6
Thread Starter
Registered User
Joined: Dec 2007
Posts: 710
Likes: 2
From: Santa Rosa, CA
The bulbs are as follows:
Back up bulbs: 1156-W30 Narrow beam (White, 30 LED, 1156 equiv bulb, narrow width to the beam). This one requires some grinding to the post in the housing.
Brake lamp: 1157-R24-WV Wide Beam (Red, 24 LED, 1157 equiv bulb, wide width beam). Roger installed this one also, but I kept wondering about buying the 30 LED 1157 red bulb, it would fit and would throw more light.
Running lamp: WLED-R6 (194/168 type, six LED, red, wedge base) The larger wedge bases will not fit in this location, this is the biggest that will fit, I believe.
As for the lenses and gaskets. Not exactly the most economical bit of maintenance. Rebuilding them is about 1/2 the price of just buying a new assembly. They are all factory Toyota parts, as you can see from the part stickers on there. I can dig up the receipt if you want, but as I recall it was close to 100 bones with shipping for all of the parts. The driver's side corner of my rig had been pushed in at some point, bondo'd and painted. The lens on that side was cracked and the divider that goes in there to separate the lights was missing. The housing was not damaged, so I had to buy a new lens and shade for that side anyway, so I did both sides.
Last edited by OutlawMike; Aug 20, 2010 at 09:47 PM.
Trending Topics
Aug 20, 2010 | 09:41 PM
#8
Thread Starter
Registered User
Joined: Dec 2007
Posts: 710
Likes: 2
From: Santa Rosa, CA
The LED's in the tail lamp are way brighter than I thought they would be. Those 30 LED bulbs put out a strong, focused beam. That one is just a matter of spending the money on the bulbs ($17 each, as I remember) and slapping them in.
Aug 23, 2010 | 08:51 AM
#9
Thread Starter
Registered User
Joined: Dec 2007
Posts: 710
Likes: 2
From: Santa Rosa, CA
I did not have a link in there the first time, I will add one now to 4Crawlers site.
If you get the LED bulbs for the tail lights, consider getting the 30 LED, red, wide beam 1157 bulbs for the stop/running lights. I would like to know how they work, as there is plenty of room for them and they should throw a lot more light.
Mike
If you get the LED bulbs for the tail lights, consider getting the 30 LED, red, wide beam 1157 bulbs for the stop/running lights. I would like to know how they work, as there is plenty of room for them and they should throw a lot more light.
Mike
Last edited by OutlawMike; Aug 23, 2010 at 11:33 AM.
Aug 26, 2010 | 06:56 AM
#11
Registered User
Joined: Sep 2006
Posts: 52
Likes: 1
From: Alabama
Incredible Post!!!!!
Lots of pics are good!!!!!
Ive been thinking of something similar but wanted to put the flush mount reverse lights in my rear bumper. I'm just a cheep guy that refuses to spend $40 dollars a piece on them.

Lots of pics are good!!!!!
Ive been thinking of something similar but wanted to put the flush mount reverse lights in my rear bumper. I'm just a cheep guy that refuses to spend $40 dollars a piece on them.
Aug 26, 2010 | 07:07 AM
#12
Thread Starter
Registered User
Joined: Dec 2007
Posts: 710
Likes: 2
From: Santa Rosa, CA
Thanks,
And I know what you mean on the cost. You can get some pretty good lights for less, but they are all the wrong form factor. I knew that I was taking a bit of a risk getting them and maybe finding that they did not throw enough light. But I figured that they were intended for the back of a big rig trailer, so they had to throw some light, otherwise, how would the guy in the cab get any benefit from them? It turned out that they throw a ton of light, so the $80 wasn't wasted in that respect.
Now, my wife questioned the need for $80 worth of back up lights, and new lenses/gaskets for the taillights....
Aug 26, 2010 | 07:24 AM
#13
Registered User
Joined: May 2007
Posts: 374
Likes: 1
From: North Bay, Ontario
Well done. I'm still in the process of finishing the wiring for my reverse lights on the pick-up... A reminder to others to disconnect the battery when doing the wiring: I think I killed my reverse light switch on the transmission after I accidentally hit a ground and caused a big spark. Now I don't have my stock reverse lights, but my new aux ones work manually. 

Aug 26, 2010 | 08:06 AM
#14
Thread Starter
Registered User
Joined: Dec 2007
Posts: 710
Likes: 2
From: Santa Rosa, CA
That is good advice, pop the negative terminal to avoid making more work. I've made that mistake too many times in the past and now I just disconnect the battery out of habit.
I added the drawing for the nut plate to the post. It is in metric, just to mess with everyone....these are metric vehicles, right? I design parts all day in metric, so, that is how my mind works for anything under 304.8 mm in length (1 foot). Over that, I revert back to English units.
I added the drawing for the nut plate to the post. It is in metric, just to mess with everyone....these are metric vehicles, right? I design parts all day in metric, so, that is how my mind works for anything under 304.8 mm in length (1 foot). Over that, I revert back to English units.

Thread
Thread Starter
Forum
Replies
Last Post
RedRunner_87
95.5-2004 Tacomas & 96-2002 4Runners (Build-Up Section)
84
Jun 1, 2021 01:51 PM
Jnkml
95.5-2004 Tacomas & 96-2002 4Runners
3
Jul 6, 2015 01:20 PM


