
ShortMag's 22re Rebuild.
 Jan 7, 2010 | 09:04 AM
#41

Thread Starter
Registered User
Joined: Jul 2008
Posts: 42
Likes: 0
From: Fayetteville, AR
I measured it by prying the crank all the way back, zeroing the gauge, and then prying forward. I can almost pull out the top bearings and the bottom ones fall out if the cap isn't on and i push the crank forward or back. I'm wondering if the original ones from enginetech will work if i lube them up with the engine assembly lube. I'm afraid to use the ones that came with the engine because the odometer reads just below 300,000.
Jan 7, 2010 | 07:56 PM
#42

Registered User
Joined: May 2009
Posts: 586
Likes: 2
From: Arizona
It would be interesting to compare the thicknesses of old and new. Do you have a caliper? If not, the 6" digital model at HF can usually be found for $20 or less (and 15-20% off any single item coupons are easy to find). Got mine on sale there for $10. They read practically the same as my old Swiss made non-digital caliper up to about beer can diameter. I didn't check anything bigger. Good value.
Jan 7, 2010 | 08:02 PM
#43
Thread Starter
Registered User
Joined: Jul 2008
Posts: 42
Likes: 0
From: Fayetteville, AR
It would be interesting to compare the thicknesses of old and new. Do you have a caliper? If not, the 6" digital model at HF can usually be found for $20 or less (and 15-20% off any single item coupons are easy to find). Got mine on sale there for $10. They read practically the same as my old Swiss made non-digital caliper up to about beer can diameter. I didn't check anything bigger. Good value.
Jan 7, 2010 | 08:10 PM
#44
Registered User
Joined: May 2009
Posts: 586
Likes: 2
From: Arizona
BTW, if you try your other set again, I'd try lightly oiling instead of using assembly lube. Also, as I probably should have done to start with, you can put the uppers in after the crank is in place. I don't know how else you'd do it when not using grease or assembly lube to stick them in place.
Push the crank slightly one direction and roll the washer in on the loose side, making sure the grooves in the washer face out. Push/lightly pry the crank tight up against that washer half and roll in the other side.
Push the crank slightly one direction and roll the washer in on the loose side, making sure the grooves in the washer face out. Push/lightly pry the crank tight up against that washer half and roll in the other side.
Jan 11, 2010 | 04:18 PM
#46
Thread Starter
Registered User
Joined: Jul 2008
Posts: 42
Likes: 0
From: Fayetteville, AR
I took the block and crank into Macon today and found out the ones i originally ordered were right, they just had something built up on them so we took them to some 180 grit sandpaper and they fit right in with clearance just under spec. I just started installing my piston and rods and on the last one i noticed the rod caps are numbered 1,1,3, or 4. Does it matter which cylinder they go in seeing as everything has been machined?
Jan 11, 2010 | 06:05 PM
#47
Registered User
Joined: May 2009
Posts: 586
Likes: 2
From: Arizona
How much thrust clearance did you end up with?
You and/or the shop should have numbered the rod ends and caps on the side that didn't already have numbers or letters. "1" stamped on the cap, "1" stamped on the same side of its corresponding rod, and so on.
Rods and caps are matched pairs. Don't mix up the caps or put them on backwards. Careful also not to put the pistons on the rods backwards.
I don't know how much switching rods from their original cylinders matters. If nobody else answers here, engnbldr is only an e-mail away.
Are you plastigaging your bearings as you assemble?
Jan 11, 2010 | 06:23 PM
#48
Thread Starter
Registered User
Joined: Jul 2008
Posts: 42
Likes: 0
From: Fayetteville, AR
Ended up with about .002" Thrust clearance.
I left the caps on the corresponding rods assuming the shop would too. I guess this is what i get for assuming.
The shop assembled the pistons on the rods and i double checked and they are all good.
I was told by a good friend who works at auto zone that switching the rods between the cylinders would not matter since i have new pistons.
I am plastigaging as i go.
Jan 11, 2010 | 07:15 PM
#49
Registered User
Joined: May 2009
Posts: 586
Likes: 2
From: Arizona
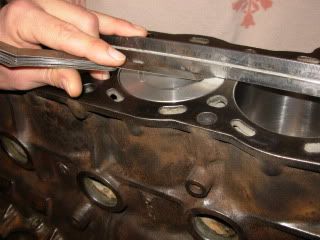
Sounds like you're doing pretty well. If you're curious like me, check your quench after the bottom is together. Turn the crank so one set of pistons is at the top, hold something flat across one (straight edge, back of a caliper), and stick some feeler gauges in to see how much the pistons stick above or below deck height.
What did you decide to use for a head and cam?
What did you decide to use for a head and cam?
Jan 11, 2010 | 08:49 PM
#51
Thread Starter
Registered User
Joined: Jul 2008
Posts: 42
Likes: 0
From: Fayetteville, AR
Thanks Flyingbrass! I've decided to go with Engnbldr's stock head with all new internals and the 261C Cam. I will be ordering that along with a new timing cover and water pump as soon as i finish this post.
Here's a big update.
I did measure the crank clearance and all of the plastigage was around .051mm which is within spec.


When I took the block and crank to Macon he told me to sand the bearings down with 180 grit sandpaper because they had some sort of build up on them.

Turns out that worked perfectly. If anyone does this I suggest doing it on the outside (the side with the oil gaps) because that side has a layer of bearing material compared to the other side which is steel.
This is a measurement before I sanded further than what we had while I was at the machine shop

I forgot to take a picture after I sanded them down but it ended up around .002".
Tonight I feel I got a lot done. I installed all four pistons/rods and measured the rod bearing clearances. Again, all of the plastigage was within spec, measuring around .051mm.


For the whole assembly I've been using Lucas Engine Assembly Lube. It is really thick and sticks to everything, but it does it's job extremely well. I went with assembly lube instead of oil because this will last longer while the block sits in my garage until "D-Day".

Pistons in their homes!

Upside down shot of the crank.

The cap bolts are torqued to 76 ft-lbs. and the rod nuts are torqued to 56 ft-lbs. All of the piston rings are aligned correctly and all of the pistons, rods, and caps are facing the correct direction.
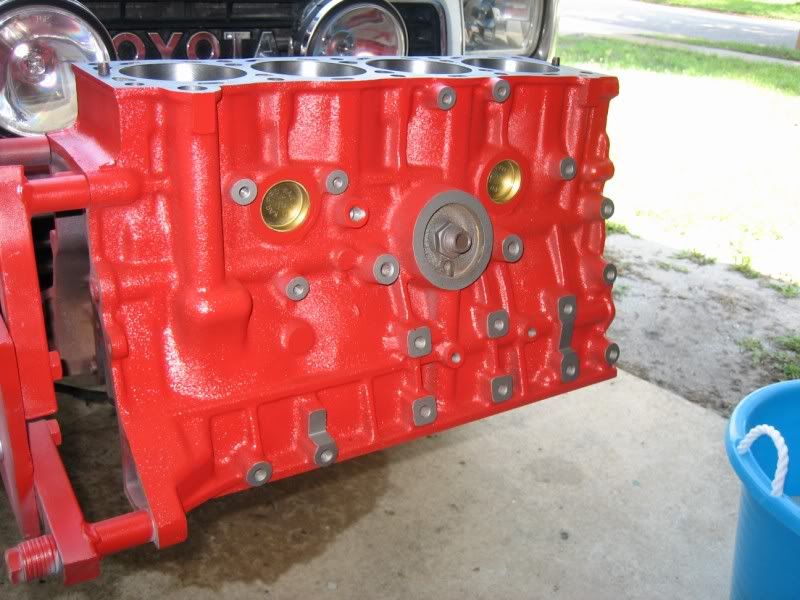
Purty paint


I can't wait for this thing to be up and running!
Here's a big update.
I did measure the crank clearance and all of the plastigage was around .051mm which is within spec.
When I took the block and crank to Macon he told me to sand the bearings down with 180 grit sandpaper because they had some sort of build up on them.
Turns out that worked perfectly. If anyone does this I suggest doing it on the outside (the side with the oil gaps) because that side has a layer of bearing material compared to the other side which is steel.
This is a measurement before I sanded further than what we had while I was at the machine shop
I forgot to take a picture after I sanded them down but it ended up around .002".
Tonight I feel I got a lot done. I installed all four pistons/rods and measured the rod bearing clearances. Again, all of the plastigage was within spec, measuring around .051mm.
For the whole assembly I've been using Lucas Engine Assembly Lube. It is really thick and sticks to everything, but it does it's job extremely well. I went with assembly lube instead of oil because this will last longer while the block sits in my garage until "D-Day".
Pistons in their homes!
Upside down shot of the crank.
The cap bolts are torqued to 76 ft-lbs. and the rod nuts are torqued to 56 ft-lbs. All of the piston rings are aligned correctly and all of the pistons, rods, and caps are facing the correct direction.
Purty paint
I can't wait for this thing to be up and running!
Last edited by ShortMag; Jan 11, 2010 at 08:53 PM.
Jan 12, 2010 | 06:49 PM
#53
Registered User
Joined: Oct 2009
Posts: 62
Likes: 0
From: Tx
Sounds like you're doing pretty well. If you're curious like me, check your quench after the bottom is together. Turn the crank so one set of pistons is at the top, hold something flat across one (straight edge, back of a caliper), and stick some feeler gauges in to see how much the pistons stick above or below deck height.
What did you decide to use for a head and cam?
What did you decide to use for a head and cam?
Looks like it worked.
 Jan 12, 2010 | 07:08 PM
#54

Registered User
Joined: May 2008
Posts: 10
Likes: 0
Progress today! And lots of it! I took the block back to the machine shop today to have a scratch on the deck looked at. All was good on that so i ran by wallyworld and picked up some rustoleum's spray paint, then got to work.


Masked everything off for paint and so i could wire wheel the crap out of it without getting too much debris in the cylinders.

After wire wheel
I blew it off with my "air compressor" and started scrubbing with mineral spirits

"Poor-Man's Air Compressor".

Dr. Du-More got a work out tonight.


Nice and shiny after even more wire wheel and mineral spirits.


All taped up and ready for primer.


I got two coats put on tonight and plan to do another one or two tomorrow, then i'll put a few top coats of flat black.
I was stuck using my phone for pictures today so i'll have better pics tomorrow.
Masked everything off for paint and so i could wire wheel the crap out of it without getting too much debris in the cylinders.
After wire wheel
I blew it off with my "air compressor" and started scrubbing with mineral spirits
"Poor-Man's Air Compressor".
Dr. Du-More got a work out tonight.
Nice and shiny after even more wire wheel and mineral spirits.
All taped up and ready for primer.
I got two coats put on tonight and plan to do another one or two tomorrow, then i'll put a few top coats of flat black.
I was stuck using my phone for pictures today so i'll have better pics tomorrow.
but i did mine blue like here
http://www.facebook.com/album.php?ai...0&l=c634715b49
2wd i know but i have done some wheeling in it!

http://www.facebook.com/album.php?ai...0&l=3284a505d9
and im getting new tires to go on my new wheels monday. 235 75 15 yokohama geolander ats
http://www.facebook.com/album.php?ai...0&l=15772023fe
Jan 12, 2010 | 07:13 PM
#55
Registered User
Joined: May 2008
Posts: 10
Likes: 0
 mine was a blast, and SUCH an awsome learning experience!
ahhh the memories of picking which color to paint it. it was either lime green or this. i decided this would match better
http://www.facebook.com/photo.php?pi...8&id=593516500
http://www.facebook.com/photo.php?pi...8&id=593516500
http://www.facebook.com/photo.php?pi...5&id=593516500
http://www.facebook.com/photo.php?pi...5&id=593516500
Last edited by thebodj; Jan 12, 2010 at 07:18 PM.
Jan 12, 2010 | 07:37 PM
#56
Thread Starter
Registered User
Joined: Jul 2008
Posts: 42
Likes: 0
From: Fayetteville, AR
Truck and block look great bodj. My machinist said he uses normal rattle can for his engines and he hasn't had any problems yet. I read the back of the cans and they say up to 200F which is a little concerning, but we'll see.
Thanks for that pic Donsway. What did yours measure at? Is there a certain clearance I should have?
BIG NEWS!
I just placed my order with Engnbldr!
A stock head, 261C cam, COV900 Timing cover, and WP900 coolant pump should be on their way soon!
ECU Harness will be my next purchase seeing as i broke about half of the clips off of mine.
I plan on painting the valve cover and all of my brackets this weekend. Still tossing around the idea of painting the engine bay. What do y'all think?
Jan 12, 2010 | 08:51 PM
#57
Registered User
Joined: Oct 2009
Posts: 62
Likes: 0
From: Tx
That was after I got the block back from the machine shop about a week ago. Had it bored 40 over brought it home, put the lower end together (master kit from Ted) and checked how high the pistons were in the cyls. All but one were .012 under the deck. The 3rd was .013. So I took it back apart and is now back at the shop to have .012 taken off the deck to make all but one piston be level with the deck. (0 deck height)
Here is where I found this info.
http://www.4x4wire.com/forums/showfl...=&fpart=1&vc=1
Took 3 months to get it back the first time because the guy does big accounts and they come first I guess???? I've had him do some small block Chevy blocks, and a nice set of double hump heads, so know he does good work. Just slow...
This is the last eng. I built that he did the machine work on. Never has made it in the Nova it's going in. Things came up and it got a big hold put on it. I have a built TH400, 3200 stall to go behind that already. So sad...
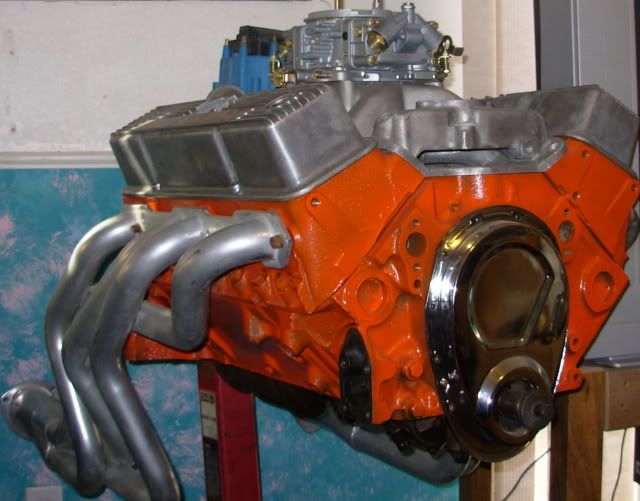
I hope I don't get banned for posting a SBC on a Toyota forum.
Here is where I found this info.
http://www.4x4wire.com/forums/showfl...=&fpart=1&vc=1
Took 3 months to get it back the first time because the guy does big accounts and they come first I guess???? I've had him do some small block Chevy blocks, and a nice set of double hump heads, so know he does good work. Just slow...
This is the last eng. I built that he did the machine work on. Never has made it in the Nova it's going in. Things came up and it got a big hold put on it. I have a built TH400, 3200 stall to go behind that already. So sad...
I hope I don't get banned for posting a SBC on a Toyota forum.
Jan 13, 2010 | 04:56 PM
#58
Registered User
Joined: May 2009
Posts: 586
Likes: 2
From: Arizona
My ignorant opinion is that surface prep and following application instructions of the product you're using probably matters more than the type of paint.
I think for your valve cover you'll need to degrease extremely well with a solvent that doesn't leave behind any residue and use a self-etching primer.
Jan 13, 2010 | 07:36 PM
#59
Thread Starter
Registered User
Joined: Jul 2008
Posts: 42
Likes: 0
From: Fayetteville, AR
That was after I got the block back from the machine shop about a week ago. Had it bored 40 over brought it home, put the lower end together (master kit from Ted) and checked how high the pistons were in the cyls. All but one were .012 under the deck. The 3rd was .013. So I took it back apart and is now back at the shop to have .012 taken off the deck to make all but one piston be level with the deck. (0 deck height)
Here is where I found this info.
http://www.4x4wire.com/forums/showfl...=&fpart=1&vc=1
Took 3 months to get it back the first time because the guy does big accounts and they come first I guess???? I've had him do some small block Chevy blocks, and a nice set of double hump heads, so know he does good work. Just slow...
This is the last eng. I built that he did the machine work on. Never has made it in the Nova it's going in. Things came up and it got a big hold put on it. I have a built TH400, 3200 stall to go behind that already. So sad...
I hope I don't get banned for posting a SBC on a Toyota forum.
That post up by engnbldr is awesome. It answered my much needed question of exhaust size. (The pipe from my muffler to the tip rusted off at the muffler.)
My machinist also put other bigger accounts ahead of mine which didn't make me too happy.
I personally don't mind an SBC. A Ford though... that's a different story.
I've read of people using normal paint on the block with good results. Some say it holds up better than rattle can high temp engine paint.
My ignorant opinion is that surface prep and following application instructions of the product you're using probably matters more than the type of paint.
I think for your valve cover you'll need to degrease extremely well with a solvent that doesn't leave behind any residue and use a self-etching primer.
Where can i pick up self-etching primer?


