ShortMag's 22re Rebuild.
 12-05-2009, 06:39 PM
#21
Registered User

I'm glad to see a fellow engine rebuilder posting pics and updates. The shop I used also took much longer than expected.
Be sure to take out your oil galley plugs (one in front, one in back, and one in the bottom) and thoroughly clean out the oil passages. Gun bore cleaning brushes work well. Mine had crap inside even after hot tanking.
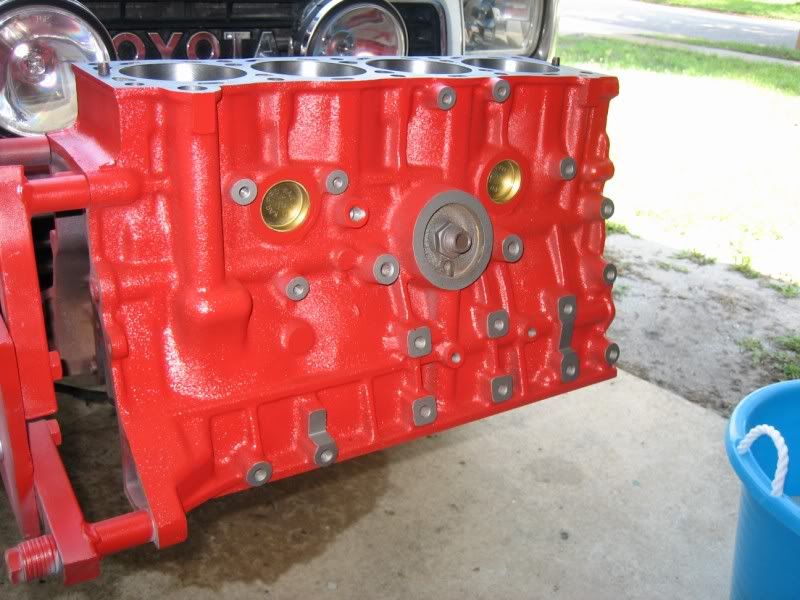
The outside of your block isn't too far off from how mine came back from the shop. I wire wheeled off the external rust, scrubbed the block with soap and water inside and out, then blew it dry with compressed air. Wipe important surfaces with some WD-40 or similar to avoid flash rusting, and don't delay painting the outside.
I envy your nice, clean, uneroded water passages on your deck. Mine are pretty bad.
You seem to be missing a freeze plug on the passenger side to the rear of the oil filter.
Be sure to take out your oil galley plugs (one in front, one in back, and one in the bottom) and thoroughly clean out the oil passages. Gun bore cleaning brushes work well. Mine had crap inside even after hot tanking.
The outside of your block isn't too far off from how mine came back from the shop. I wire wheeled off the external rust, scrubbed the block with soap and water inside and out, then blew it dry with compressed air. Wipe important surfaces with some WD-40 or similar to avoid flash rusting, and don't delay painting the outside.
I envy your nice, clean, uneroded water passages on your deck. Mine are pretty bad.
You seem to be missing a freeze plug on the passenger side to the rear of the oil filter.
Last edited by flyingbrass; 12-05-2009 at 06:56 PM.
 12-05-2009, 08:04 PM
#22
Contributing Member
looks good!
I love seeing 22re rebiuld threads mine was a blast, and SUCH an awsome learning experience!
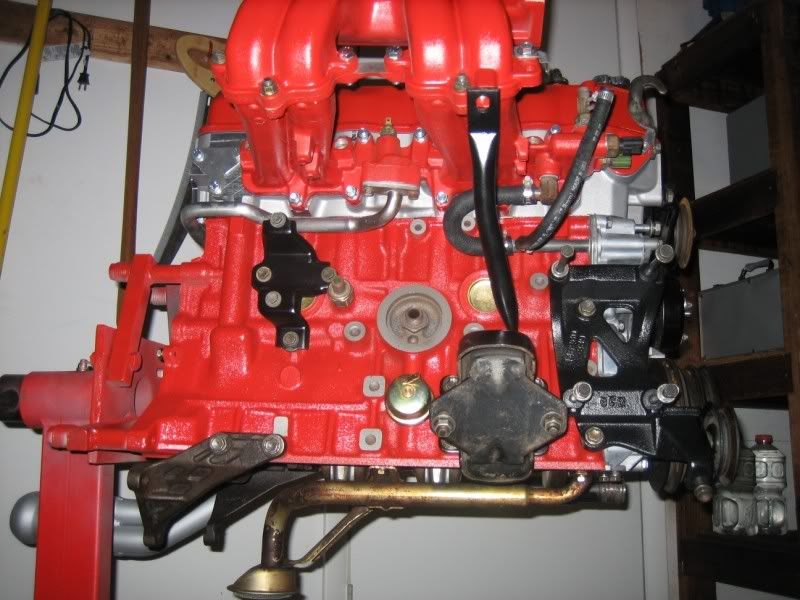
ummm, yeah, it's definately just hidden behind the fuel filter bracket 
I love seeing 22re rebiuld threads
mine was a blast, and SUCH an awsome learning experience!
Last edited by iamsuperbleeder; 12-05-2009 at 08:05 PM.
12-05-2009, 08:18 PM
#23
Registered User
Ok, that's an RE thing. Was the bracket taken off and the freeze plug behind it removed/replaced?
I don't trust shops.
My 22R:

I don't trust shops.
My 22R:
Last edited by flyingbrass; 12-05-2009 at 08:37 PM.
12-07-2009, 04:19 PM
#24
Registered User
Thread Starter

Join Date: Jul 2008
Location: Fayetteville, AR
Posts: 42
Likes: 0
Received 0 Likes
on
0 Posts
Your guys' blocks look awesome!
Thanks for posting those up Keith. The final bill included a .20 over bore, hone, hot dip, line bore on the mains, the crank turned, and the deck machined .010". I'm very impressed with the way the deck, cylinders, mains and crank look. I'm not so impressed with the customer service from Macon. I dropped the block, crank, piston and rods off on Oct. 27th and was told I could pick it up in a week. I called the next week and his crank turning machine was broken so he didn't get around to doing any of it...(turns out Macon didn't even turn the crank, he took it to another shop across town.) I kept calling once or twice a week after that and kept getting told it would be ready in 4 days, or in a week. Not the case. After 5 weeks he finally started and i was told last tuesday that i could pick it up thursday. Turns out he hadn't ordered the new parts until that monday and they were a day late on shipping so i couldn't get it. It was finally ready on Saturday so i went and picked it up before work. Anyway...
I hadn't planned on decking the block but I was told I would have blown a head gasket instantly due to the multiple .008" deep dips in the deck so he evened it out by taking .010" off. I ordered an Engine Tech parts kit from the shop and it included pistons, rings, full bearing and gasket set, oil pump, and timing set. The plan from here is to paint it (color is still undetermined, and i'm very open to suggestions.), clean up and paint all the brackets, and assemble the bottom end. I'm asking my parents to buy part of the stock engnbldr head for Christmas, and I'll be getting a 261 Cam at the same time. I plan on having the rig going by February at the latest!
Here's a few more snap shots:

I found the missing freeze plug.

crappy shot of the mains
Thanks for posting those up Keith. The final bill included a .20 over bore, hone, hot dip, line bore on the mains, the crank turned, and the deck machined .010". I'm very impressed with the way the deck, cylinders, mains and crank look. I'm not so impressed with the customer service from Macon. I dropped the block, crank, piston and rods off on Oct. 27th and was told I could pick it up in a week. I called the next week and his crank turning machine was broken so he didn't get around to doing any of it...(turns out Macon didn't even turn the crank, he took it to another shop across town.) I kept calling once or twice a week after that and kept getting told it would be ready in 4 days, or in a week. Not the case. After 5 weeks he finally started and i was told last tuesday that i could pick it up thursday. Turns out he hadn't ordered the new parts until that monday and they were a day late on shipping so i couldn't get it. It was finally ready on Saturday so i went and picked it up before work. Anyway...
I hadn't planned on decking the block but I was told I would have blown a head gasket instantly due to the multiple .008" deep dips in the deck so he evened it out by taking .010" off. I ordered an Engine Tech parts kit from the shop and it included pistons, rings, full bearing and gasket set, oil pump, and timing set. The plan from here is to paint it (color is still undetermined, and i'm very open to suggestions.), clean up and paint all the brackets, and assemble the bottom end. I'm asking my parents to buy part of the stock engnbldr head for Christmas, and I'll be getting a 261 Cam at the same time. I plan on having the rig going by February at the latest!
Here's a few more snap shots:
I found the missing freeze plug.
crappy shot of the mains
12-14-2009, 08:28 PM
#25
Registered User
Thread Starter
Join Date: Jul 2008
Location: Fayetteville, AR
Posts: 42
Likes: 0
Received 0 Likes
on
0 Posts
Progress today! And lots of it! I took the block back to the machine shop today to have a scratch on the deck looked at. All was good on that so i ran by wallyworld and picked up some rustoleum's spray paint, then got to work.


Masked everything off for paint and so i could wire wheel the crap out of it without getting too much debris in the cylinders.

After wire wheel
I blew it off with my "air compressor" and started scrubbing with mineral spirits

"Poor-Man's Air Compressor".

Dr. Du-More got a work out tonight.


Nice and shiny after even more wire wheel and mineral spirits.


All taped up and ready for primer.


I got two coats put on tonight and plan to do another one or two tomorrow, then i'll put a few top coats of flat black.
I was stuck using my phone for pictures today so i'll have better pics tomorrow.
Masked everything off for paint and so i could wire wheel the crap out of it without getting too much debris in the cylinders.
After wire wheel
I blew it off with my "air compressor" and started scrubbing with mineral spirits
"Poor-Man's Air Compressor".
Dr. Du-More got a work out tonight.
Nice and shiny after even more wire wheel and mineral spirits.
All taped up and ready for primer.
I got two coats put on tonight and plan to do another one or two tomorrow, then i'll put a few top coats of flat black.
I was stuck using my phone for pictures today so i'll have better pics tomorrow.
12-14-2009, 09:15 PM
#26
Registered User
Are you planning to wash the inside of the block? Remove oil galley plugs and clean those passages? Wash or otherwise clean the crank?
I figured parts coming back from the shop would be clean and pretty much ready to go, particularly the clean looking crank wrapped in a plastic bag. They weren't.
I figured parts coming back from the shop would be clean and pretty much ready to go, particularly the clean looking crank wrapped in a plastic bag. They weren't.
12-14-2009, 09:41 PM
#27
Contributing Member
Join Date: Jan 2004
Location: Trafford, Pa
Posts: 1,202
Likes: 0
Received 0 Likes
on
0 Posts
When you got the block decked did they do they do the timing cover also? I've heard you have to get them both done together. Otherwise the T.C. is .010 higher. Also it looks like they used a torch on the connecting rods where the piston pins are to get them out. Is that normal practice. I could be wrong from the pics.
This brings me back memories when I did my first one. Looking great so far.
This brings me back memories when I did my first one. Looking great so far.
Last edited by 86toyota; 12-14-2009 at 09:44 PM.
12-15-2009, 08:22 PM
#28
Registered User
Thread Starter
Join Date: Jul 2008
Location: Fayetteville, AR
Posts: 42
Likes: 0
Received 0 Likes
on
0 Posts
When you got the block decked did they do they do the timing cover also? I've heard you have to get them both done together. Otherwise the T.C. is .010 higher. Also it looks like they used a torch on the connecting rods where the piston pins are to get them out. Is that normal practice. I could be wrong from the pics.
This brings me back memories when I did my first one. Looking great so far.
This brings me back memories when I did my first one. Looking great so far.
Are you planning to wash the inside of the block? Remove oil galley plugs and clean those passages? Wash or otherwise clean the crank?
I figured parts coming back from the shop would be clean and pretty much ready to go, particularly the clean looking crank wrapped in a plastic bag. They weren't.
I figured parts coming back from the shop would be clean and pretty much ready to go, particularly the clean looking crank wrapped in a plastic bag. They weren't.
I plan on running a "snake" through all my passages to clean them out. And as far as the crank goes, it's pretty darn clean. There's a little surface rust on some of the counter balances, but that's it.
12-15-2009, 09:12 PM
#29
Registered User
Sounds like how my crank came back. I looked in a few oil holes nearest the bag's opening. They looked ok (figures that I saw the only clean ones), so I wiped off the journals and installed it. Got to looking at the rod oil holes and noticed they were dirty. I removed the crank and cleaned the oil passages as best I could without removing the plugs.
Look at the pic here: https://www.yotatech.com/51308125-post177.html And that's just from wiping off the cleaning brush after poking through the reachable holes. Give your crank a better exam than I first did. Wouldn't hurt to at least blow out the passages with air.
22R wrist pins are free floating, so no need for a torch. The pins are, at least when everything is new, a tight fit in the pistons. The FSM says to heat the pistons to something like 140 F and then drive the pins out. Mine were worn enough they didn't need that. To install you're supposed to heat the pistons to about 176 F. I dunked my new ones in boiling water.
Last edited by flyingbrass; 12-20-2009 at 12:28 AM.
12-18-2009, 12:52 PM
#30
Registered User
Thread Starter
Join Date: Jul 2008
Location: Fayetteville, AR
Posts: 42
Likes: 0
Received 0 Likes
on
0 Posts
Well piss. 
I started assembly of my bottom end today. I had my main bearings and TW bearings in place along with some plasti gauge and I started setting my crank in place, but it would not sit correctly. Turns out my TW bearings are too big or my crank was not ground enough. I am not happy. My machinist said he would get back to me when he got back to the shop... who knows how long that will be.
I started assembly of my bottom end today. I had my main bearings and TW bearings in place along with some plasti gauge and I started setting my crank in place, but it would not sit correctly. Turns out my TW bearings are too big or my crank was not ground enough. I am not happy. My machinist said he would get back to me when he got back to the shop... who knows how long that will be.
12-18-2009, 02:53 PM
#31
Contributing Member
Join Date: Jan 2004
Location: Trafford, Pa
Posts: 1,202
Likes: 0
Received 0 Likes
on
0 Posts
Well piss.
I started assembly of my bottom end today. I had my main bearings and TW bearings in place along with some plasti gauge and I started setting my crank in place, but it would not sit correctly. Turns out my TW bearings are too big or my crank was not ground enough. I am not happy. My machinist said he would get back to me when he got back to the shop... who knows how long that will be.
I started assembly of my bottom end today. I had my main bearings and TW bearings in place along with some plasti gauge and I started setting my crank in place, but it would not sit correctly. Turns out my TW bearings are too big or my crank was not ground enough. I am not happy. My machinist said he would get back to me when he got back to the shop... who knows how long that will be.
Keep us posted on what you do.
12-18-2009, 04:31 PM
#32
Registered User
Small world. I've been pulling my hair out lately over thrust washers. The ones in my kit measured in spec but were too thick for my crank. I'm still deciding whether to use the new ones I've slightly sanded down or reuse my originals.
Ted (Engnbldr) advises thrust clearance of .003" to .008". A dial indicator is very helpful.
Ted (Engnbldr) advises thrust clearance of .003" to .008". A dial indicator is very helpful.
12-18-2009, 04:38 PM
#33
Registered User
Assuming you're as ignorant about this stuff as I am, be sure to get the thrust washers centered before torquing down the middle cap. The FSM doesn't say anything about it, but it's important. If the cap is off a bit (front to back) the washer halves won't be lined up with each other.
Chilton's says torque the 4 other caps, then pry the crank forward, backward, then forward again as you torque the center.
Ted said he just gives the rear of the crank a tap with a rubber hammer or block of wood.
Chilton's says torque the 4 other caps, then pry the crank forward, backward, then forward again as you torque the center.
Ted said he just gives the rear of the crank a tap with a rubber hammer or block of wood.
Last edited by flyingbrass; 12-18-2009 at 04:41 PM.
12-18-2009, 05:10 PM
#34
Registered User
Join Date: Jul 2009
Location: hubert nc
Posts: 1,151
Likes: 0
Received 0 Likes
on
0 Posts
dont break your knock sensor that is located next to the oil filter.. that little sensor is expensive is anywhere from 130.00-180.00 dollars... some how the boggieman broke mine after i pulled mine engine.. and i was shocked once i found out how much that sensor cost.
12-18-2009, 05:20 PM
#35
Registered User
Join Date: Jul 2009
Location: hubert nc
Posts: 1,151
Likes: 0
Received 0 Likes
on
0 Posts
your doing a great job with your engine.. i was just lazy and tore my old engine down and found a used one on craigslist for 250.00 bucks that had very low miles. so i really couldnt complain... its was cheapper then doing a rebuild..
12-19-2009, 08:21 AM
#36
Registered User
Thread Starter
Join Date: Jul 2008
Location: Fayetteville, AR
Posts: 42
Likes: 0
Received 0 Likes
on
0 Posts
Small world. I've been pulling my hair out lately over thrust washers. The ones in my kit measured in spec but were too thick for my crank. I'm still deciding whether to use the new ones I've slightly sanded down or reuse my originals.
Ted (Engnbldr) advises thrust clearance of .003" to .008". A dial indicator is very helpful.
Ted (Engnbldr) advises thrust clearance of .003" to .008". A dial indicator is very helpful.
I have some platigage that measures .002 - .006 so i'll try and measure the thrust washer clearance with that. If that doesn't work I'll probably haul it back to the machine shop and have him use his dial.
Assuming you're as ignorant about this stuff as I am, be sure to get the thrust washers centered before torquing down the middle cap. The FSM doesn't say anything about it, but it's important. If the cap is off a bit (front to back) the washer halves won't be lined up with each other.
Chilton's says torque the 4 other caps, then pry the crank forward, backward, then forward again as you torque the center.
Ted said he just gives the rear of the crank a tap with a rubber hammer or block of wood.
Chilton's says torque the 4 other caps, then pry the crank forward, backward, then forward again as you torque the center.
Ted said he just gives the rear of the crank a tap with a rubber hammer or block of wood.
dont break your knock sensor that is located next to the oil filter.. that little sensor is expensive is anywhere from 130.00-180.00 dollars... some how the boggieman broke mine after i pulled mine engine.. and i was shocked once i found out how much that sensor cost.
I got a call from Macon (my machinist) right as i was walking into work last night. He said there are two different part numbers for the TW and enginetech probably put the wrong ones in the box. They were packaged with the main bearings though so it makes me wonder if those are wrong too. I think one part number was for 84-85 and then the other for 85+. I called him again this morning but nobody picked up. I'll post something up as soon as i hear from him.
Last edited by ShortMag; 12-19-2009 at 03:43 PM.
12-20-2009, 12:11 AM
#37
Registered User
Plastigage won't work for checking thrust clearance. You're measuring movement of the crank end to end as it butts against the thrust washers. You can use feeler gauges. I didn't have much luck trying that. A dial indicator works far better and is the right tool for the job. You can buy a dial and magnetic base for about $20.
Pry (lightly, don't go crazy) the crank fore and aft and measure how much it moves. If using a feeler gauge, pry it one direction and measure clearance between washer and crank on the "loose" side.
Realistically, measuring and fussing over the exact clearance is probably overkill. As long as the washers don't bind crank rotation in the least and there isn't too much slop, you're probably fine. But, newbies like us don't have the experience to give the crank a spin and a shake to judge whether it's ok.
Last edited by flyingbrass; 12-20-2009 at 12:19 AM.
12-20-2009, 12:33 AM
#38
Registered User
I plastigaged my main bearings without installing the thrust washers. You could do the same to see if your bearing clearances are ok. If they are out, that'll be another item for the shop to address.
01-06-2010, 08:27 PM
#39
Registered User
Thread Starter
Join Date: Jul 2008
Location: Fayetteville, AR
Posts: 42
Likes: 0
Received 0 Likes
on
0 Posts
Correct me if I'm wrong...
Macon got me a set of new, thinner TW early this week. I picked up a dial gauge and base from harbor freight today so i could measure clearance properly. I start assembling, lube and all. I torqued the outer 4, attempted to center the TW's and then torqued cap 3. I got my gauge all set up and then measured... I couldn't believe it, .0465"! FSM calls for .0008 - .012". Please correct me if i am wrong, but it looks to me like i have a predicament on my hands.

I also plastigaged my crank this week. All is good there . Will post pics later.
I also plastigaged my crank this week. All is good there
. Will post pics later.
01-06-2010, 09:04 PM
#40
Registered User
Don't worry about what numbers the dial shows, only how much they change when you lightly pry the crank forward and rearward. Say, for example it reads 50 pried forward and 46 the other way. Your thrust clearance would be .004".
If you had zeroed your dial and are actually getting .046" movement, those washers aren't anywhere near right.
In retrospect I suspect I originally didn't have my cap centered. Plus, I didn't really know how much clearance there was until I bought a dial indicator. The washers in Engnbldr's kit should have worked. I somehow managed to ruin them setting the crank in, so I reused my originals. I swapped front and rear sets so the rear would have a fresher face. The rear gets practically all the wear. IIRC, my thrust clearance ended up around .005". Engnbldr says it should be .003" to .008".
To make sure I got the middle cap centered I checked thrust with only the upper halves in. I figured that was a baseline -- no intererence at all from the cap. I made sure it stayed the same after putting on the middle cap.


