
Rotor change out.... problem....
 Feb 11, 2009 | 08:33 PM
#1
Thread Starter
Registered User
Joined: Oct 2008
Posts: 126
Likes: 0
From: Kansas
Rotor change out.... problem....
Ok. To start with, I have a 95 4Runner, 2WD, v6
I planned to change my pads and rotors today, but came accross a problem as soon as i took off my wheel.
You have to remove the "hub" I guess it is called, or whatever, to remove the bearings, then the plate that holds the studs (which do not go into the rotor), then the rotor. Which then should be able to be removed.
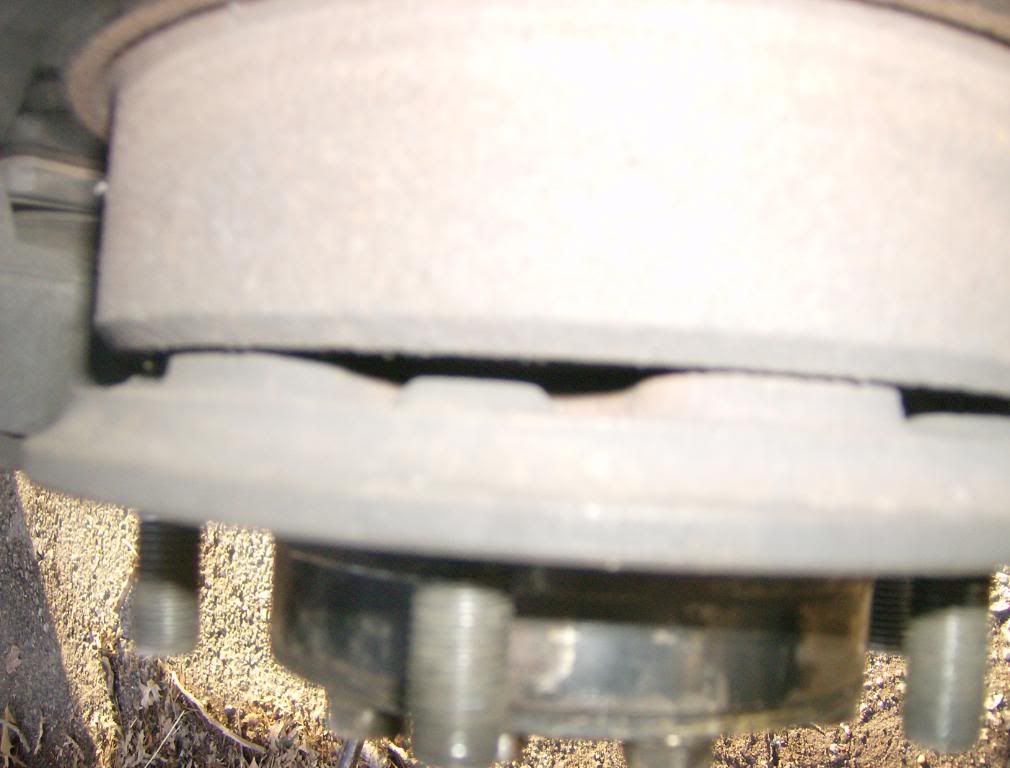
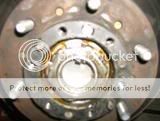
Here are some pics about what I am talking about:
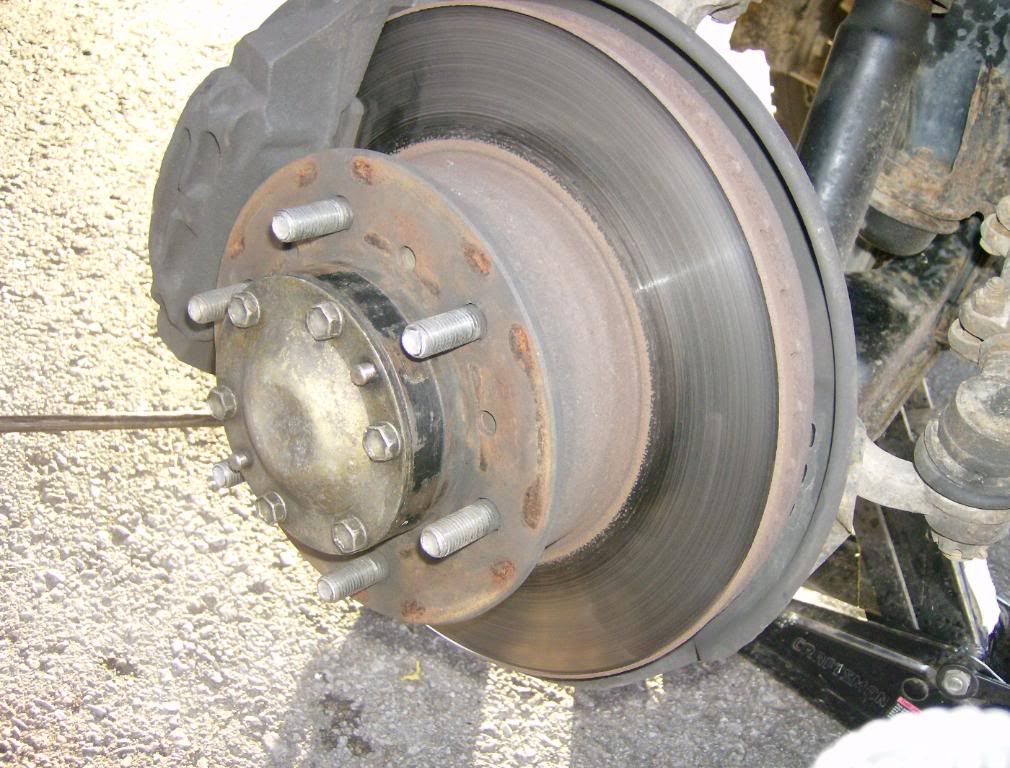
(Full view)
(Can see that it doesnt go into the rotor)
(Where bearings are, and Can not get that bolt i guess u would call it, turned.)

(Rotor I got)
(Just a side by side picture)
First off, I cant get that bolt/whatever for the bearings off. There is no way to get something on the side, and have tryed from the front....... but cant turn it. (and yes i know that sounds sooo wrong...)
Could I use that rotor I got and then put the studs in that and plate on top? Use rotor, but put plate back in front with studs? Or?....
And how do i get the bearings out so that I can get rotor off?
Thanks in advance.
I planned to change my pads and rotors today, but came accross a problem as soon as i took off my wheel.
You have to remove the "hub" I guess it is called, or whatever, to remove the bearings, then the plate that holds the studs (which do not go into the rotor), then the rotor. Which then should be able to be removed.
Here are some pics about what I am talking about:
(Full view)
(Can see that it doesnt go into the rotor)
(Where bearings are, and Can not get that bolt i guess u would call it, turned.)
(Rotor I got)
(Just a side by side picture)
First off, I cant get that bolt/whatever for the bearings off. There is no way to get something on the side, and have tryed from the front....... but cant turn it. (and yes i know that sounds sooo wrong...)
Could I use that rotor I got and then put the studs in that and plate on top? Use rotor, but put plate back in front with studs? Or?....
And how do i get the bearings out so that I can get rotor off?
Thanks in advance.
Feb 11, 2009 | 08:37 PM
#2
Registered User
Joined: Sep 2007
Posts: 249
Likes: 0
From: Puyallup, WA
Well I had this exact same problem about 3 weeks ago - my thread is here
https://www.yotatech.com/forums/f116...please-164927/
If you go down about half way I have a youtube link of my problem.
Basically you need to get that "nut" off.. it is 54mm or 2 1/8 - either will work. My bearings were so bad that they welded those nuts on tight.. I had a 3 foot pry bar on it and it wouldn't budge. The two links in the first post of the thread I gave you should provide a LOT of info on how to get them off
Lemme know if you still can't get it. There are two 54mm nuts separated by washers. Don't try to turn both at once or it won't budge. It should only be a tad tighter than hand tight.
Last edited by devldogs55; Feb 11, 2009 at 08:40 PM.
Feb 11, 2009 | 08:42 PM
#3
Thread Starter
Registered User
Joined: Oct 2008
Posts: 126
Likes: 0
From: Kansas
Well I had this exact same problem about 3 weeks ago - my thread is here
https://www.yotatech.com/forums/f116...please-164927/
If you go down about half way I have a youtube link of my problem.
Basically you need to get that "nut" off.. it is 54mm or 2 1/8 - either will work. My bearings were so bad that they welded those nuts on tight.. I had a 3 foot pry bar on it and it wouldn't budge. The two links in the first post of the thread I gave you should provide a LOT of info on how to get them off
Lemme know if you still can't get it. There are two 54mm nuts separated by washers. Don't try to turn both at once or it won't budge. It should only be a tad tighter than hand tight.
https://www.yotatech.com/forums/f116...please-164927/
If you go down about half way I have a youtube link of my problem.
Basically you need to get that "nut" off.. it is 54mm or 2 1/8 - either will work. My bearings were so bad that they welded those nuts on tight.. I had a 3 foot pry bar on it and it wouldn't budge. The two links in the first post of the thread I gave you should provide a LOT of info on how to get them off
Lemme know if you still can't get it. There are two 54mm nuts separated by washers. Don't try to turn both at once or it won't budge. It should only be a tad tighter than hand tight.
What about the rotor? You have same problem with that? (Just now about to look at your thread, just want to catch you in case that wasn't answered there.)
Feb 11, 2009 | 08:47 PM
#4
Registered User
Joined: Sep 2007
Posts: 249
Likes: 0
From: Puyallup, WA
i don't quite understand your problem with the rotor.. are you having trouble removing it? If so... you have to get the two 54mm nuts off first and then the rotor will come off along with that plate. then you have to separate the rotor from the plate via the studs in the back of the rotor. Both the inner and outer wheel bearings will be accessible then.
HINT - when you have that whole thing off - take the tire from the side you're working on and lay that entire rotor/plate assembly in with the lug bolts going into the tire like it was mounted to it... makes it a LOT easier to hold steady while you loosen the nuts on the back of the rotor.
Check out the link to the FSM on the top of my thread.
Last edited by devldogs55; Feb 11, 2009 at 08:48 PM.
Feb 11, 2009 | 08:50 PM
#5
Thread Starter
Registered User
Joined: Oct 2008
Posts: 126
Likes: 0
From: Kansas
 Feb 11, 2009 | 08:53 PM
#6
Registered User
Joined: Sep 2007
Posts: 249
Likes: 0
From: Puyallup, WA
The only studs I see in your pictures are the lug bolts - correct?
The studs that hold the rotor to that plate are in the back of the rotor. You have to take the rotor/hub assembly off of the axle as one piece and separate the rotor from the hub plate while it's off.
The studs that hold the rotor to that plate are in the back of the rotor. You have to take the rotor/hub assembly off of the axle as one piece and separate the rotor from the hub plate while it's off.
Feb 11, 2009 | 08:56 PM
#7
Thread Starter
Registered User
Joined: Oct 2008
Posts: 126
Likes: 0
From: Kansas
So I do have to remove the bearings to get the plate and rotor off?
And to remove the bearings I need to get a 54mm socket or 2 1/8 socket and get it off. Then take out bearings (placing them somewhere clean), then the rest should come off.
Right?
Trending Topics
Feb 11, 2009 | 09:00 PM
#8
Registered User
Joined: Sep 2007
Posts: 249
Likes: 0
From: Puyallup, WA
Kinda... you don't remove the bearings until you get the two 54mm nuts off and then when you pull off that rotor/hub plate assembly the outer bearings will be exposed on the front and the inner bearings will be exposed in the back. It will all make immediate sense to you once you get the 54mm nuts off.
Pull that assembly off and then pull the bearings out. If they're old I would recommend replacing them. If not - at least clean and repack them with grease. Then unbolt the rotor and bolt the new one back on. tap in the new bearings and re-install.
Pull that assembly off and then pull the bearings out. If they're old I would recommend replacing them. If not - at least clean and repack them with grease. Then unbolt the rotor and bolt the new one back on. tap in the new bearings and re-install.
Feb 11, 2009 | 09:04 PM
#9
Thread Starter
Registered User
Joined: Oct 2008
Posts: 126
Likes: 0
From: Kansas
Kinda... you don't remove the bearings until you get the two 54mm nuts off and then when you pull off that rotor/hub plate assembly the outer bearings will be exposed on the front and the inner bearings will be exposed in the back. It will all make immediate sense to you once you get the 54mm nuts off.
And I hope so.... might have to have my uncle around (like my mechanic, that i can consult with) incase i screw up. lol.
Feb 11, 2009 | 09:08 PM
#10

Registered User
Joined: Jun 2006
Posts: 119
Likes: 0
From: KC, MO
nut removal
Go down to sears or your local parts store and get yourself a giant socket. LOL I tried doing brake jobs on my toyotas using chanellocks to get that nut off, you allways bugger them up. The 2ndgen trucks 4wd take a 55mm6pt socket. I don't know if yours is smaller? maybe a 53mm but once you see these sockets you will be able to find the right size. The one I have is listed as PERFORMACE TOOL part#W83255. but as I said, any good parts store should have this tool. That nut is called a spindle nut. Ask for a spindle nut socket and they can fix you up. Good luck.
Feb 11, 2009 | 09:09 PM
#11
Registered User
Joined: Sep 2007
Posts: 249
Likes: 0
From: Puyallup, WA
Haha.. you've got it - its easy. YES - you have to get those 54mm nuts off to get to the rotor AND the bearings. If you don't have a 54mm socket or a 2 1/8" then try and get a chisel and tap on the corner to loosen it.
Those nuts really shouldn't be that tight at all. They're a pain to get out if you don't have the socket though. Only place around here with that size socket was Sears and they ain't cheap either.
Those nuts really shouldn't be that tight at all. They're a pain to get out if you don't have the socket though. Only place around here with that size socket was Sears and they ain't cheap either.
Feb 11, 2009 | 09:11 PM
#12
Registered User
Joined: Sep 2007
Posts: 249
Likes: 0
From: Puyallup, WA
Feb 11, 2009 | 09:15 PM
#13
Thread Starter
Registered User
Joined: Oct 2008
Posts: 126
Likes: 0
From: Kansas
Originally Posted by devildogs55
Haha.. you've got it - its easy. YES - you have to get those 54mm nuts off to get to the rotor AND the bearings. If you don't have a 54mm socket or a 2 1/8" then try and get a chisel and tap on the corner to loosen it.
Feb 12, 2009 | 03:06 AM
#14
Registered User
Joined: Mar 2005
Posts: 1,756
Likes: 7
From: New Brunswick, Canada
Here's a bit of help for you. How to remove the hub. This procedure also walks you through repacking your bearings. Don't forget to bend out the tabs on the lock washer (located between the two 54mm nuts) before you start trying to remove the outer nut.
...and how to replace the rotor.
When you're putting things back together, make sure you go through the procedure to properly adjust the preload on your bearings. It's in the first link I posted.
If you're planning on keeping this vehicle for a while, I'd recommend getting the 54mm (or 2-1/8") socket. You should be repacking your bearings at least once per year or so. Also, to properly set the bearing pre-load, you should be using a fish-scale to measure the force that it takes to turn the hub (this is also explained in the first link).
Last edited by GSGALLANT; Feb 12, 2009 at 03:16 AM.
Feb 12, 2009 | 07:09 AM
#16
Registered User
Joined: Mar 2005
Posts: 1,756
Likes: 7
From: New Brunswick, Canada
Final torque on the adjusting nut is 18 ft-lb. Final torque on the lock nut is 35 ft-lb. It's a little tough to retorque that nut with a chisel... unless you want to spend the extra money and buy a calibrated torque chisel. 
Feb 12, 2009 | 07:13 AM
#17
Registered User
Joined: Sep 2007
Posts: 249
Likes: 0
From: Puyallup, WA
The outer bearing is held in place by the spindle nuts and washer.
"repacking" only means forcing grease into the inside of the bearings with your hands.
Feb 12, 2009 | 08:25 AM
#18
Registered User
Joined: Mar 2008
Posts: 12,723
Likes: 6
From: Temecula Valley, CA
 Feb 12, 2009 | 06:32 PM
#19
Thread Starter
Registered User
Joined: Oct 2008
Posts: 126
Likes: 0
From: Kansas
Nonono.. that person is pressing in the spindle bushing. You're not even worrying about that bushing. All you need to do is set the bearings on the races which shouldn't require any force at all... then the inner bearing is held in place by an oil seal that you will need to tap in with either the 54mm socket or a 2x4 that you lay flat over the seal and hit with a hammer.
The outer bearing is held in place by the spindle nuts and washer.
"repacking" only means forcing grease into the inside of the bearings with your hands.
The outer bearing is held in place by the spindle nuts and washer.
"repacking" only means forcing grease into the inside of the bearings with your hands.
Especially your "repacking" definition. I still will try to have it to where my uncle is available incase I get COMPLETELY lost somehow.
Ill post when I am able to get it done. Should be next day or so... I have a terrible rotor now on 1 side and had to replace brakes on both sides.
1 rotor has scratches on it... not just lite scratches.... deeeeep scratches because somehow I ran the pad... well completely out and into the metal.
I was about to replace, (not really any squeking, just felt about time.), and after cleaning up rims and what not, within a day, I heard and felt like a metal on metal grinding when I touched the brakes, so tryed stopping with Parking brake when I could, without driving much at all. Just to place to get it done. Kinda curious if one of the cleaners got on the rotor and started eating up the pad a little bit... Is that possible?
Feb 15, 2009 | 07:47 PM
#20
Thread Starter
Registered User
Joined: Oct 2008
Posts: 126
Likes: 0
From: Kansas
OK.
I got it. I dont have it back together because of something I did, but will be tomorrow. I was bead blasting the disc/hub part and some got in barrings so have to clean it up.
What I did to get it off.
I took off tire (duh)
Took off caliper and put on a jack stand.
Took off hub cap. (cap on front with 6 bolts. Mine was copper)
Used vise grips, clamped down on nut, and hit vise grips to make them loosen the nut. until I got the first off, then reached in, and took off nest washer/locker piece, then used vise grips again to get next nut.
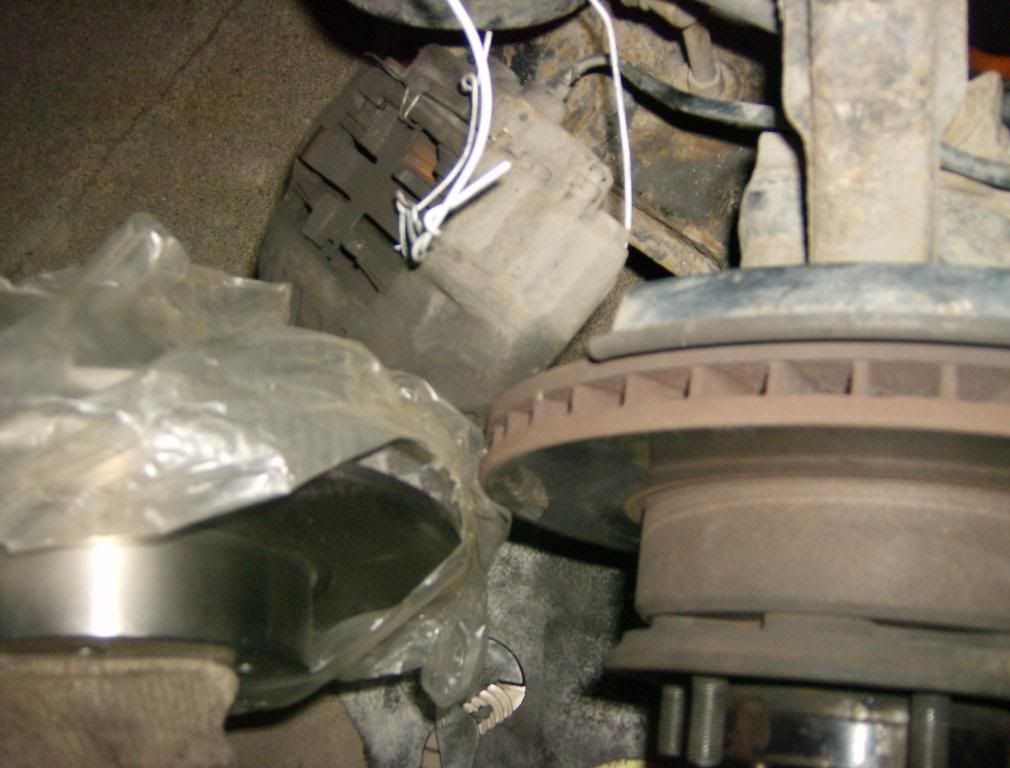
(Here is a pic)

Then removed whole rotor/hub assembly.
took the barrings out and set on paper towel.
Then after a while had someone figure out how to get rotor and hub apart.
Here is a pic to help explain:
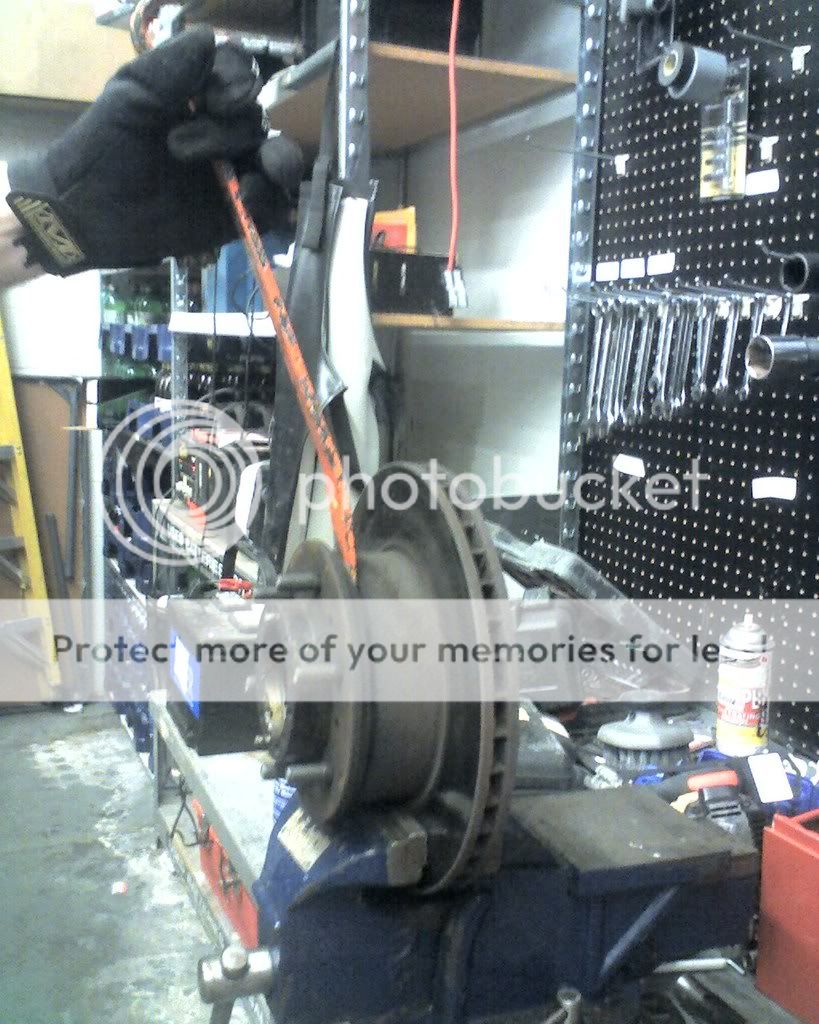
Taking a pry bar, hitting it down into the area between the disc and rotor, then pulling apart. Doing this around whole rotor until it is apart. Had that problem because it had rust/corrosion on it.
Then I decided to clean it all up, and got dirt in the barrings....

It will be cleaned up tomorrow and then have it all on and back running.
Anyone doing same thing and got some questions? Might have answer.
BTW, without using that clamp on a table, you will play h*ll trying to get that apart, if you ever do.
I got it. I dont have it back together because of something I did, but will be tomorrow. I was bead blasting the disc/hub part and some got in barrings so have to clean it up.
What I did to get it off.
I took off tire (duh)
Took off caliper and put on a jack stand.
Took off hub cap. (cap on front with 6 bolts. Mine was copper)
Used vise grips, clamped down on nut, and hit vise grips to make them loosen the nut. until I got the first off, then reached in, and took off nest washer/locker piece, then used vise grips again to get next nut.
(Here is a pic)
Then removed whole rotor/hub assembly.
took the barrings out and set on paper towel.
Then after a while had someone figure out how to get rotor and hub apart.
Here is a pic to help explain:
Taking a pry bar, hitting it down into the area between the disc and rotor, then pulling apart. Doing this around whole rotor until it is apart. Had that problem because it had rust/corrosion on it.
Then I decided to clean it all up, and got dirt in the barrings....
It will be cleaned up tomorrow and then have it all on and back running.
Anyone doing same thing and got some questions? Might have answer.
BTW, without using that clamp on a table, you will play h*ll trying to get that apart, if you ever do.
Last edited by Gokumono; Feb 15, 2009 at 07:52 PM.


