When you click on links to various merchants on this site and make a purchase, this can result in this site earning a commission. Affiliate programs and affiliations include, but are not limited to, the eBay Partner Network.
Replace the connectors. http://www.ebay.com/itm/Nippon-Denso-Fuel-Injector-Pigtail-Connectors-Toyota-Honda-Acura-More-/231456189656?hash=item35e3dd2cd8&vxp=mtr (I bought a set of six and saved a few dollars, but you'll need to get what is available. I recommend getting the sets with three (one extra) connectors per housing. I didn't need any of the extras, but if I didn't have them .... Note that the Nippon Denso connectors come in "top slot" and "bottom slot." Look at the pictures and match what you have!)
You have to get the crimp tool (like http://www.ebay.com/itm/Pin-Full-Cycle-Wire-Crimping-Tool-2-54mm-3-96mm-28-18-AWG-Crimper-0-1-1-0m-New-/131596117758?hash=item1ea3bd66fe), but this is a much easier and cleaner job than getting connectors with "pig tails" that you splice to your existing wires. If you do it this way you'll shorten the leads by about 5mm, and you have plenty of slack to cover that.
In an ideal world, the metal part of the old connectors would fit into the new housings, but it's not an ideal world. For the best job, remove the metal parts from the existing housings. Mine had a white locking piece that you first pulled out.
Then I used a tiny screwdriver to remove the connectors in the usual way.
You now need to remove the metal part, while leaving as much wire length as you can. You won't be able to open the crimp on the wire; just cut the connector through the wire right at the end of the insulation. The "gland" around the insulation, held by other half of the crimp, is even more brittle. Squeeze it gently; it will crumble, and you can remove the rest of the crimp. Then using your crimp tool, install the new connectors and slide them into the connector body.
Do these ONE AT A TIME. Injectors aren't polarized, so reversing the wires is "okay," but it's strictly bush league. Always have an assembled connector to look at to get the wire orientation.
While you're at it, you're almost certain to have broken "pintle covers." So get the kit: http://injector-rehab.com/shop/Toyota-4Runner-Kit.html Note that there are two "sizes" of pintle covers; the black are smaller than the grey (black was too small for me; I get the grey and they worked well.)
Last edited by scope103; Sep 10, 2015 at 08:43 PM.
Looking at your profile, you have an 86 truck. 85-94 had three different style connectors. 85-87, 88 is a one year only, and 89-94 is a different style.
I'm thinking i'm going to have to pull the rail and replace all the O rings. These look bad to me. This is all going so slow, I really feel like it bit off more than i can chew. But i'm taking little bites. I will get there in the end.
Funny how when you start out fixing things it turns into a major rebuild and restore project I can really relate !!!
No kidding. On one hand i'm getting deeper and deeper. But I think its really the way to go. and it will be easier fixing it now then when it's leaking on the side of the road.
When you install the Injecotrs, Toyota says to use gasoline for the seals, I use gas or WD-40, just anything as not to install them dry. Make sure you mark your vacuum lines and get the hoses back on and you will be okasy. Leave the Throttle Position Sensor on the Throttle body and you will be okay. Here https://www.yotatech.com/forums/f199...l#post52147101 might give you somethings to look for while having it tore down to the injectors.
i use spit to put them in. if things are a bit complicated, you can always go to toyota and get built pigtails. as expensive as toyota always is, i found pigtails to generally be much cheaper than anything else. simple cut/crimp/heat/done.
Im looking at the Fuel Injector Seal Kits some have 4 O rings and some have 1 O-Ring & 1 Grommet. Im not sure what I need. Im in to deep to get cheap now. So what do i need?
I can see where the 1 O-Ring & 1 Grommet but what about the other end?
If the set just has four o-rings, usually that is ONLY the upper o-ring for four injectors.
I like this set: http://injector-rehab.com/shop/Toyota-4Runner-Kit.html For my '94, the black pintle cap was too small to fit the injector; I needed the gray cap. Keep that in mind if you want to replace the pintle cap too. (By the way, Keith was VERY good about getting me the gray caps!) And you really can't beat the price.
The vocabulary isn't standard, but these guys call the parts the o-ring, the upper grommet spacer, and the lower seal. Note that he also includes the in-injector filter. Nice.
Last, once you get this apart, you'll probably notice that the injector seats into a plastic cup, that in turn sits in the intake manifold (this is probably heat insulation). That cup has an o-ring to seal the interface to the manifold. Mine did not need to be replaced, but you ought to take a look. That's no place to get a vacuum leak!
Im going to order the kit as soon as i figure out what i need. I see the above kit if for a "Toyota 4Runner" Im not sure if that will work for my "1986 Toyota Pickup Xtra Cab SR5 5-Spd". It might be all the same im not sure.
and are you saying I need the gray caps?
I was too tired to pull the injectors today (doing a head and timing chain job) But I would like to get them ordered.
And thanks that price is the best I have seen. So far its 8-10 bucks each. I don't mind buying extra caps.
I'm saying "I don't know."
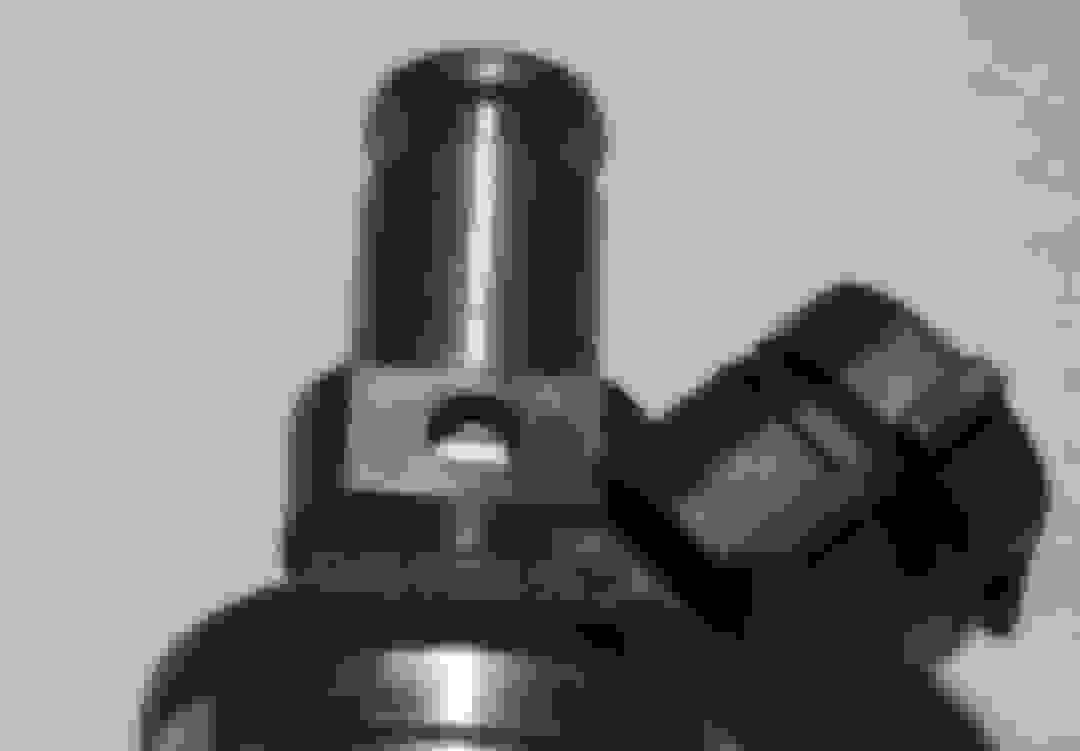
First, is your injector part number 23250-65020? Even if it is, at least some people think the black will fit, so it may be that Toyota changed the dimensions of the injector but not the part number! Part No. 23250-65020
Better yet, MEASURE your injector. As you can see, mine was "too fat" to fit into the black cover (and while plastic, they are not "stretchy"). Dimensions
Ok I pulled them. I will post a pic later after i get them cleaned up.
Does it mater what order they are placed back in the engine, Or are they all the same?
They SHOULD be all the same. But didn't you say you've got different part numbers? (Still, there's no difference; they all open at the same time anyway.)
Sorry for the delay in my reply.
On one side they are all the same 23250-45011
but on the other side
2 have "0475 26" and the other 2 have "23 0475"
That's not backwards one has 0475 before the 23 and one has 26 after the 0475..
It could be a date or lot number of manufacture.. I don't know so i will keep each one in a numbered bag and put them back in the same place.
The old rubber seals and O rings turned to hard brittle plastic and snapped in to pieces when I took them off.
I talk to the guy at injector-rehab.com and said i want to just buy both type of pintle caps. He said they have a kit with both caps it has the same parts numbers on the Toyota 4Runner Kit so I orderd them and they should arive today it was 11 dollars + 7 or so shipping. I'm happy with that.
Just so you know, the injector filter is removed from the injector by GENTLY screwing a sheet metal screw (#10 or #8 should do) into the old filter, then wiggling it out with locking pliers.
The filter is kinda delicate, so if you have a way to evenly press it into the injector it will help.

 Sep 10, 2015 | 07:15 PM


 I am really not sure just way I would say to go.