
Rebuild to start soon
 Mar 30, 2006 | 04:11 PM
#1

Thread Starter
Registered User
Joined: Sep 2005
Posts: 310
Likes: 1
From: Yelm, WA
Rebuild to start soon
Well after a few months a few weeks ago I took my engine out and took it to a machine shop to learn that I was lied to about the engine being rebuilt so this Sunday I will start the rebuild and I hope to take many pictures. I had the head shaved due to it being warped, had the block bored .030 over had to have the crank ground down .010, got a rebuild kit from engbldr with the 268 cam, also had to get all new intake valves and had the fly wheel resurfaced and I think thats about it the acid bathed everything so I hope to get it back nice and clean because it is all going in the back of a friend's Tahoe that I spent all last weekend putting new carpet in...Lucky me he is in Iraqi and I have been using his truck while mine is down...Thank god he'll be home soon and stayed safe while there. So I ask everybody wish me luck on this rebuild.
Mar 30, 2006 | 05:55 PM
#3
Contributing Member
Joined: Jul 2005
Posts: 12,261
Likes: 7
From: Siletz,Oregon
i also get to rebuild my motor since it went downhill fast this will be my first time pulling a motor ..im going to have engnbldr do all the work im looking at $700 all i have to do is put it all back
Mar 31, 2006 | 09:44 AM
#5
Registered User
Joined: Mar 2003
Posts: 3,981
Likes: 4
From: Lacey, WA
my initial rebuild(other than the nickel and dime parts i should have had but had to buy like flywheel etc) cost about $500. this was having the block resurfaced, cleaned, bored and honed, rods rebushed, valve seals installed and the master engine kit. however no grinding was necessary on my crank.
Apr 1, 2006 | 06:46 AM
#6
Thread Starter
Registered User
Joined: Sep 2005
Posts: 310
Likes: 1
From: Yelm, WA
Well I got all the main bearings in, thrust washers, and the crank I also put the cam in the head and the rear main seal/cover and put the new oil pump on the timing chain cover. Sorry I didn't take any pictures I'll take some once I get it on the engine stand I got to get some bolts from a buddy I don't have any long enough.
Apr 9, 2006 | 06:29 AM
#7
Thread Starter
Registered User
Joined: Sep 2005
Posts: 310
Likes: 1
From: Yelm, WA
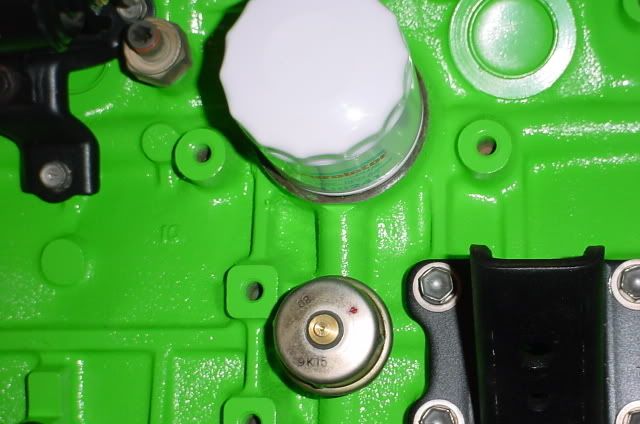
Got some pictures...
Got a question in the first picture just want to make sure I got this sensor in the correct place it is the one between the fuel & oil filter. Second picture want to make sure that sensor is in the correct place I have it under the oil filter these are the only two things I am unsure I got in the correct place.

These are just random pictures I took I decided to paint it Grabber Green I wasn't even going to paint it but said what the heck...


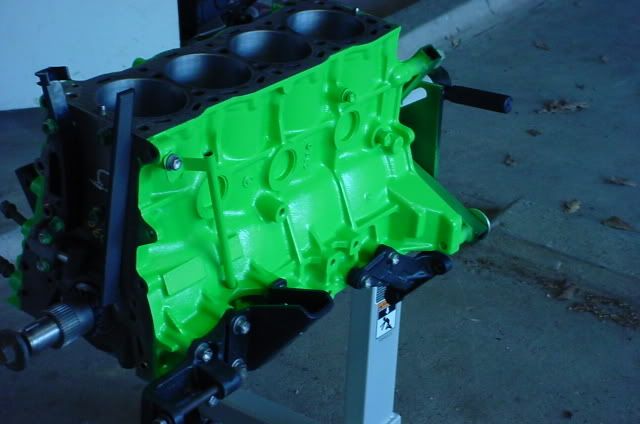
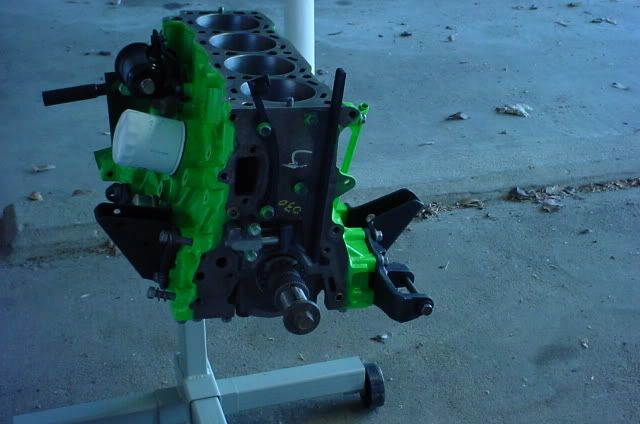
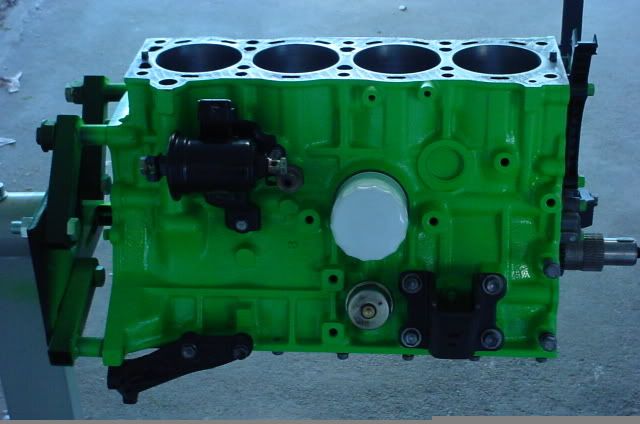
These are just random pictures I took I decided to paint it Grabber Green I wasn't even going to paint it but said what the heck...
Trending Topics
Apr 10, 2006 | 04:26 AM
#8

Registered User
Joined: Jan 2006
Posts: 392
Likes: 0
From: Massachusetts
Looks good so far! You might consider removing the timing guides until you place the head on. They don't get in the way that way. I just finished my rebuild recently. BTW, I bought the exact same engine stand. I got mine at Advanced.
I think you have the sensors right. I'll try to get a quick look at mine today to be sure.
That green sure is bright! I painted mine black.
I think you have the sensors right. I'll try to get a quick look at mine today to be sure.
That green sure is bright! I painted mine black.
Apr 10, 2006 | 04:35 AM
#10
Thread Starter
Registered User
Joined: Sep 2005
Posts: 310
Likes: 1
From: Yelm, WA
I temp installed everything just to make sure I remembered where everytihng went and just didn't take them off yet. The machine shop tore down the engine and I wanted to make sure they didn't lose any of my bolts...Yea I got the stand at advanced for around $37 or something. And after digging through my FSM I found the sensor under the oil filter it is the oil pressure sensor and it is in the correct place and the other one can only go in that spot because it seems to be the only one big enough does anybody know what it is I couldn't find it anywhere in my book.
Last edited by Lunnzz; Apr 10, 2006 at 04:37 AM.
Apr 10, 2006 | 02:55 PM
#11
Thread Starter
Registered User
Joined: Sep 2005
Posts: 310
Likes: 1
From: Yelm, WA
I spent a few hours today getting the engine ready to go back in and I got that done only thing that concerns me is that when I put the timing chain on. I put the timng sprocket on the crank and turned the crank until the timng mark was pointing down, put the chain on with a shiney link lined up with that mark and did exactly as the FSM said I even taped the tensioner as it said only thing that is throwing me is that the timing mark on the crank pully is offtoward the drivers side when everything else seems to be good it it OK or did I screw something up??
Apr 10, 2006 | 03:51 PM
#12
Registered User
Joined: Jun 2004
Posts: 144
Likes: 0
From: Tucson, Az
Looking good so far. I thought about painting mine the same color but went with yellow instead. You are correct about the sensor under the oil filter being the pressure sending unit. The sensor in between the fuel filter and oil filter is the knock sensor. When you hook all the wiring back up, make sure the wire that connects to it is fully in tact.
As far as the timing setup goes...when you set it up, you want the key on the crank and the camshaft key both at the 12'o'clock position. The little gold links do not make a difference so long as both are set at the 12'o'clock position.
As far as the timing setup goes...when you set it up, you want the key on the crank and the camshaft key both at the 12'o'clock position. The little gold links do not make a difference so long as both are set at the 12'o'clock position.
Last edited by Wildcat_4R; Apr 10, 2006 at 03:57 PM.
Apr 15, 2006 | 01:51 PM
#14
Thread Starter
Registered User
Joined: Sep 2005
Posts: 310
Likes: 1
From: Yelm, WA
Well got the engine back in and started the truck but I ran into a problem it seems to be leaking anti-freeze all around the bottom of the head (where block and head meet) The head was warped and the machine shop fixed it and of course I used all new gaskets could it possibly be from me using the old head bolts could they be stretched and causing the haed not to seat all the way down? It is reall discourging to go through all this work to have this kind of problem if anybody has any words of wisdom I am all ears..Thanks. OH I did torque them down.
Apr 16, 2006 | 04:16 PM
#15
Thread Starter
Registered User
Joined: Sep 2005
Posts: 310
Likes: 1
From: Yelm, WA
I e-mailed Ted from engnbldr this AM and he gave me some tips to fix my leak and it worked no more coolant leak now I think I might have a vacuum leak somewhere the truck idles around 800rpm and timing is right on but I tried to take it down the street and it had next to no power and wanted to die. Tommrow I am going to make sure all my intake manifold bolts are tight I am pretty certain I got all the vacuum lines in the right spot. How do I know if I need to adjust my TPS I didn't touch it during the rebuild so is it ok? I'm just glad it is running and no leaking just need to fix the vacuum leak.
Apr 16, 2006 | 05:02 PM
#16
Registered User

Joined: Jun 2004
Posts: 740
Likes: 2
From: Little Rock, AR
Hey, good to see you got that all fixed up.....check the tps with a voltmeter...there's a write up for it on rogers site.... http://www.4crawler.com/4x4/CheapTricks/TPS/index.shtml It should help you out with all that...let me know if you need any help

Thread
Thread Starter
Forum
Replies
Last Post
FS[PacSouthWest]: 2- 8"3rd members:4.88 ratchet lockers,new setup kit, rear axle rebuild kit,diff armor
jerusry
Axles - Suspensions - Tires - Wheels
1
Oct 19, 2015 05:28 PM


