
People That Have Done AFM Swap, Question ?.
 Feb 1, 2012 | 12:18 PM
#161

Registered User
Joined: Jun 2010
Posts: 123
Likes: 0
From: Washington
Hey guys, Just did the AFM swap using one out of an 86 cressida. Insallation went great, but they arent exactly plug and play. I had to swap the circuit board out of the original AFM to the one out of the cressida. If you have a soldering iron, good vision and a semi steady hand the circuit board swap should take less than a half an hour. Not to mention the Post '82 supra AFM's and Cressida AFM's are a lot cheaper and easier to find. All you need to do is cut the silicone (if you havent already done so) take out the 3 screws that hold it in place, use a hot soldering iron to undo the three connections to the plug, remove the other quick connectors and do the same and reverse to the other AFM. Plus, I was able to put the original cover on the new AFM so the part number matched in case anyone wanted to get nosy (not sure why but I thought it was a good idea).
I completed a similar installation to Mr BBPile (thanks for the Idea) and havent thrown any codes and enjoyed great throttle response and top end snort. I could probably do a write up with pics if guys were interested in taking that route. Just let me know.
I completed a similar installation to Mr BBPile (thanks for the Idea) and havent thrown any codes and enjoyed great throttle response and top end snort. I could probably do a write up with pics if guys were interested in taking that route. Just let me know.
Feb 1, 2012 | 04:49 PM
#163
Registered User
Joined: Feb 2010
Posts: 301
Likes: 0
From: Southern California
Hey guys, Just did the AFM swap using one out of an 86 cressida. Insallation went great, but they arent exactly plug and play. I had to swap the circuit board out of the original AFM to the one out of the cressida. If you have a soldering iron, good vision and a semi steady hand the circuit board swap should take less than a half an hour. Not to mention the Post '82 supra AFM's and Cressida AFM's are a lot cheaper and easier to find. All you need to do is cut the silicone (if you havent already done so) take out the 3 screws that hold it in place, use a hot soldering iron to undo the three connections to the plug, remove the other quick connectors and do the same and reverse to the other AFM. Plus, I was able to put the original cover on the new AFM so the part number matched in case anyone wanted to get nosy (not sure why but I thought it was a good idea).
I completed a similar installation to Mr BBPile (thanks for the Idea) and havent thrown any codes and enjoyed great throttle response and top end snort. I could probably do a write up with pics if guys were interested in taking that route. Just let me know.
I completed a similar installation to Mr BBPile (thanks for the Idea) and havent thrown any codes and enjoyed great throttle response and top end snort. I could probably do a write up with pics if guys were interested in taking that route. Just let me know.
The 82 supra afm is the ONLY one that is plug n play, all other require board swapping as you did.
Feb 2, 2012 | 09:10 AM
#165
Registered User
Joined: Jan 2012
Posts: 194
Likes: 0
You can always get this replacement one if you have the money:
http://www.buyautoparts.com/parts/49-00453.html
http://www.buyautoparts.com/parts/49-00453.html

 Feb 3, 2012 | 12:36 PM
#169
Registered User
Joined: Jun 2010
Posts: 123
Likes: 0
From: Washington
If you are unable to locate one out of a 82 supra, here are the steps you can take to do a correct circuit board swap. I have already posted it in the how to section but thought you guys might want to take a look so here you go...
Ok so here is the deal. Did a bunch of research last month about doing an AFM swap from the stock 22RE to a larger, higher flowing 5MGE unit. The only AFM that is plug and play that I know of is out of the 1982 Supra or part number 22250-43110. These particular AFM's are not easy to come by in my neck of the woods. We only have one local junk yard and they charge almost retail pricing for their stuff. I resorted to looking at Ebay and other places online. To say the least, the 82 Supra AFM's come at a small premium. I found out that you could swap the circuit boards out of your stock AFM into a larger one from a different year 5MGE and it would work. So I did, and it works Flawlessly.
To clear up anything I said above, this is for converting a NON 1982 5MGE AFM out of a 1983 and up Supra or mid 80s Cressida for use in a 22RE. As far as I know, this can be done to any year 22RE.
Here are the simple steps I took to make this work. I purchased an AFM out of a 1986 Cressida, which is identical in size and shape to the early Supras. Estimated completion time for someone with more than novice skills is about 30-45 minutes. I recommend a soldering iron, flathead screwdriver (skinnier the better), Phillips head screwdriver, allen wrench set, and some kind of razor blade or box knife. A needle nose pliers may come in handy for this as well.
1.FIRST! Plug in your soldering iron!!! Set it too the side. Cut the silicone caulking used to seal the black cover to the aluminum housing. A strait razor blade or box knife works great for this.

2. Once the silicone is cut, use a flat head screwdriver or other prying device to GENTLY remove the cover. Do not insert the screwdriver too deep as you may damage some of the circuitry.

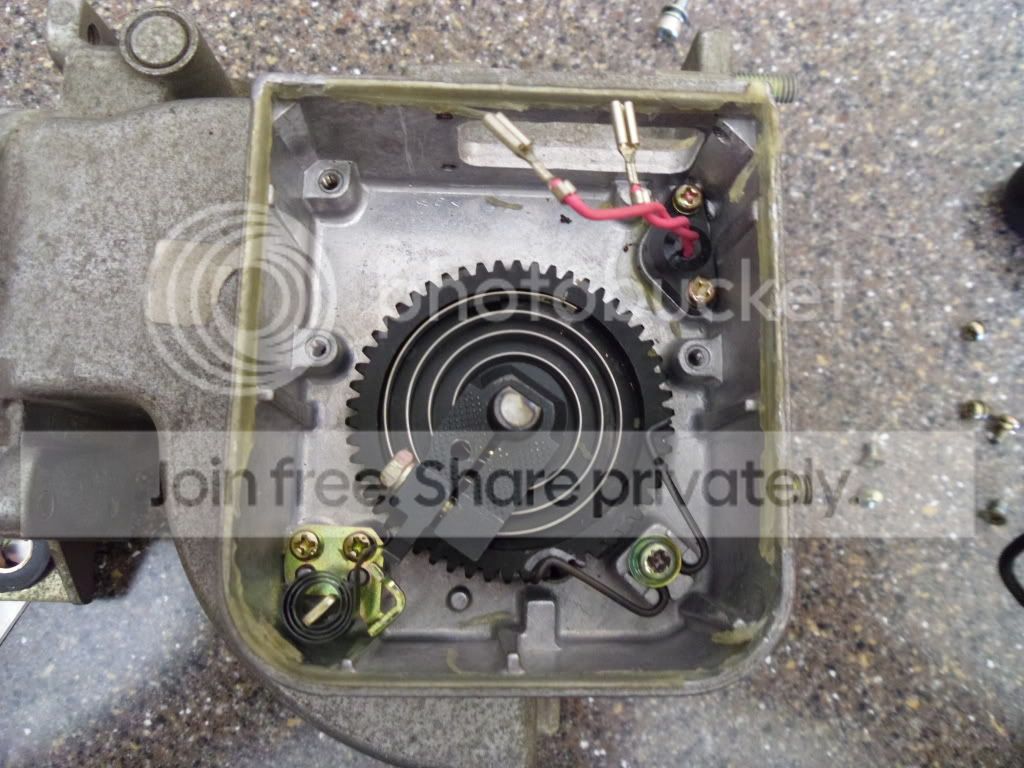
Here is a picture of the inside of the AFM...Pretty old school technology which makes this swap easy. Check out the two pinkish/red wires and the single black wire with quick connect spade terminals.
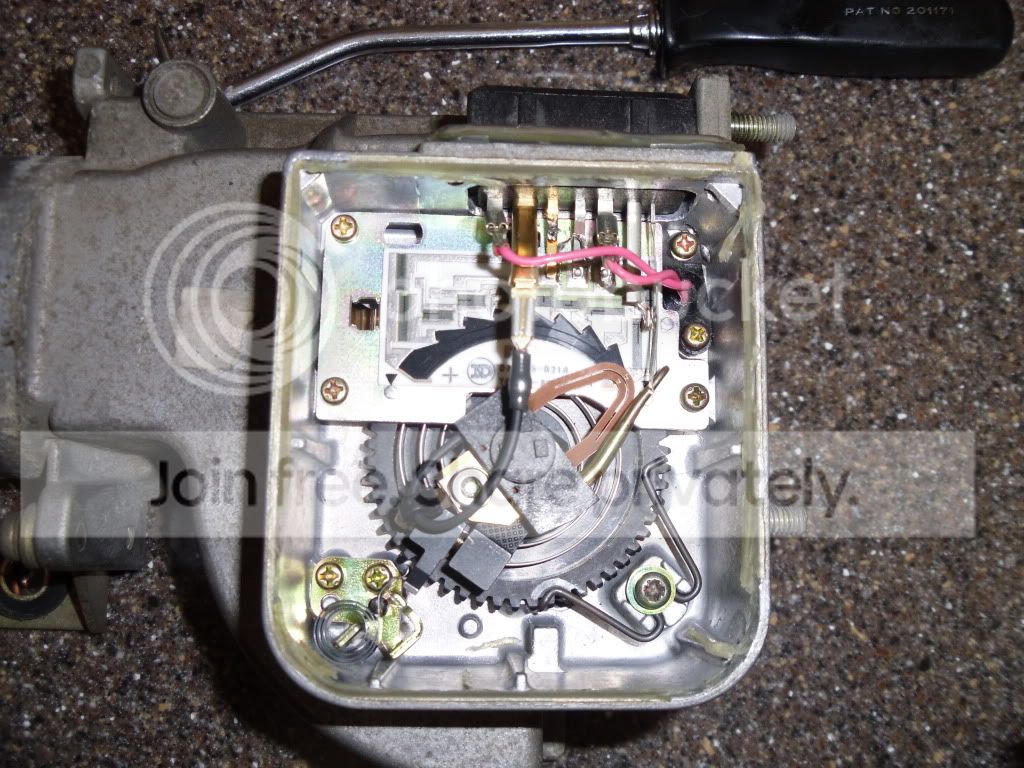
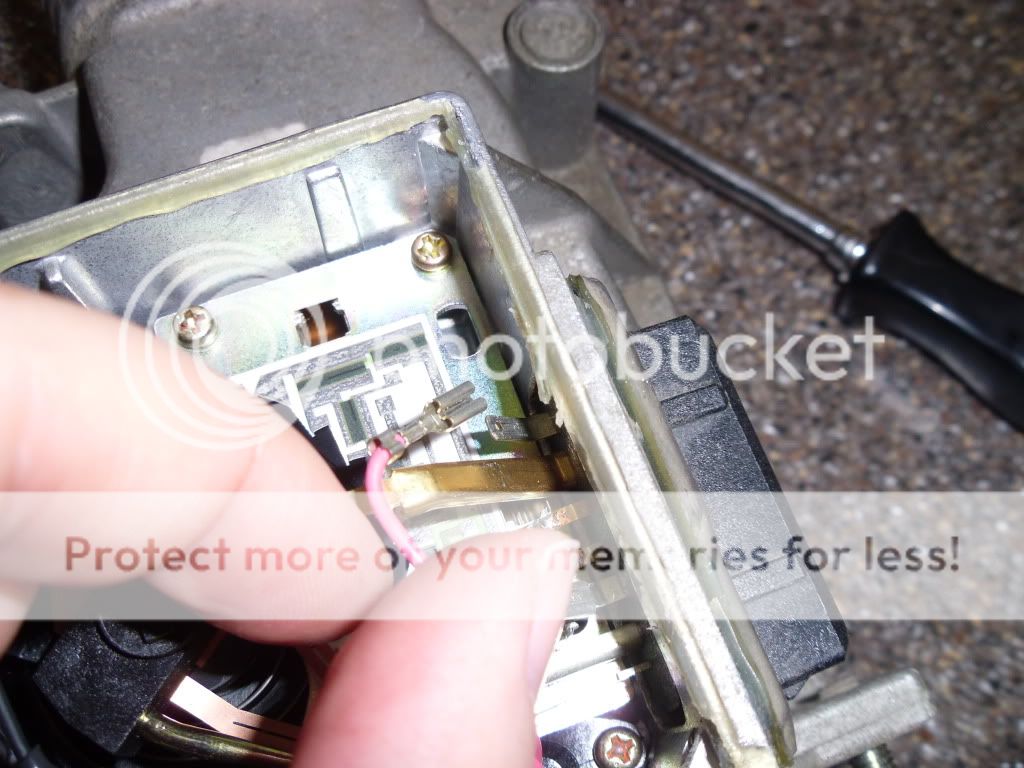
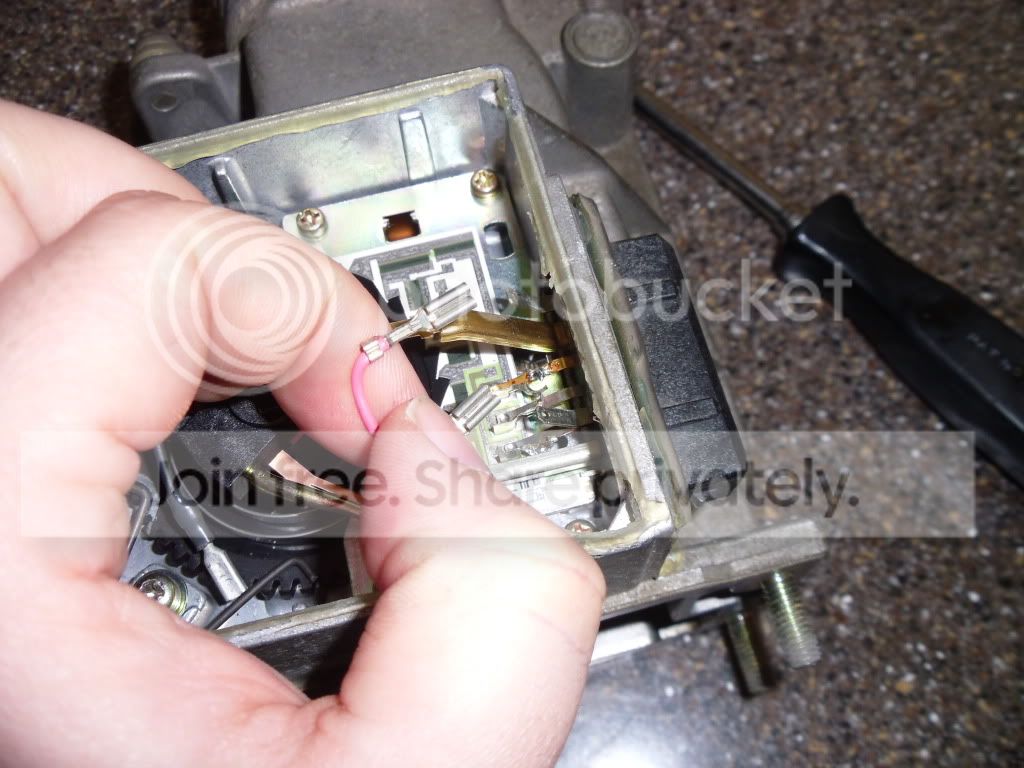
3. Remove the Pinkish/Red wires and Black wire from their corresponding terminals. A needle nose pliers may come in handy here if you cant get a good grip. REMEMBER to do these steps gently, as you do not want to cause any permanent damage to the circuitry or the plug body.
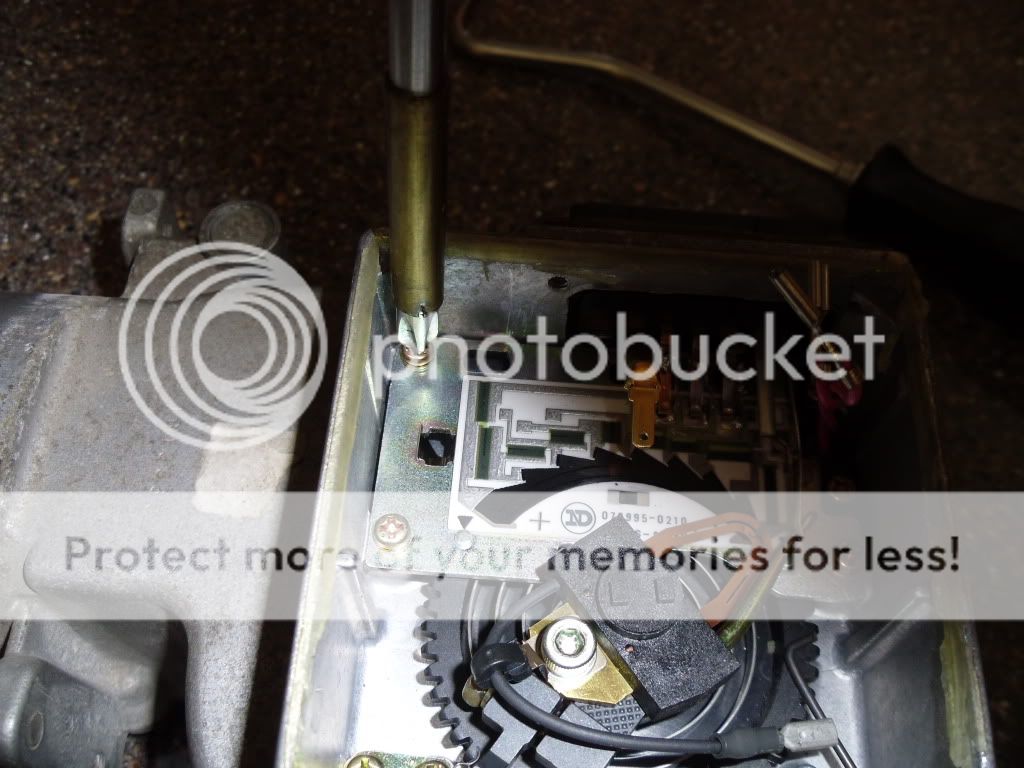
4. Next, use the philips head to remove the 3 screws holding the circuit board down. Set them in the black cover that is off to the side so they dont get lost.
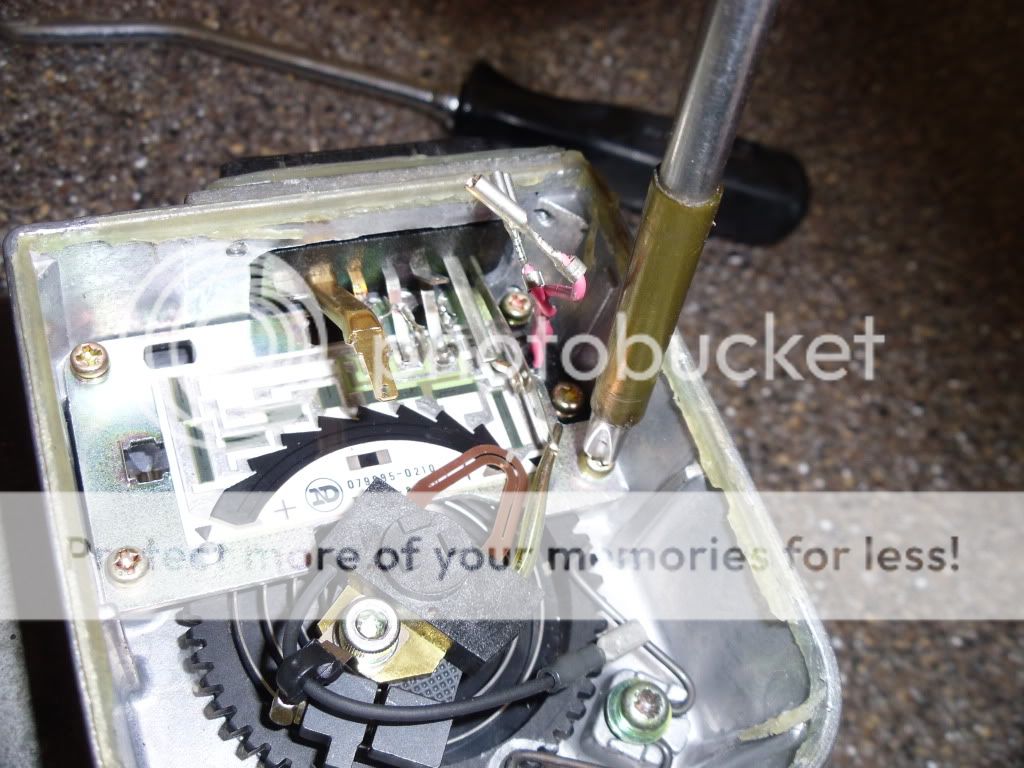
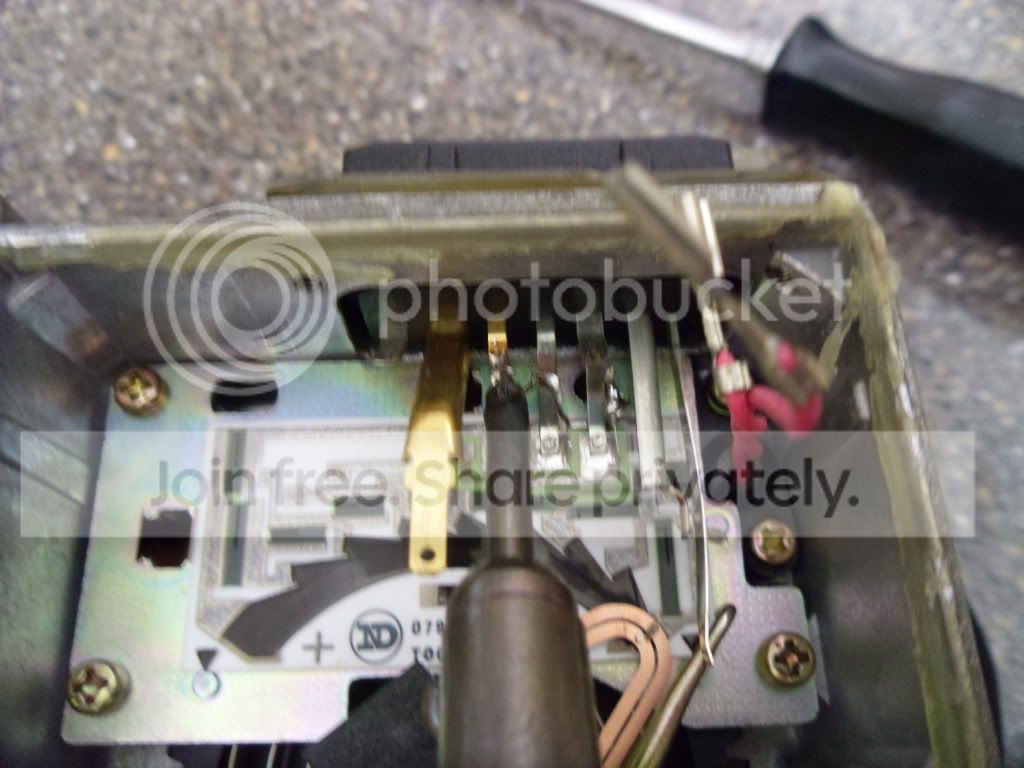
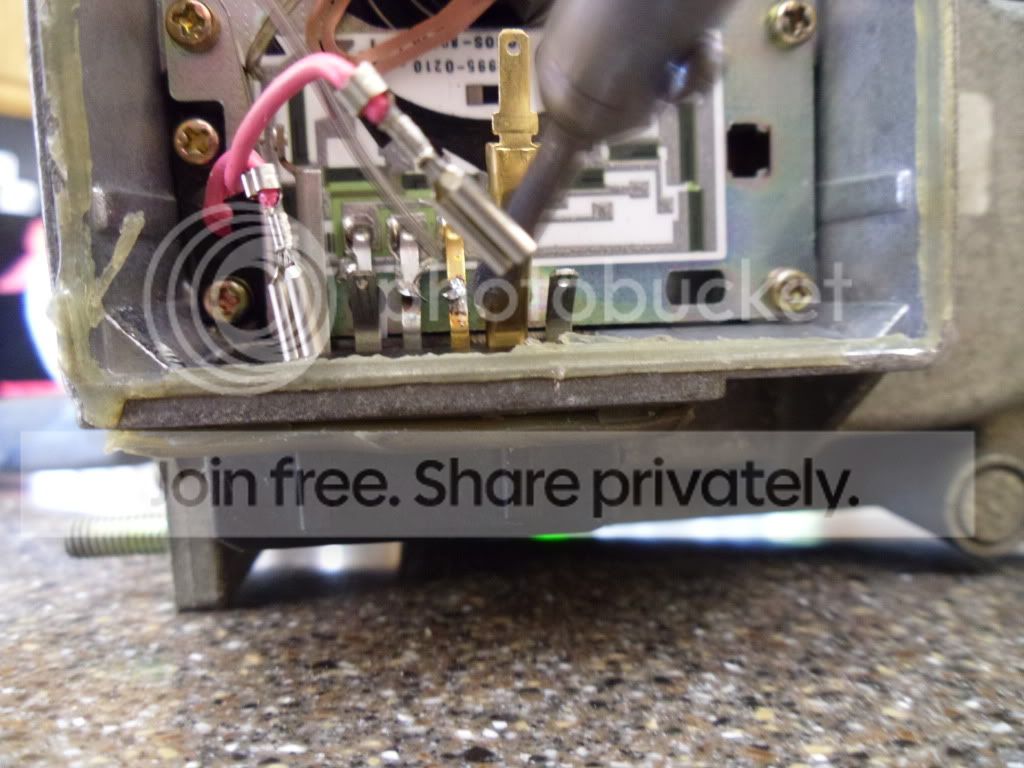
5.This is where the fun really starts. Using your hot soldering iron, (I suppose you could heat up a nail or screw with a blow torch if you didnt have the iron, carefully of course) heat up the soldered connections between the circuit board and the three prongs that feed the plug body and separate them carefully!!! In both of mine one was a brass color and the other two were silver.


6. Next, using the razor blade, cut the silicone caulking around the plug body.
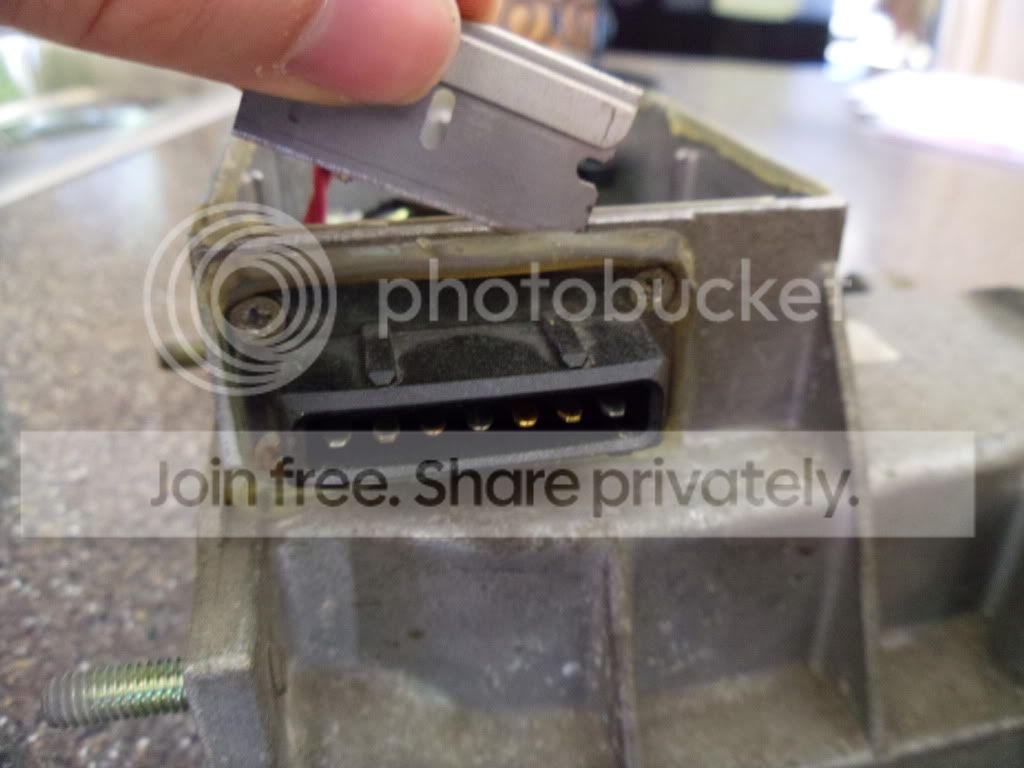
7. Remove the 4 screws holding the plug in place. CAUTION!!! Be sure to use the proper fitting screwdriver for this part of the procedure! I did not and ended up stripping out the screw and had to drill it out...not fun.


8. Remove the plug body (prying may be required).
9. This step is performed on a case by case basis. On one of my AFM's I had to do this and on the other I didn't so use your discretion. If necessary, use your allen wrench to undo this socket head screw holding the slider in place.

Move the slider out of the way, or remove it completely

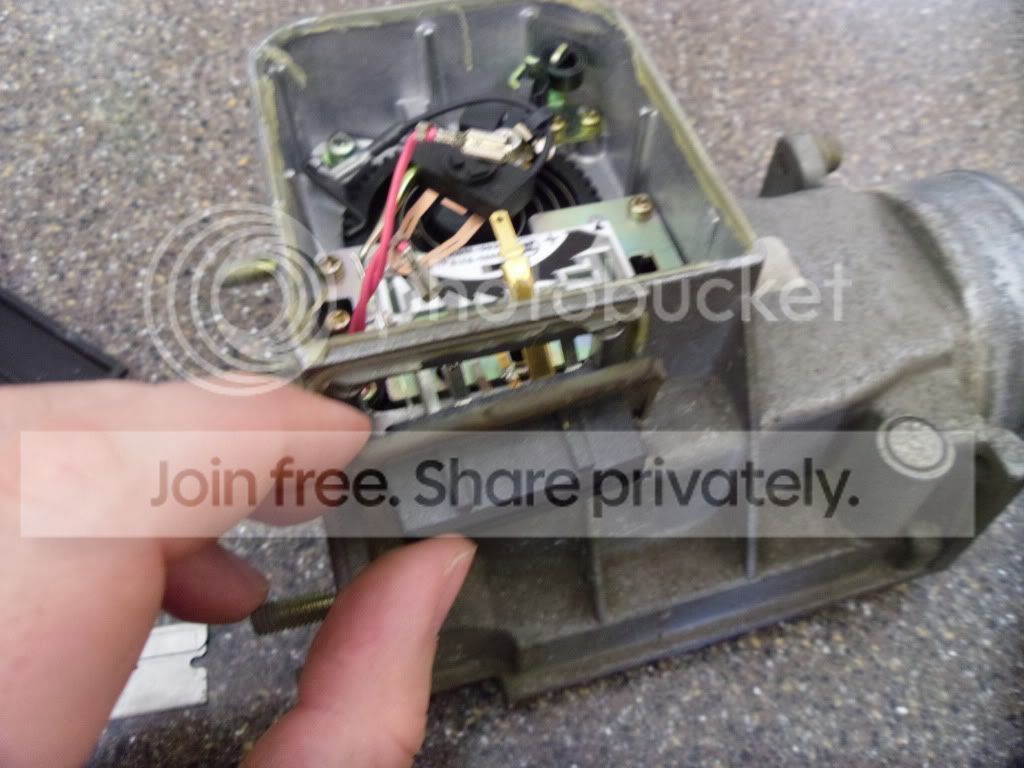
The circuit board should be sitting there loosely and you should be able to just pick it up.

10. Remove the circuit board and set it on the black cover along with the screws. IF YOU NEED TO LABEL IT, DO SO! You do not want to re-install the wrong circuit board so dont mix them up. Try to avoid touching the circuit board with your hands to prevent contamination.

Empty AFM housing.
NOW, Repeat steps 1-10 on the original AFM after removing it from your truck. Again, separate the pieces so they do not get mixed up, especially the circuit boards since this is what we want!
11. Take the circuit board that came out of the truck's AFM, and place it in the AFM out of the Cressida or Supra AFM and screw it back into place.
12. Replace the slider assembly if you had to remove it.
13. Reinsert the plug body into the AFM and screw it into place. Make sure the three soldered prongs line up on their corresponding pads on the circuit board.
Now, the connectors that you unsoldered are very flimsy so gently move them back into place using the screwdriver or other prodding device you have.
14. Using the soldering iron and some wire, re-solder the connections between the circuit board and the plug body
DOUBLE CHECK that your connectors do not contact each other. If they do, your AFM will not function properly therefore your truck will run like crap.
Plug your quick connect spade terminals back into their corresponding spades and you are finished with the swap!
How you re-rout your intake tubing is up to you. If you want, this is a great time to work on the battery position swap which greatly shortens your intake path and I hear that is a great mod. I used some universal parts made by spectre to complete my mod and have been really happy.
If you follow these steps explicitly, you should have no issues as I did.
Some notes:
Do this in a well lit area, and preferably, mostly sober...
I leaned out my AFM after installation after noticing that my truck started running really rich.
Be sure to use a good high flow air filter...not that anyone would want to put a restrictive low flow filter on but doing so would negate all of the work you just completed.
Ok so here is the deal. Did a bunch of research last month about doing an AFM swap from the stock 22RE to a larger, higher flowing 5MGE unit. The only AFM that is plug and play that I know of is out of the 1982 Supra or part number 22250-43110. These particular AFM's are not easy to come by in my neck of the woods. We only have one local junk yard and they charge almost retail pricing for their stuff. I resorted to looking at Ebay and other places online. To say the least, the 82 Supra AFM's come at a small premium. I found out that you could swap the circuit boards out of your stock AFM into a larger one from a different year 5MGE and it would work. So I did, and it works Flawlessly.
To clear up anything I said above, this is for converting a NON 1982 5MGE AFM out of a 1983 and up Supra or mid 80s Cressida for use in a 22RE. As far as I know, this can be done to any year 22RE.
Here are the simple steps I took to make this work. I purchased an AFM out of a 1986 Cressida, which is identical in size and shape to the early Supras. Estimated completion time for someone with more than novice skills is about 30-45 minutes. I recommend a soldering iron, flathead screwdriver (skinnier the better), Phillips head screwdriver, allen wrench set, and some kind of razor blade or box knife. A needle nose pliers may come in handy for this as well.
1.FIRST! Plug in your soldering iron!!! Set it too the side. Cut the silicone caulking used to seal the black cover to the aluminum housing. A strait razor blade or box knife works great for this.
2. Once the silicone is cut, use a flat head screwdriver or other prying device to GENTLY remove the cover. Do not insert the screwdriver too deep as you may damage some of the circuitry.
Here is a picture of the inside of the AFM...Pretty old school technology which makes this swap easy. Check out the two pinkish/red wires and the single black wire with quick connect spade terminals.
3. Remove the Pinkish/Red wires and Black wire from their corresponding terminals. A needle nose pliers may come in handy here if you cant get a good grip. REMEMBER to do these steps gently, as you do not want to cause any permanent damage to the circuitry or the plug body.
4. Next, use the philips head to remove the 3 screws holding the circuit board down. Set them in the black cover that is off to the side so they dont get lost.
5.This is where the fun really starts. Using your hot soldering iron, (I suppose you could heat up a nail or screw with a blow torch if you didnt have the iron, carefully of course) heat up the soldered connections between the circuit board and the three prongs that feed the plug body and separate them carefully!!! In both of mine one was a brass color and the other two were silver.
6. Next, using the razor blade, cut the silicone caulking around the plug body.
7. Remove the 4 screws holding the plug in place. CAUTION!!! Be sure to use the proper fitting screwdriver for this part of the procedure! I did not and ended up stripping out the screw and had to drill it out...not fun.
8. Remove the plug body (prying may be required).
9. This step is performed on a case by case basis. On one of my AFM's I had to do this and on the other I didn't so use your discretion. If necessary, use your allen wrench to undo this socket head screw holding the slider in place.
Move the slider out of the way, or remove it completely
The circuit board should be sitting there loosely and you should be able to just pick it up.
10. Remove the circuit board and set it on the black cover along with the screws. IF YOU NEED TO LABEL IT, DO SO! You do not want to re-install the wrong circuit board so dont mix them up. Try to avoid touching the circuit board with your hands to prevent contamination.
Empty AFM housing.
NOW, Repeat steps 1-10 on the original AFM after removing it from your truck. Again, separate the pieces so they do not get mixed up, especially the circuit boards since this is what we want!
11. Take the circuit board that came out of the truck's AFM, and place it in the AFM out of the Cressida or Supra AFM and screw it back into place.
12. Replace the slider assembly if you had to remove it.
13. Reinsert the plug body into the AFM and screw it into place. Make sure the three soldered prongs line up on their corresponding pads on the circuit board.
Now, the connectors that you unsoldered are very flimsy so gently move them back into place using the screwdriver or other prodding device you have.
14. Using the soldering iron and some wire, re-solder the connections between the circuit board and the plug body
DOUBLE CHECK that your connectors do not contact each other. If they do, your AFM will not function properly therefore your truck will run like crap.
Plug your quick connect spade terminals back into their corresponding spades and you are finished with the swap!
How you re-rout your intake tubing is up to you. If you want, this is a great time to work on the battery position swap which greatly shortens your intake path and I hear that is a great mod. I used some universal parts made by spectre to complete my mod and have been really happy.
If you follow these steps explicitly, you should have no issues as I did.
Some notes:
Do this in a well lit area, and preferably, mostly sober...
I leaned out my AFM after installation after noticing that my truck started running really rich.
Be sure to use a good high flow air filter...not that anyone would want to put a restrictive low flow filter on but doing so would negate all of the work you just completed.

Thread
Thread Starter
Forum
Replies
Last Post
the1998sr5
95.5-2004 Tacomas & 96-2002 4Runners
15
Jul 14, 2020 08:35 PM


