When you click on links to various merchants on this site and make a purchase, this can result in this site earning a commission. Affiliate programs and affiliations include, but are not limited to, the eBay Partner Network.
How Headlight Control Works and Troubleshooting - 22RE and other early models
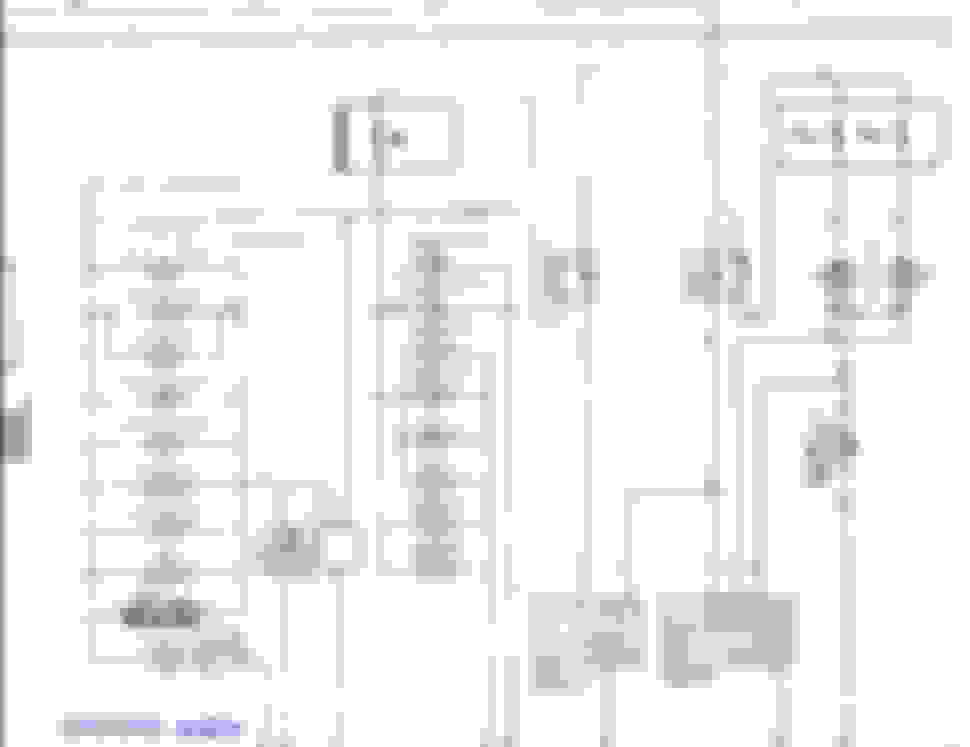
HOW HEADLIGHT SYSTEM WORKS.
(Schematic below)
When h3adlight 5witch is turned on, headlight r3lay in (engine compartment fuse block for first-gens 22RE) energizes, closes contact, sends +12V to both headlight fuses and to pin 3 of both bulbs.
Toyota uses switched-ground control; Dimmer-switch select which filament (high or low) of bulb to connect to ground.
When in low beam position, switch contact 6 (HL) of dimmer-combo switch connects pin1 (red with green stripes) to ground (G = zero volt, H is floating so there is 12Volt there.)
When in high-beam position, switch contact 5(FU) connects pin 2 (red with yellow stripe) of bulbs to ground (H = zero volt, G is floating so there will be 12V there. G is also connected to high-beam indicator so that 12V will turn it on.)
TROUBLESHOOTING: Voltage test points and expected voltage readings ON NORMALLY-FUNCTIONING SYSTEM. To the best of my knowledge, the schematic and tests here apply to USA model (no DRL) 3rd-Gen and earlier 4Runners/Trucks.
(I verified below to apply to 1986 to 1988 22R-Eliable , based my own 1986 and pdf schematic of 1988).
This will determine if your wiring and power are good. If wiring and power are good, suspect your bulbs.
Other tests may be needed but these points will cover most troubleshooting scenarios.
H3adlight r3lay and fuses are in fuse block in the engine compartment.
PERFORM THE CHECK BELOW WITH GOOD BULBS CONNECTED. PROBE THE BACK OF CONNECTOR OR PULL IT OUT JUST ENOUGH SO YOU CAN PROBE THE PIN BETWEEN THE GAP.
Multi-meter in Volts DC mode (usually 20-V range IF not auto-ranging).
Negative (black) probe on bare, shiny metal of negative battery post or bare, shiny metal of body ground.
Probe points A through H in Off, Low-beam, and High-beam modes.
Points E,F,G and H are on the H4 connector. Probe the back of the pins or Pull terminal out slightly to be able to probe the contact blades while lights are still operational.
EXPECT READINGS BELOW FOR NORMALLY-FUNCTIONING LIGHTS. Let us know what you see is different about your system..
H4 CONNECTOR PIN-OUTS (FEMALE SIDE ON HARNESS):
ALTERNATIVE METHOD OF VOLTAGE CHECK (across pins of the H4 connector): NOTE: THIS SHOULD ALSO BE DONE WITH GOOD BULBS CONNECTED, otherwise you would not detect bad combo switch contacts.
If voltage readings with bulb connected is significantly different from without bulbs connected, suspect bad dimmer-combo-stalk switch contacts.
I ONLY PICTURE UNCONNECTED CONNECTORS TO HELP SHOW PIN-OUTS..
LOW-BEAM
HIGH-BEAM
Last edited by RAD4Runner; Dec 5, 2019 at 04:06 PM.
Thanks, Robb.
I added "how it works" and schematic above. That should cover general troubleshooting.
We will add/discuss details as members describe their specific issues.
Last edited by RAD4Runner; Nov 27, 2017 at 10:39 AM.
High beams do not work, High beam flash works AND low beams work
Symptoms: BOTH high beams do not work, High beam flash works AND low beams work.
Troubleshooting:
Turn headlights on. Make sure low beams come on.
Switch to high beam. Still no light, of course?
Find Pins 5 (Red-Yel Wire) and 13 (wht-blk) of dimmer combo switch . Jump 5 to 13. Got highs?
If you get high beam, it's bad contact between those 2 pins. You may be able to clean or fix. However, the flaw in headlight wiring of that generation where current flows on thin wire over a convoluted path (ask 4crawler) and though the dimmer-combo switch will shorten it's life again.
If you still don't get highs, jump pin 5 directly to shiny, bare metal ground. Got highs? If yes, it's bad connection between pin 13 and ground.
(I have not actually done this work hands-on, so would appreciate if anybody could share pictures of switch and test points/pins.)
Last edited by RAD4Runner; Jan 7, 2018 at 08:37 PM.
I have A similar issue on my 1987 SR5 4runner. My low beams work MOST of the time, then, POOF, lights out total darkness. But, I can turn on the high beams and they would work. I can flash the high beams a time or 2, or turn the lights off and on, and then the low beams will work again BUT when the low beams come back on, the high beam indicator stays on in the instrument cluster.
I have A similar issue on my 1987 SR5 4runner. My low beams work MOST of the time, then, POOF, lights out total darkness. But, I can turn on the high beams and they would work. I can flash the high beams a time or 2, or turn the lights off and on, and then the low beams will work again BUT when the low beams come back on, the high beam indicator stays on in the instrument cluster.
Perform checks as described in post 4 above, and let us know what you find.
RAD4runner, I’ll check that and get back to u, taking my rig to the shop tomorrow to try to fix another issue... If you don’t mind would you check out my thread https://www.yotatech.com/forums/show...3&goto=newpost and see if anything jumps out?
Last edited by bendiesel76; Apr 16, 2018 at 05:36 PM.
Perform checks as described in post 4 above, and let us know what you find.
RAD4runner, I�ll check that and get back to u, taking my rig to the shop tomorrow to try to fix another issue... If you don�t mind would you check out my thread https://www.yotatech.com/forums/show...3&goto=newpost and see if anything jumps out?
RAD4runner, I�ll check that and get back to u, taking my rig to the shop tomorrow to try to fix another issue... If you don�t mind would you check out my thread https://www.yotatech.com/forums/show...3&goto=newpost and see if anything jumps out?
K.
Sorry. Post 4 is actually for when high-beam does NOT work but low-beams do.
Better to do first post checks. You can do them AT THE HEADLIGHT CONNECTOR ITSELF. https://www.yotatech.com/forums/f116.../#post52379293
High beam works, High beam flash works but LOW-BEAM DOES NOT WORK
Originally Posted by bendiesel76
I have A similar issue on my 1987 SR5 4runner. My low beams work MOST of the time, then, POOF, lights out total darkness. ... the low beams will work again BUT when the low beams come back on, the high beam indicator stays on...
Most likely high resistance in the low-beam contacts of dimmer combo switch.
I just got through looking into this problem today. I actually have two headlight/blinker switches. I bought the one I'm using now years ago when the original one started having the high beam black out problem. Well the replacement started doing the same thing.
I broke both switches down. The original switch was just full of old grease. Removing the headlight toggle, the spring, and ball, and cleaning everything with electronics cleaner has everything working again after lubing with dielectric grease.
The second switch had a solder joint turn lose on there Y/R wire on the bottom of the headlight switch.
What I want to know is, what's the best way to clean rusty male pins in the PIN connector besides a tiny flathead screwdriver?
Last edited by Tims86Toy; May 12, 2018 at 08:59 PM.
It�s been while, but here�s what I have..... I tested the working at the headlights.... drivers side NOTHING on low beam but high works fine....passenger side, BOTH work correctly..... however now, I have absolutely zero low beam... I have to run my dogs or high bans all the time ...
...What I want to know is, what's the best way to clean rusty male pins in the PIN connector besides a tiny flathead screwdriver?
Good job!
Look closely at connector housing. There is a little tab you can push out of the way with a tiny jeweler's screw driver, then you can pull the pin out from behind. Clean with very fine sandpaper or steel wool.
OR fold very fine sandpaper over the tip of your tiny flathead screwdriver.
Now that you have fixed the switch. Help extend its life, and get brighter lights with H4 conversion harness. Google "convoluted path 4crawler".
... drivers side NOTHING on low beam but high works fine....passenger side, BOTH work correctly..... however now, I have absolutely zero low beam... ...
REPEAT: EXPECT READINGS BELOW ABOVE ARE FOR NORMALLY-FUNCTIONING LIGHTS. Let us know what you see is different about your system..
Nothing what? What voltage readings did you get? Where?
A picture paints a thousand words.
Last edited by RAD4Runner; May 13, 2018 at 10:41 AM.
REPEAT: EXPECT READINGS BELOW ABOVE ARE FOR NORMALLY-FUNCTIONING LIGHTS. Let us know what you see is different about your system..
Nothing what? What voltage readings did you get? Where?
A picture paints a thousand words.
didnt take a pic, but , I was getting 11.8v DC on the high beam for the drivers side and no reading at all on the low beam. On the passenger side I was getting 12.2v DC on the high beam and 11.8v dc on the low beam. These were taken at the plug the hooks to the headlight. But, like I said, now I have no low beam, I�m just running highs and/or my 6� KCs.
I had a lot of small things,to work on, I’ll jump the red/green wire to ground and see if that gives me any positive results. If nothing else, I’ll run another set of wires and add a rocker switch for the low beams.
Good job!
Look closely at connector housing. There is a little tab you can push out of the way with a tiny jeweler's screw driver, then you can pull the pin out from behind. Clean with very fine sandpaper or steel wool.
OR fold very fine sandpaper over the tip of your tiny flathead screwdriver.
Now that you have fixed the switch. Help extend its life, and get brighter lights with H4 conversion harness. Google "convoluted path 4crawler".
Nice! Thanks for the tip! But I gotta go back and solve the riddle of a ground problem in my gauge cluster first. I thought I fixed it but I still have no temp or fuel gauge.
Oh Great and All Knowing Master Guru of all things magical and electric.
So I was about to take the voltage measurements on my lights as they are, before doing the relay thing. I removed the driver’s side 3 prong headlight connector and found that the connector was looking pretty sad (at least very dirty if not semi melted or burnt. So I figured I would replace the connector vs. screwing around trying to get it clean.
Then IIRC part of the relay deal is up sizing one of the wires. I see it on a diagram you made but have no darn clue which wire that is. Is it one of the wires that comes out of the 3 prong headlight connector?
Last edited by L5wolvesf; Jun 11, 2018 at 02:06 PM.

 Oct 11, 2017 | 12:53 PM