When you click on links to various merchants on this site and make a purchase, this can result in this site earning a commission. Affiliate programs and affiliations include, but are not limited to, the eBay Partner Network.
... Is it one of the wires that comes out of the 3 prong headlight connector?
LOL!
Start with the Red-Yellow and the Red-Green. Red-Green will go to Pin 87A (Normally closed) of retrofit relay. Red- Yellow will go to Pin 87 (normally open of relay.
Had some time today to do the voltage measurements before I make any changes. Stock Wiring: Measured on driver�s Side (socket looks bad) Low Beam:
Batt: 13.24 volts, Across low beam filament (pins 1 & 3): 10.89 volts
Voltage drop in wiring: 2.35 volts � 17.7% of battery voltage
High Beam:
Batt 12.87 volts, Across high beam filament (pins 2 & 3): 9.88 volts
Voltage drop in wiring: 2.99 volts � 23.2% of battery voltage
Thank you, Sir!
WOW! You ave more losses in the wiring than mine had...
Rad4Runner's:
Stock Wiring
Low Beam:
Batt: 12.05V, Across low beam filament (pins 1 & 3): 11.15V
Voltage drop in wiring: 0.9V
volt drop = 7.5% of battery voltage
High Beam:
Batt 11.94, Across high beam filament (pins 2 & 3): 10.07
Volt drop: 15.7% of battery voltage! After Retrofit:
Low Beam:
Batt: 12.31V, : Across low beam filament (pins 1 & 3): 12.11V
Volt Drop: 0.2 = 1.6% of Battery voltage
High Beam:
Batt: 12.24V, Across high beam filament (pins 2 & 3): 11.78V
Voltage drop: =0.46V = 3.75% of battery voltage
Yeah I'm losing a good chunk of voltage. I presume this tests the whole headlight system Switch thru wiring etc.
Where would you or I check to see where the voltage loss is happening?
For ease of measurement, I recommend inserting a piece of aluminum foil with the male pin to create a tab outside the connector where to probe. This will ensure the connector is well-seated.
On low Beam, Pin1 to battery negative
On high Beam, Pin2 to battery negative
You'll get the voltage drop because of the convoluted path of the ground leg (bulb negative, to cabin, to steering column, to dimmer-combo switch, back to engine compartment, to fender ground= maybe 15 feet of thin wire?).
The positive leg is not too bad, because power goes from fuse to headlight relay (both in the same block) to headlight positive (pin3).
Hey RAD, I didn�t have any problem getting the measurements. I did as you suggested earlier. I pulled the socket �OUT JUST ENOUGH SO YOU CAN PROBE THE PIN BETWEEN THE GAP�. I also cleaned off the headlight prongs before testing.
So as far as the voltage drops really the next step is to do the headlight relay thing correct?
...
So as far as the voltage drops really the next step is to do the headlight relay thing correct?
Yes. My mod will address the bigger part of the problem- the ground leg, require less parts, and, keep low-beam working even if relay mal-functions, and retain Toyota's switched ground wiring.
H4 conversion harness is easier if bought, or u can make one like on 4Crawlers site. It will also take power more directly from battery. It will convert to switched-positve which may be a problem with less expensive LED headlights. Truck-lites work with either system.
Either relay retrofit will also prepare for upgrade to LED headlights like Trucklites. These lights may flicker from too much voltage drop. IIRC, Spacejunk had thay issue.
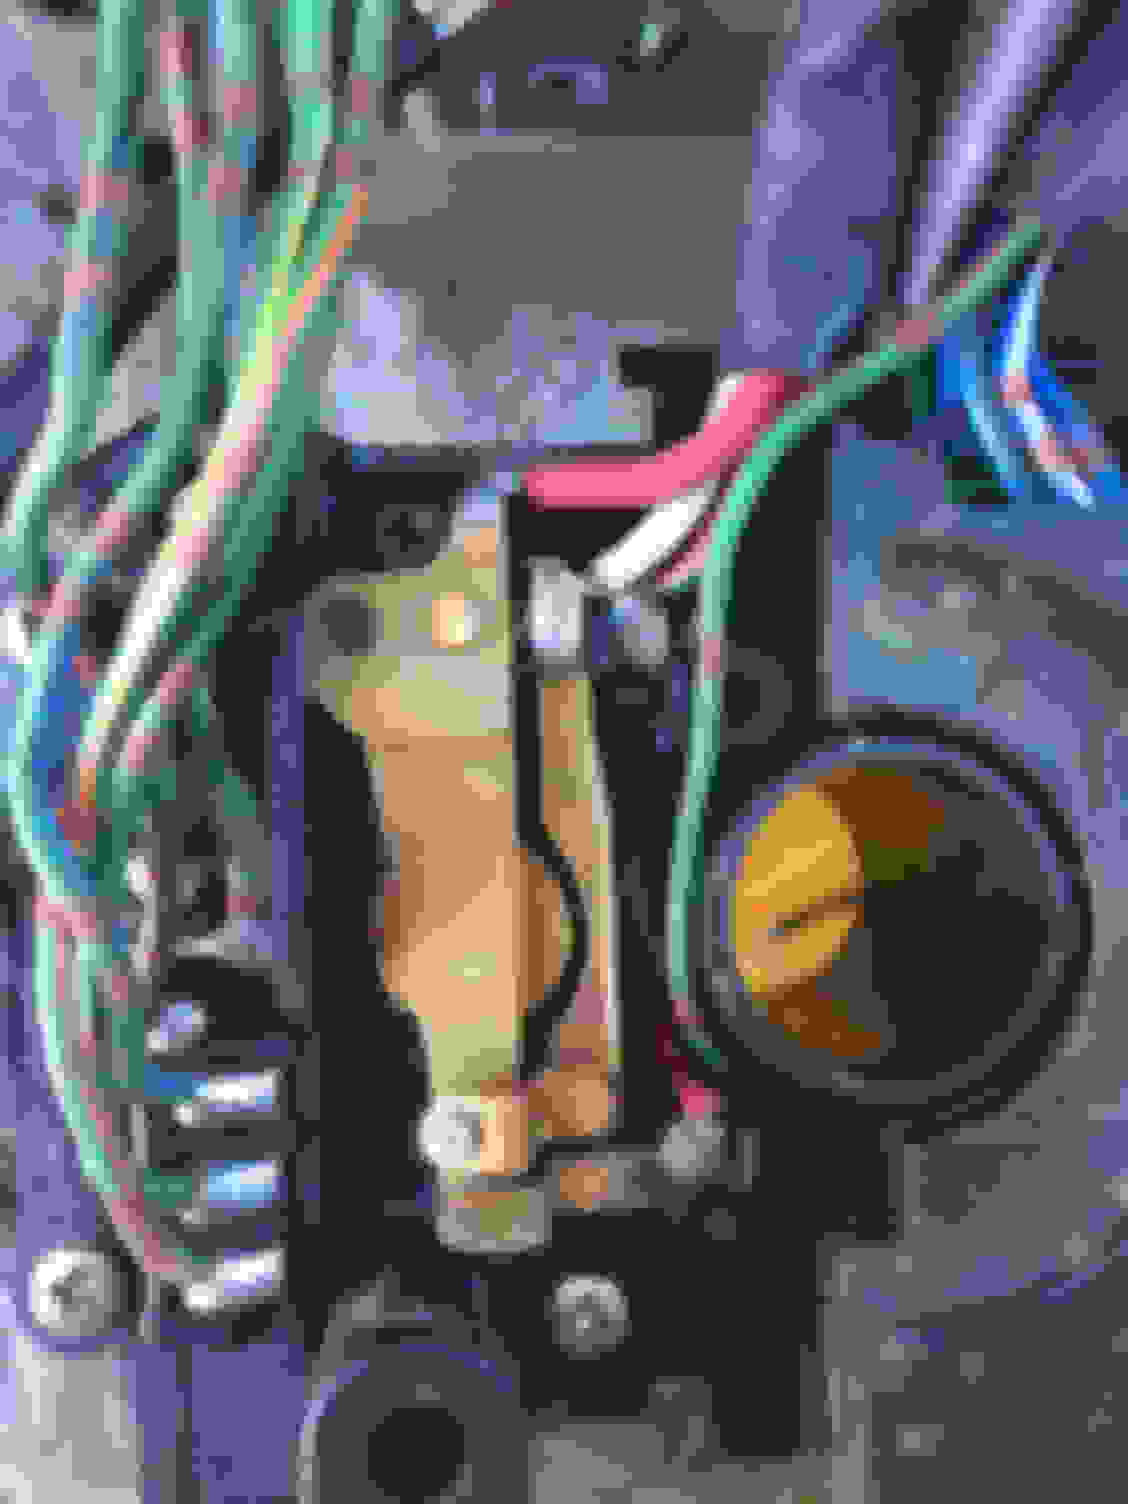
overall switch looks good nothing corroded or burnt. All contacts look good.
Im trying to get this straightened out before my new headlights and H4 harness arrive Monday. Any help is appreciated
******UPDATE****
So I installed the new LEDs last night with the H4 harness and Have a new issue. Basically I think I either have wires crossed some where or my switch is just . It kinda looks like some did some soldering and may have messed something up.
So now I have brights all the time with the headlight switch on
I noticed these two contacts (W/B and R/Y) constantly making constant contact so I slipped a piece of paper between them and that disengaged high beams. 2
with the paper in the Low beams are on, High flash still works but when I push the stalk forward nothing happens the low beams stay on as before it would shut everything off. Also side note I'm no longer getting a HI beam light on the dash
These contacts Shouldn't always be touching right? that's the high beam circuit.
Last edited by roughridn_sob; Dec 18, 2018 at 09:25 AM.
Reason: UPDATE!
AWESOME when someone does his homework like this^^^ and specifies that he is not driving an Escalade -
(Some people just say "high beams dead")
H (R-Y wire) provides ground to high-beam filament. This happens when Pin 5 makes contact with pin 13 which is connected to ground via W-B wire.
When you connect 5 to 13, highs work. That means that 5 and 13 are not making good contact. I suggest looking more closely at those contacts. Just need to follow the metal pieces from the wires. Try pushing them more tightly together with a wooden toothpick. I think Terrys87 has procedure for cleaning combo switch contacts.
When you do your H4 conversion harness, the system will not depend on high current through the combo switch contacts so even if they are less than perfect the lights will still work. Less current through the combo switch will also extend its life.
Just remember that most H4 conversion harness convert to switched positive. Meaning pin 3 will be constantly at ground and Pins 1 or 2 will get 12V for Lo/Hi. Some LED bulbs may not work with switched positive.
Last edited by RAD4Runner; Dec 15, 2018 at 06:33 PM.
AWESOME when someone does his homework like this^^^ and specifies that he is not driving an Escalade -
(Some people just say "high beams dead")
H (R-Y wire) provides ground to high-beam filament. This happens when Pin 5 makes contact with pin 13 which is connected to ground via W-B wire.
When you connect 5 to 13, highs work. That means that 5 and 13 are not making good contact. I suggest looking more closely at those contacts. Just need to follow the metal pieces from the wires. Try pushing them more tightly together with a wooden toothpick. I think Terrys87 has procedure for cleaning combo switch contacts.
When you do your H4 conversion harness, the system will not depend on high current through the combo switch contacts so even if they are less than perfect the lights will still work. Less current through the combo switch will also extend its life.
Just remember that most H4 conversion harness convert to switched positive. Meaning pin 3 will be constantly at ground and Pins 1 or 2 will get 12V for Lo/Hi. Some LED bulbs may not work with switched positive.
thanks RAD I�ll do some more troubleshooting and cleaning tomorrow I did take a small file to all the contacts just for ˟˟˟˟s and gigs and still no highbeams.
I bought the exact same harness and lights he linked in his video so hopefully they will work. If I still can�t get high beams do you think it�ll will hurt anything to put pin 5 and 13 on a switch temporarily basically make a switched jumper? I drive a lot of country roads when I leave for work in the morning packed with hogs 🐖 and deer 🦌.
And thanks I read the whole thread twice and troubleshot 3 times before posting lol Don�t wanna be the guy that asked an already answered question.
Pls tell us how your lights worked before this problem., and let's troubleshoot with stock setup. Harness will complicate things.
The R-Y and W-B wires (pins 5 & 13) should only make contact when stalk is pushed forward, AND that disconnects R-G from W-B, so your insulating paper method is good troubleshooting.
I also THINK, R-G and W-B only make contact when headlight is turned on in low-beam.
Re: crossed wires, pls check Terrys87 posts ;he had taken the switch apart.
High-beam indicator not working with H4 conversion sometimes happens. Depends on resistance of the coils in relays used.
Last edited by RAD4Runner; Dec 18, 2018 at 02:17 PM.
Thanks Rad if you look at the first part of post 28 it describes my issues and the trouble shooting I did prior to installing the harness and lights. I�ll break everything back down later this week and do so more for now the paper insulator is gunna have to work
Thanks Rad if you look at the first part of post 28 it describes my issues and the trouble shooting...
What I meant was, have u always had this issue since u bought the truck?
Whn u have it apart,.check to make sure switch contacts behave as I described.
What I meant was, have u always had this issue since u bought the truck?
Whn u have it apart,.check to make sure switch contacts behave as I described.
I will. I suppose I should have started my posting with the fact I�ve only owned this truck for 2 weeks hahaha so yes it�s always had the headlight issue as stated in my first post since I have had it . First order of business was making it run right cause th PO made a vaccuum system a nightmare fixed that the. �Fixed� my heat. And now trying to get higbeams for these dark country roads I drive 4 hours a day (2 in the am and 2 in the PM) already totaled 2 cars by hitting animals so that�s why i went to something hopefully a little more robust
Last edited by roughridn_sob; Dec 18, 2018 at 06:46 PM.
The Problem:
It ended up being constant contact between the R/Y wire and the W/B wire, causing constanty high beams
The solution:
I cleaned all contacts using a small jewelers file. and then straiughtend the R/Y contacts as RAD suggested to cause a gap. The R/Y contact now floats and I have regained the use of both flashers and high beams on demand.
Just put new headlights with h4 hids. Bought the h4 conversion . Wired up like it should be. Found 2 different sites on how prongs should be Switched .anyone know the correct prong setup. Right now I have low beam center , ground right and high left . Another site shows high beam center low left and ground right. only have high beams with very poor lighting .almost like its low beams with minimum lighting. Need help. Yes its raptor lined.
Last edited by Bpitts23; Dec 20, 2018 at 08:10 PM.
Reason: Add more info

 Jun 11, 2018 | 03:14 PM


 ... Is it one of the wires that comes out of the 3 prong headlight connector?


 . It kinda looks like some did some soldering and may have messed something up.