
EB Street RV *check* 261 Cam *check* 22re blown HG *check*
 Jul 15, 2011 | 10:18 AM
#21
Hey Buddy, .... Sup? lol. A BEEMER, EH? OOOH! lol. I loved mine, "78 Euro-Imported 320i, fullyi loaded with mods"... Thing was a lil ROCKET! lol.
Anyway, Yep, as said, yellow goo is normal, that's the "vanilla milk shake".... And take a wiff of everything in there, ....several as a matter of fact. Get familiar with that smell as it can give you warning. BTW, it's also normal that you'll see that 'mixture' and foam-wadding in the Valve Cover, first.
Sorry you got raped there.... that's really uncool! Not to defend him, but sometimes, crap happens, and they don't know until you tell em, right? In this case, the details seem pretty clear! lol. OH WELL, you learned, you move on, right?
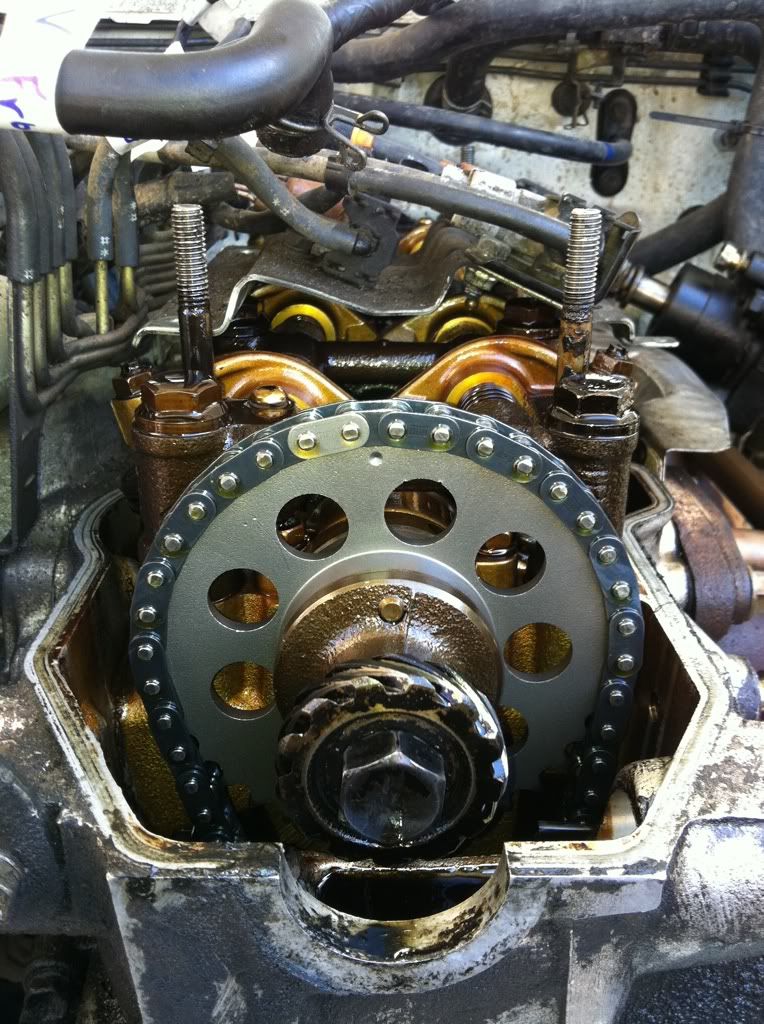
Far as the timing chain bright link.... PRETTY SURE; it can take up to MULTIPLE revolutions of the motor to get that back where the bright link lines up with the notch, cam dowel at 12, dimple in sprocket/bright link at 11:59.... So that's not really telling of ANYTHING at this point, ya know? You really just go by the bright link for assembly. Then, afterward, when setting valves, etc., you don't need that bright link in that spot, because you'd possibly have to turn it over and over and over and over and over...you get the point, in order to get that link there. First though.. you're on TDC ....>>> COMPRESSION? Or Intake stroke? If you're on compression stroke, the #1 and #4 pistons will be at the top(You should be able to see them through the hole).... and the Valves, 1&2 on the intake and 1&3 on the exhaust side should be loose(1 being in the front, toward bumper). As long as YOU KNOW you're on TDC compression stroke, with the rotor right where it was in that picture you posted(yes, that's piston #1, front), valves I mentioned loose, ALL OTHERS TIGHT, ....then you can pull the chain and reassemble new goodies with the bright link in the way it's directed.
Honestly, that chain and sprocket look a LOT like my kit from Engnbldr. Lots of the sellers out there use those sprockets and even the chain.... My initial builder/machinist(KNOB! LOL) used another purveyor and yet, it was the same kit pretty much, .....but with both guides in plastic(even though I gave him an LCE KIT w/steel rail! GRRR). Look on the tensioner, see if it's "OSK-Japan"... if so, it's a decent kit, GRANTING he even changed the tensioner(which I think he would, it just isn't that easy to piece a kit together, and why would he bother, right?). If that's the case, ....and the chain measures out fine, ...I don't see why not just reuse everything but the guide that you can get from AutoZone as mentioned. But I get ya, and I relate well, .... "Why not KNOW THAT I have an all new kit from engnbldr?" ...... Just sayin, you could, which I might, depending on how much of a rebuild I was doing.(in other words, 'will I be rebuilding the WHOLE motor, anyway, within 50K or so?', ya know?)
Anyway, Yep, as said, yellow goo is normal, that's the "vanilla milk shake".... And take a wiff of everything in there, ....several as a matter of fact. Get familiar with that smell as it can give you warning. BTW, it's also normal that you'll see that 'mixture' and foam-wadding in the Valve Cover, first.
Sorry you got raped there.... that's really uncool! Not to defend him, but sometimes, crap happens, and they don't know until you tell em, right? In this case, the details seem pretty clear! lol. OH WELL, you learned, you move on, right?
Far as the timing chain bright link.... PRETTY SURE; it can take up to MULTIPLE revolutions of the motor to get that back where the bright link lines up with the notch, cam dowel at 12, dimple in sprocket/bright link at 11:59.... So that's not really telling of ANYTHING at this point, ya know? You really just go by the bright link for assembly. Then, afterward, when setting valves, etc., you don't need that bright link in that spot, because you'd possibly have to turn it over and over and over and over and over...you get the point, in order to get that link there. First though.. you're on TDC ....>>> COMPRESSION? Or Intake stroke? If you're on compression stroke, the #1 and #4 pistons will be at the top(You should be able to see them through the hole).... and the Valves, 1&2 on the intake and 1&3 on the exhaust side should be loose(1 being in the front, toward bumper). As long as YOU KNOW you're on TDC compression stroke, with the rotor right where it was in that picture you posted(yes, that's piston #1, front), valves I mentioned loose, ALL OTHERS TIGHT, ....then you can pull the chain and reassemble new goodies with the bright link in the way it's directed.
Honestly, that chain and sprocket look a LOT like my kit from Engnbldr. Lots of the sellers out there use those sprockets and even the chain.... My initial builder/machinist(KNOB! LOL) used another purveyor and yet, it was the same kit pretty much, .....but with both guides in plastic(even though I gave him an LCE KIT w/steel rail! GRRR). Look on the tensioner, see if it's "OSK-Japan"... if so, it's a decent kit, GRANTING he even changed the tensioner(which I think he would, it just isn't that easy to piece a kit together, and why would he bother, right?). If that's the case, ....and the chain measures out fine, ...I don't see why not just reuse everything but the guide that you can get from AutoZone as mentioned. But I get ya, and I relate well, .... "Why not KNOW THAT I have an all new kit from engnbldr?" ...... Just sayin, you could, which I might, depending on how much of a rebuild I was doing.(in other words, 'will I be rebuilding the WHOLE motor, anyway, within 50K or so?', ya know?)
Last edited by ChefYota4x4; Jul 15, 2011 at 10:19 AM.
Jul 15, 2011 | 10:40 AM
#22
Thread Starter
Registered User
Joined: Oct 2009
Posts: 1,560
Likes: 1
From: Santa Cruz, CA
Hey man, so thought I'd stop by for a little update while I eat some lunch.
I've turned the motor over a lot of times just so I can get an idea of exactly how it all works. I think that kind of thing is interesting
No matter how many times I turn it the chain always lines up like this, so I think he was just lazy and put it in a link over top and bottom, or having the chain wrong like that for a long time would have caused some problems I would think?
We'll find out for sure when I get the cover off though!
I think it would definitely be a toyota timing kit because I know he is a toyota dealership mechanic, so I am guessing that was the cheapest place to get parts for him. That or he is just a real sob and ordered an EB kit with a plastic guide lolz. Either way, I called up 22re-performance this morning and got some more goodies, I figured it is time to do a lot of maintenance while I am in here.
Got Wires, Cap and rotor, a steel guide (15 bucks and saves me a trip to AZ, which is no where remotely close to me), thermostat, all the belts and exhaust studs. Ordering things is just easier when you live out in the boonies and they carried pretty much everything i needed with high quality parts and pretty good prices I felt. They're also located in CA, so shipping will be fast, they said they'd have it out the door today.
Side note, I talked to the guy at 22rePerformance for a while and when I asked if they had the toyota FIPG he said that he'd done a lot of research on it and talked to Permatex and that Toyota, Subaru etc.. all buy the Permatex GREY and dye it their own color, relabel it and jack the price up. He said he just uses grey everything, not the black.
OK, so this is where it sits right now.
LABELING everything, even though I have no idea what to call some of it, just numbering systems and lots of tape!
Jul 15, 2011 | 11:10 AM
#23
Nice work, man!
Far as the Toyota FIPG, ..... I really am grateful to Jim for all the time he's given to try and talk me through some REAL nightmares... and I'M NOT saying he's not correct.. But honestly, I've used them all, and the Toyota CAM and Oil Pan FIPG stuff seems TOTALLY different in texture, time to dry, etc. BUT, honestly, the Permatex Gray is FINE stuff, and will work well. BUT-#2! LOL...>>>> The reason I pointed out "The Right Stuff" from Napa is because it's 'SUPPOSED' to be really good with Oil/Coolant/Fuel(?). No matter what you use, SC, ......GET IT RIGHT THE FIRST TIME, cuz it's a BIOTCH to get it off once its' set! lol.
That's another thing..... I've never had as much trouble removing stuff as when I've used the Toyota FIPG. It was WAY harder to get the pan off the time I used that stuff instead of the Permatex(but, maybe that's all in my head now that I've heard what you said..>??? lol Seriously! I wanna know this stuff, I'm not gonna fight the truth just cuz I wanna believe I'm paying MORE for something BETTER! .... I'd rather get Permatex for that price difference. And, I'd better update my build thread with that info from Jim, as I don't want people spending 17$(20% off) from Toyota if it's the same stuff.
Jul 15, 2011 | 11:48 AM
#25

Registered User
Joined: Nov 2006
Posts: 730
Likes: 2
From: Indiana
I'm sitting on here on Yotatech, posting and posting and searching for info and more info and I have all the parts and I'm just procrastinating and not wanting to get started to put it all together, one little mess up, oil gushing out uncontrollably and start all over, I've done all types of repairs by myself, but is this beyond my abilities? I don't drink so can't loose my demons that way ;}LOL Meditation? Hummmm?
Jul 15, 2011 | 01:17 PM
#26
Thread Starter
Registered User
Joined: Oct 2009
Posts: 1,560
Likes: 1
From: Santa Cruz, CA
I know how you feel John, but at the same time, but the more I get this engine apart the more I see how darn simple it is. It all makes sense when you can really touch and turn the mechanics of it. The part that worries me is all the vacuum hoses and getting the seals to seat nicely. Timing and adjusting the valves is all new to me, I'll see if I can get the mechanics down the road to give me a hand for a case of beer or something to deal with that.
BONUS POINT!
Right below the cam gear you can see the pinched head gasket causing the leak down the front of the motor.
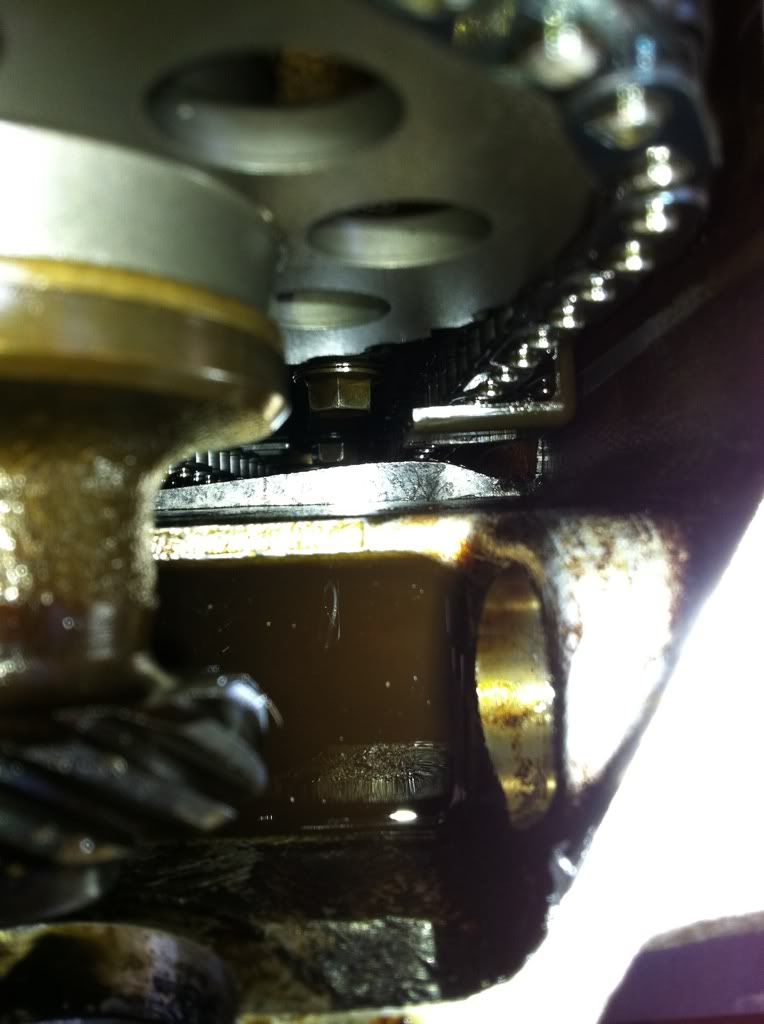
BONUS POINT!
Right below the cam gear you can see the pinched head gasket causing the leak down the front of the motor.
Last edited by SCToy; Jul 15, 2011 at 01:25 PM.
Jul 15, 2011 | 02:19 PM
#27
Registered User
Joined: Nov 2006
Posts: 730
Likes: 2
From: Indiana
I did a head gasket on a 89 Tercel, but it didn't call for ALL a 22R needs to do a HG, just took off head, had it shaved in case the over heating because under intake manifold around the back of the block coolant tube got a leak (replaced) and I thought it might of warped the head, put new gasket on, put head on (didn't have all that timing BS) slipped timing belt on and put all back together and sold it, This one I'm going to be buried in it, so needs to last!!!! ;}
I didn't label everything, took lots of pics, got lots of other people engine pics and also factory diagrams of vacuum hoses, and 99% are cut to length needed, so there connection points are not to far away from the vacuum rail next to valve cover there all still connected there. I'm going for broke tomorrow, going to get started, wish me luck gentlemen!!!!
My fears,
1. sealant on timing cover top and bottom corners & no leaks
2. timing cover to block paper gaskets & no leaks
3. new redesigned factory end seals I got if I get in right place's & no leaks
4. all those pesky air tube gaskets everywhere & no leaks
5. all the pesky water seals dry and rubber o-ring ones & no leaks
6. oil pump o-ring seal & no leaks
7. bet there is more, but that 89 tercel didn't have all that already listed.
8. timing chain tensioner is it going to work or fail?
9. I cut off 2 old head bolt heads to uses as dowels to align engnbldr pro head and OEM gasket and then put on rocker assembly put other head bolts in and remove cut one and replace for ones with heads, didn't have $132 bucks extra for ARP studs.
10. Dinner time so it's Break time! BBL ;}LOL
Jul 15, 2011 | 02:30 PM
#28
Thread Starter
Registered User
Joined: Oct 2009
Posts: 1,560
Likes: 1
From: Santa Cruz, CA
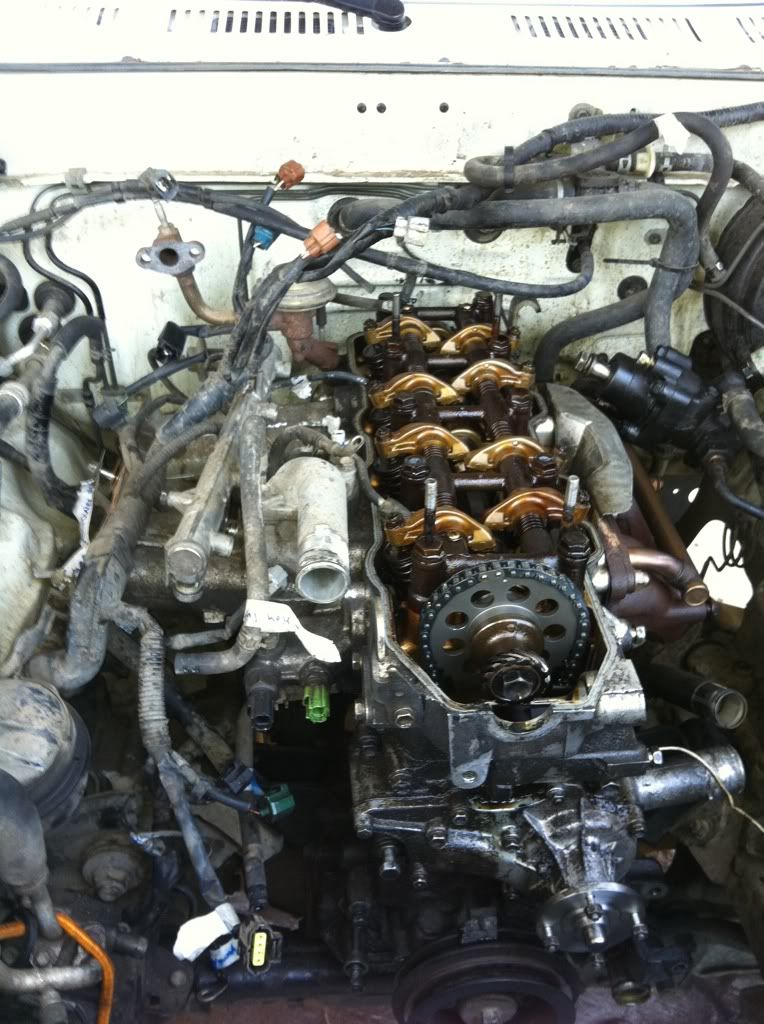
Well, more carnage to feast your eyes. So far, I am pretty good at taking things apart, we'll see if I can get it back together 
The injectors look pretty good to me, not that I really know anything, but they aren't all gummed up really
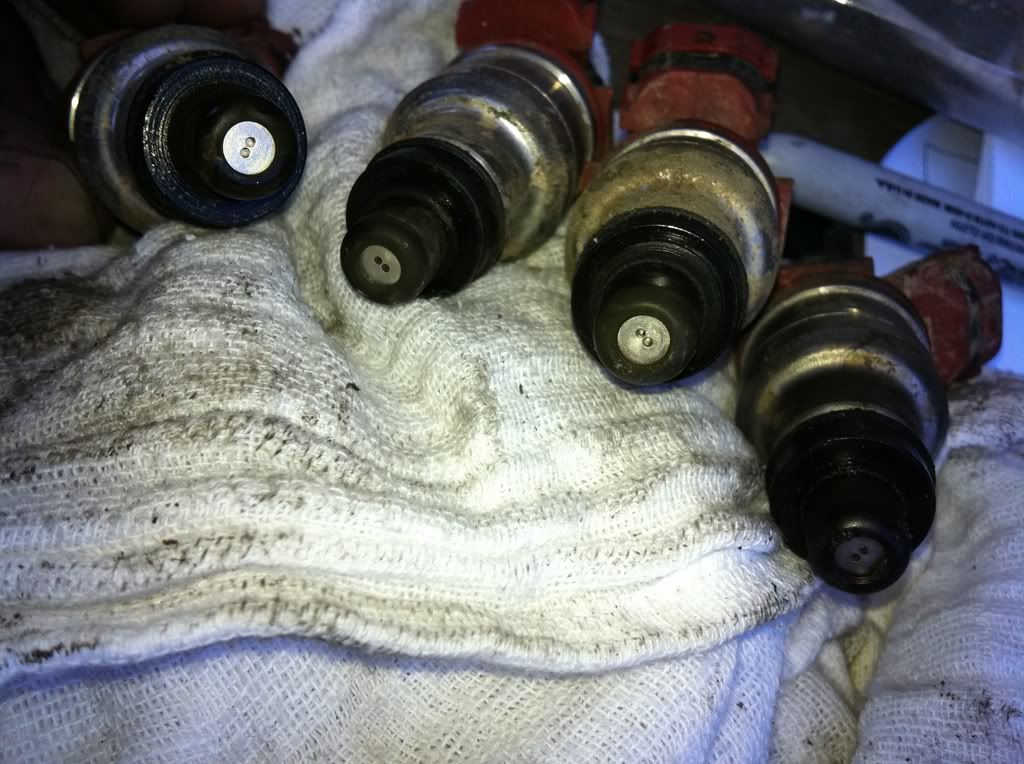
Bonus points for the Rastafarian EFI

The injectors look pretty good to me, not that I really know anything, but they aren't all gummed up really
Bonus points for the Rastafarian EFI
Jul 15, 2011 | 08:58 PM
#29
Hahaha, ... I remember these feelings I'm hearing described! lol. You'll be fine, John, ...just take your time, it's pretty straight forward if you just read and reread and take notes down before each portion(helps with visualizing it)... You'll do just fine. If you have questions on portions of it, just throw it out there!
Nice work, SC, ...coming right along! Injectors do look surprisingly good, ....but that doesn't mean they are, ya know? They could test even "GOOD", ....but Witchhunter would get em back to you, most likely all of them, at "EXCELLENT", ya know? Better mileage, power, etc. And YES, these Plenums stilled vacuumed up remind me of "Predator", hahaha. "You're one ugly mo............" lol.
Nice work, SC, ...coming right along! Injectors do look surprisingly good, ....but that doesn't mean they are, ya know? They could test even "GOOD", ....but Witchhunter would get em back to you, most likely all of them, at "EXCELLENT", ya know? Better mileage, power, etc. And YES, these Plenums stilled vacuumed up remind me of "Predator", hahaha. "You're one ugly mo............" lol.
Jul 16, 2011 | 08:51 AM
#30
Thread Starter
Registered User
Joined: Oct 2009
Posts: 1,560
Likes: 1
From: Santa Cruz, CA
I'm definitely sending them off, the seals are old and hard, they've been in there for 16 years or something now, so they are due. I guess running Chevron does pay off though
I gotta take a break and note everything I've done so far, but for the most part everything has huge masking tape labels.
I gotta take a break and note everything I've done so far, but for the most part everything has huge masking tape labels.
Jul 16, 2011 | 10:59 AM
#32

Registered User
Joined: Sep 2006
Posts: 949
Likes: 3
From: i ka moana
Side note, I talked to the guy at 22rePerformance for a while and when I asked if they had the toyota FIPG he said that he'd done a lot of research on it and talked to Permatex and that Toyota, Subaru etc.. all buy the Permatex GREY and dye it their own color, relabel it and jack the price up. He said he just uses grey everything, not the black.
thats sad about the timing cover job. in my opinion he should have just cut the front of the head gasket right off. i ran into this problem trying to fix a timing cover and countless guides on the internet say 'oh its easy just slide it right back under there' ... after a couple hours and lots of anger i just decided to cut the HG flush with the block and use toyota never-comes-off FIPG there instead. works fine. hack job? maybe. but at least there's no pinched gasket spewing oil all over my engine bay. it's nice and dry.
Last edited by fork; Jul 16, 2011 at 11:06 AM.
Jul 16, 2011 | 11:12 AM
#35
Thread Starter
Registered User
Joined: Oct 2009
Posts: 1,560
Likes: 1
From: Santa Cruz, CA
Hopefully by the end of next week at the latest, I've got a box of parts coming that should be here monday or tuesday. Has my timing chain guide, so I can't really do much except clean things and empty the bits of guide out of the pan until then.
Keep in mind I will still be on the stock exhaust for a while, so I am not expecting much of a change yet.
Keep in mind I will still be on the stock exhaust for a while, so I am not expecting much of a change yet.
Last edited by SCToy; Jul 16, 2011 at 11:13 AM.
Jul 16, 2011 | 11:40 AM
#36
Far as the 261, .... my swap in of that cam came around 1200 miles into a new rebuild by a guy that was once one of the most respected in CA for building Japanese and Domestic Race Engines....(This leads me to a tangent, herein, that's related to "THIS GUY SCREWED UP MY MOTOR, ...A PRO, HOW COULD THIS HAPPEN?")>>> And, well, as I said, USED to be, lol. He botched about 4 Different MAJOR things on my motor, including, 1. a TERRIBLE grind on my orig. cam and then reinstalling it, 2. a terrible machining job on my crank and cylinders(all were out of round), 3. TOTALLY botched the timing cover job w/too much sealant(was oozing out the sides) , and 4. not having the top right t-cover bolt that goes through the alternator bracket, he used one he had..... it was too long... and subsequently, he caused a crack in the face of the block that I didn't find til tearing the cover off for a second time. OH YEAH, and 5. I sent him an LCE Steel guide timing kit, ..... he installed whatever "rebuild kit product" he ordered with "everything".... same stuff engnbldr uses, which is fine....but WITH A PLASTIC GUIDE, DRIVER SIDE!(When I asked him, "Where is my LCE Kit??? I paid 150$ or more for that, man, ....and after all you f'd up???" .... he called me back, and I kid you not, said, "Sorry about all that stuff.....pause...... I just called, and I can order you one if you want?" ... YEAH? THANKS FOR NOTHING! Douche wanted to charge me for a steel guided kit from wherever, not even offering to replace mine from LCE, through LCE! GRRRRR! lol...........
Even with all that stuff going on I had decent power, which, I mention it because I started with a Header, clean injectors and Cold Air Kit from LCE..... Once I swapped the new 261 CAM in, I DEFINITELY felt the difference. NOTHING LIKE putting an EVO in a once stock Civic or something, ...but most definitely got GAINS in top end of RPM and on the Hills. 5K into that motor, I rebuilt again, COMPLETELY, with a new Short block, etc..... and re-used the 261, ... It's working great!
One thing I will mention, which engnbldr and others don't don't feel makes much difference..... Almost all aftermarket CAMS come A TEENY bit bent. If you spin the things in the heads journals, using a dial indicator, you'll usually find that, away from the center, you'll get a bounce on the needle. Mine was up to 6-8thousandths on each end.... and so I took it to Engle CAMS, in Gardena, CA, ...they straightened it for me and when checking it again, it was 0- BOUNCE, AT ALL! You can feel the replacement cams bind up a tiny bit in the journals WHEN THE CAPS ARE ON. When I had it straightened before assembling my second motor.... spun free as heck w/out binding.(I believe Tod and Ted of engnbldr.... it's probably not an issue.... But for 10$ to straighten it in 3 minutes on Engle's CAMS' machine? Worth it to me after all I've been through,... to have piece of mind, etc.)>>> Also, (When Engle Handed me the CAM, he said, "CAREFUL! They bend VERY easily, even just throwing it in your padded trunk could put it right back where it was. Shipping is usually where it happens"....
Sorry for rambling, SC, Fork.... but I figured, while you wait for parts, why not share a lil insight from personal experience. If you want, I'll edit it really short to "Love the 261, works great and has a noticeable diff. in power"? lol.
Jul 16, 2011 | 11:43 AM
#37
Hopefully by the end of next week at the latest, I've got a box of parts coming that should be here monday or tuesday. Has my timing chain guide, so I can't really do much except clean things and empty the bits of guide out of the pan until then.
Keep in mind I will still be on the stock exhaust for a while, so I am not expecting much of a change yet.
Keep in mind I will still be on the stock exhaust for a while, so I am not expecting much of a change yet.
Last edited by ChefYota4x4; Jul 16, 2011 at 11:44 AM.
Jul 16, 2011 | 01:02 PM
#38
Registered User
Joined: Sep 2006
Posts: 949
Likes: 3
From: i ka moana
when my 261 arrived it was right on, not quite a thousandth out. i've check over and over for vac leaks and can't find any, but under 900-1000rpm it just idles wacky. the only thing i can blame at this point is the tps which is a ****hair out of adjustment. it doesnt bother me at all, i don't really care about it, i was just wondering if anyone else has this situation with a 261 in a 22r-e
Jul 17, 2011 | 11:09 PM
#39
Mine is purring, .... so I would look elsewhere, Fork, like with the TPS as you mentioned. Had you done a Stage 2 and a 274 CAM or something like that... then yes, I'd be tinkering with the lash, etc., till it got where I wanted. But the 261 just seems to be fairly stock with a lil more go-go.
Far as the intake leaks, they can be sneaky, ...but I chased around for one as well, and wound up everything was Top end related, lol. My orig guides were re-used, as well as all 8 valves(the first rebuild) and a crapily ground orig. cam... and even after swapping in the 261, it was better, but still just 'wacky as hell', lol. With the loose fit in the guides, it would purr anything over 1200rpm, and never pop or backfire, but even in the upper rpms like that, it would miss, noticeably. ESPECIALLY at 750-1500rpm. Mileage was worse, too. It's better now, not a LOT, but better, haha.
Best wishes on that if you pursue the anomaly.
PS> I've been told by a couple Master techs that these like it a bit more advanced than recommended, ....especially with a lil CAM'age in there. Couldn't hurt to try, eh?


