
Bleeder-Dude's Official 22re Engine Rebuild Thread - TONS OF PICTURES!!!


 May 10, 2009 | 07:32 PM
#102
Thread Starter
Contributing Member
Joined: Feb 2008
Posts: 12,248
Likes: 33
From: Lake City, Fl
 May 10, 2009 | 07:33 PM
#103
Thread Starter
Contributing Member
Joined: Feb 2008
Posts: 12,248
Likes: 33
From: Lake City, Fl
I like it

[YOUTUBE]http://www.youtube.com/watch?v=_emsoiVzPcU[/YOUTUBE]
ah, the motor was running so good then
 I do notice a little blueish smoke in the video though, lol
Last edited by iamsuperbleeder; May 10, 2009 at 07:35 PM.
May 11, 2009 | 06:33 PM
#104
Thread Starter
Contributing Member
Joined: Feb 2008
Posts: 12,248
Likes: 33
From: Lake City, Fl
oooookay, well, gotta little done today
BUT, before I start with the stories, let me go ahead and say I got NO pictures from today... I was nasty from head to toe, it was hot out, and I didn't feel like running back and forth with the camera... I'd get some now, but I'm worn out, I just got out of the shower, and I really don't feel like going into the garage to touch dirty parts to get pictures
First thing I tackled today involved the pressure washer I borrowed from my sister's fiance's father
I fired the thing up and blasted a TON of oil soaked mud, sand, and clay off the front frame rails, UCAs, firewall, a little off the trans, and off the front diff. I honestly never knew the front cover on the diff was suppose to be a lighter color than the rest of the diff, lmao. All the time I've had it, it's been black... and kinda just matched the rest of the undercarrage
THEN, I rolled the motor out on the stand and gave it a once over with the pressure washer. It's still nasty looking, but should be much better to work on now
After I was saticefied, I realised I still had some daylight left, so I thoughy what the hell, let's take some stuff apart
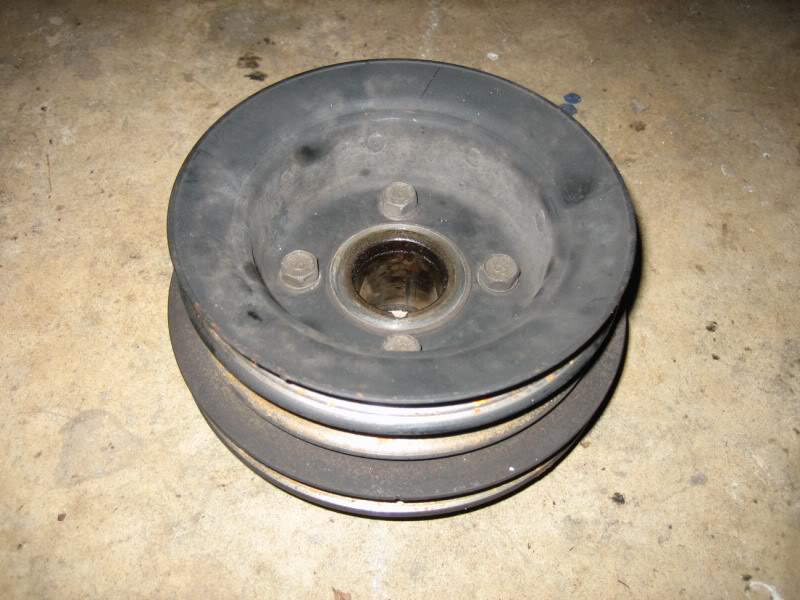
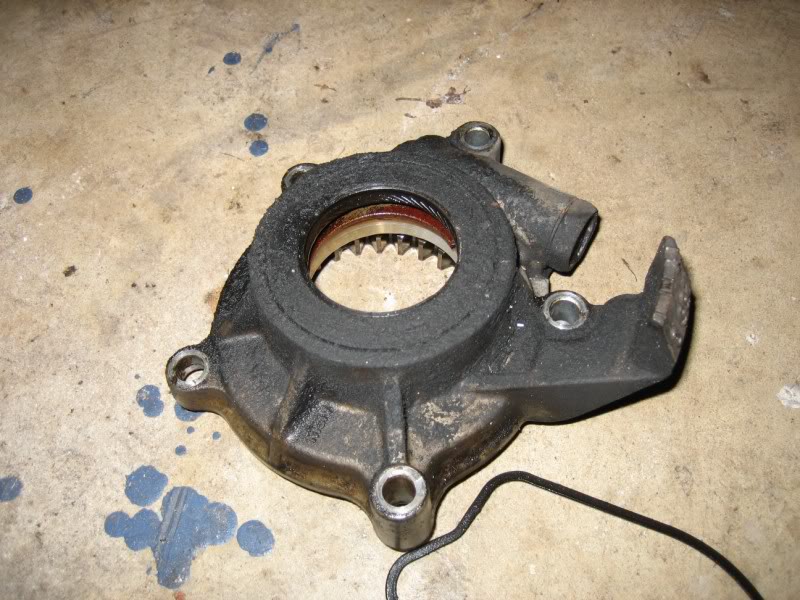
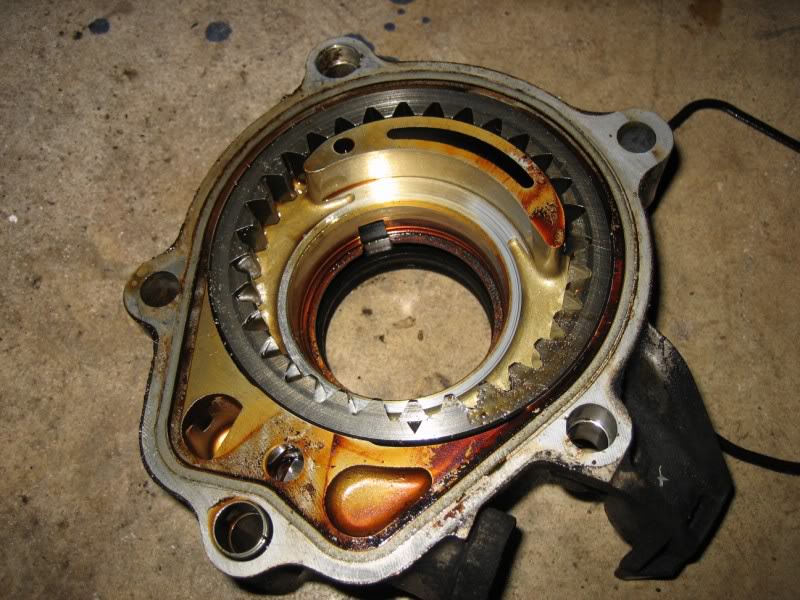
Pulled the water pump, the oil pump, the timing cover, all of the timing components (or rather what was left), then the valve cover, and started removing head bolts. Here's where things got interesting...
I knew these head bolts aren't suppose to be a walk in the park to break free. But I started torquing on the first one, and the SOB didn't want to break loose... so I skipped it and went to the next. Out of the others, all but one came loose without a hitch. So at this point I'm stuck with 2 bolts will holding the head on. I go back to the first one I had problems with. I put a wrench on it, and a 3 foot jack handle on the end to get some good leverage, and the thing just resist any torque I put on it, untill... SNAP!!! THE FREEK'N HEAD BOLT BROKE CLEAN IN HALF!!! WTF!!! So I'm like "oh great... I hope the machine shop can take care of that..." After that, I moved onto the other bolt giving me greif; the only bolt left in the head. So I tried the same method; wrench on the bolt, 3 foot cheater bar jack handle on the wrench, and give er hell... no dice... I thought I was going to break my damn wrench in half as far as it was bending! After numerous tries and several techniques (tapping on the wrench with a hammer, putting other bolts back in around it to spread the tention out, tapping on the bolt itself to maybe brak it free), I gave up after the wrench starting slipping off the bolt head. It's a 12pt closed end wrench, and if I where to keep going, I would have just rounded the bolt off. So tomorrow I'm going to stop and get a good 17mm 6pt socket and wrench, and break the freek'n bolt like the other if I have to... I just know it's going to break too... there's no way it's coming out intact...
So yeah, that's what today consisted off... sorry for no pics; I'll get them and post them tomorrow, hopefully with some pics of the combustion chambers as well

BUT, before I start with the stories, let me go ahead and say I got NO pictures from today... I was nasty from head to toe, it was hot out, and I didn't feel like running back and forth with the camera... I'd get some now, but I'm worn out, I just got out of the shower, and I really don't feel like going into the garage to touch dirty parts to get pictures
First thing I tackled today involved the pressure washer I borrowed from my sister's fiance's father
I fired the thing up and blasted a TON of oil soaked mud, sand, and clay off the front frame rails, UCAs, firewall, a little off the trans, and off the front diff. I honestly never knew the front cover on the diff was suppose to be a lighter color than the rest of the diff, lmao. All the time I've had it, it's been black... and kinda just matched the rest of the undercarrage
THEN, I rolled the motor out on the stand and gave it a once over with the pressure washer. It's still nasty looking, but should be much better to work on now
After I was saticefied, I realised I still had some daylight left, so I thoughy what the hell, let's take some stuff apart
Pulled the water pump, the oil pump, the timing cover, all of the timing components (or rather what was left
), then the valve cover, and started removing head bolts. Here's where things got interesting...I knew these head bolts aren't suppose to be a walk in the park to break free. But I started torquing on the first one, and the SOB didn't want to break loose... so I skipped it and went to the next. Out of the others, all but one came loose without a hitch. So at this point I'm stuck with 2 bolts will holding the head on. I go back to the first one I had problems with. I put a wrench on it, and a 3 foot jack handle on the end to get some good leverage, and the thing just resist any torque I put on it, untill... SNAP!!!
THE FREEK'N HEAD BOLT BROKE CLEAN IN HALF!!! WTF!!! So I'm like "oh great... I hope the machine shop can take care of that..." After that, I moved onto the other bolt giving me greif; the only bolt left in the head. So I tried the same method; wrench on the bolt, 3 foot cheater bar jack handle on the wrench, and give er hell... no dice... I thought I was going to break my damn wrench in half as far as it was bending! After numerous tries and several techniques (tapping on the wrench with a hammer, putting other bolts back in around it to spread the tention out, tapping on the bolt itself to maybe brak it free), I gave up after the wrench starting slipping off the bolt head. It's a 12pt closed end wrench, and if I where to keep going, I would have just rounded the bolt off. So tomorrow I'm going to stop and get a good 17mm 6pt socket and wrench, and break the freek'n bolt like the other if I have to... I just know it's going to break too... there's no way it's coming out intact...So yeah, that's what today consisted off... sorry for no pics; I'll get them and post them tomorrow, hopefully with some pics of the combustion chambers as well
Last edited by iamsuperbleeder; May 11, 2009 at 06:36 PM.
May 11, 2009 | 06:48 PM
#105
Registered User
Joined: Sep 2008
Posts: 4,355
Likes: 2
From: middle of no where Alaska
Aren't pressure washers fun?!?!?! I used one for a few weeks last summer when I was prepping a building for paint.
sucks about the head bolts 296K miles must have like melted them together. Hopefully the shop can get them out.
I still think you should put in a 1uz-fe. Good luck
sucks about the head bolts
296K miles must have like melted them together. Hopefully the shop can get them out.I still think you should put in a 1uz-fe. Good luck
May 11, 2009 | 06:54 PM
#106
Thread Starter
Contributing Member
Joined: Feb 2008
Posts: 12,248
Likes: 33
From: Lake City, Fl
Aren't pressure washers fun?!?!?! I used one for a few weeks last summer when I was prepping a building for paint.
sucks about the head bolts 296K miles must have like melted them together. Hopefully the shop can get them out.
I still think you should put in a 1uz-fe. Good luck
sucks about the head bolts
296K miles must have like melted them together. Hopefully the shop can get them out.I still think you should put in a 1uz-fe. Good luck
go figurewe'll see; I might be able to carefully drill and out-it myself once I get the other bolt off and pry the head free
and oh yes, pressure washers are a BLAST (no pun intended
). I like to call them "make-it-newers", cause they make things look like new, lmao
Last edited by iamsuperbleeder; May 11, 2009 at 06:55 PM.
May 11, 2009 | 07:06 PM
#108
Wow, no pics...it's like I'm not sure I can actually believe it. I'm truely hurt.
LOL!! Man, I didn't have that much trouble?? Did you follow the FSM for taking the bolts out?
LOL!! Man, I didn't have that much trouble??
Did you follow the FSM for taking the bolts out?
May 11, 2009 | 07:23 PM
#110
Thread Starter
Contributing Member
Joined: Feb 2008
Posts: 12,248
Likes: 33
From: Lake City, Fl
but really, I didn't realise there was a process to it; if anything, just break them all free first about a quarter turn, then go back and remove them all, and that's honestly what my plan was... but two didn't want to break loose
just another few $$ added to my total, lol. So far I'm looking at almost $1400 in parts alone!!! nothin but the best though
May 11, 2009 | 07:42 PM
#113
Thread Starter
Contributing Member
Joined: Feb 2008
Posts: 12,248
Likes: 33
From: Lake City, Fl
well I'll be damned if you weren't right

"head warping or cracking could result"... I guess it's a good thing I already had plans to REPLACE the head, lol
btw, it's number 8 that broke, and number 5 that is being stubborn
"head warping or cracking could result"... I guess it's a good thing I already had plans to REPLACE the head, lol
btw, it's number 8 that broke, and number 5 that is being stubborn
Last edited by iamsuperbleeder; May 11, 2009 at 07:43 PM.
 May 11, 2009 | 07:52 PM
#115
Thread Starter
Contributing Member
Joined: Feb 2008
Posts: 12,248
Likes: 33
From: Lake City, Fl
lmao, again? comon...
on a side note, kinda off topic, but that pic made a thought pop into my mind; anyone see the new Star Trek movie yet? I'm not a fan at all, but I've heard from others that never watched the show, that's it's a pretty kick-@$$ film... I might have to see it
on a side note, kinda off topic, but that pic made a thought pop into my mind; anyone see the new Star Trek movie yet? I'm not a fan at all, but I've heard from others that never watched the show, that's it's a pretty kick-@$$ film... I might have to see it
Last edited by iamsuperbleeder; May 11, 2009 at 07:54 PM.
May 11, 2009 | 08:01 PM
#116
Registered User
Joined: Jan 2009
Posts: 982
Likes: 1
From: Tacoma, Washington
head bolts are PITA sometimes, GL to YA machine shop shoudl be able to take care of it.
Are you using a ratchet or a breaker bar. I use a 24" breaker bar and give it a few good pumping action type thrusts. Instead of holy moly try to wrench it off with all my might pressure.
I also have one of those milwaukee electric impact guns they are huge! but it has saved my butt a bunch of times since my tiny compressor wont run a good 1/2" pnematic impact. My little compressor is good for a 1 min run with a die grinder and quick spurts with the 3/8" air ratchet.
May 11, 2009 | 08:05 PM
#117
Yeah, it's pretty darn good! I think Corey started a thread about it the other day. I'm hoping it'll be at the IMAX!
May 11, 2009 | 08:07 PM
#118
Thread Starter
Contributing Member
Joined: Feb 2008
Posts: 12,248
Likes: 33
From: Lake City, Fl
head bolts are PITA sometimes, GL to YA machine shop shoudl be able to take care of it.
Are you using a ratchet or a breaker bar. I use a 24" breaker bar and give it a few good pumping action type thrusts. Instead of holy moly try to wrench it off with all my might pressure.
I also have one of those milwaukee electric impact guns they are huge! but it has saved my butt a bunch of times since my tiny compressor wont run a good 1/2" pnematic impact. My little compressor is good for a 1 min run with a die grinder and quick spurts with the 3/8" air ratchet.
Are you using a ratchet or a breaker bar. I use a 24" breaker bar and give it a few good pumping action type thrusts. Instead of holy moly try to wrench it off with all my might pressure.
I also have one of those milwaukee electric impact guns they are huge! but it has saved my butt a bunch of times since my tiny compressor wont run a good 1/2" pnematic impact. My little compressor is good for a 1 min run with a die grinder and quick spurts with the 3/8" air ratchet.
Last edited by iamsuperbleeder; May 11, 2009 at 08:08 PM.
May 12, 2009 | 05:36 PM
#120
Thread Starter
Contributing Member
Joined: Feb 2008
Posts: 12,248
Likes: 33
From: Lake City, Fl
yeah that threw a red flag in my dirty mind too
well guys, I stopped by the parts store, got a 6pt socket, and a BIGGER cheater bar
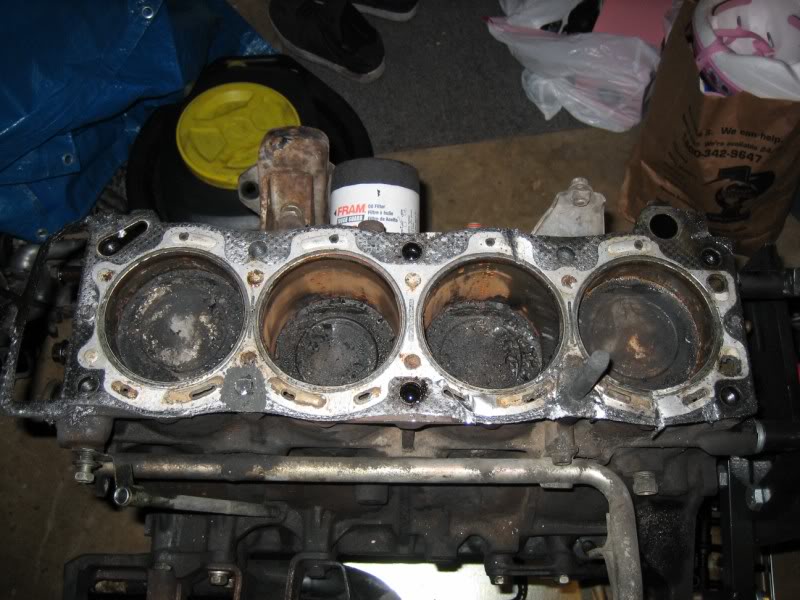
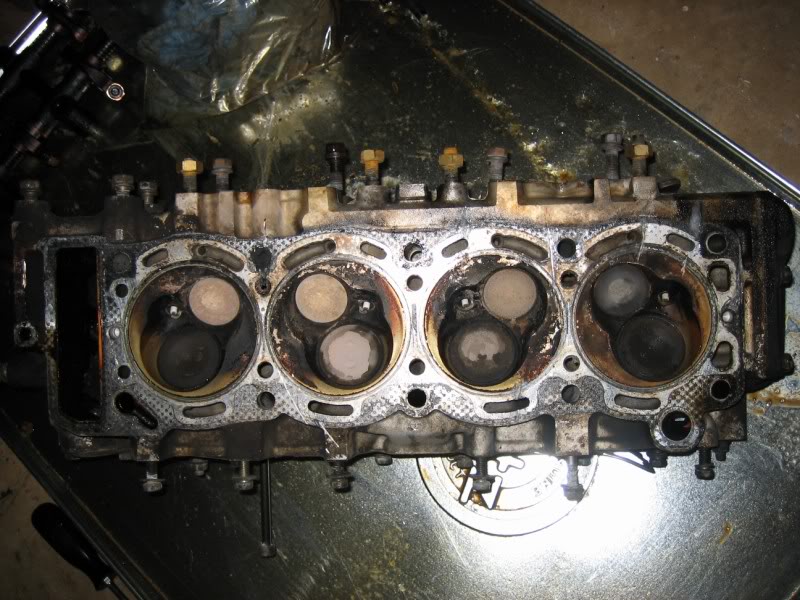
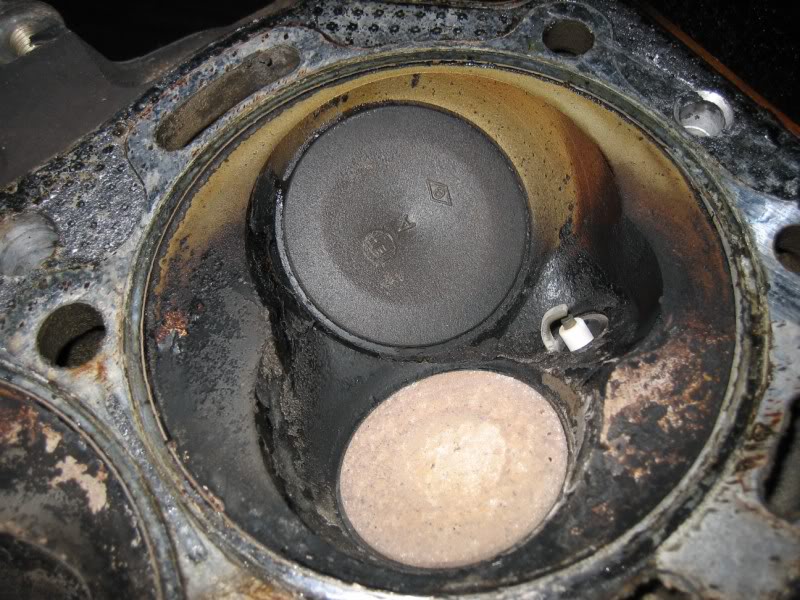
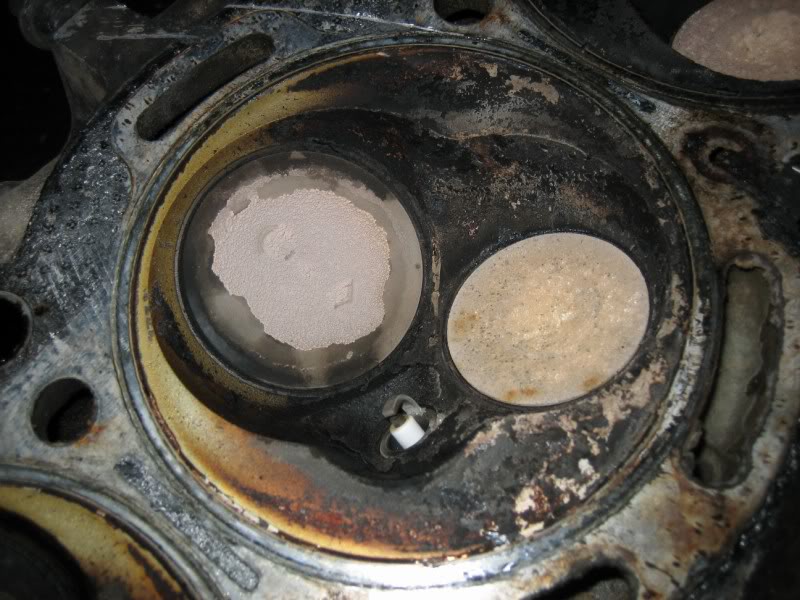
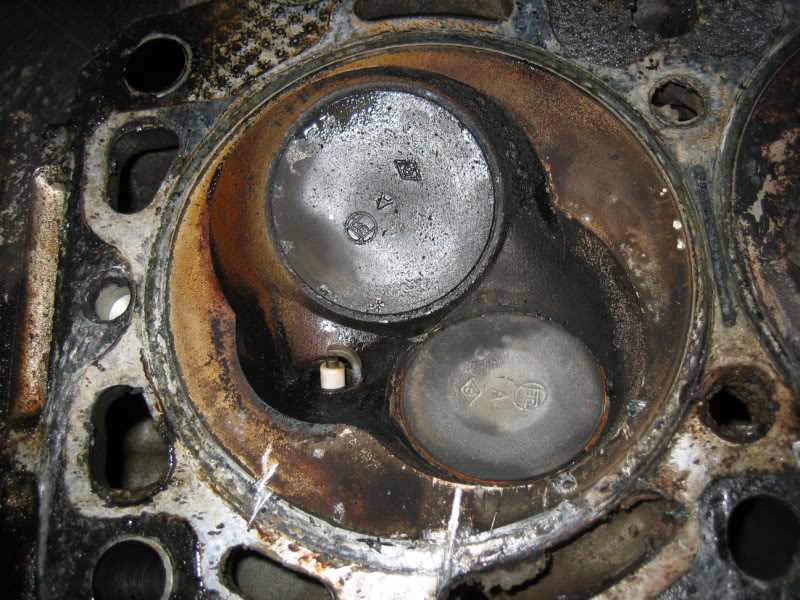
ready for the money shots?
without further delay, and no words in between, for your veiwing pleasure:
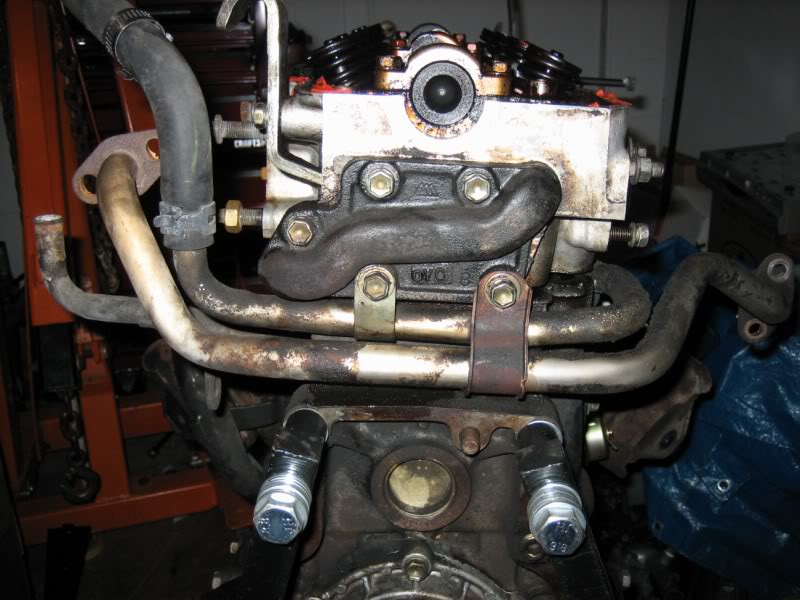

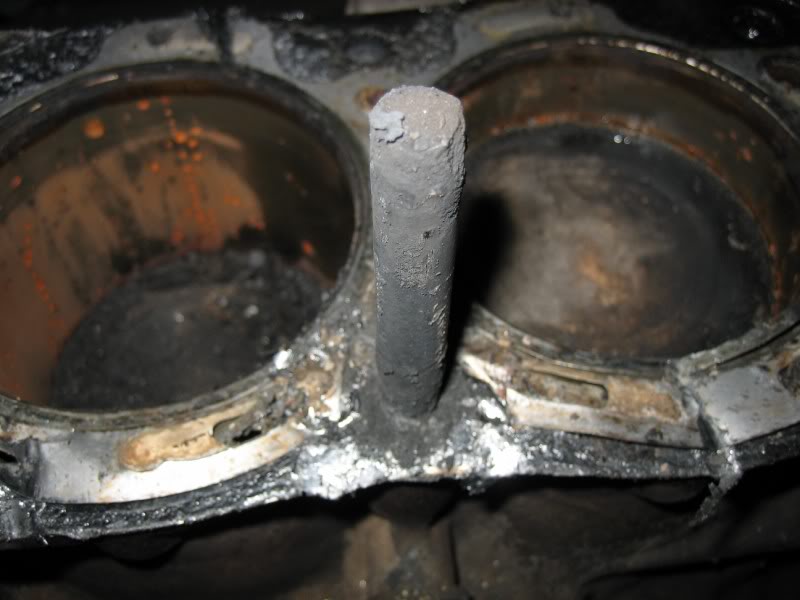
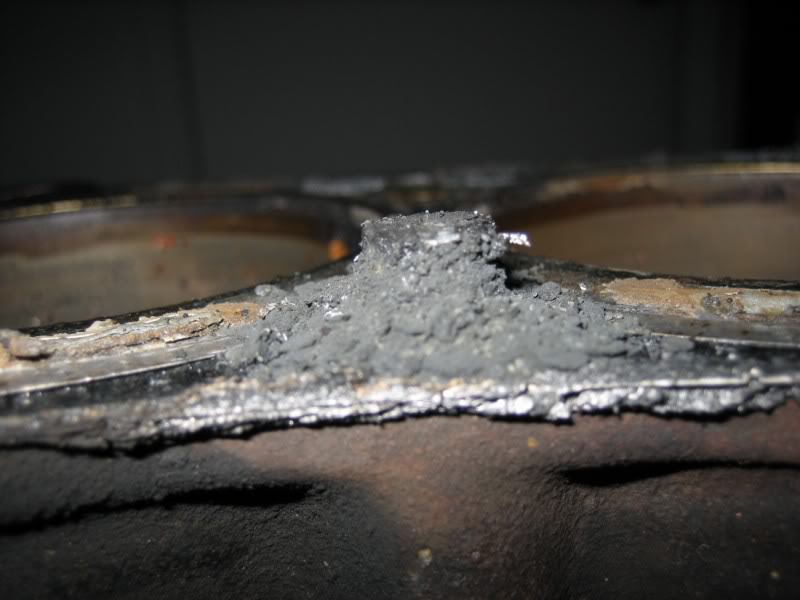
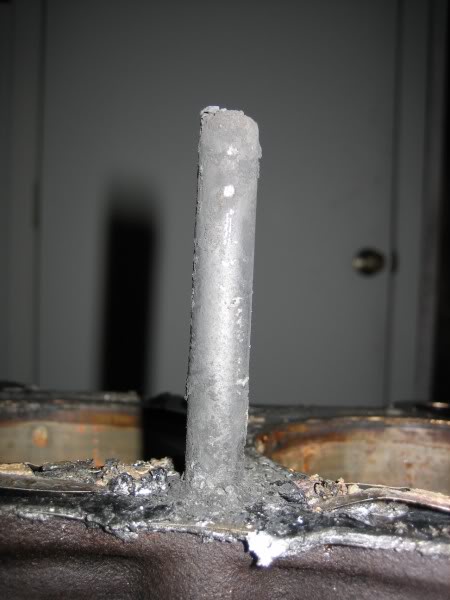


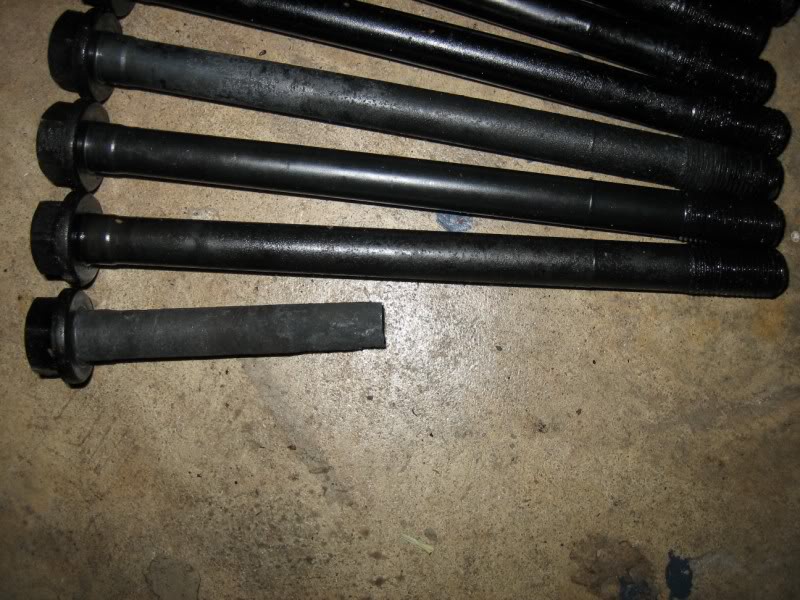
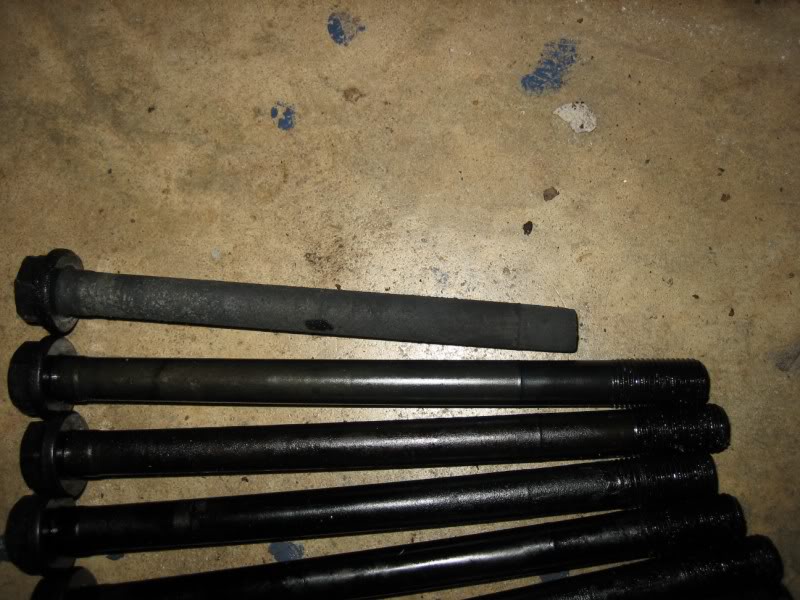
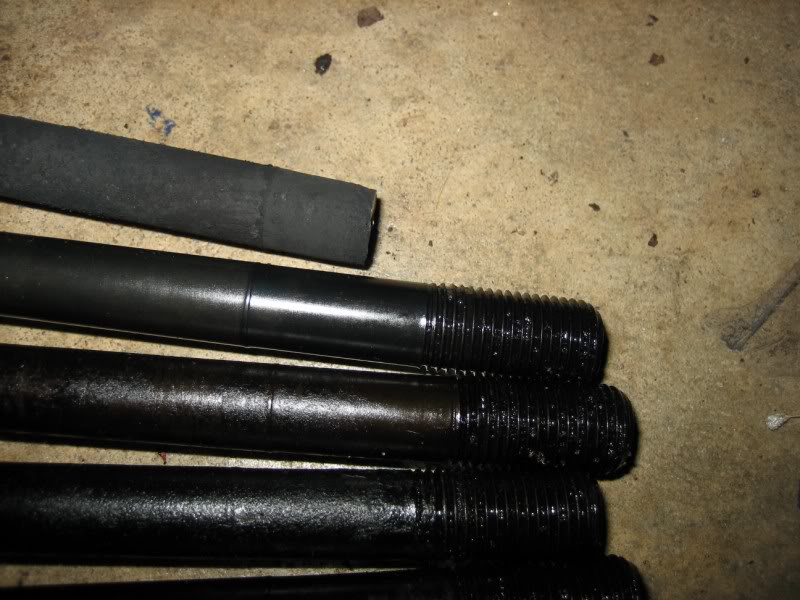
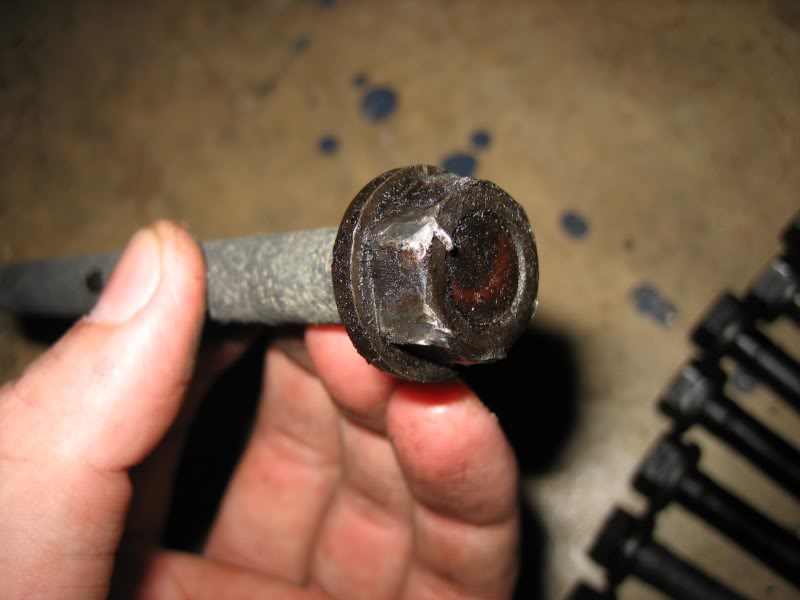


Now, as you can tell, that last troublesome bolt, well it snapped too but I kind of expected it to, as hard as it was grabbing
Plan for those is to soak them in PB blaster and/or WD40, and luckily since it looks like there's plenty of bolt left sticking up from the block, and I maybe get a good grab on them with a pipe wrench (I've heard that works great for extracting them so long as you have the bolt exposed)
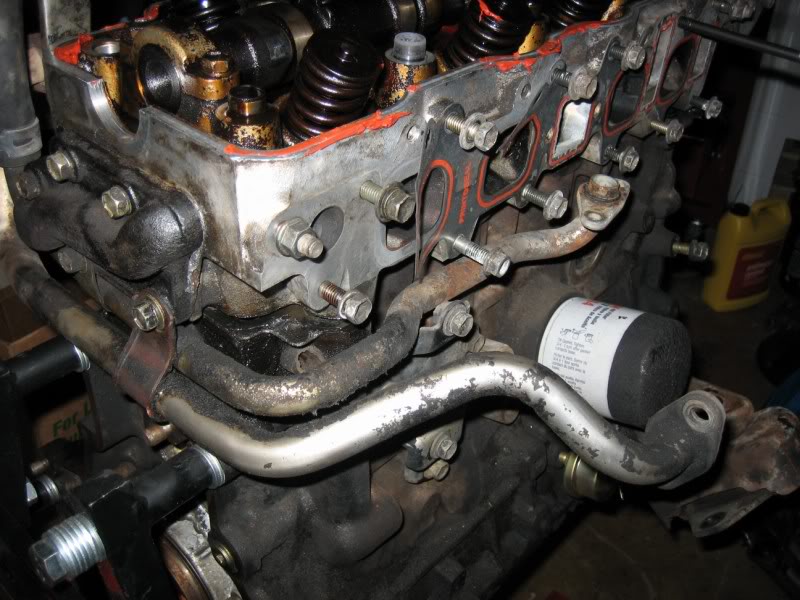
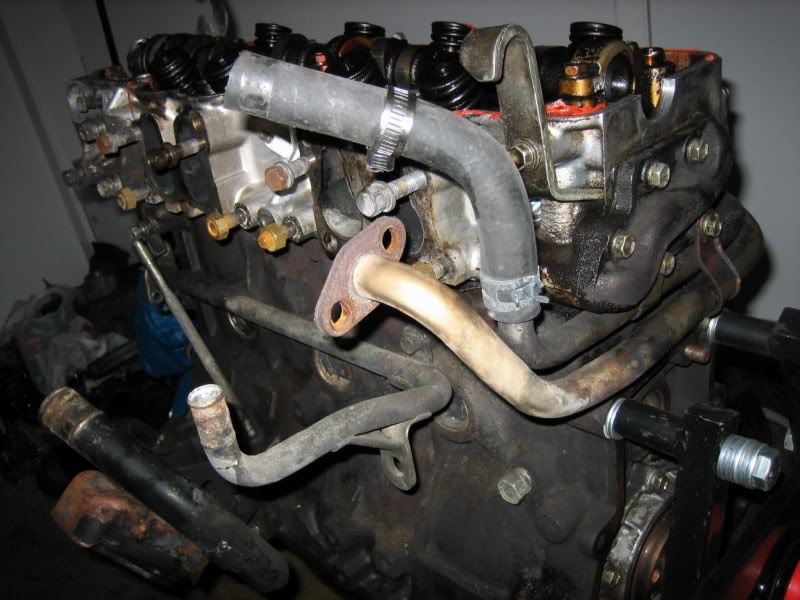
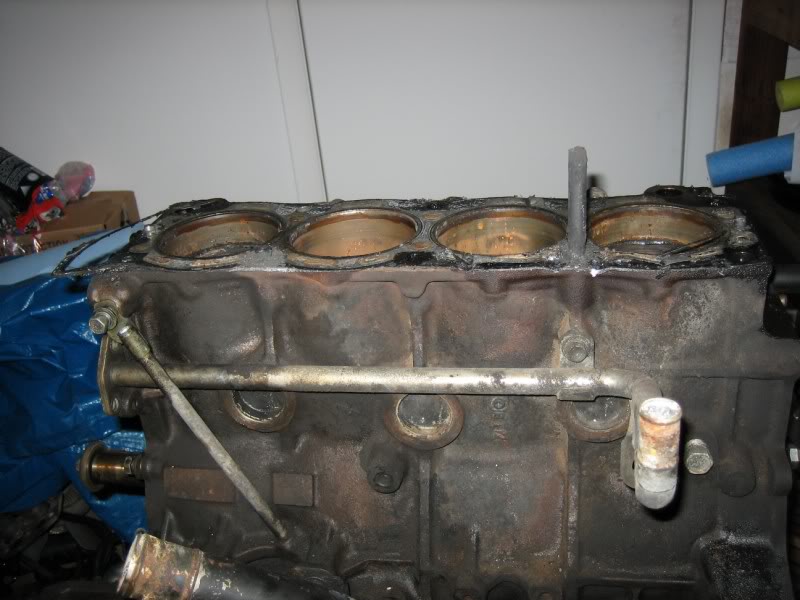
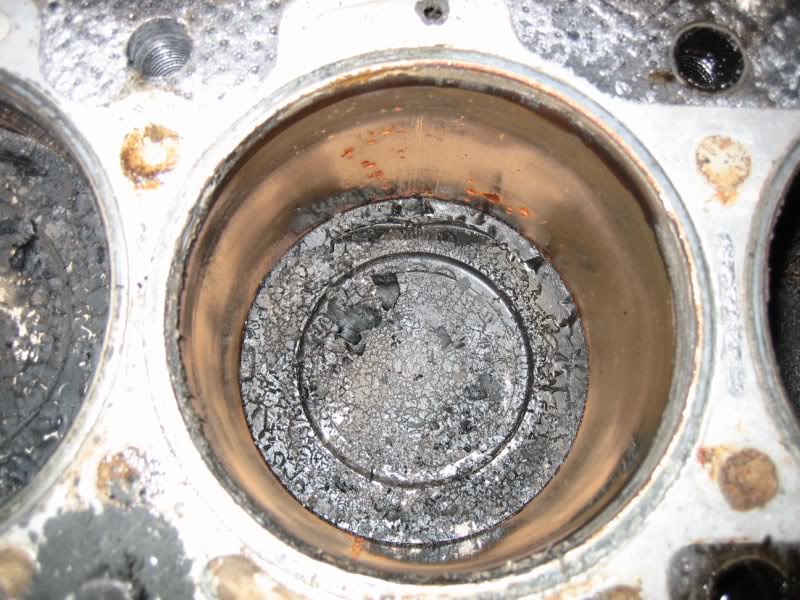
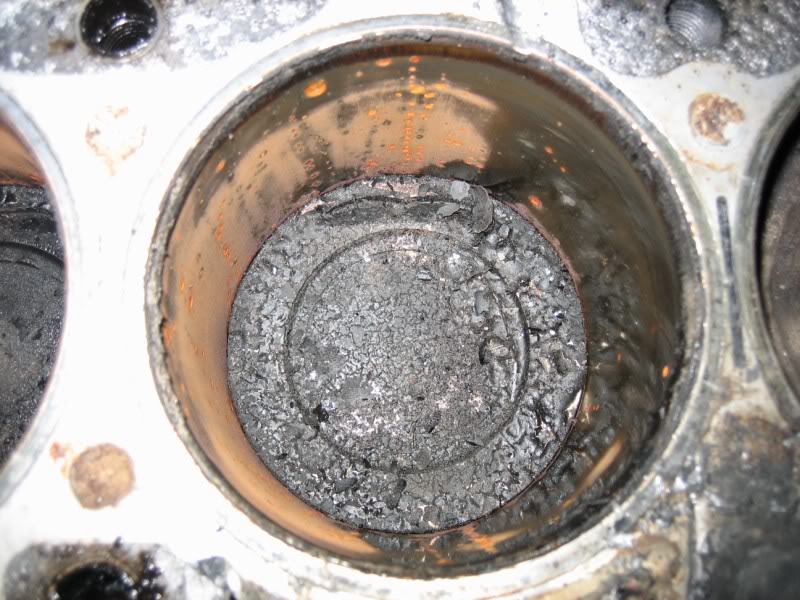
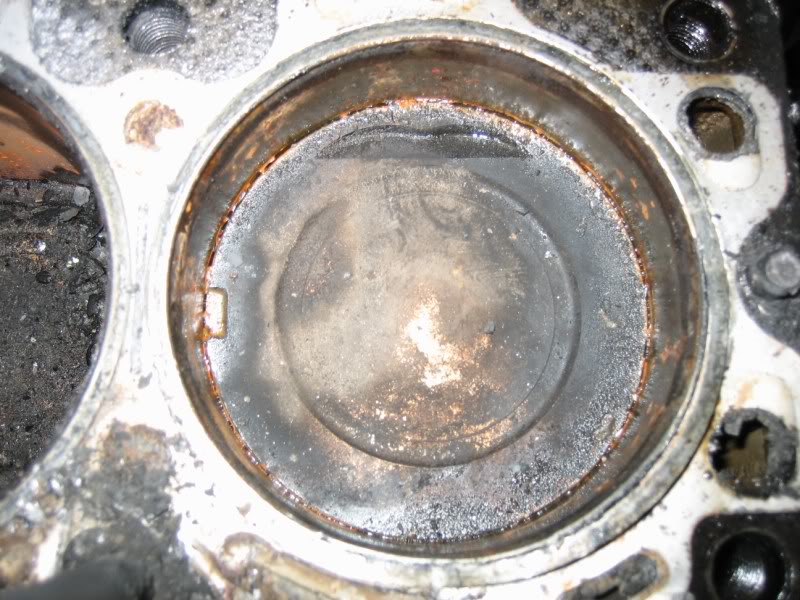
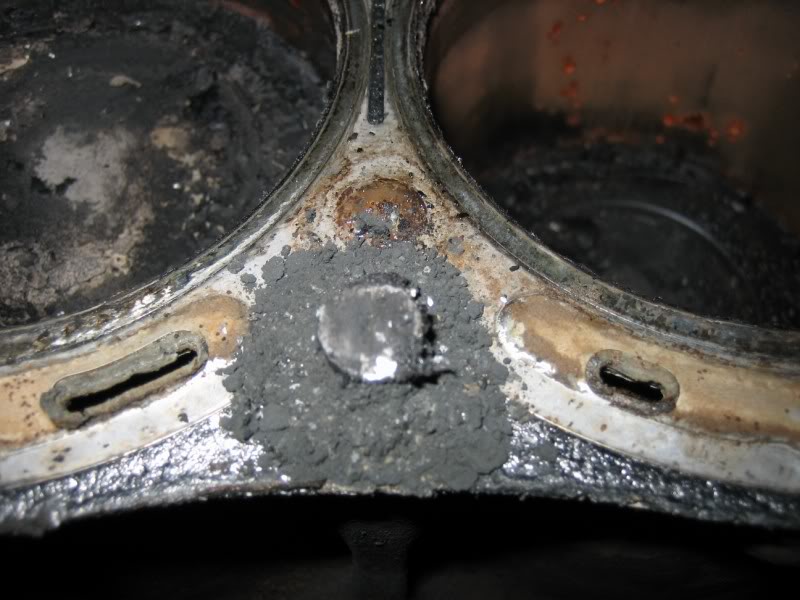
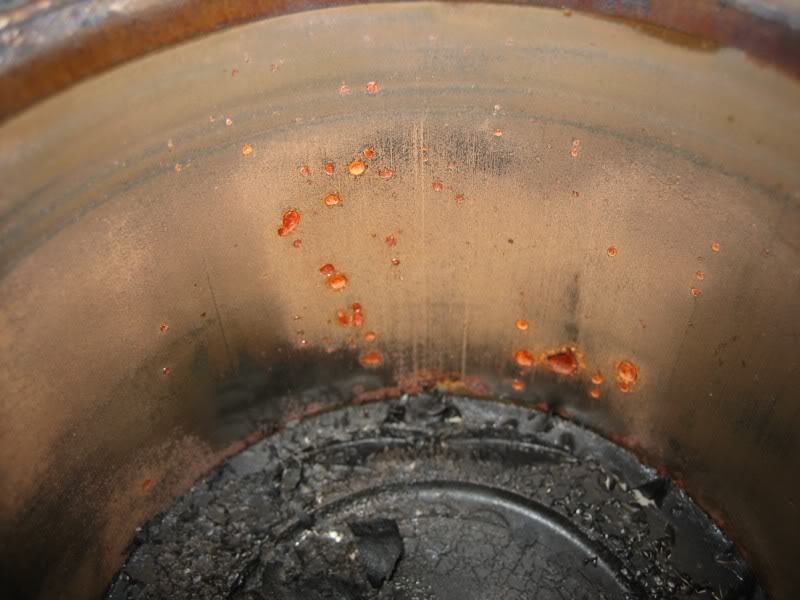
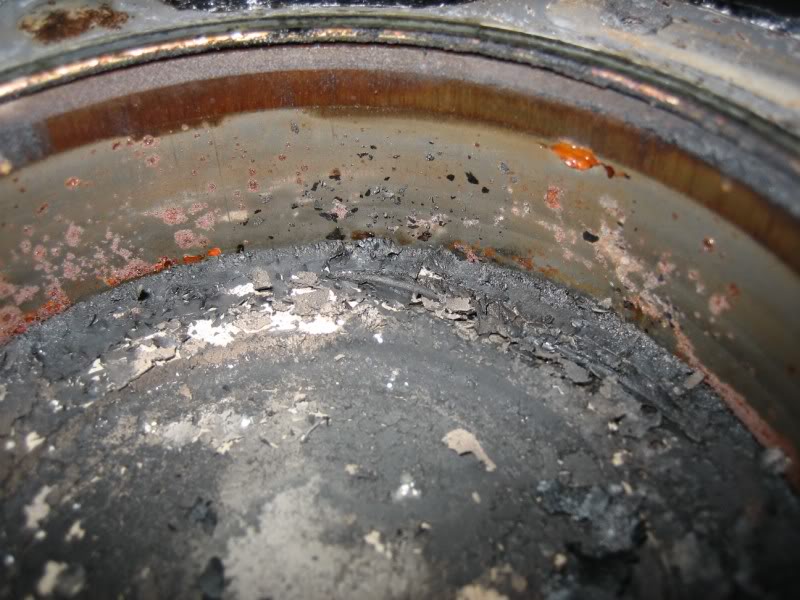
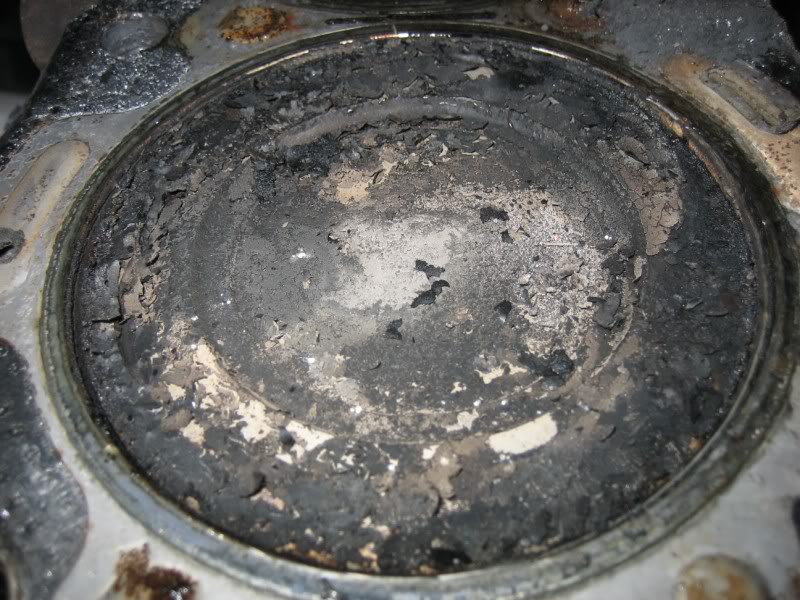
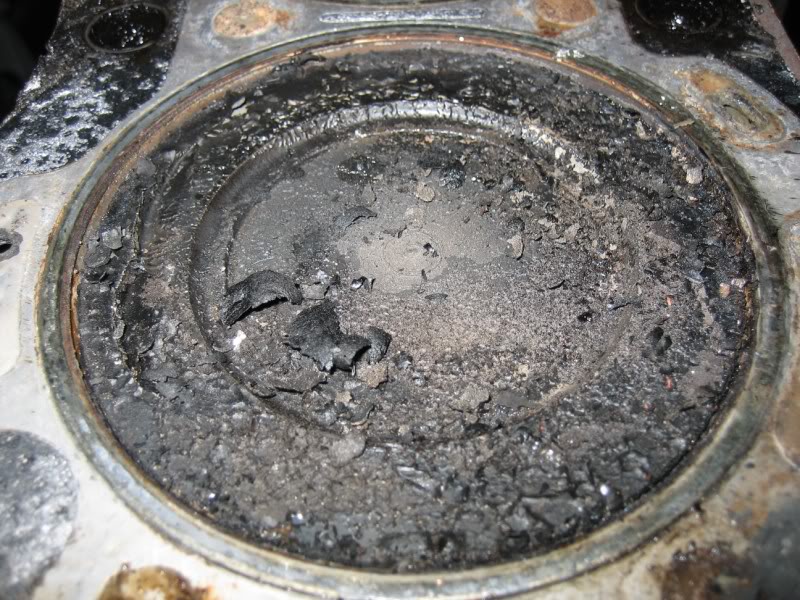
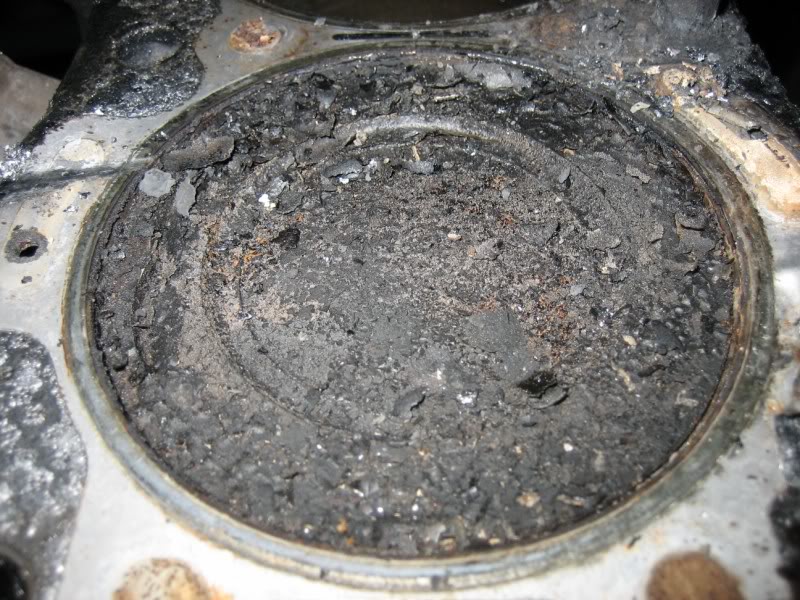
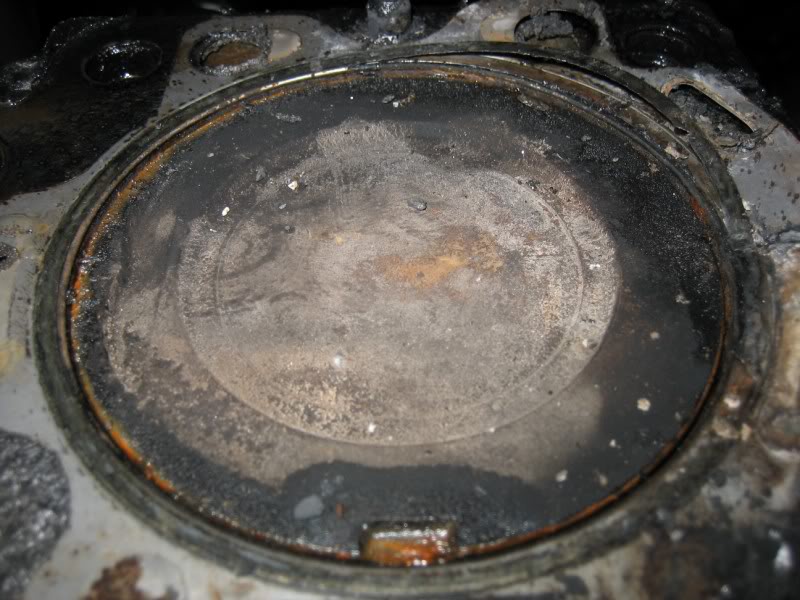
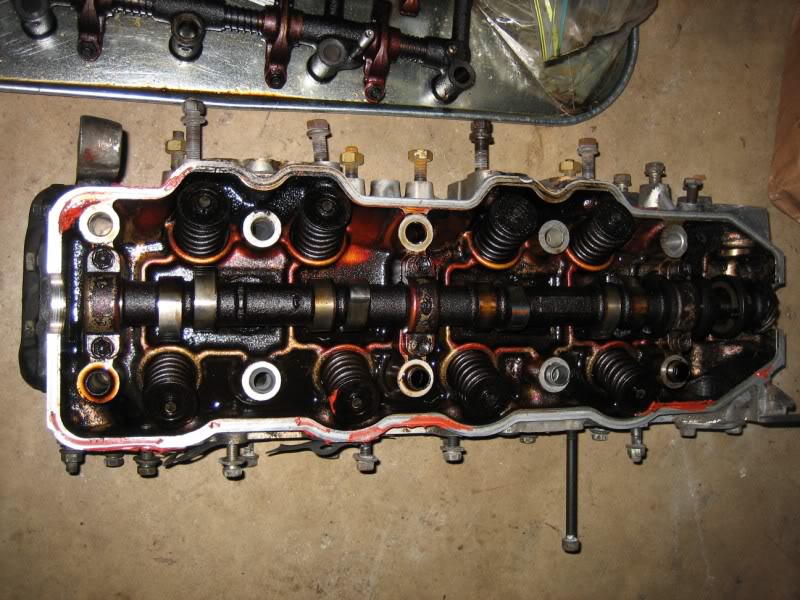
But as you can see, the combustion chambers look AWESOME
All the pictures of the cylinders/pistons and underside of the head are in order, from cylinder 1 to 4. Now I KNOW that I had some oil getting into the chambers... it's all burnt and caked onto the pistons, lol. The cylinder walls themselves look pretty good though (the little bit of surface rust on the walls just came from the cleaning of the block, then having to let it set for a little while)
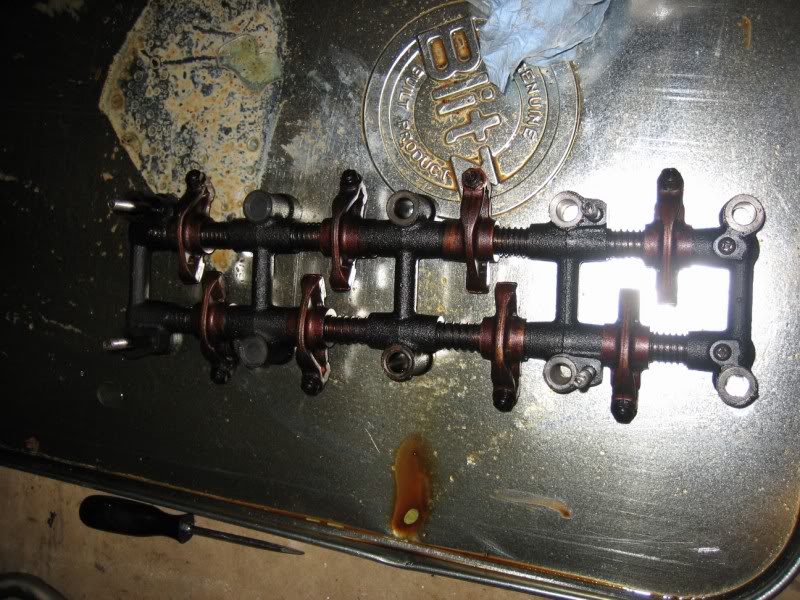
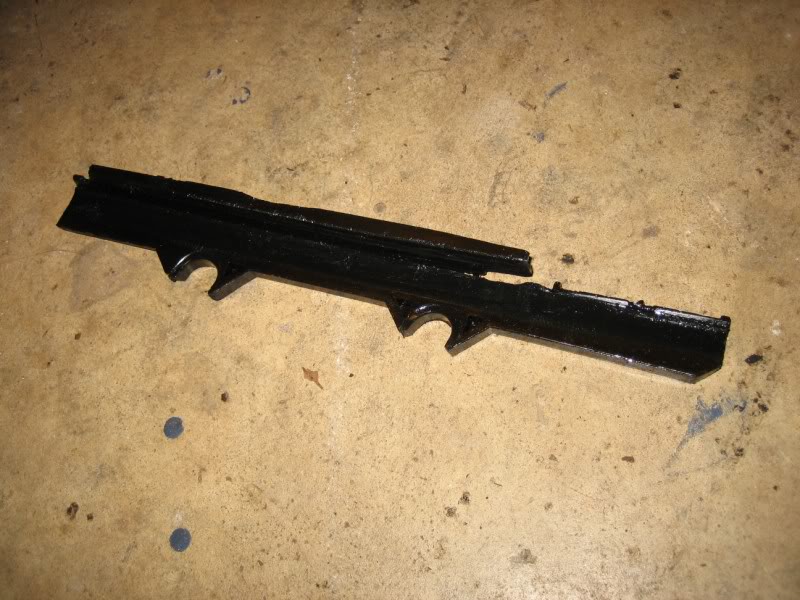
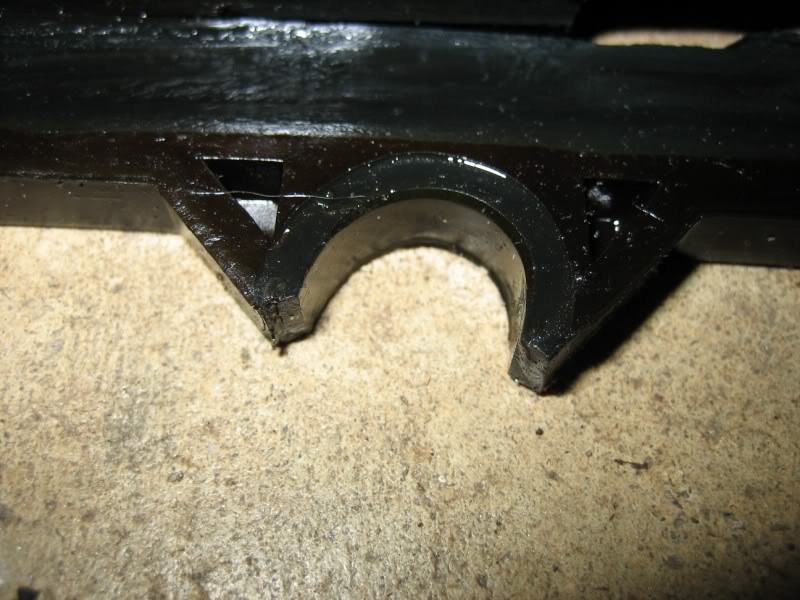
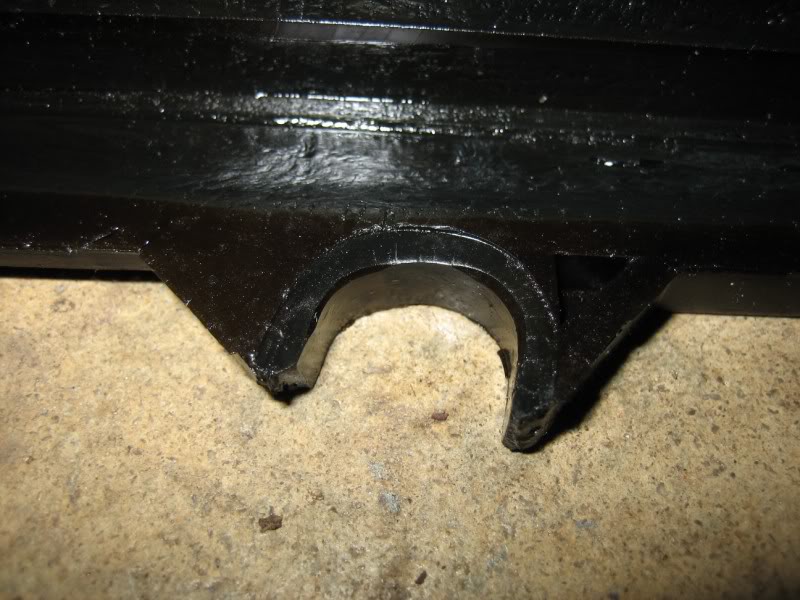
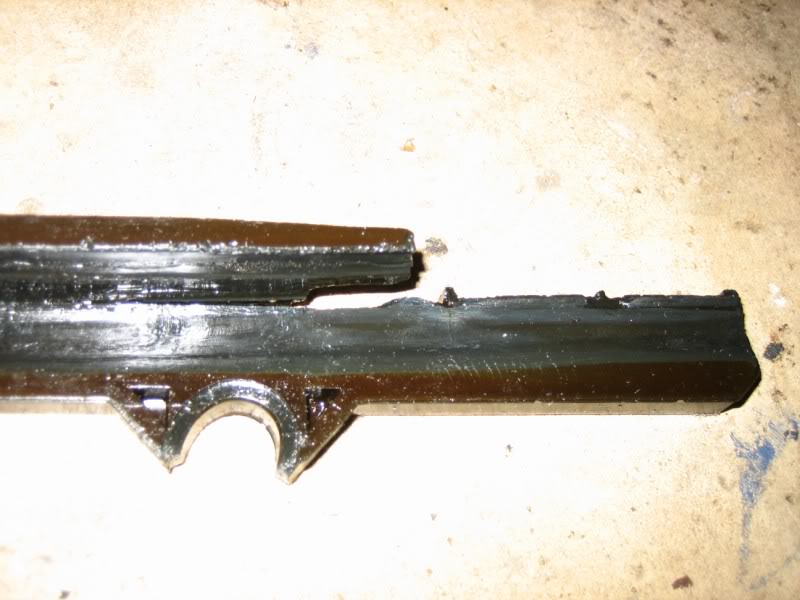
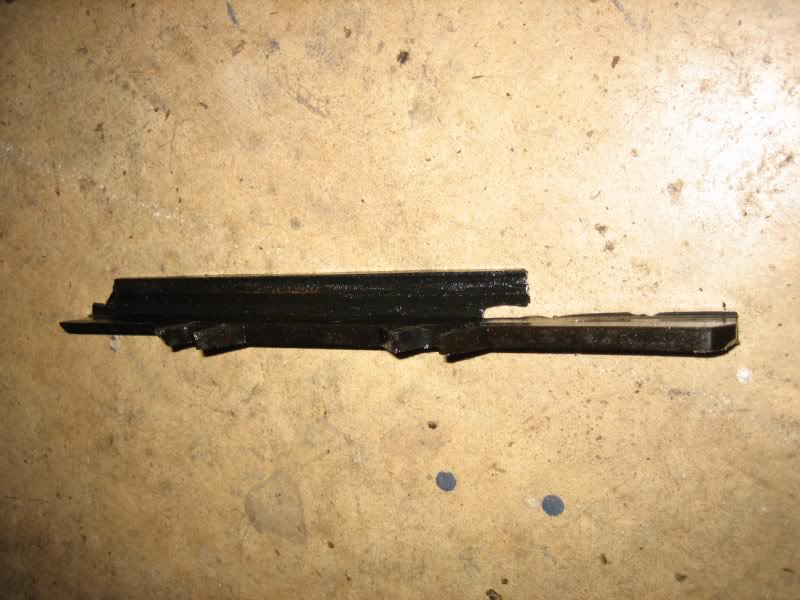
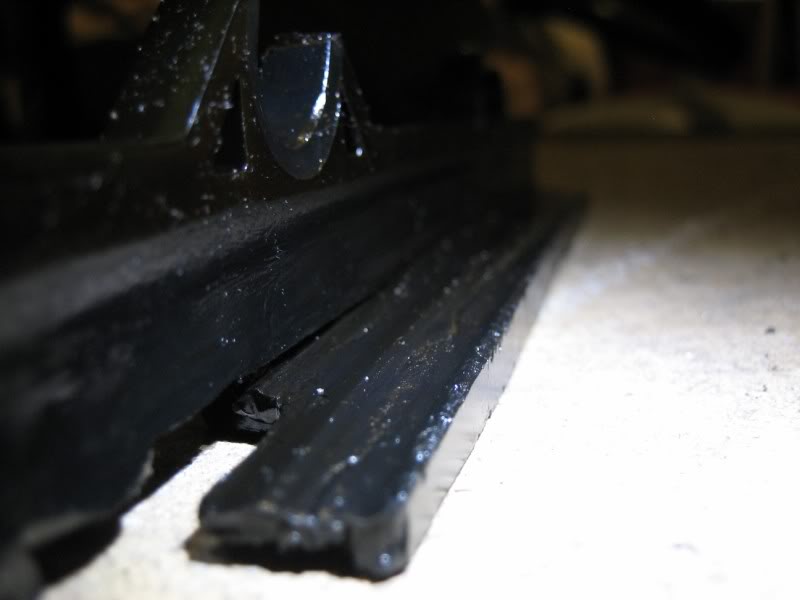
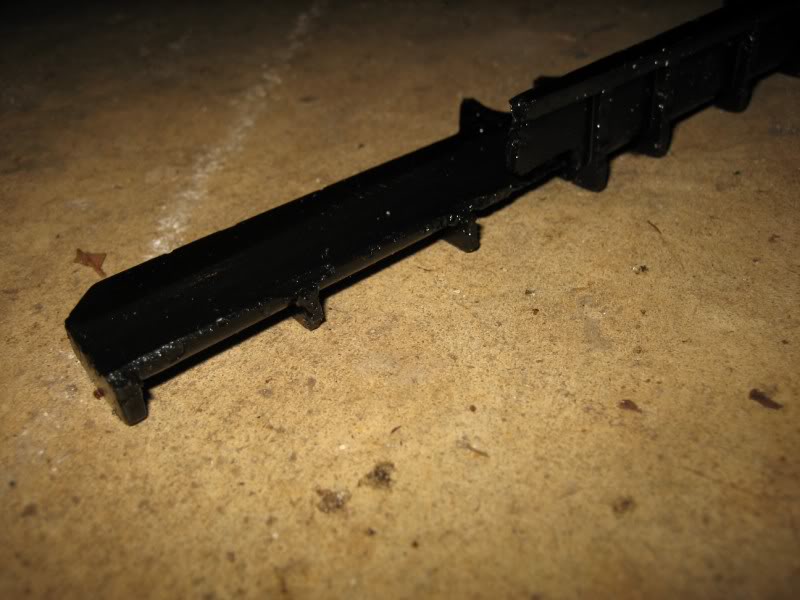
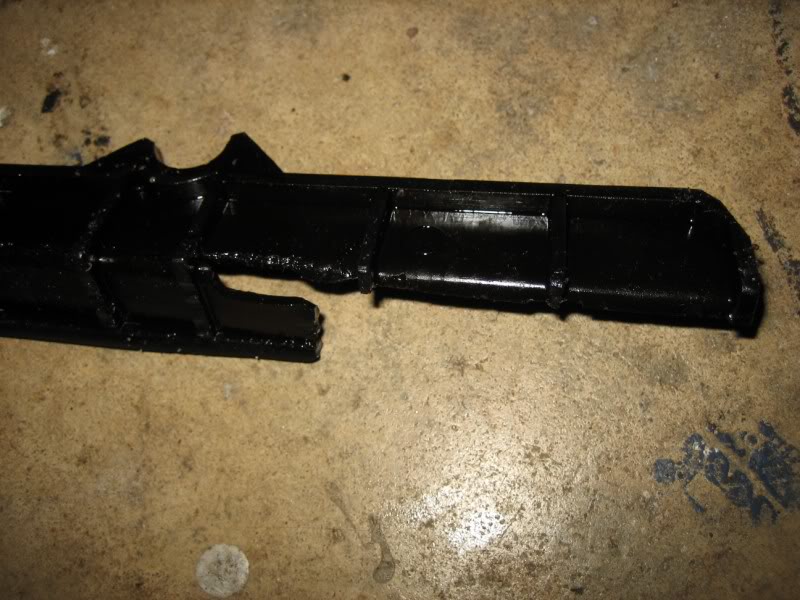
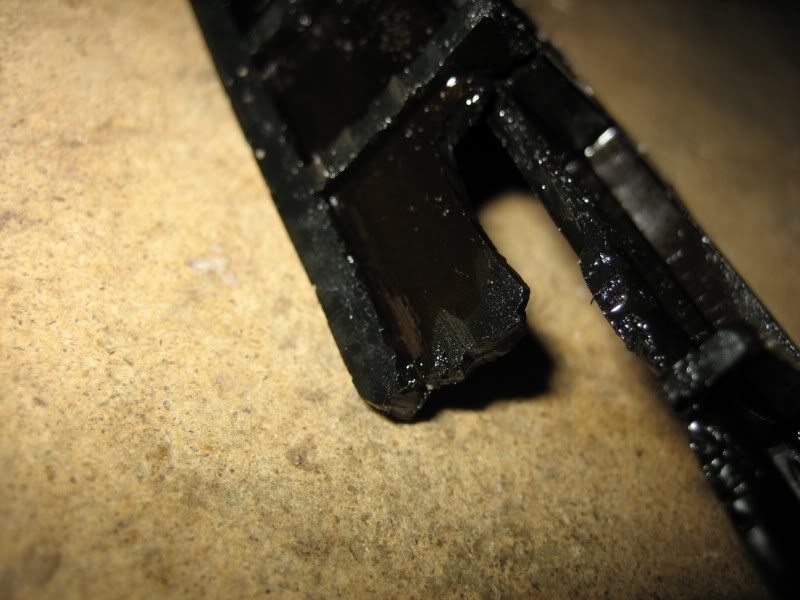
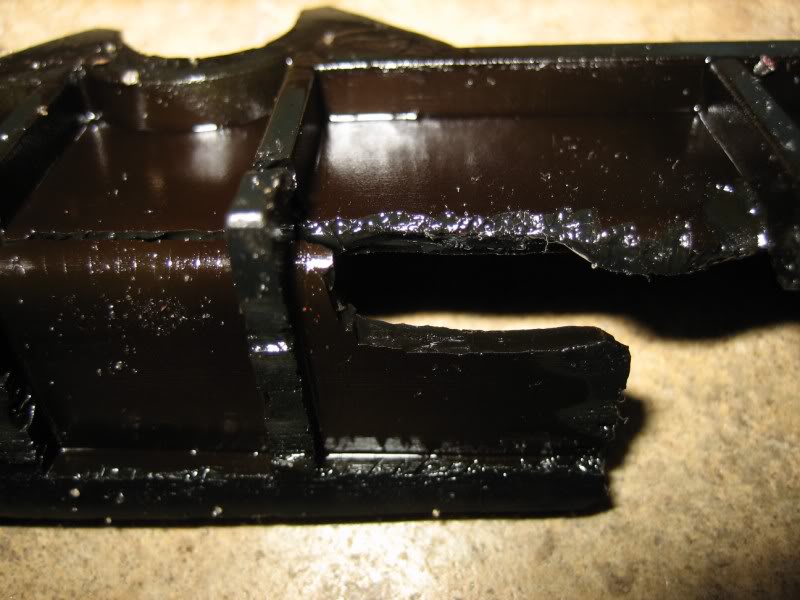
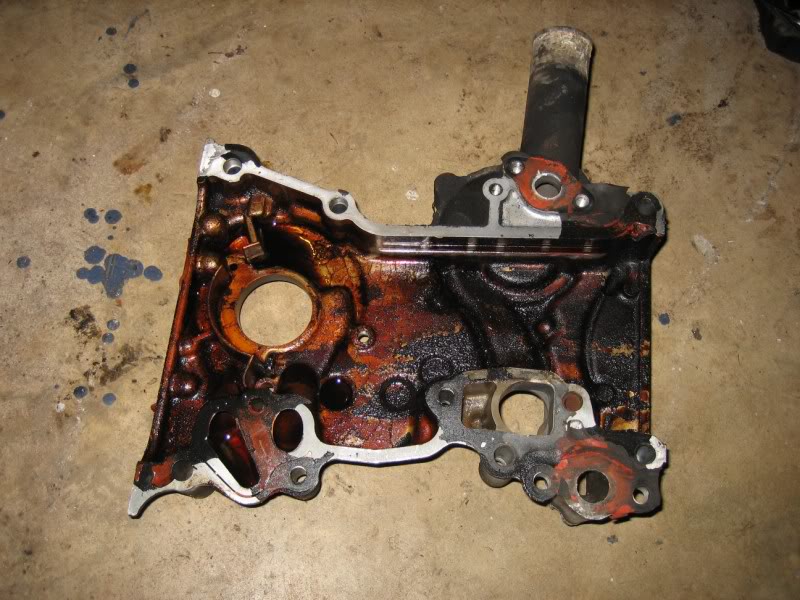
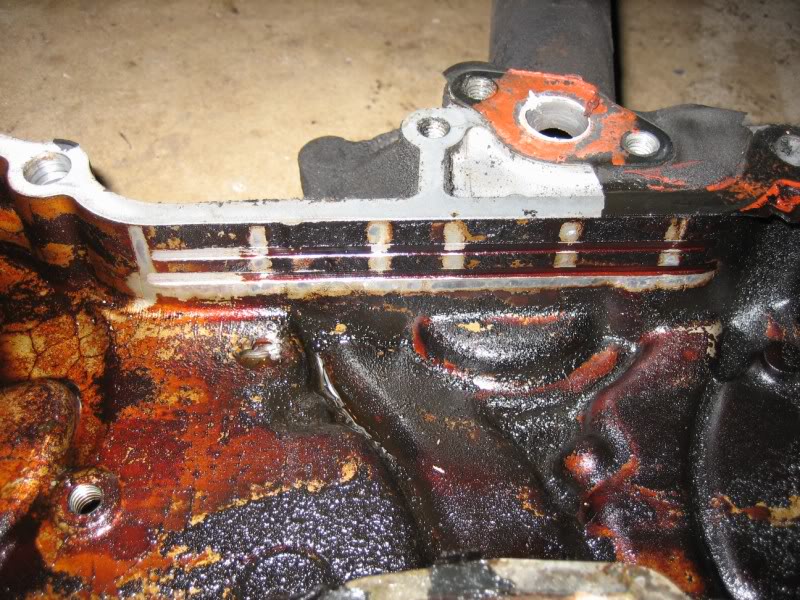
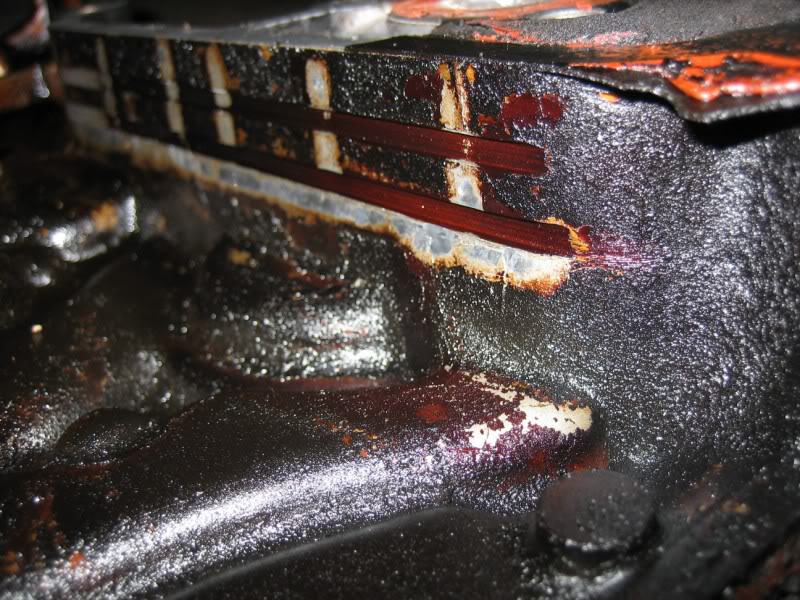
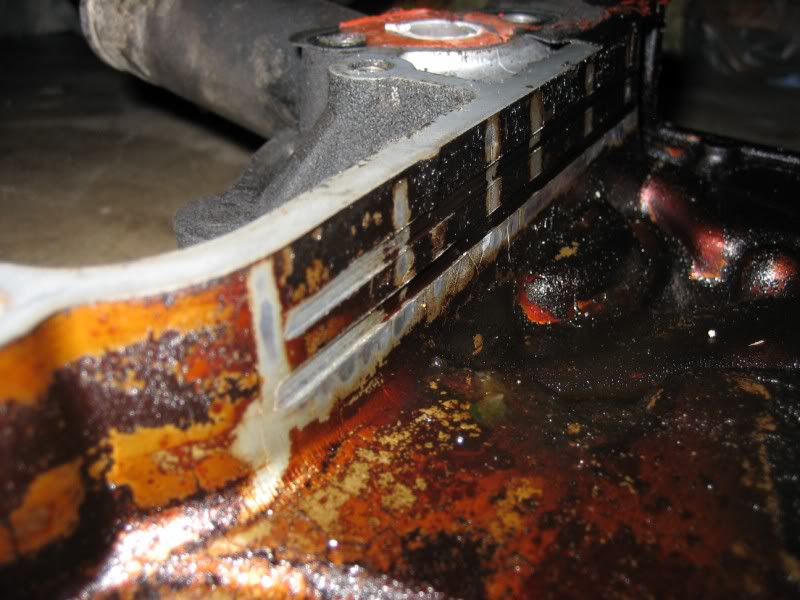
Now to that timing guide, lmao. I have no idea how that thing was even hanging on there. I took the cover off, and it literally fell off... I didn't even have to loosen the 2 bolts holding it on I knew that the top was broken, but it was broken even more than I had thought. The cover shows its history too, with grooves cut all the way to the bottom, and you can see where the recent guide failure has cause a little new scaring near the top.
Tomorrow, hopefully I'll get the pan off and get to pulling apart the rotating assembely, and maybe get the block and crank to the machine shop nearing the end of the week
well guys, I stopped by the parts store, got a 6pt socket, and a BIGGER cheater bar
ready for the money shots?
without further delay, and no words in between, for your veiwing pleasure:
Now, as you can tell, that last troublesome bolt, well it snapped too
but I kind of expected it to, as hard as it was grabbingPlan for those is to soak them in PB blaster and/or WD40, and luckily since it looks like there's plenty of bolt left sticking up from the block, and I maybe get a good grab on them with a pipe wrench (I've heard that works great for extracting them so long as you have the bolt exposed)
But as you can see, the combustion chambers look AWESOME
All the pictures of the cylinders/pistons and underside of the head are in order, from cylinder 1 to 4. Now I KNOW that I had some oil getting into the chambers... it's all burnt and caked onto the pistons, lol. The cylinder walls themselves look pretty good though (the little bit of surface rust on the walls just came from the cleaning of the block, then having to let it set for a little while)
Now to that timing guide, lmao. I have no idea how that thing was even hanging on there. I took the cover off, and it literally fell off... I didn't even have to loosen the 2 bolts holding it on
I knew that the top was broken, but it was broken even more than I had thought. The cover shows its history too, with grooves cut all the way to the bottom, and you can see where the recent guide failure has cause a little new scaring near the top.Tomorrow, hopefully I'll get the pan off and get to pulling apart the rotating assembely, and maybe get the block and crank to the machine shop nearing the end of the week


