

 Feb 9, 2016, 09:40 AM
Last edit by: IB Advertising
See related guides and technical advice from our community experts:
Browse all: Exterior Guides
- Toyota 4Runner 1984-1995 Why Won't Driver Door Open
Guide to diagnose trouble and recommended solutions
Browse all: Exterior Guides

86 Door Panel Swap Write Up
Jan 31, 2010 | 10:48 PM
#1
Thread Starter
Registered User
Joined: Jan 2010
Posts: 2,259
Likes: 84
From: Pismo Beach, California
86 Door Panel Swap Write Up
Hello everyone, Ive never done a write up and i figured its about time. Not too crazy but i learned a good deal on door panel swapping from this project...
Do you have an 84-87 toyota with beat up door panels? Do you wonder why the door panels from the 88's and 89's are so much better looking than yours? Do you wonder if door panels can be swapped although they have different mounting brackets? then you should check this out....
I have a 1986 4Runner, and am going to put door panels from a donor 1989 4runner on it. Note that both are first gens
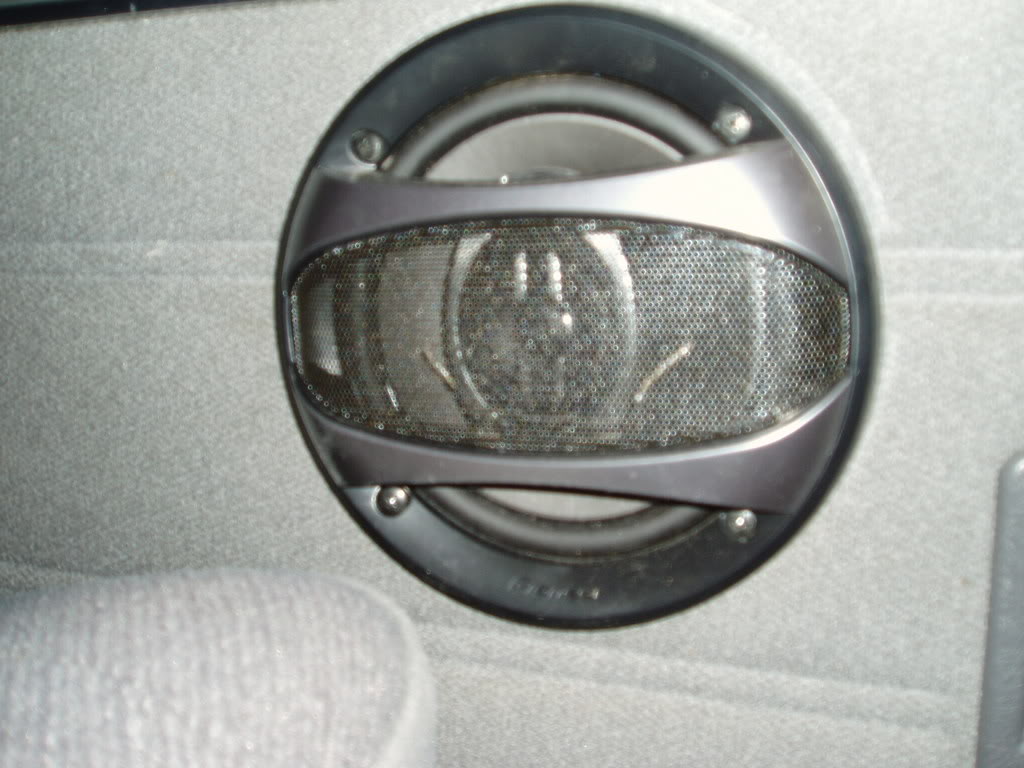
The old beat up door panels: ( Not too bad looking here but they are severely warped from years of water and abuse and I dont like how the power window/lock controls are mounted vertically) I was also over having speakers in the door, as they were always taking a beating from getting in and out, so i re located them to the stock in dash location.

Okay, before you start, you need to make sure that your power controls work. if not, first check out this black box, the door control relay, mounted up above where it is pictured and go from there...

The entire door panel power control wire harness is different than the 89...
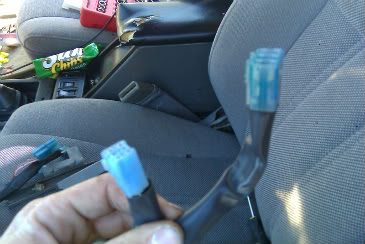
89 has a power mirror switch integrated in (mine doesnt have power mirrors) and one of the connections for the window is different as well as shown here
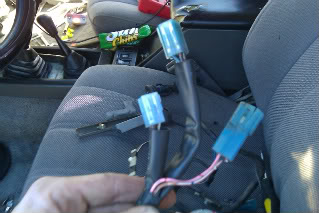
1986 harness connections:
An important wiring tip to note is that the courtesy light connection is integrated into the window switch and door lock connections in the 89. The 86 courtesy light wire does NOT set up like this, so you can either use the old wire or splice it into this. I chose to do it like this just because i thought it would be cleaner if it was hooked up right.
Splice the new connectors on for the 89 and use your existing door wiring harness...it is much easier than trying to swap the entire harness even if you have one from an 89.
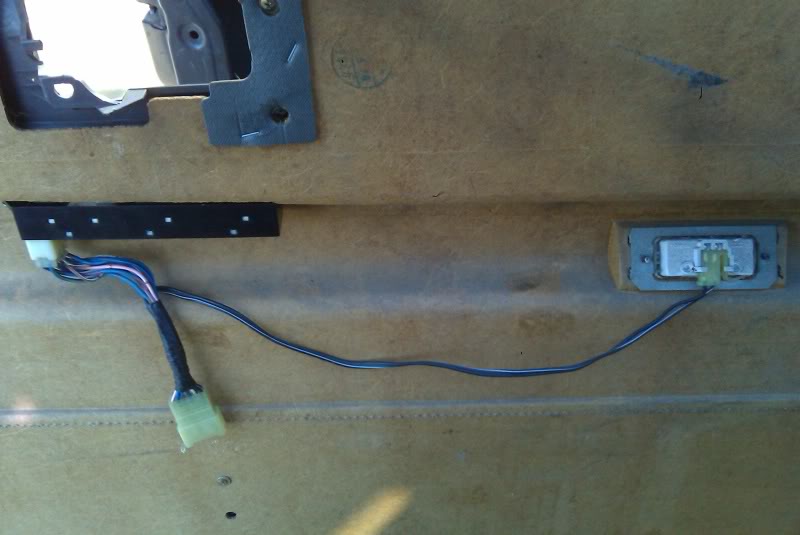
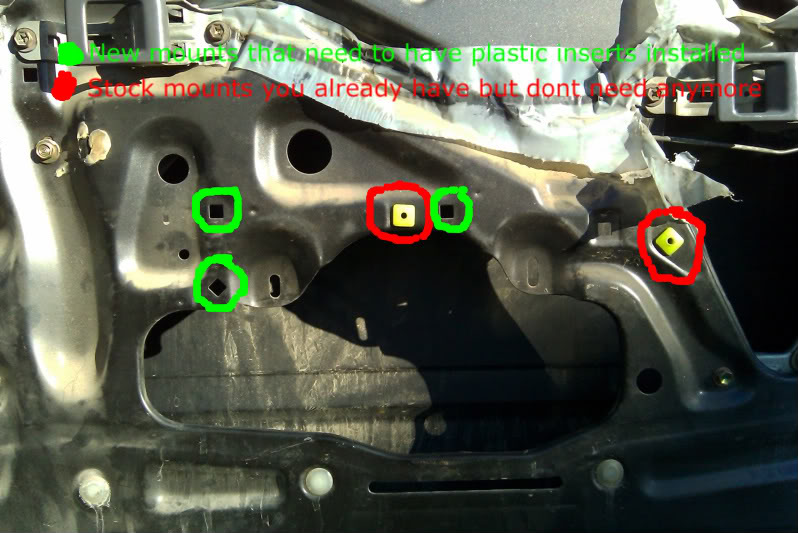
after you have everything all wired up, you can start to prepare for mounting. Look at this picture of my 86 door...it has the square cut outs for the mount that the 89 uses, i dont know why its really strange. i expected to have to drill these out, so i was happy to discover that all you need to do is grab some extra plastic srew backings and pop them into the holes.
I didnt get a good picture of the 89's brackets that the arm rest portion of the door panels rest on, but you can see where it goes here in proportion to the door panel
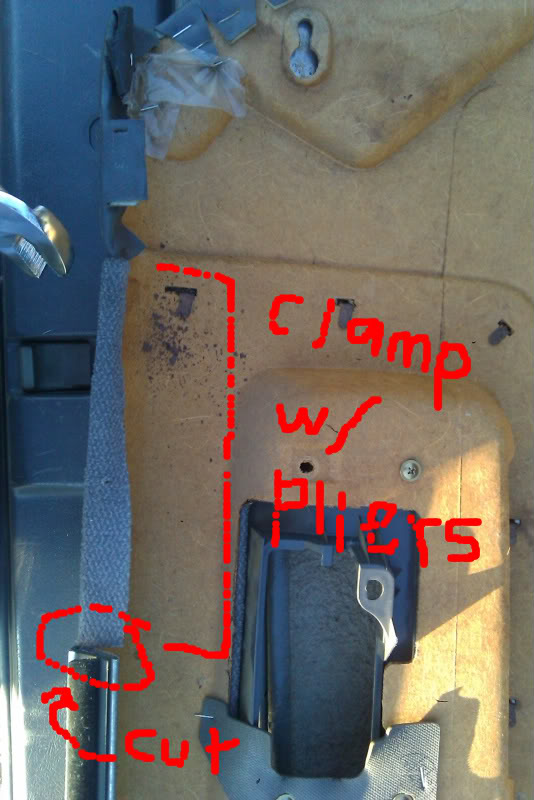
Next, remove the chrome inside felt piece from the 89 panel and put it up to the window. you need to cut this where the vent wing pillar is so it will fit.
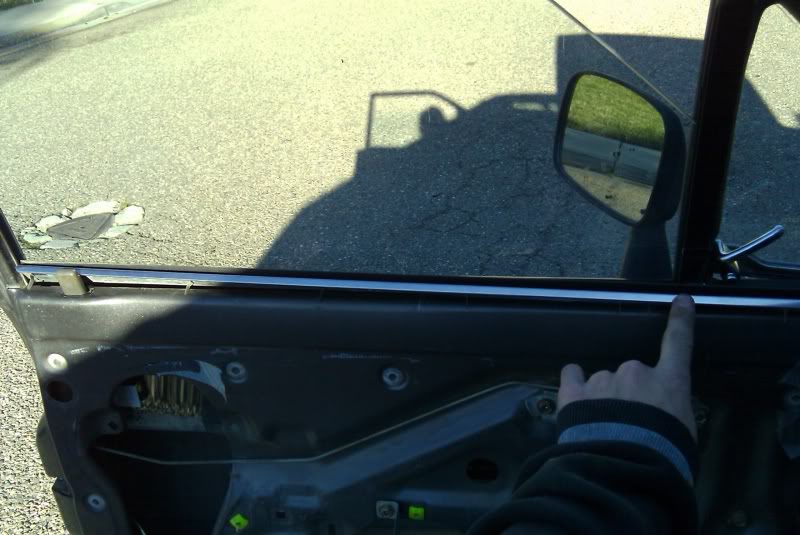
Picture of it installed back on the door panel with it cut to length
cut the metal backing of the door panel that would normally rest on the top of the door. You just need to bend it down so that the vent wing will clear. Make sure you do this well, or your vent wing will not be able to open.
Next cut the rubber flap of the vent wing rubber for clearance issues. this does not affect the seal or anything
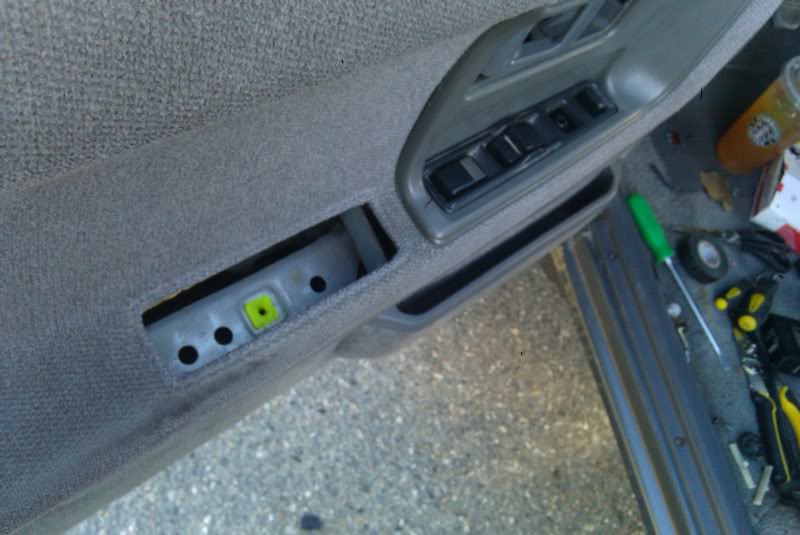
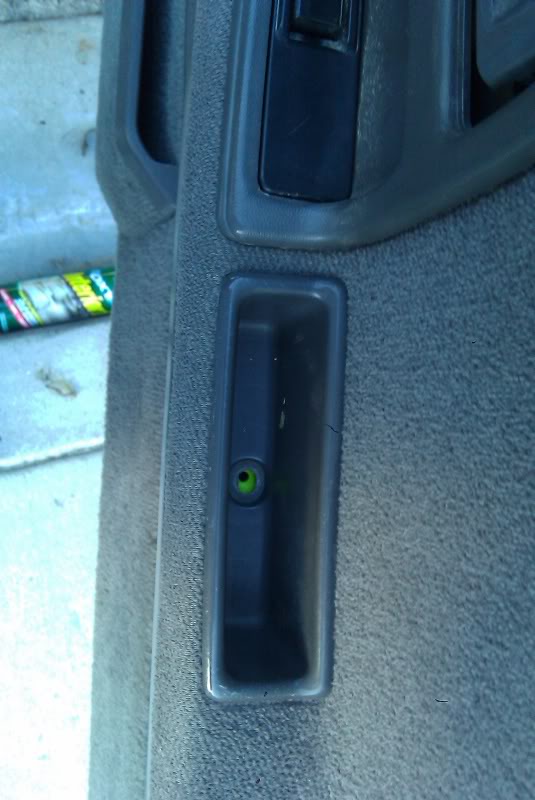
Put the door panel on starting with the upper portion closest to the door lock. make sure that when you put the grip inset in that the hole matches up to the plastic screw backing
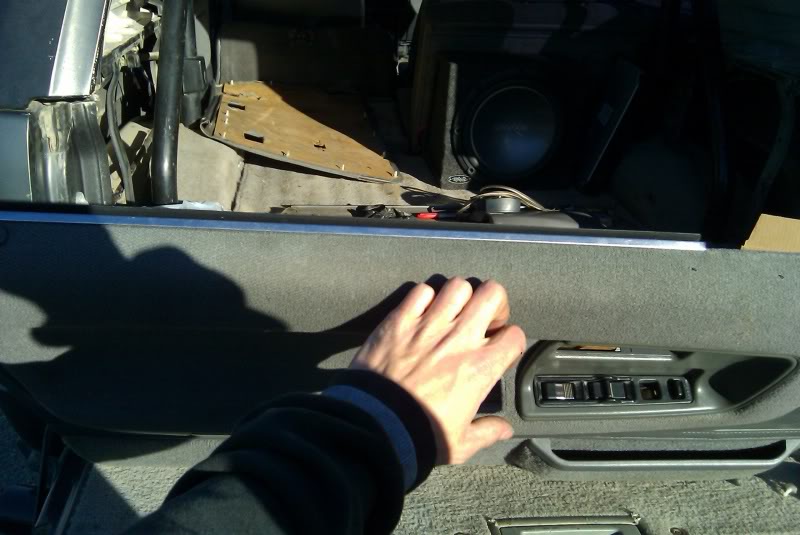
And then you have your finished product, a one of a kind 89 panel on an 86 with vent wings! I also replaced the warn interior door handles with the nice ones from the donor 89.
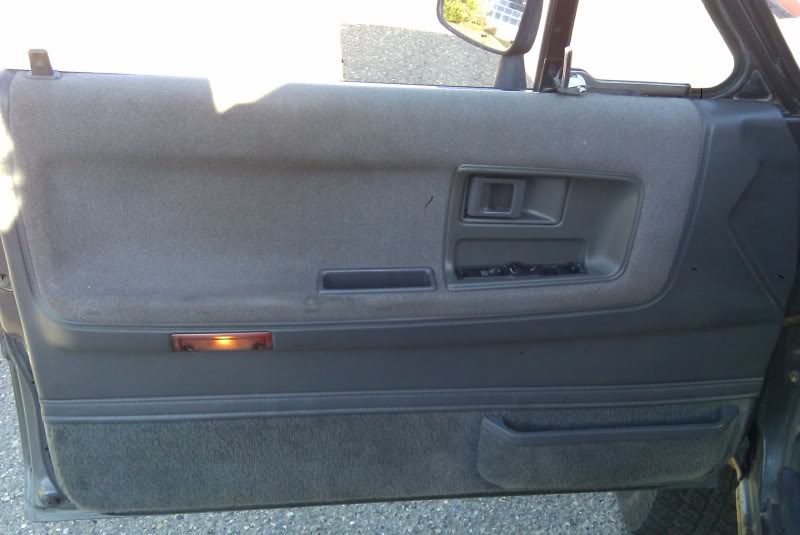
I really am diggin the looks and the power control locations!
Do you have an 84-87 toyota with beat up door panels? Do you wonder why the door panels from the 88's and 89's are so much better looking than yours? Do you wonder if door panels can be swapped although they have different mounting brackets? then you should check this out....
I have a 1986 4Runner, and am going to put door panels from a donor 1989 4runner on it. Note that both are first gens
The old beat up door panels: ( Not too bad looking here but they are severely warped from years of water and abuse and I dont like how the power window/lock controls are mounted vertically) I was also over having speakers in the door, as they were always taking a beating from getting in and out, so i re located them to the stock in dash location.
Okay, before you start, you need to make sure that your power controls work. if not, first check out this black box, the door control relay, mounted up above where it is pictured and go from there...
The entire door panel power control wire harness is different than the 89...
89 has a power mirror switch integrated in (mine doesnt have power mirrors) and one of the connections for the window is different as well as shown here
1986 harness connections:
An important wiring tip to note is that the courtesy light connection is integrated into the window switch and door lock connections in the 89. The 86 courtesy light wire does NOT set up like this, so you can either use the old wire or splice it into this. I chose to do it like this just because i thought it would be cleaner if it was hooked up right.
Splice the new connectors on for the 89 and use your existing door wiring harness...it is much easier than trying to swap the entire harness even if you have one from an 89.
after you have everything all wired up, you can start to prepare for mounting. Look at this picture of my 86 door...it has the square cut outs for the mount that the 89 uses, i dont know why its really strange. i expected to have to drill these out, so i was happy to discover that all you need to do is grab some extra plastic srew backings and pop them into the holes.
I didnt get a good picture of the 89's brackets that the arm rest portion of the door panels rest on, but you can see where it goes here in proportion to the door panel
Next, remove the chrome inside felt piece from the 89 panel and put it up to the window. you need to cut this where the vent wing pillar is so it will fit.
Picture of it installed back on the door panel with it cut to length
cut the metal backing of the door panel that would normally rest on the top of the door. You just need to bend it down so that the vent wing will clear. Make sure you do this well, or your vent wing will not be able to open.
Next cut the rubber flap of the vent wing rubber for clearance issues. this does not affect the seal or anything
Put the door panel on starting with the upper portion closest to the door lock. make sure that when you put the grip inset in that the hole matches up to the plastic screw backing
And then you have your finished product, a one of a kind 89 panel on an 86 with vent wings! I also replaced the warn interior door handles with the nice ones from the donor 89.
I really am diggin the looks and the power control locations!
Last edited by PismoJoe; Aug 11, 2010 at 09:47 AM.
Jan 31, 2010 | 11:03 PM
#2
Registered User
Joined: Feb 2009
Posts: 7,591
Likes: 76
From: Tacoma, WA
Awesome write up! Thanks for the link. When I saw it at the junk yard the first time, just took a quick peek and said screw it, mine are in good shape. But I like those panels better, I will have to put this on the list of to-dos. Nice work dude!

I wonder if I could use that power mirror switch in the door, then find the blank cubby for the dash and get rid of that switch. Interesting......
I wonder if I could use that power mirror switch in the door, then find the blank cubby for the dash and get rid of that switch. Interesting......
Last edited by kiyobrown; Feb 1, 2010 at 12:20 AM.
Apr 11, 2010 | 08:29 PM
#4
Thread Starter
Registered User
Joined: Jan 2010
Posts: 2,259
Likes: 84
From: Pismo Beach, California
Thanks guys! Sorry for the late response, I accidentally unsubscribed lol
Kiyo- I think there's a lot of things you could do with that switch! Let me know what you end up doing when you swap your panels! (if you do, I checked out your 4runner album and yours look pretty nice as is)
Kiyo- I think there's a lot of things you could do with that switch! Let me know what you end up doing when you swap your panels! (if you do, I checked out your 4runner album and yours look pretty nice as is)
Apr 11, 2010 | 08:36 PM
#5
Registered User
Joined: Feb 2009
Posts: 7,591
Likes: 76
From: Tacoma, WA
Hahaha. Thanks. Yeah it's clean and all in good shape. So I am in no hurry. I think the ones you have there just look a little more modern.
Maybe if I get bored enough and find a good set of donors I will attack the whole power window deal! Great write up again.
Maybe if I get bored enough and find a good set of donors I will attack the whole power window deal! Great write up again.


 Apr 11, 2010 | 09:33 PM
#7
Registered User
Joined: Oct 2009
Posts: 536
Likes: 0
From: Ahwahnee, CA
Looks great. I was actually wondering about this for myself. I have an 88, so I lack the winged doors and I have the nice door panels. But I was considering taking some older doors with the wing windows and tranferring my 88 panels onto them. That way, I can have my nice door panels and be able to place my speakers in the doors. The full window prevents speakers being placed in door. But again, great write up!
Trending Topics
Apr 11, 2010 | 10:12 PM
#8
Thread Starter
Registered User
Joined: Jan 2010
Posts: 2,259
Likes: 84
From: Pismo Beach, California
Thanks again guys!
Yeah Kiyo, the real reason behind the door panel swap madness is that I got the whole set of door panels, front and rear, with the power switches, bezels, connectors, handles for $20. Turns out this kid that I went to high school with has a family owned junkyard lol.
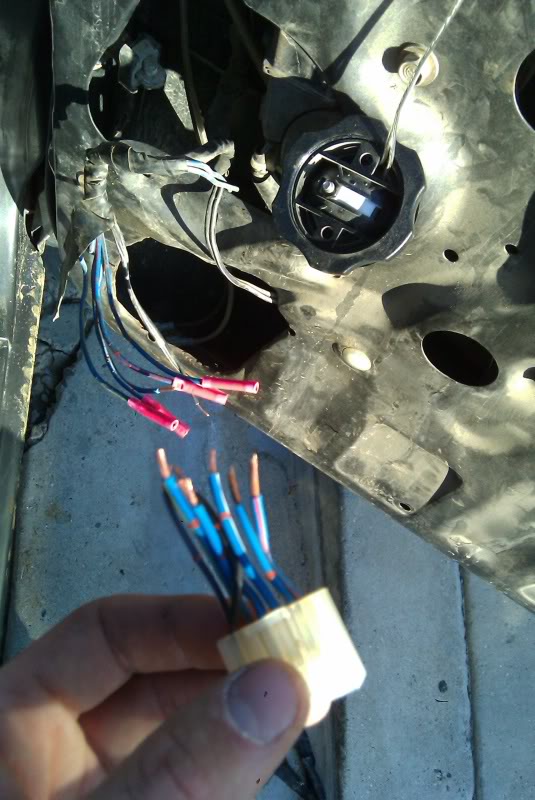
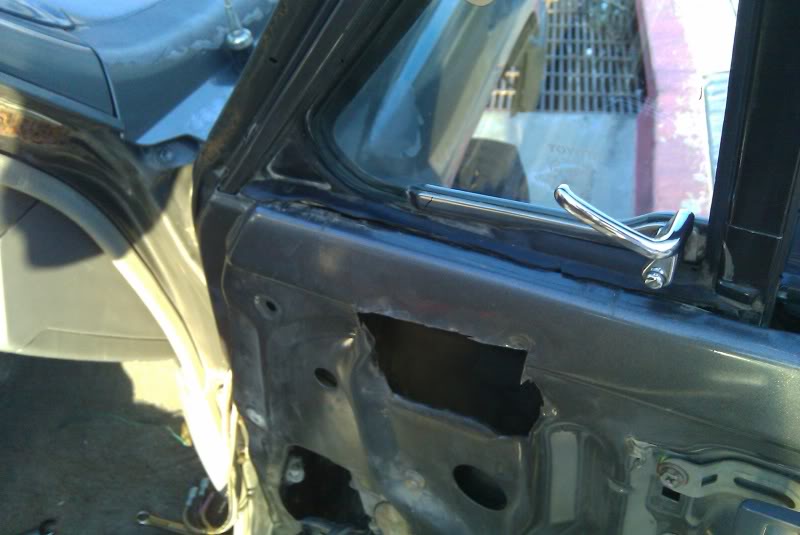
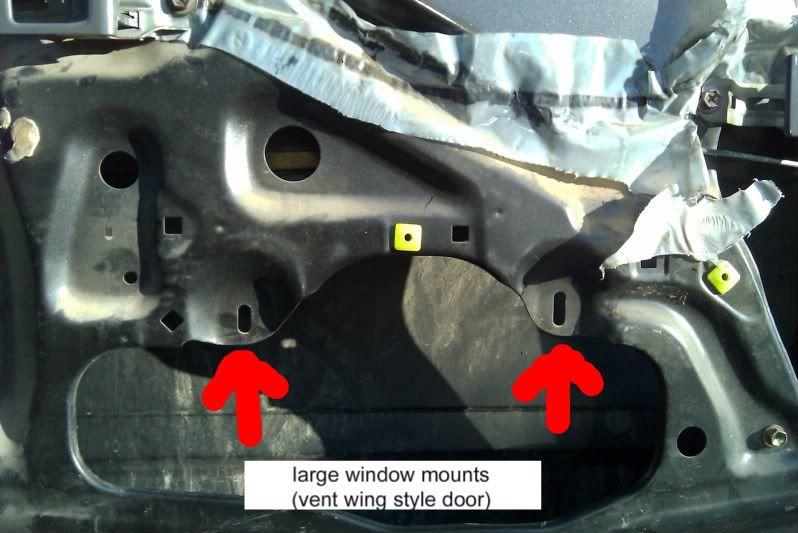
B4Runner- I never thought about speaker clearance issues with the non vent wing doors. One thing that I noticed is that you can turn a vent wing door into a non wing door and vice versa. The window glass and guides are different of course, the regulator is also mounted slightly different. Just as the door handle bracket mounts were present on my 86 and the 89, so are the other style window mount holes. Check this out:
Yeah Kiyo, the real reason behind the door panel swap madness is that I got the whole set of door panels, front and rear, with the power switches, bezels, connectors, handles for $20. Turns out this kid that I went to high school with has a family owned junkyard lol.
B4Runner- I never thought about speaker clearance issues with the non vent wing doors. One thing that I noticed is that you can turn a vent wing door into a non wing door and vice versa. The window glass and guides are different of course, the regulator is also mounted slightly different. Just as the door handle bracket mounts were present on my 86 and the 89, so are the other style window mount holes. Check this out:
Last edited by PismoJoe; Apr 11, 2010 at 10:13 PM.
Apr 12, 2010 | 05:41 AM
#9
Registered User
Joined: Oct 2009
Posts: 536
Likes: 0
From: Ahwahnee, CA
B4Runner- I never thought about speaker clearance issues with the non vent wing doors. One thing that I noticed is that you can turn a vent wing door into a non wing door and vice versa. The window glass and guides are different of course, the regulator is also mounted slightly different. Just as the door handle bracket mounts were present on my 86 and the 89, so are the other style window mount holes.
 If I hadn't found a set of boston Acoustics 4 inch components, I would probably be looking into a set of 6.5's for the door.
Apr 12, 2010 | 08:05 AM
If I hadn't found a set of boston Acoustics 4 inch components, I would probably be looking into a set of 6.5's for the door.
Apr 12, 2010 | 08:05 AM
#12
Registered User
Joined: Feb 2009
Posts: 7,591
Likes: 76
From: Tacoma, WA
Yep. They are older, the rc420's, but they were still new in the box. Sound better then the Infinity Kappa component's I had in my 88. And the good companies stopped making 4 inch components. You either have to buy a crap brand or the super high end too much money brands now.
Found this a couple days ago, got 10 hours left!!
http://cgi.ebay.com/Brand-New-Boston...item439e825f5d
And they take 180 watts, RMS! I have mine amped at 50 and they sound awesome, I can't wait til I can afford an amp upgrade, just used a cheap one I had.
Got mine for $60 to the door I think. Well worth it. Even if they were made in 2003, lol.
Apr 12, 2010 | 08:48 AM
#13
Thread Starter
Registered User
Joined: Jan 2010
Posts: 2,259
Likes: 84
From: Pismo Beach, California
That is worth it! I pulled mine out of the 89 that I got my interior parts from. Not sure what model they are, they definitely aren't close to new but they sound like it! For $5 for the pair, I couldn't resist, and someone took the time to modify the stock rear speaker mounts to make them fit, so I got the whole assembly. Good luck on that auction man, hope you get em!
Apr 12, 2010 | 08:52 AM
#14
Registered User
Joined: Feb 2009
Posts: 7,591
Likes: 76
From: Tacoma, WA
I already have em, I posted those up so another guy around here could get em. Not sure if he has the extra cash for speakers. But the guy I bought em from said he was running out of them, they are gonna be all but extinct soon!!

 Apr 12, 2010 | 11:35 AM
#20
Thread Starter
Registered User
Joined: Jan 2010
Posts: 2,259
Likes: 84
From: Pismo Beach, California
Nice! Before I put my new door panels in, the PO cut the hell out of the original ones, in the shape of some ancient speaker size that is NOT common at all haha. And the speakers were gone, but the huge 2" tweeters were still there! It definitely looked horrible, but yours looks clean!


