
3vze timing belt - need help
 Feb 1, 2009 | 07:54 PM
#1
Thread Starter
Registered User
Joined: Feb 2009
Posts: 33
Likes: 0
From: Vancouver, WA
3vze timing belt - need help
Hi guys,
This is my first post on here, I just bought my third 2nd gen 4Runner. I'm excited because I got a good deal on a 92 with a SAS, lockers and a 6" lift. I bought it with a known leaking water pump but I didn't look into it enough to find out that it requires doing the timing belt. I decided to do the whole thing - Timing belt, idler pulley, tensioner pulley, water pump, all belts and all hoses. I've never done a timing belt before, but I've done most of my own work on all vehicles.
So I have the timing belt off, and replaced the water pump and tensioner, but I believe that I made a mistake; I turned the crank a few revolutions after loosening the tensioner, which caused one or both of the cam sprockets to slip on the belt. I did line up the crank pulley with the 0 notch (TDC?) and removed the harmonic balancer.
So my question is can I just line up the cam gears up with the notches at the top, and make sure the crank is at TDC, as opposed to possibly being at BDC and put the belt back on? I'm afraid due to the distance of the notches I may get the belt a cog off on one or both cam gears.
I apologize, I don't have a lot of experience in dealing with the cams and timing.
Also, I have a replacement idler pulley. In order to remove and replace this do I need to remove the cam sprockets to get to the 4 bolts that hold it on?
Any help would be greatly appreciated. Thanks in advance!
-Jordan
Last edited by angryj; Feb 1, 2009 at 07:57 PM.
Feb 1, 2009 | 09:47 PM
#2
Registered User
Joined: Dec 2007
Posts: 420
Likes: 7
From: Missoula, MT
Welcome to the board!
To replace the Idler you should be able to remove the bolts (4 i think) holding the black plate which goes over the idler and then the 4 bolts for the idler. As for the timing, line up the cam timing marks, and the crank shaft with the mark on the oil pump. Start the belt at the top idler and keep it tight as you work it around the cam pulleys toward the tensioner, which needs to be last to get any slack. Otherwise a cam may turn a tooth or so. Even if you mess up the timing on this engine you won't damage the pistons or valves. You'll just have to do it again. After you think you got it and the tensioner is tightened, rotate the engine 360 twice and check the marks on both cams and the crank mark. Wouldn't hurt to double check it either.
I did my first 3vze head gaskets, timing belt, water pump, idler, tensioner over Christmas and its still running strong. Good luck and have fun with that rig!
Feb 1, 2009 | 10:03 PM
#3

Registered User
Joined: Apr 2007
Posts: 1,580
Likes: 1
From: Park City, UT
If you could, it's helpful to remove the passenger side cam sprocket. How I reassembled the timing belt:
Crank at TDC, driver side cam sprocket at TDC, passenger side sprocket installed and at TDC, except with the dowel pin behind the bolt removed so the sprocket isn't turning the cam.
Once you have the belt on, turn the motor over until the dowel hole lines up. remove the cam bolt you didn't torque down yet, slip the dowel in, install bolt and torque.
The reason I did it this way is the passenger side cam wants to go one way or the other at TDC 'cause a lifter is pushing right on the point of a cam lobe. When it's all said and done, the only thing left to be timed is the distributor, unless you never removed it.
Feb 2, 2009 | 07:39 AM
#4
Registered User
Joined: Aug 2003
Posts: 106
Likes: 0
From: Richmond VA
https://www.yotatech.com/forums/f116...sy-pics-85169/
You dont have to remove the cam sprocket to do the No. 2 idler. The pictures aren't great, but it's pretty self explanatory when you get to the point of removal. Also, the idler I bought came with an existing gasket that expands as you tighten the bolts. Toss that in the trash and use some gray Permatex. I used the existing gasket the first time, and it leaked a few months later.
I think when I did mine, the cam sprocket slipped and I turned it back by hand, and re-aligned it. I then turned the engine by hand when i got the belt on, and made sure the marks lined back up. I also used a couple of big spring clamps to hold the belt on the cam sprockets when I re installed it.
Last edited by VA_Yotaman; Feb 2, 2009 at 07:43 AM.
Feb 2, 2009 | 08:10 AM
#5
Thread Starter
Registered User
Joined: Feb 2009
Posts: 33
Likes: 0
From: Vancouver, WA
This answers almost all of my questions. I really appreciate all of the quick replies. I'll be hopefully getting this all back together tonight.
The last question I'm still a little unclear on is that the notch on the oil pump pulley (crank pulley) is at 0 now. I assume it should be at 0? And my impression was that when it's at 0, it's at TDC, but after thinking about it, it could be at BDC - is this correct? Do I need to set it at 0, check the #1 cylinder through the spark plug hole and if I can't verify the piston, rotate the crank another 360* and verify?
Also, I saw some other information on forums and under the hood referring to the timing being set to 10* BTDC, and I'm a little confused as to what that means.
Feb 2, 2009 | 08:51 AM
#7
Registered User
Joined: Mar 2005
Posts: 1,756
Likes: 7
From: New Brunswick, Canada
This answers almost all of my questions. I really appreciate all of the quick replies. I'll be hopefully getting this all back together tonight.
The last question I'm still a little unclear on is that the notch on the oil pump pulley (crank pulley) is at 0 now. I assume it should be at 0? And my impression was that when it's at 0, it's at TDC, but after thinking about it, it could be at BDC - is this correct? Do I need to set it at 0, check the #1 cylinder through the spark plug hole and if I can't verify the piston, rotate the crank another 360* and verify?
Also, I saw some other information on forums and under the hood referring to the timing being set to 10* BTDC, and I'm a little confused as to what that means.
The last question I'm still a little unclear on is that the notch on the oil pump pulley (crank pulley) is at 0 now. I assume it should be at 0? And my impression was that when it's at 0, it's at TDC, but after thinking about it, it could be at BDC - is this correct? Do I need to set it at 0, check the #1 cylinder through the spark plug hole and if I can't verify the piston, rotate the crank another 360* and verify?
Also, I saw some other information on forums and under the hood referring to the timing being set to 10* BTDC, and I'm a little confused as to what that means.
When it matters is when you go to re-install your distributer (however, since you probably didn't remove it in the first place, this should not cause you any problems). If you had removed the distributer, to set it up right, you have to know whether you are at TDC compression or not, because you want your spark to fire on the compression stroke... not on the exhaust stroke. Since every second revolution of the crank shaft will get you to TDC compression on #1, you have a 50% chance of getting it right by guessing. If you get it wrong, the truck won't run. If you want to know for sure, connect a compression guage to your #1 spark plug hole, use a ratchet on the crank bolt, turn the engine over one revolution as fast as you can, and see if you build up any pressure. If not, you're on the exhaust stroke (which means the exhaust valve in cylinder #1 is open, and the piston will be at the top of it's stroke). Go another revolution and you should build up some pressure (both the inlet and exhaust valves will be closed and the piston will be at the top of its stroke), which will confirm that you're on the compression stroke. Keep in mind it will be very low pressure, but on the compression stroke, you can build up a psi or two by hand if you rotate it fast enough. You may not see it register on the guage because of the scale, but you will hear it when you press the relief valve.
When you hear about being 10* BTDC... that's ignition timing (or spark timing)... again, this has to do with the distributer adjustment, and has nothing to do with the timing belt installation. Toyota determined that 10* BTDC is the best spot to set the timing to get the best fuel economy / efficiency / power combination from that particular engine. To get the best timing, you want to set it up so that the power (pressure) you're getting from the combustion of the air/fuel mixture comes at the right time so that you're not fighting the existing momentum of the engine. If it happens too soon, it will act to slow down the piston as it's coming up... not good. That causes detonation and decreased power. If it happens too late, the piston will be too far down in the cylinder by the time the cylinder pressure is at its highest. You will see decreased power, and in this case, you can end up with an incomplete burn of your fuel, and your emission numbers can go out of spec.
Last edited by GSGALLANT; Feb 2, 2009 at 09:08 AM.
Trending Topics
Feb 2, 2009 | 09:33 AM
#9
Registered User
Joined: Mar 2005
Posts: 1,756
Likes: 7
From: New Brunswick, Canada
My method would only be used when it came time to re-install the distributer (if it had been removed and the top timing cover is back on so that you can't see the cam sprockets). In this case, looking at the rotor will not help (since the distributer is not installed on the engine yet). That's the only time that it (TDC compression vs TDC exhaust) is important. Otherwise, you can just look at the mark on the crank pulley. Every time it's lined up, piston #1 will be at the top of it's stroke.
Feb 3, 2009 | 06:09 AM
#10
Thread Starter
Registered User
Joined: Feb 2009
Posts: 33
Likes: 0
From: Vancouver, WA
I think I got it. I used a 1/4" drive wobbler with 6" extension and was able to get all 4 bolts of the upper idler. I didn't even realized that there's a removable panel for it, which made it a lot easier than trying to get the bolts from directly above.
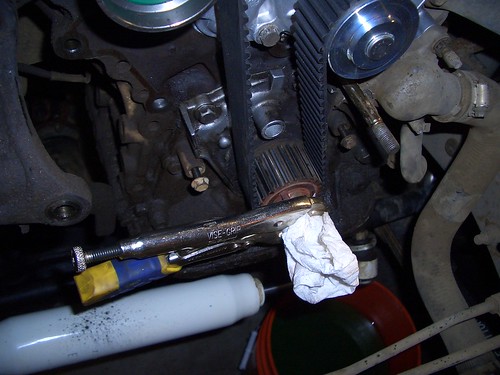
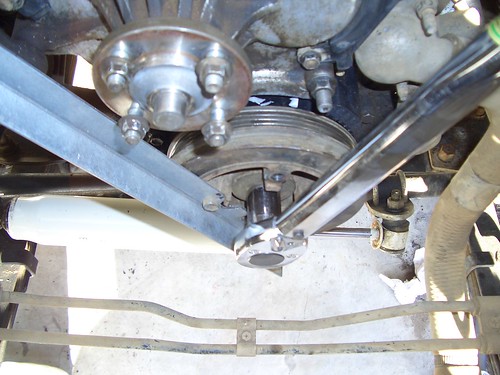
Getting the belt back on and keeping everything lined up was kind of a pain. I think I got it right. I got the left cam sprocket in the grooves with the right and wedged a socket wrench in to hold it from slipping(pic1) due to the lack of tension while I slightly rotated the crank (with gator grips-pic2) and got the belt on.
pic1

pic2
I got it all lined up the second try. The first it looked like the crank wasn't quite lined up so pulled it all off and went again.
After this I bolted up the tensioner and gave it 2 rotations and it lined up so I went two more and it was still lined up perfectly.
Hopefully I'll be able to get it all back together tonight. I do need to fabricate something to hold the crank pulley and get 181ftlbs of torque. I used a impact wrench to get the bolt off and just figured I'd worry about making a tool to put it back on later. I also noticed that a big piece of the upper timing belt cover is missing, causing lots of dirt to get under the cover. Does anyone know if you can just buy this "gasket" from the dealer? Hopefully it's not too expensive.
Thanks again to everyone for all of the help so far.
Getting the belt back on and keeping everything lined up was kind of a pain. I think I got it right. I got the left cam sprocket in the grooves with the right and wedged a socket wrench in to hold it from slipping(pic1) due to the lack of tension while I slightly rotated the crank (with gator grips-pic2) and got the belt on.
pic1
pic2
I got it all lined up the second try. The first it looked like the crank wasn't quite lined up so pulled it all off and went again.
After this I bolted up the tensioner and gave it 2 rotations and it lined up so I went two more and it was still lined up perfectly.
Hopefully I'll be able to get it all back together tonight. I do need to fabricate something to hold the crank pulley and get 181ftlbs of torque. I used a impact wrench to get the bolt off and just figured I'd worry about making a tool to put it back on later. I also noticed that a big piece of the upper timing belt cover is missing, causing lots of dirt to get under the cover. Does anyone know if you can just buy this "gasket" from the dealer? Hopefully it's not too expensive.
Thanks again to everyone for all of the help so far.
Feb 18, 2009 | 03:36 PM
#11
Thread Starter
Registered User
Joined: Feb 2009
Posts: 33
Likes: 0
From: Vancouver, WA
I thought I'd just add some closure to this thread. I did get everything back together and it started up great and ran right away. As far as I can tell the timing is perfect and it runs smoothly.
One part I had trouble with was getting the crank pulley torqued back on - I built a tool:
but it didn't work out well:
I ended up making another, with 3/8th steel which worked much better!
I also bought all new gaskets for the timing belt cover and a new lower timing cover which were expensive from the dealer.
Thanks again to everyone for the help on my first timing belt / water pump job!
Mar 10, 2009 | 02:44 PM
#13
Registered User
Joined: Mar 2009
Posts: 25
Likes: 0
From: Tri-Cities WA
GSGALLANT, Explain to me a little more about setting the distributor, i did a head gasket job and accidently moved the harmonic balancer a little and after i had assembled everything it will not start, i am positive the distributor was not put in correctly. The new timing belt was installed and lined up correctly with the harmonic balencer at TDC, but i had doughts about the distributor, i did make marks on the distributor before i took it off but i did not line up the engine TDC before i made the marks, making them meaningless. Any info would be great.
WHAT I UNDERSTAND:
Make sure that i find the compression stroke, and set it to 0 TDC on harmonic balancer, But then what will i do with the distributor? Try to re-install it so that the rotor is under the #1 spark plug wire point on the cap?
WHAT I UNDERSTAND:
Make sure that i find the compression stroke, and set it to 0 TDC on harmonic balancer, But then what will i do with the distributor? Try to re-install it so that the rotor is under the #1 spark plug wire point on the cap?
Mar 10, 2009 | 03:05 PM
#14
Registered User
Joined: Mar 2005
Posts: 1,756
Likes: 7
From: New Brunswick, Canada
GSGALLANT, Explain to me a little more about setting the distributor, i did a head gasket job and accidently moved the harmonic balancer a little and after i had assembled everything it will not start, i am positive the distributor was not put in correctly. The new timing belt was installed and lined up correctly with the harmonic balencer at TDC, but i had doughts about the distributor, i did make marks on the distributor before i took it off but i did not line up the engine TDC before i made the marks, making them meaningless. Any info would be great.
WHAT I UNDERSTAND:
Make sure that i find the compression stroke, and set it to 0 TDC on harmonic balancer, But then what will i do with the distributor? Try to re-install it so that the rotor is under the #1 spark plug wire point on the cap?
WHAT I UNDERSTAND:
Make sure that i find the compression stroke, and set it to 0 TDC on harmonic balancer, But then what will i do with the distributor? Try to re-install it so that the rotor is under the #1 spark plug wire point on the cap?
Distributor Procedure
Mar 10, 2009 | 03:13 PM
#15
Registered User
Joined: Mar 2009
Posts: 25
Likes: 0
From: Tri-Cities WA
You are my hero, thank you so much for the quick reply. One more random qusetion, i was filling up the anti-freeze, and it started coming out of a hose at the rear of the intake that i missed and forgot to hook up, i have no idea where it goes onto, can't find the connection anywhere, any idea? It is about 1/2 in overall diameter, it is hooked to the metal tube that runns under the intake, but it is just a hose that T's off that big one..... Can't seem to find any good pics.
Mar 10, 2009 | 04:19 PM
#17
Registered User
Joined: Mar 2009
Posts: 25
Likes: 0
From: Tri-Cities WA
OK, IT STARTED!!!!! Thanks man, i was off a tooth or two, And after it started a lil while i herd a big pop, the fan exploded and broke the shroud to pieces to, ill take pics, there are no tools in there either, just exploded.... odd.
Mar 11, 2009 | 03:43 AM
#18
Registered User
Joined: Mar 2005
Posts: 1,756
Likes: 7
From: New Brunswick, Canada
awww... that sucks, man. Was the hood open at the time causing pieces to fly out everywhere? Those fans are dangerous. Make sure to check out your fan bracket to make sure there are no cracks in it, and to ensure the bearing is still good before putting another fan on there. Good luck.

Thread
Thread Starter
Forum
Replies
Last Post


