When you click on links to various merchants on this site and make a purchase, this can result in this site earning a commission. Affiliate programs and affiliations include, but are not limited to, the eBay Partner Network.
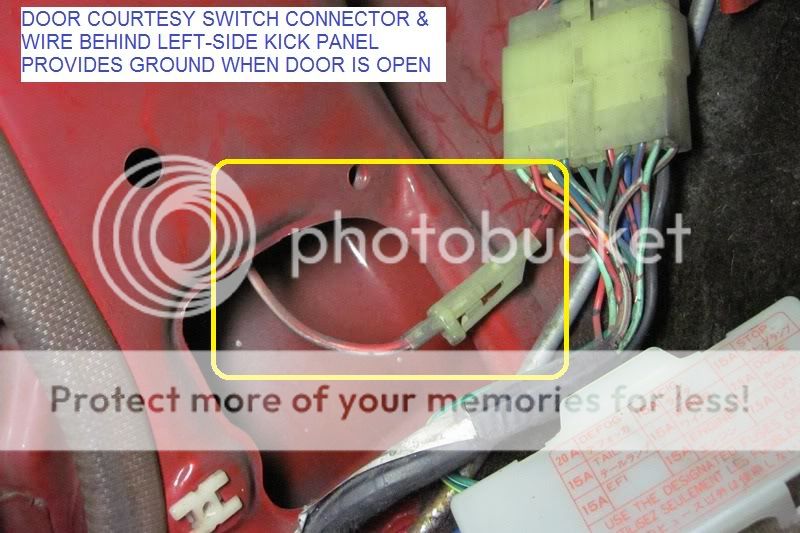
I'm trying to figure out my driver side door jamb switch and a few other wiring mysteries. The dome light works with my pass door but, not my driver side. I pulled the driver door jamb switch and it's clearly been cut.
So, where's the other end of the cut wire? On my passenger side, the wire goes down and out to a connector then up to the loom.
Where am I supposed to find the other end on the driver side? There's nothing coming down and I'm not seeing anything that would be coming down from the top.
Next, what are these cut wires supposed to run to? They're interesting because there are the same cut wires on both driver and passenger sides.
Driver side:
Pass side:
Lastly (for now), I took the glove compartment out to track down a leak and found these connectors not plugged into anything. Anyone have an idea what they should be plugged into, if anything?
What is the label / part number on that box ^^^?
Do you have buzzer similar to below above the steering column?
I am assuming your dome circuit is same as 1986 thru 1988. IF so, and you have the buzzer box. The wire from the door switch would go there. Below is how it's wired on 1986 to 1988...
Thanks a million. I do have the buzzer box but, I'll have to look at it to see if the part numbers are the same. Would be interesting if it were different. Regarding the wiring schematic, I barely know what I'm looking at. I'm real rookie level when it comes to electrical. That being what it is, I'll have a look at the connector that goes into the buzzer box and see if I can spot a red-white wire. At work now but, I'll give an update when I get home and have a look at things.
Thanks a million. I do have the buzzer box but, I'll have to look at it to see if the part numbers are the same. Would be interesting if it were different. Regarding the wiring schematic, I barely know what I'm looking at. I'm real rookie level when it comes to electrical. That being what it is, I'll have a look at the connector that goes into the buzzer box and see if I can spot a red-white wire. At work now but, I'll give an update when I get home and have a look at things.
Pls take picture of box connector showing wire colors clearly.
should be plain red from box to tiny connector for door switch. Tiny connector to switch should be red-white.
Pls take picture of box connector showing wire colors clearly.
should be plain red from box to tiny connector for door switch. Tiny connector to switch should be red-white.
Will do. Looks like your driver side comes out below like mine on the pass side. I'm off here is a few and I'll let you know what I find.
What is the label / part number on that box ^^^?
Do you have buzzer similar to below above the steering column?
I am assuming your dome circuit is same as 1986 thru 1988. IF so, and you have the buzzer box. The wire from the door switch would go there. Below is how it's wired on 1986 to 1988...
We�ve got the same buzzer.
All the wires from the connector go up above some air ducting and into a big loom of wires. I can�t tell where it comes out and should go down towards the kick panel. Is the red wire, left of the red-white wire, the one I want? If that�s it, it�s a short run that should be easy to jump.
Darn then your already getting water in there? You could wrap the ECU in plastic. I did just incase my repairs didn't work out. It's a bag from a quality VW parts supplier, even the bag was good quality!
Darn then your already getting water in there? You could wrap the ECU in plastic. I did just incase my repairs didn't work out. It's a bag from a quality VW parts supplier, even the bag was good quality!
Jumped it. Fixed! Now the next question. What wire is the power out from the buzzer box that energizes the dome light? I was going to mount T10 led bulbs on each side of the radio and have it mimic the dome light function with the door. There�s holes in support pieces on each side that will be perfect to light the footwells when the door is open. I�ve got the sockets on order, just need the wire to power them.
Jumped it. Fixed! Now the next question. What wire is the power out from the buzzer box that energizes the dome light?
Nothing in buzzer box provides power to dome, only grounds its negative side, via that black wire with red arrow ^^^.
Tap off the downstream/fused side of dome fuse to supply steady 12V on pos side of ur T10 socket . I did it from rear of my fuse block.
Thn connect neg side of T10 socket to THAT black wire your red arrow points to. Just as extra measure, put pos test probe to known 12V, neg test probe to that black wire. Shud see zero with door closed, 12V with door open.
Photos below exampls only becoz ur ckt may be different.
Last edited by RAD4Runner; Jan 16, 2022 at 11:17 AM.
Nothing in buzzer box provides power to dome, only grounds its negative side, via that black wire with red arrow ^^^.
Tap off the downstream/fused side of dome fuse to supply steady 12V on pos side of ur T10 socket . I did it from rear of my fuse block.
Thn connect neg side of T10 socket to THAT black wire your red arrow points to. Just as extra measure, put pos test probe to known 12V, neg test probe to that black wire. Shud see zero with door closed, 12V with door open.
Photos below exampls only becoz ur ckt may be different.
Thanks. I'm getting a little confused. I don't think I should have to jump at both the fuse and the buzzer.
Is the switch on the ground side? If so, I could jump the buzzer and connect the positive to an always hot at the radio.
Or is the switch on the hot side? If so, I could jump the fuse and ground at the radio.
Or am I thinking about this all wrong and I need to jump at both the fuse and buzzer? I could be wrong but, this is how I think of it. The positive side can always have power to it and the ground side has a switch that opens and closes or the ground side is always closed and the power gets switched on and off. Let me know if I'm missing something. Set me straight if I need it.
Dome light always has 12V on positive side. Negative side is connected to ground by "ON" switch or door switch, via the buzzer box.
If you want your footwell lights to work with, and like, dome it would be wired like below:
You can also tap off positive side of tail light, but still need a switch if you do not want it on while tails are on.
Thanks. I'll have to take a look at this and try to get a better understanding. First I need the T10 sockets to get here so I can get soft wire some stuff up and see how it works.
I've been working on the pickup over the weekend when I got off of work. Finally got in this morning to drive it again and was surprised the buzzer started working. Maybe I should have been able to tell by the wiring schematic, but the buzzer never worked with just the pass side door jamb switch working. It only started working when I got the driver side door jamb switch wired. Everyone seems to hate the buzzer. I dig it.
Ha ha, it's one of the first things I got working plus the horn. Yes it's a little annoying and all I had to do was plug the door switch back in. That goofy meep meep horn needed the 22 bullet shell which I happened to find on the floor when we got the truck. At the time I thought the PO was just into hunting. Then I read about the fix. Currently I am running duel horns and set up a switch to the old horn. I still love it.
While you're in there it's a good time to add a buzzer for the headlights. Simple add on if you don't already have it.
Quote:
Originally Posted by RAD4Runner Thanks, Terrys87!
I'm concerned about leaving my lights on and draining the battery. Per FSM, the light reminder relay is supposed to be here, but I only see a mounting hole on mine, confirming my suspicion that the light reminder circuit was only available on SR5 first-gens. Therefore, one lazy afternoon, I got busy
The circuit is simple. It will energize when there is positive voltage from the tail light circuit AND ground via the the driver side door courtesy switch when door is opened. (When headlights are on, there is also power to tail light circuit.)
Parts & Equipment Needed:
Buzzer PN 273-059 from Radioshack. I used an overhand knot and ran lead wire through mounting hole for strain relief. Also affixed foam-backed double-sided tape for mounting.
LED indicator light. (I used an LED lying around in my toolbox and appropriate resistor.) Easier to simply buy pre-assembled indicator LED light (i.e., from O'Reilly)
Remove Tail Fuse (15A). Verify that left terminal (marked below) is the supply side by measuring +12V when tail light switch is in ON position, 0 volt when tail light switch is OFF. It is important that you connect to supply side of fuse so that IF headlight is on and even if tail fuse is blown, this will still power the reminder circuit.
NOTE: The cleaner method would be to solder it into the circuit in the back of the fuse block, which I would do later.
Slip red wire into supply side, and re-install fuse. Be careful that you do not cut strands that might fall on other circuits and cause shorts.
NOTE: The cleaner method would be to solder it into the circuit in the back of the fuse block, which I would do later.
An option is to take positive voltage from this green wire (the section in yellow heat-shrink) that once supplied stock deck lamp circuit, but I disconnected in order to do my deck lamp retrofit. Verify that this green wire has 12V when, and only when, tail light is on.
Strip door courtesy switch wire at a convenient spot and connect ground side of circuit to that. Soldering then insulating with heat-shrink tubing or electrical tape is recommended.
Here's the circuit connected and properly labeled. Buzzer is stuck on fuse block with foam-backed tape. [Let us keep our wiring and and mods clean & properly documented to make it easy to troubleshoot or return to stock when needed/desired. This way our classic rigs can be considered improved, not molested. ]
I'm digging the lights on buzzer. Would want to figure out a way to get it to buzz the actual Toyota buzzer. Even if I had to get a second buzzer just for that circuit. As much as people try to disable these things, there's got to be plenty floating around unused.

 Jan 15, 2022 | 10:23 AM