
'85 4Runner Build...


 Mar 30, 2006 | 09:43 AM
#45
Thread Starter
Registered User
Joined: Mar 2006
Posts: 115
Likes: 0
From: Duncannon, PA
Not sure... I was considering it but i don't know if i'll have my gears in time, we will see though.
I've been working on the 4Runner just haven't had anything worth taking a picture of, mostly just clean up & pulling wires and such... As soon as its street legal again im going to focus just on teh doors with the weather being as nice as its been i've been trying to get it road worthy. The pics will start coming as soon as everything starts coming together.
I've been working on the 4Runner just haven't had anything worth taking a picture of, mostly just clean up & pulling wires and such... As soon as its street legal again im going to focus just on teh doors with the weather being as nice as its been i've been trying to get it road worthy. The pics will start coming as soon as everything starts coming together.
Mar 30, 2006 | 09:54 AM
#46
Contributing Member
Joined: Feb 2006
Posts: 1,876
Likes: 1
From: Gulfport, Mississippi
I hope to have mine ready too. I will be going even if I dont, and ride with somebody else on the trails. I will trailer my 4Runner up there just to get some build feedback. If I do have mine done & your gears aren't in, you can ride/drive with me if you want.

 go on get to work
  lol
Mar 31, 2006 | 07:43 PM
lol
Mar 31, 2006 | 07:43 PM
#51
Thread Starter
Registered User
Joined: Mar 2006
Posts: 115
Likes: 0
From: Duncannon, PA
Yeah Yeah here ya go...  My vision is a little blury at the moment
  so hopefully these will look as good as they do now in the morning

Relocated the little computer to the glove compartment...

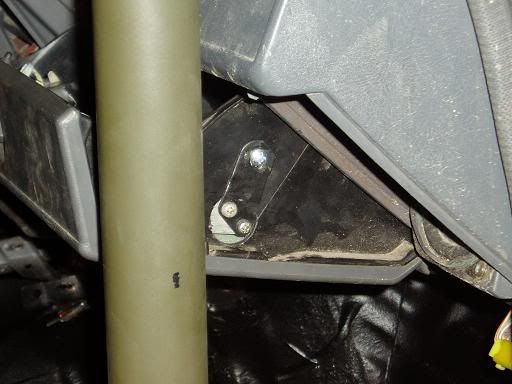
I used one of the brackets that were on it to fasten it down (took my BFH & made it flat). I also added a little foam under the computer to keep it from vibrating... I'm slowly getting the interior back together, I don't want to miss anything & deffnently don't want to have to take it back apart again.
My vision is a little blury at the moment so hopefully these will look as good as they do now in the morning Relocated the little computer to the glove compartment...
I used one of the brackets that were on it to fasten it down (took my BFH & made it flat). I also added a little foam under the computer to keep it from vibrating... I'm slowly getting the interior back together, I don't want to miss anything & deffnently don't want to have to take it back apart again.
Last edited by Newb; Mar 31, 2006 at 08:05 PM.
Mar 31, 2006 | 11:08 PM
#52
Registered User
Joined: Mar 2006
Posts: 75
Likes: 0
From: San Diego
Once the weather warms up again im sprayin the floor and cage down with bed liner, covering the seats in a canvas material and pretty much redoing everything i can with either black, green, or camo... Haha its gonna be pimp.
Apr 1, 2006 | 05:48 AM
#54
That is the first mod anyone should do on a "wheeler" is move up the ECU off the floor outta the kick panel...especially since when the windshields leak the ECU is right in the path for the flood.
Bedliner is all about prep work...or it won't stick, stay or be durable. I'm going to have mine professionally done one day for that reason - lifetime warranty.
1.75" or 2" tubing on the cage?
Looking good.

Bedliner is all about prep work...or it won't stick, stay or be durable. I'm going to have mine professionally done one day for that reason - lifetime warranty.
1.75" or 2" tubing on the cage?
Looking good.
Apr 1, 2006 | 06:15 AM
#55
Contributing Member
Joined: Jun 2004
Posts: 1,314
Likes: 0
From: Bangkok, Thailand
Newb, if your still worried about the inside of the cage, there is a company called jp wiegle (sp?) they make a steel bicycle frame preserver that comes in a areosal spray. (not sure on the name spelling) I used a lot of it when I lived near galveston on cusotmers bikes. you would spray it in though tiny holes with a wand tip (like wd40 comes with)
FOUND IT:
http://www.bikeparts.com/search_resu...p?ID=BPC306996
keep posting the build up looks great!
FOUND IT:
http://www.bikeparts.com/search_resu...p?ID=BPC306996
keep posting the build up looks great!
Last edited by shiftless89; Apr 1, 2006 at 10:29 AM.
Apr 1, 2006 | 12:30 PM
#57
Thread Starter
Registered User
Joined: Mar 2006
Posts: 115
Likes: 0
From: Duncannon, PA
Im thinking that im going to extend all the wires from the fuse boxes on the drivers side and mount it in the glove compartment as well... Is there any reason why I should not do this?
Apr 3, 2006 | 06:57 PM
#59
Thread Starter
Registered User
Joined: Mar 2006
Posts: 115
Likes: 0
From: Duncannon, PA
Yeah umm, my beer goggles were a little fuzzier than I thought that night cuz i actually forgot a picture.  In any case heres a pic of how I mounted it, I actually flipped it upside down and beat the one brackek flat and just used the original holes that were in the computer...
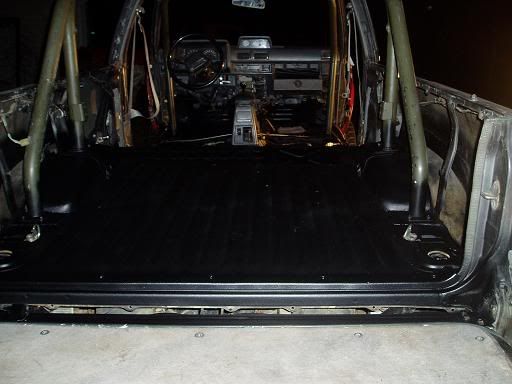
Popak to your question Im actually using the rattle-can bed linner by dubli-color, like Rabbit said you should consider just having it proffesionally done. I used this stuff on my S-10 blazer and had absolutely no problems with it, now I didn't go quite as extensive but the stuff is a reasonable price and I wanted to test it out and see just how strong it is.
1985 4Runner as to your request I'll take some pics of the cage next chance I get. It's really really simple design & there are alot of things I plan on changing on it, but then again I can't complain cause it kept me alive.
Aight heres some daylighters...
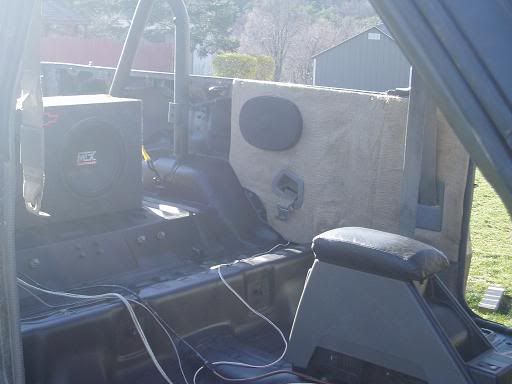
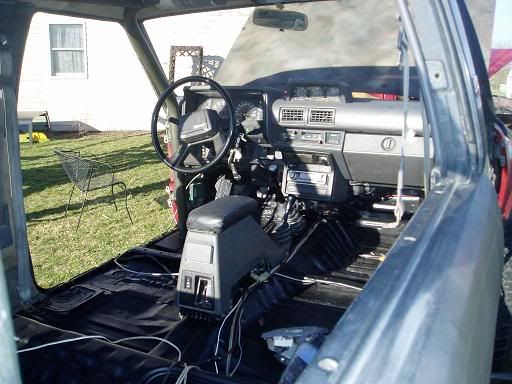
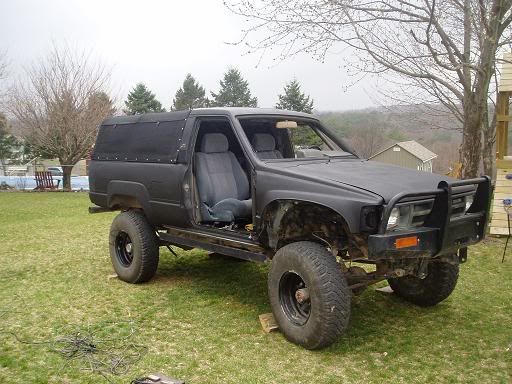
This is how it sits at the moment as you can see it deffnently needs a rear fendor trimming and tubbed in the front end, but all that is soon to come . Also the interior is still not finished but close I just needed to feel like I was actually accomplishing something. Oh yeah I had a foot left with taking the windshield out of the donor truck and it cracked right up the middle after 3hrs of taking my time and being as careful as possible 


In any case heres a pic of how I mounted it, I actually flipped it upside down and beat the one brackek flat and just used the original holes that were in the computer...Popak to your question Im actually using the rattle-can bed linner by dubli-color, like Rabbit said you should consider just having it proffesionally done. I used this stuff on my S-10 blazer and had absolutely no problems with it, now I didn't go quite as extensive but the stuff is a reasonable price and I wanted to test it out and see just how strong it is.
1985 4Runner as to your request I'll take some pics of the cage next chance I get. It's really really simple design & there are alot of things I plan on changing on it, but then again I can't complain cause it kept me alive.
Aight heres some daylighters...
This is how it sits at the moment as you can see it deffnently needs a rear fendor trimming and tubbed in the front end, but all that is soon to come
. Also the interior is still not finished but close I just needed to feel like I was actually accomplishing something. Oh yeah I had a foot left with taking the windshield out of the donor truck and it cracked right up the middle after 3hrs of taking my time and being as careful as possible
Apr 3, 2006 | 10:06 PM
#60
Contributing Member
Joined: Feb 2006
Posts: 1,876
Likes: 1
From: Gulfport, Mississippi
Sorry to hear about the windshield, I know that sucked. You're making more progress than me though, I can't seem to to any of the major stuff done by myself. Keep up the good work & I'll look for the cage pics.
Does that rear heater work? I used to LOVE the one I had in my '89.
Does that rear heater work? I used to LOVE the one I had in my '89.


