
dropzone's notebook of ideas, links, mods, misc BS
 Apr 23, 2009 | 05:44 AM
#41
gear chart
info is from 4lo.com:
http://4lo.com/calc/geartable.htm
Good "rule of thumb" calculation is to mutiply .12 by your tire diameter. (.12 X 38" = 4.56)
(see more formulas at bottom of page)
The below table can be used to get a rough idea on gear ratios. The colors represent ideal RPM's at highway speeds (65). For highway cruising and best fuel economy stay towards the yellow (2600 rpm), around town daily driving is color coded green (2800 rpm), and for better towing power or just more 4-low power use the ratios near the red (3100 rpm). These calculations are assuming a manual transmission with a 1:1 ratio. If you drive an automatic your RPMs will be slightly higher, and the opposite is true if you have overdrive (your RPMs will be slightly lower).

this chart is not toyota specific
http://4lo.com/calc/geartable.htm
Good "rule of thumb" calculation is to mutiply .12 by your tire diameter. (.12 X 38" = 4.56)
(see more formulas at bottom of page)
The below table can be used to get a rough idea on gear ratios. The colors represent ideal RPM's at highway speeds (65). For highway cruising and best fuel economy stay towards the yellow (2600 rpm), around town daily driving is color coded green (2800 rpm), and for better towing power or just more 4-low power use the ratios near the red (3100 rpm). These calculations are assuming a manual transmission with a 1:1 ratio. If you drive an automatic your RPMs will be slightly higher, and the opposite is true if you have overdrive (your RPMs will be slightly lower).
this chart is not toyota specific
Apr 24, 2009 | 10:19 PM
#42
ECU Mounting for EFI conversion
From Crash's 1st Gen EFI conversion threadon Pirate:
So the next thing to tackle--was to find a spot and mount this jewel.

Some years ago I found sweet spoit to mount ECM's on a first gen. Pull the glove box insert and right about that is where a single dash speaker used to go. Its nice and high and there is enough room to even get a gm ecm to fit. This is where my ecm has been mounted for 6 years with zero problems. But the one thing that makes it nice, there are 2 threaded holes in the metal skeleton of the dash. The picture is kinda dark but you can see the holes (red spots)

Next thing to do was make a bractet that bolts to those holes and to the ecm to hold it firmly into place.


And here it is mounted to the ecm. I utilized the threaded holes on the side of the ecm's case.

And there you have it--up in its new home.

Some years ago I found sweet spoit to mount ECM's on a first gen. Pull the glove box insert and right about that is where a single dash speaker used to go. Its nice and high and there is enough room to even get a gm ecm to fit. This is where my ecm has been mounted for 6 years with zero problems. But the one thing that makes it nice, there are 2 threaded holes in the metal skeleton of the dash. The picture is kinda dark but you can see the holes (red spots)
Next thing to do was make a bractet that bolts to those holes and to the ecm to hold it firmly into place.
And here it is mounted to the ecm. I utilized the threaded holes on the side of the ecm's case.
And there you have it--up in its new home.
May 5, 2009 | 09:03 AM
#43
BOdy Lift installed/now truck over heats
Personally I don't like body lifts but found this info and thought it was worth saving..

Try this: Drain the coolant. Take the upper heater hose off, and fill the system until water pours out of the outlet for the heater core, and the hose you detached. Reattach the hose, and fill the rest of the system. Park on an incline, or jack up the front of the truck as well. You just have an air in the system, and its not circulating out. Thats what the high idle is from too, since the coolant temp sensor is searching for coolant thats not there.
hey guys i just did a body lift on my 93 pickup and now the truck overheats i was like hmm maybe rattling the rad around clogged it because the rad is rusty inside and the rad was hot at the top and cold right in the middle. so i change the rad and still it goes right to red after a few mins and i shut it off fast. also the truck idles like at 1500 to 2000 rpm fast like it has a loose vacuum line at idle. my buddy was thinking maybe the ecm is shot because it overheats and idles super rough. the truck ran like a champ before the body lift.i dont see how a body lift would make it overheat. my friend will ask his mech teacher tomorrow for me. im so stumped right now and dont want to tow to a mech.
How tall a lift?
Did you relocate the radiator with the body lift?
- http://www.4crawler.com/4x4/ForSale/...shtml#Radiator
Did you relocate the radiator with the body lift?
- http://www.4crawler.com/4x4/ForSale/...shtml#Radiator
Try this: Drain the coolant. Take the upper heater hose off, and fill the system until water pours out of the outlet for the heater core, and the hose you detached. Reattach the hose, and fill the rest of the system. Park on an incline, or jack up the front of the truck as well. You just have an air in the system, and its not circulating out. Thats what the high idle is from too, since the coolant temp sensor is searching for coolant thats not there.
May 14, 2009 | 05:14 AM
#44
steering joint/rag joint mod
in case you end up needing to use one from a later model (86+) truck.
borrowed this one from pirate:
borrowed this one from pirate:
I didn't want to pay $60+ for an aftermarket steering u-joint that didn't have the correct spline for the Toyota steering box. I also wanted to avoid using the rag joint (I think that is what it is called).
While this may have very little use outside of my truck, I haven't seen it on here (nor have i looked) I will be running your run of the mill stock car removable steering wheel with a 3/4" tube for the steering shaft.
Anyway, here are the pics.
I didn't get a pic from before, but you get the idea.
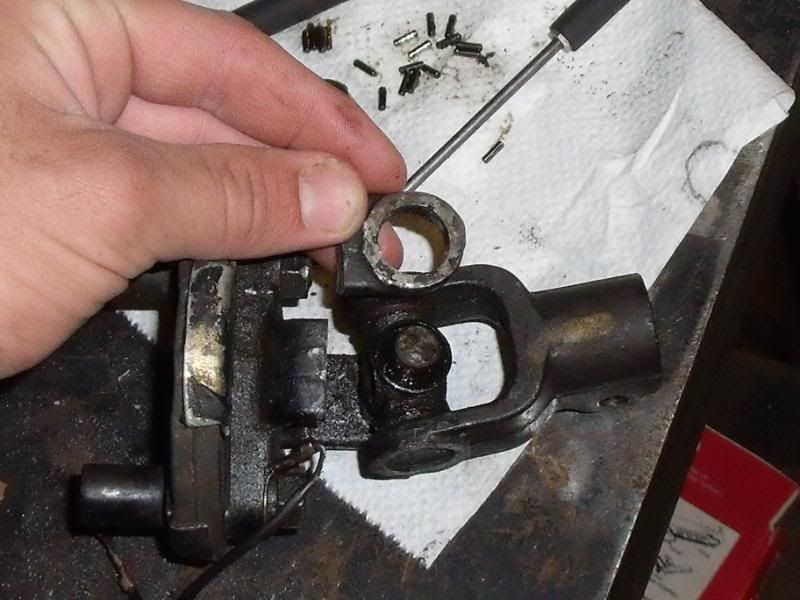
The little caps are crimped in there (at least on the 1986 IFS box I have) So, there isn't really an easy way of removing them without cutting.
This is the part that will replace the rag joint and allow me to weld the splined end of the shaft to the new tubing.
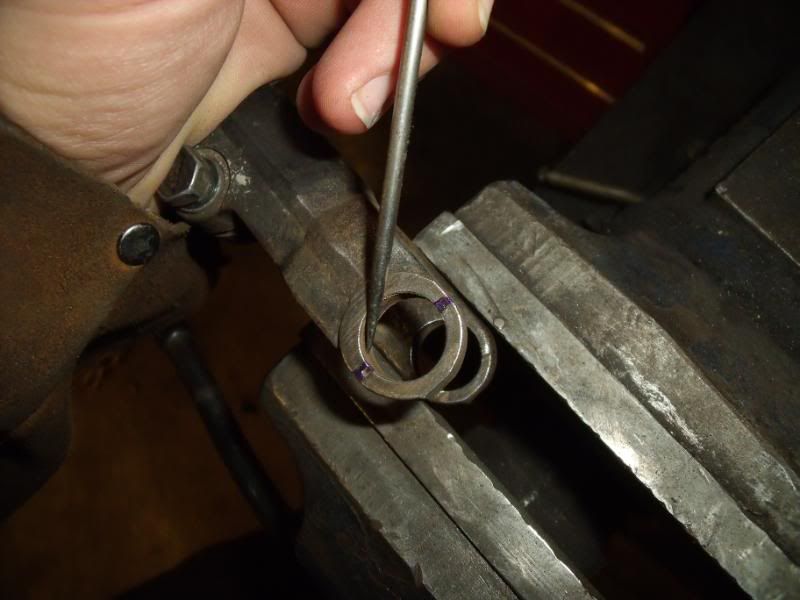
No pic from the removal of the other joint. Pretty much just cut the ujoint out with a cut-off wheel. The little blue marks are the crimps on the yoke from the firewall. For some reason, the firewall side has two crimps and the steering box side has three.

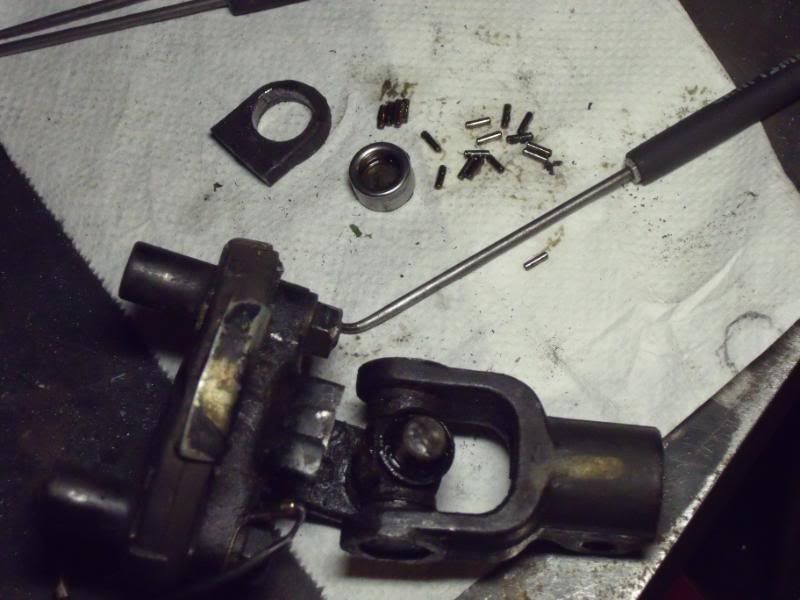
use a dremel and sand off the crimps from the firewall yoke. Then assemble the modified firewall u-joint with the steering box yoke. and....
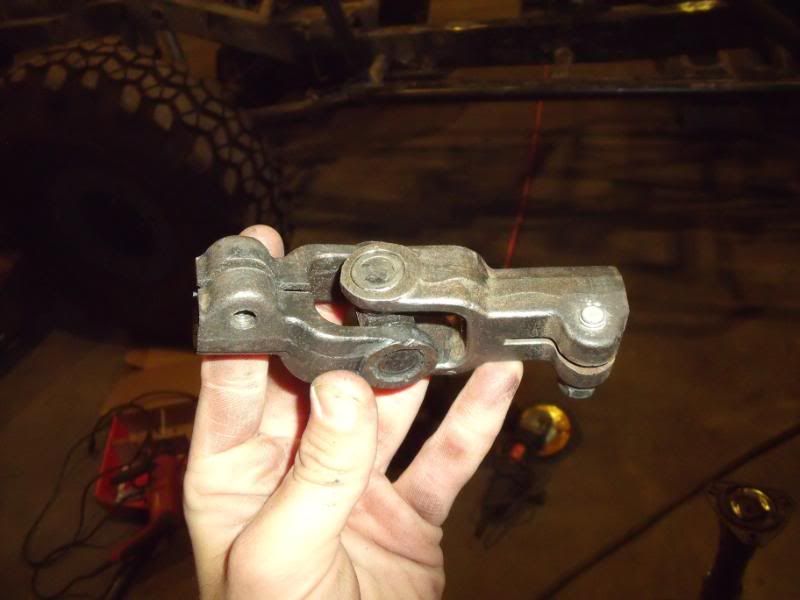
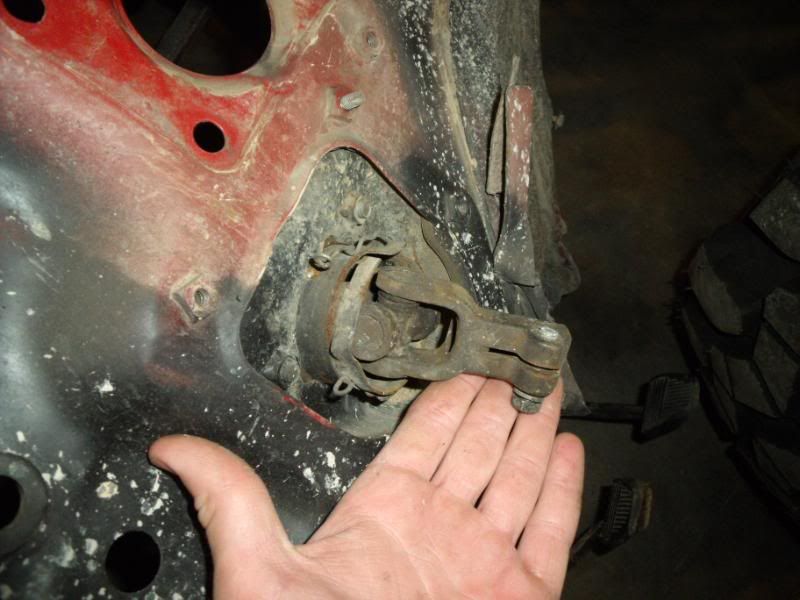
The finished product. It works perfect too.
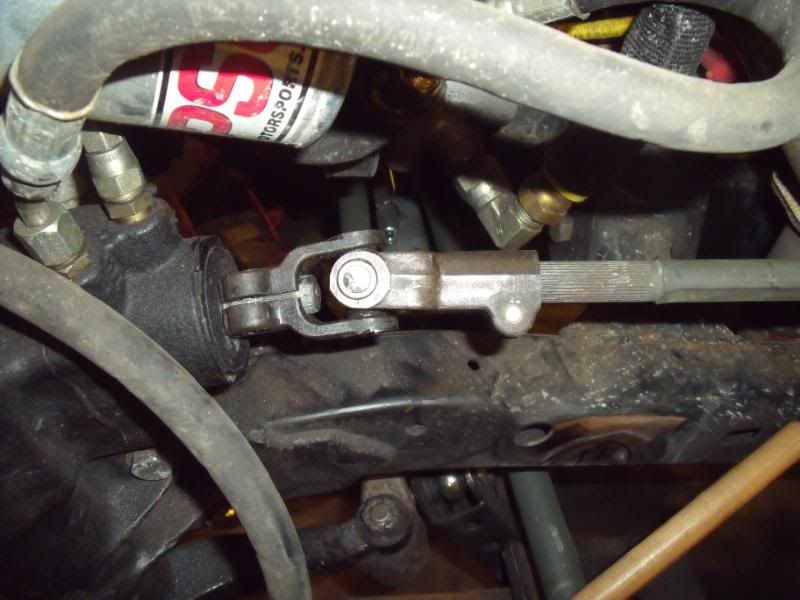
And in action (although not yet hooked up to the new steering wheel)
Notes:
DO NOT grab the u-joint caps with pliers. They will dent and become useless.
The 1985 and earlier models have a wider yoke and use an internal snap ring to retain the u-joint cap instead of the crimp method. I have these parts sitting on the bench, but have yet to assemble them. I would bet that these parts work better for this because there is not cutting or griding, but the new joint would be larger in girth.
While this may have very little use outside of my truck, I haven't seen it on here (nor have i looked) I will be running your run of the mill stock car removable steering wheel with a 3/4" tube for the steering shaft.
Anyway, here are the pics.
I didn't get a pic from before, but you get the idea.
The little caps are crimped in there (at least on the 1986 IFS box I have) So, there isn't really an easy way of removing them without cutting.
This is the part that will replace the rag joint and allow me to weld the splined end of the shaft to the new tubing.
No pic from the removal of the other joint. Pretty much just cut the ujoint out with a cut-off wheel. The little blue marks are the crimps on the yoke from the firewall. For some reason, the firewall side has two crimps and the steering box side has three.
use a dremel and sand off the crimps from the firewall yoke. Then assemble the modified firewall u-joint with the steering box yoke. and....
The finished product. It works perfect too.
And in action (although not yet hooked up to the new steering wheel)
Notes:
DO NOT grab the u-joint caps with pliers. They will dent and become useless.
The 1985 and earlier models have a wider yoke and use an internal snap ring to retain the u-joint cap instead of the crimp method. I have these parts sitting on the bench, but have yet to assemble them. I would bet that these parts work better for this because there is not cutting or griding, but the new joint would be larger in girth.
 May 14, 2009 | 05:20 AM
#46
Newbie Mod Recommendation thread
AxleIke came up with a great thread a couple of years ago with recommendations for Newbie to avoid some of the costly mistakes some of us have made of the years, read his thread and learn from it
mine was paying for gears 2x's in one year because i changed my mind about tire size, 33's and 4.88's, 6 month later went to 35's and 5.29's BIG Mistake!
and I am sure you all have read how TC can wheel the you know what out of IFS:
mine was paying for gears 2x's in one year because i changed my mind about tire size, 33's and 4.88's, 6 month later went to 35's and 5.29's BIG Mistake!
After seeing a great many threads on here, I've decided to pitch in a thread that will hopefully help some of you newer guys out when you first start modifying your trucks.
Hopefully it will help you keep from making the same mistakes I did.
First of all, this is a post to try to help guys who want to modify their truck?s off-road performance, not so much for street cool looks. Don't get me wrong, there is nothing wrong with looking good, but looking good doesn't equal trail capability.
So, you've bought a 4x4 and you?d like to get some more off-road performance out of it. Awesome. Probably, you are thinking about a lift, right? Please forget about it.
Here is a saying that has been around the net for quite a while: What is cool on the internet or on the street is seldom what is cool on the trail.
The order of importance for different modifications on your truck is as follows.
1. Drivetrain
2. Armor
3. Tires
4. Suspension
Yes, suspension is the least important part of a truck. Why? Because they all accomplish the same thing, which is moving your tires over the terrain. They will get you about as far down the trail as stock. Granted, an otherwise stock truck that has been solid axle swapped with good flex will go farther than a stock IFS truck, but not a ton.
Sooooo, what I?m getting at here is hardware. Hardware makes your truck go. If you are looking to spend some money on a truck, your first consideration should be lockers. Perhaps you can only afford one for the rear, that is fine, get it. Gears are usually recommended when installing lockers, but it isn?t mandatory. If you decide to gear lower in the future, it will cost you an extra 200 for installation that you won?t have to pay if you have them done first off. But that is personal choice. It really depends on what size tire you want to run.
Gears are the next important step, as lower gearing means slower going on the trail. This gives you better control, better torque, and saves clutches. It also involves less ?slamming? up stuff by having to give the truck a lot of skinny pedal. This involves usually two important parts of the vehicle. Differential gearing involves replacing your ring and pinion gears in the differential itself, and is usually a balance of your on road performance with bigger tires. Larger tires will slow a truck down considerably. Regearing the diffs will allow you to keep a more stock feel while running a larger tire. The second step is regearing and/or doubling the transfer case. This provides a much greater ability to crawl or go slow on the trail. For example, a stock drive train (stock transfer case with a reduction of 2.28:1, manual transmission with a 3.95:1 first gear ration, and stock diff gears of 4.1:1) has a crawl ratio of 37:1. With doubled cases and gearing, trucks can get down to 225:1. It is a big difference. Again, benefits are control and less damage by being able to keep the speed down.
Next is armor. Usually, it is recommended that this be done fairly quickly after lockers and gears are installed, as increasing the difficulty of the trails you can drive up will increase the likelihood of body damage. Sliders, bumpers, and underbelly skid plates are all highly recommended. Get what fits your budget, but remember, with all things, you get what you pay for.
Tires are the next thing to look to. There are many threads about brands, sizes, etc. You can choose what you like best. Really, it?s about traction here. What type of wheeling do you see the most? Mud, sand, rocks? I recommend getting the largest size you can get with none, or minor rubbing. Minor rubbing usually occurs on the pinch welds in the fender, and can be easily pounded flat to gain the necessary clearance to eliminate rubbing, and does not affect the cosmetic look of the truck. Tires are the only real way to get ground clearance under your differentials. Lift will leave the axles in the same place as they were. Tires will get your diffs over rocks. In addition, it is important to get a tire that is going to take some abuse. Again, I refer you to the search function on that, so you can make your own decision on brand and genre of tire, as I?m as biased as the rest when it comes to tire choice.
Lastly, look to the suspension.
Here is the deal. If you have put in gearing, lockers, armor, and good tires on a truck, you will be able to drive most of the trails in your area, especially if you?ve ponied up for two lockers. If you have IFS, a suspension lift will get you bigger tires if you really start working your fenders with a sawzall and hammer, and a body lift will get you tires without the need for fender modification, but you?ll still have the crappy flex, and the other issues associated with IFS. Believe it or not, but IFS, especially the early (86-95) IFS, works best stock. No lift, no nothing. In fact, early IFS usually starts to puke steering parts with any sort of lift that changes the steering angles.
In invite you to look up TC, who is a member here. He has a 2nd gen 4runner, and simply has two ARB lockers, and a bunch of armor. No lift, and he runs a 33x1050 tire on it. Minor pinch weld modification and he runs these tires with little or no rubbing. With this set up, he is able to tackle the most difficult trails Colorado has to offer. Check out some of his videos. Now, TC is an AMAZING driver, but even a novice would be able to tackle most trails with the same set up.
If this has all been a jumble of words to you, here are the take home points.
If all you are looking for is to be able to go out and wheel trails with confidence and get up harder obstacles, DO NOT look to your suspension to help you there. Look to the stuff you can?t see.
If you want to look cool driving around town, and aren?t really concerned about getting any farther up the trail than you did before, you just want to look cool while doing it, then look to a lift and monster tires.
Questions are appreciated, post if you have em. Good luck with your builds.
Last edited by dropzone; May 14, 2009 at 05:21 AM.
May 27, 2009 | 06:00 PM
#47
Heated Mirror Write Up
Found this write up in the 86+ folder...pretty dang good idea:
http://www.tacomaworld.com/forum/2nd...d-mirrors.html
http://www.tacomaworld.com/forum/2nd...d-mirrors.html
Jun 3, 2009 | 09:15 PM
#48
how to seal exo tubes running through body
not a ton of people run exo tubes through their body but saw this stuff on Pirate in this thread
and thought is was some great info to save:
and thought is was some great info to save:
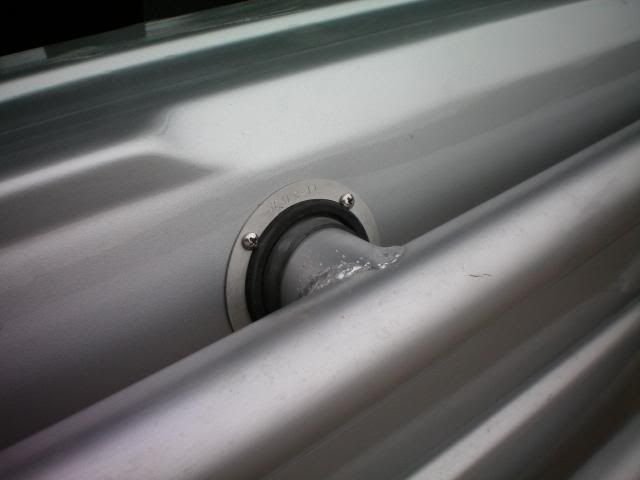
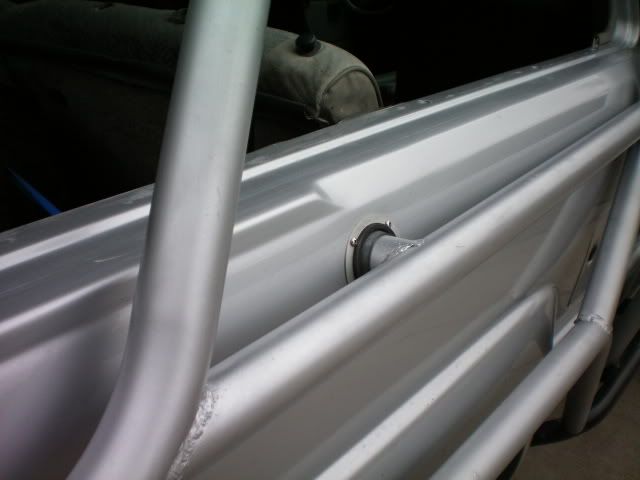
I found these seals at Earl's plumbing and used them to seal the tubes I ran from my exo through the side of the bed, and to the stock inner roll bar. I always wanted to do this but couldn't figure out a good way to seal it. These are the biggest ones they make and work perfect on 1 3/4 tubes. Thought someone else might be looking for something like this.
http://www.holley.com/types/Seals-It...et%20Seals.asp
http://www.holley.com/types/Seals-It...et%20Seals.asp
I have used these ones before and they worked nice, $15.00 a piece, cant remember the site for where i got them from, i'll see if i can find it again...

This place sells alot of different styles also,they have Split Grommets, like someone mentioned above for adding after a cage is already through the cab, but looks like the biggest of that style is 1". Gives you an idea though on how to make a set if you are that serious...
Split Grommets
Normal Grommets
EDIT: Didnt realize the two links i gave at the bottom are for the same pictured in the first post, carry on.
Jun 17, 2009 | 09:57 AM
#49
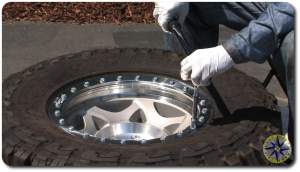
The hard core guy know all this but have you ever wonder how beadlocker wheels work or how you mount tires on them? Here is a how to video and write-up showing you how we did it... no fancy tire shop... just a little brute force.
mounting tires on beadlockers
mounting tires on beadlockers
Jun 21, 2009 | 12:58 AM
#50
How to Make your Weber work on a hill
Found this one on a Local 4Wheeler board linked from the Marlin Board:
http://board.marlincrawler.com/index...8356#msg588356
compliments of dropthattaco:
Ok, so I have a Weber 32/36 DGAV on my 81 4x4. The Weber works great on the 22r, and picked up a bit of pep and the driveability is loads better than stock. Even gets 18 MPG much to my surprise. Unfortunately, the Weber really does not like going up hills. Deciding this was unacceptable, I took it upon myself to remedy this situation. The problem is the location of the bowl vent. When the truck tilts back, the fuel spills into the air horn, making the truck stall. To fix this there are three things you need to do. First, make sure the float level is AT MOST spec height, preferrably 1-2mm lower. Second, install a fuel pressure regulator. I use this one:

and it's set to 2psi. NO MORE.
Third, you need to relocate the fuel bowl vent. This is the hardest part, and the one I'm going to focus on.
To relocate the bowl vent:
Remove the top of the carb.

You will notice a couple of rectangles that pass through the top. One of these is the the bowl vent. It is the one closest to the fuel inlet, furthest from the choke tower. You will need to plug it. I used JB Weld. Here:

And here it is after the JB weld:

Now you will need to make a vent to replace the one you plugged. Luckily there is a blanked port that isn't used on these carbs. Here's what you do.

Drill some holes in the port to allow the vapors out. You will be able to see your drill bit through the hole in the end. Then you will need to vent the vapor somewhere. The fitting in the end is 3/8" inside diameter, so I bought some copper tube from ACE hardware and hammered it in.

and from the top:

Then I routed it to the stock carb charcoal canister (under the battery) using 3/8" fuel hose.


And here's the finished product:

Runs up hills like a champ now. Good luck!!!
http://board.marlincrawler.com/index...8356#msg588356
compliments of dropthattaco:
Ok, so I have a Weber 32/36 DGAV on my 81 4x4. The Weber works great on the 22r, and picked up a bit of pep and the driveability is loads better than stock. Even gets 18 MPG much to my surprise. Unfortunately, the Weber really does not like going up hills. Deciding this was unacceptable, I took it upon myself to remedy this situation. The problem is the location of the bowl vent. When the truck tilts back, the fuel spills into the air horn, making the truck stall. To fix this there are three things you need to do. First, make sure the float level is AT MOST spec height, preferrably 1-2mm lower. Second, install a fuel pressure regulator. I use this one:
and it's set to 2psi. NO MORE.
Third, you need to relocate the fuel bowl vent. This is the hardest part, and the one I'm going to focus on.
To relocate the bowl vent:
Remove the top of the carb.
You will notice a couple of rectangles that pass through the top. One of these is the the bowl vent. It is the one closest to the fuel inlet, furthest from the choke tower. You will need to plug it. I used JB Weld. Here:
And here it is after the JB weld:
Now you will need to make a vent to replace the one you plugged. Luckily there is a blanked port that isn't used on these carbs. Here's what you do.
Drill some holes in the port to allow the vapors out. You will be able to see your drill bit through the hole in the end. Then you will need to vent the vapor somewhere. The fitting in the end is 3/8" inside diameter, so I bought some copper tube from ACE hardware and hammered it in.
and from the top:
Then I routed it to the stock carb charcoal canister (under the battery) using 3/8" fuel hose.
And here's the finished product:
Runs up hills like a champ now. Good luck!!!
Jun 21, 2009 | 05:29 AM
#51
IFS Frame Dimensions
IFS Frame Dimensions Link: http://www.pirate4x4.com/forum/showthread.php?t=599542
Jul 10, 2009 | 08:42 AM
#52
Extending Rear E-Brake cable when installing IFS Rear End
when installing an IFS rear end in a 79-85 truck your E-Brake cable will be short on each side. SUre you can do some trick stuff like a T-C brake, but this is pretty dang simple:
from Erik's page on 4x4wire:

from Erik's page on 4x4wire:
Jul 11, 2009 | 05:13 PM
#53
Dual Purpose Dolley or Jackstand/Tires
Borrowing this idea from Brian aka Waskillywabbit--very cool cheap trick:
I saw some like these on Spike TV, on "Trucks" maybe, a couple weeks ago and I had been meaning to make some anyway.
2x2x1/8 angle (8) pieces at 17" long
1.75" x 0.120 wall HREW tubing (8) pieces at 13" long
5x1.25 wheel casters with steel frames and hard rubber wheels, (16) @ 3.99 each at HF, they roll great on the concrete and the steel frame allowed me to weld them on easily and solidly
I got about $100 in them maybe.
Took me a couple hours to make (4) of these dollies
The base model, 1100 lb capacity per dolly, so I can move around 4400 lbs safely, easily anything I need to at the shop.

With the 12 ton jack stand (I got these for their height, not for the weight). I can use these to move around a frame, tube chassis, axle, whatver.

With a 39.5" Irok

A very worth while additional to any shop and a heckovalot cheaper than buying some dollies.
I am going to paint them tomorrow a nice flourescent orange so they don't "bite" me on the shop floor.

2x2x1/8 angle (8) pieces at 17" long
1.75" x 0.120 wall HREW tubing (8) pieces at 13" long
5x1.25 wheel casters with steel frames and hard rubber wheels, (16) @ 3.99 each at HF, they roll great on the concrete and the steel frame allowed me to weld them on easily and solidly
I got about $100 in them maybe.
Took me a couple hours to make (4) of these dollies
The base model, 1100 lb capacity per dolly, so I can move around 4400 lbs safely, easily anything I need to at the shop.
With the 12 ton jack stand (I got these for their height, not for the weight). I can use these to move around a frame, tube chassis, axle, whatver.
With a 39.5" Irok
A very worth while additional to any shop and a heckovalot cheaper than buying some dollies.
I am going to paint them tomorrow a nice flourescent orange so they don't "bite" me on the shop floor.
Jul 17, 2009 | 12:58 AM
#54
Convert LSPV to Manual proportioning Valve
this is some awesome tech from this thread: http://pirate4x4.com/forum/showthread.php?t=804330

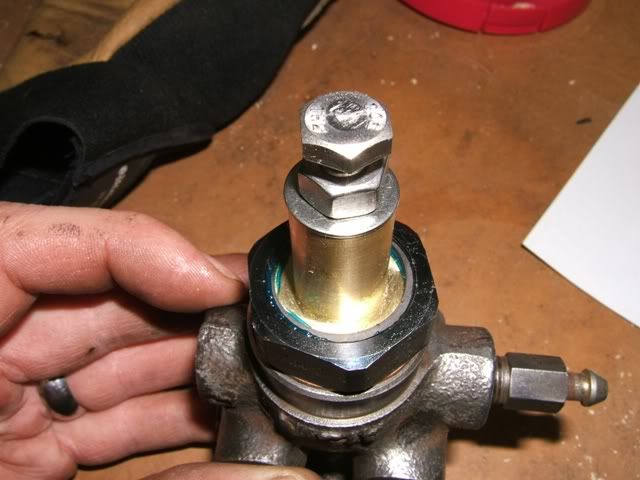
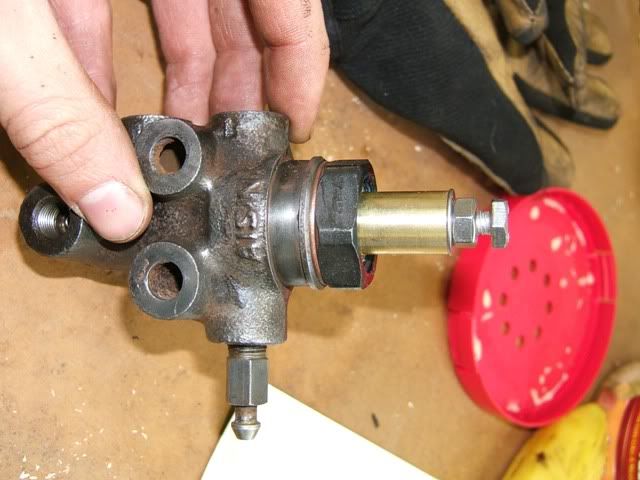
so, everyone is all about replacing their lspv with a new proportioning valve and new brake lines...or wire tying up the arm for the lspv...etc. well, if your brake lines are in nice shape, and your lspv is working properly, you can easily turn it into an adjustable proportioning valve and leave your brake lines intact. i had my lspv off, but it's not necessary to remove it.
i don't have the exact measurements, because i made it on the fly on my cnc mill (lathe wasn't hooked up yet), but if you aren't a moron, you could remake it on a lathe, or drill press out of just about any material you wanted.
the black plastic part in the one pic is the original piece held in by the c-clip that the arm goes into. the brass piece is what i replaced it with. it is tapped for a 1/4-20 bolt. voila.
Jul 29, 2009 | 10:08 PM
#55
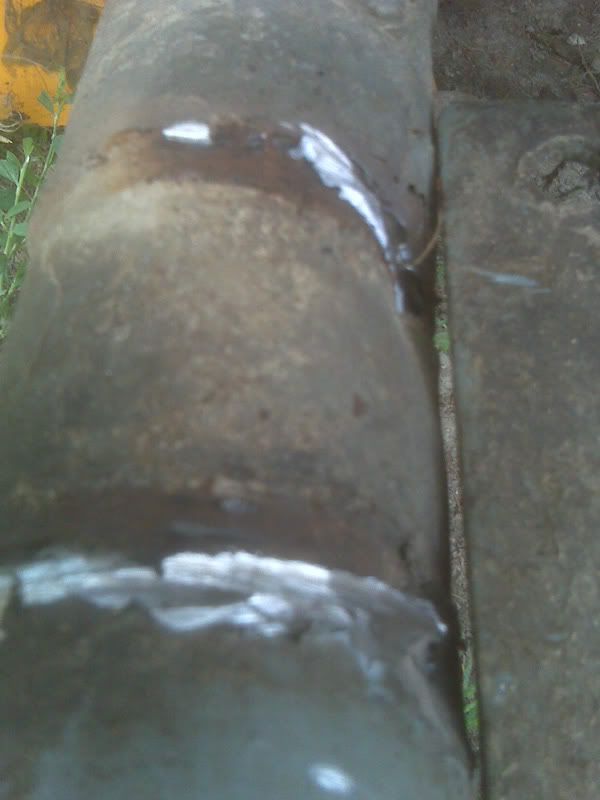
Preventing Crushed Axle tubes
How to help prevent Crushed axle tubes-( from this spring perch/axlw tube thread on Pirate )
-sometimes axle tubes are crushed due to wheel hop of larger tires, overtorquing of the u-bolts:
the Symptoms:
A Cure:
always remember to stitch weld when working on axle tubes to prevent warping
-sometimes axle tubes are crushed due to wheel hop of larger tires, overtorquing of the u-bolts:
the Symptoms:
I noticed my pinion angle decreasing over time, past being inline with hte driveshaft, to where the agle was a few degrees negative.
But when I set out to grind out the welds on my perches i noticed thatthe tube had been crushed by the perches.
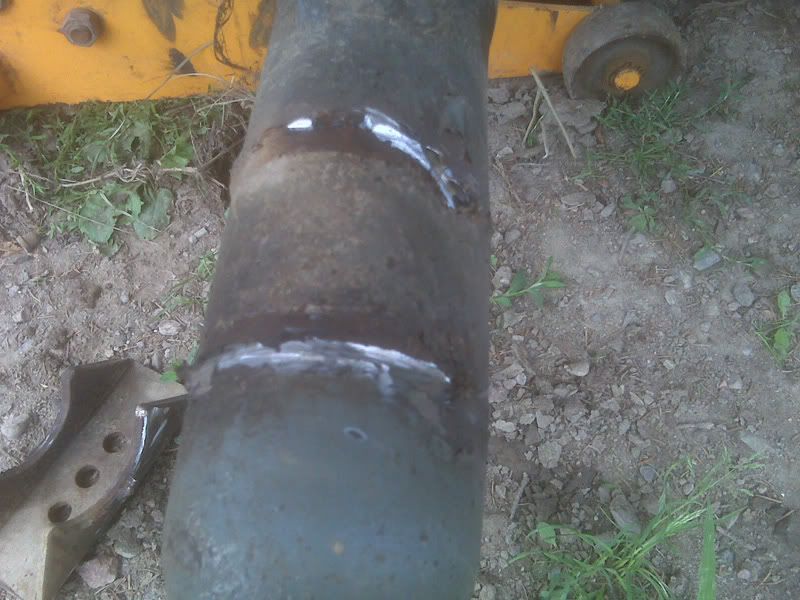
thats a 1/4" gap under the straight edge.
But when I set out to grind out the welds on my perches i noticed thatthe tube had been crushed by the perches.
thats a 1/4" gap under the straight edge.
always remember to stitch weld when working on axle tubes to prevent warping

 Aug 14, 2009 | 08:55 AM
#56
Toyota Gear/Differential set Up links
Zuk, a member on this board and several others, is pretty much a master at setting up Toyota Third members.
His website: http://gearinstalls.com/ has several great write ups on setting up diffs
Tools needed to set up a Differential:
http://gearinstalls.com/gearinstalltools.htm
Breaking in Differentials: http://performanceunlimited.com/docu...arbreakin.html
Definitions of DIffential terms, pattern examples:
http://www.differentials.com/install.html
Definitions:
Ring & Pinion gears
The driveshaft is connected to and drives the pinion gear, which in-turn drives the ring gear at a reduced rate and at a 90 degree angle from the driveshaft. The ring gear is basically connected to the wheels.
Backlash
This is the term used to describe the "clearance" between the ring & pinion gears and is usually measured in thousandths-of-an-inch by a dial indicator. Example .008-.012"
Drive / Coast
The drive side of the ring gear is the side of the tooth that is contacted when the vehicle is accelerating / The coast side is the side of the tooth on the ring gear that is contacted when the vehicle is decelerating (during engine-braking).
Pattern
This refers to the tooth contact area of the gearset; In other words, Where the Ring gear and the Pinion gear "Rub" together.
Preload
The Pinion bearings and Carrier bearings run a little tight, similar to the way a wheel bearing should be "loaded". The tapered bearings are adjusted to eliminate any play and then they are set a little tighter, making them a little "hard to turn". This is measured by checking the torque required to turn the bearings with a dial torque wrench. Example 15 to 25 in.lbs.
Pinion Depth
This is set with "pinion shims" and controls how the pinion contacts the ring gear in relation to the axle center.
Crush Sleeve
A piece of "pipe" that is used to hold the pinion bearings apart and offer some resistance for the pinion nut. The pinion nut must be tightened down, crushing the crush sleeve, until proper pinion preload adjustment is achieved.
http://home.4x4wire.com/erik/diffs/
**links pulled from Zuk's site and google.
Sep 9, 2009 | 08:32 AM
#57
22RE ECU diagrams
not getting fuel
https://www.yotatech.com/forums/f115.../#post51224581
https://www.yotatech.com/forums/f115.../#post51224581
I thought I had!!! I learned so much and thought I had it all figured out. Now I'm left with...no injector pulse. I'm getting spark, it turns over at about 600-700 rpm, I've looked through all of my fuses, ohmed out and volted out everything possible, double checked all of my wiring, and banged my face against the grill. I have the IGT lead from the ECU going straight into the starter to bypass the NSS. My main relay clicks and all of that. The only thing that I haven't done is hook a 12v LED to my injector harness but my exhaust manifold is bone dry bone dry (piping isn't hooked up) so it's clearly not getting fuel.
It is an '84 4runner if that helps. I don't see a check engine light or trouble code. If you can think of something obvious the please for God's sake let me know. If you live in central ohio, you're really nice, and would be willing to lend me some time or want some money, please email me. I need help or I'm going to roll this thing out of my garage into my driveway and just set the thing on fire. I just want to hear this thing run so I can order my suspension and brakes. Please please help! Thank you ahead of time for solving all of my problems.
It is an '84 4runner if that helps. I don't see a check engine light or trouble code. If you can think of something obvious the please for God's sake let me know. If you live in central ohio, you're really nice, and would be willing to lend me some time or want some money, please email me. I need help or I'm going to roll this thing out of my garage into my driveway and just set the thing on fire. I just want to hear this thing run so I can order my suspension and brakes. Please please help! Thank you ahead of time for solving all of my problems.
Check the injector wire splices:
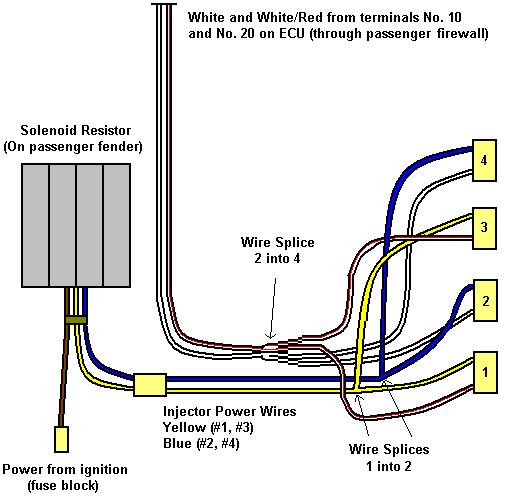
Not uncommon for problems to show up there:
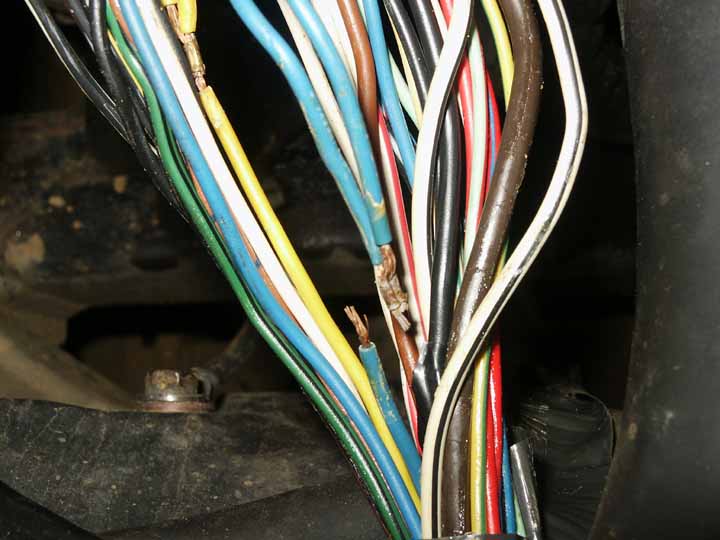

Some threads on this problem with more information:
- http://www.4x4wire.com/forums/showfl...rue#Post850091
- http://www.4x4wire.com/forums/showfl...=&fpart=1&vc=1
Not uncommon for problems to show up there:
Some threads on this problem with more information:
- http://www.4x4wire.com/forums/showfl...rue#Post850091
- http://www.4x4wire.com/forums/showfl...=&fpart=1&vc=1
Last edited by dropzone; Sep 9, 2009 at 08:34 AM.
Sep 22, 2009 | 07:21 AM
#58
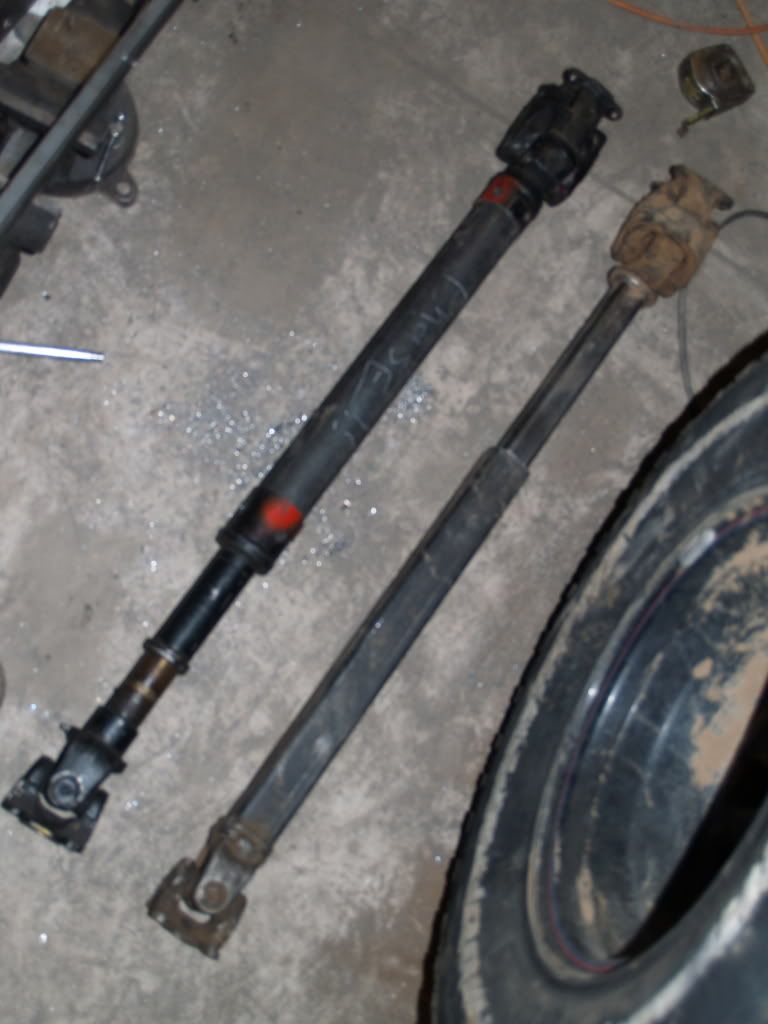
Driveshaft Tech
Note: Will be adding other stuff soon
**from: http://www.pirate4x4.com/forum/showthread.php?t=772346
**This would probably be great on a trail rig...if you DD your rig a lot, consider getting DS work done professionally
**from: http://www.pirate4x4.com/forum/showthread.php?t=772346
**This would probably be great on a trail rig...if you DD your rig a lot, consider getting DS work done professionally
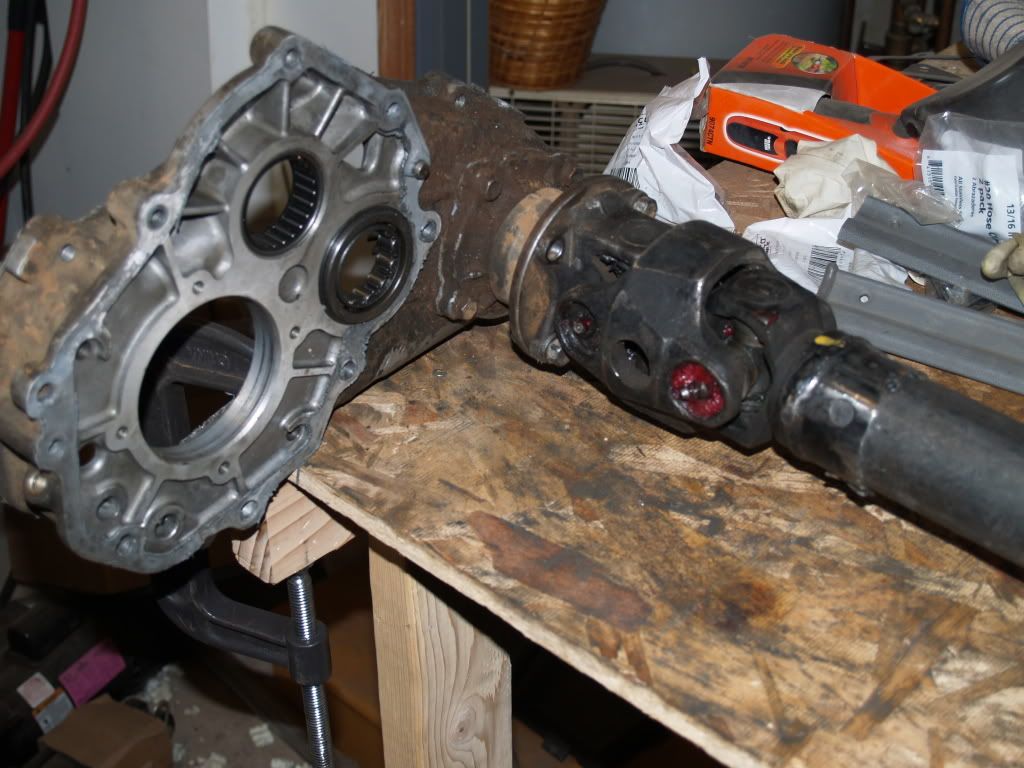
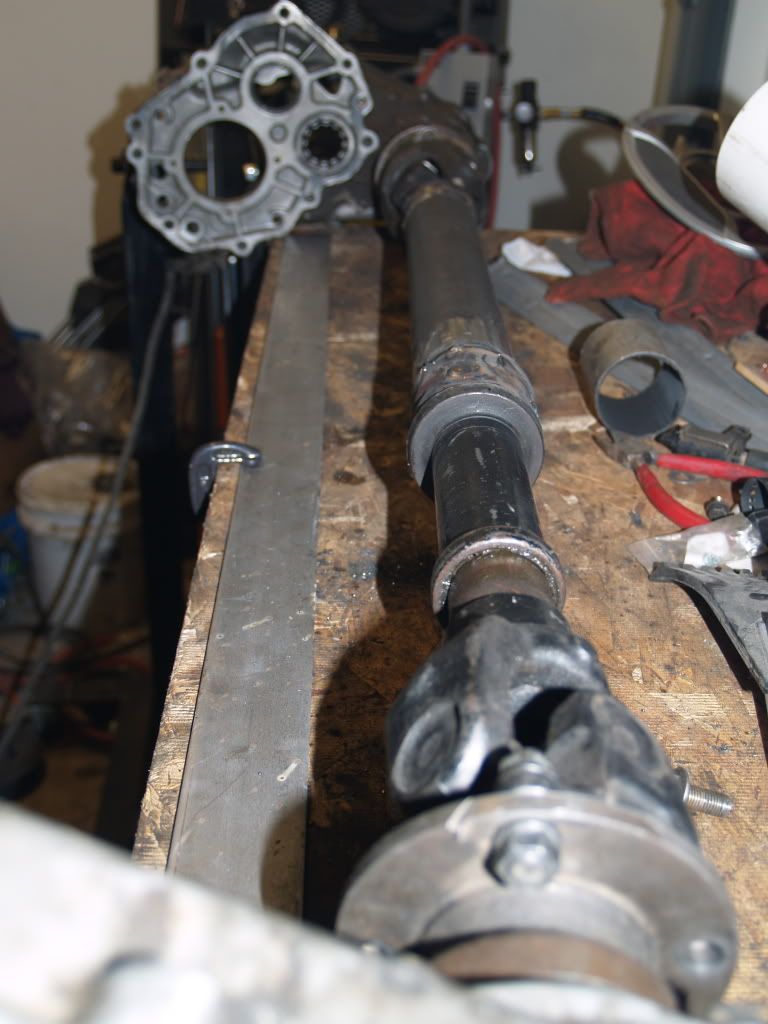
Well there used to be a post on here about making a 2 1/2 inch Sch. 40 driveline that is now gone.:shaking: Well here is my take on it.
First I cut the stock tube on the d-line in half and drill 4 holes on each end of the remaining tube to plug weld. Also, I used my front square shaft to find the length of the driveline at ride hight, made life easy.
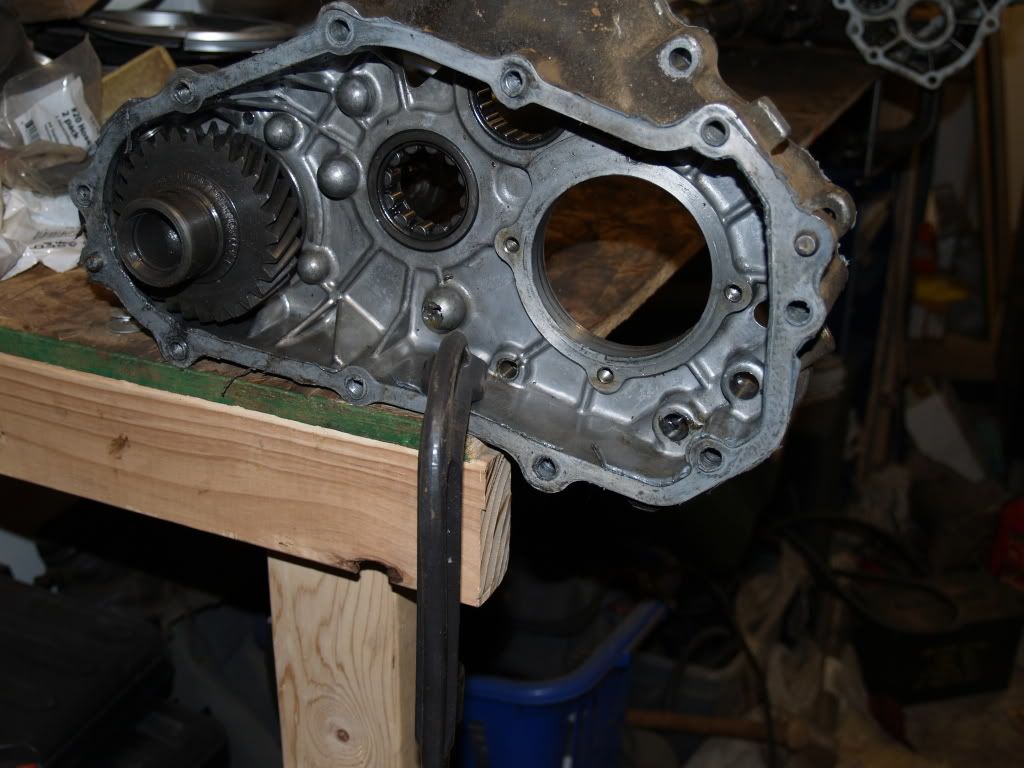
Then I found some t-case parts that I had sitting around to start making a jig. Both pieces are the part of the case the holds the forward drop drive flange, if that makes sense.
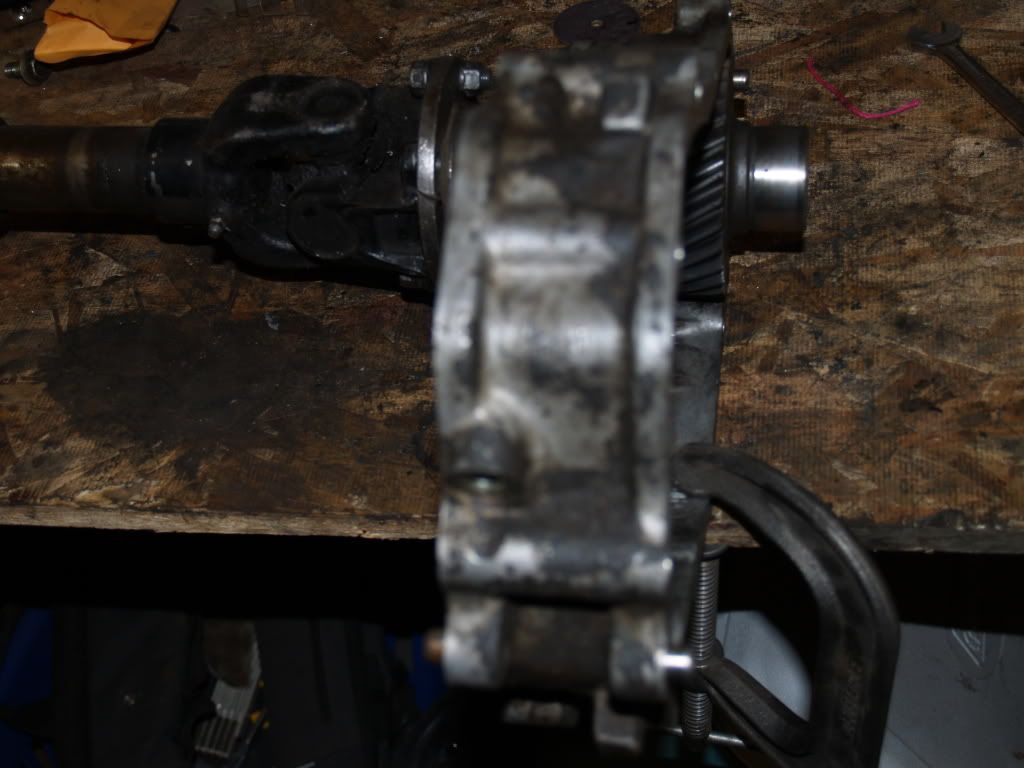
Bolted up the two halves of the d-line and compressed the yoke as down as far as possible.

Then I used c-clamps to clamp them to my very messy work bench
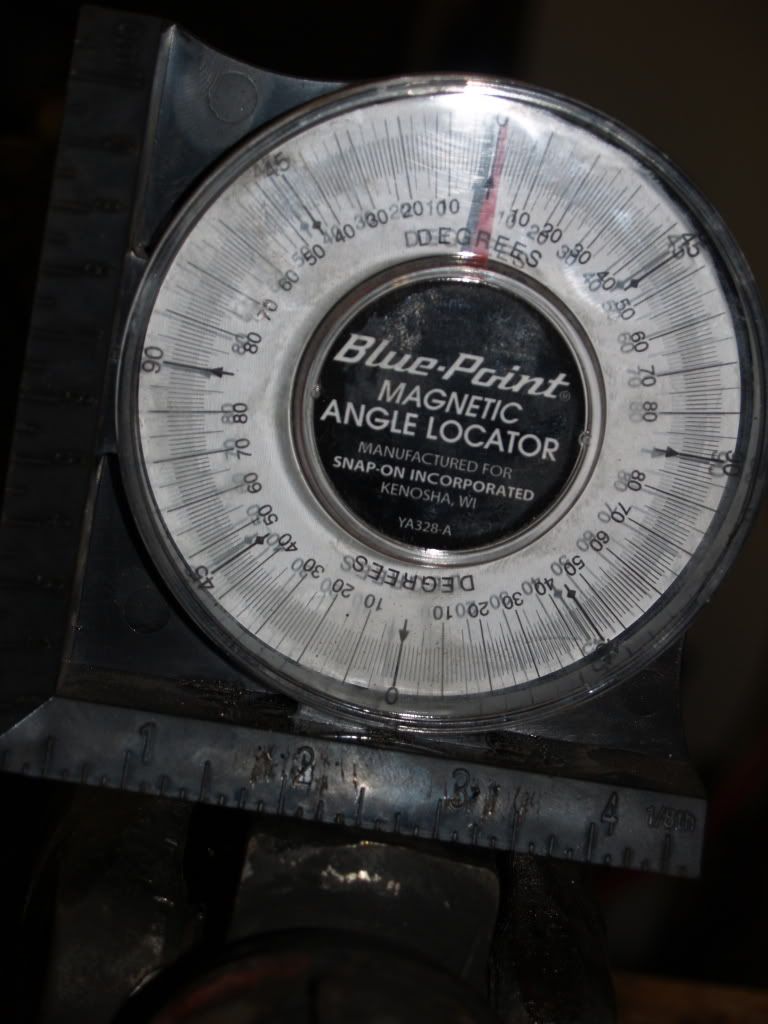
Made sure that the ears were in phase by putting an angle finder on the flat spot of each u-joint and made my first tack
Then I clamped some flat strap down to use my magnetic dial gauge... then started tacking turning and beating on the driveline to minimize the run out
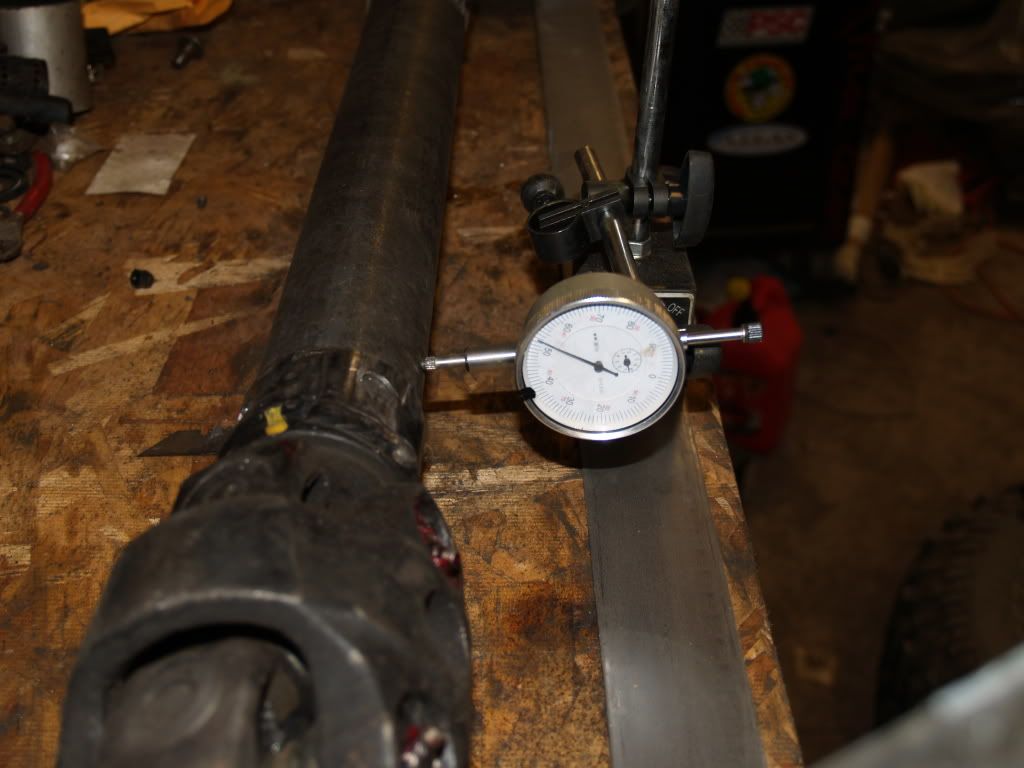
Finish product was able to get it under .010 in for the run out... of course the first rock I smack will probably undo all that.:flipoff2:
Anyway maybe this will help someone.
First I cut the stock tube on the d-line in half and drill 4 holes on each end of the remaining tube to plug weld. Also, I used my front square shaft to find the length of the driveline at ride hight, made life easy.
Then I found some t-case parts that I had sitting around to start making a jig. Both pieces are the part of the case the holds the forward drop drive flange, if that makes sense.
Bolted up the two halves of the d-line and compressed the yoke as down as far as possible.
Then I used c-clamps to clamp them to my very messy work bench
Made sure that the ears were in phase by putting an angle finder on the flat spot of each u-joint and made my first tack
Then I clamped some flat strap down to use my magnetic dial gauge... then started tacking turning and beating on the driveline to minimize the run out
Finish product was able to get it under .010 in for the run out... of course the first rock I smack will probably undo all that.:flipoff2:
Anyway maybe this will help someone.
Last edited by dropzone; Sep 22, 2009 at 07:22 AM.
Sep 25, 2009 | 05:55 PM
#59
Alignment after High Steer
from this thread: https://www.yotatech.com/forums/f116...stions-192496/
Looks like it'll work.
Here is how I do mine:
- http://www.4crawler.com/4x4/CheapTri...html#Alignment
Here is how I do mine:
- http://www.4crawler.com/4x4/CheapTri...html#Alignment
Place the steering wheel so that it is in the center of it's movement left to right. Bolt on the pitman arm using the stock nut and washer. Connect the left side of the steering Drag Link to the the front most hole in the right side steering arm. Tie rod ends should have approximately 3 three exposed threads. Do not expose more than 1/2 of the tie rod end threads as this can cause an unsafe driving condition.
With the truck on the ground, set the tow-in of the front tires at 1/8". This is done by turning the Tie Rod with the jam nuts loose. Measure the widest part of the tire at the front and rear of the tire. Adjust the Tie Rod until the front is 1/8" narrower than the rear.
Once completed turn the steering wheel all the way left and right. Verify that the wheels turn the same amount left and right. If not, adjust the length of the drag link or adjust the position of the pitman arm.
Tighten the pitman nut to 130 ft/lbs. Tighten the jam nuts on the Tie Rod and Drag Link using an adjustable wrench.
Oct 11, 2009 | 09:47 PM
#60
Head Gasket Issues
**More to follow :
:
Indications you might have a head gasket leak:
https://www.yotatech.com/forums/f116...t-leak-193718/
:Indications you might have a head gasket leak:
https://www.yotatech.com/forums/f116...t-leak-193718/


