
De-Smogging an early 22R
 Feb 25, 2013 | 09:06 PM
#242
Thread Starter
Registered User
Joined: Jan 2010
Posts: 447
Likes: 0
From: Sonora, CA (Central Sierra)
Not a clue, it depends on the shop and local regulations. I suggest paying for a precheck first, most smog shops used to roll the cost of the precheck into the smog fee if you passed the precheck.
Feb 26, 2013 | 05:12 AM
#243
From what I can gather, the HAC goes to two vacuum ports on the carb (I believe it is the two ports closest to the radiator on the carb - they should be directly adjacent to each other and angled back towards the passenger side of the truck) and other goes to a T-fitting going from the VCV to the distributor vacuum advance (T-ed in between the check valve and the distributor). But like pumkin said, the HAC is not a smog requirement - you're best off leaving it out (unless you're getting smog tested at an extremely high altitude) when you go for your smog test. Plus, you need to do some research to determine if you even need the HAC. Look into what elevations you will be driving in and see at what elevations there is an effect on air fuel ratios and combustion for the 22R. You may find out that you don't even need it after all
Mar 8, 2013 | 06:21 PM
#244

Registered User
Joined: Mar 2013
Posts: 4
Likes: 0
From: Oregon
OK, finally done working, eating my dinner, and about to pour my scotch... I'm ready to post.
Here are some PAIR/Reed valve pics, with important bits noted (thanks Peow130!).
Here is the front mounting bolt for the PAIR valve:

And here is the rear mounting bolt. Also in this pic, circled in green, is where the PAIR valve attaches to the Air Injection manifold.
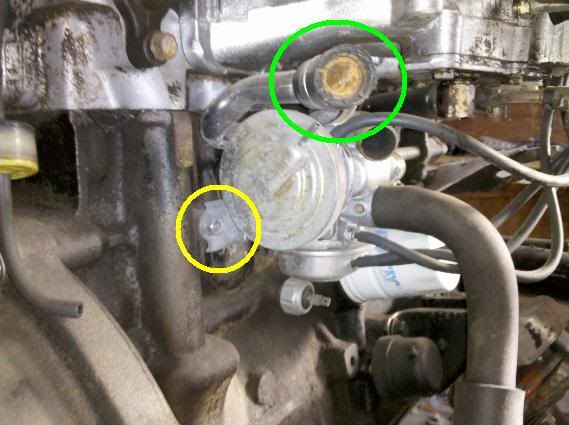
And here is a pic of the back of the block / back of the pair valve / back of the EGR. In this pic, red is the EGR valve mounted to the head, yellow is the PAIR valve itself, and green is where the PAIR valve attaches to the Air Injection manifold.

Here are some PAIR/Reed valve pics, with important bits noted (thanks Peow130!).
Here is the front mounting bolt for the PAIR valve:
And here is the rear mounting bolt. Also in this pic, circled in green, is where the PAIR valve attaches to the Air Injection manifold.
And here is a pic of the back of the block / back of the pair valve / back of the EGR. In this pic, red is the EGR valve mounted to the head, yellow is the PAIR valve itself, and green is where the PAIR valve attaches to the Air Injection manifold.
Mar 8, 2013 | 07:41 PM
#245

Registered User
Joined: Dec 2012
Posts: 100
Likes: 0
I am pretty much an expert in this now (I passed CA Smog W/ out the HAC, BTW) so what do you want to know?
Mar 8, 2013 | 08:23 PM
#246
Thread Starter
Registered User
Joined: Jan 2010
Posts: 447
Likes: 0
From: Sonora, CA (Central Sierra)
The long and the short is: pull it all off. Cap the EGR and PAIR (exhaust manifold) parts. Remove every vacuum line. Re-add the vacuum advance per the earlier instructions. Re-time it. Drive it like you stole it.
Mar 8, 2013 | 08:25 PM
#247
Thread Starter
Registered User
Joined: Jan 2010
Posts: 447
Likes: 0
From: Sonora, CA (Central Sierra)
Mar 8, 2013 | 09:36 PM
#248
Registered User
Joined: Dec 2012
Posts: 100
Likes: 0
Well, there are some other systems in the carburetor that need to be hooked up. Like the high idle stop (if you have an automatic transmission). There are some richener circuits, too, but depending on your altitude you might get away without them. (Secondary power valve) things like that.
The mechanic kept saying how good the engine ran, and how good I tuned it XD
FYI, they're doing this thing now where they pressurize the fuel tank with nitrogen and test for leaks. It's absolutely insane, because the tank is vented to the charcoal canister. Under what conditions is it fully pressurized with six PSI? None!
The insanity of this state is mind boggling.
Mar 8, 2013 | 09:48 PM
#249
Registered User
Joined: Mar 2013
Posts: 4
Likes: 0
From: Oregon
Thanks so much! I ripped out the smog pump and the eacv. And the pipe to the exhaust. Now just need to tap the exhaust and block it. Already installed the LCE egr block kit. Any way you can put up a pic of the only vacuum lines that need to be attached?
Mar 9, 2013 | 03:20 AM
#250
Thread Starter
Registered User
Joined: Jan 2010
Posts: 447
Likes: 0
From: Sonora, CA (Central Sierra)
There are pics and instructions earlier in the thread, as well as a federal vacuum diagram (posted by thetundrawolf) that is pretty straightforward. The only vacuum you need is to the distributor vacuum advance. You will need a lot of 1/8" vacuum caps for everything else. You will also need to retime your motor after this process. Good luck!
Mar 25, 2013 | 10:53 AM
#251

Registered User
Joined: Mar 2013
Posts: 47
Likes: 0
Wow great write up. I took my clogged up smog setup off and it seems to run so much better. Thank you so much. I made my own block off plates also. Now I just gotta finish removing more vac lines and she will be even better. It's amzing how much cleaner the engine bay looks without all the pump crap. Thanks again
Apr 13, 2013 | 04:23 PM
#252

Registered User
Joined: Dec 2011
Posts: 250
Likes: 3
I have a 1989 2wd pickup that came from california. I bought it out west and drove it back to my home state of Maine. I removed the outrageous "smog pump" that leeched off the main engine pulley a few months back. I'm interested in doing a full de-smog but after just browsing through this whole thread, I'm not sure if there are clear enough directions here. It's very scattered and not direct. I saw mention of someone doing a detailed concise write up on it. Anything like that exist?
Apr 13, 2013 | 04:41 PM
#253
Thread Starter
Registered User
Joined: Jan 2010
Posts: 447
Likes: 0
From: Sonora, CA (Central Sierra)
Here's the thing: if you have basic knowledge of the systems involved, you can do this. If you want perfect, step by step instructions for your model and year, you won't find them. Your truck, being an EFI 22RE, will be different than the one described on this thread, which goes heavily into a carbed vehicle.
On yours, the process will be different. Not having done one, I am not sure how different. On a carbed motor, you basically remove and cap everything but the vacuum advance, run a set of switched power wires to the fuel shutoff solenoid, retune the motor, and that's it. You don't need the computer anymore, and there are only 2 vacuum hoses (to the distributor) in the entire engine bay.
I don't know the RE motors well, but I suspect it won't be that simple. It can be done. Try calling LC Engineering for more specifics if you like, they probably know that motor better than anyone who doesn't work at Toyota. You will have to read a lot more forums like this one, and learn how the systems work, and learn what you can take off. Photo document and label every part you remove, so you can reinstall it if needed. If you don't like this forum, you can use those pics to create your own.
Apr 13, 2013 | 05:06 PM
#254
Registered User
Joined: Dec 2011
Posts: 250
Likes: 3
Here's the thing: if you have basic knowledge of the systems involved, you can do this. If you want perfect, step by step instructions for your model and year, you won't find them. Your truck, being an EFI 22RE, will be different than the one described on this thread, which goes heavily into a carbed vehicle.
On yours, the process will be different. Not having done one, I am not sure how different. On a carbed motor, you basically remove and cap everything but the vacuum advance, run a set of switched power wires to the fuel shutoff solenoid, retune the motor, and that's it. You don't need the computer anymore, and there are only 2 vacuum hoses (to the distributor) in the entire engine bay.
I don't know the RE motors well, but I suspect it won't be that simple. It can be done. Try calling LC Engineering for more specifics if you like, they probably know that motor better than anyone who doesn't work at Toyota. You will have to read a lot more forums like this one, and learn how the systems work, and learn what you can take off. Photo document and label every part you remove, so you can reinstall it if needed. If you don't like this forum, you can use those pics to create your own.
On yours, the process will be different. Not having done one, I am not sure how different. On a carbed motor, you basically remove and cap everything but the vacuum advance, run a set of switched power wires to the fuel shutoff solenoid, retune the motor, and that's it. You don't need the computer anymore, and there are only 2 vacuum hoses (to the distributor) in the entire engine bay.
I don't know the RE motors well, but I suspect it won't be that simple. It can be done. Try calling LC Engineering for more specifics if you like, they probably know that motor better than anyone who doesn't work at Toyota. You will have to read a lot more forums like this one, and learn how the systems work, and learn what you can take off. Photo document and label every part you remove, so you can reinstall it if needed. If you don't like this forum, you can use those pics to create your own.
Thank you for the quick reply. I just realized that I had started reading the thread on page 3. I went back to page 1 and it all makes much more sense now.
I actually do have a 22r. Probably one of the last years the 22r was used in the pickup. First year of the 90s body style. It's a totally stock 2wd that is bare bones. Doesn't even have power steering.
Apr 13, 2013 | 05:34 PM
#255
Thread Starter
Registered User
Joined: Jan 2010
Posts: 447
Likes: 0
From: Sonora, CA (Central Sierra)
No prob, glad you found more info. The best piece of advice I can give you is buy a Weber 32/36. It will make life SO much easier. Delete everything else, add the vacuum lines to the distributor, retime it, and you'll be good to go. The hardest part is getting over the fear of doing it. The 22r is really a simple motor, it doesn't need all that junk to run well.
Feel free to post questions if you get stopped somewhere. Also, I probably need to update the LCE links, their website is here:
http://www.lceperformance.com
All you should need is about 10 feet of vacuum line, and the below:
An EGR block plate
http://www.lceperformance.com/EGR-Bl...-p/1016038.htm
PAIR port block plates
http://www.lceperformance.com/mobile/default.aspx#P3058
O2 sensor block plate:
http://www.lceperformance.com/mobile/default.aspx#P999
Apr 13, 2013 | 05:56 PM
#256
Registered User
Joined: Dec 2011
Posts: 250
Likes: 3
No prob, glad you found more info. The best piece of advice I can give you is buy a Weber 32/36. It will make life SO much easier. Delete everything else, add the vacuum lines to the distributor, retime it, and you'll be good to go. The hardest part is getting over the fear of doing it. The 22r is really a simple motor, it doesn't need all that junk to run well.
Feel free to post questions if you get stopped somewhere. Also, I probably need to update the LCE links, their website is here:
http://www.lceperformance.com
All you should need is about 10 feet of vacuum line, and the below:
An EGR block plate
http://www.lceperformance.com/EGR-Bl...-p/1016038.htm
PAIR port block plates
http://www.lceperformance.com/mobile/default.aspx#P3058
O2 sensor block plate:
http://www.lceperformance.com/mobile/default.aspx#P999
Feel free to post questions if you get stopped somewhere. Also, I probably need to update the LCE links, their website is here:
http://www.lceperformance.com
All you should need is about 10 feet of vacuum line, and the below:
An EGR block plate
http://www.lceperformance.com/EGR-Bl...-p/1016038.htm
PAIR port block plates
http://www.lceperformance.com/mobile/default.aspx#P3058
O2 sensor block plate:
http://www.lceperformance.com/mobile/default.aspx#P999
My largest concern in all of this is retaining gas mileage. My normal is 26.5 mpg. Sometimes 27 or 28 as well. Truck has almost 200 K miles and I know I have a vacuum leak somewhere.
Apr 13, 2013 | 06:11 PM
#257
Thread Starter
Registered User
Joined: Jan 2010
Posts: 447
Likes: 0
From: Sonora, CA (Central Sierra)
A weber will make it easier for two reasons. First, the Aisin is a great carb, but it is 30 years old, and built for the smog package that comes with the truck. You can use 1/8 vacuum caps to cover all the ports in the carb, but for some reason those vacuum caps seem to rot and fail within weeks or months. The second reason is that the weber is simple, cheap, and works REALLY well. Parts and rebuild kits are everywhere for it when you need them, and are reasonably priced.
Apr 13, 2013 | 07:14 PM
#258
Registered User
Joined: Dec 2011
Posts: 250
Likes: 3
A weber will make it easier for two reasons. First, the Aisin is a great carb, but it is 30 years old, and built for the smog package that comes with the truck. You can use 1/8 vacuum caps to cover all the ports in the carb, but for some reason those vacuum caps seem to rot and fail within weeks or months. The second reason is that the weber is simple, cheap, and works REALLY well. Parts and rebuild kits are everywhere for it when you need them, and are reasonably priced.
Last edited by irv; Apr 13, 2013 at 07:21 PM.


