
De-Smogging an early 22R
 Mar 2, 2010 | 06:01 PM
#21
Registered User

Joined: Jan 2010
Posts: 261
Likes: 35
From: Sedalia MO
Cool. I just did this last week to my 81. I made my own EGR block off plates. The only vaccum lines I'm running are to the vaccum advance, and the power brakes. It sure runs better. I'll keep watching this to see if I need to do anything else. Dean
Mar 2, 2010 | 09:14 PM
#23
Thread Starter
Registered User
Joined: Jan 2010
Posts: 447
Likes: 0
From: Sonora, CA (Central Sierra)
OK, finally done working, eating my dinner, and about to pour my scotch... I'm ready to post.
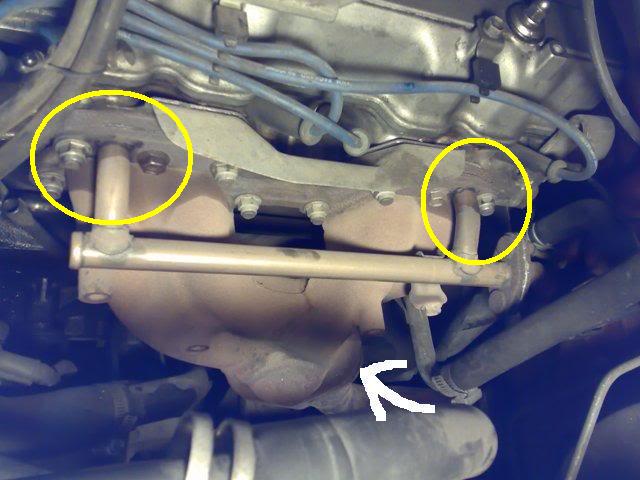
Here are some PAIR/Reed valve pics, with important bits noted (thanks Peow130!).
Here is the front mounting bolt for the PAIR valve:
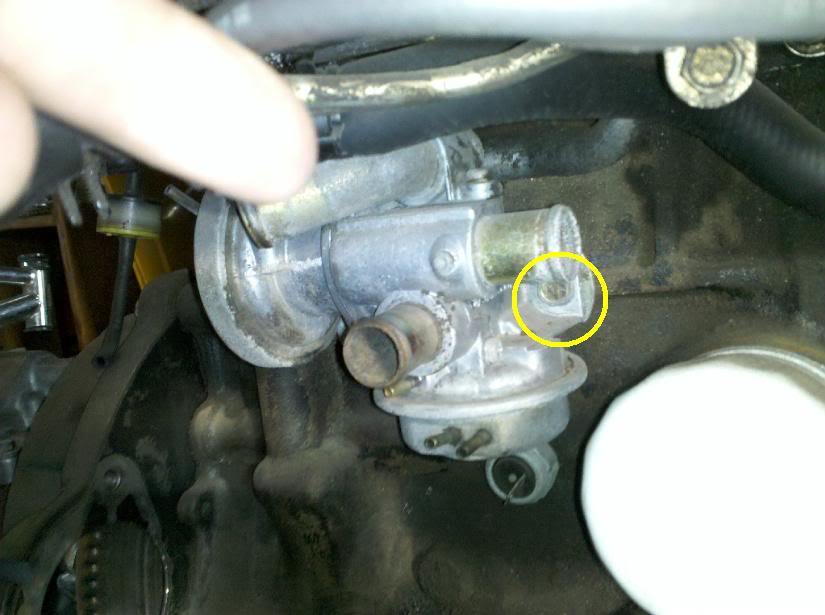
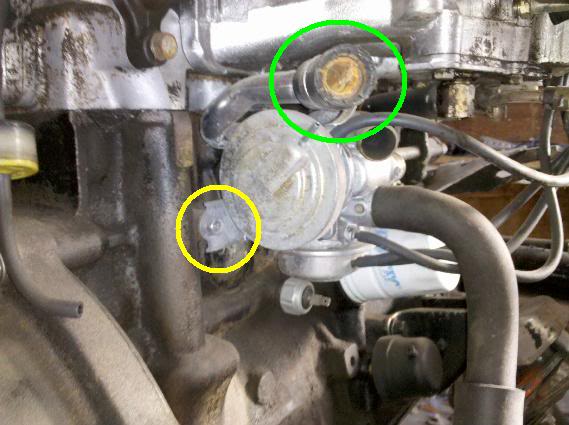
And here is the rear mounting bolt. Also in this pic, circled in green, is where the PAIR valve attaches to the Air Injection manifold.
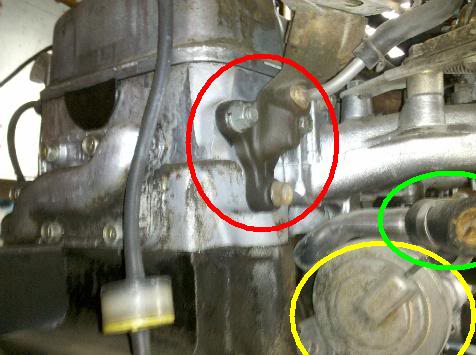
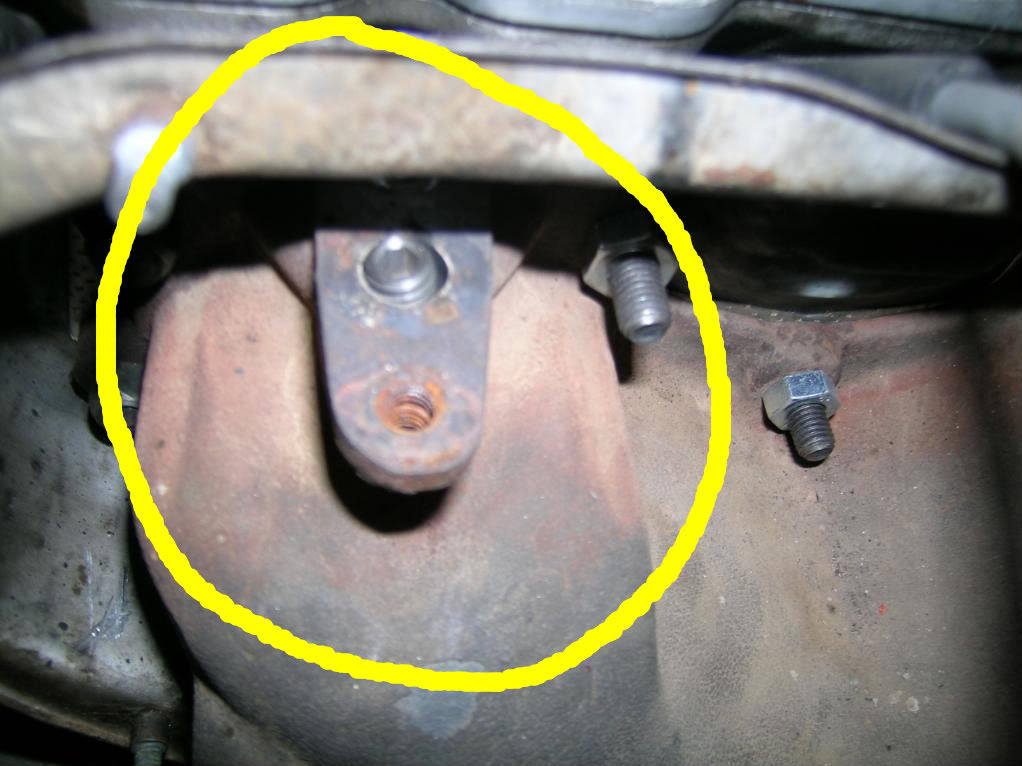
And here is a pic of the back of the block / back of the pair valve / back of the EGR. In this pic, red is the EGR valve mounted to the head, yellow is the PAIR valve itself, and green is where the PAIR valve attaches to the Air Injection manifold.
Here are some PAIR/Reed valve pics, with important bits noted (thanks Peow130!).
Here is the front mounting bolt for the PAIR valve:
And here is the rear mounting bolt. Also in this pic, circled in green, is where the PAIR valve attaches to the Air Injection manifold.
And here is a pic of the back of the block / back of the pair valve / back of the EGR. In this pic, red is the EGR valve mounted to the head, yellow is the PAIR valve itself, and green is where the PAIR valve attaches to the Air Injection manifold.
Mar 2, 2010 | 09:18 PM
#24
Thread Starter
Registered User
Joined: Jan 2010
Posts: 447
Likes: 0
From: Sonora, CA (Central Sierra)
So basically, to remove the PAIR valve, you unscrew the fitting attaching it to the Air Injection manifold, and unbolt it from the block. Uncouple and unbolt and hoses, fittings, vacuum lines, etc., and rip it out!
Mar 2, 2010 | 10:02 PM
#25
Thread Starter
Registered User
Joined: Jan 2010
Posts: 447
Likes: 0
From: Sonora, CA (Central Sierra)
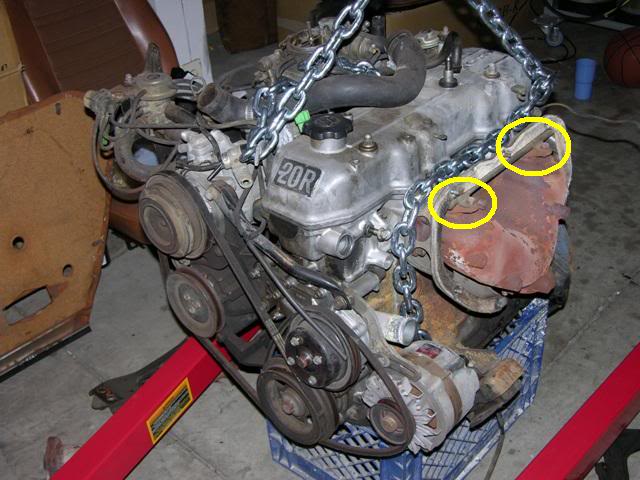
So here is where the process will differ slightly by how your vehicle is built. Most people will have an air injection manifold that bolts onto the head through the exhaust manifold, like this:

However, there are an unlucky few, like me, who have a 20R style exhaust manifold, with air injection ports on top of the exhaust manifold itself, like this:

In either case, remove the bolts holding it to the head or manifold. Since you ave already uncoupled it from your PAIR valve, you should be able to finagle it around the engine block and remove that pile of crap from your engine bay.
However, there are an unlucky few, like me, who have a 20R style exhaust manifold, with air injection ports on top of the exhaust manifold itself, like this:
In either case, remove the bolts holding it to the head or manifold. Since you ave already uncoupled it from your PAIR valve, you should be able to finagle it around the engine block and remove that pile of crap from your engine bay.
Mar 2, 2010 | 10:16 PM
#26
Thread Starter
Registered User
Joined: Jan 2010
Posts: 447
Likes: 0
From: Sonora, CA (Central Sierra)
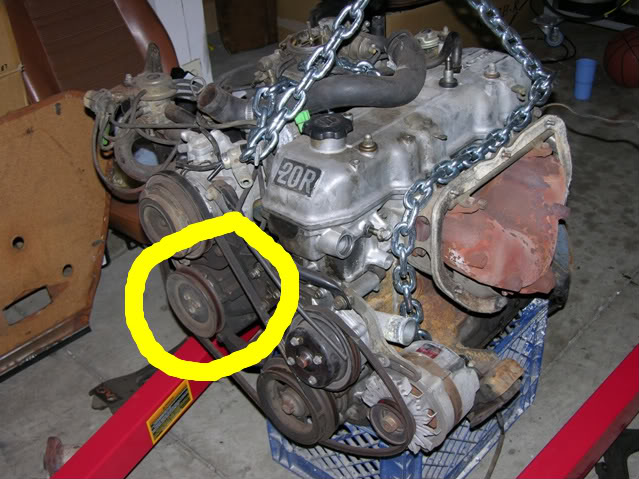
Next up for removal, the smog pump. I a using the same 20r pic as above, the smog pump is in the same location on a 20R as a 22R. You should be able to pull belts, and pull the smog pump out. You will need to leave the bracket for now, as the motor mounts through that bracket 
Mar 3, 2010 | 09:10 PM
#28
Thread Starter
Registered User
Joined: Jan 2010
Posts: 447
Likes: 0
From: Sonora, CA (Central Sierra)
OK, there are several ways to go about removing all excess vacuum lines. How I did it is to fly redneck and by the seat of my pants, and basically just remove everything that wasn't attached to a brake booster or charcoal canister.
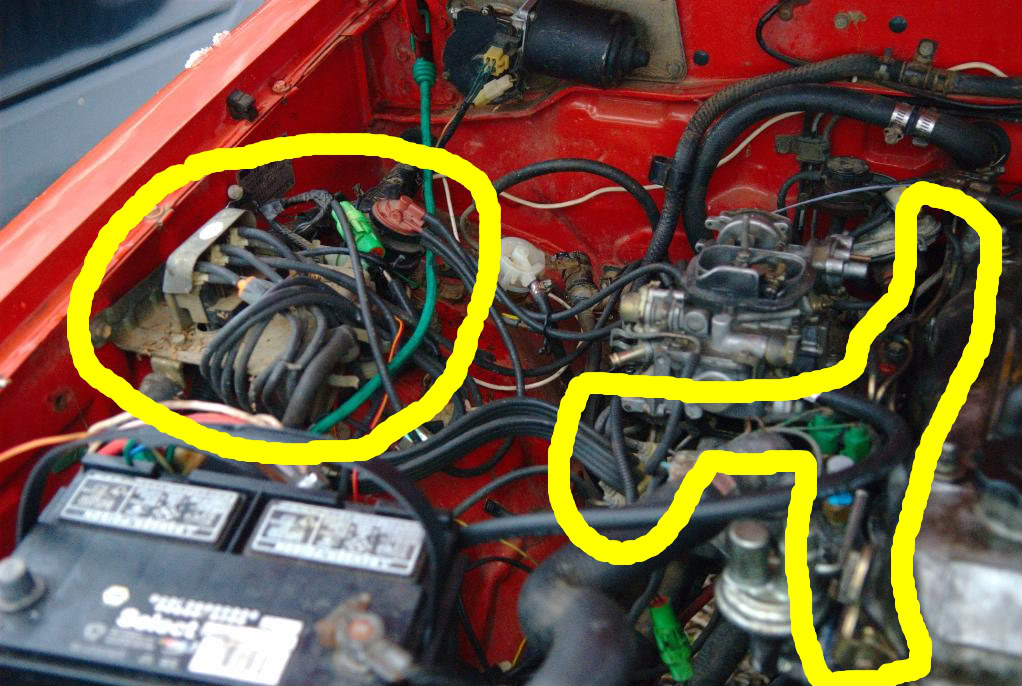
First, you should probably unbolt the vacuum hardline manifold from the head. There are two points where it bolts on, one is on the engine lift hook in the front, the other is bolted into the head in the rear. Disconnect the vacuum lines from this hardline manifold going to the distributor, BVSV, carb, etc., and pull it free gently. Since you have already removed the EGR and PAIR valves, there shouldn't be anything attached to this manifold other than the carb, BVSV, Distributor, High Altitude Compensator (on the distributor vacuum advance line), and the big bulky plate full of VSV's bolted to the passengers side inner fender.
Unbolt the VSV assembly from the passenger side inner fender. Now, you should be able to remove both the vacuum manifold and the VSV assembly completely from the vehicle.
In yellow: VSV assembly and vacuum manifold.
Mar 3, 2010 | 09:22 PM
#29
Thread Starter
Registered User
Joined: Jan 2010
Posts: 447
Likes: 0
From: Sonora, CA (Central Sierra)
Now, we should have all your major smog system components disconnected. The only real things left are the ECM (emissions control module, the computer on the drivers side interior toe panel), the O2 sensor, and the fuel shutoff solenoid. We are going to leave this all connected for now, as removing and re-wiring this stuff is a little more in-depth. The ECM won't be controlling anything anymore, so it is OK to leave in. The fuel cutoff solenoid is actually nice, as it shuts off fuel delivery to the carb on ignition shutoff. The O2 sensor isn't doing anything anymore, you can leave it in place, or plate it off.
Mar 3, 2010 | 09:41 PM
#30
Thread Starter
Registered User
Joined: Jan 2010
Posts: 447
Likes: 0
From: Sonora, CA (Central Sierra)
Our next step:
Blocking off holes.
Here are the things you need to block off:
EGR, where it bolted to the head.
EGR, where it bolted to the manifold.
Air injection ports, on the exhaust manifold.
If you have this style of exhaust manifold / air injection:
Here are the parts you need:
EGR block kit:
http://www.toyotacatalog.net/M1WebGe...4-D715971CF42D
Air Injection block kit:
http://www.toyotacatalog.net/M1WebGe...4-D715971CF42D
However, if you have this style of exhaust manifold / air injection:

Things are a little more complicated. You still need this EGR block kit:
http://www.toyotacatalog.net/M1WebGe...4-D715971CF42D
But you will need to either fabricate your own block plates for the Air Injection ports, or do what I did, and tap in some threads and install a plug.
Blocking off holes.
Here are the things you need to block off:
EGR, where it bolted to the head.
EGR, where it bolted to the manifold.
Air injection ports, on the exhaust manifold.
If you have this style of exhaust manifold / air injection:
Here are the parts you need:
EGR block kit:
http://www.toyotacatalog.net/M1WebGe...4-D715971CF42D
Air Injection block kit:
http://www.toyotacatalog.net/M1WebGe...4-D715971CF42D
However, if you have this style of exhaust manifold / air injection:
Things are a little more complicated. You still need this EGR block kit:
http://www.toyotacatalog.net/M1WebGe...4-D715971CF42D
But you will need to either fabricate your own block plates for the Air Injection ports, or do what I did, and tap in some threads and install a plug.
Mar 3, 2010 | 09:50 PM
#32
Thread Starter
Registered User
Joined: Jan 2010
Posts: 447
Likes: 0
From: Sonora, CA (Central Sierra)
To tap and plug this hole, here's what you will need:
7/16-14 tap
7/16-14 set screw or bolt, less than 1/2" long.
The process is simple. Tap out the hole, coat your bolt or set screw in locktite to ensure a good seal, and install it. Here's a pic of how this looks when completed:
7/16-14 tap
7/16-14 set screw or bolt, less than 1/2" long.
The process is simple. Tap out the hole, coat your bolt or set screw in locktite to ensure a good seal, and install it. Here's a pic of how this looks when completed:
Mar 3, 2010 | 09:57 PM
#33
Thread Starter
Registered User
Joined: Jan 2010
Posts: 447
Likes: 0
From: Sonora, CA (Central Sierra)
How and what to cap off vacuum wise on the carb is coming up a little bit later, I promise I am getting there
 . This is a lot of info to compile, and I have little enough time to sleep between working as it is
  Mar 3, 2010 | 10:04 PM
#34
Registered User
Joined: Sep 2008
Posts: 3,887
Likes: 16
From: Spokane, WA
Haha, it's okay.
I'm just eager to find out so that when i finally get my jeep all put together i can look back at this thread and determine what i need and what i dont need for it to stay running
I'm just eager to find out so that when i finally get my jeep all put together i can look back at this thread and determine what i need and what i dont need for it to stay running
Mar 6, 2010 | 05:31 PM
#35
Registered User
Joined: Dec 2009
Posts: 18
Likes: 0
From: Bonney Lake, WA
So how does it run now? I've been scared to due this for two reasons. I can pump my pedal once and the truck fires right up into its high idle. The other is when I go wheeling, the carb actually works off camber. So does it still work how it should?
Mar 7, 2010 | 04:09 PM
#36

Registered User
Joined: Mar 2005
Posts: 784
Likes: 0
From: MN
However, if you have this style of exhaust manifold / air injection:
wow I do not have those things on my truck??? I only have one small belt going around my alternator, waterpump and crank pulley. those other two are not on my truck. does that mean someone removed them at one time?
wow I do not have those things on my truck??? I only have one small belt going around my alternator, waterpump and crank pulley. those other two are not on my truck. does that mean someone removed them at one time?
Mar 7, 2010 | 04:12 PM
#37
Registered User
Joined: Mar 2005
Posts: 784
Likes: 0
From: MN
 [/QUOTE]
I also do not have any of those hoses on the fenderwell behind the battery that are circled. did someone de smog my truck at one point??? the plate is there but it only has two things on it and no hoses I think.
Mar 8, 2010 | 12:08 PM
#38
Thread Starter
Registered User
Joined: Jan 2010
Posts: 447
Likes: 0
From: Sonora, CA (Central Sierra)
However, if you have this style of exhaust manifold / air injection:

wow I do not have those things on my truck??? I only have one small belt going around my alternator, waterpump and crank pulley. those other two are not on my truck. does that mean someone removed them at one time?
wow I do not have those things on my truck??? I only have one small belt going around my alternator, waterpump and crank pulley. those other two are not on my truck. does that mean someone removed them at one time?

I also do not have any of those hoses on the fenderwell behind the battery that are circled. did someone de smog my truck at one point??? the plate is there but it only has two things on it and no hoses I think.[/QUOTE]
Your truck has probably been modified, I think even the canada version had more going on than this. As to the de-smog, do you have an EGR valve?
Mar 8, 2010 | 12:19 PM
#39
Thread Starter
Registered User
Joined: Jan 2010
Posts: 447
Likes: 0
From: Sonora, CA (Central Sierra)
The truck still works well. Many people roll with non-functional EGR's for years without even noticing. There are probably as many failed out EGR valves in existence as there are working ones. As far as a difference in how the vehicle runs, there is some debate about this. Some people say that your engine will run a little warmer without an EGR, as much of the gas that the EGR re-circulates to your intake is mostly inert, and is taking up volume that could be used by combustable oxygen. Some say the opposite, that your vehicle will run a little cooler as you aren't re-introducing hot exhaust to the combustion mix. I personally haven't operated my vehicle enough after the de-smog to have noticed any seat of the pants difference in temp, although the truck seems to have more seat of the pants throttle response. I also have not seen anyone corroborate their argument on the temp change with any actual fact, so I would reserve judgement until I see factual data.
Mar 8, 2010 | 12:20 PM
#40
Thread Starter
Registered User
Joined: Jan 2010
Posts: 447
Likes: 0
From: Sonora, CA (Central Sierra)
Also, to those following, I apologize for the post delay, I have had a bunch of stuff going on in the personal life. More posts and Carbeuration/Vacuum info coming tonight.


