2nd Gen Amp, Speaker, Sub, and Head Unit install...
 03-25-2006, 10:31 AM
#1
Registered User
Thread Starter
Join Date: Mar 2006
Location: Maryland
Posts: 379
Likes: 0
Received 0 Likes
on
0 Posts
2nd Gen Amp, Speaker, Sub, and Head Unit install...
I can't have a rig without tunes. I removed my Alpine CDA9815 from my last car, along with my JL 250/1 sub amp and JL 10w3D2 10" sub I built into a custom enclosure.
I have to say that the 2nd gens are among the easiest vehicles to run wires through- the panels come out nice and easy, and pop back into place far better than any of my VW's or American cars.
There is one problem though- my 1990 has a factory amp for the rear speakers and I can't figure out its location so I can bypass. Anybody wanna help a brother out?
Pictures will follow.
Specialty tools required:
Panel poppers. cant say enough about these things- saves a lot of time and aggravation and busted panel fasteners!

Ratcheting screwdriver with extension- better than a screw gun and able to reach some tough spots:

Part 1: Removal of factory head unit.
The Toyota factory radio requires a wiring harness to work with an aftermarket radio, but no antenna adapter, and in most cases, no fit kit if there is a pocket below the radio.
Panel that the radio, HVAC controls and clock is the center of three large pieces. You need to remove the passenger side, loosen the driver's, and then take off the center.
1. On the passenger side, the bottom left corner of the glove box is a philips head screw. Remove that. At the pillar on the other side of the glove box is a small screw with an 8mm nut end. Remove that.
2. Open the glove box and at the very top where it meets the dash pad, remove three philips screws.
3. In front of the center console, there is a small panel with two GM-style push-pin fasteners. Push the center pins in with a screwdriver, and remove the entire panel carefully.
4. Remove the entire glove box assembly carefully, starting at the edges and working around. There are two wire connections here, one above the glove box for the light, and one to the right for the front speaker.
5. On the driver's side, there is a screw directly above the parking brake handle. (spin the handle to make it easier to gain access.) There is one at the bottom of the panel, below the handle. Remove this. On the other side of the steering column, remove the screw at the bottom. Pry the panel slightly to release the hold it has on the center piece.
6. Remove the ash tray.
7. The panel that surrounds the ignition pops off VERY easily. Pry it loose.
8. Pull the knobs off of the HVAC controls.
9. Using the panel popper, carefully begin to pry the center panel loose. As you work this loose, be careful to disconnect the power to the clock. The labels for the HVAC control will come free at this point. Carefully remove this trim.
10. If you've done this all correctly, your center panel will hang forward, allowing plenty of access to the radio assembly. There are four screws that hold the radio in place, with the pocket attached.
This is commonly called an "ISO-DIN" configuration. Once you've removed the screws, there are two wiring harnesses attached to the radio- one for power and the front speakers, and one specifically for the rear speakers. The antenna is connected at the bottom left of the factory radio. Remove this.
Next, there are several screws that hold the pocket to the radio. In order to properly flush the new radio into the dash, attach the pocket to the new radio with the factory screws. I cant think of a single aftermarket radio that doesn't have indentations on it for an ISO-DIN pocket's bracket. ISO-DIN radios will not allow the use of a factory trim ring that typically comes with all new radios. Don't worry- 90% of the time there ARE parts left over in the box. It's okay! It's not a transfer case!
To reconnect the harnesses, an adapter is required. I used METRA's 70-1761 harness (www.metraonline.com). Everything is color coded to the standard new radio connections. Crimp connect the harnesses together, and plug into your new aftermarket radio. Connect to the existing factory harness, and reverse the steps.
Pics to follow!
I have to say that the 2nd gens are among the easiest vehicles to run wires through- the panels come out nice and easy, and pop back into place far better than any of my VW's or American cars.
There is one problem though- my 1990 has a factory amp for the rear speakers and I can't figure out its location so I can bypass. Anybody wanna help a brother out?
Pictures will follow.
Specialty tools required:
Panel poppers. cant say enough about these things- saves a lot of time and aggravation and busted panel fasteners!
Ratcheting screwdriver with extension- better than a screw gun and able to reach some tough spots:
Part 1: Removal of factory head unit.
The Toyota factory radio requires a wiring harness to work with an aftermarket radio, but no antenna adapter, and in most cases, no fit kit if there is a pocket below the radio.
Panel that the radio, HVAC controls and clock is the center of three large pieces. You need to remove the passenger side, loosen the driver's, and then take off the center.
1. On the passenger side, the bottom left corner of the glove box is a philips head screw. Remove that. At the pillar on the other side of the glove box is a small screw with an 8mm nut end. Remove that.
2. Open the glove box and at the very top where it meets the dash pad, remove three philips screws.
3. In front of the center console, there is a small panel with two GM-style push-pin fasteners. Push the center pins in with a screwdriver, and remove the entire panel carefully.
4. Remove the entire glove box assembly carefully, starting at the edges and working around. There are two wire connections here, one above the glove box for the light, and one to the right for the front speaker.
5. On the driver's side, there is a screw directly above the parking brake handle. (spin the handle to make it easier to gain access.) There is one at the bottom of the panel, below the handle. Remove this. On the other side of the steering column, remove the screw at the bottom. Pry the panel slightly to release the hold it has on the center piece.
6. Remove the ash tray.
7. The panel that surrounds the ignition pops off VERY easily. Pry it loose.
8. Pull the knobs off of the HVAC controls.
9. Using the panel popper, carefully begin to pry the center panel loose. As you work this loose, be careful to disconnect the power to the clock. The labels for the HVAC control will come free at this point. Carefully remove this trim.
10. If you've done this all correctly, your center panel will hang forward, allowing plenty of access to the radio assembly. There are four screws that hold the radio in place, with the pocket attached.
This is commonly called an "ISO-DIN" configuration. Once you've removed the screws, there are two wiring harnesses attached to the radio- one for power and the front speakers, and one specifically for the rear speakers. The antenna is connected at the bottom left of the factory radio. Remove this.
Next, there are several screws that hold the pocket to the radio. In order to properly flush the new radio into the dash, attach the pocket to the new radio with the factory screws. I cant think of a single aftermarket radio that doesn't have indentations on it for an ISO-DIN pocket's bracket. ISO-DIN radios will not allow the use of a factory trim ring that typically comes with all new radios. Don't worry- 90% of the time there ARE parts left over in the box. It's okay! It's not a transfer case!
To reconnect the harnesses, an adapter is required. I used METRA's 70-1761 harness (www.metraonline.com). Everything is color coded to the standard new radio connections. Crimp connect the harnesses together, and plug into your new aftermarket radio. Connect to the existing factory harness, and reverse the steps.
Pics to follow!
 03-25-2006, 10:50 AM
#2
Registered User
Thread Starter
Join Date: Mar 2006
Location: Maryland
Posts: 379
Likes: 0
Received 0 Likes
on
0 Posts
When running a system through a vehicle, its often best to run a bit more than you need at the time to save aggravation and time wasted to disassemble everything and run new wires. For my install, I wanted to have as much flexibility as possible. For this reason, I ran the following:
1 4 gauge power cable
1 RG59 Coaxial cable (for future CB radio)
2 twisted pair RCA interconnect cables (one for sub, one for future amp install)
4 twisted pair speaker cables, two to each front kickpanel location for future component speakers
1 12v amp turn-on lead
Running cables in the rig is pretty straight forward- just a few words of advice:
1. Run your power cables and RCA cables/speaker cables on opposite sides of the vehicle if possible. This will limit potential interference ("alternator hum") from the high voltage power cable.
2. Anticipate a potential upgrade in your system- run a heavier gauge power cable. Rule of thumb is that 8 gauge cable is good up to 300watts of amp power, 4 gauge is good to up to 1000 watts, etc. I plan on running 550 total RMS power when I'm finished, so I chose 4 gauge.
To run the power cables:
First, find a good amp intall kit. It will have most everything you will need to get power from the battery to the amp. I bought the Rockford kit at Best Buy for $66, complete with fuse holders, cables, preterminated ends, etc. Well worth it. This includes 17 ft of primary power cable, which is plenty to snake back along the driver's side to the driver's side rear seat for amp install.
To make this easier, I removed the driver's and passenger's seats. There are four bolts that hold them down.
Also, I disconnected the front seat belt mounts from the floor. Again, all to make it easier.
It is easier to run the power lines across the driver's than the passenger's side since the HVAC assembly is under the passenger's side dash.
Next, remove the kickpanel from the driver's side where the internal fuse box is. There is a plastic thumbscrew that holds it in place. Remove this first, then pry the panel loose.
Next, remove the sill plates. Front door has 4 screws (philips head) and rear has 2 screws. Loosen the screws and Pry these up CAREFULLY!!!

(note- this is passenger side, front)
Now, begin to pull the carpet back.
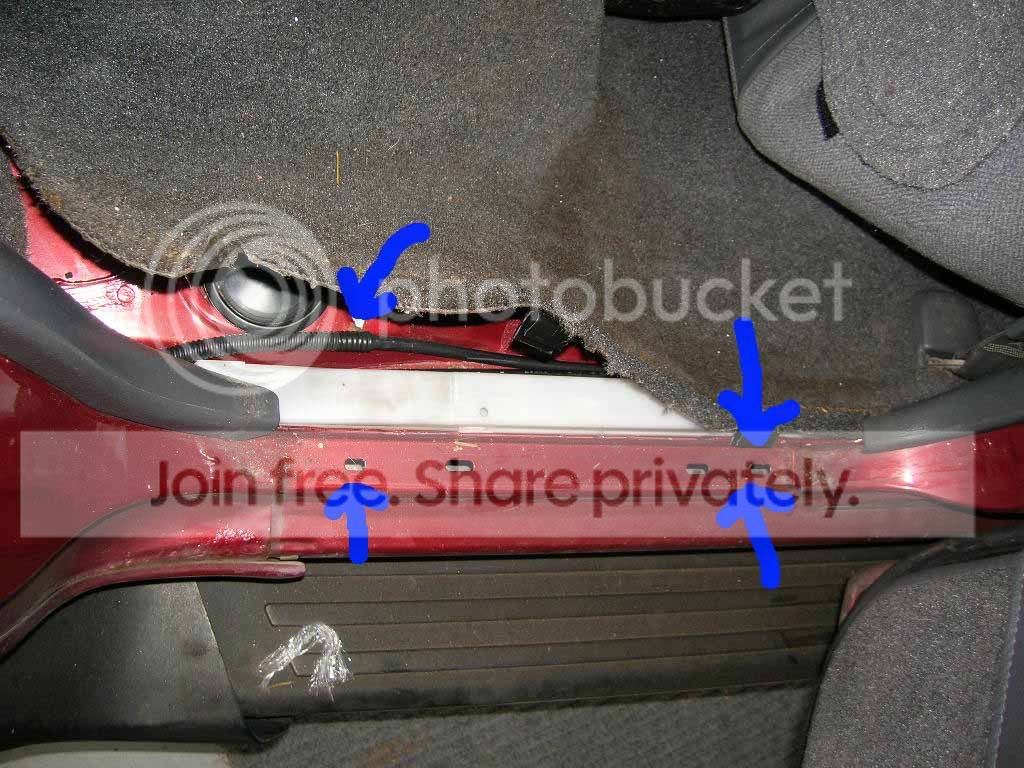
Carefully pop the plastic clips from along the rails as marked.
Along the way, you'll want to pry the panel at the rear door where it meets the door. To do this, carefully pry the top away from the panel that trims the rear window of the cargo area, and work all along to the bottom.
Running the cable:
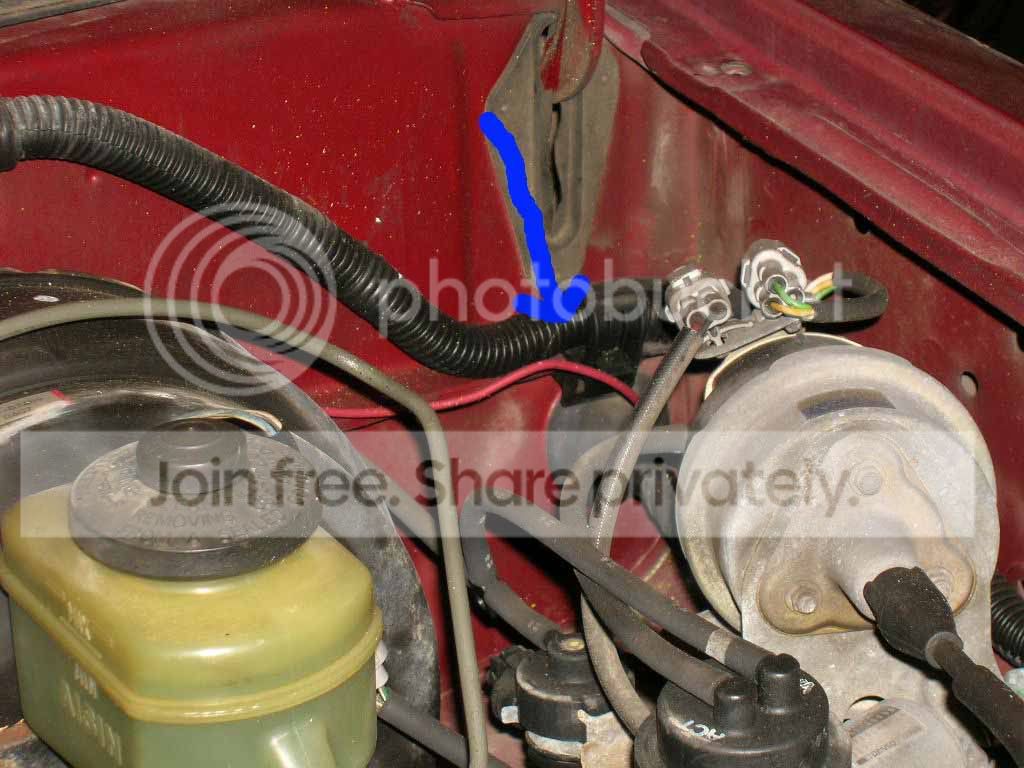
1. disconnect the positive terminal from battery. Attach the pre-terminated end to the factory battery ring. Route the cable along the firewall, above the hood-release cable to the driver's side. Zip tie it to the hood release cable to tie it back. Not too tight!
Now, most folks will just punch a hole below the master cylinder with a Uni-Bit to run this cable. I don't like to do this for several reasons- it leaves a rough edge that could tear the jacket of the cable, and puts another hole where water could potentially leak through. I look for existing grommets from the factory.
2. In the back corner of the firewall, you will see a rubber grommet where the hood release cable snakes through. From the inside of the vehicle, carefully push the entire grommet through into the engine compartment. Using a pair of snips, carefully cut a hole in the grommet for the new power cable to fit through. A couple slits is all it takes, since it will stretch around the cable to seal.
Internal shot:
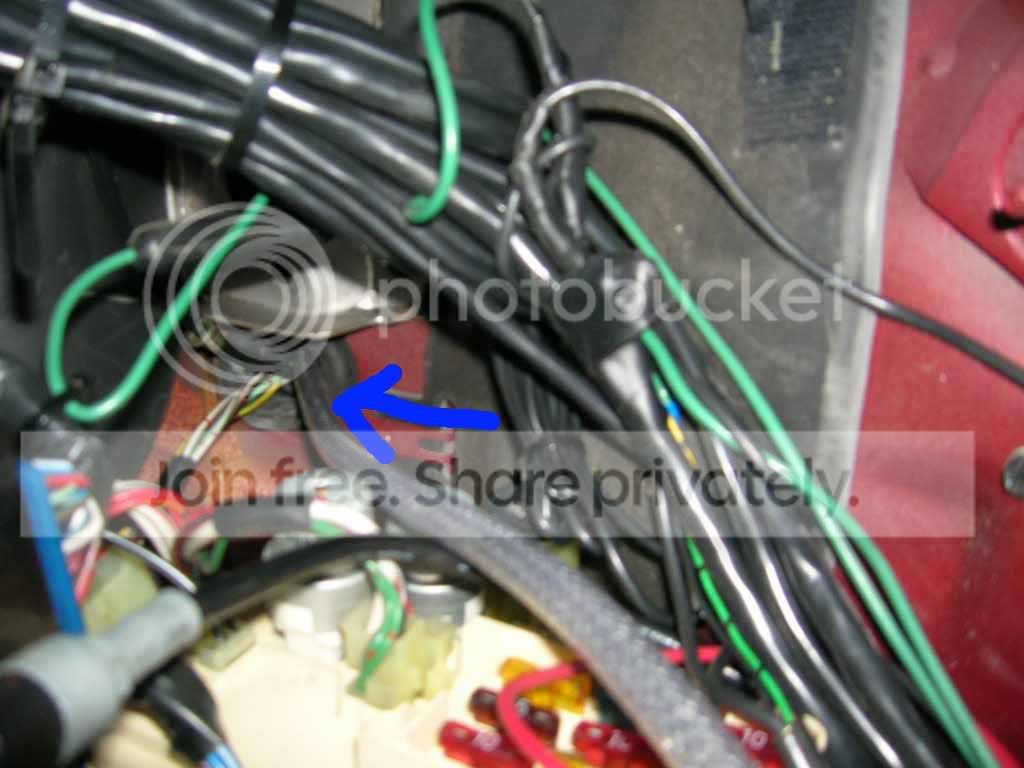
Note- the bundle of black cables is part of an old school cell phone i removed at the same time.
3. Pull the cable through and into the compartment. To re-seat the grommet, push back through from the engine compartment until it is back in place.
4. Route the cable along the door sill in the channels provided by the factory. Go under the exisiting harnesses, and stay within that channel as best as possible.
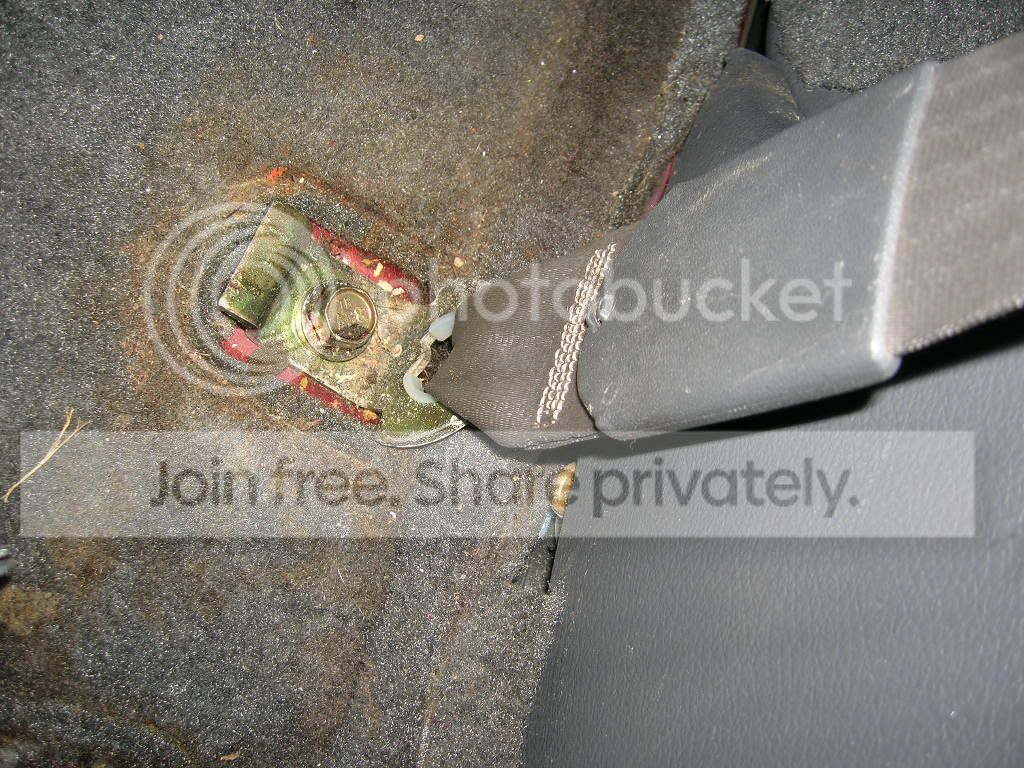
Its best to route the cable between the mount for the seatbelt and the trim panel...
(post install, cant tell there is a cable there.)
5. When the cable is to the back seat, pull the carpet under the seat up just enough to snake through, and go under the seat and into the cargo compartment. The 17 feet is enough to have about 1 foot of slack on the amp end for future connections. No need to route under that panel to the right. Run under the carpet and save yourself the trouble and potentially broken panel clips!

1 4 gauge power cable
1 RG59 Coaxial cable (for future CB radio)
2 twisted pair RCA interconnect cables (one for sub, one for future amp install)
4 twisted pair speaker cables, two to each front kickpanel location for future component speakers
1 12v amp turn-on lead
Running cables in the rig is pretty straight forward- just a few words of advice:
1. Run your power cables and RCA cables/speaker cables on opposite sides of the vehicle if possible. This will limit potential interference ("alternator hum") from the high voltage power cable.
2. Anticipate a potential upgrade in your system- run a heavier gauge power cable. Rule of thumb is that 8 gauge cable is good up to 300watts of amp power, 4 gauge is good to up to 1000 watts, etc. I plan on running 550 total RMS power when I'm finished, so I chose 4 gauge.
To run the power cables:
First, find a good amp intall kit. It will have most everything you will need to get power from the battery to the amp. I bought the Rockford kit at Best Buy for $66, complete with fuse holders, cables, preterminated ends, etc. Well worth it. This includes 17 ft of primary power cable, which is plenty to snake back along the driver's side to the driver's side rear seat for amp install.
To make this easier, I removed the driver's and passenger's seats. There are four bolts that hold them down.
Also, I disconnected the front seat belt mounts from the floor. Again, all to make it easier.
It is easier to run the power lines across the driver's than the passenger's side since the HVAC assembly is under the passenger's side dash.
Next, remove the kickpanel from the driver's side where the internal fuse box is. There is a plastic thumbscrew that holds it in place. Remove this first, then pry the panel loose.
Next, remove the sill plates. Front door has 4 screws (philips head) and rear has 2 screws. Loosen the screws and Pry these up CAREFULLY!!!
(note- this is passenger side, front)
Now, begin to pull the carpet back.
Carefully pop the plastic clips from along the rails as marked.
Along the way, you'll want to pry the panel at the rear door where it meets the door. To do this, carefully pry the top away from the panel that trims the rear window of the cargo area, and work all along to the bottom.
Running the cable:
1. disconnect the positive terminal from battery. Attach the pre-terminated end to the factory battery ring. Route the cable along the firewall, above the hood-release cable to the driver's side. Zip tie it to the hood release cable to tie it back. Not too tight!
Now, most folks will just punch a hole below the master cylinder with a Uni-Bit to run this cable. I don't like to do this for several reasons- it leaves a rough edge that could tear the jacket of the cable, and puts another hole where water could potentially leak through. I look for existing grommets from the factory.
2. In the back corner of the firewall, you will see a rubber grommet where the hood release cable snakes through. From the inside of the vehicle, carefully push the entire grommet through into the engine compartment. Using a pair of snips, carefully cut a hole in the grommet for the new power cable to fit through. A couple slits is all it takes, since it will stretch around the cable to seal.
Internal shot:
Note- the bundle of black cables is part of an old school cell phone i removed at the same time.
3. Pull the cable through and into the compartment. To re-seat the grommet, push back through from the engine compartment until it is back in place.
4. Route the cable along the door sill in the channels provided by the factory. Go under the exisiting harnesses, and stay within that channel as best as possible.
Its best to route the cable between the mount for the seatbelt and the trim panel...
(post install, cant tell there is a cable there.)
5. When the cable is to the back seat, pull the carpet under the seat up just enough to snake through, and go under the seat and into the cargo compartment. The 17 feet is enough to have about 1 foot of slack on the amp end for future connections. No need to route under that panel to the right. Run under the carpet and save yourself the trouble and potentially broken panel clips!
Last edited by Turd Ferguson; 04-01-2006 at 06:04 PM.
03-25-2006, 10:56 AM
#3
Registered User
Thread Starter
Join Date: Mar 2006
Location: Maryland
Posts: 379
Likes: 0
Received 0 Likes
on
0 Posts
Speaker removal, Front:
2nd gens come with some 4" speakers mounted in the dash, near the driver's and passenger's knees. Assuming you've removed the lower dash panels, you'll clearly see the plastic housings that hold the speakers.
Remove the 3-4 screws that hold the assembly (effectively an enclosure) that hold the speakers from the dash panel, then remove the two screws that hold the speakers in place.
You can replace them with any 4" speaker on the market, though I think that Boston Acoustics 4" speakers (not the old "football" speakers) work best in this location.
There is a clip on the enclosure for the connection to the factory speakers. This will not, however, work with new speakers. It is best to:
Cut the factory wiring harness clip off.
Drill a small hole in the enclosure.
Crimp an extension of speaker wire to the factory harness, and run through the hole you drilled. Then, crimp connectors to this new wire, and connect to the new speaker's terminals.
 03-25-2006, 11:26 PM
#6
Registered User
Thread Starter
Join Date: Mar 2006
Location: Maryland
Posts: 379
Likes: 0
Received 0 Likes
on
0 Posts
Originally Posted by 4x4Lamm
The factory amp is the silver thing with heat fins and a molex harness right below the headunit in the center dash.
Lamm
Lamm
And I left my camera at my folks house last night. I'll u/l pics soon!
03-26-2006, 12:48 AM
#7
Registered User
Originally Posted by Turd Ferguson
Hmm, didn't see that there, you are 100% sure? The molex for the rear speakers went into a wire loom that had a bunch of other wires wrapped with it. I'll check tomorrow.
And I left my camera at my folks house last night. I'll u/l pics soon!
And I left my camera at my folks house last night. I'll u/l pics soon!
Trending Topics
03-27-2006, 11:48 PM
#9
Registered User
Thread Starter
Join Date: Mar 2006
Location: Maryland
Posts: 379
Likes: 0
Received 0 Likes
on
0 Posts
Originally Posted by runethechamp
I know my 94 had a small amp attached to each of the two rear speaker boxes.
1. Bypass the amp entirely
2. tap into the constant power line from the Alpine to the antenna and run into the factory amp.
Given that my internal amp on the radio (and these are only rear speakers) is likely stronger on its own than the factory amp, I'll choose to bypass it. But its gonna have to wait a while- i have shoulder reconstructive surgery on Wed. and won't be able to drive it, let alone work on it for a LONG time
 For now, it shall sit.
04-01-2006, 05:53 PM
For now, it shall sit.
04-01-2006, 05:53 PM
#10
Registered User
Thread Starter
Join Date: Mar 2006
Location: Maryland
Posts: 379
Likes: 0
Received 0 Likes
on
0 Posts
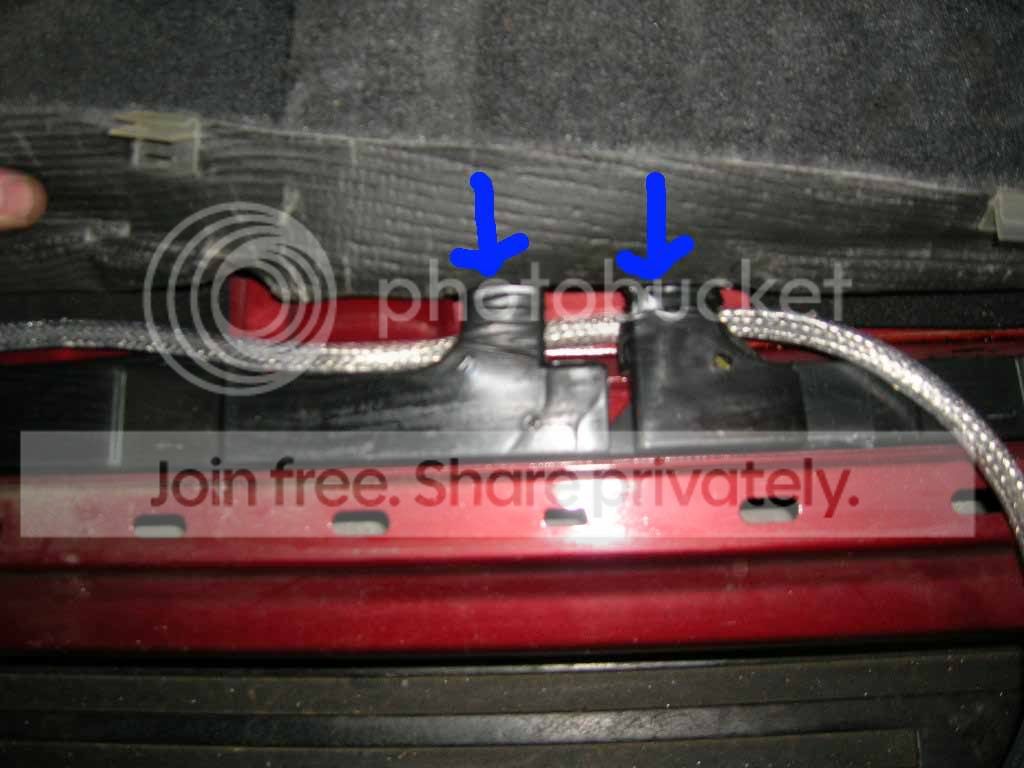
Running your cables pics update....
Note, as stated, run any speaker and RCA lines on the other side of the vehicle to minimize any interference from the power cables (alternator hum). Sorry they aren't more detailed, but with my shoulder in a sling now I cant pull it apart again...
Note, as stated, run any speaker and RCA lines on the other side of the vehicle to minimize any interference from the power cables (alternator hum). Sorry they aren't more detailed, but with my shoulder in a sling now I cant pull it apart again...
 06-02-2009, 09:34 PM
#12
Registered User
Join Date: Jun 2009
Posts: 1
Likes: 0
Received 0 Likes
on
0 Posts
thanks for the great info TF! can anyone please tell me the best way to get into the rear speaker panels? i just replaced my deck, and want to put in my pioneer premier 6*9's as apparently there is no power going to those rear stock speaker amps now...(perhaps because the antenna is m.i.a.) thanks

Thread
Thread Starter
Forum
Replies
Last Post
RedRunner_87
95.5-2004 Tacomas & 96-2002 4Runners (Build-Up Section)
84
06-01-2021 01:51 PM
FS[PacNorWest]: 1987 Toyota 4Runner $1800 Whidbey Island, WA
coreyedwards7611
Vehicles - Trailers (Complete)
4
01-16-2016 06:38 PM
Steezy96yota
86-95 Trucks & 4Runners (Build-Up Section)
1
07-06-2015 10:00 AM


