
Engine Bay Lighting Installation
 Mar 15, 2008 | 09:28 PM
#1


Engine Bay Lighting Installation
Finished up the Engine Bay lighting mod so here is the write up for all of you who are waiting. I will add that if I find a better set of lights for under the hood then I will update the current install and update the write up as well. So thanks for all the support and kind words from each and everyone of you here on Yota Tech
Engine Bay Lighting
 Disclaimer: Every effort was made to ensure a correct and safe installation of this modification. But with all changes to a factory tested vehicle not every situtation can be forseen. All modifications were accomplished using simple hand tools and used parts from various motor vehicles. While every attempt has been made to simplify the installation not all situtations can be foreseen. It is assumed that anyone attempting this or any other modification understands the risks involved and basic knowledge of mechanics and electricity is implied. Any attempt to duplicate this or any other modification is done so at your own risk to both the installer and the vehicle into which it is installed. Please use common sense in all your modification efforts.
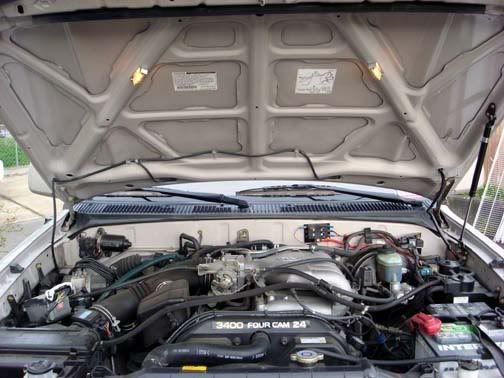
 To begin the installation of engine bay lighting there will be several items required for the installation. This modification was accomplished on a 1998 SR5 Toyota 4Runner by the writer.
Besides some basic hand tools some items needed will be:
Portable or cordless drill
1/8" drill bit
drill bit the same diameter as the shaft of the switch
crimps
crimping tool
wire cutters
wire strippers
applicable metric wrenches for the switch and lock nut
electrical tape
split loom material
flat washers 3-5 required
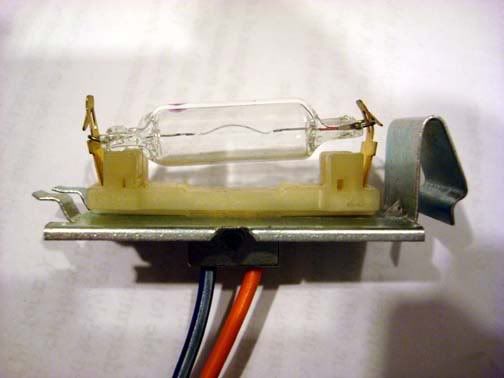
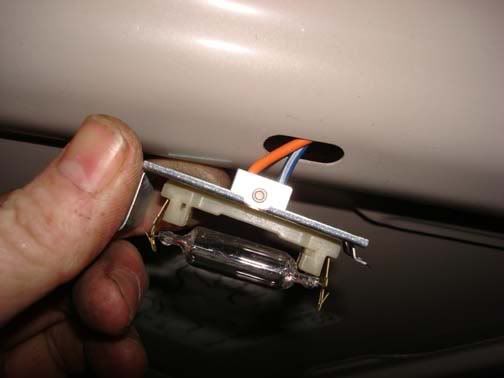
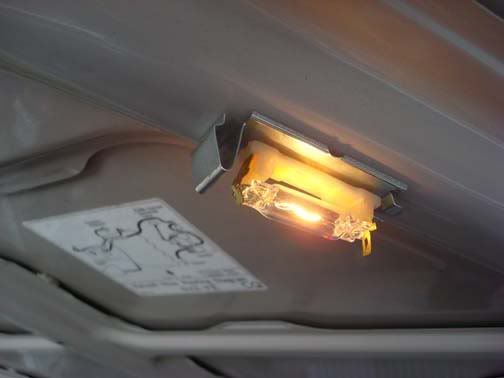
Lighting fixtures � 2
Obtained from late model Cadillac Escalade. These lights were located under the front dash above the foot area on each side of the vehicle.
Activation switch � 1
1994 Toyota 4Runner rear passenger door which activated the dome light.
This switch was unscrewed from the rear door pillar. You will need to pull the side panel cover on the door post to get to the cable run. There will be a small single wire (red) with a white plastic connector. Unplug the connector then unscrew the switch and remove. You will need both ends of the connector.
18 gage wire in you own choice of colors. I obtained part of the wiring harness that runs from the front to the rear of the same 4Runner I obtained the switch from. My local wrecking yard had no real issue with my taking the harness, so I ended up with quite a bit of wire for this and future projects. Cost: $0.00

Split loom for parts of the install along with some 18 gage wire crimps.
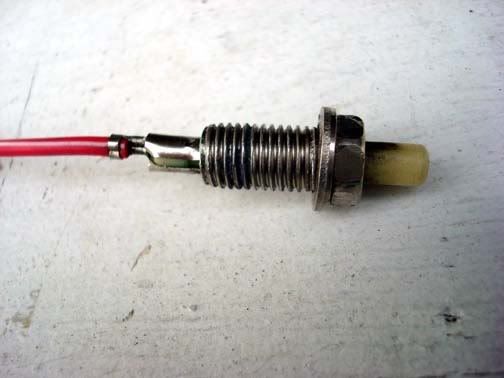
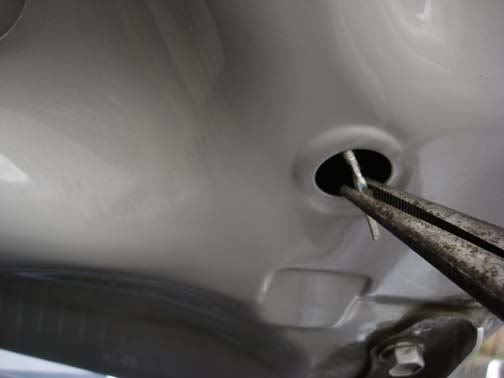
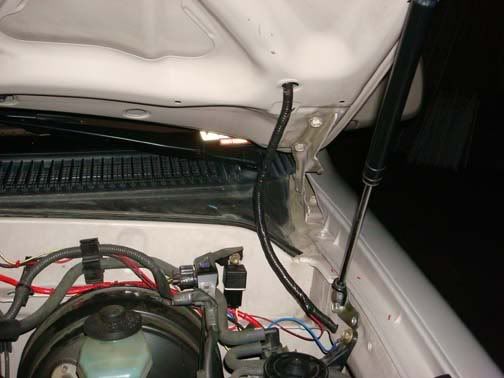
One of the first tasks is to install the switch that will activate the lights when the hood is released/raised. I chose the location next to the left side hood cushion.
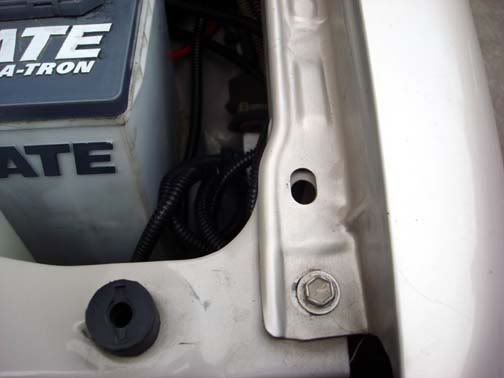
Initially I was going to mount it in the provided hole along the fender as can be seen in the photo, but when I attempted to shut the hood, the switch could not make any contact with the hood so this location was rendered unusable. Looking further I noticed that there was a flat angled spot on the hood itself next to the hood cushion. To better identify this location I took a piece of black electrical tape and folded it back over on itself. I centered the tape on the cushion and closed the hood. When I lifted the hood, the tape was stuck to the hood showing where the cushion actually contacted the hood.
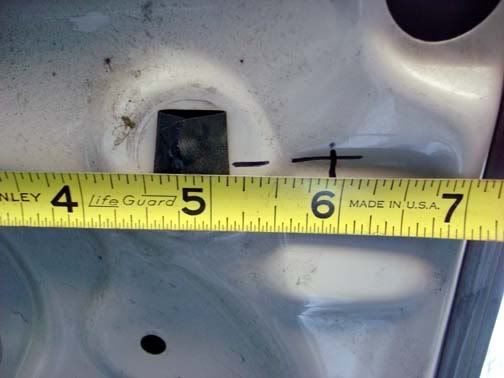
Next I measured over approximately 1� from the center of the cushion and made a mark.

Measure the same distance on the hood using the tape as your center mark for the cushion.
I noted the location of the flat on the hood and then measured the distance and angle I would need. Marking the fender frame, the location of the switch would be on an angle but any closer to the cushion would not allow for a backing nut to be placed on the back of the threaded switch.
Draw another line and then measure about 1/8th of an inch and this will be where the pilot hole will be drilled.
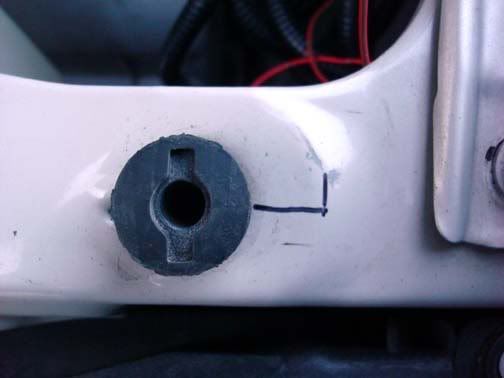
NOTE: Be very careful when drilling this hole as there is a wire harness located below this location and there are live wires located in this harness.
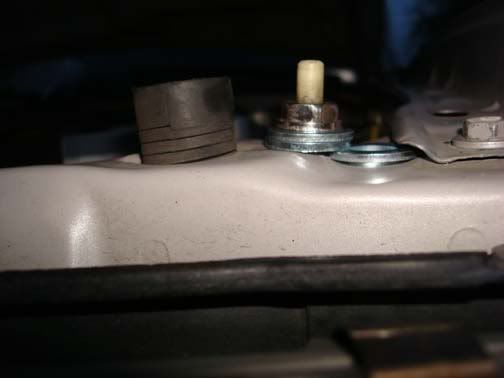
Insert the switch into the hole from the top. Check the height of the cushion compared to the top of the switch. The switch must be slightly higher then the cushion. I need two flat washers between the switch mounting washer and the frame. Afix a flange washer (I believe this to be a 10 mm nut. I found one during my excursion to get the switch and wire. Do not tighten the nut down just yet. Next obtain another flat washer and slip it beneath the other two flat washer and the fender.

Tighten down the lower flange nut. Watch the angle of the switch as you tighten the switch into the hole. You want to keep this as close to 90 degrees as you can.
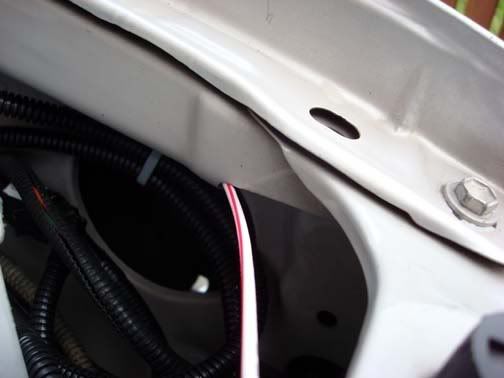
The next process is routing the wires. I used a heavier gage wire to be used as the pull wire. Beginning near the firewall you will notice a few openings in the fender well. The one we are concerned with is the one that enters into the fender channel near the top of the fender.
Feed the wire down the fender channel until it exits near the front of the fender and cross beam.
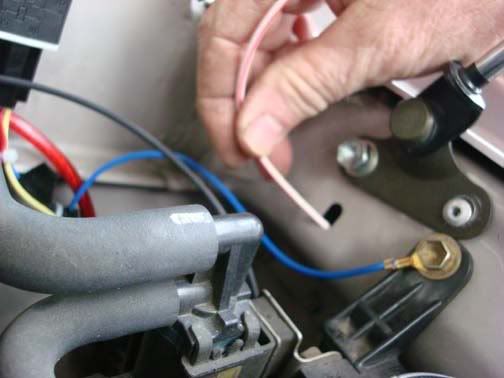
Now you can attach a single 18 gage wire to the pull wire using tape. Pull the wire slowly until it exits the hole in the fender well.
Feed the pull wire from the left side oblong hole downward to the circular hole near the fire wall. Use needle nose pliers to aid in pulling the wire through.
Attach a single wire to the pull wire and feed it though.
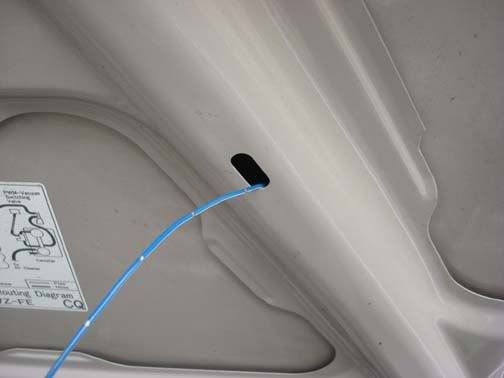
From the right side of the hood, route the pull wire from the oblong hole in the right side up towards the shorter or upper cross bracing. Push this across until it appears at the left side oblong hole. It may take several attempts and nudging the wire along to get to the left side hole. Once there pull it through.
Attach a pair of 18 gage wires to the pull wire and the feeding the wire in the hole as you pull it across to the left side hole.
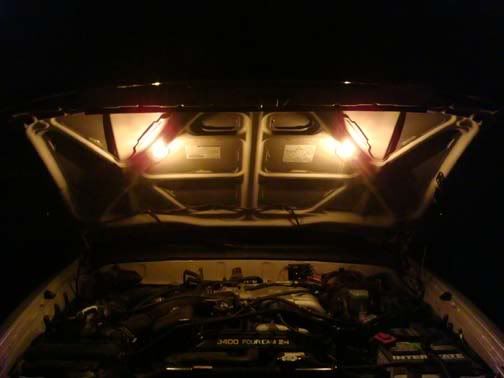
You should now have a pair of wires running from the right side to the left side of the hood
The first lamp assembly is ready to be crimped onto the hood wires. I staggered the wire crimps so that when the wires are pulled into the supports, they are not too big. This is important when you put split loom on any of the wires as well as the overall diameter is smaller. Wrap the completed splice with electrical tape to give it a clean finished look.
Once the wires have been attached to the lamp assembly, begin to press the assembly into the oblong hole by feeding the excess wires into the hood bracing. There is a rivet in the base of the assembly which makes for a tight fit and will hold the assembly in place.
Continue pressing the assembly into the hole until it �snaps� in. The assembly should be flush with the bracing. If you do not get a tight fitting install then you will need to install a single 1/8th inch short pop rivet to hold the light assembly in place.
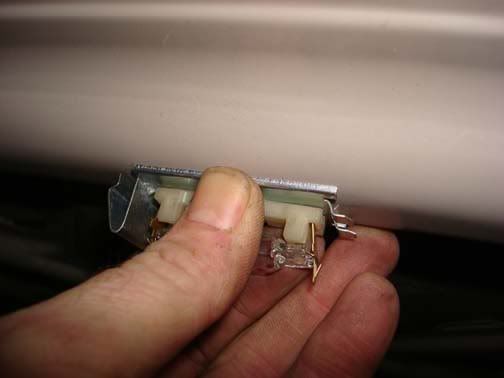
I chose to have the larger �Z� angle of the assembly facing forward. There is no right or wrong way to install these, but be consistent. Makes for a neater looking install.
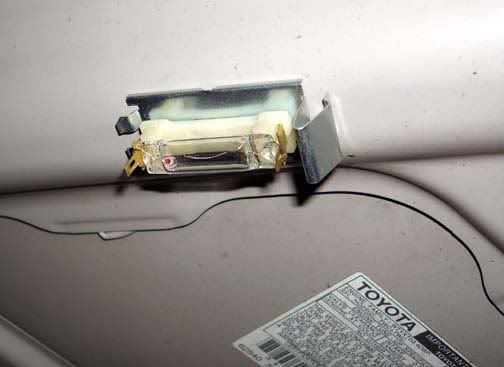
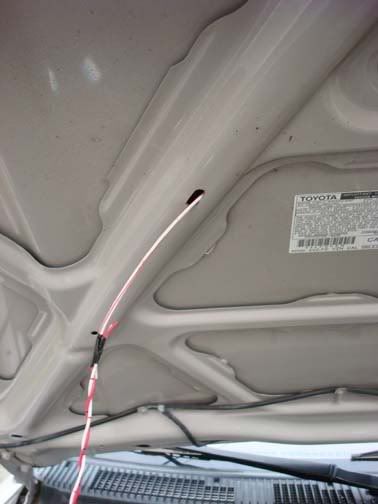
On the left side, we will attach the second assembly but this time we will attach one lead to one of the wires coming from the right side assembly. The second wire of our left side assembly will attach to the wire that was run through the hood bracing to the firewall. When completed, you will have two wires exiting the lower hole of the hood bracing.
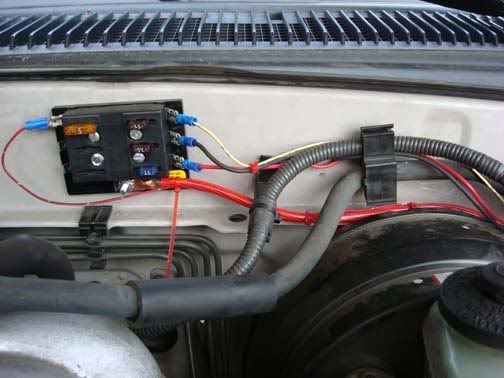
One wire will have a female spade connector crimped to it for connection to the hot side of a 12 vdc supply source. In this install I have an Auxiliary fuse panel installed so this will be used as our power source.
The second wire will connect to the wire routed through the fender channel to our switch. This is the Ground path. Using a piece of split loom, cover the wire bundle coming from the hood. Use enough so that part of the loom will install into the hood bracing. Tape the ends.
Install a 5 amp fuse in the Auxilary fuse panel and if all is connected correctly, then you should have lights!
Test operation of the switch by simply pressing down on it. Next item is to close the hood and latch it. I had some issues with initial closing of the hood as it crimped down on the wires at the base of the hood. I am trying to locate a rubber plug that I can install to keep the wire and loom from slipping out of position.
If you have located and adjusted the hood switch properly the when the hood is fully closed and latched, the engine bay lights should be out. If this is not the case, you will need to remove the securing nut, disconnect the switch from the wire and add another washer to the switch to raise its height.
Engine Bay Lighting
Disclaimer: Every effort was made to ensure a correct and safe installation of this modification. But with all changes to a factory tested vehicle not every situtation can be forseen. All modifications were accomplished using simple hand tools and used parts from various motor vehicles. While every attempt has been made to simplify the installation not all situtations can be foreseen. It is assumed that anyone attempting this or any other modification understands the risks involved and basic knowledge of mechanics and electricity is implied. Any attempt to duplicate this or any other modification is done so at your own risk to both the installer and the vehicle into which it is installed. Please use common sense in all your modification efforts. To begin the installation of engine bay lighting there will be several items required for the installation. This modification was accomplished on a 1998 SR5 Toyota 4Runner by the writer.Besides some basic hand tools some items needed will be:
Portable or cordless drill
1/8" drill bit
drill bit the same diameter as the shaft of the switch
crimps
crimping tool
wire cutters
wire strippers
applicable metric wrenches for the switch and lock nut
electrical tape
split loom material
flat washers 3-5 required
Lighting fixtures � 2
Obtained from late model Cadillac Escalade. These lights were located under the front dash above the foot area on each side of the vehicle.
Activation switch � 1
1994 Toyota 4Runner rear passenger door which activated the dome light.
This switch was unscrewed from the rear door pillar. You will need to pull the side panel cover on the door post to get to the cable run. There will be a small single wire (red) with a white plastic connector. Unplug the connector then unscrew the switch and remove. You will need both ends of the connector.
18 gage wire in you own choice of colors. I obtained part of the wiring harness that runs from the front to the rear of the same 4Runner I obtained the switch from. My local wrecking yard had no real issue with my taking the harness, so I ended up with quite a bit of wire for this and future projects. Cost: $0.00
Split loom for parts of the install along with some 18 gage wire crimps.
One of the first tasks is to install the switch that will activate the lights when the hood is released/raised. I chose the location next to the left side hood cushion.
Initially I was going to mount it in the provided hole along the fender as can be seen in the photo, but when I attempted to shut the hood, the switch could not make any contact with the hood so this location was rendered unusable. Looking further I noticed that there was a flat angled spot on the hood itself next to the hood cushion. To better identify this location I took a piece of black electrical tape and folded it back over on itself. I centered the tape on the cushion and closed the hood. When I lifted the hood, the tape was stuck to the hood showing where the cushion actually contacted the hood.
Next I measured over approximately 1� from the center of the cushion and made a mark.
Measure the same distance on the hood using the tape as your center mark for the cushion.
I noted the location of the flat on the hood and then measured the distance and angle I would need. Marking the fender frame, the location of the switch would be on an angle but any closer to the cushion would not allow for a backing nut to be placed on the back of the threaded switch.
Draw another line and then measure about 1/8th of an inch and this will be where the pilot hole will be drilled.
NOTE: Be very careful when drilling this hole as there is a wire harness located below this location and there are live wires located in this harness.
Insert the switch into the hole from the top. Check the height of the cushion compared to the top of the switch. The switch must be slightly higher then the cushion. I need two flat washers between the switch mounting washer and the frame. Afix a flange washer (I believe this to be a 10 mm nut. I found one during my excursion to get the switch and wire. Do not tighten the nut down just yet. Next obtain another flat washer and slip it beneath the other two flat washer and the fender.
Tighten down the lower flange nut. Watch the angle of the switch as you tighten the switch into the hole. You want to keep this as close to 90 degrees as you can.
The next process is routing the wires. I used a heavier gage wire to be used as the pull wire. Beginning near the firewall you will notice a few openings in the fender well. The one we are concerned with is the one that enters into the fender channel near the top of the fender.
Feed the wire down the fender channel until it exits near the front of the fender and cross beam.
Now you can attach a single 18 gage wire to the pull wire using tape. Pull the wire slowly until it exits the hole in the fender well.
Feed the pull wire from the left side oblong hole downward to the circular hole near the fire wall. Use needle nose pliers to aid in pulling the wire through.
Attach a single wire to the pull wire and feed it though.
From the right side of the hood, route the pull wire from the oblong hole in the right side up towards the shorter or upper cross bracing. Push this across until it appears at the left side oblong hole. It may take several attempts and nudging the wire along to get to the left side hole. Once there pull it through.
Attach a pair of 18 gage wires to the pull wire and the feeding the wire in the hole as you pull it across to the left side hole.
You should now have a pair of wires running from the right side to the left side of the hood
The first lamp assembly is ready to be crimped onto the hood wires. I staggered the wire crimps so that when the wires are pulled into the supports, they are not too big. This is important when you put split loom on any of the wires as well as the overall diameter is smaller. Wrap the completed splice with electrical tape to give it a clean finished look.
Once the wires have been attached to the lamp assembly, begin to press the assembly into the oblong hole by feeding the excess wires into the hood bracing. There is a rivet in the base of the assembly which makes for a tight fit and will hold the assembly in place.
Continue pressing the assembly into the hole until it �snaps� in. The assembly should be flush with the bracing. If you do not get a tight fitting install then you will need to install a single 1/8th inch short pop rivet to hold the light assembly in place.
I chose to have the larger �Z� angle of the assembly facing forward. There is no right or wrong way to install these, but be consistent. Makes for a neater looking install.
On the left side, we will attach the second assembly but this time we will attach one lead to one of the wires coming from the right side assembly. The second wire of our left side assembly will attach to the wire that was run through the hood bracing to the firewall. When completed, you will have two wires exiting the lower hole of the hood bracing.
One wire will have a female spade connector crimped to it for connection to the hot side of a 12 vdc supply source. In this install I have an Auxiliary fuse panel installed so this will be used as our power source.
The second wire will connect to the wire routed through the fender channel to our switch. This is the Ground path. Using a piece of split loom, cover the wire bundle coming from the hood. Use enough so that part of the loom will install into the hood bracing. Tape the ends.
Install a 5 amp fuse in the Auxilary fuse panel and if all is connected correctly, then you should have lights!
Test operation of the switch by simply pressing down on it. Next item is to close the hood and latch it. I had some issues with initial closing of the hood as it crimped down on the wires at the base of the hood. I am trying to locate a rubber plug that I can install to keep the wire and loom from slipping out of position.
If you have located and adjusted the hood switch properly the when the hood is fully closed and latched, the engine bay lights should be out. If this is not the case, you will need to remove the securing nut, disconnect the switch from the wire and add another washer to the switch to raise its height.
Mar 16, 2008 | 07:08 PM
#4
I went to my local yard and pulled out a wire harness from a Gen 2 4runner that was part of the wiring for the tail lights and misc electrical systems. I do this to get OEM wires that are made to carry most any normal loading I would encouter on my various projects. Usually I can get enough wire of length to do a project and then some. So I guess the answer to your question is ... YES, I cut up a factory harness. I have scavenged harnesses from other vehicles before and they usually let me have what I put out of the crush cars for free. It also allows me to get wires that are similar in color coding as the OEM wires I am adding circuits to or accessories that are being spliced into the existing harnesses. Hey it saves me some money having to buy rolls of wire from the local auto parts store.
Last edited by Ritzy4Runner; Mar 16, 2008 at 07:11 PM.
Mar 17, 2008 | 05:56 AM
#5
Contributing Member
Joined: Mar 2003
Posts: 11,334
Likes: 0
From: COTKU,Ontario,Canada
Very nice and clean engine bay ritzy... I really really have to wash mine out... heh heh ... You could try a zip tie and one of those 1" square stick on mounting tab thingys or else a zip tie with a screw hole mount attached either one would give you the control to prevent pinching you're looking for...
inspiring job now I'll have to do something similar...
inspiring job now I'll have to do something similar...
Dec 14, 2009 | 06:55 AM
#7
Pretty much any local parts store should carry the aux fuse panel. I got mine from Auto Zone. I believe it was around $5. This is what it looks like installed
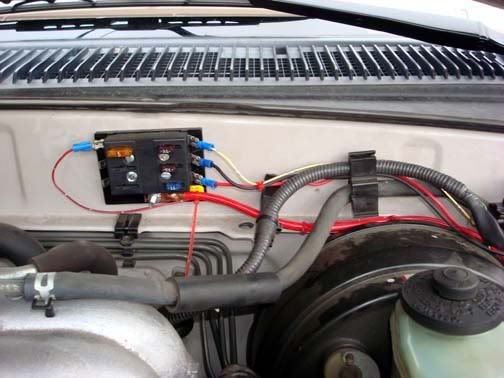
I located it on the firewall just to the left of the power brakes master cylinder (left as you are looking at it). Really simple install, mount to the firewall, run a length of 8 gauge power wire from the panel along the lower edge of the firewall over along the fender well to the battery terminal, crimp on lug that can be attached to the positive terminal clamp and the panel is hot. There are some install write ups you can also check.
I located it on the firewall just to the left of the power brakes master cylinder (left as you are looking at it). Really simple install, mount to the firewall, run a length of 8 gauge power wire from the panel along the lower edge of the firewall over along the fender well to the battery terminal, crimp on lug that can be attached to the positive terminal clamp and the panel is hot. There are some install write ups you can also check.
Trending Topics
Dec 15, 2009 | 06:05 AM
#9
Many of today's higher end luxury vehicles come with some sort of engine bay lighting so going to your favorite wrecking yard may yield numerous choices. At the time I found these I had not decided on this little add on to my Runner. It was while I was looking for an auto-dimming rear view mirror that I came across the Escalade floor board lights and started me to thinking that these may yield some excellent lighting in my engine bay. Due to the construction of the lights themselves, they also allowed minimal drilling as the rivet connector on the back of the lights provided an easy way to mount in the existing holes in the hood which eliminated cutting/drilling modifications to the hood as well. My choice of the door switch from another 4runner just allowed me to use a known quality switch that would hold up to the harsh environment of the engine bay and be reliable and weather proof. Hey it was a Toyota door switch! These made the decisions for me on which way to go. I'm sure if I were to start from scratch, I would transplant an existing configuration to help simplify the install.

 Dec 17, 2009 | 07:30 AM
#14
'Flatter spot' ... I chose the location based on a couple of things, first wanted to make it an easy install and minimize the amount of modifing to the front. Using the door switch also needed clearance and finding a good location along the front support is difficult. There are not too many flat spots that would provide for a easy install of the switch and have the correct clearance to adjust the switch for proper operation. I'm sure if I had all the right kind of specialty tools and could weld, braze, shape metal, clean, paint etc, I could have made it look even more factory. Maybe one day I will mod the mod!
Most of my mods are using proven components from other vehicles. Why try to engineer something that has already been figured out? By using parts from other vehicles located in wrecking yards, it makes them easy to obtain at minimal expense. If they fail at some time in the future, obtaining a replacement part is going to be fairly easy as it can be obtained again or even ordered! I have tried to take what I would consider nice to have accessories from one vehicle that were not in ours and then modify them for use in our trucks. Alot of times I find things that are great accessories and some items are really throw away items so you can pick them up very cheaply. Also I try to use common mechanics tools that most of us back yard mechanics would have in our tool box along with trying to make them a simple weekend project. Low cost and easy on istallation were the first goals.

An example would be the hood lift mod. You can find complete kits obtained from several sources for around $70 or more. They are usually of great quality and easy to install with common hand tools. All the thinking has been taken out of it as well as trying to source the parts. Thus the price and hey the guys who did these and offer them are not doing it for free. They spent time and effort to make it a simple install and provide you all you should need.
In my case, I wanted to see if I could locate the same or better parts and reduce the cost to me directly. Also using proven parts I used the rear lift gate hydraulics from a 95 Toyota Landcruiser. These bad boys are heavy duty. The weight of the rear lift gate is substainally more then our hoods and they had the right bends in the mounting plates. They could utililize an existing factory mounted bolt hole in the engine bay while using pop rivets and tygon tubing for bushings complete the mounting. At a total cost of less then $10 and the satifaction of doing it, what more can I say? Then passing that information along to other fellow Techers!
Another great mod is the auto dimming mirror. Toyota finally added that to their later generation 4runner and Tacoma trucks. Not much good to those of use who already own an older version. Enter the Yukon auto dimming mirror! It took some time and effort to get it out of the donor truck and then figuring out how to mount it in my truck but it had nothing but upside. Once installed, it would work great and added some side benefits as well, I had a compass/thermometer as well. My total cost ended up less then $40.

There are lots of great mods being done by many members of YOTA Tech. I feel greatful to be counted as one of those who have helped to contribute. Thats what makes this site one my most favorite and the first place I go when I have a problem.
It doesn't matter what your level of knowledge or what you do for a living, you level of mechnical ability or your choice of what you drive from all out hard core 4wheeler or Mallrunner,
 everyone can learn, profit and enjoy the contributions of all our members, I know I surely do!
Last edited by Ritzy4Runner; Dec 17, 2009 at 07:48 AM.
Dec 17, 2009 | 07:37 AM
#15
 Dec 17, 2009 | 04:03 PM
#16
And I even missed the hood lift mod! Another "Will Do" in the very near future cuz I'm just lazy and like the idea of unlatching and letting it lift on it's own!! Got a write up on that as well? Come to think of it, how many mod writeups do you have!!?? lol I'll be doin' a few searches tonight!

Excellent info to say the least!
Dec 17, 2009 | 08:09 PM
#17
Well here ya go so you can't say you missed it now! Enjoyhttps://www.yotatech.com/forums/f2/t...-lifts-148547/
 Dec 18, 2009 | 10:42 AM
#19

Thread
Thread Starter
Forum
Replies
Last Post


