

 Mar 30, 2016, 09:30 AM
Last edit by: IB Advertising
See related guides and technical advice from our community experts:
- Toyota Tacoma SRunner and XRunner Trucks That Turn Corners<br>Important information to help you understand your Tacoma.

Corner blinkers 96-2002 4Runner and Tacoma
Dec 22, 2007 | 09:15 AM
#1


Corner blinkers 96-2002 4Runner and Tacoma
Here is the complete write up on the corner light blinker conversion for those who did not subscribe to my post on this mod. I will be submitting a tech article as well. Let me know what you think guys Here is the link: https://www.yotatech.com/forums/f2/c...0701602:bigok:
Corner Blinkers For 96-2002 Toyota 4 Runner
Was looking for a simple but effective addition to my truck and this is as simple a mod that I have yet to do. When it comes to safety there is never enough you can do so here for your edification is my Corner light blinker option.
Some to the tools you will need:
#2 phillips screw driver
diagonal cutters
wire stripper
crimper
1/8th � drill bit
9/16th � drill bit
medium flat tip screwdriver
Utility knife
Q-tips swabs (2)
Parts:
1982-83 Honda Accord corner light sockets (194) (2 ea)
(4) wire crimps for 16-18 gauge wire
electrical tape
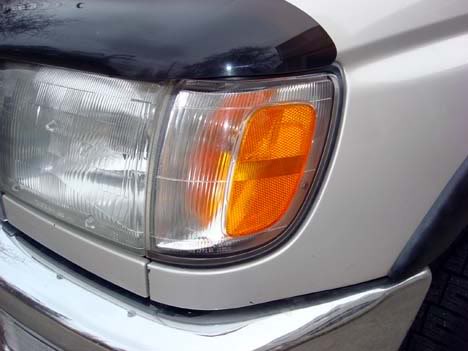
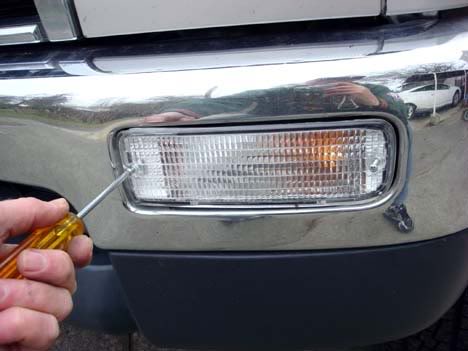
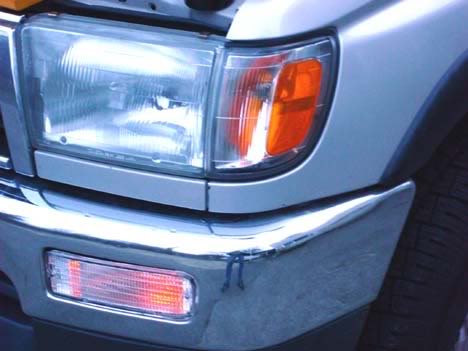
This is the stock OEM corner on a 1998 4Runner. The pictures in this write up will be of the drivers side or left side corner light.
This is what the 194 corner lights from the 82-83 Honda Accord look like
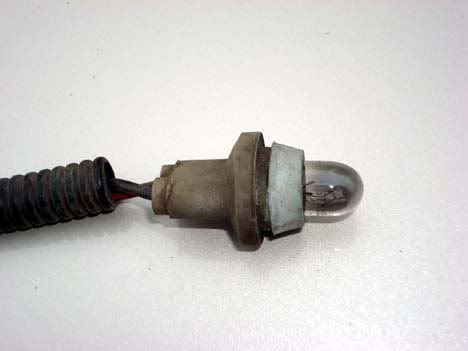
I chose these because they are a rubber grommet style insert unlike the twist-lock sockets on newer vehicles. In a previous write up, the author used a replacement socket utilizing an 1157 dual filament bulb. While these may be an effective alternative, it required drilling out the old twist-lock in the corner lights and then having to use silicone adhesive to seal the new socket in place is a short term fix at best. Without having to re-engineer the socket for ease of lamp replacement, I chose this option.
The up side for using the Accord sockets are many. They are small, will seal in the light assembly without any sealants or cutting new notches to make twist-lock sockets work. They will allow the use of the corner parking lights as designed as well.
First, open the hood and remove the hold down screw for the corner light.
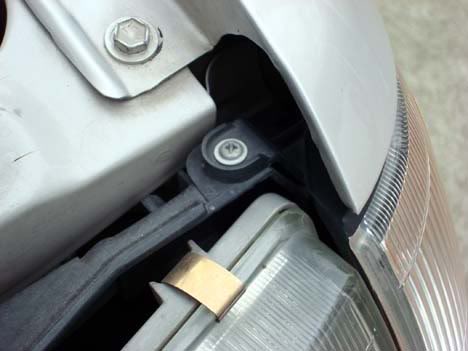
Grasping the corner light, pull it directly forward. It may be a tight, snug fit but you will eventually feel the lense begin to move and then it just lets go so be ready.
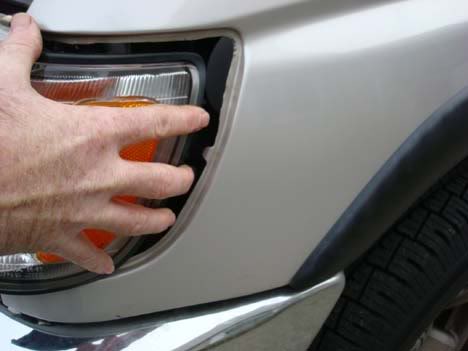
Hold the lense in one hand and squeeze the tab on the base of the connector. Pull the connector out of the socket.
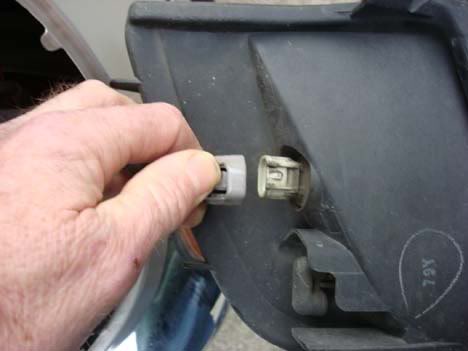
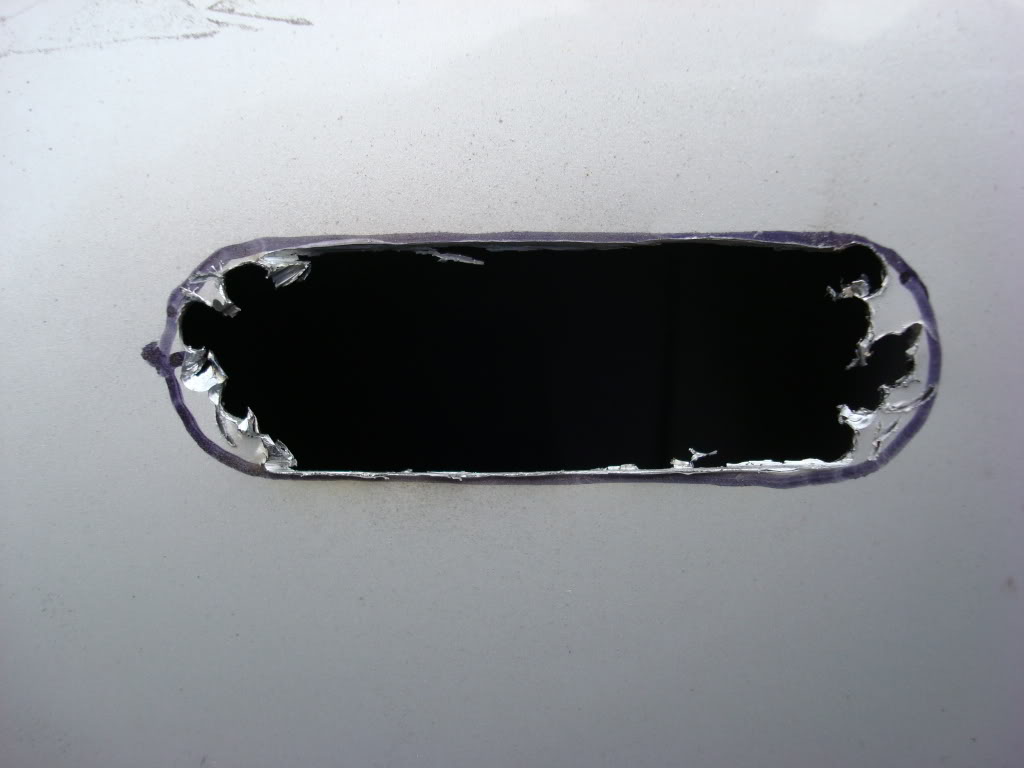
Twist the socket and remove from the lense. Locate a point approximately 1� above the OEM socket hole. Mark the center most position with a pen or Sharpie. This will be where you will drill your pilot hole with the 1/8th inch drill bit. Next you will need a 9/16th inch drill bit. I used a wood style bit mounted in a drill press. If you don�t have access to a drill press you can do it with a corded or cordless drill. Line up the point of the drill bit with the pilot hole and slowly drill out the new mounting hole above the OEM hole.
Trim up the edge of the hole to remove any slag pieces of plastic from drilling. I had to use a couple of Q-tips to remove some of the tiny bits of plastic slag that were being held by static electricity on the mirrored surface of the lense. Remove all of the shavings that you can. Ensure the hole edges are free of any remaining strands of plastic.
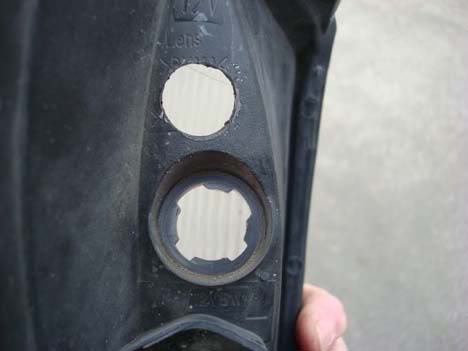
Gently but firmly press the rubber grommet of the Accord light socket in to the new hole and align the socket as shown.
Check that the socket is completely seated in the hole by checking for complete seating of the groove of the socket.
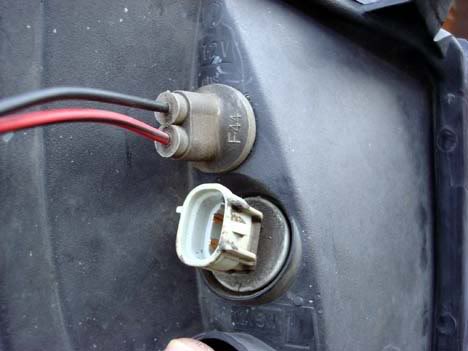
Next will be wiring the new sockets to be �blinkers�. Remove the bumper turn signals.
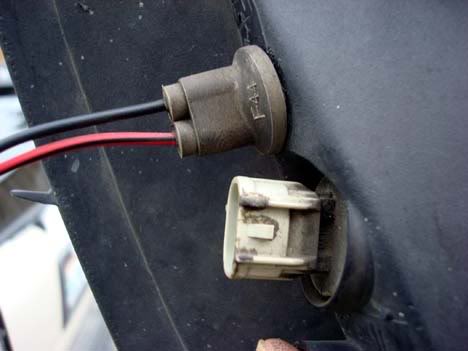
Disconnect the plug from the turn signal socket. There is s small tang that will need to be depressed in order to pull the plug free. Use a small tipped flat blad screw driver or a some other small tipped tool to press the tang down. Looking down from the top you will see the blinker wire is attached to an �L� shaped piece of plastic. Use the med tip flat blade screw driver and pry the clip out of its mounting hole near the bottom of the front support..
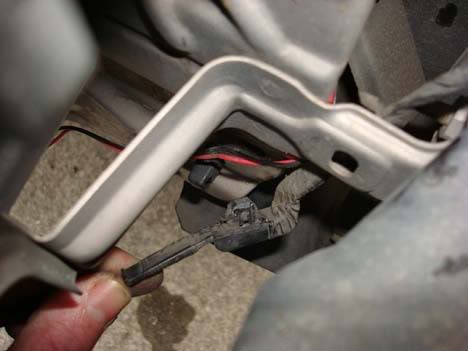
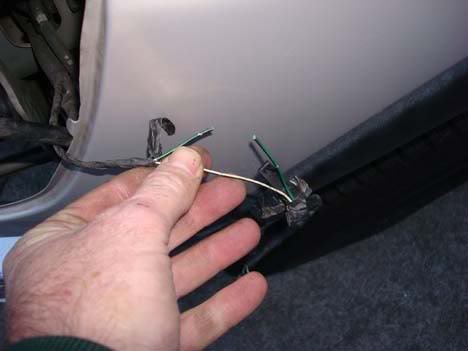
Pull the wires up through the opening where the corner light is attached to the fender so you can work on the wires.
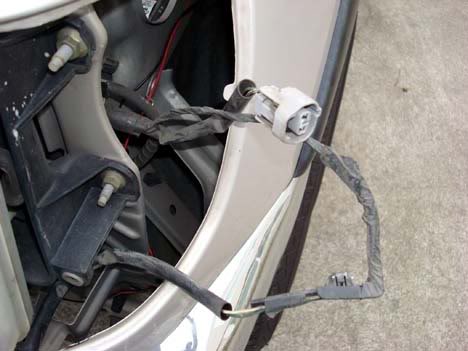
Remove the tape securing the plastic mount from the wires. It may require cutting the tape so if you must do this, be careful not to nick the wires. Remove part of the tape from the wires themselves exposing approximately 6-8 inches of the wires.
The wires exposed are identified as follows:
Left :
Green/Black +
White/Black �
Right:
Green/Yellow +
White/Black �
Accord blinker lights:
Red +
Black -
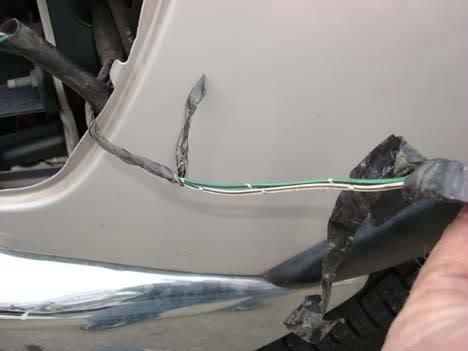
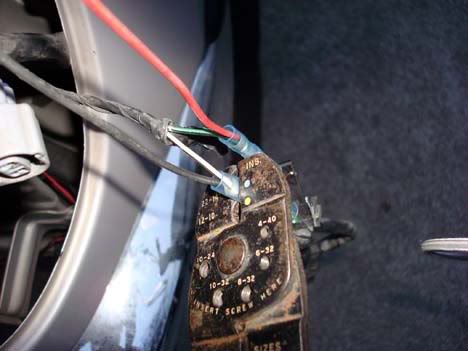
First cut the green wire and strip approximately �� of the insulation from each end.
Insert one end of the blinker wire into a crimp and crimp. Insert the second end along with the red wire from the new blinker and crimp. Ensure you push the wires in as far as they will go in the crimp.
Do the same with the remaining white/black and black wires.
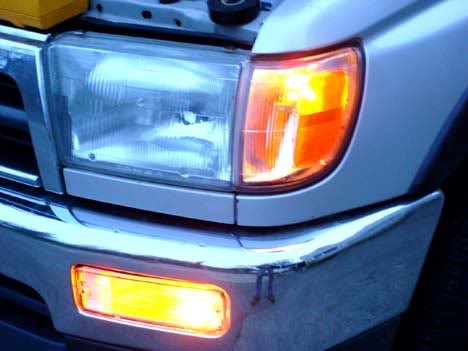
Test the lamp to ensure it is operating correctly. I just turned on the hazard flasher. This operates both left and right simultaneously. If the lamp is not blinking check the position of the bulb in the new socket. I had a minor problem with the bulb being seated too deeply in the socket. When you are satisfied with the operation, reinstall the socket (if removed for adjustment) then re tape the sections of the wires with new electrical tape. Start at the plastic mounting �L� and continue wrapping the wire bundle including the crimps wrapping to the ends of the crimps approximately 1 inch and then wrap the wires separately so you will have a completely wrapped �Y� looking harness. Route any excess wire into the opening of the Corner light and install the lense.
Install the mount screw, install the bumper blinker assembly and you�re done!
Corner Blinkers For 96-2002 Toyota 4 Runner
Was looking for a simple but effective addition to my truck and this is as simple a mod that I have yet to do. When it comes to safety there is never enough you can do so here for your edification is my Corner light blinker option.
Some to the tools you will need:
#2 phillips screw driver
diagonal cutters
wire stripper
crimper
1/8th � drill bit
9/16th � drill bit
medium flat tip screwdriver
Utility knife
Q-tips swabs (2)
Parts:
1982-83 Honda Accord corner light sockets (194) (2 ea)
(4) wire crimps for 16-18 gauge wire
electrical tape
This is the stock OEM corner on a 1998 4Runner. The pictures in this write up will be of the drivers side or left side corner light.
This is what the 194 corner lights from the 82-83 Honda Accord look like
I chose these because they are a rubber grommet style insert unlike the twist-lock sockets on newer vehicles. In a previous write up, the author used a replacement socket utilizing an 1157 dual filament bulb. While these may be an effective alternative, it required drilling out the old twist-lock in the corner lights and then having to use silicone adhesive to seal the new socket in place is a short term fix at best. Without having to re-engineer the socket for ease of lamp replacement, I chose this option.
The up side for using the Accord sockets are many. They are small, will seal in the light assembly without any sealants or cutting new notches to make twist-lock sockets work. They will allow the use of the corner parking lights as designed as well.
First, open the hood and remove the hold down screw for the corner light.
Grasping the corner light, pull it directly forward. It may be a tight, snug fit but you will eventually feel the lense begin to move and then it just lets go so be ready.
Hold the lense in one hand and squeeze the tab on the base of the connector. Pull the connector out of the socket.
Twist the socket and remove from the lense. Locate a point approximately 1� above the OEM socket hole. Mark the center most position with a pen or Sharpie. This will be where you will drill your pilot hole with the 1/8th inch drill bit. Next you will need a 9/16th inch drill bit. I used a wood style bit mounted in a drill press. If you don�t have access to a drill press you can do it with a corded or cordless drill. Line up the point of the drill bit with the pilot hole and slowly drill out the new mounting hole above the OEM hole.
Trim up the edge of the hole to remove any slag pieces of plastic from drilling. I had to use a couple of Q-tips to remove some of the tiny bits of plastic slag that were being held by static electricity on the mirrored surface of the lense. Remove all of the shavings that you can. Ensure the hole edges are free of any remaining strands of plastic.
Gently but firmly press the rubber grommet of the Accord light socket in to the new hole and align the socket as shown.
Check that the socket is completely seated in the hole by checking for complete seating of the groove of the socket.
Next will be wiring the new sockets to be �blinkers�. Remove the bumper turn signals.
Disconnect the plug from the turn signal socket. There is s small tang that will need to be depressed in order to pull the plug free. Use a small tipped flat blad screw driver or a some other small tipped tool to press the tang down. Looking down from the top you will see the blinker wire is attached to an �L� shaped piece of plastic. Use the med tip flat blade screw driver and pry the clip out of its mounting hole near the bottom of the front support..
Pull the wires up through the opening where the corner light is attached to the fender so you can work on the wires.
Remove the tape securing the plastic mount from the wires. It may require cutting the tape so if you must do this, be careful not to nick the wires. Remove part of the tape from the wires themselves exposing approximately 6-8 inches of the wires.
The wires exposed are identified as follows:
Left :
Green/Black +
White/Black �
Right:
Green/Yellow +
White/Black �
Accord blinker lights:
Red +
Black -
First cut the green wire and strip approximately �� of the insulation from each end.
Insert one end of the blinker wire into a crimp and crimp. Insert the second end along with the red wire from the new blinker and crimp. Ensure you push the wires in as far as they will go in the crimp.
Do the same with the remaining white/black and black wires.
Test the lamp to ensure it is operating correctly. I just turned on the hazard flasher. This operates both left and right simultaneously. If the lamp is not blinking check the position of the bulb in the new socket. I had a minor problem with the bulb being seated too deeply in the socket. When you are satisfied with the operation, reinstall the socket (if removed for adjustment) then re tape the sections of the wires with new electrical tape. Start at the plastic mounting �L� and continue wrapping the wire bundle including the crimps wrapping to the ends of the crimps approximately 1 inch and then wrap the wires separately so you will have a completely wrapped �Y� looking harness. Route any excess wire into the opening of the Corner light and install the lense.
Install the mount screw, install the bumper blinker assembly and you�re done!
Dec 22, 2007 | 12:42 PM
#2
Contributing Member
Joined: Sep 2003
Posts: 10,549
Likes: 0
From: Littleton,CO
So,teh actual turn signal is just the parking light right? Does the corner still light up continuous.
I like the mod but I wouldn't post several threads for it.
I like the mod but I wouldn't post several threads for it.
Last edited by X-AWDriver; Dec 22, 2007 at 12:44 PM.
Dec 22, 2007 | 02:43 PM
#3
In response to your question: The bumper mounted OEM turn signal is still the turn signal. It does NOT l;ight continuously like a parking light. What I have done is ADD the ability for the corner light to act as a turn signal and blink. The OEM corner light, by design, was only a parking light. This function remains and was not altered. I ADDED the new socket and bulb to the corner to provide the ability for a second more visible signal to the side as well as the front.
As for putting several threads, if you check you will note the beginning thread was to enlighten that it was coming showing the finished pictures of flashing on then off. I then posted back to the original thread as some who responded to my first thread had subscribed to it waiting for the finished result. As a courtesy to those who had responded to my original post, I posted the completed thread as well as submitting the completed write up to the Tech Section.
As some may not have subscribed to the original, I posted the entire article as a stand alone post. In fact if you read the beginning of this post you will see my disclaimer to that effect! All I was doing was letting the max number see the mod. There is another mod out there which is much more difficult but a gr8 idea non the less. I found a simpler more effective method which will save problems down the line.
I hope this answered your questions. If you desire any other imformation I welcome your questions, comments and suggestions.
Last edited by Ritzy4Runner; Dec 22, 2007 at 02:50 PM.
Jan 26, 2008 | 08:03 PM
#5
Registered User
Joined: May 2007
Posts: 2,175
Likes: 2
From: Denver metro area-CO
Ritzy thanks very much for the most excellent write up . I was able to get mine wired up today with some warm weather at last coming around again.
I wanted to mention I could not locate the 82-83 Honda Accords at the junkyards-but did get some of the same lighting "plugs" off of a 84 Honda Prelude (I believe it was) which had both large and small size plug sockets for the front corner marker lights. I also found an 84 Civic wagon (hood tilts from firewall forward) which had the plugs needed to make the mod work. Having searched most nearby junkyards I do feel safe in saying no other manufacturer appears to have used these type of plugs, as most every car maker favors the twist and lock type.
As for the "need" of this mod-it can be important if you add the newer style of ARB Tacoma front bumper-it is not flat across the face of the bumper-so the turn signal indicators up front can be hidden when you are at an angle to oncoming traffic. The mod helps give other drivers another place to focus on my intentions to turn.
Very well written up and I look forward to trying a few others of your mods. Outstanding photos accompanying the instructions, thanks again sir.
Jan 28, 2008 | 06:30 AM
#6
Ron, thanks for your encouragement and kudos. Gr8 infor on the other Honda's. I have always found that pictures really make a difference when trying to describe how to do something. Learned that from being a Naval Instructor for 6 years.
As for up coming mods, I have started another one that is an updated version of the side marker install. Found the side markers from a late model VW Beetle and have one installed on the drivers side, the passenger side will be a bit more involved as the antenna is installed in that fender. To install these lamps you need to either remove the fender or at least detach it from the rear so you can get behind the fender to mount the housings. They are secured from inside with 2 #20 TORX screws. The upgrade is that the later model Beetles use LEDs in the side markers unlike those found on most other european cars which use regular bulbs. They are really bright and very visable. The lamps consist of about 10 LED's in a reflective zig zag mounting. When installed they project the light out and rearward. Another safety upgrade I really like. Will finish this one up when the weather warms a bit. Congrats on your install!
 Jan 28, 2008 | 06:44 AM
#7
Registered User
Joined: May 2007
Posts: 2,175
Likes: 2
From: Denver metro area-CO
yeah trust me I am lurking along on the BUG led for the side marker-I just can't picture making a cut like that in my rig... maybe after a shot or two...
And not to beat this to death but can you think of a way to make this mod more effective in daylight conditions with existing factory corner lens?
I am thinking simply of a different colored bulb-but deep down I think the answer is to go to clear corners with amber inserted 194 bulbs for both marker light and separate amber inserted 194 bulb for new turn signal enhancement.
I guess I really don't know what all colors the 194 bulbs(or their many numerical equivalent bulb) come in --but what would show up the best in daylight conditions?
Trending Topics
Jan 28, 2008 | 09:21 AM
#8
And not to beat this to death but can you think of a way to make this mod more effective in daylight conditions with existing factory corner lens?
I guess I really don't know what all colors the 194 bulbs(or their many numerical equivalent bulb) come in --but what would show up the best in daylight conditions?
I guess I really don't know what all colors the 194 bulbs(or their many numerical equivalent bulb) come in --but what would show up the best in daylight conditions?
Last edited by Ritzy4Runner; Jan 28, 2008 at 09:32 AM.
Aug 7, 2008 | 05:46 AM
#10
Registered User
Joined: May 2007
Posts: 2,175
Likes: 2
From: Denver metro area-CO
80s Hondas
[QUOTE=Ron Helmuth;50733346].... Having searched most nearby junkyards I do feel safe in saying no other manufacturer appears to have used these type of plugs, as most every car maker favors the twist and lock type.
okay I am quoting from myself but...
I have been through most every foreign manufacturer wrecks and early 80s Hondas appear to be the only car maker that used these. Note that some folks have adopted the twist/lock type of mounting-but that requires real cutting skill to form the extra "tab" space to insert the bulb and twist to lock it down.
Slee Off Road has a writeup on that type of set up.
 Aug 7, 2008 | 11:59 AM
#13
Registered User
Joined: Jan 2007
Posts: 214
Likes: 0
From: Lake County, IL
Here is how I did mine with no cutting at all.
https://www.yotatech.com/forums/f131...ignals-147786/
https://www.yotatech.com/forums/f131...ignals-147786/
Aug 8, 2008 | 09:16 AM
#15
Registered User
Joined: Aug 2007
Posts: 9
Likes: 0
problem conveniently solved
Here's a coincidence for you. Yesterday, I received my $25 ebay headlights for my 95 Tacoma. I got the ones with the 'built-in city lights'. I never planned to use those stupid blue bulbs anyway, so i yanked them out.
Turns out, they're just like the 82-83 Honda sockets that are so hard to find.
Perfect.
So, for those interested in wiring the corner light on their 95-? Tacoma for blinkers, spend $25 on some ebay headlights and use the stupid 'city lights' that come with them.
Turns out, they're just like the 82-83 Honda sockets that are so hard to find.
Perfect.
So, for those interested in wiring the corner light on their 95-? Tacoma for blinkers, spend $25 on some ebay headlights and use the stupid 'city lights' that come with them.
Aug 8, 2008 | 12:22 PM
#16
Registered User
Joined: Jan 2007
Posts: 214
Likes: 0
From: Lake County, IL

 Welp... next time Ill know...
Aug 11, 2008 | 09:03 AM
Welp... next time Ill know...
Aug 11, 2008 | 09:03 AM
#20
Registered User
Joined: Aug 2008
Posts: 111
Likes: 0
From: Moon Base
dirtoyboy, for me, it had to be done because I didnt get lights put in my new bumper (OPS!) Even tho most aftermarket bumpers out ther have the signals built in, for guys like me, this it pretty helpfull.


