sbarnesvta's 1992 Pickup Build-Up Thread
 03-07-2010, 05:41 PM
#1
Registered User
Thread Starter

Join Date: Jan 2010
Posts: 109
Likes: 0
Received 0 Likes
on
0 Posts
sbarnesvta's 1992 Pickup Build-Up Thread SAS
Hey guys
Im pretty mew to the site only been around a month or so.
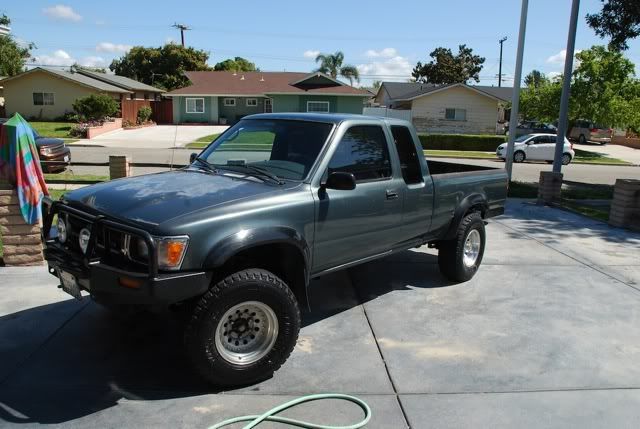
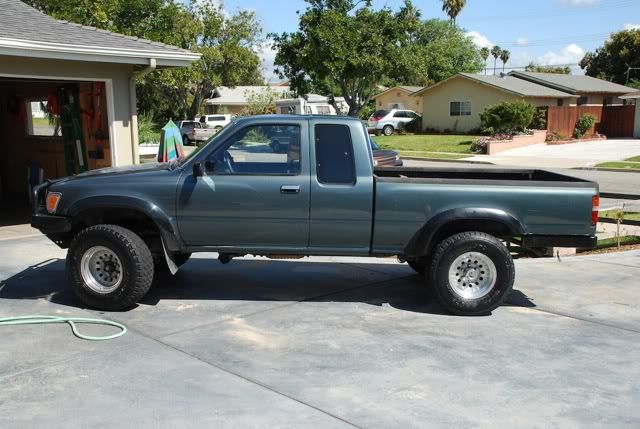
I picked up a 1992 toyota pickup DLX 4x4 xcab. It has the stock 3.0L V6 motor.
The truck is pretty much stock at the moment.
Plans for the truck:
1) Interior- Rip all the carpet out and herculine the interior.
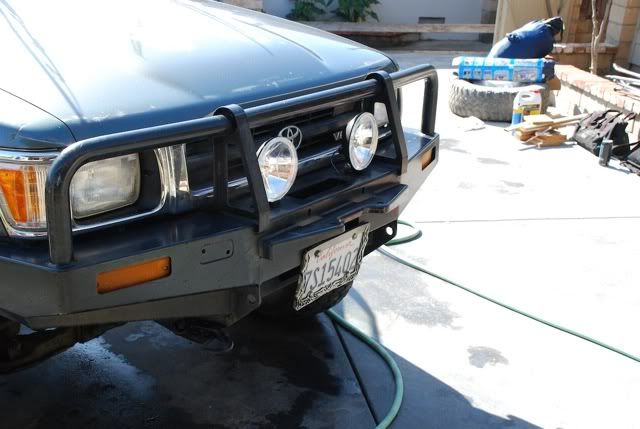
2) New Rear Bumper (truck came with an ARB front bumper) and Rock sliders
3) Fix windshield wipers and sprayer setup (long story ill explain later)
4) New audio system for inside and out (gotta have tunes for the camp site)
5) Solid Axle Swap (trying to collect parts, as soon as I get everything together I will be swapping front ends).
6) New tires (33x10.5 MTR KM2)
7) Repaint truck
I have attached a couple pictures attached below, let me know what you guys think. I am sure I will have a ton of questions.
Im pretty mew to the site only been around a month or so.
I picked up a 1992 toyota pickup DLX 4x4 xcab. It has the stock 3.0L V6 motor.
The truck is pretty much stock at the moment.
Plans for the truck:
1) Interior- Rip all the carpet out and herculine the interior.
2) New Rear Bumper (truck came with an ARB front bumper) and Rock sliders
3) Fix windshield wipers and sprayer setup (long story ill explain later)
4) New audio system for inside and out (gotta have tunes for the camp site)
5) Solid Axle Swap (trying to collect parts, as soon as I get everything together I will be swapping front ends).
6) New tires (33x10.5 MTR KM2)
7) Repaint truck
I have attached a couple pictures attached below, let me know what you guys think. I am sure I will have a ton of questions.
Last edited by sbarnesvta; 08-23-2010 at 09:17 PM.
 03-19-2010, 07:22 PM
#2
Registered User
Thread Starter
Join Date: Jan 2010
Posts: 109
Likes: 0
Received 0 Likes
on
0 Posts
Well i finally made it home after 8 days in texas for work.
Step 1: DONE
I was able to remove all the carpet and herculiner the interior before i left, it was nice to leave the truck open in the garage while I was gone. The truck does smell nearly as bad and when the stuff was being applied. I will post up some pics later this week.
Step 2: IN PROGRESS
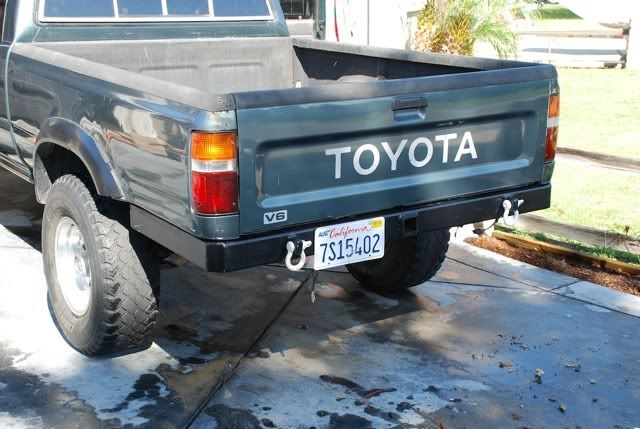
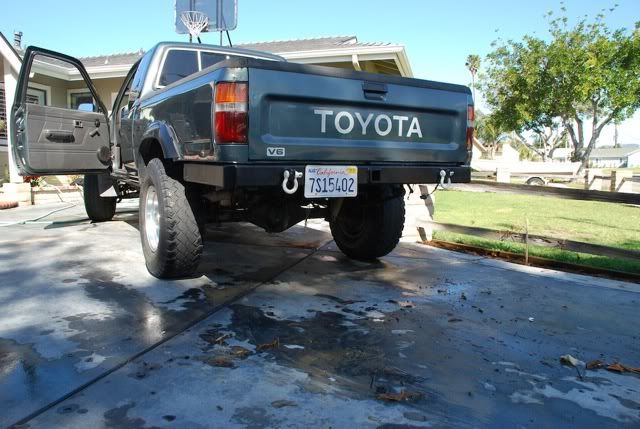
I spend a couple hours the last 2 days making working on a rear bumper. After toying around with ideas for a while, i am going for a high clearance bulletproof bumper.
Day 1: remove old bumper and tow set-up, clean up old tow setup and throw a fresh coat of primer on it, rough cut stock 2x4 steel for bumper,
Day 2: Tack bumper together to get a rough idea of dimensions, remove roughly 6" from the bottom of the bed, clean up frame, finish mocking up rear bumper, final cut and weld rear bumper up, mock up mounting plates for bumper
Day 3: To Be Determined
Here area few pics of the progress so far, i dropped the spare tire so you can see the rear clearance I will have when its done. I am also planning on mounting the rear tire somewhere on the side of the bed.
Step 1: DONE
I was able to remove all the carpet and herculiner the interior before i left, it was nice to leave the truck open in the garage while I was gone. The truck does smell nearly as bad and when the stuff was being applied. I will post up some pics later this week.
Step 2: IN PROGRESS
I spend a couple hours the last 2 days making working on a rear bumper. After toying around with ideas for a while, i am going for a high clearance bulletproof bumper.
Day 1: remove old bumper and tow set-up, clean up old tow setup and throw a fresh coat of primer on it, rough cut stock 2x4 steel for bumper,
Day 2: Tack bumper together to get a rough idea of dimensions, remove roughly 6" from the bottom of the bed, clean up frame, finish mocking up rear bumper, final cut and weld rear bumper up, mock up mounting plates for bumper
Day 3: To Be Determined
Here area few pics of the progress so far, i dropped the spare tire so you can see the rear clearance I will have when its done. I am also planning on mounting the rear tire somewhere on the side of the bed.

 03-19-2010, 08:07 PM
#4
Registered User
Thread Starter
Join Date: Jan 2010
Posts: 109
Likes: 0
Received 0 Likes
on
0 Posts
mine also came on the truck but i believe they are american racing american outlaw II machine rims
http://images04.olx.com/ui/3/09/56/6...W-II-15-MA.jpg
http://images04.olx.com/ui/3/09/56/6...W-II-15-MA.jpg
03-21-2010, 05:32 PM
#6
Registered User
Thread Starter
Join Date: Jan 2010
Posts: 109
Likes: 0
Received 0 Likes
on
0 Posts
^ Not a problem,
Got a little more work done on the bumper today,
- Machined, reinforced, and welded mounting brackets
- Welded brackets to bumper in final location
- Finished all end caps and began welding them in place
- Finished shackle mounts
Still to do
- Finish welding caps
- Finish welding main support bracket
- Grind, Sand, Prime, Paint
I am hoping to have this finished and mounted on tuesday with pictures to follow.
03-27-2010, 09:03 AM
#7
Registered User
Thread Starter
Join Date: Jan 2010
Posts: 109
Likes: 0
Received 0 Likes
on
0 Posts
Got the bumper somewhat finished for now.
I still need to figure out what tires i'm going to run before i finish off the side bars, but other than that it should be good to go.
Ill post up some pics a little bit later today.
One other question where are you guys mounting the license plate on a custom rear bumper? I'm looking for some creative ideas and pics would help
Trending Topics
04-04-2010, 06:39 PM
#8
Registered User
Thread Starter
Join Date: Jan 2010
Posts: 109
Likes: 0
Received 0 Likes
on
0 Posts
A bunch of updates and pics coming!
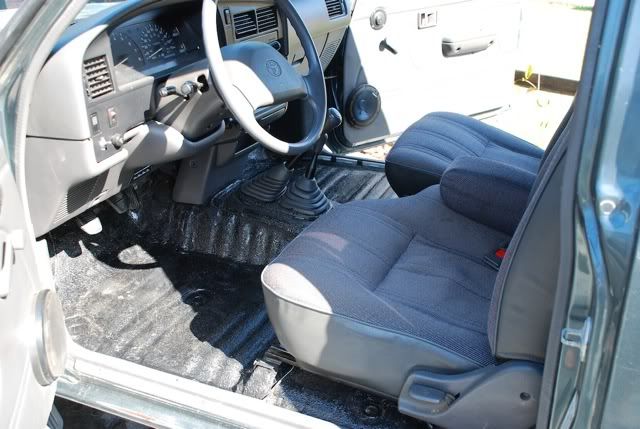
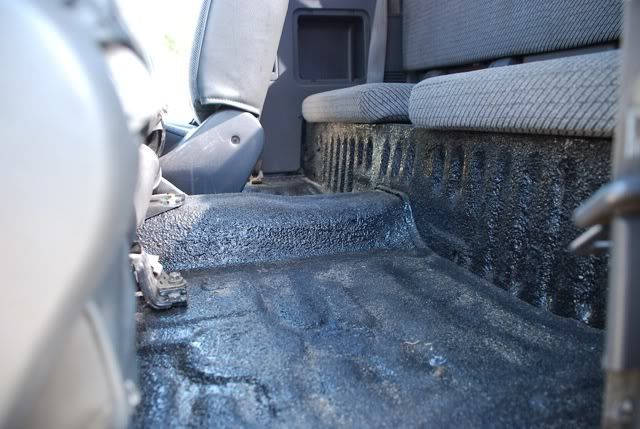
First- Remove all interior carpet and rhinoline interior. I wish I had taken more pictures of the process but it was pretty straight forward.
Day 1: Remove seats, hardware and carpet, vacuum and sweep out truck, clean with acetone, scuff all interior paint, one final wipe down.
Day 2: Wipe down one last time to make sure there is nothing left behind. Apply coat #1 of herculiner. 8hrs later apply coat #2.
Day 3: Apply final coat #3. I ended up letting it sit for another 2 days to fully cure before i reinstalled the seats. It also happened that I had to go to texas for work for a week so the truck got to cure another week or so before i used it. So i let it air out for a week, and the smell is just about gone.
I am extremely happy with how it turned out and the durability so far. I don't worry tracking mud or anything inside because it just wipe away.
here are a few pics.
 04-04-2010, 06:45 PM
#10
Registered User
Thread Starter
Join Date: Jan 2010
Posts: 109
Likes: 0
Received 0 Likes
on
0 Posts
Next up was replace the crappy off-road lights the truck came with that didn't work with some Hella 500's. I bought a pair from autozone and when i got them home I found that they had been previously installed and missing all the mounting hardware and wiring harness. So i found another pair at another autozone locally and exchanged them.
The whole process took about 2 hrs after removing the old lights, installing the new lights and wiring them up.
I used the the day after I installed them and they made a HUGE difference, but i'm thinking I might be modding the with an HID kit in the future.
here are a couple pics

The whole process took about 2 hrs after removing the old lights, installing the new lights and wiring them up.
I used the the day after I installed them and they made a HUGE difference, but i'm thinking I might be modding the with an HID kit in the future.
here are a couple pics
04-04-2010, 06:57 PM
#11
Registered User
Thread Starter
Join Date: Jan 2010
Posts: 109
Likes: 0
Received 0 Likes
on
0 Posts
And last but not least I was finally able to take the truck out with some friends. w
We made our way up to pismo, ca for the day.
So i had to make a last minute whip mount because there require. It is machine out of 6061 aluminium.

The truck did alright in the sand, only managed to get stuck once (my stupidity theand damn open diffs).
I was cruising around in 2wd for part of the day, but the stock 4.10 gearing with 31's and open rear diff sucks in the sand. The engine would bog in 1st and just didnt have to balls I was used to with my last truck (82 chevy k30 454 detroit locker front and rear).
So i ended up just cruising around in 4hi and 4lo all day, but I still had a blast.
I think after this trip i have decided to go with 35" tires and 5.29 gearing. A good friend has a 93 SAS with 35's and 5.29 and a locker in the rear and it just seamed to be a good match.
Of course we forgot the camera's and my wondering iphone was perishing so i don't have any pics, but ill put up a couple pics of the truck as it sits now.
I am still on the lookout for a solid front axle so i can get going on my SAS. the current plan is-
- 85 Front axle, armored, 5.29, selectable locker (possibly some dirty 30's or longfields)
- 5.29's and selectable locker for the rear
- 4" or 5" TG IFS eliminator kit
- 35" BFG MTR KM2's
and this thing should be good to go for a while.

We made our way up to pismo, ca for the day.
So i had to make a last minute whip mount because there require. It is machine out of 6061 aluminium.
The truck did alright in the sand, only managed to get stuck once (my stupidity theand damn open diffs).
I was cruising around in 2wd for part of the day, but the stock 4.10 gearing with 31's and open rear diff sucks in the sand. The engine would bog in 1st and just didnt have to balls I was used to with my last truck (82 chevy k30 454 detroit locker front and rear).
So i ended up just cruising around in 4hi and 4lo all day, but I still had a blast.
I think after this trip i have decided to go with 35" tires and 5.29 gearing. A good friend has a 93 SAS with 35's and 5.29 and a locker in the rear and it just seamed to be a good match.
Of course we forgot the camera's and my wondering iphone was perishing so i don't have any pics, but ill put up a couple pics of the truck as it sits now.
I am still on the lookout for a solid front axle so i can get going on my SAS. the current plan is-
- 85 Front axle, armored, 5.29, selectable locker (possibly some dirty 30's or longfields)
- 5.29's and selectable locker for the rear
- 4" or 5" TG IFS eliminator kit
- 35" BFG MTR KM2's
and this thing should be good to go for a while.
04-04-2010, 07:09 PM
#12
Registered User
Join Date: Feb 2010
Posts: 47
Likes: 0
Received 0 Likes
on
0 Posts
Nice bumper. If worse comes to worst with my '87, I might just cut off the lower bed panels, because all the rust is just in that seam and on the lower panels. Then I was thinking about fabricating some kind of under-bed tool boxes. Now I am thinking boxes in front and a wrap around bumper like you did.. still I gotta wonder why you didn't just build some armor around your rear bed panels because they didn't look rusted out at all. Cutting up a non-rusted bed is not something we understand in the Northeast 
04-05-2010, 08:11 PM
#13
Registered User
Thread Starter
Join Date: Jan 2010
Posts: 109
Likes: 0
Received 0 Likes
on
0 Posts
Nice bumper. If worse comes to worst with my '87, I might just cut off the lower bed panels, because all the rust is just in that seam and on the lower panels. Then I was thinking about fabricating some kind of under-bed tool boxes. Now I am thinking boxes in front and a wrap around bumper like you did.. still I gotta wonder why you didn't just build some armor around your rear bed panels because they didn't look rusted out at all. Cutting up a non-rusted bed is not something we understand in the Northeast
As far as the whole bumper project. The previous owner had backed into a couple things or maybe just one good thing, which left quite a bit of damage to the bottom of the bed on the drivers side when the bumper was removed. The bumper was also completely rotted out and had been reinforced a couple times (non of which looked successful) so i figured while building a bumper i might as well get rid of the bed damage and add in some rear sliders for the bumper.
04-13-2010, 07:24 PM
#14
Registered User
Thread Starter
Join Date: Jan 2010
Posts: 109
Likes: 0
Received 0 Likes
on
0 Posts
Recent Purchase update:
Picked up a couple used BFG M/T 33x12.5x15 Tires for $50.
They still have some life for them, but i'm going to us them for mocking up purposes.
Next I took a day trip to Hungry Valley OHV Park in Gorman, CA.
It was my first trip out there and we had a blast. I went with a couple friends and we took one other built toyota out there.
I was very happy with how the truck performed with the stock suspension and drivetrain, but it will be nice when she's all built
We ended up doing a couple trails one being a black diamond (I don't understand their grading system there because I was able to do without too much trouble, I think it might have been the tight turns and a few climbs).
The trails we picked ended up being about a 2hrs round trip.
Here are a couple pictures below:
Making my way through the little sluice box:


Cruising up a climb:

Truck Posing:


A buddy's truck

The next project will be some rock sliders, finish up the rear bumper, and add some more panel armor in the rear.
I also might have found a front axle for the truck available relatively close, let's hope all goes well with it.
Picked up a couple used BFG M/T 33x12.5x15 Tires for $50.
They still have some life for them, but i'm going to us them for mocking up purposes.
Next I took a day trip to Hungry Valley OHV Park in Gorman, CA.
It was my first trip out there and we had a blast. I went with a couple friends and we took one other built toyota out there.
I was very happy with how the truck performed with the stock suspension and drivetrain, but it will be nice when she's all built
We ended up doing a couple trails one being a black diamond (I don't understand their grading system there because I was able to do without too much trouble, I think it might have been the tight turns and a few climbs).
The trails we picked ended up being about a 2hrs round trip.
Here are a couple pictures below:
Making my way through the little sluice box:
Cruising up a climb:
Truck Posing:
A buddy's truck
The next project will be some rock sliders, finish up the rear bumper, and add some more panel armor in the rear.
I also might have found a front axle for the truck available relatively close, let's hope all goes well with it.
04-20-2010, 07:14 PM
#15
Registered User
Thread Starter
Join Date: Jan 2010
Posts: 109
Likes: 0
Received 0 Likes
on
0 Posts
WAHOOOOO
I finally found a front axle out of an 85' pickup. The previous owner was swapping a bunch of chevy stuff into his truck and getting rid of the toyota stuff.
Today I picked up
-85' Toyota Solid Front axle w/4.10 gears
-another 4cyl transfer case (planning on a dual case setup for this thing)
-waiting for the aussie locked 3rd member to be pulled out of the rear
-and a couple other misc parts
So i got home today and started cleaning up the axle, the plan was to take the hubs apart, but that eventually led to tearing the whole axle down. I got one side completely disassembled and will have to work on the other side next time i have some time off work.
I am also going to order up my TG 3" IFS eliminator kit, but im not quite sure what i want to do in the rear yet. Ill probably just end up ordering the TG 4" Rear kit.
Ill post up some pics later
04-24-2010, 08:50 AM
#16
Registered User
Thread Starter
Join Date: Jan 2010
Posts: 109
Likes: 0
Received 0 Likes
on
0 Posts
Well springs showed up yesterday, I came home to the front a rear leaves sitting on the porch, apparently most of the other stuff will be in monday. I am just hoping the axle rebuild stuff will be here so i can get going on putting that back together.
This build is going to take a lot longer than I thought because of school and work. I am a full time student and own a small freelance audio engineering company so i think i will be home one day in the next couple weeks.
Here are a couple work pics


Enjoy!
Also Does anyone have a good degreaser they recommend for cleaning up an axle?
This build is going to take a lot longer than I thought because of school and work. I am a full time student and own a small freelance audio engineering company so i think i will be home one day in the next couple weeks.
Here are a couple work pics
Enjoy!
Also Does anyone have a good degreaser they recommend for cleaning up an axle?
04-24-2010, 03:10 PM
#17
Registered User
05-02-2010, 07:53 PM
#18
Registered User
Thread Starter
Join Date: Jan 2010
Posts: 109
Likes: 0
Received 0 Likes
on
0 Posts
Thanks for the info, I ended up picking up 2 bottle of yellow top oven cleaner. It worked great to take all the road grime. I will need to grind all the extra tabs off and bracket off the axle and get the axle down to bare metal. My goal is to get this stuff done by friday.
I found a great deal on an used 33x12.5x15 BFG A/T tires that still had there little wear tabs on them. I'm guessing they still have about 95% tread left on them. I am hoping to have those mounted up in the next couple weeks.
Last but not least, As I was pulling the hubs apart i noticed that one of the hubs had a broken selector knob so if you have one laying around or know someone with an extra set of hubs for a 85 front axle I need them.
05-09-2010, 09:04 AM
#19
Registered User
Thread Starter
Join Date: Jan 2010
Posts: 109
Likes: 0
Received 0 Likes
on
0 Posts
i managed to find another complete set of IFS hubs at the local pick a part for $35. So i was able to get the parts i needed off of those to make them work. Here are a couple pics of painting and rebuilding those.
Selector knob all painted up

Selector knob being installed

Selector Installed

Locking ring being installed


All Assembled I stil need to paint the letters white but you get the idea

Selector knob all painted up
Selector knob being installed
Selector Installed
Locking ring being installed
All Assembled I stil need to paint the letters white but you get the idea


