

 02-10-2016, 09:29 AM
Last edit by: IB Advertising
See related guides and technical advice from our community experts:
Browse all: Steering & Suspension Guides
- Toyota 4Runner 1984-1995 How to Replace Ball Joints
Step by step instructions for do-it-yourself repairs
Browse all: Steering & Suspension Guides

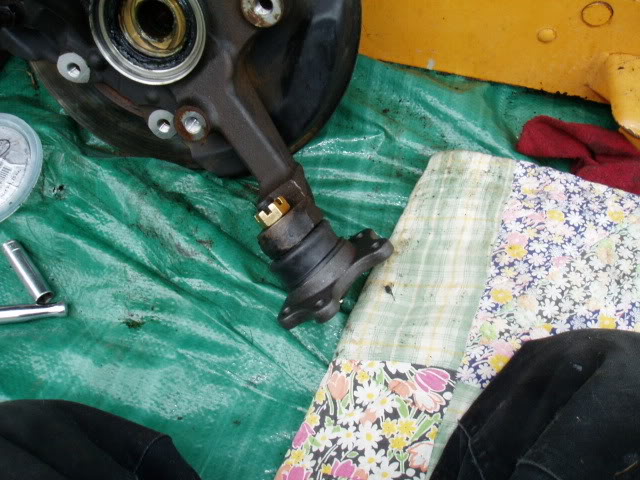
CV, Ball joint, TRE, replacement write up with PICTURES!!
10-04-2010, 08:02 PM
#41
Registered User
Join Date: Feb 2010
Location: Fayetteville, AR
Posts: 56
Likes: 0
Received 0 Likes
on
0 Posts
Appreciate this writeup man, pictures are some of the best on any thread on Yotatech.
Just got my drivers side done this weekend, should have sprayed those six nuts connecting to the differential down before hand though....huge pain to get them out.
Lesson learned
Just got my drivers side done this weekend, should have sprayed those six nuts connecting to the differential down before hand though....huge pain to get them out.
Lesson learned
 10-04-2010, 08:08 PM
#42
Registered User
Thread Starter
Thanks for the compliment!
12-15-2010, 06:40 AM
#43
Registered User
Does anyone know the size of the big axle nut at the end of the half shaft. I would search but I am on my way to work and need to pick up the tool for tonight
12-28-2010, 01:12 PM
#47
Registered User
iTrader: (1)

Join Date: Dec 2010
Location: Salt Lake City, UT
Posts: 314
Likes: 0
Received 0 Likes
on
0 Posts
Bump for a nice writeup, wish I'd found this before I did mine last summer.
I'll second the shims to hold the upper a-arm when lining up the BJ spacer, and a solid whack with a hammer on the outside of the hub right next to the cone washer will pop those things free and send them flying across the driveway to chip the paint on your wife's car.
I'll second the shims to hold the upper a-arm when lining up the BJ spacer, and a solid whack with a hammer on the outside of the hub right next to the cone washer will pop those things free and send them flying across the driveway to chip the paint on your wife's car.

 03-29-2011, 01:41 PM
#51
Registered User

Join Date: Mar 2009
Location: just north of seattle, wa
Posts: 183
Received 0 Likes
on
0 Posts
By the way folks, if you are bumping the thread so that it shows up on your subscribed list, you can skip that and just go the the 'thread tools' and select the option to add it to your subscribed list. "thread tools" is a link towards the top of the page, just under the page number, a bit to the left.
Cheers
Cheers
11-23-2011, 12:40 PM
#52
Registered User
hey man need yur help. Where did you get that new knuckle seal at? Remember the part number off hand? Was that a single piece that went in there or two pieces? Can't tell from the photo, but does that steel dust shield extend beyond the knuckle or sit flush with the hole?
Last edited by xxxtreme22r; 11-23-2011 at 12:42 PM.
02-28-2012, 07:37 AM
#53
Registered User

By the way folks, if you are bumping the thread so that it shows up on your subscribed list, you can skip that and just go the the 'thread tools' and select the option to add it to your subscribed list. "thread tools" is a link towards the top of the page, just under the page number, a bit to the left.
Cheers
Cheers

This write up is godly-im doin my ball joints this afternoon after work and this writeup basically does the work for me
 awesome
 04-08-2012, 07:25 PM
#55
Registered User

Join Date: Apr 2012
Location: Las vegas
Posts: 1
Likes: 0
Received 0 Likes
on
0 Posts
Thanks and a few pointers
Just wanted to thank you for the great write up. Perfect pics, I even followed the breakfast directions to a T! Just a few things that helped me out.
Removing the shock was key. I used a floor jack to get it in the air, then a bottle jack on the bottom of the brake disk area, not the disk per say, but under it. I struggled with getting the half shaft in until I got it up in the air enough to slide it in.
I locked the other hub and took it in and out of 4wheel to help the axle from spinning. I used pivoting sockets with a breaker bar and air to get it off of the differential.
Took about four hours to complete both sides with new shocks...my other shocks were so shot that it wouldn't even rebound! Caused a wobble at 65 to 70 mph. Now smooth as butter!
Thanks for the write up, directions and pictures, my ride hasn't felt better.
Pics to come.
06-09-2012, 11:23 AM
#57
Registered User

Join Date: May 2012
Location: Albuquerque, NM
Posts: 69
Likes: 0
Received 0 Likes
on
0 Posts
hey toyo. i'm replacing both of my CVs in my 86 4runner and got all the way to the part where the CV is ready to slide out. nuts off, snap ring and washer off, etc. however, i can't get the damn CV to slide out! the diff side of it is caught on those damn bolts. i jacked the lower control arm up so that there was no more travel in it and there is a lot of play in the CV but there doesn't seem to be any way that it will clear the diff lip and allow me to push it through. any suggestions?
06-09-2012, 11:41 AM
#58
Registered User
hey toyo. i'm replacing both of my CVs in my 86 4runner and got all the way to the part where the CV is ready to slide out. nuts off, snap ring and washer off, etc. however, i can't get the damn CV to slide out! the diff side of it is caught on those damn bolts. i jacked the lower control arm up so that there was no more travel in it and there is a lot of play in the CV but there doesn't seem to be any way that it will clear the diff lip and allow me to push it through. any suggestions?
06-09-2012, 12:30 PM
#59
Registered User

Join Date: Sep 2007
Location: San Francisco East Bay
Posts: 8,258
Likes: 0
Received 824 Likes
on
651 Posts
Once you jack up the lower control arm it should come out (you might try jacking on the rotor instead of the control arm. It's the end of the half-shaft you're trying to move, and there is a little slack through the ball joints). Some folks have found they have to lift the opposite corner a little, in order to compress the suspension enough on the corner you're working on (I've never needed to do that.)
And no, you don't have to unscrew the ball joints or remove the knuckles. And you certainly don't have to take a sledge hammer to the differential flange. Seriously; why would one think that Toyota designed a vehicle that required that sort of destruction for a common maintenance task?
And no, you don't have to unscrew the ball joints or remove the knuckles. And you certainly don't have to take a sledge hammer to the differential flange. Seriously; why would one think that Toyota designed a vehicle that required that sort of destruction for a common maintenance task?
06-09-2012, 02:16 PM
#60
Registered User
Yea...funny thing about that method, I tried exactly that and it didn't work. Nothing worked. I reasearched on here for hours trying to find the right way and finally settled on unscrewing the lower ball joint to cock the bottom of the hub out which was THE ONLY method that WORKED FOR ME. Think of it as a last resort.
Note: I have a 4 inch lift and removed my bump stops and sway bars too.
Note: I have a 4 inch lift and removed my bump stops and sway bars too.


