
RamblinOn's '88 4Runner 22RE 4x4 Build Up Thread
 Oct 1, 2014 | 04:47 PM
#1

Thread Starter
Registered User
Joined: Oct 2013
Posts: 42
Likes: 0
From: Atlanta, GA
RamblinOn's '88 4Runner 22RE 4x4 Build Up Thread
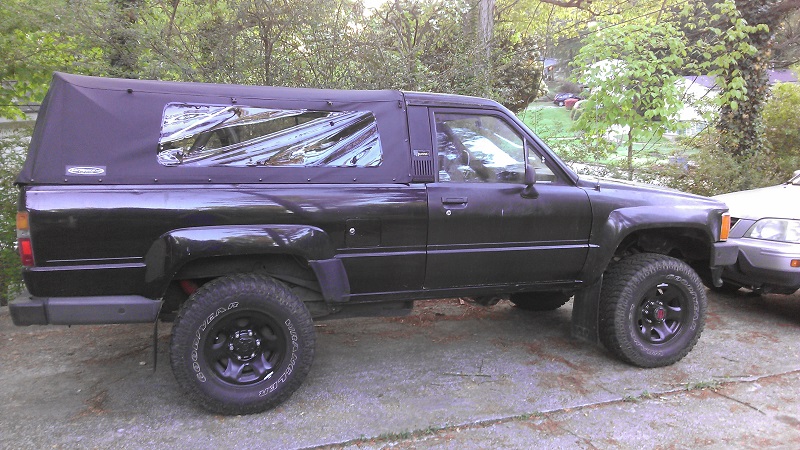
Hey guys, after buying my '88 4Runner 22RE 4x4 last summer I figured it was about time I got my build thread started. I spend enough time here, I might as well try to contribute to the knowledge base.
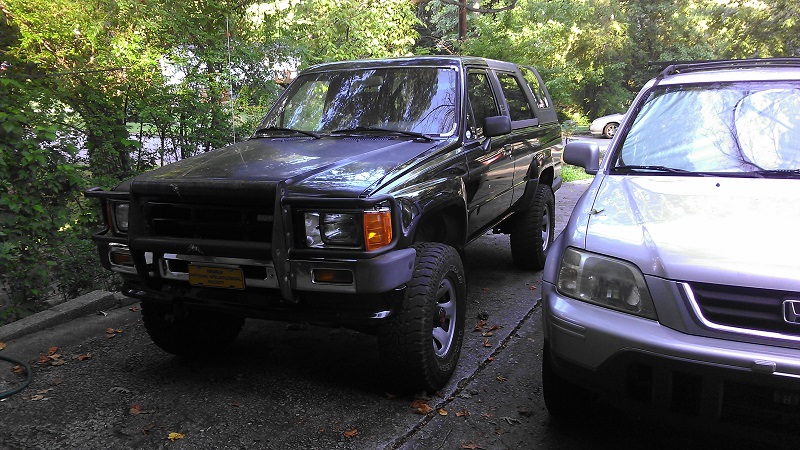
The day I bought it:
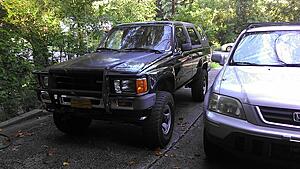
When I bought the truck it was (for having 262k miles) in really good shape mechanically. The only pressing issue was a leaky power steering pump. I got it from a good buddy of mine who bought it in good condition for his wife in '98 and only in the last couple years had it seen any abuse when his younger son had been driving it 50 miles a day to school (plus doing God knows what to it on the weekends). I bought the truck mainly as a trail rig to get to caving and rock climbing locations. My �01 Honda CRV has gotten me around surprisingly well but I�ve been wanting something more trail-reliable for a while and the Honda is my daily driver so I want to keep it nice.
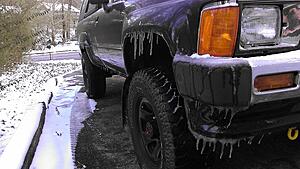
Picture from Atlanta's SNOWPOCALYPSE this past winter:
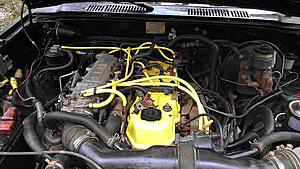
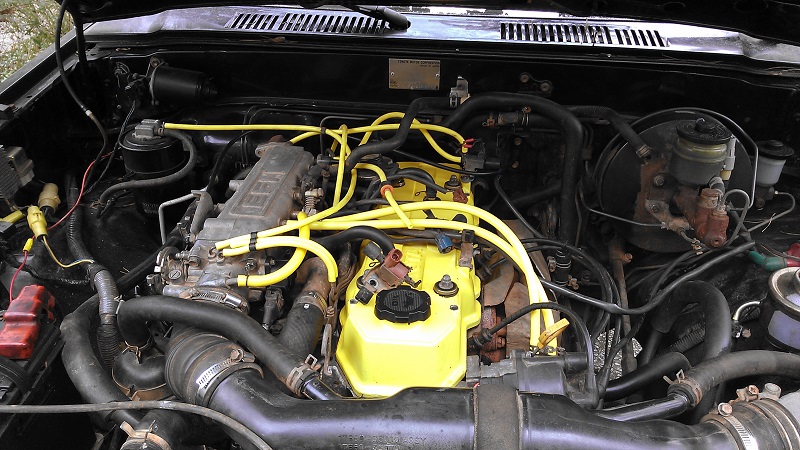
Currentish view of the engine compartment (with a busted vacuum switch that I since ditched):
Maintenance done:
Oil/filter change (duh)
Rebuilt the power steering pump with all new seals
New O2 sensor
Front brake pads and inspected/repacked the front wheel bearings
New TPS
Cleaned out the throttle body and new gasket
New throttle return spring to make my idle a consistent 800-900 (PITA adjusting it but worth it)
Valve clearance adjustment, new valve cover gasket, painted valve cover
All new vacuum lines
Full coolant system flush
New silicone radiator hoses (except for the heater hoses)
New power steering and alternator belts
Shifter bushing and seat from Marlin Crawler
Rebuilt the starter solenoid (new copper washer and contacts)
Maintenance still to do:
Rear brake job and retension/replace parking brake cable
New clutch assembly and flywheel (really not looking forward to this)
New PCV valve (threw it into a big order just because it was cheap, may do the inline filter mod too)
Look into my heater core/blower area to see why my heat is so mediocre
I�m trying not to drop a whole bunch of money on it just yet so I�m sticking to some cheap or custom built type stuff for now. So far the only real money I�ve dropped on it is the SoftTopper I put on a few months ago:
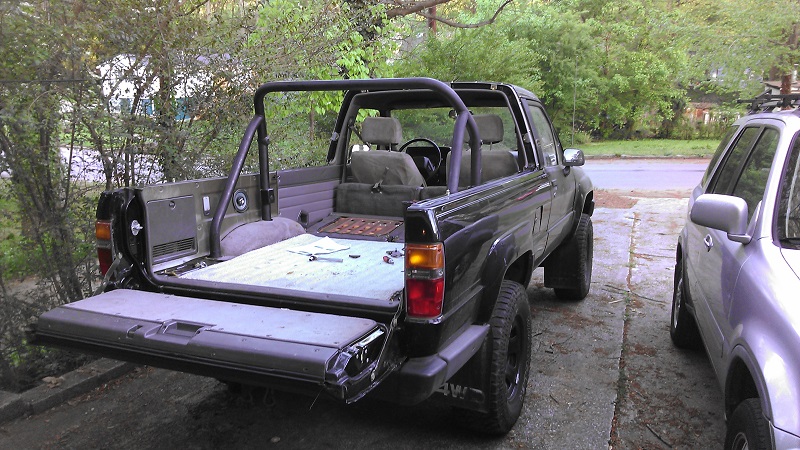
Topless (NSFW):
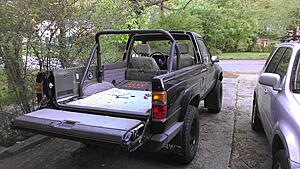
Top on (SFW):
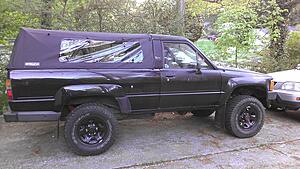
Any tips for how to get the top to hang better? Those creases in the vinyl have me a little nervous for the long run, though they don't seem to be "setting in" at all so far.
Future project ideas:
Full sound deadening and thermal insulation (in progress)
SR5 instrument cluster swap along with hopefully a new dash to replace my cracked one
Full inspection of two systems I don't know well at all: suspension and steering. Any help on what to look for as far as wear parts go? Maybe a good primer for me to read so I know WTF I'm looking at?
The day I bought it:
When I bought the truck it was (for having 262k miles) in really good shape mechanically. The only pressing issue was a leaky power steering pump. I got it from a good buddy of mine who bought it in good condition for his wife in '98 and only in the last couple years had it seen any abuse when his younger son had been driving it 50 miles a day to school (plus doing God knows what to it on the weekends). I bought the truck mainly as a trail rig to get to caving and rock climbing locations. My �01 Honda CRV has gotten me around surprisingly well but I�ve been wanting something more trail-reliable for a while and the Honda is my daily driver so I want to keep it nice.
Picture from Atlanta's SNOWPOCALYPSE this past winter:

Currentish view of the engine compartment (with a busted vacuum switch that I since ditched):
Maintenance done:
Oil/filter change (duh)
Rebuilt the power steering pump with all new seals
New O2 sensor
Front brake pads and inspected/repacked the front wheel bearings
New TPS
Cleaned out the throttle body and new gasket
New throttle return spring to make my idle a consistent 800-900 (PITA adjusting it but worth it)
Valve clearance adjustment, new valve cover gasket, painted valve cover
All new vacuum lines
Full coolant system flush
New silicone radiator hoses (except for the heater hoses)
New power steering and alternator belts
Shifter bushing and seat from Marlin Crawler
Rebuilt the starter solenoid (new copper washer and contacts)
Maintenance still to do:
Rear brake job and retension/replace parking brake cable
New clutch assembly and flywheel (really not looking forward to this)
New PCV valve (threw it into a big order just because it was cheap, may do the inline filter mod too)
Look into my heater core/blower area to see why my heat is so mediocre
I�m trying not to drop a whole bunch of money on it just yet so I�m sticking to some cheap or custom built type stuff for now. So far the only real money I�ve dropped on it is the SoftTopper I put on a few months ago:
Topless (NSFW):
Top on (SFW):
Any tips for how to get the top to hang better? Those creases in the vinyl have me a little nervous for the long run, though they don't seem to be "setting in" at all so far.
Future project ideas:
Full sound deadening and thermal insulation (in progress)
SR5 instrument cluster swap along with hopefully a new dash to replace my cracked one
Full inspection of two systems I don't know well at all: suspension and steering. Any help on what to look for as far as wear parts go? Maybe a good primer for me to read so I know WTF I'm looking at?
Oct 1, 2014 | 04:55 PM
#2
Thread Starter
Registered User
Joined: Oct 2013
Posts: 42
Likes: 0
From: Atlanta, GA
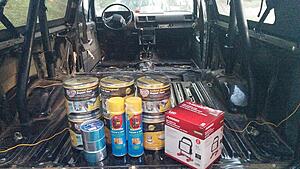
Sound deadening!
After reading through RAD4Runner's thread about his sound deadening and insulation project, I knew I'd want to do the same. It's loud as ˟˟˟˟˟ on the highway and this baby is going to see a LOT of highway miles driving up to TN and AL on expeditions. I started ripping out the interior a few days ago. It was actually a nice break after all the under the hood work. I could sit down, sip on a beer and just focus on not losing all the little fasteners!
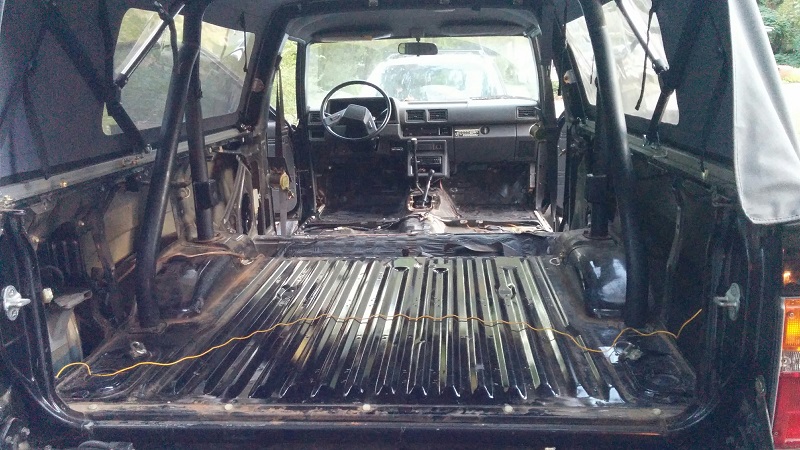
All gone!

I went with U-Seal from Home Depot. I bought 6 rolls for a total of 75sqft. That plus a couple cans of Great Stuff, 3 rolls of aluminum tape and a $35 LED work light ran me $167. Not too shabby.
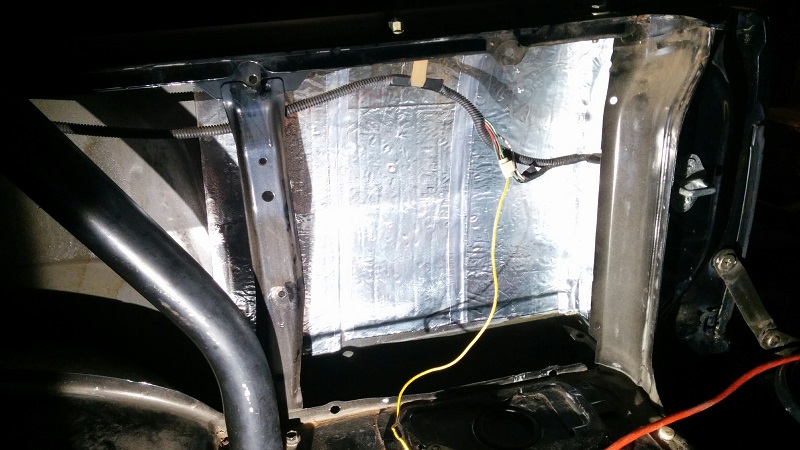
This little section must have taken me 30 minutes. I have GOT to get quicker at this, haha.

I figure the floor will go quickly and once I get a hang of it the sides should go quicker.
All gone!
I went with U-Seal from Home Depot. I bought 6 rolls for a total of 75sqft. That plus a couple cans of Great Stuff, 3 rolls of aluminum tape and a $35 LED work light ran me $167. Not too shabby.

This little section must have taken me 30 minutes. I have GOT to get quicker at this, haha.
I figure the floor will go quickly and once I get a hang of it the sides should go quicker.
Oct 2, 2014 | 07:05 AM
#3
Registered User
Joined: Jun 2010
Posts: 1,448
Likes: 100
From: Virginia
Wait...what are you using the Great Stuff for? I frequent a boating forum and restored an old Boston Whaler. Great Stuff will eventually break down and absorb and hold water from what others have said. You do not want to put that next to metal. Good job sound proofing otherwise. I just did it with Protecto Wrap (Peel n' Seal) in the doors and Frost King in the body sides. Be sure and leave drains open so water vapor can escape.
 Oct 3, 2014 | 05:21 AM
#6
Thread Starter
Registered User
Joined: Oct 2013
Posts: 42
Likes: 0
From: Atlanta, GA
Wait...what are you using the Great Stuff for? I frequent a boating forum and restored an old Boston Whaler. Great Stuff will eventually break down and absorb and hold water from what others have said. You do not want to put that next to metal. Good job sound proofing otherwise. I just did it with Protecto Wrap (Peel n' Seal) in the doors and Frost King in the body sides. Be sure and leave drains open so water vapor can escape.
Oct 3, 2014 | 11:43 AM
#7
Registered User
Joined: Jun 2010
Posts: 1,448
Likes: 100
From: Virginia
Anywhere there is a pinch weld it seems to be left open in some places. I can confirm this because a while back I sprayed rust proofer inside and it leaked right out most of the bottom areas.
Some car restoration book I had a long time ago (Mustang) told you to take a wire coat hanger and open the weep holes at the bottom of the doors and body walls. Where my 4Runner rusted there was mud caked so people have to be very careful to clean the chassis after they get it muddy.
Some car restoration book I had a long time ago (Mustang) told you to take a wire coat hanger and open the weep holes at the bottom of the doors and body walls. Where my 4Runner rusted there was mud caked so people have to be very careful to clean the chassis after they get it muddy.
Trending Topics
Oct 4, 2014 | 11:22 PM
#9
The drain hole behind the rear tire is kind of hard to find. In front of the rear tire they are easy to see. You can take the door seal off and looking thru the oval cut outs in the rocker panels, and looking at an angle you can see if they are clear. Probably going to find a lot of debris in the rocker panels. This is a view from the bottom side and on the inside of the rocker panel.

In the doors, you have 4 drain holes. I take the door panels off and use an air hose to get them cleaned out.


In the doors, you have 4 drain holes. I take the door panels off and use an air hose to get them cleaned out.
 Oct 19, 2014 | 02:59 PM
#10
Registered User


Joined: Mar 2012
Posts: 7,125
Likes: 681
Nice work!
I just came across this.
Yes, I agree with the inputs on Great Stuff, and clearing pinch weld drains. I found pool of water in rocker panel that Terry is point to ^^^. Normal condensation collects there and would remain there if drains were clogged.
Keep up the good job!
I just came across this.
Yes, I agree with the inputs on Great Stuff, and clearing pinch weld drains. I found pool of water in rocker panel that Terry is point to ^^^. Normal condensation collects there and would remain there if drains were clogged.
Keep up the good job!
Oct 19, 2014 | 03:13 PM
#12
Registered User
Joined: Mar 2012
Posts: 7,125
Likes: 681
Door panels are really piece of cake. What sucks are the hidden fasteners that may break when removed. I like to replace them with easily accessible/serviceable/standard screws and expansion nuts like this as I encounter them.
Oct 19, 2014 | 03:15 PM
#13
Registered User
Joined: Jan 2011
Posts: 1,051
Likes: 0
From: Memphis, TN
Door panels are really piece of cake. What sucks are the hidden fasteners that may break when removed. I like to replace them with easily accessible/serviceable/standard screws and expansion nuts like this as I encounter them.
Great info and link, though
 Oct 20, 2014 | 05:32 AM
#14
Registered User
Joined: Jun 2010
Posts: 1,448
Likes: 100
From: Virginia
Every time I take the door panels off with the rag the omega shaped wire clips go flying. First time I went to put the handle back on I could not find directions any where on the internet. There are lots of Youtubes on how to get the window handle off but none on how to put it back. Anyway I finally figured out you put the clip on the handle and push it back in place. Easy. I felt really stupid. Maybe I am. I have 50 omega clips coming from eBay for $4.99 because I need to open the doors again.
Oct 20, 2014 | 06:36 AM
#15
Registered User
Joined: Jan 2011
Posts: 1,051
Likes: 0
From: Memphis, TN
Every time I take the door panels off with the rag the omega shaped wire clips go flying. First time I went to put the handle back on I could not find directions any where on the internet. There are lots of Youtubes on how to get the window handle off but none on how to put it back. Anyway I finally figured out you put the clip on the handle and push it back in place. Easy. I felt really stupid. Maybe I am. I have 50 omega clips coming from eBay for $4.99 because I need to open the doors again.
 Oct 22, 2014 | 10:43 AM
#16
Thread Starter
Registered User
Joined: Oct 2013
Posts: 42
Likes: 0
From: Atlanta, GA
Thanks a lot for the pics, Terry. That should help me a lot.
Haven't had much time to work on it, though I did get the passenger door panel off and the insulation in. Wasn't as bad as I thought it would be. I'll try to get the driver side done tonight and finish "Stage 1". Then I can at least put panels back on front and rear (after cleaning my drains!)
I spent last weekend hauling lumber for my buddy who is building a fence and picking up a ~1960s Craftsman 100 table saw so I've decided to leave my bed bare until I get a pickup to do all my haulin'. I have some extra carpet that came with the truck so that should at least help in the back.
Anyone have any experience with the website autotrimsupply.com? They have molded carpets for this exact truck, front and rear, for ~$135 total. Seems too good to be true for what should be a simple drop in install....
Thanks for all the input guys, I really appreciate it.
Oct 23, 2014 | 05:13 AM
#17
I have not gotten carpet from the vendor that you mentioned but have a couple of other places. They will have it formed to the mold in the body but from the two different vendors I have bought carpet from, you have to do all the cut outs and usually the carpet will be 2 inches wider all the way around.
Take your time and be patient when installing the carpet. There is a lot of trimming to do. At that price, I am guessing they are not installing any insulation on the bottom side. I would suggest getting the insulation. I usually pay $150 for the passenger area and for the trunk area, I find a left over piece at a carpet shop for about $25. To buy the trunk piece from a vendor is normally around $100 if I recall right.
I would like to find a simple drop in but I have not as of yet. A friend of mine tried a third vendor and still alot of trimming. Installing carpet is a workout from my experience. Lay it in the sun and let it warm up will help out a lot. Get it as flexible as possible. It will come to you rolled up.
Doing the trunk area is easy to do. Use "X" cuts for bolt holes and seating bolts. I put the bolt in the hole and cut a small x over the bolt and then lift the carpet and push the bolt thru the cut. If you make a mistake and need to adjust the carpet the small cut will never show.
Last edited by Terrys87; Oct 23, 2014 at 05:19 AM.
Oct 23, 2014 | 06:02 AM
#18
Great Thread already. It looks really clean in the pictures. The more I see this peel and seal stuff, the more I realize that I need to put some on mine. I will agree it is a very loud vehicle on the highway.
I love the soft top you installed. It looks Great. That is also something that I want to do in the near future. Then I am making a sled out of the old top. haha
I love the soft top you installed. It looks Great. That is also something that I want to do in the near future. Then I am making a sled out of the old top. haha
Oct 23, 2014 | 07:55 AM
#19
Thread Starter
Registered User
Joined: Oct 2013
Posts: 42
Likes: 0
From: Atlanta, GA
I have not gotten carpet from the vendor that you mentioned but have a couple of other places. They will have it formed to the mold in the body but from the two different vendors I have bought carpet from, you have to do all the cut outs and usually the carpet will be 2 inches wider all the way around.
Take your time and be patient when installing the carpet. There is a lot of trimming to do. At that price, I am guessing they are not installing any insulation on the bottom side. I would suggest getting the insulation. I usually pay $150 for the passenger area and for the trunk area, I find a left over piece at a carpet shop for about $25. To buy the trunk piece from a vendor is normally around $100 if I recall right.
I would like to find a simple drop in but I have not as of yet. A friend of mine tried a third vendor and still alot of trimming. Installing carpet is a workout from my experience. Lay it in the sun and let it warm up will help out a lot. Get it as flexible as possible. It will come to you rolled up.
Doing the trunk area is easy to do. Use "X" cuts for bolt holes and seating bolts. I put the bolt in the hole and cut a small x over the bolt and then lift the carpet and push the bolt thru the cut. If you make a mistake and need to adjust the carpet the small cut will never show.
Take your time and be patient when installing the carpet. There is a lot of trimming to do. At that price, I am guessing they are not installing any insulation on the bottom side. I would suggest getting the insulation. I usually pay $150 for the passenger area and for the trunk area, I find a left over piece at a carpet shop for about $25. To buy the trunk piece from a vendor is normally around $100 if I recall right.
I would like to find a simple drop in but I have not as of yet. A friend of mine tried a third vendor and still alot of trimming. Installing carpet is a workout from my experience. Lay it in the sun and let it warm up will help out a lot. Get it as flexible as possible. It will come to you rolled up.
Doing the trunk area is easy to do. Use "X" cuts for bolt holes and seating bolts. I put the bolt in the hole and cut a small x over the bolt and then lift the carpet and push the bolt thru the cut. If you make a mistake and need to adjust the carpet the small cut will never show.
Oct 23, 2014 | 09:12 AM
#20
Thread Starter
Registered User
Joined: Oct 2013
Posts: 42
Likes: 0
From: Atlanta, GA
Thanks, I'm really happy with it so far. Straight forward install, only took a few hours to do. We'll see how it holds up over the years... my Runner sits out in the elements all year. Not much snow down here but LOTS of blasting sun. Hopefully I can get it under a carport sometime in the next few years...


