
That little spot under the cig. lighter, I found the solution!
 Jun 29, 2011 | 07:46 AM
#1
Thread Starter
Registered User
Joined: Feb 2009
Posts: 384
Likes: 0
From: BisMan, ND
That little spot under the cig. lighter, I found the solution!
yeah, thats right I did it.
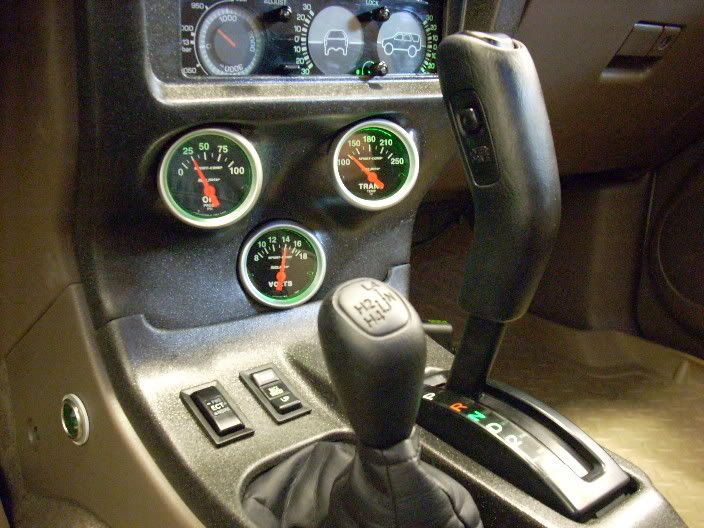
Always wanted a voltmeter in my 4Runner just because i like to be able to know that type of stuff. and i figured out that a 2" gauge would fit PERFECT with a little wooden mounting plate. pics: (sorry if theyre too big)

Theres already two small holes in the top back corners of the "cubby" so thats where i put my wires

I alos had the ashtray out and the little light that used to be for it had burnt out a year ago so i used that for my backlight and it even dims too!


its wired directly to the battery so i put in my own switch to control it too, but they didnt have one that would fit so i had to get a tiny one. i'll have to modify one of the popouts to accept the switch. but when its on it lights up green too, now i just need a green 194 bulb for the gauge...
Always wanted a voltmeter in my 4Runner just because i like to be able to know that type of stuff. and i figured out that a 2" gauge would fit PERFECT with a little wooden mounting plate. pics: (sorry if theyre too big)
Theres already two small holes in the top back corners of the "cubby" so thats where i put my wires
I alos had the ashtray out and the little light that used to be for it had burnt out a year ago so i used that for my backlight and it even dims too!
its wired directly to the battery so i put in my own switch to control it too, but they didnt have one that would fit so i had to get a tiny one. i'll have to modify one of the popouts to accept the switch. but when its on it lights up green too, now i just need a green 194 bulb for the gauge...
Last edited by sportrunner2001; Jun 29, 2011 at 07:47 AM.
Jun 29, 2011 | 08:02 AM
#3
Thread Starter
Registered User
Joined: Feb 2009
Posts: 384
Likes: 0
From: BisMan, ND
well i would have done it right to the cig lighter but i didnt want to have to pull dash panels to get to the wires so i went right to the battery and then i dont need to have the car on and i dont always have to have the gauge on
Jul 1, 2011 | 12:31 PM
#6
Registered User
Joined: Nov 2009
Posts: 79
Likes: 0
From: Olympic City, BC
Looks like I'm not the only one who found use for that spot under the cig lighter. I used the space for my ECT & rear window switches when I did the 99 cup holder mod a while ago.


Last edited by blcktpgsr; Jul 1, 2011 at 12:34 PM.

Trending Topics
 Jul 4, 2011 | 07:22 PM
#9
Thread Starter
Registered User
Joined: Feb 2009
Posts: 384
Likes: 0
From: BisMan, ND
^ ooooooh fancy, looks really good. havent seen your build but did you do that yourself or have it done? one of my friends could fiberglass the whole center stack for me if i wanted and have any kind of configuration. but i like it the way it is with a few tweaks for now.

 Jul 6, 2011 | 06:16 PM
#11
^ ooooooh fancy, looks really good. havent seen your build but did you do that yourself or have it done? one of my friends could fiberglass the whole center stack for me if i wanted and have any kind of configuration. but i like it the way it is with a few tweaks for now.
I will admit now that I know a thing or two about body work and materials, that I could have used some different materials and techniques on this project. However, I didn't know squat then and after the fact you can always say "I should have done this instead of this". It's been about 3 1/2 years now and I only see one little crack in the paint on a seam between old and new material so I'd say that's pretty good for what it is. I have another radio bezel and if I ever get around to doing this again I'll use fiberglass and some other industrial adhesives and techniques to make it stronger and look nicer. I'm happy with it for now.
I like yours though, simple and gets the job done.
Jul 7, 2011 | 06:05 PM
#12
Thread Starter
Registered User
Joined: Feb 2009
Posts: 384
Likes: 0
From: BisMan, ND
yours is even better for what you used and how it still looks today. i justed used what i had laying around and made it work. i think it needs another coat or two of black on it though from the pictures.

Thread
Thread Starter
Forum
Replies
Last Post
theking11863
Vehicle Audio & Home Entertainment
2
Mar 19, 2016 09:36 PM
justdifferentials
Just Differentials
1
Aug 15, 2015 05:25 PM


