
Timing chain blues
 Mar 28, 2010 | 07:02 PM
#1

Thread Starter
Registered User
Joined: Dec 2009
Posts: 112
Likes: 0
From: Walland, TN
Timing chain blues
Just replaced my timing chain on my '88 4Runner's 22RE. Followed the instructions and did it without dropping the oil pan or removing the head. Unfortunately when I put the timing chain cover back on it folded the exposed portion of the head gasket back, bending it. Try as I did, I could not get the cover on with the head gasket in its proper place, so I cut the exposed portion of the head gasket off and used the same Toyota black goop for a seal that I was using on the oil pan.
Curious if anyone else has run into this problem?
All is now back together except I can't for the life of me remember how the top bracket on the alternator attaches. I suspect it was somehow attached to the power steering bracket. If anyone knows of a picture I would appreciate a link.
Curious if anyone else has run into this problem?
All is now back together except I can't for the life of me remember how the top bracket on the alternator attaches. I suspect it was somehow attached to the power steering bracket. If anyone knows of a picture I would appreciate a link.
Mar 28, 2010 | 07:15 PM
#2

Registered User
Joined: Jul 2009
Posts: 28
Likes: 0
From: Albuquerque, NM
I had that same problem (with the bracket) when I did my timing chain.
When I was taking that bracket off it seemed so obvious how it went on. But when I tried to put it back, it was suddenly a mystery. For 20 minutes I put that bracket in every combination possible. By minute 19, I was almost convinced it didn't even come off my truck and it was just laying around on the garage floor before I started the job.
I'm sorry I don't have a good picture for you and I'm not sure it would help. I don't know if my 1994 has the same brackets as an '88. Hopefully someone will be along in a minute with a picture. If all else fails get a good nights sleep and try it again in the morning. Good luck!!
Mar 28, 2010 | 08:41 PM
#5
Contributing Member
Joined: Dec 2002
Posts: 389
Likes: 0
From: Helena, Mt.
I was told to cut up a "coke" can use the thin alum as a guide for the T-chain cove to slide in under the head and gasket....
I have not done it but that was my understanding.
A few folks have had to cut their head gaskets w/o trouble, as far as they stated on the threads I've been reading, the toyot gasket maker or the right stuff also seems to be the fix.
as another poster pointed out cracking the t-chain cover or other areas w/ bolts too tight may cause problems???
anyone
Repo
Mar 28, 2010 | 08:49 PM
#6
Registered User
Joined: Jul 2008
Posts: 1,818
Likes: 4
From: Nashville TN. I can help you if you're close BUT NOBODY CAN HELP YOU IF YOU DON'T FILL YOUR LOCATION IN!
I hardly ever do anything in-frame because of this...
T shirt over hood catch, AC compressor bungee tied in place of the battery, and I can have an engine out in two shakes...
Nice having 30 feet of room instead of 4-6" bent over the rad support.
T shirt over hood catch, AC compressor bungee tied in place of the battery, and I can have an engine out in two shakes...
Nice having 30 feet of room
instead of 4-6" bent over the rad support.
Last edited by tried4x2signN; Mar 28, 2010 at 08:51 PM.
Mar 28, 2010 | 10:43 PM
#7
Registered User
Joined: Dec 2009
Posts: 78
Likes: 0
From: Dixon CA
As long as you sealed those corners pretty good it should be fine...
http://www.4crawler.com/4x4/CheapTri...ingChain.shtml
Scroll almost down to the bottom of the page there is a pic of how the bracket goes on...
Good luck.

http://www.4crawler.com/4x4/CheapTri...ingChain.shtml
Scroll almost down to the bottom of the page there is a pic of how the bracket goes on...
Good luck.
Trending Topics
Mar 29, 2010 | 05:59 AM
#8
Thread Starter
Registered User
Joined: Dec 2009
Posts: 112
Likes: 0
From: Walland, TN
Thank you one and all for the great info. Does anyone recall if the alternator bracket has to be reattached before the power steering unit is reattached? The reason I'm asking is I've already got the power steering unit back in place and was wondering if I will have to take it off to bolt on the alternator bracket.
And then there's the issue of the missing bolt which secures the alternator to the bracket....as Gilda Radner said "It's always something."
No need to reply. After examining the picture in the link provided by DGFRIEND I can see I need to remove it.
And then there's the issue of the missing bolt which secures the alternator to the bracket....as Gilda Radner said "It's always something."
No need to reply. After examining the picture in the link provided by DGFRIEND I can see I need to remove it.
Last edited by PETDOC; Mar 29, 2010 at 06:10 AM.
Mar 29, 2010 | 06:59 AM
#9
Thread Starter
Registered User
Joined: Dec 2009
Posts: 112
Likes: 0
From: Walland, TN
One other quick question. When removing the various parts on top of the valve cover prior to taking it off, about half way back and subsequently a little farther back there are 2 small parts bolted to the top driver's side of the valve cover each with 2 very small rubber hoses attaching adjacent to one another. In trying to remove the rubber hoses on each of the 2 parts one of the plastic attachment points snapped off inside the hose (4Runner's got 322,000 miles on it). I think these are some kind of vacuum switching units (shop manual is over in friend's garage with my nearly reassembled 4Runner).
Question is will these have to be replaced before I can get my 4Runner going or can I get it home and then pick these up later off a parts 4Runner?
I may be able with tape to secure them enough to make them functional. My experience in trying to glue plastic has been uniformly bad.
Question is will these have to be replaced before I can get my 4Runner going or can I get it home and then pick these up later off a parts 4Runner?
I may be able with tape to secure them enough to make them functional. My experience in trying to glue plastic has been uniformly bad.
Mar 29, 2010 | 07:02 AM
#10
Contributing Member
Joined: Dec 2002
Posts: 389
Likes: 0
From: Helena, Mt.
I have no idea if this will help....
I drove home w/ little to no vacume hoses on my last "94" it ws also only running on 3 injectors, 1 was not giving any fuel at all...:CRY
These little motors want to run!
I THINK you'll be alright, but I'm just some dumb wrench on line so wait for a few other to confirm....
Repo
I drove home w/ little to no vacume hoses on my last "94" it ws also only running on 3 injectors, 1 was not giving any fuel at all...:CRY
These little motors want to run!
I THINK you'll be alright, but I'm just some dumb wrench on line so wait for a few other to confirm....
Repo
Mar 29, 2010 | 07:06 AM
#11

Depends on which VSVs are damaged:
- http://www.4crawler.com/4x4/CheapTri...Pix/index.html
- http://www.4crawler.com/4x4/CheapTri...Pix/index.html
Mar 29, 2010 | 01:58 PM
#12
Registered User
Joined: Dec 2009
Posts: 78
Likes: 0
From: Dixon CA
I broke one on my vsv also...I just slipped the vac. line right over it and made sure its getting at least a little air... Drives fine and cant tell a difference...but will eventually get a new one...
Mar 29, 2010 | 04:12 PM
#13
Thread Starter
Registered User
Joined: Dec 2009
Posts: 112
Likes: 0
From: Walland, TN
FWIW after spending 11 hours doing my first timing chain I feel like I just went 3 round with Mike Tyson. My body aches all over. Hopefully I'll have about 150,000 miles to recover.
 Mar 29, 2010 | 05:04 PM
#16

Registered User

Joined: Jun 2008
Posts: 321
Likes: 0
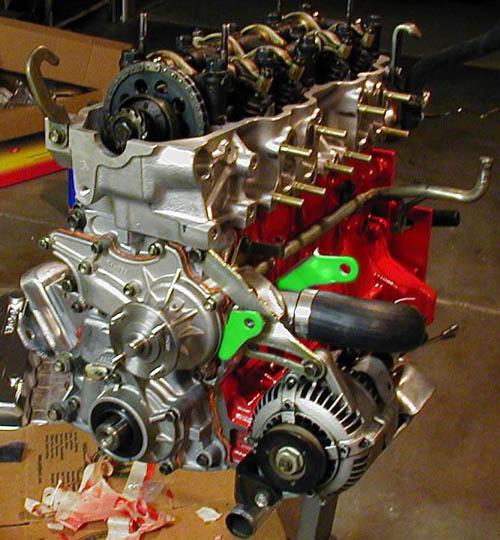
no problem. Took me a good hour to figure out how that damn bracket went until i found this pic (whos ever motor it is, its pretty).
I did my t-chain three weeks ago. Truck is running sooo much better now. Next is a rv head/cam from engbldr. Just waiting for a long weekend.
I did my t-chain three weeks ago. Truck is running sooo much better now. Next is a rv head/cam from engbldr. Just waiting for a long weekend.
Mar 29, 2010 | 07:57 PM
#17
Registered User
Joined: Dec 2009
Posts: 78
Likes: 0
From: Dixon CA
I figured I can fix them as good as new by using a small section of the little tube that is taped to the side of a spray can as a connector, and then secure everything with some duct tape. If the plastic tube on the spray can is too big I've got access to a bunch of different sized plastic catheters , one of which will fit. I just knew my medical training would come in handy for working on my 4Runner.
FWIW after spending 11 hours doing my first timing chain I feel like I just went 3 round with Mike Tyson. My body aches all over. Hopefully I'll have about 150,000 miles to recover.
FWIW after spending 11 hours doing my first timing chain I feel like I just went 3 round with Mike Tyson. My body aches all over. Hopefully I'll have about 150,000 miles to recover.
Well I did that at first also... but I lost the little plastic noodle like thing lol
 Mar 30, 2010 | 04:39 AM
#18
Thread Starter
Registered User
Joined: Dec 2009
Posts: 112
Likes: 0
From: Walland, TN
If interested just go by any small animal vet hospital and ask them if you can buy a Tom cat catheter. Should be less than $5. Or better yet ask them to save you a used one, which would otherwise be discarded. These are made of a flexible, but reasonably hard plastic. One end is large enough to fit an IV catheter, so I suspect it would fit tightly in the rubber vacuum tube. The Tom cat catheter then rapidly tapers to fit inside the cat's urethra, so the thin section should fit inside the VSV opening. My plan is to use a tube as an internal stent between the hard plastic tip of the VSV that now rests inside the vacuum tube and the small orifice on the VSV. If all goes well I will find some sort of glue that will make it a permanent fix.
Mar 30, 2010 | 05:10 AM
#19
Registered User
Joined: Mar 2008
Posts: 12,723
Likes: 6
From: Temecula Valley, CA
Hmm... a catheter... who'd have thunk?
I've got a broken VSV on my 91- the one that actuates the EGR. I've been looking for small diameter steel or copper tubing, similar to the metal vaccum lines around the engine, to fix mine- dremel out the opening in the VSV, epoxy a small section of steel tubing inside the VSV then attach the vacuum hose.
I've got a broken VSV on my 91- the one that actuates the EGR. I've been looking for small diameter steel or copper tubing, similar to the metal vaccum lines around the engine, to fix mine- dremel out the opening in the VSV, epoxy a small section of steel tubing inside the VSV then attach the vacuum hose.
Mar 30, 2010 | 06:45 AM
#20
Thread Starter
Registered User
Joined: Dec 2009
Posts: 112
Likes: 0
From: Walland, TN
Hmm... a catheter... who'd have thunk?
I've got a broken VSV on my 91- the one that actuates the EGR. I've been looking for small diameter steel or copper tubing, similar to the metal vaccum lines around the engine, to fix mine- dremel out the opening in the VSV, epoxy a small section of steel tubing inside the VSV then attach the vacuum hose.
I've got a broken VSV on my 91- the one that actuates the EGR. I've been looking for small diameter steel or copper tubing, similar to the metal vaccum lines around the engine, to fix mine- dremel out the opening in the VSV, epoxy a small section of steel tubing inside the VSV then attach the vacuum hose.
I, however, hadn't thought about adjusting the hole size. I was going to take several small catheters and just use the one that fit, but because of your comment I'm taking my drill with some tiny bits and if need be drill out the orifice on the VSV and the broken hard plastic part in the vacuum tube to fit the stent.


