When you click on links to various merchants on this site and make a purchase, this can result in this site earning a commission. Affiliate programs and affiliations include, but are not limited to, the eBay Partner Network.
The Truck
In October, I purchased a 1987 4Runner off of eBay. According to the records that I have, the truck has spent its entire life in Southern AZ. It's 99% stock and almost entirely rust free - score!
This 4Runner came equipped with a 22R-E and 5 speed manual transmission. The truck currently has over 245,000 miles on the body and in 2007, the 22R-E was completely rebuilt. The shop that performed the work was Dan's Toy Shop in Tuscon. I have no personal experience with this business, but I was incredibly impressed by the cleanliness of the rebuild (compared to other "professional" jobs I've seen). I also liked that they provided detailed notes about all of the work they did and the parts that were replaced. Anything can happen, but I feel confident that this 22R-E is going to last for a while.
The interior is immaculate. Other than a cracked dash pad and torn front seats, it's all original and in excellent shape. There is very little to do on the inside except to replace the aforementioned items and clean/paint some of the faded trim pieces. There are a few mods that I want to do, which I'll discuss later.
This build thread will document my efforts to restore and preserve this truck.
I plan to change very little about my 4Runner. I'll be cleaning and painting old parts and whenever possible, replacing broken or worn pieces with OEM components. My goal is to maintain this vehicle as close as possible to original specs.
That being said, I do want to make a few changes - e.g. SR5 vs standard gauge cluster.
I'm looking forward to the process and hope to learn as much as I can about these trucks. I'm sure that the YotaTech forums will prove to be a valuable resource along the way.
That's a really nice looking truck you got there, good score! It appears that you've successfully done what I was going for (but failed) when I bought my '85 back in 2012. The body looks nearly perfect, that's rare.
On the downside, you probably won't learn how to rebuild a 22re anytime soon, but keep it long enough and you'll be initiated into the club someday, lol.
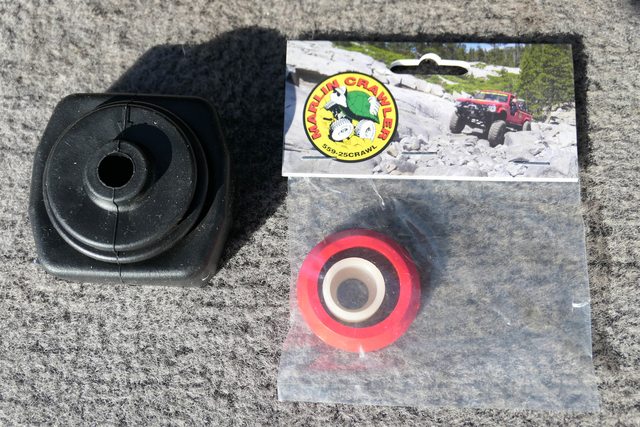
My 4Runner shifted well and the gears engaged with little issue. However, there was definitely some noticeable slop and I knew it could be better. I ordered the HD shifter seat (the red one), HD shifter socket and the small rubber boot that covers the bottom of the shifter from Marlin Crawler. The parts came in today, so I got to work!
Getting down to the base of the shifter is pretty straightforward. This website documents the process pretty well. Just keep up with all of the screws and be careful pulling on the 30 year old trim pieces! I've read that some people struggle to remove the shift lever due to a metal collar that has to be pushed down and turned counterclockwise - my setup was not like this! Once I had everything unbolted, the shifter simply lifted out.
I used a pair of needle nose forceps to remove the old seat and debris. The original seat was still intact, which was a bit of a surprise. It's made of soft rubber and was originally installed by squeezing it into place.
The HD Marlin seat is rotated into position like this. Afterwords, I cleaned up the shifter, installed the new socket on the end, applied a light coating of grease and reinstalled everything.
The original socket on the end of the shift lever (below) had noticeable wear. The old one was a bear to get off!
After everything was buttoned back up, I took the truck for a test drive - and WOW! It made a huge difference! The shifts are crisper and a lot of the slop is gone. It was definitely worth the time and cost to make this repair. Marlin Crawler appears to make a quality product!
In hindsight, I wish I would have cleaned the area on top of the transmission. It was gunked up pretty bad.
That's a really nice looking truck you got there, good score! It appears that you've successfully done what I was going for (but failed) when I bought my '85 back in 2012. The body looks nearly perfect, that's rare.
On the downside, you probably won't learn how to rebuild a 22re anytime soon, but keep it long enough and you'll be initiated into the club someday, lol.
Thanks! It has its fair share of dings and whatnot, but the frame is in great shape and surface rust is minor.
I've got my fingers crossed that this 22R-E runs trouble free for a long time. lol I can't afford to rebuild one anytime soon!
Every old Toyota that I've owned has been plagued by the terrible, rattling tailgate. It's not so noticeable on a pickup, but it can be annoyingly obvious in a 4Runner.
The rattling is caused by the tailgate braces which are normally held in place by these broken clips (below).
There are four clips in total, two on each side. After 30 years, the plastic becomes brittle and the center piece breaks off. You can still get them from Toyota - part #: 65778-89104
I ordered four new ones and installed them today (below).
Getting the old clips off was a pain... I ended up breaking most of the old clips off - piece by piece (below).
Installing the new clips was easy and now my tailgate is quiet! Sometimes it's the little things that are the most rewarding.
I wouldn't have guessed Toyota still made those clips. I just stuck some furniture slider felt pads in a few strategic locations. Now I feel like I should spend the $15 and undo my band-aid repair. Thanks for the part number.
I wouldn't have guessed Toyota still made those clips. I just stuck some furniture slider felt pads in a few strategic locations. Now I feel like I should spend the $15 and undo my band-aid repair. Thanks for the part number.
Yep, I was surprised too. It was worth it to me. These trucks are noisy anyway - that's one less rattle to worry about.
nicer than my '87, but like you, i'm interested in a predominantly stock 4runner, so the work i've done reflects that. much of it has been addressing factory wiring flaws and shortcomings; very few mechanical changes.
That's definitely a beauty. The only thing I don't like about the stock route is the bumpers. I much prefer something a little more beefy as mine is going to be a daily driver and in the winter when roads and drivers are questionable then I want that added protection. I even thought about recreating the stock bumpers but with a thicker steel and incorporating a winch too. Keep us posted on the progress and thanks for the pics of those clips. I broke mine too and need to order some among other clips that just are too brittle.
Nice find! I look forward to your progress. I really like clean original rust free finds like yours. Welcome to Yotatech.
Thanks! I'm looking forward to keeping this updated. I feel incredibly lucky to have found this 4Runner - it may sound corny, but I actually couldn't believe it when the auction ended and I was the winning bidder. I kind of just sat there for a few seconds in a daze before it sank in. lol It was a great feeling!
nicer than my '87, but like you, i'm interested in a predominantly stock 4runner, so the work i've done reflects that. much of it has been addressing factory wiring flaws and shortcomings; very few mechanical changes.
Do you have a build thread wallytoo?
That's definitely a beauty. The only thing I don't like about the stock route is the bumpers. I much prefer something a little more beefy as mine is going to be a daily driver and in the winter when roads and drivers are questionable then I want that added protection. I even thought about recreating the stock bumpers but with a thicker steel and incorporating a winch too. Keep us posted on the progress and thanks for the pics of those clips. I broke mine too and need to order some among other clips that just are too brittle.
I've thought about that too. Fabricating is wayyy beyond my abilities, but my uncle has a welding business and might be able to help me come up with something. My bumpers are in good condition and I want to maintain the stock appearance. The PO did coat the rear bumper in some kind of bed liner, which I like.
Thanks for this, NC87_Runner. Yes, that rattle s so annoying. Added to my Toyota Parts Deal shopping cart
I'm actually happy that I was able to contribute something useful to other members. I've spent a lot of time reading through your build thread and have drawn a lot of inspiration from some of the things that you've done to your 4Runner.
looks like I got the brother to your 4runner is yours the toyota 033 white? I painted mine the original color and its on the yellow side. its kinda creamy
looks like I got the brother to your 4runner is yours the toyota 033 white? I painted mine the original color and its on the yellow side. its kinda creamy
That's a great looking truck! My 4Runner was repainted at some point in its former life, so I'm not sure if it's Toyota white or not. It's not a super bright shade of white though. If I had a choice, I would have preferred gray, silver or red, but the white is beginning to grow on me.
My 4Runner came without the badges that go on the B-pillar. If I had to guess, I'd say that the originals became faded and ugly, so the P.O. removed them. I've seen threads on YotaTech that detailed how to restore those badges, but I would have to buy them first. While searching for the used badges on eBay, I found these. They're expensive, but I figured what the heck - they'll really improve the look of the truck.
So...I prepped the area where the old badges were. A paint scraper got rid of most of the old residue and sandpaper and a bit of alcohol finished the job (below).
The replicas came equipped with 3M adhesive tape and were a breeze to apply. One of them is popping up a bit, so I'll go back and apply some glue when it warms up. I think these replicas look GREAT (below)! I'm trying to brainstorm how I can replace or restore the other badges on the truck - especially the 4Runner badge on the back.
Those badges do look great. I've bought parts from that seller before, he's local to me. Hopefully I'll be meeting up with him soon for an exhaust pipe I need. I can't pull the trigger on those badges just yet, I'm nowhere near restored status, but they do kind of bring everything together on a truck as clean as yours. I did buy those tailgate stoppers you posted. Thanks for that part number. Opened up my tailgate and they were all busted/missing. My "Huh?! How about that!" moment.

 12-04-2017, 01:46 PM


 I've read that some people struggle to remove the shift lever due to a metal collar that has to be pushed down and turned counterclockwise - my setup was not like this! Once I had everything unbolted, the shifter simply lifted out.


 I ended up breaking most of the old clips off - piece by piece (below).