
Yes, another buildup thread
 Jun 11, 2005 | 05:50 PM
#61
Thread Starter
Contributing Member
Joined: Mar 2003
Posts: 1,252
Likes: 0
From: Elwood, Il
No, it had a headgasket on it. All the compression is blowing past the rings. Its so bad that when turning the engine over by hand you can actually hear it hissing past the rings.
On the bright side, i sure have gotten fast at pulling 22r's appart. It only took me an hour an 20 min with nothing but hand tools to go from a full engine bay to just a block with the pistons in it and a starter.
On the bright side, i sure have gotten fast at pulling 22r's appart. It only took me an hour an 20 min with nothing but hand tools to go from a full engine bay to just a block with the pistons in it and a starter.
Last edited by joez; Jun 11, 2005 at 05:52 PM.
Jun 12, 2005 | 09:28 PM
#63
Thread Starter
Contributing Member
Joined: Mar 2003
Posts: 1,252
Likes: 0
From: Elwood, Il
Yup, pulling the motor and rebuilding it completely.
Im really, really kicking myself in the ass over this one. I assumed that a 22r with only 75K miles would be in good shape, as you can see i was wrong. Had i just done a compression test a month ago, i could already have had the entire motor rebuilt and back in the engine compartment. Ugh, ill never forgive myself for this one
Im really, really kicking myself in the ass over this one. I assumed that a 22r with only 75K miles would be in good shape, as you can see i was wrong. Had i just done a compression test a month ago, i could already have had the entire motor rebuilt and back in the engine compartment. Ugh, ill never forgive myself for this one
 Jun 13, 2005 | 02:56 PM
#65
Originally Posted by joez
Yup, pulling the motor and rebuilding it completely.
Im really, really kicking myself in the ass over this one. I assumed that a 22r with only 75K miles would be in good shape, as you can see i was wrong. Had i just done a compression test a month ago, i could already have had the entire motor rebuilt and back in the engine compartment. Ugh, ill never forgive myself for this one
Im really, really kicking myself in the ass over this one. I assumed that a 22r with only 75K miles would be in good shape, as you can see i was wrong. Had i just done a compression test a month ago, i could already have had the entire motor rebuilt and back in the engine compartment. Ugh, ill never forgive myself for this one

 Jun 18, 2005 | 06:14 PM
#66
Thread Starter
Contributing Member
Joined: Mar 2003
Posts: 1,252
Likes: 0
From: Elwood, Il
Originally Posted by waskillywabbit
Exactly why I had mine completely rebuilt, you never can tell what the POSs did to it before you. Now I have a brand new engine that will run longer than I'll be around...


Got the Detroit and spool installed today with help from a friend. I dont know why people make this out to be such a big deal, i was suprised how easy it was. This was my first crack at it, i had done lockrights before, but never a full carrier replacement that required gear setup. The gears were in great shape, suprising considering the rest of the truck. Backlash is set at .005 with a perfect gear pattern on both diff's. Took a while on the first diff to get it right, but the second went pretty quick.
Tommarow ill start on the reasembly of the front and rear axles, and should be able to at least have the rear sitting on tires instead of jackstands like the front. I still havent been able to get the motor out, but need to badly early this week. As soon as i get the K5 back driving without puking oil all over the place, ill get the motor out of the toy and off to the machine shop.
Last edited by joez; Jun 18, 2005 at 06:17 PM.
Jun 20, 2005 | 07:18 PM
#67
Thread Starter
Contributing Member
Joined: Mar 2003
Posts: 1,252
Likes: 0
From: Elwood, Il

Getting those 30 splines in was a total PITA. Took about 2 hours and i destroyed one inner axle seal to get them in. Most of that time was spent on the long side, as was the axle seal. It just did not want to go in, and at one point i got the inner shaft stuck in the detroit, i had to find a steel rod that fit through the carrier and pound the axleshaft out of the housing. But when it did go together, it went in one fluid motion and took about 3 seconds. I didnt know whether to be happy, or be angry that it couldnt do that the first time.
I had gotten a couple requests for comparison pics of the 30 spline inners and birf's compared to stock 27 spline stuff, so here they are.


Last edited by joez; Jun 22, 2005 at 02:00 PM.
 Jun 22, 2005 | 06:00 PM
#69
Contributing Member
Joined: Dec 2002
Posts: 2,424
Likes: 0
From: The Lone Star State
Looks great.
Dude, how did you learn all this?
I feel like I've been learning a while and I couldn't tackle a job like this.
I need to figure out how to rebuild the front axle on a FJ80. Is it the same concept as what you are doing or different?
You've got all my respect for being able to do something like this.
How old are you anyways? For some reason I think you are younger than me but I may be wrong.
:bounce2:
Jun 22, 2005 | 07:10 PM
#70
Thread Starter
Contributing Member
Joined: Mar 2003
Posts: 1,252
Likes: 0
From: Elwood, Il
Originally Posted by AgRunner06
Looks great.
Dude, how did you learn all this?
I feel like I've been learning a while and I couldn't tackle a job like this.
I need to figure out how to rebuild the front axle on a FJ80. Is it the same concept as what you are doing or different?
You've got all my respect for being able to do something like this.
How old are you anyways? For some reason I think you are younger than me but I may be wrong.
:bounce2:
Dude, how did you learn all this?
I feel like I've been learning a while and I couldn't tackle a job like this.
I need to figure out how to rebuild the front axle on a FJ80. Is it the same concept as what you are doing or different?
You've got all my respect for being able to do something like this.
How old are you anyways? For some reason I think you are younger than me but I may be wrong.
:bounce2:
The FJ-80 axle is pretty much exactly the same, just has some bigger parts in it and is wider. The axles are pretty simple. Honestly, setting the trunion bearing preloads was one of the most time consuming parts of the reasembly, and thats nothing difficult.
As for age, im only 19.
Jun 23, 2005 | 04:12 PM
#71
Thread Starter
Contributing Member
Joined: Mar 2003
Posts: 1,252
Likes: 0
From: Elwood, Il
Well, FINALLY the motor is out. We had to put the tranny back in to do it as i found out yesterday it wasnt going to happen without the tranny bolted to the motor. I tried to put the axle under the truck, but somehow managed to break a center pin, and at that point i called it a day.
Anyway, here is how you pull a motor with no loader tractor or engine hoist. It actually went very smoothly with 2 people, had it out in now time.


Keep the motor and tranny level and strait up and down, make sure they stay inline like they should, dont let the straps get away from you, and in a few minutes you end up here:

Anyway, here is how you pull a motor with no loader tractor or engine hoist. It actually went very smoothly with 2 people, had it out in now time.
Keep the motor and tranny level and strait up and down, make sure they stay inline like they should, dont let the straps get away from you, and in a few minutes you end up here:
Jun 25, 2005 | 10:31 PM
#72
Thread Starter
Contributing Member
Joined: Mar 2003
Posts: 1,252
Likes: 0
From: Elwood, Il
Axle is under it, hopefully it will be sitting on 4 Q78's tommarow.
Use your imagination a bit, as the front end will come down about 3" with the drivetrain in it, and the tires will not stay on these rims, but at least you get an idea of where it is headed. I may need to push the axle further forward, will have to wait until i get it trimmed and can see what it does.

Use your imagination a bit, as the front end will come down about 3" with the drivetrain in it, and the tires will not stay on these rims, but at least you get an idea of where it is headed. I may need to push the axle further forward, will have to wait until i get it trimmed and can see what it does.
Jul 13, 2005 | 06:08 PM
#74
Thread Starter
Contributing Member
Joined: Mar 2003
Posts: 1,252
Likes: 0
From: Elwood, Il
Been a while since i updated this, but there have been changes. I had some setbacks, including problems with the K5, a bathroom that needed remodelling which took away my garage, a club wheeling trip, and a few other things.
Axle is under and done, the trucks been sitting on 4 tires for a couple weeks now. Still only the 31's, because its been to hot to dissmount by hand without giving myself a heart attack. Im going to take them up and have them done soon, i'll just pay to have it done.
The big change, is that the block that was in the motor is no good, even for a rebuild. I got it torn down nearly 2 weeks ago, and discovered the true extent of the damage to the walls. It would need a .060 over to get it good again, and that puts me in the realm of expensive parts. So last friday i went and picked up a complete, running 22r, but since we were remodeing our bathroom i didnt get it out of the back of my K5 until today. I went out and bought myself some new toys over the past couple weeks to help move this project along, an engine hoist, stand, and some air tools. Home Depot had a composite Husky that will put out 600 ft/lbs of torque on sale for only $100, so i jumped on that.
The new motor was on the engine stand and had the head off within 45 min. Cylinder walls still have cross hatching on them, so far it looks to be in pretty decent shape. Tommarow it will finish getting torn down, and then i will reasemble it with some new parts, and put the new flywheel and clutch on. Then ill bolt up the rest of the drivetrain, and it will be ready to go back in the truck. Here are a few pics:
Finishing the axle install, the springs didnt want to cooperate as you can see

New motor, just out of the back of the K5

Looks good so far, at least a lot better than that other basketcase of a motor. Ill get pics of the rings and pistons and the block of that "other" motor later, its amazing how bad of shape it was in for how little miles were on it.

And this is the new family rig, and my tow rig. The K5 will just be my DD/school/winter beater and light wheeler, its in to sad of shape to sell anymore and i like it to much to want to get rid of it, i just love the truck.

Axle is under and done, the trucks been sitting on 4 tires for a couple weeks now. Still only the 31's, because its been to hot to dissmount by hand without giving myself a heart attack. Im going to take them up and have them done soon, i'll just pay to have it done.
The big change, is that the block that was in the motor is no good, even for a rebuild. I got it torn down nearly 2 weeks ago, and discovered the true extent of the damage to the walls. It would need a .060 over to get it good again, and that puts me in the realm of expensive parts. So last friday i went and picked up a complete, running 22r, but since we were remodeing our bathroom i didnt get it out of the back of my K5 until today. I went out and bought myself some new toys over the past couple weeks to help move this project along, an engine hoist, stand, and some air tools. Home Depot had a composite Husky that will put out 600 ft/lbs of torque on sale for only $100, so i jumped on that.
The new motor was on the engine stand and had the head off within 45 min. Cylinder walls still have cross hatching on them, so far it looks to be in pretty decent shape. Tommarow it will finish getting torn down, and then i will reasemble it with some new parts, and put the new flywheel and clutch on. Then ill bolt up the rest of the drivetrain, and it will be ready to go back in the truck. Here are a few pics:
Finishing the axle install, the springs didnt want to cooperate as you can see
New motor, just out of the back of the K5
Looks good so far, at least a lot better than that other basketcase of a motor. Ill get pics of the rings and pistons and the block of that "other" motor later, its amazing how bad of shape it was in for how little miles were on it.
And this is the new family rig, and my tow rig. The K5 will just be my DD/school/winter beater and light wheeler, its in to sad of shape to sell anymore and i like it to much to want to get rid of it, i just love the truck.
 Jul 15, 2005 | 09:47 PM
#76
Thread Starter
Contributing Member
Joined: Mar 2003
Posts: 1,252
Likes: 0
From: Elwood, Il
The tundra's tow real nice, this is our second one. As soon as i get a good steady income going again, i think i may get rid of my K5 and go out and buy a regular cab, 2wd with a V8. Rubber floors, roll up windows, bench seat, my kind of truck, no frills. I figure i could walk out of the dealer with one for ~$16-17K the way i would like it.
Had very little time yesterday to work on the truck(got the motor torn the rest of the way down, but that was it), but did had some today today. Meet motor #2, complete and ready to drop in. This one has a problem, though, it has bad valve guide seals and i know it. I have new ones on order, but no time to do them right now. Ill just run it for a while, and probobally pull it and tear it down again this fall, or build the other motor with some custom stuff, im undecided.

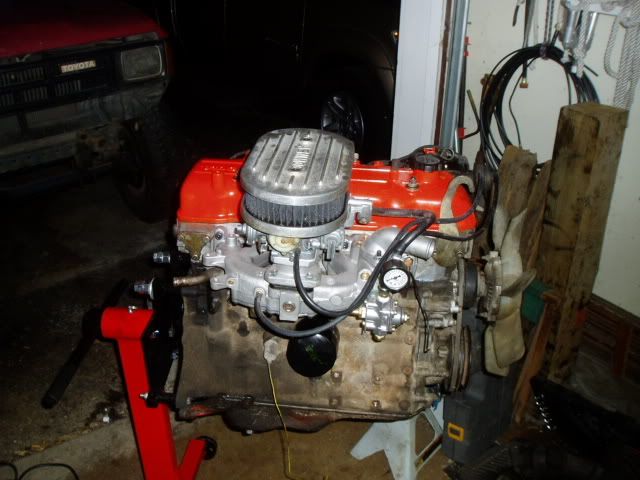

It is dirty and unpainted, but at this point i dont care Everything checked out, except for the known bad valve guide seals. New gaskets and seals most other places, new tensioner and guides, and newer water pump. Sunday ill get the flywheel and clutch on, bolt up the tranny, and swing it back under the hood where it belongs.
Had very little time yesterday to work on the truck(got the motor torn the rest of the way down, but that was it), but did had some today today. Meet motor #2, complete and ready to drop in. This one has a problem, though, it has bad valve guide seals and i know it. I have new ones on order, but no time to do them right now. Ill just run it for a while, and probobally pull it and tear it down again this fall, or build the other motor with some custom stuff, im undecided.
It is dirty and unpainted, but at this point i dont care Everything checked out, except for the known bad valve guide seals. New gaskets and seals most other places, new tensioner and guides, and newer water pump. Sunday ill get the flywheel and clutch on, bolt up the tranny, and swing it back under the hood where it belongs.
Jul 15, 2005 | 10:33 PM
#77
Registered User
Joined: Oct 2003
Posts: 1,264
Likes: 1
From: mayport FL
Sweet motor..
You might as well wire brush it and rattle it low gloss black while you are at it.
I just blasted the hell out of my block with carb cleaner and engine cleaner.
It actaully had been painted decent before and protected by the layers of crud on my motor.
You might as well wire brush it and rattle it low gloss black while you are at it.
I just blasted the hell out of my block with carb cleaner and engine cleaner.
It actaully had been painted decent before and protected by the layers of crud on my motor.
Last edited by 934rnr; Jul 15, 2005 at 10:37 PM.
Jul 16, 2005 | 06:29 AM
#79

Contributing Member
Joined: Nov 2003
Posts: 2,315
Likes: 0
Originally Posted by joez
Everything checked out, except for the known bad valve guide seals.
There is a way you can change your valve giuide seals without taking the head off. It's a little trick I used to do when I wrenched. I have a compresion tester with quick disconects... screw the one end into the spark plug hole and attach to a compressor. With the cam out of the head, I use a magnetic Overhead Valve Tool that all you do is smack it with a hammer and the keepers fly out. The air pressure holds the valves from falling out. You reverse the process to install the keepers, it works very fast and saves plenty of time.
Then you simply pull the springs and replace the seals.....
Last edited by BruceTS; Jul 16, 2005 at 06:32 AM.
Jul 16, 2005 | 08:48 AM
#80
Thread Starter
Contributing Member
Joined: Mar 2003
Posts: 1,252
Likes: 0
From: Elwood, Il
Bruce, thanks for the tip, i had never heard that trick before. Should save a lot of time 
Yelosub, i stuck it in my attic in case i needed something for the front end before i get the new front bumper built. I still need to run 220 to my garage, using the readywelder gets to be a pain after a while, i dont want to be fabbing any larger scale projects without 220 and a real welder.
I would have cleaned up the motor better, but i ran out of brake cleaner and time is dissapearing fast. There will be several late nights in the garage this week to get it done enough to wheel, i have a 3-day event at the badlands to go to that starts this upcoming friday. Hello crunch time.
Yelosub, i stuck it in my attic in case i needed something for the front end before i get the new front bumper built. I still need to run 220 to my garage, using the readywelder gets to be a pain after a while, i dont want to be fabbing any larger scale projects without 220 and a real welder.
I would have cleaned up the motor better, but i ran out of brake cleaner and time is dissapearing fast. There will be several late nights in the garage this week to get it done enough to wheel, i have a 3-day event at the badlands to go to that starts this upcoming friday.
Hello crunch time.


