
repairing the famous dash crack
 Sep 23, 2008 | 07:32 PM
#1
Thread Starter
Registered User
Joined: Sep 2007
Posts: 6,002
Likes: 1
From: Spring Valley, CA
repairing the famous dash crack
my dash is cracked down the center, its got some marks on the pad as if the P.O. had his GF in the truck and he drove so bad she dug her nails into the dash. another part of the dash(small part) is totally missing the blue cover, and the foam is exposed. im thinking just use some caulking to cover the crack then smooth it out so its at an even level with the rest of the dash, and paint it, but then i come to the BIG problem: TEXTURE. how do i match the texture on the dash, or can i just caulk the whole thing so its all smooth, and paint it then? but that would look BORING. has anyone ever SUCCESSFULLY conquered this problem? and buying a new dash is out of the question. ....for now. maybe ill find a 91 4runner in the junkyard and rip the dash, doors, seats, and carpet out... but back to the problem... whats a good way to fix it? i mean i plan on getting a dash cover, but i still want it to look good underneath... you know? any thoughts? and i know i may be taking on too much, what with the speedo cable AND doing the dash, but i figure what a better time to do the dash than when im replacing my speedo cable??? help?
Sep 23, 2008 | 07:47 PM
#4

Contributing Member
Joined: Apr 2006
Posts: 218
Likes: 0
From: Oklahoma, USA
Glues
No answers, only questions...
Seriously, I have thought about this before and if you figure it out be sure and patent it before you tell everyone else cause you'll be rich!
I think that if you're even going to attempt it scratch the caulk/silicone idea. Epoxy maybe, but not caulk. I might even try super glue or something in layers in the crack because it is thin and will settle. Just get it to the level of the material around it then paint it. The biggest mistake people make is getting the repair glue all over the dash!
Let me know if you come up with anything useful. By the way, do P.O. 's never have wives anymore? Why is it always a GF?
{At age 29, 5 years of most excellent marriage and counting.}
Last edited by khoopes; Sep 23, 2008 at 07:53 PM.
Sep 23, 2008 | 08:03 PM
#5
Thread Starter
Registered User
Joined: Sep 2007
Posts: 6,002
Likes: 1
From: Spring Valley, CA
since i doubt theres a way to fix it from the inside, i was thinkin of maybe using caulk (ok scratched) to COVER the crack, but now i think maybe ill use some plastic filler(they have it, right? i mean they have wood filler...) and epoxy, then get the original dash paint from toyota. hell worst comes to worst ill sand it down so its smooth, then put a light layer of primer on it, then spray it with liquid chrome, so it will have a metallic look. im just throwing ideas out. the caulk/coverup idea is the best one ive got.
Sep 23, 2008 | 08:11 PM
#6
Registered User
Joined: Oct 2007
Posts: 253
Likes: 0
From: Mile High
Doh! Here is a dash repair kit from JC Whitney, I don't think Id buy it but it might work
http://www.jcwhitney.com/autoparts/P...tt=dash+repair

http://www.jcwhitney.com/autoparts/P...tt=dash+repair
Trending Topics
Sep 24, 2008 | 03:59 PM
#8


my old dash is cracked right in half on my "Trekker build" (79-83 fourm )
I am going to fix it .. and here's my thought's ..
It will require an obvious removal of the pad .. then I'm going to duct tape up the crack .. use some expanding foam in a hole I make in the duct tape , and fill er' up . Then I can remove the original vinal , sculpt the expanding foam to match the original foam pad , and recover with my choice of LEATHER ..
..
sounds easy enough !!
.
I am going to fix it .. and here's my thought's ..
It will require an obvious removal of the pad .. then I'm going to duct tape up the crack .. use some expanding foam in a hole I make in the duct tape , and fill er' up . Then I can remove the original vinal , sculpt the expanding foam to match the original foam pad , and recover with my choice of LEATHER
.. sounds easy enough !!
.
Feb 24, 2012 | 04:20 PM
#9
Registered User
Joined: Feb 2012
Posts: 9
Likes: 0
i know this is old but you guys might get a kick out of what i did. my dash had SEVERAL cracks all the way from the windshield to the bottom, i just got back form iraq and had some acu tops that i had never worn so instead of throwing them away i used them to wrap my dash and door panels. very tough material mud just breaks right off when it dries and it get attention by everyone. all i used was a stanley stapler and a pair of scissors. looks pretty good if you want pics just pm me.
Nov 6, 2012 | 05:12 AM
#10

Registered User
Joined: Oct 2012
Posts: 171
Likes: 0
From: Oklahoma
I know this thread is old, but here is what I'm thinking, trim all the old crummies from the cracks so the top is flat, cut a piece of the cloth from a fiberglass repair kit to fit the contour, lay down a coat of por, lay down a layer of fib mat, another coat of por, the por seems to flow pretty smooth, so I think it will come out ok, then sand smooth, there will be some fiber mat showing probably but that will add to the look then clear coat with satin clear so it won't be too shiny. My dad used por and fiber mat to patch rust holes in his 41 Chevy and it may be tougher than fiberglass resin, and way easier to apply.
 Nov 6, 2012 | 10:09 AM
#12
Registered User
Joined: Nov 2008
Posts: 2,306
Likes: 8
From: Cheyenne, Wyoming
Nov 6, 2012 | 10:15 AM
#13
link to Corax's thread:
https://www.yotatech.com/forums/f123...repair-230891/
https://www.yotatech.com/forums/f123...repair-230891/
Nov 6, 2012 | 05:24 PM
#14
Registered User
Joined: Oct 2012
Posts: 171
Likes: 0
From: Oklahoma
Fiberglass resin is harder to work with than por but I think por is plenty durable for coating a dah pad, the fiber glass cloth will confer the whole dash and when sanded I think it will prolly look like carbon fiber
Jan 6, 2013 | 01:22 PM
#15
Registered User
Joined: Mar 2012
Posts: 387
Likes: 1
From: Topeka, Kansas
kinda old but i saw a guy make a gauge pillar pod then he sprayed it with undercoating, and then put the factory color spray paint over it.
i suppose if you used a epoxy to fill in the cracks, sand it down and use the above method that it would look factory, but im not for sure as my 95 does not have the infamous dash crack
i suppose if you used a epoxy to fill in the cracks, sand it down and use the above method that it would look factory, but im not for sure as my 95 does not have the infamous dash crack
Jan 11, 2013 | 08:17 AM
#16
link to Corax's thread:
https://www.yotatech.com/forums/f123...repair-230891/
https://www.yotatech.com/forums/f123...repair-230891/
this was a great write up. i would definitely go this route
Sep 15, 2014 | 01:21 PM
#17

Registered User
Joined: Apr 2014
Posts: 109
Likes: 1
From: Baltimore, MD (!)
another repair option-plastic welding (fail) and ABS cement
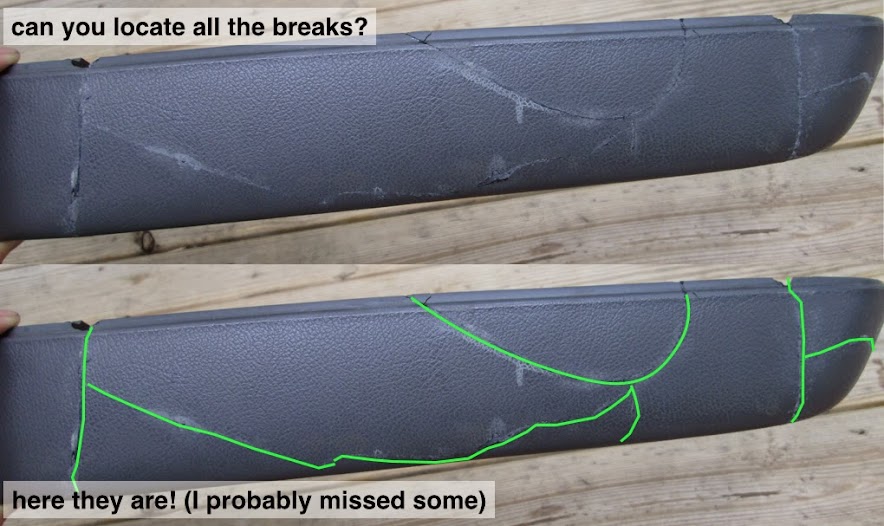
my �94 xtracab DLX (3VZE) also came with the infamous dashboard crack gratis. Shortly after, the dash increasingly rattled during driving and eventually broke in another location. Being the cheap-o and not wanting to purchase plastic epoxy and essentially do full �body work� on the interior panel, I decided to try a few things. It was clear when I pulled the dash out that a PO had tried to remove it without removing the lower instrument panel dash, so all the brackets and mount points were broken (probably also caused the multiple breaks as you�ll see soon).
First was plastic �welding� with a sacrificial soldering iron:

This did not work.
My brother mentioned ABS cement (picked up at Home Depot for ~$4)
good reference:http://faq.ninja250.org/wiki/Plastic...ith_ABS_cement

product link: www.oatey.com/products/plastic-pipe-cements-and-primers/oatey-abs-cements

The back side of the dash even says �PC ABS� (poly carbonate/acrylonitrile Butadiene Styrene which Wiki says is a blend makes for a stronger plastic. (the picture was taken after I already cemented parts of together)

So, we went for it.
* work outside or with proper ventilation/mask: did I mention this stuff really stinks?

I thought I could get away with just cementing it and then carefully sanding down the lines that showed through the front side, but I wasn�t pleased with the results, so I used the ABS cement as �filler� and ended up doing the body work I wasn�t intending to do.

Decided to give Rustoleum's textured pray paint a try. It's supposed to hide imperfections of which my now patched and sanded dash have plenty.

The results are mixed. The combination of butterfingers and the right side of the dash being extremely brittle (more UV damage?) resulted in a bunch more cracks and breaks than were initially present. The textured paint was much less textured than I expected.

Then this happened...


final piece:

Lessons learned:
*use the lower dash (or whatever your finished piece is going to attach to) as a frame to get the angles/joints just right
*work quickly. The cement dries to handling within 30 second or so, 2 hours for full cure (longer for thick gobs)
*make sure you cement the pieces on perfectly. A slight skew or misalignment results in having to fill in the gaps/dents with more ABS. The photos of the finished dash make the repair job look better than it does in real person. It�s definitely lumpy and with multiple textures (sanded vs. original �leather grain�)
*Most importantly, the ABS joints are extremely strong (the solvent in the cement dissolves the plastic in the pieces you're cementing together, then fills in the cracks with the stuff that's already dissolved in the can. The secondary breaks were always at locations other than the cemented joints.
Now that I have the whole rest of the can of ABS left, what else can I cement...
Hope that helps!
First was plastic �welding� with a sacrificial soldering iron:
This did not work.
My brother mentioned ABS cement (picked up at Home Depot for ~$4)
good reference:http://faq.ninja250.org/wiki/Plastic...ith_ABS_cement
product link: www.oatey.com/products/plastic-pipe-cements-and-primers/oatey-abs-cements
The back side of the dash even says �PC ABS� (poly carbonate/acrylonitrile Butadiene Styrene which Wiki says is a blend makes for a stronger plastic. (the picture was taken after I already cemented parts of together)
So, we went for it.
* work outside or with proper ventilation/mask: did I mention this stuff really stinks?
I thought I could get away with just cementing it and then carefully sanding down the lines that showed through the front side, but I wasn�t pleased with the results, so I used the ABS cement as �filler� and ended up doing the body work I wasn�t intending to do.
Decided to give Rustoleum's textured pray paint a try. It's supposed to hide imperfections of which my now patched and sanded dash have plenty.
The results are mixed. The combination of butterfingers and the right side of the dash being extremely brittle (more UV damage?) resulted in a bunch more cracks and breaks than were initially present. The textured paint was much less textured than I expected.
Then this happened...
final piece:
Lessons learned:
*use the lower dash (or whatever your finished piece is going to attach to) as a frame to get the angles/joints just right
*work quickly. The cement dries to handling within 30 second or so, 2 hours for full cure (longer for thick gobs)
*make sure you cement the pieces on perfectly. A slight skew or misalignment results in having to fill in the gaps/dents with more ABS. The photos of the finished dash make the repair job look better than it does in real person. It�s definitely lumpy and with multiple textures (sanded vs. original �leather grain�)
*Most importantly, the ABS joints are extremely strong (the solvent in the cement dissolves the plastic in the pieces you're cementing together, then fills in the cracks with the stuff that's already dissolved in the can. The secondary breaks were always at locations other than the cemented joints.
Now that I have the whole rest of the can of ABS left, what else can I cement...
Hope that helps!


