
Redeth's Overland Trailer Build

 Oct 1, 2015 | 07:26 PM
#23
Thread Starter
Registered User
Joined: Apr 2012
Posts: 2,817
Likes: 2
From: Los Angeles CA
lol i thought it was going pretty slow. But i guess you're right i have been pretty busy these past few days. Taking advantage of my last week to myself trying to accomplish as much as possible before i start the new job at the hospital. I have been trying to get all the main frame parts made so all i need to worry about is the main storage compartments. 
No truck axle. They weigh way too much. I like the idea of being able to use the axle as spare parts for emergencies. But you cant use the axle brakes while driving. the only time you can use the brakes is for the parking brake to keep it in place. But i thought having an electric brake system was much more important when driving on the highway, offroad, and stop and go traffic. My truck has a hard time braking suddenly on its own weight with those heavy bumpers and 35" tires; Let alone while hauling a trailer with no brakes on top of all that lol. So i will definitely be using a dedicated trailer axle. But rather then the standard 4 or 5 lug axles i am going to have mine made (or buy a DIY kit) so i can have 6x5.5 hubs. I am going to buy 2 more 5x8 procomp steal rims and 2 more 35"/12.5/r15 BfGoodrich KM2's for the trailer. I may buy them used, but new is always nice right? lol The reason for using the same rim and tire combo as my truck uses is so i can use the trailer tire/rims as spares in the situation that i miraculously blow out 2 tires on my truck while rock crawling lol.
No truck axle. They weigh way too much. I like the idea of being able to use the axle as spare parts for emergencies. But you cant use the axle brakes while driving. the only time you can use the brakes is for the parking brake to keep it in place. But i thought having an electric brake system was much more important when driving on the highway, offroad, and stop and go traffic. My truck has a hard time braking suddenly on its own weight with those heavy bumpers and 35" tires; Let alone while hauling a trailer with no brakes on top of all that lol. So i will definitely be using a dedicated trailer axle. But rather then the standard 4 or 5 lug axles i am going to have mine made (or buy a DIY kit) so i can have 6x5.5 hubs. I am going to buy 2 more 5x8 procomp steal rims and 2 more 35"/12.5/r15 BfGoodrich KM2's for the trailer. I may buy them used, but new is always nice right? lol The reason for using the same rim and tire combo as my truck uses is so i can use the trailer tire/rims as spares in the situation that i miraculously blow out 2 tires on my truck while rock crawling lol.
Oct 2, 2015 | 08:28 PM
#24
Thread Starter
Registered User
Joined: Apr 2012
Posts: 2,817
Likes: 2
From: Los Angeles CA
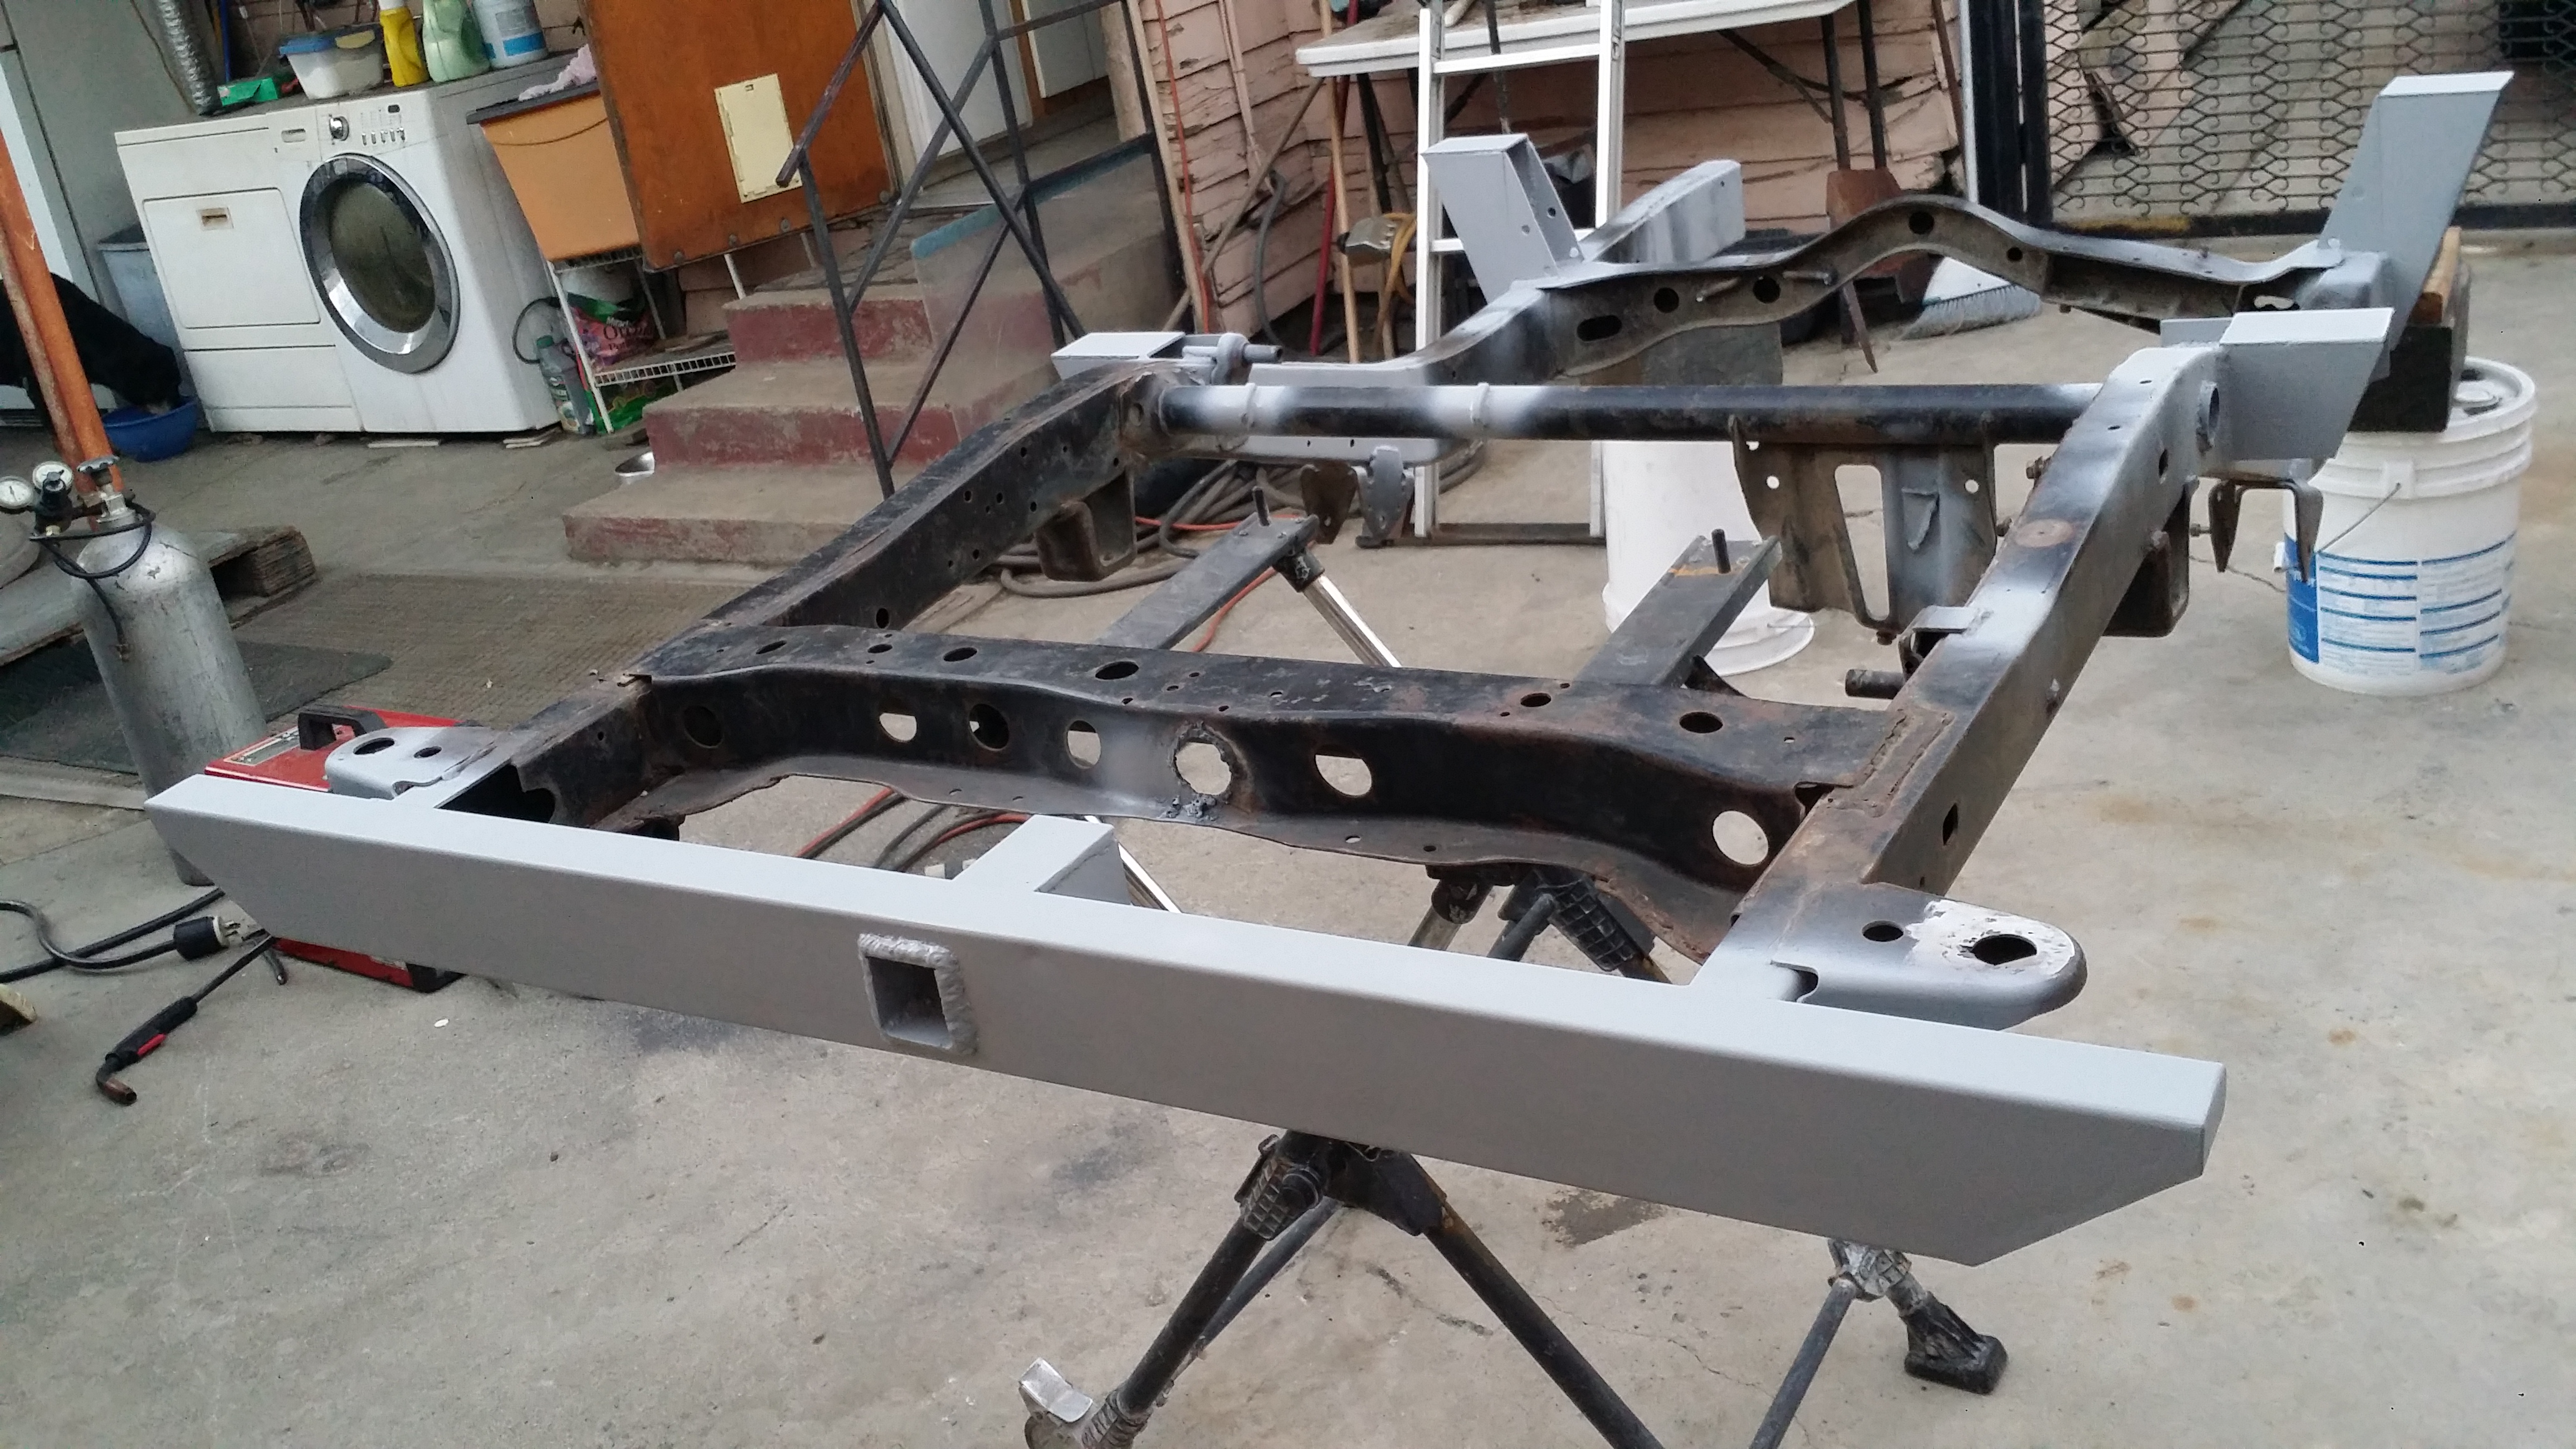
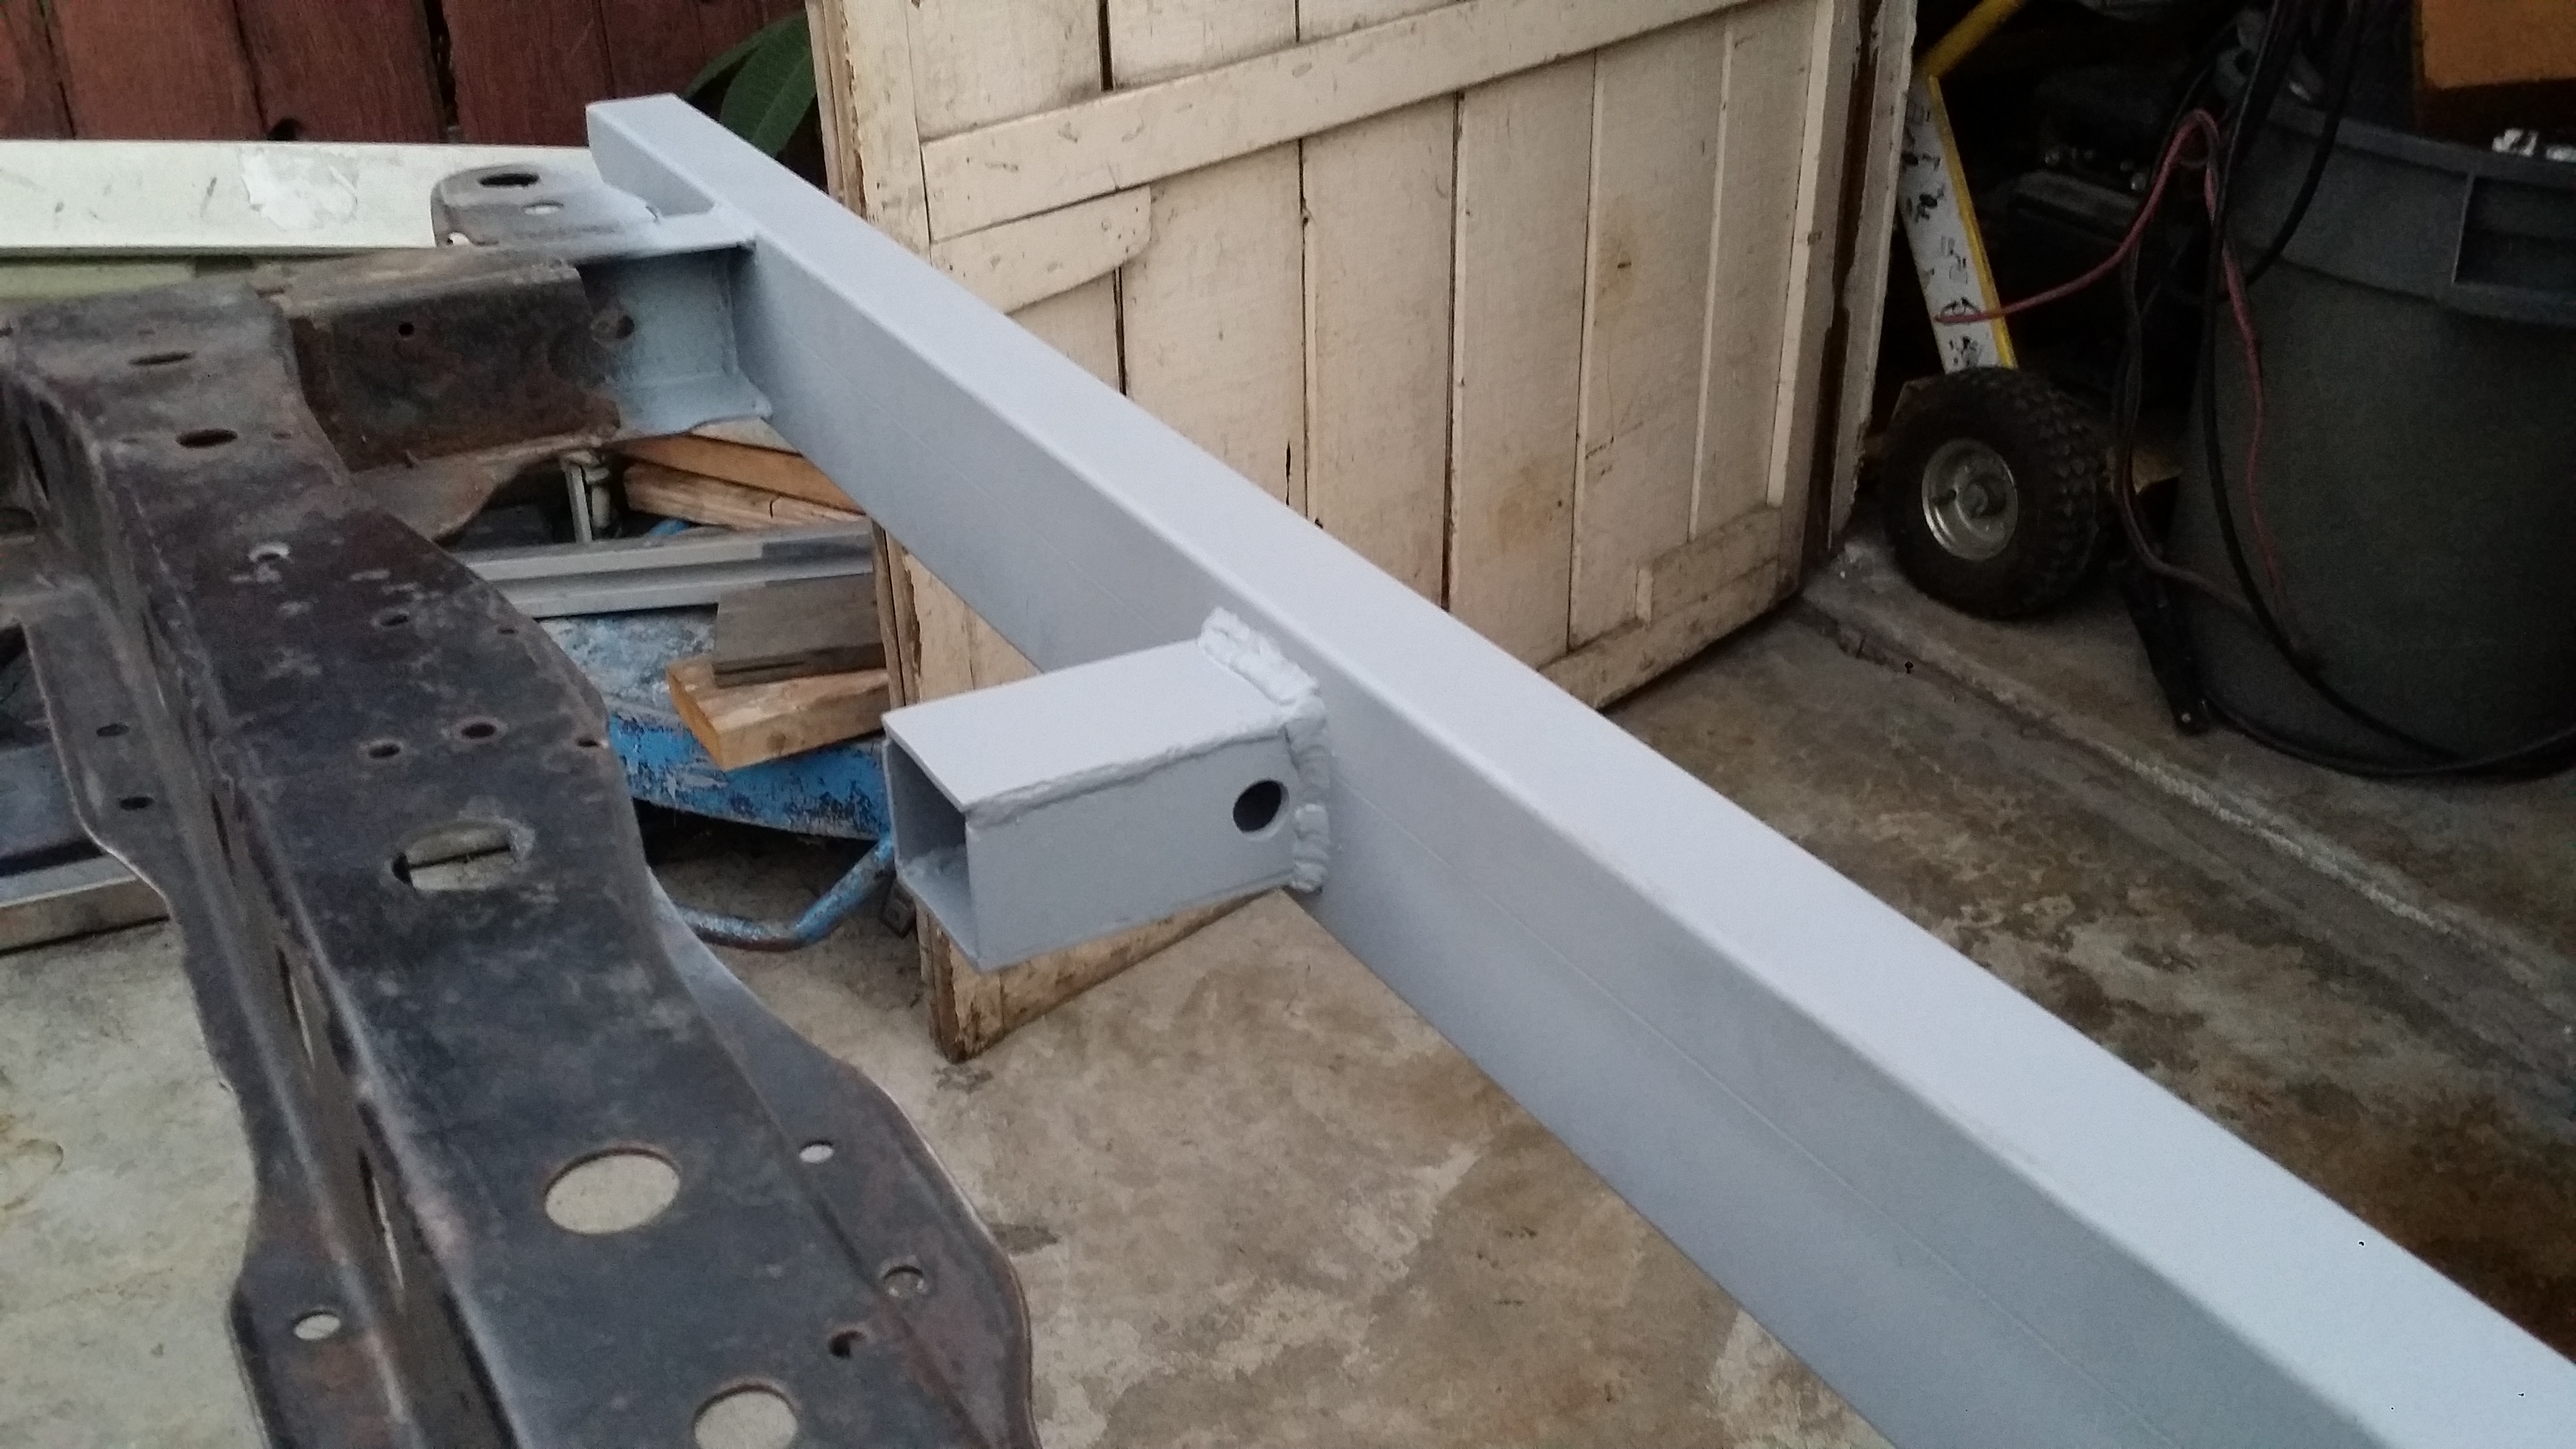
Today it was time to finish that rear bumper. I made the 2&1/2" square cut out for the receiver when i made the bumper. Now it was time to add the receiver. I had originally planned to use the one i bought at Harbor Freight but for as much as it costed i didn't want to have that heavy duty hitch for the super light duty stuff this receiver was meant for. So rather then buy another i figured i would make one with the left over steel i had laying around from when i made my front and rear bumpers.
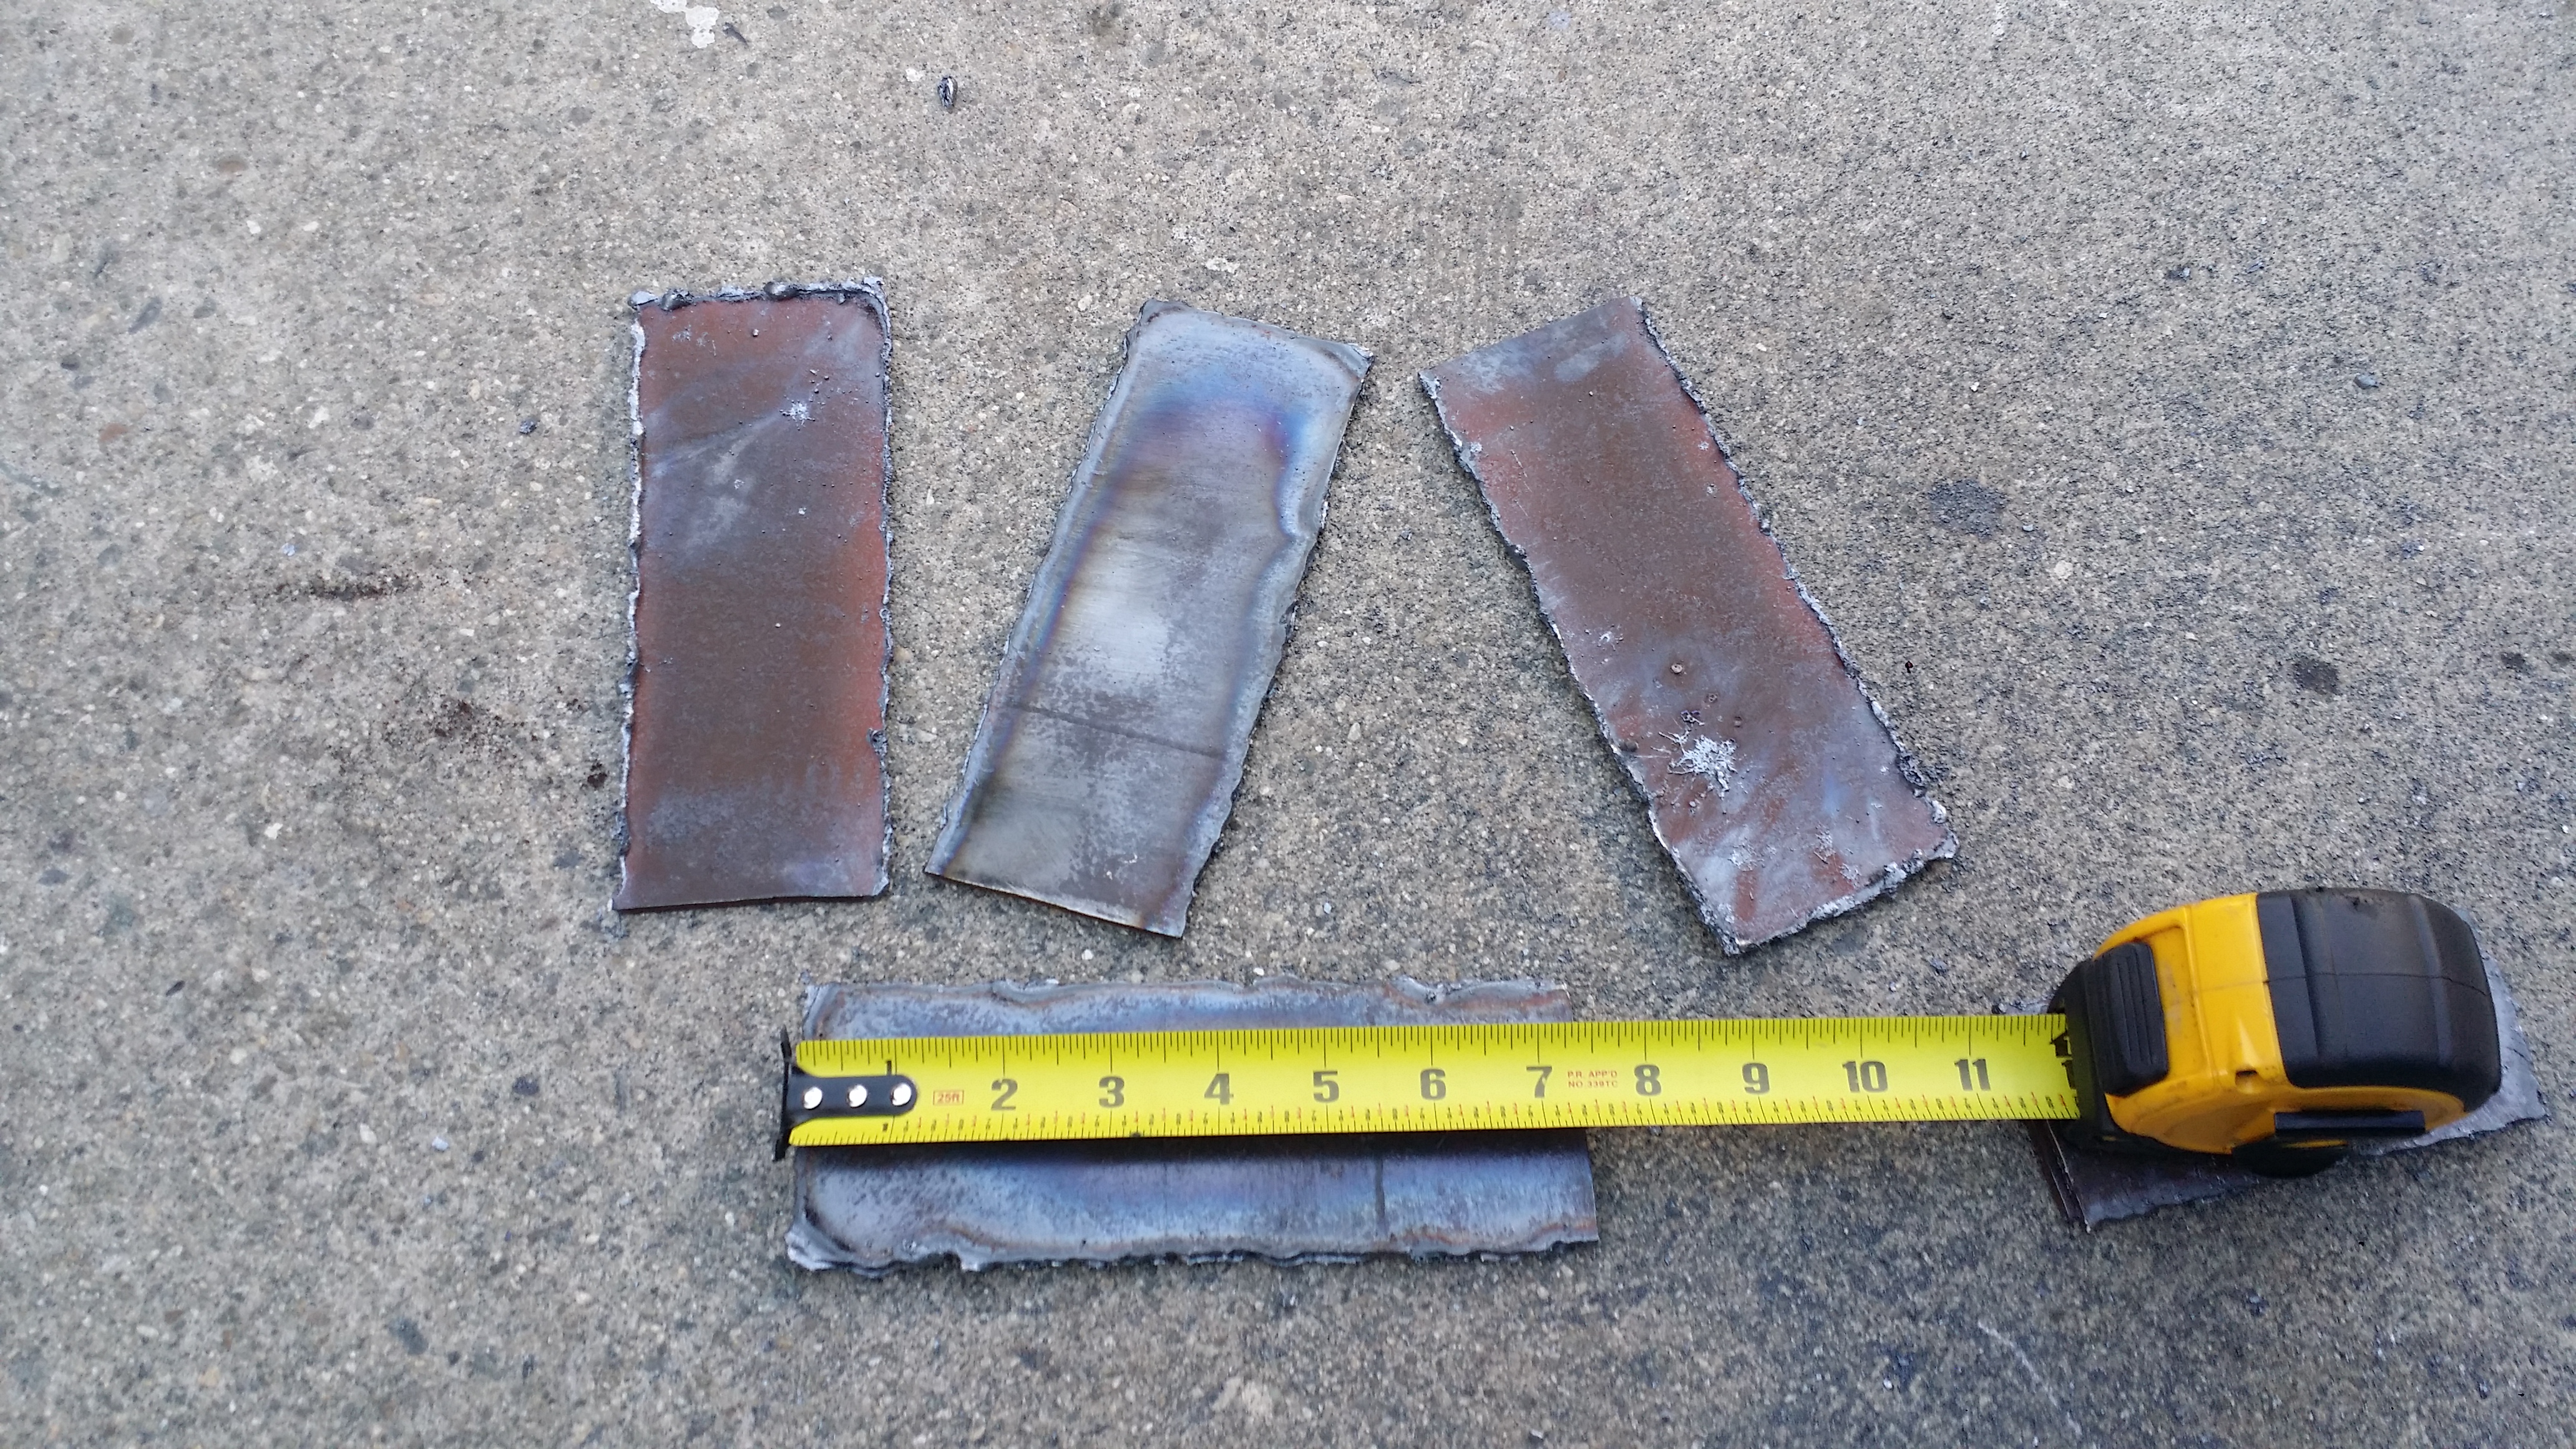
Now that i learned how to cut somewhat precisely with the acetylene torch i cut out these pieces.
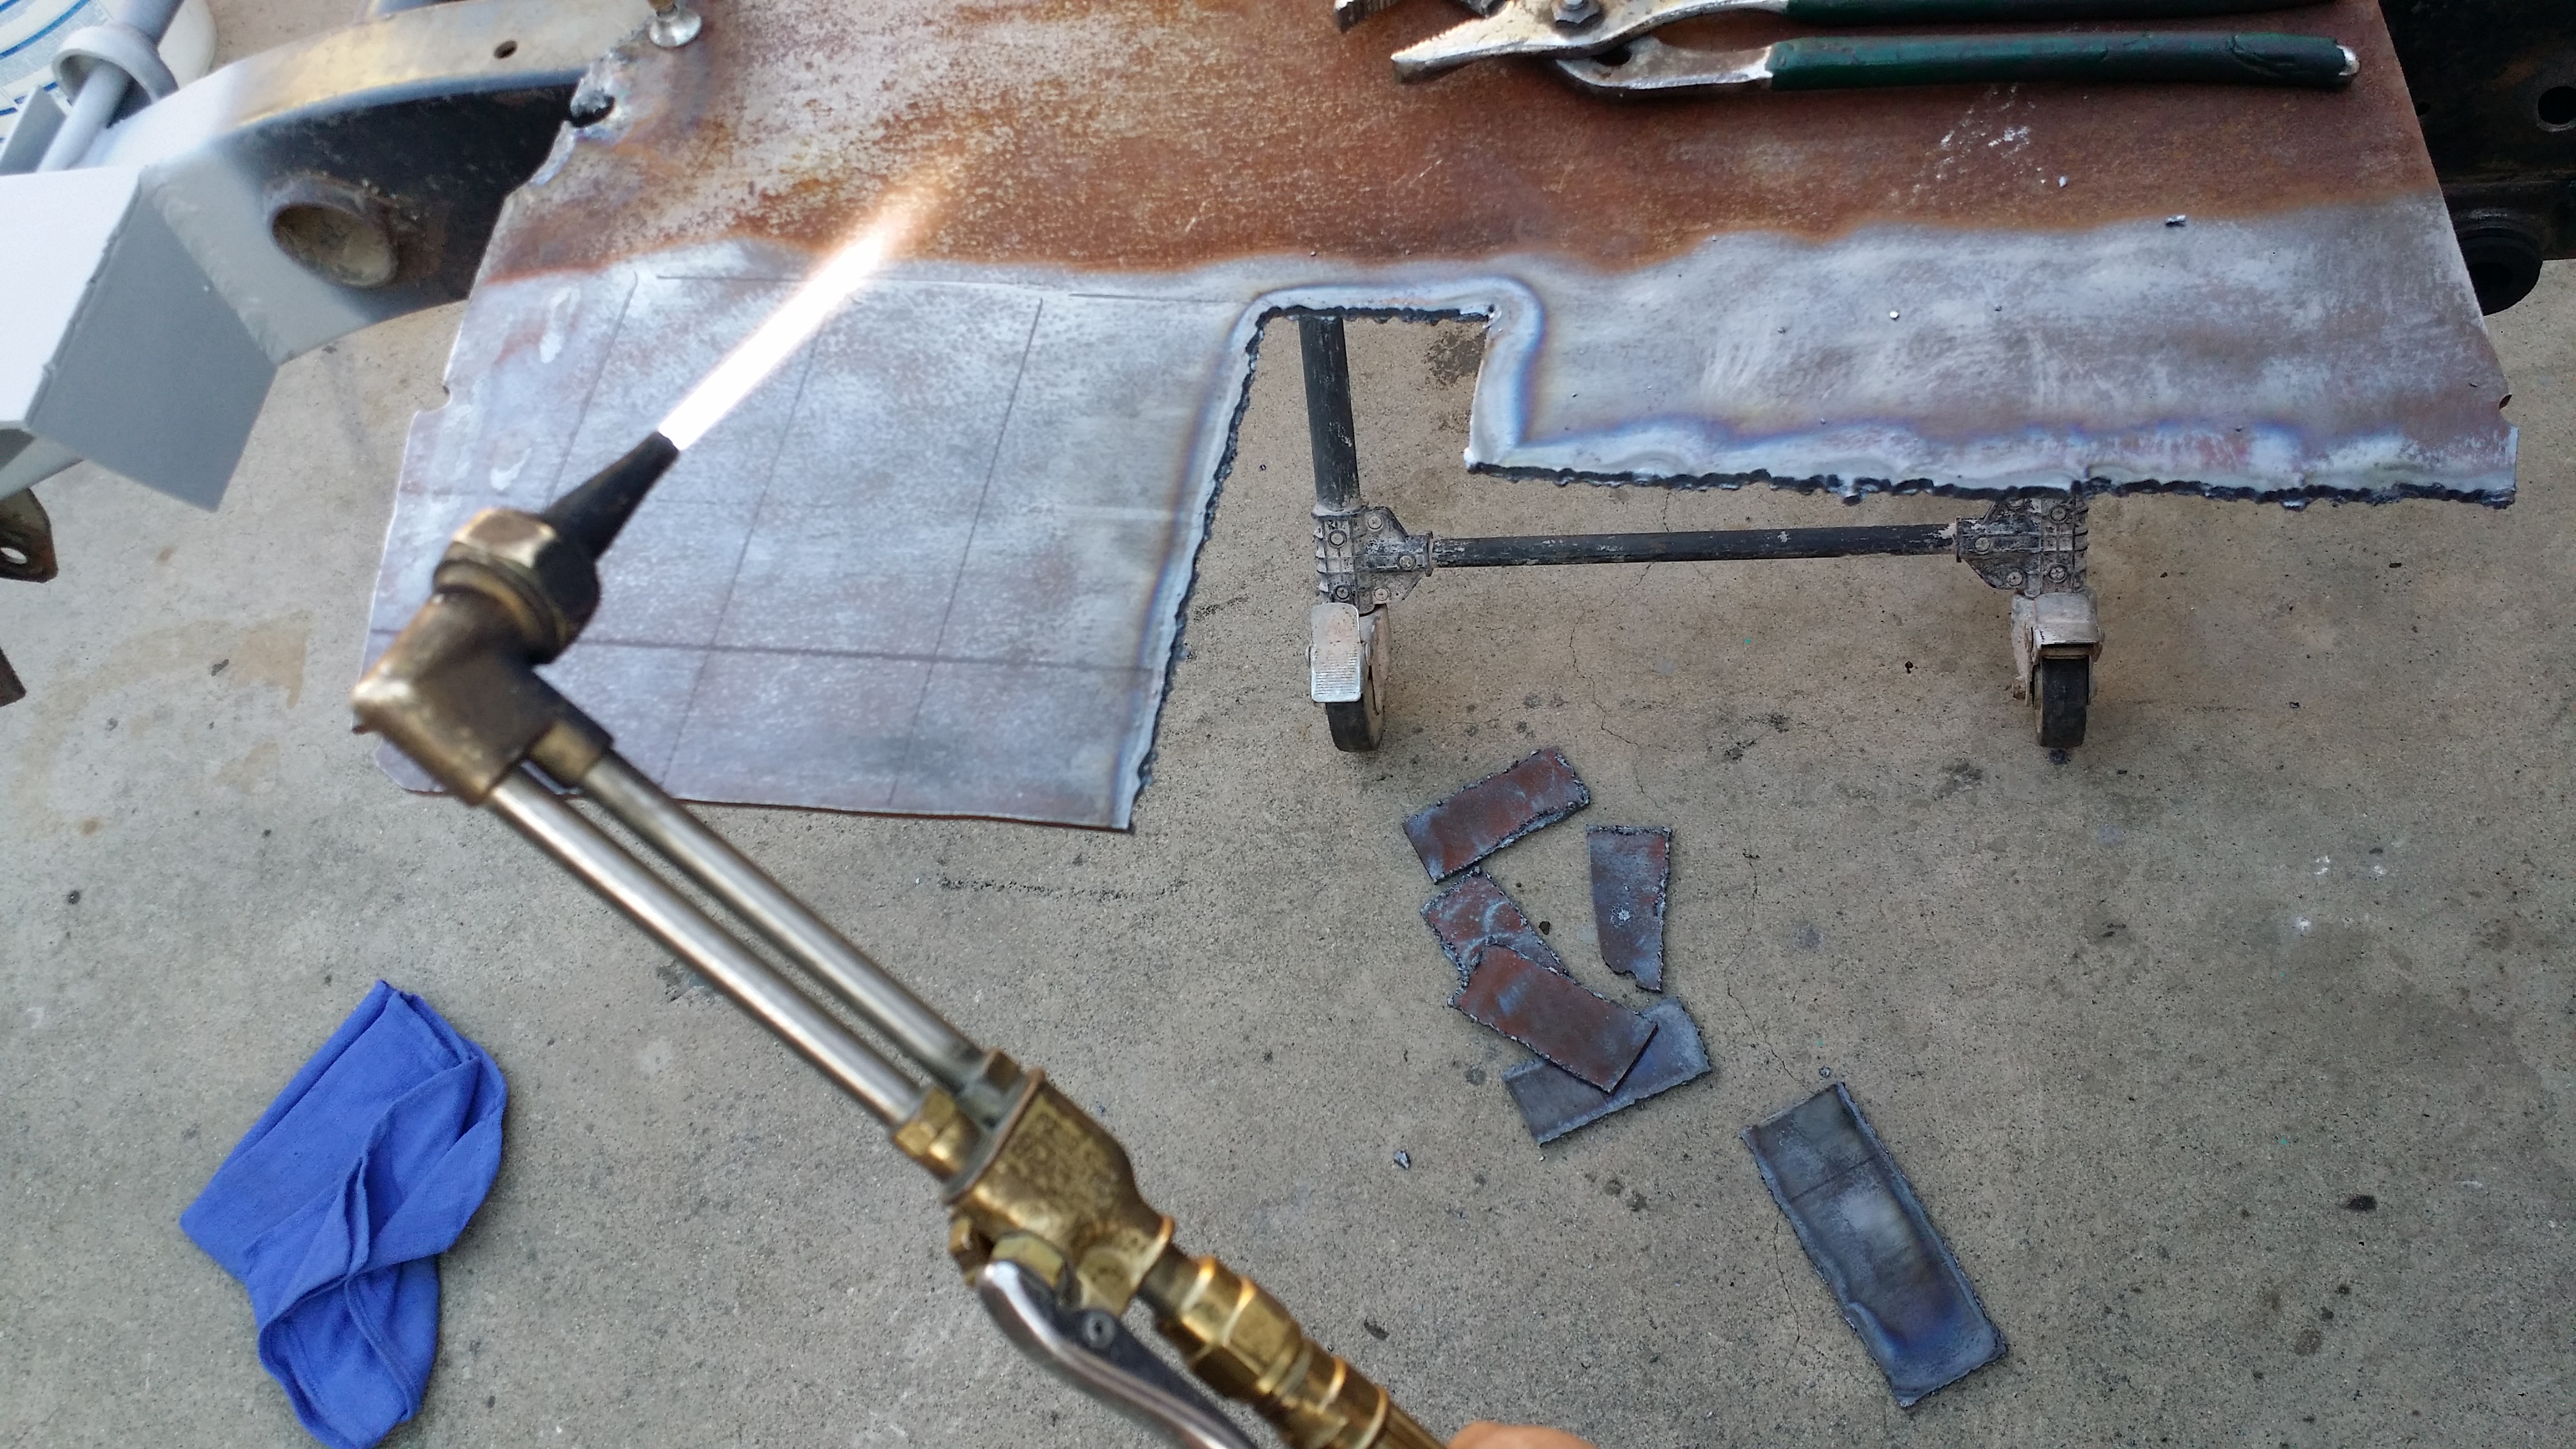
They are 2.5" wide and 7.5" long. I wish i would have cut all the pieces 2&1/4" it would have made it much easier to weld together with alot less grinding. And if you are wondering why i didnt just use a 2.5" square tube its because i didnt have any laying around. and rather then buy a small piece i figured i would just make one out of the scrap metal i had laying around.
Trailer hitch hole is marked, and indented in the center so i can make my holes with the drill. These have got to be the ugliest welds i ever done. But they'll hold up. Its totally fine, nobody will ever see them unless they go under the trailer and physically look for them lol

Perfect size. It is about 1/8" too big of a hole but it works for what i want to use it for.
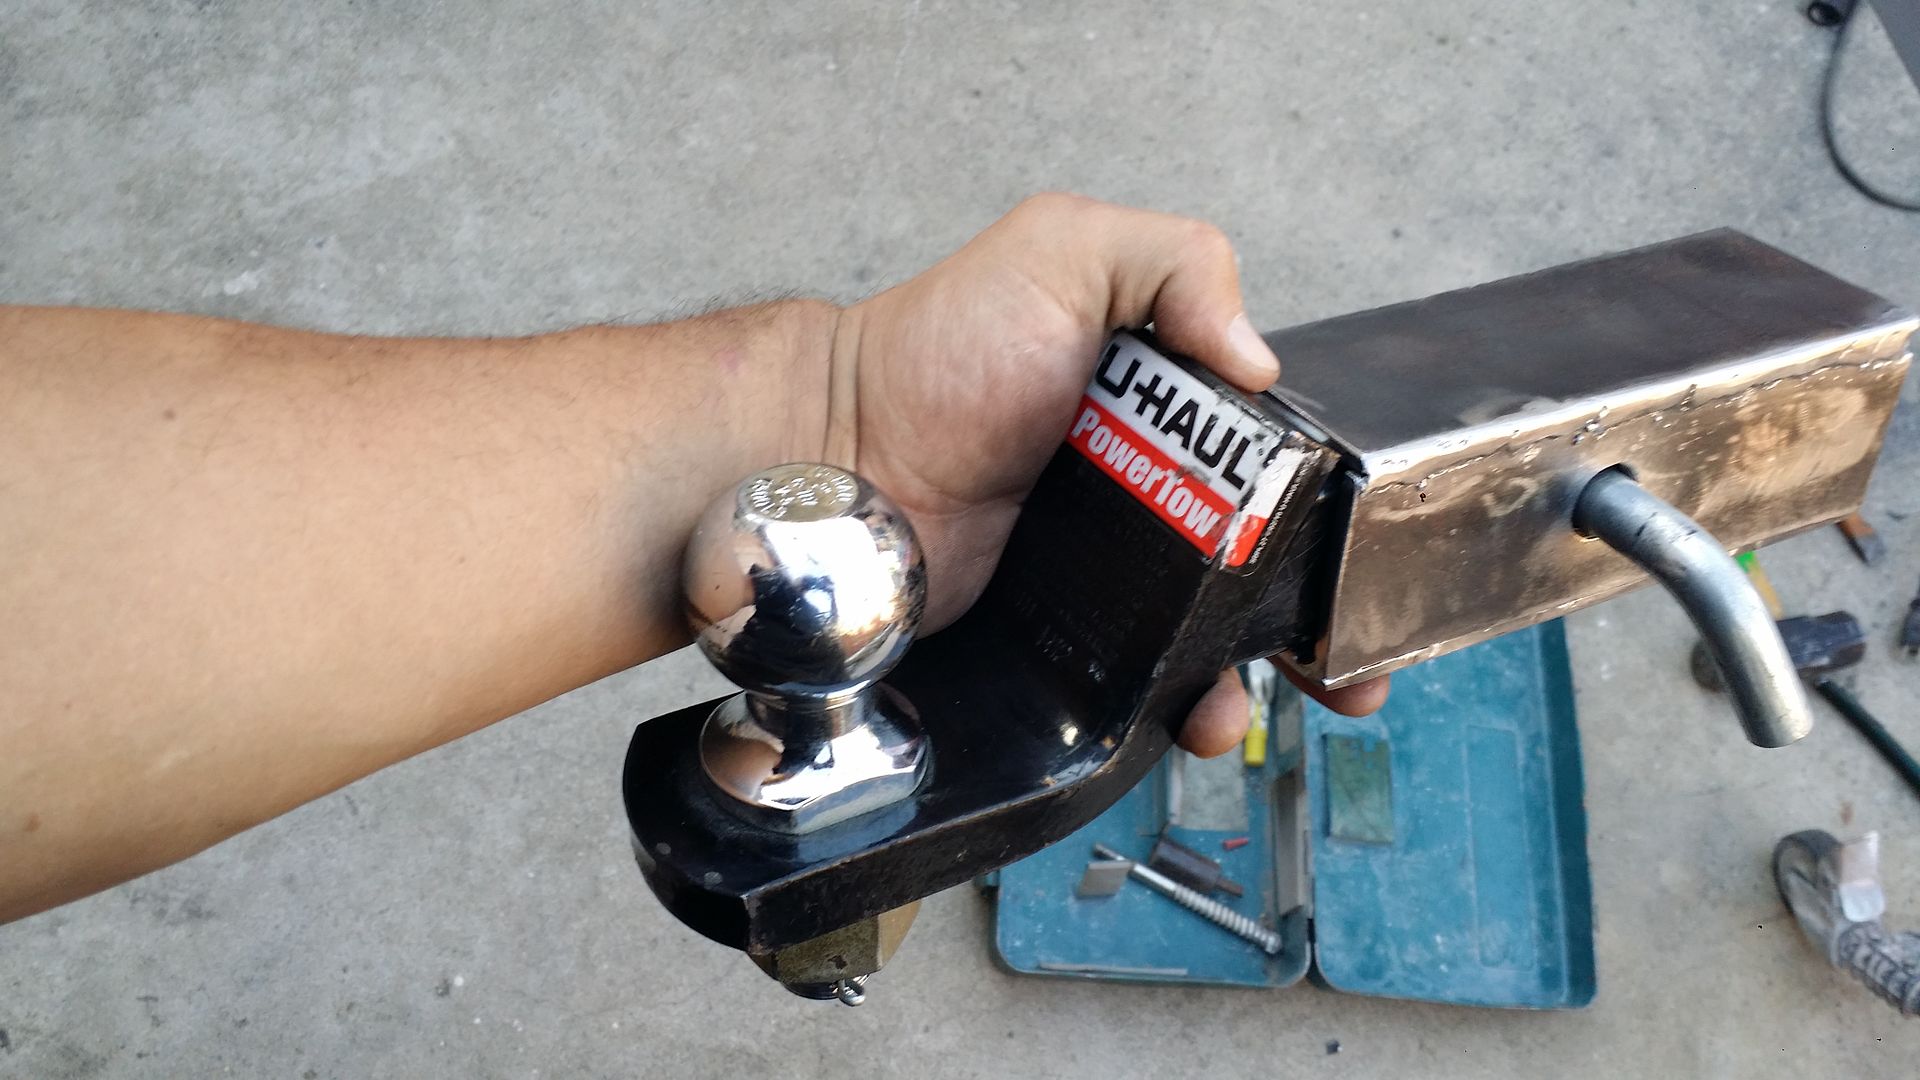
Woooo Hitch receiver welded on. As you can see i welded it on both sides of the bumper so i can avoid getting water into the tube bumper. by doing this i'll make a water tight seal so it wont rust from the inside.
This is more like the reason i chose to do a hitch. mainly for this d-ring. In case i ever get caught in a bad spot while out exploring. I also wanted this for carrying light weight mountain bikes for cruising around when i dont feel like driving anywhere.
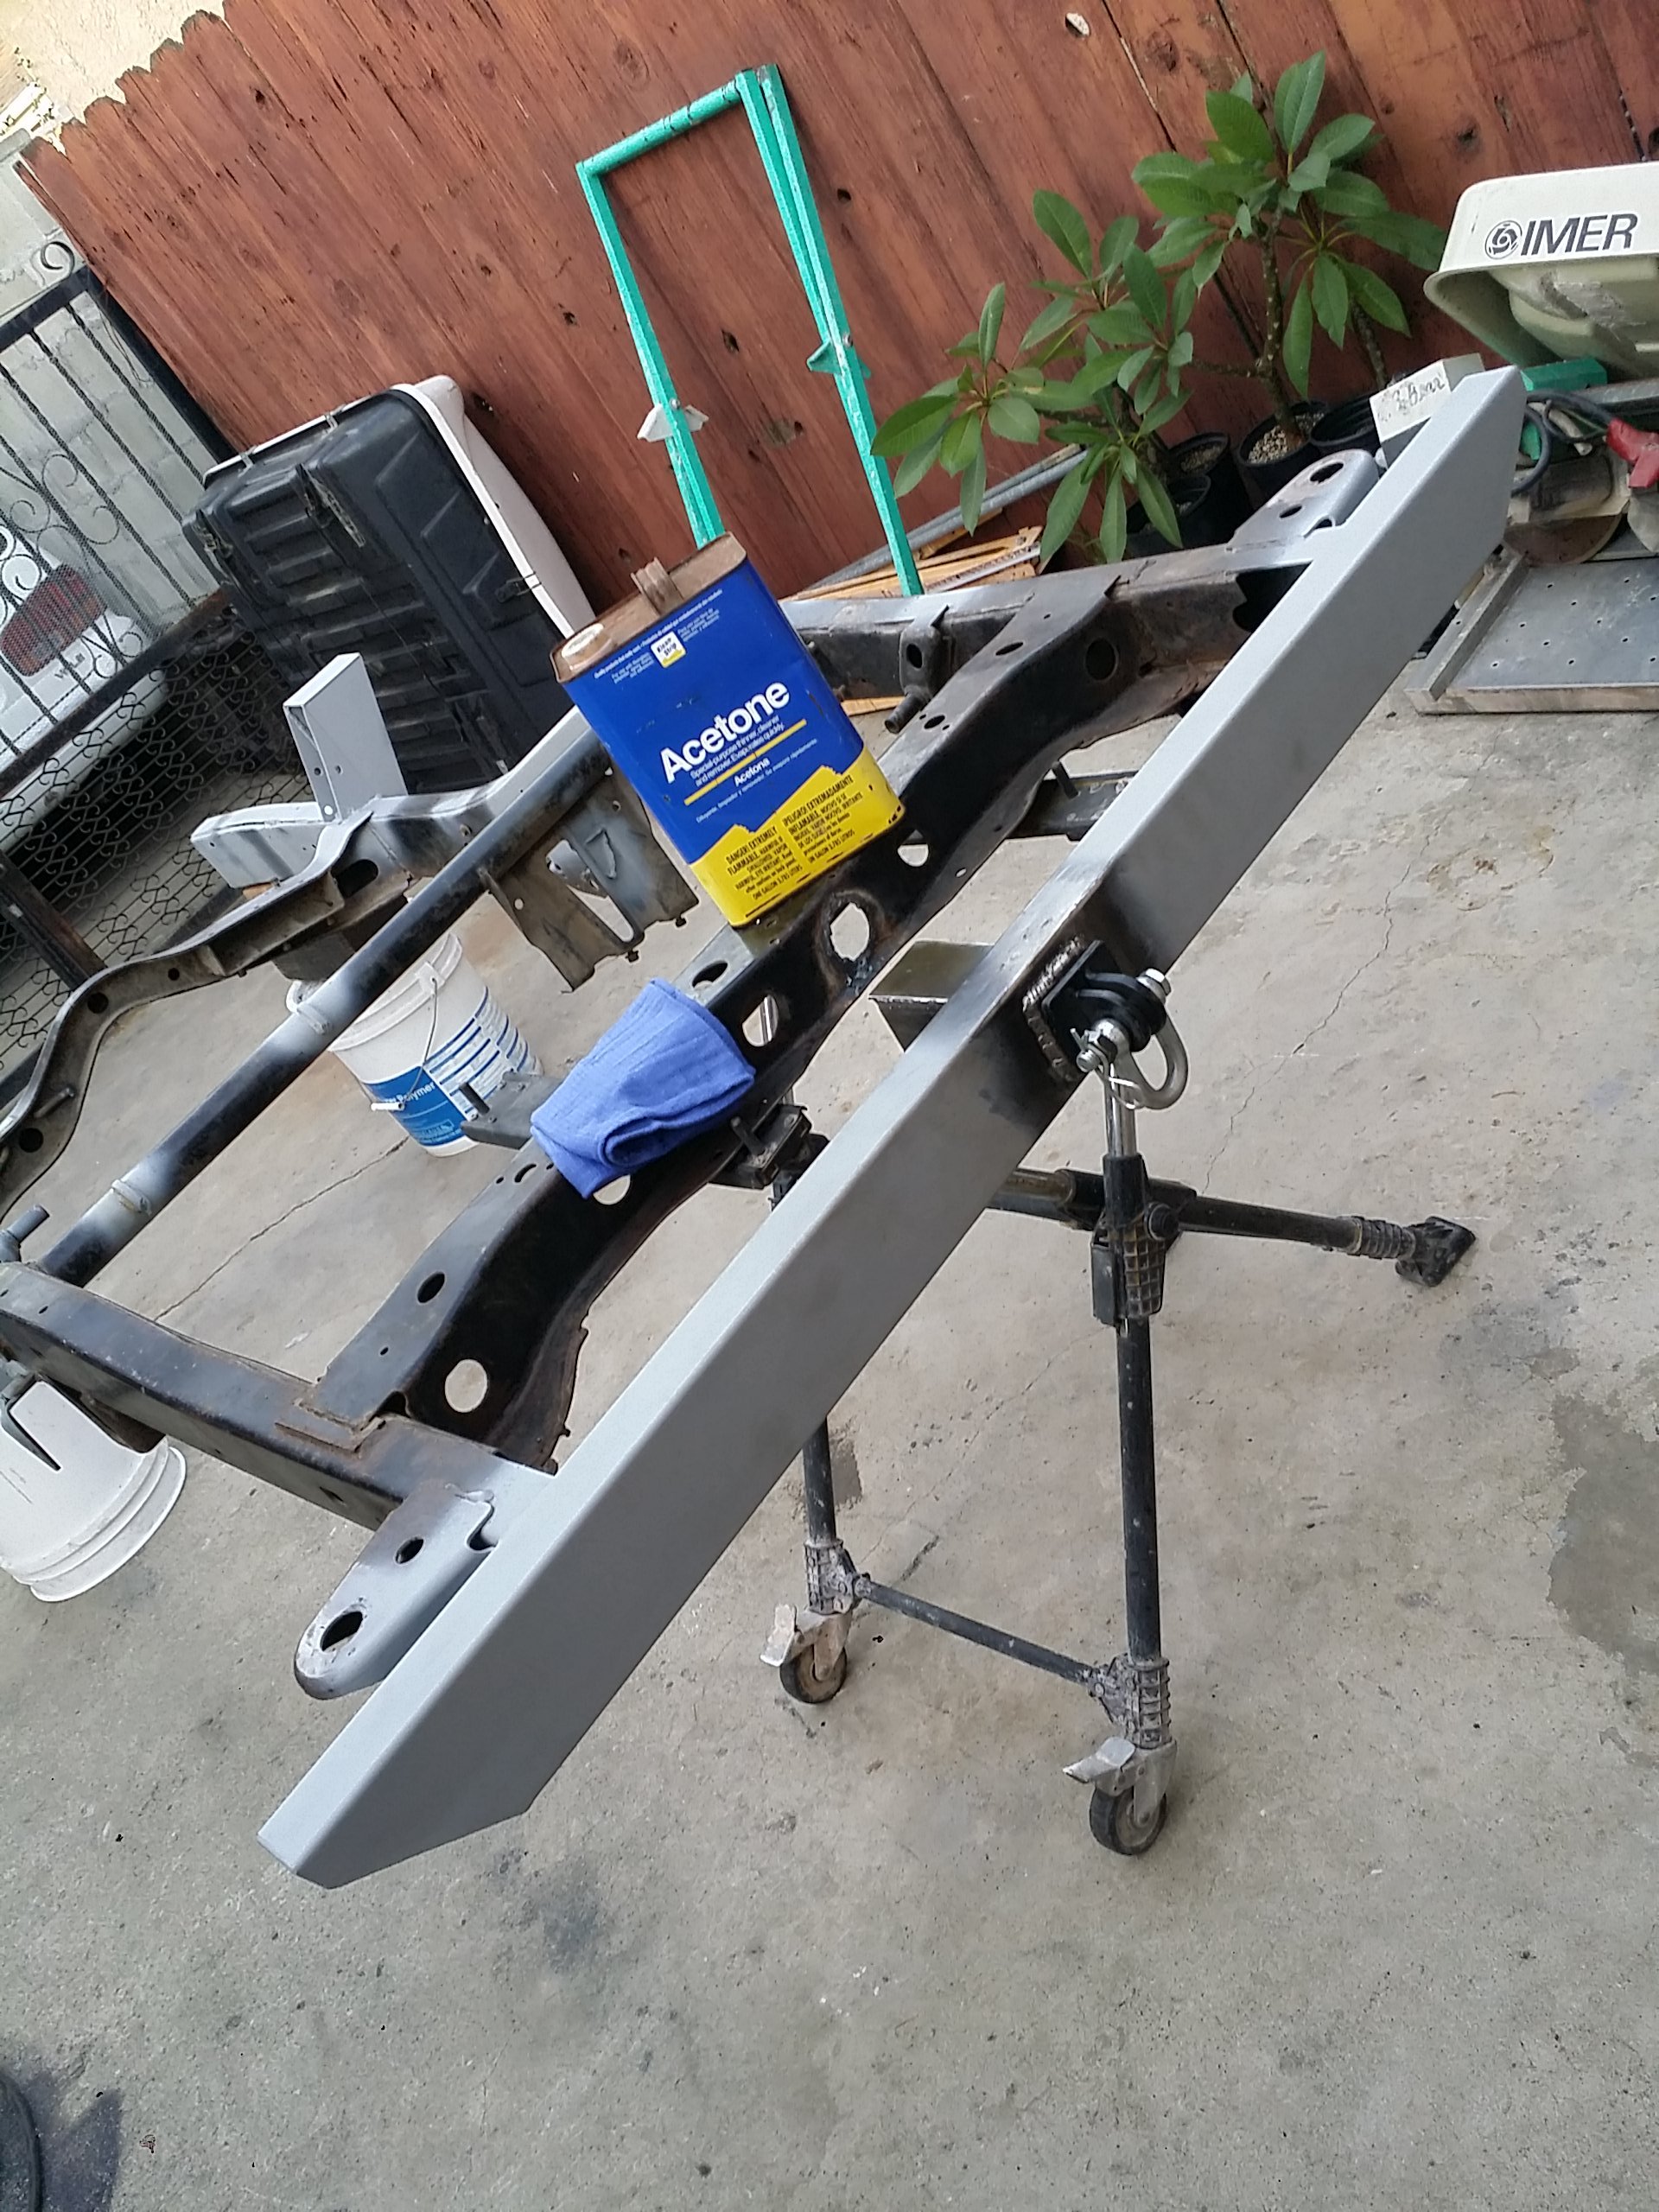
Surface cleaned up with acetone and then primed to prevent rust.
By the way, in case you are wondering where the hole sits on that receiver. Keep in mind that the bumper is made from 2"x4" steel tube. I left about 1/4" sticking out in the front of the bumper so i could have enough metal surface to get a good corner weld. And i have another 1/4", or 3/8" at most, on the back side before the hole starts. It's plenty of room to put that pin in place. I think it may even work with a locking type trailer pin as well.
Now that i learned how to cut somewhat precisely with the acetylene torch i cut out these pieces.

They are 2.5" wide and 7.5" long. I wish i would have cut all the pieces 2&1/4" it would have made it much easier to weld together with alot less grinding. And if you are wondering why i didnt just use a 2.5" square tube its because i didnt have any laying around. and rather then buy a small piece i figured i would just make one out of the scrap metal i had laying around.

Trailer hitch hole is marked, and indented in the center so i can make my holes with the drill. These have got to be the ugliest welds i ever done. But they'll hold up. Its totally fine, nobody will ever see them unless they go under the trailer and physically look for them lol

Perfect size. It is about 1/8" too big of a hole but it works for what i want to use it for.

Woooo Hitch receiver welded on. As you can see i welded it on both sides of the bumper so i can avoid getting water into the tube bumper. by doing this i'll make a water tight seal so it wont rust from the inside.

This is more like the reason i chose to do a hitch. mainly for this d-ring. In case i ever get caught in a bad spot while out exploring. I also wanted this for carrying light weight mountain bikes for cruising around when i dont feel like driving anywhere.

Surface cleaned up with acetone and then primed to prevent rust.

By the way, in case you are wondering where the hole sits on that receiver. Keep in mind that the bumper is made from 2"x4" steel tube. I left about 1/4" sticking out in the front of the bumper so i could have enough metal surface to get a good corner weld. And i have another 1/4", or 3/8" at most, on the back side before the hole starts. It's plenty of room to put that pin in place. I think it may even work with a locking type trailer pin as well.

Last edited by Redeth005; Oct 2, 2015 at 08:49 PM.
 Oct 6, 2015 | 07:44 PM
#28
Thread Starter
Registered User
Joined: Apr 2012
Posts: 2,817
Likes: 2
From: Los Angeles CA
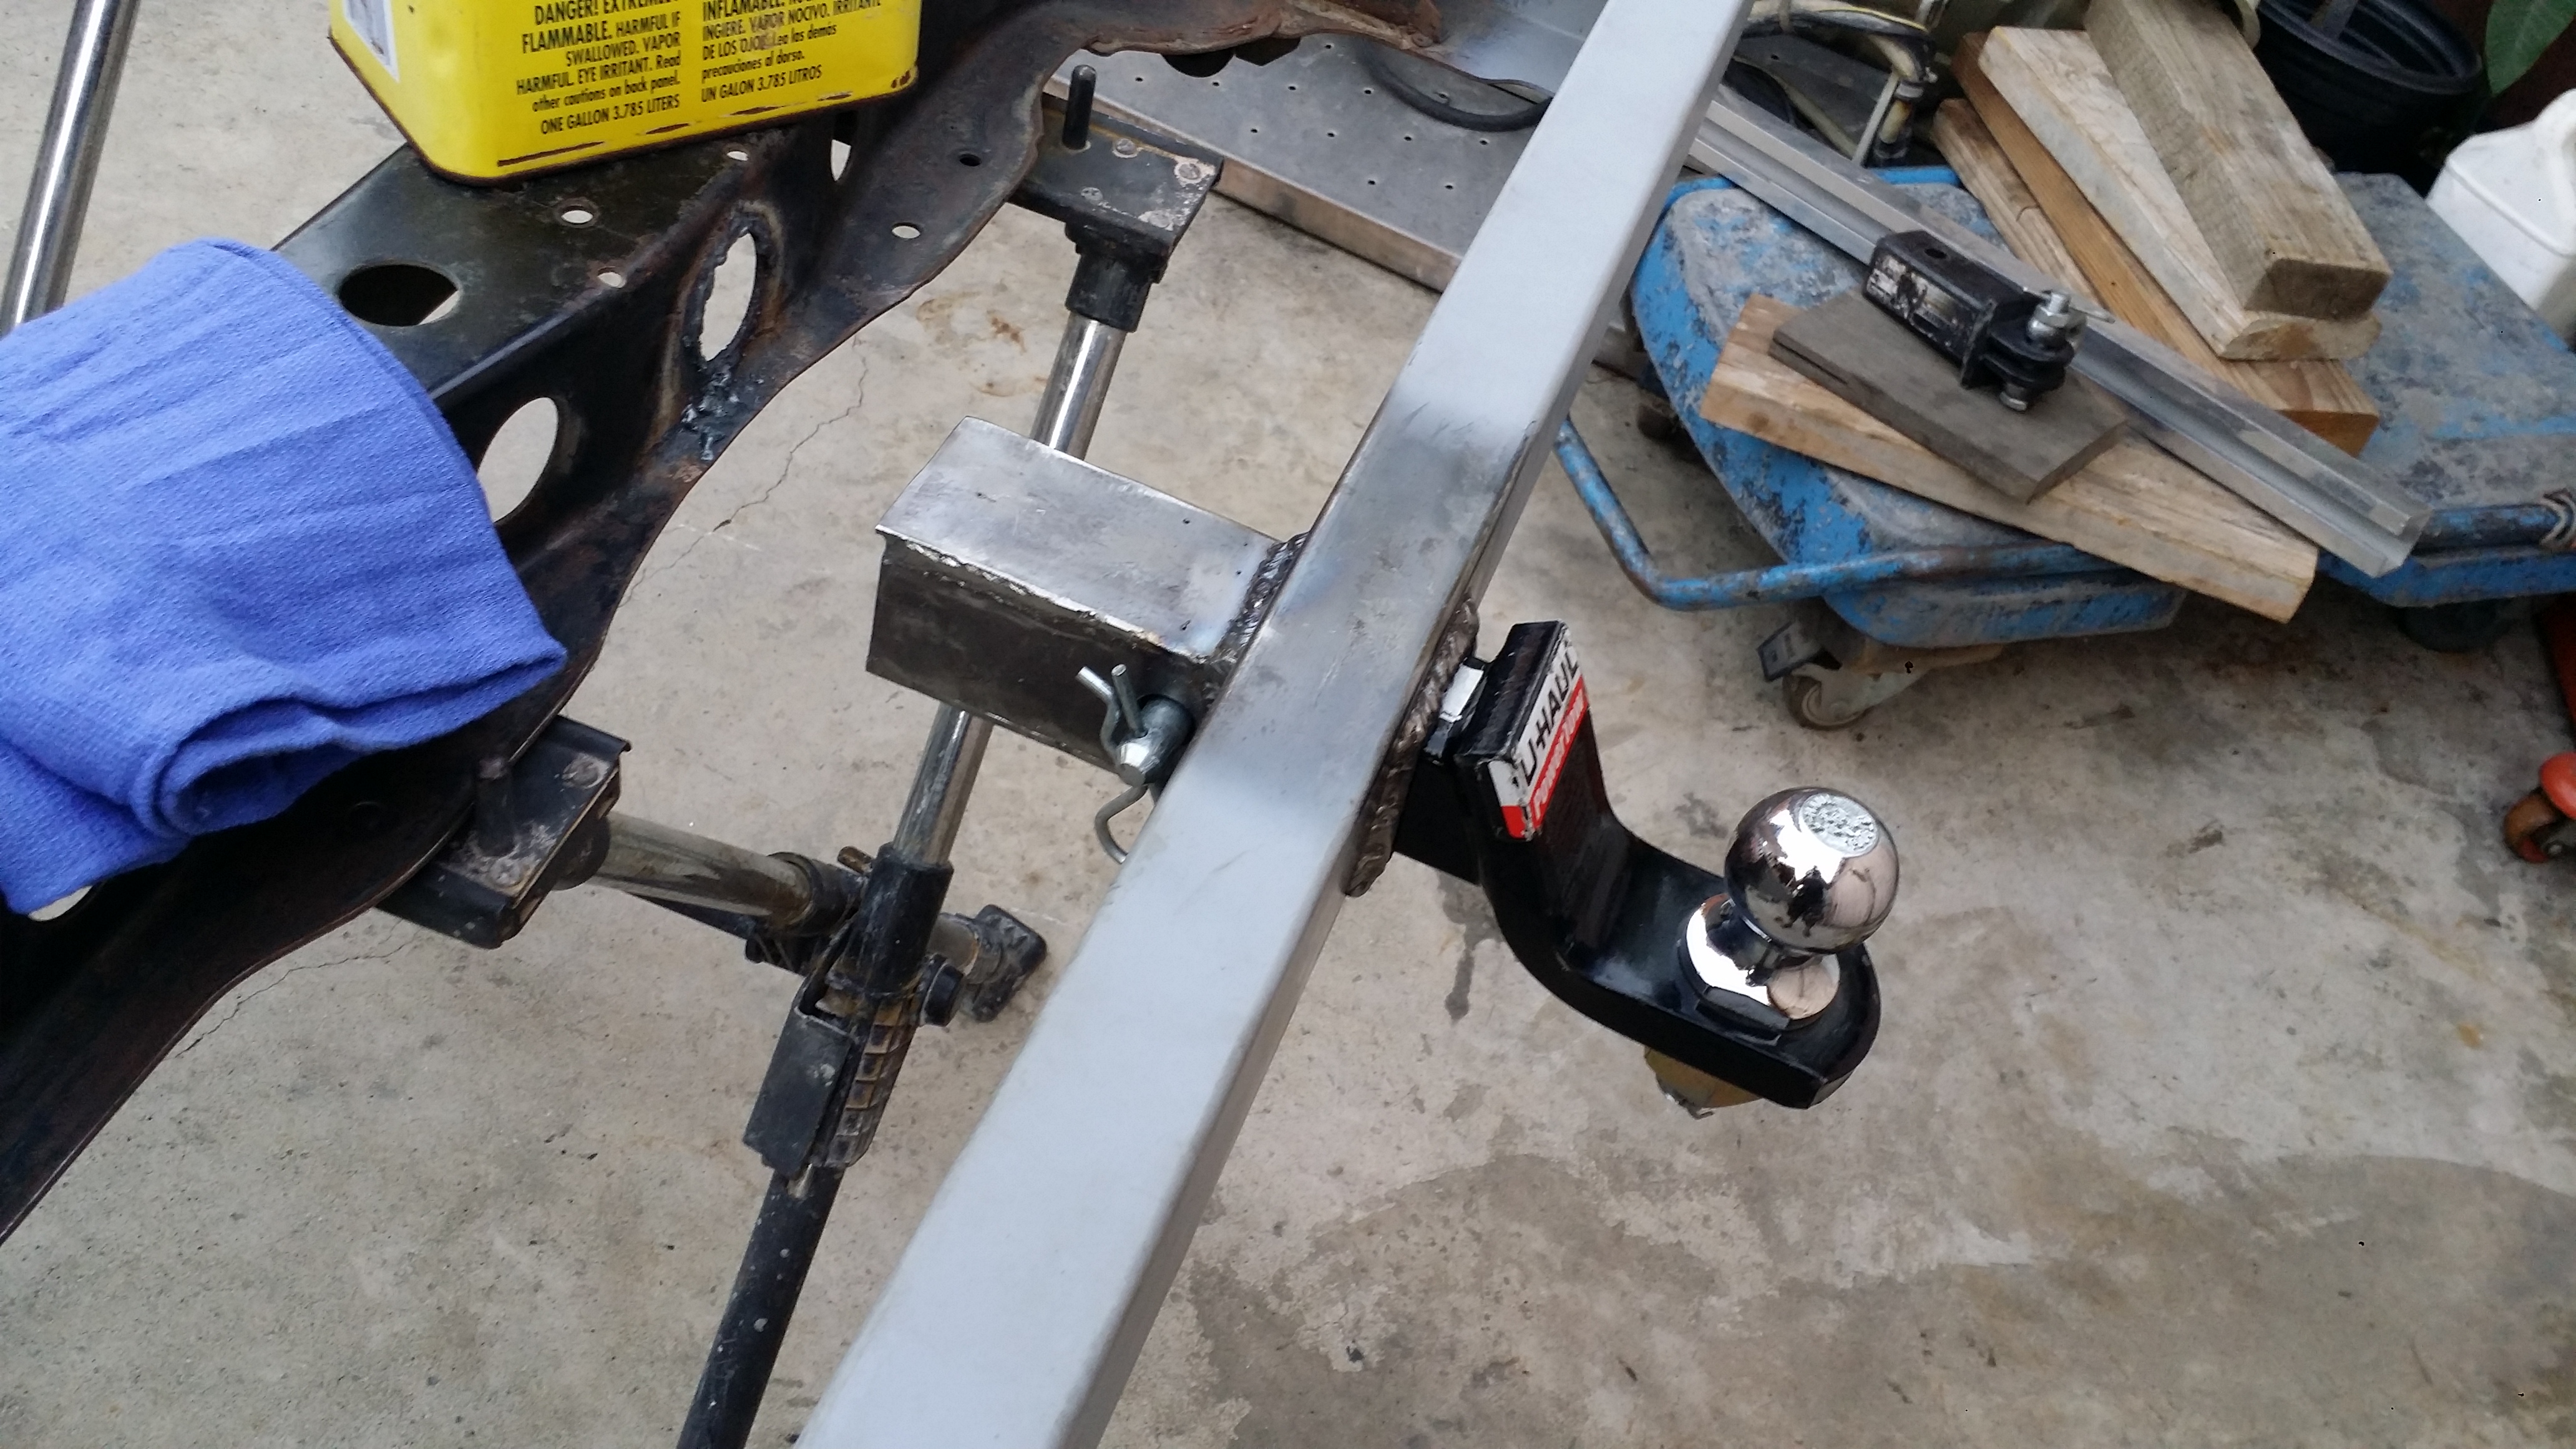
exactly. Hole was in the wrong spot which would have required the hitch to stick out further. By making my own i was able to adjust the hitch exactly to the distance i wanted. but i am thinking of possibly adding the support to the crossmemeber like irab mentioned. But i wont be holding too much weight off of it so i am not too concerned.
Last edited by Redeth005; Oct 6, 2015 at 07:49 PM.
Oct 24, 2015 | 02:42 PM
#29
Thread Starter
Registered User
Joined: Apr 2012
Posts: 2,817
Likes: 2
From: Los Angeles CA
I have a huge update for all you guys later today. I haven't had any progress in the past 3 weeks because I ran out of money. And up until this past Wednesday I finally got paid and I bought all kinds if good stuff for the trailer. I'll post everything I bought in an update hopefully by tonight
Oct 24, 2015 | 09:09 PM
#30
Thread Starter
Registered User
Joined: Apr 2012
Posts: 2,817
Likes: 2
From: Los Angeles CA
WOO HOOO!  FINALLY SOME UPDATES! Well not to the trailer yet, but items are already ordered!
So Like i mentioned in the previous comment; the trailer project had been placed on hold for about 3 weeks because i ran out of money to spend. And also because i had just started my new career as a Surgical Technologist at UCLA hospital in Santa Monica CA and unfortunately for me they withhold the first biweekly check. So this week i finally got paid and was able to go crazy on spending.
I don't want to build carelessly without knowing the exact measurements/dimensions of the items i'm going to install into the trailer. It would really suck to build the storage compartments only to find out i came up too short on size to fit the stuff i want. So i went ahead and ordered a ton of stuff of this build with my first paycheck. The following items are one of the crucial parts that i wanted to include in my trailer; MY HEATED WATER SYSTEM FOR THE SHOWER! After many hours of research i finally found some affordable, compact, & 5 STAR rated items that i could use and be content with. Here is everything in a nutshell:
WATER SUPPLY:
Lets start with the water storage tank. This tank holds 15 gallons (57 liters). I chose this water tank because of it's low profile. Rather then having a super bulky box like your average RV or 5th wheel trailers the height on this tank measures only 8" the width is 30" and length is 16" this size will be a perfect fit directly next to the stock gas tank that i plan to reuse for a spare gas storage. It will be mounted right next to the tank and sit almost flush with the frame. I will most likely build a metal plate skid out of 3/16" just to protect the plastic water tank from rocks and stuff on the trail I cant tell you exactly how i will do it yet but once i have the tank it will be much easier to explain with pix. Details and link below:
15 Gallon Water Tank ------------------[$116.54+tax and S&H]
(H=8" x L=16" x D=30")
http://www.valterra.com/product/abs-.../?pcat_id=1701
----------------------------------------------------------------------------------
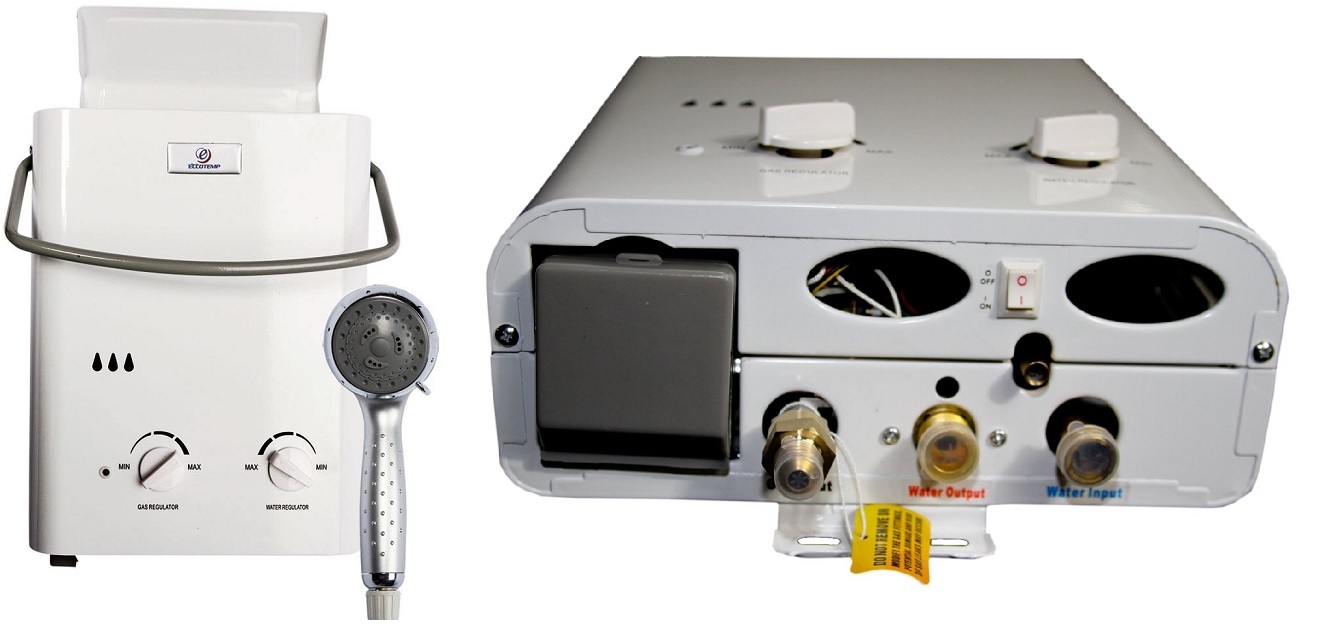
Next up I researched for hours on end before finally making my mind up on a heated shower system heated by your average BBQ propane tank and low GPM(gallons per minute) speed. This particular model is rated 5 stars on multiple websites but one of the things that held me back from buying it before was that i didnt know how to rig this water heater to work off the grid where i dont have access to a home water hose that has normal water pressure. Without water pressure this thing wont work it needs at least 20psi of water pressure to work. So i did alot nore research and finally i came accross this guy on YouTube who explains exactly how to rig this water heater with a water compressor. Check it out:
Here is where i bought mine off of
Eccotemp L5 -------------------[$119+tax and S&H]
----------------------------------------------------------------------------------
I went ahead and went with a water pump that gives less GPM then the one the guy in that youtube video used. My reason behind that is mainly to conserve water so i dont waste 15 gallons all in one day. This particular pump had better ratings too. This particular pump is 1GPM and works at 60PSI which is plenty to get the EcoTemp shower/heater working.
Shurflo 1GPM Water Pump that ----------------[$69.99+tax and S&H]
http://www.northerntool.com/shop/too...dyQaAhhv8P8HAQ

----------------------------------------------------------------------------------
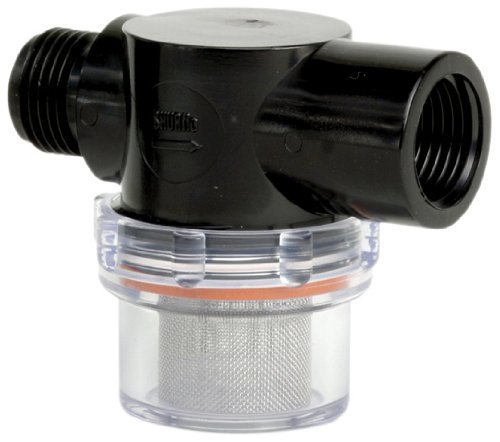
As expensive as that small 1GPM water pump is it does have a chance of getting damaged with debris that can clog it and such so why not buy a simple filter that filters all the water entering that water pump. It'll get the job done and give my water pump a longer life. Best part about it is that the clear container at the bottom is unscrewable so you can open it up rinse and clean then reinstall it. quick and easy maintainence at low cost will keep your water pump working longer.
Shurflo Water strainer -----------------[$13.41+tax and S&H]
to enure longer life of water devices.
----------------------------------------------------------------------------------
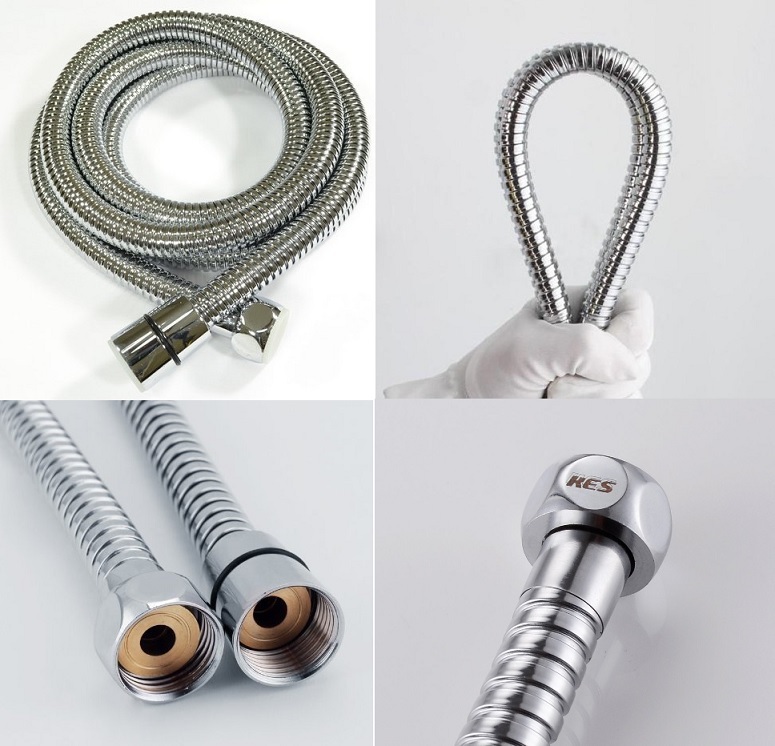
The hose on the water heater device is way too short and will never reach all the way to my Cabellas shower tent. So i got this 118 inch (9.8 ft/3 meters) shower Hose Extension ---------- [$15.99+tax and S&H]
----------------------------------------------------------------------------------
This is going to be a pretty smaller compact area to refill my water tank. I was looking at the fancy chrome marine water fill ones but those cost way too much and i figured this is going to be locked away from the outside anyway behind a metal door. so i decided on this small (8 x 5 x 1 inches) Gravity/City inlet water filler
Water fill box --------[$21.28+tax and S&H]

---------------------------------------------------------------------------------
As of right now the only thing that i need for this water system is going to be the is the brass adaptors for the tubing that attach onto the water tank and onto the water pump plus the 7/16" vinyl tubing. I didn't want to buy these items yet because i wanted to be sure how much i would have to buy and be sure on the exact threading sizes. Those items i can easily find at a Home Depot or Lowes warehouse. So that will be bought at a later time
But if you watched the youtube video i posted you will see what kind of tubing and brass adaptors i will need to make this work.
---------------------------------------------------------------------------------------
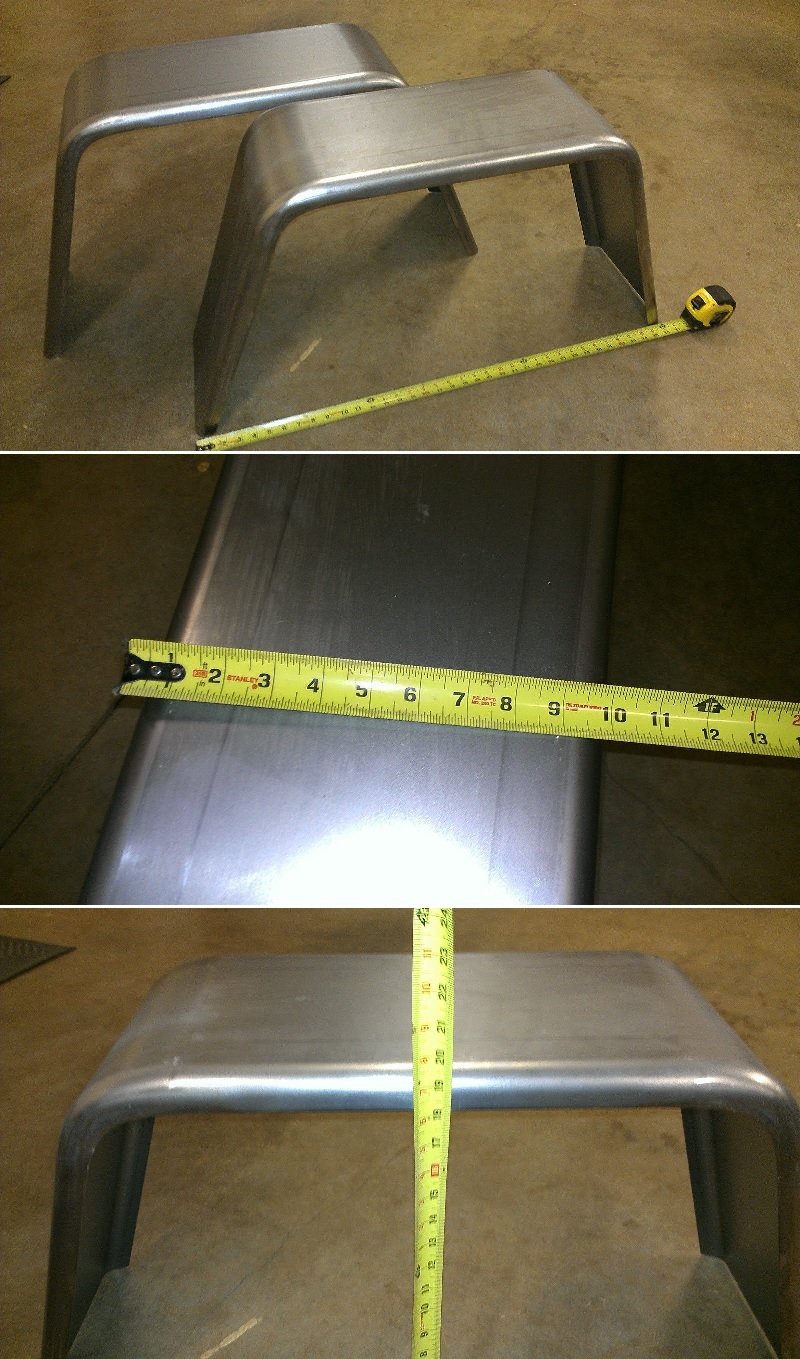
And Steel items bought are a pair of Jeep Style Fenders that measure (10" wide x 36" long x 19.25" high.": -------[$78.99]
They are made of 16 guage steel. These are the biggest and widest fenders i was able to find. and 36" wide sitting at the top of a 35" tire i think they will be perfect size for some sort of flexing and articulation when placed at the correct distance away from the tire(maybe 6-7" away). I'm not gonna take this trailer rock crawling or anything so i think these will work out great for the terrain i plan to use the trailer on.
http://www.ebay.com/itm/PAIR-of-Trailer-Fenders-Single-Axle-10-x36-Jeep-Style-FREE-SHIPPING/150807701090?_trksid=p2047675.c100005.m1851&_trkparms=aid%3D222007%26algo%3DSIC.MBE%26ao%3D1%26asc%3D34004%26meid%3D123e2fc62012490b81b4ab837aab4d5c%26pid%3D100005%26rk%3D2%26rkt%3D6%26sd%3D150817882593
With everything i bought today plus tax and shipping and handling i spent a total of $392.48 That was a heap of cash but still peanuts compared to what the CVT tent and Fridge freezer is going to cost me. At least with the items i bought today i will be able to fabricate the front storage box and make trailer tongue already. With a propane tank holder area. Plus i still need to find a stock 14 or 17 gallon 1st gen 4runner gas tank with the skid plate for it. After i have the water tank storage with the stock gas tank installed at the right height then i can start building the large storage compartment floor or at least the base frame. but i cant fabricate anything on the rear compartment box until i figure out how to fabricate the cooler slide out. And that is going to become a challenge for me to do without having the fridge/freezer cooler in front of me. I will need to go based off of the dimensions online because it cost too much to buy right now. I will get more into detail about what fridge i chose and why at a later post.
----------------------------------------------------------------------------------------------------------------------------------------------------------
Now the updates don't end there!
Today i went to meet up with my buddy Ruben again (he's the guy who helped me pick up the chassis the day i brought it to his home) to pick up his donation for this trailer. He upgraded to some new heavy duty Trail gear springs and let me have these worn leaf springs with a slightly bent overload leaf on both. These are Trail-Gear 4" lift front leaf springs for a 1st gen 4runner/2nd gen pickup. They should work for what I plan to use them for. I doubt the weight of my trailer will ever require the use of the overload leaf anyway. So I think I'm in the clear. And in case you're wondering why i didnt use stock leaf springs or why im going with a lift on the trailer this is why....
I wouldn't mind the stock leaf springs but stock leafs would most likely sit way too low. I want to get a close match from the trailer to my 1st Gen 4Runner height. That's why I never bought stock springs off Craigslist. These Trail-Gear springs are going to sit slightly lower then the 4" of lift they say they get; this is mainly because they are front leaf springs instead of rear ones. But I'm totally fine with that. It is supposed to be a 4 inch lift but he broke them in and now they sit at about 3" of lift but since I'm going to use them in the rear of the chassis they will most likely sit at a 2" or 2.5" lift which is about where I want to be on this build.
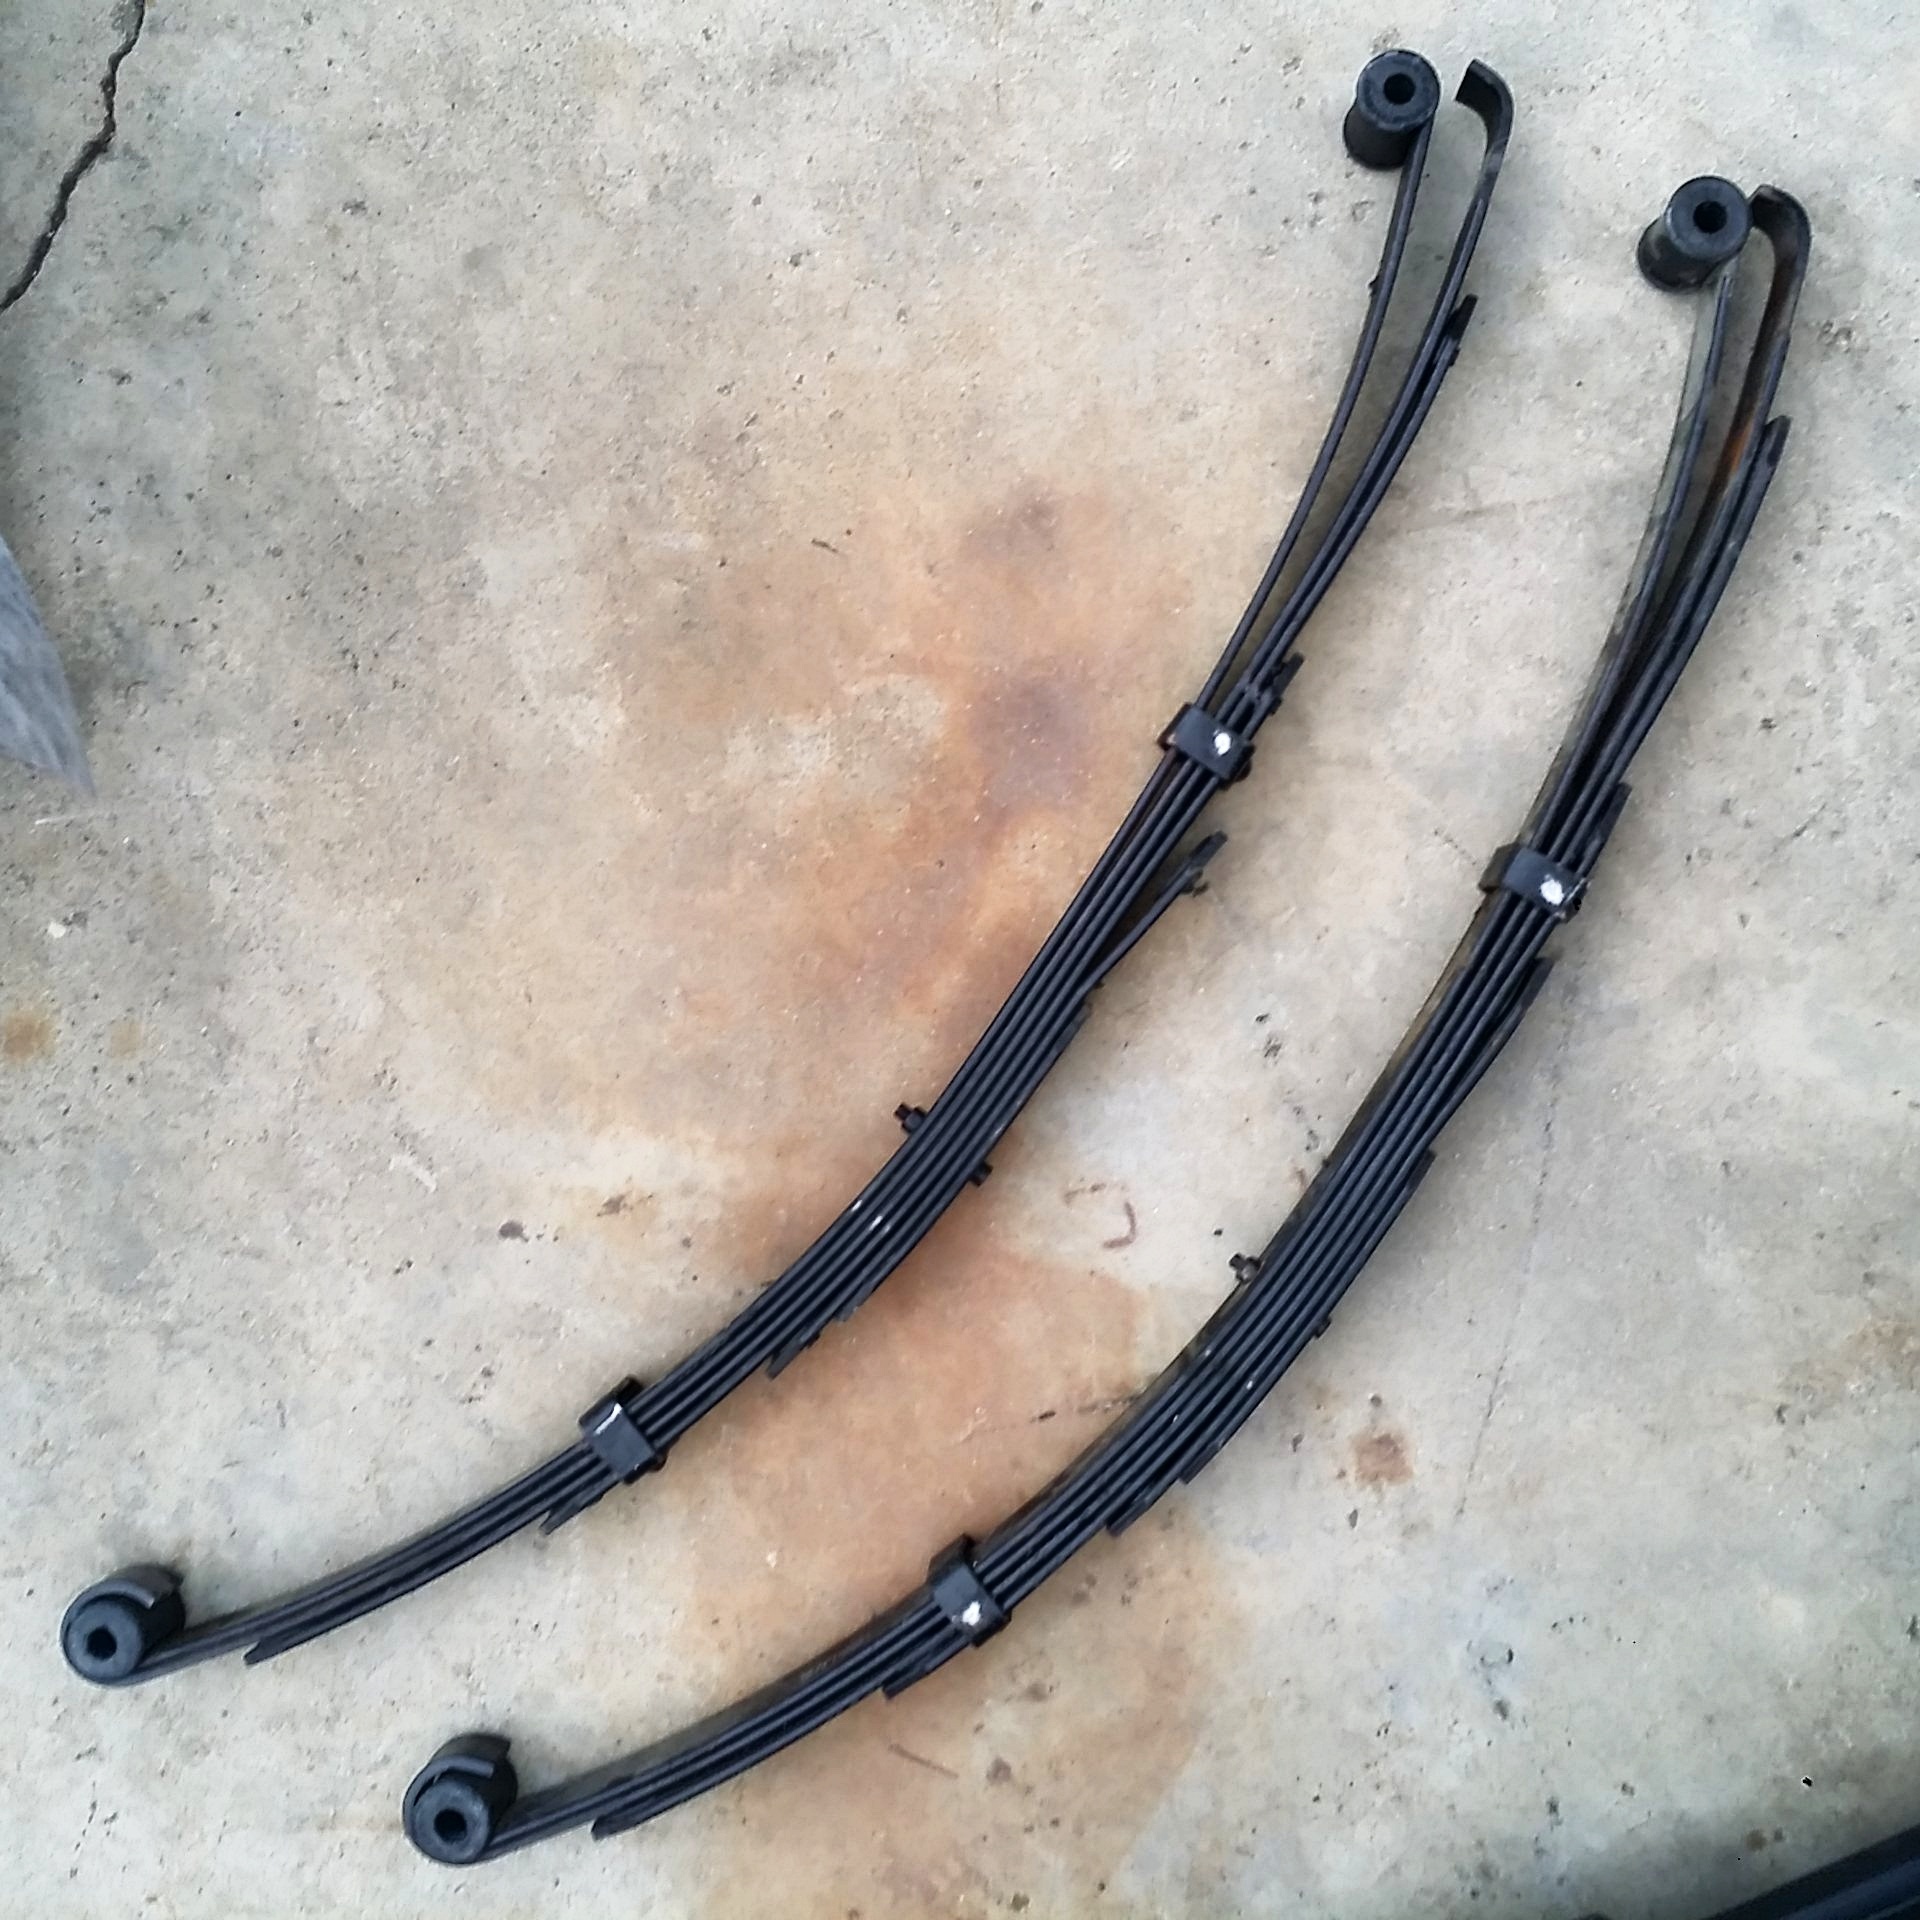
Also if you are wondering why the leaf springs are damaged its because He was traveling about 50mph and hit a small rut that bent the springs. They still work fine. And then the last blow was when he rolled over his truck. That was when he decided to just go with a new set of leaf springs. Believe it or not these springs only have 2 wheeling trips on them haha! He goes all out when it comes to offroad as you can see...
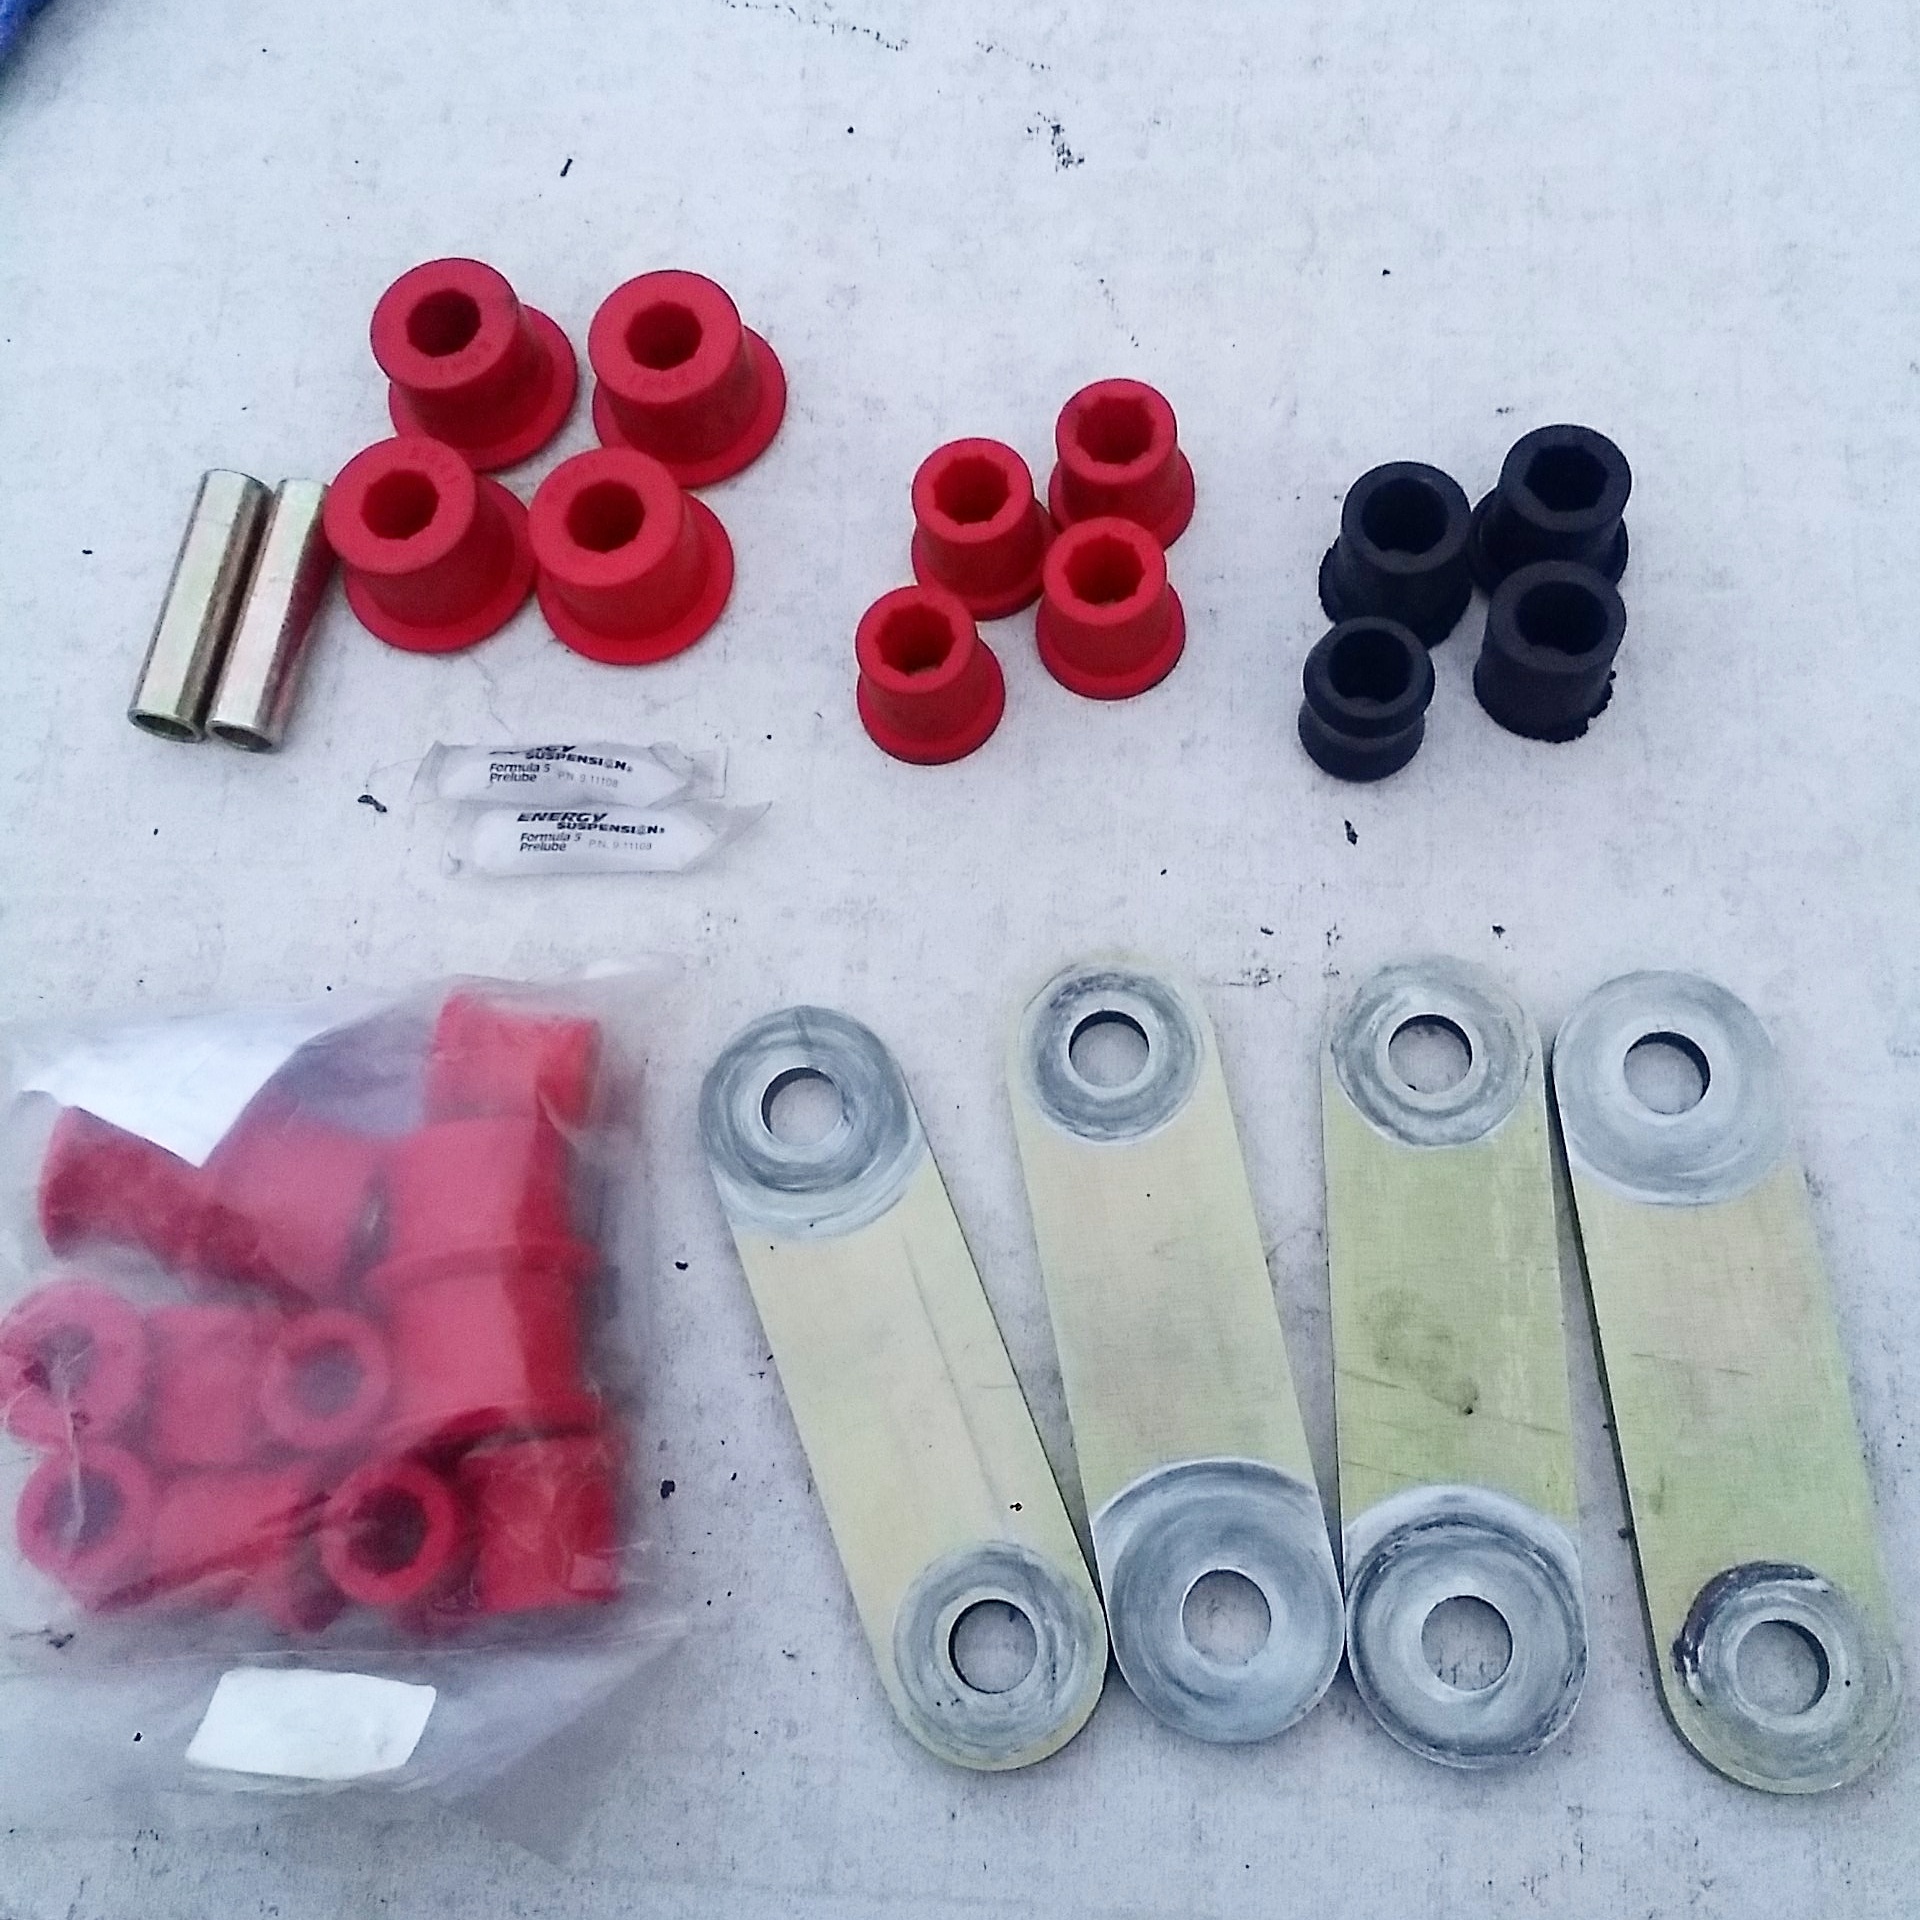
Next update is that today i went digging in my closet and found my old AllPro-offroad 4" shackles from when I replaced them with 6" to fix the rear sagging. Glad I kept them! I'll be using these shackles paired with the donated leaf springs I just brought home to get at least 3" of lift on that trailer to match the lift I have on my 4runner. And also here are a bunch of spring bushings that I got off the person who sold me the front axle that is currently on my 4Runner 3 & 1/2 years ago from before I did the solid axle swap on the truck. Wooo I'm so happy I'm off to a great start with this project SO MANY DONATED ITEMS! So grateful to everybody who has helped me out with parts.
FINALLY SOME UPDATES! Well not to the trailer yet, but items are already ordered! So Like i mentioned in the previous comment; the trailer project had been placed on hold for about 3 weeks because i ran out of money to spend. And also because i had just started my new career as a Surgical Technologist at UCLA hospital in Santa Monica CA and unfortunately for me they withhold the first biweekly check. So this week i finally got paid and was able to go crazy on spending.
I don't want to build carelessly without knowing the exact measurements/dimensions of the items i'm going to install into the trailer. It would really suck to build the storage compartments only to find out i came up too short on size to fit the stuff i want. So i went ahead and ordered a ton of stuff of this build with my first paycheck. The following items are one of the crucial parts that i wanted to include in my trailer; MY HEATED WATER SYSTEM FOR THE SHOWER! After many hours of research i finally found some affordable, compact, & 5 STAR rated items that i could use and be content with. Here is everything in a nutshell:
WATER SUPPLY:
Lets start with the water storage tank. This tank holds 15 gallons (57 liters). I chose this water tank because of it's low profile. Rather then having a super bulky box like your average RV or 5th wheel trailers the height on this tank measures only 8" the width is 30" and length is 16" this size will be a perfect fit directly next to the stock gas tank that i plan to reuse for a spare gas storage. It will be mounted right next to the tank and sit almost flush with the frame. I will most likely build a metal plate skid out of 3/16" just to protect the plastic water tank from rocks and stuff on the trail I cant tell you exactly how i will do it yet but once i have the tank it will be much easier to explain with pix. Details and link below:
15 Gallon Water Tank ------------------[$116.54+tax and S&H]
(H=8" x L=16" x D=30")
http://www.valterra.com/product/abs-.../?pcat_id=1701

----------------------------------------------------------------------------------
Next up I researched for hours on end before finally making my mind up on a heated shower system heated by your average BBQ propane tank and low GPM(gallons per minute) speed. This particular model is rated 5 stars on multiple websites but one of the things that held me back from buying it before was that i didnt know how to rig this water heater to work off the grid where i dont have access to a home water hose that has normal water pressure. Without water pressure this thing wont work it needs at least 20psi of water pressure to work. So i did alot nore research and finally i came accross this guy on YouTube who explains exactly how to rig this water heater with a water compressor. Check it out:
Here is where i bought mine off of
Eccotemp L5 -------------------[$119+tax and S&H]

----------------------------------------------------------------------------------
I went ahead and went with a water pump that gives less GPM then the one the guy in that youtube video used. My reason behind that is mainly to conserve water so i dont waste 15 gallons all in one day. This particular pump had better ratings too. This particular pump is 1GPM and works at 60PSI which is plenty to get the EcoTemp shower/heater working.
Shurflo 1GPM Water Pump that ----------------[$69.99+tax and S&H]
http://www.northerntool.com/shop/too...dyQaAhhv8P8HAQ

----------------------------------------------------------------------------------
As expensive as that small 1GPM water pump is it does have a chance of getting damaged with debris that can clog it and such so why not buy a simple filter that filters all the water entering that water pump. It'll get the job done and give my water pump a longer life. Best part about it is that the clear container at the bottom is unscrewable so you can open it up rinse and clean then reinstall it. quick and easy maintainence at low cost will keep your water pump working longer.
Shurflo Water strainer -----------------[$13.41+tax and S&H]
to enure longer life of water devices.

----------------------------------------------------------------------------------
The hose on the water heater device is way too short and will never reach all the way to my Cabellas shower tent. So i got this 118 inch (9.8 ft/3 meters) shower Hose Extension ---------- [$15.99+tax and S&H]

----------------------------------------------------------------------------------
This is going to be a pretty smaller compact area to refill my water tank. I was looking at the fancy chrome marine water fill ones but those cost way too much and i figured this is going to be locked away from the outside anyway behind a metal door. so i decided on this small (8 x 5 x 1 inches) Gravity/City inlet water filler
Water fill box --------[$21.28+tax and S&H]

---------------------------------------------------------------------------------
As of right now the only thing that i need for this water system is going to be the is the brass adaptors for the tubing that attach onto the water tank and onto the water pump plus the 7/16" vinyl tubing. I didn't want to buy these items yet because i wanted to be sure how much i would have to buy and be sure on the exact threading sizes. Those items i can easily find at a Home Depot or Lowes warehouse. So that will be bought at a later time
But if you watched the youtube video i posted you will see what kind of tubing and brass adaptors i will need to make this work.
---------------------------------------------------------------------------------------
And Steel items bought are a pair of Jeep Style Fenders that measure (10" wide x 36" long x 19.25" high.": -------[$78.99]
They are made of 16 guage steel. These are the biggest and widest fenders i was able to find. and 36" wide sitting at the top of a 35" tire i think they will be perfect size for some sort of flexing and articulation when placed at the correct distance away from the tire(maybe 6-7" away). I'm not gonna take this trailer rock crawling or anything so i think these will work out great for the terrain i plan to use the trailer on.
http://www.ebay.com/itm/PAIR-of-Trailer-Fenders-Single-Axle-10-x36-Jeep-Style-FREE-SHIPPING/150807701090?_trksid=p2047675.c100005.m1851&_trkparms=aid%3D222007%26algo%3DSIC.MBE%26ao%3D1%26asc%3D34004%26meid%3D123e2fc62012490b81b4ab837aab4d5c%26pid%3D100005%26rk%3D2%26rkt%3D6%26sd%3D150817882593

With everything i bought today plus tax and shipping and handling i spent a total of $392.48 That was a heap of cash but still peanuts compared to what the CVT tent and Fridge freezer is going to cost me. At least with the items i bought today i will be able to fabricate the front storage box and make trailer tongue already. With a propane tank holder area. Plus i still need to find a stock 14 or 17 gallon 1st gen 4runner gas tank with the skid plate for it. After i have the water tank storage with the stock gas tank installed at the right height then i can start building the large storage compartment floor or at least the base frame. but i cant fabricate anything on the rear compartment box until i figure out how to fabricate the cooler slide out. And that is going to become a challenge for me to do without having the fridge/freezer cooler in front of me. I will need to go based off of the dimensions online because it cost too much to buy right now. I will get more into detail about what fridge i chose and why at a later post.
----------------------------------------------------------------------------------------------------------------------------------------------------------
Now the updates don't end there!
Today i went to meet up with my buddy Ruben again (he's the guy who helped me pick up the chassis the day i brought it to his home) to pick up his donation for this trailer. He upgraded to some new heavy duty Trail gear springs and let me have these worn leaf springs with a slightly bent overload leaf on both. These are Trail-Gear 4" lift front leaf springs for a 1st gen 4runner/2nd gen pickup. They should work for what I plan to use them for. I doubt the weight of my trailer will ever require the use of the overload leaf anyway. So I think I'm in the clear. And in case you're wondering why i didnt use stock leaf springs or why im going with a lift on the trailer this is why....
I wouldn't mind the stock leaf springs but stock leafs would most likely sit way too low. I want to get a close match from the trailer to my 1st Gen 4Runner height. That's why I never bought stock springs off Craigslist. These Trail-Gear springs are going to sit slightly lower then the 4" of lift they say they get; this is mainly because they are front leaf springs instead of rear ones. But I'm totally fine with that. It is supposed to be a 4 inch lift but he broke them in and now they sit at about 3" of lift but since I'm going to use them in the rear of the chassis they will most likely sit at a 2" or 2.5" lift which is about where I want to be on this build.

Also if you are wondering why the leaf springs are damaged its because He was traveling about 50mph and hit a small rut that bent the springs. They still work fine. And then the last blow was when he rolled over his truck. That was when he decided to just go with a new set of leaf springs. Believe it or not these springs only have 2 wheeling trips on them haha! He goes all out when it comes to offroad as you can see...
Next update is that today i went digging in my closet and found my old AllPro-offroad 4" shackles from when I replaced them with 6" to fix the rear sagging. Glad I kept them! I'll be using these shackles paired with the donated leaf springs I just brought home to get at least 3" of lift on that trailer to match the lift I have on my 4runner. And also here are a bunch of spring bushings that I got off the person who sold me the front axle that is currently on my 4Runner 3 & 1/2 years ago from before I did the solid axle swap on the truck. Wooo I'm so happy I'm off to a great start with this project SO MANY DONATED ITEMS! So grateful to everybody who has helped me out with parts.

Last edited by Redeth005; Oct 24, 2015 at 10:06 PM.
Oct 25, 2015 | 03:45 PM
#31
Looks like you've done your research well on the off the grid shower system. I installed a propane whole house tankless system when we remodeled our home. Best investment I've made, well that and a jacuzzi tub.
Oct 26, 2015 | 04:12 PM
#32
Thread Starter
Registered User
Joined: Apr 2012
Posts: 2,817
Likes: 2
From: Los Angeles CA
Thanks. And yes i did hours of research because this is one of the main things i want on my trailer and i wanted to have i done right the first time lol
Oct 27, 2015 | 05:57 AM
#34
Registered User
Joined: Jul 2013
Posts: 56
Likes: 0
From: Indianapolis, IN
Two questions for you.
What's the estimated weight of the whole trailer going to be when completed?
Where are you mounting the water heater? External would get it munged up with road and trail dust; internal would mean running a propane burner in an enclosed place. Are you going to mount it on a swing-out door?
What's the estimated weight of the whole trailer going to be when completed?
Where are you mounting the water heater? External would get it munged up with road and trail dust; internal would mean running a propane burner in an enclosed place. Are you going to mount it on a swing-out door?
Nov 8, 2015 | 08:12 PM
#35
Thread Starter
Registered User
Joined: Apr 2012
Posts: 2,817
Likes: 2
From: Los Angeles CA
Two questions for you.
What's the estimated weight of the whole trailer going to be when completed?
Where are you mounting the water heater? External would get it munged up with road and trail dust; internal would mean running a propane burner in an enclosed place. Are you going to mount it on a swing-out door?
What's the estimated weight of the whole trailer going to be when completed?
Where are you mounting the water heater? External would get it munged up with road and trail dust; internal would mean running a propane burner in an enclosed place. Are you going to mount it on a swing-out door?
as for the weight of the trailer.... well im not too sure. im trying to keep the weight down as much as possible but we'll see what it comes out to as i go into the build more.
Nov 8, 2015 | 08:14 PM
#36
Thread Starter
Registered User
Joined: Apr 2012
Posts: 2,817
Likes: 2
From: Los Angeles CA
Quick update.
All my heated shower parts finally came!
Here is a quick video explaining how it will work and the 2nd half of the video is it actually being connected and showing how hot it gets.
All my heated shower parts finally came!
Here is a quick video explaining how it will work and the 2nd half of the video is it actually being connected and showing how hot it gets.
Nov 8, 2015 | 09:55 PM
#37
Thanks for the info on the bushings.
I saw your video earlier on instagram, nicely done
Oh oh...photo bucket is throttling your data...no pics.
You can upload to YT and even copy and paste them to other forums if you have similar threads going
I saw your video earlier on instagram, nicely done
Oh oh...photo bucket is throttling your data...no pics.
You can upload to YT and even copy and paste them to other forums if you have similar threads going
Last edited by dropzone; Nov 8, 2015 at 09:57 PM.
Nov 11, 2015 | 03:35 PM
#38
Thread Starter
Registered User
Joined: Apr 2012
Posts: 2,817
Likes: 2
From: Los Angeles CA
as for the pix. yea i know i can upload to here now but i like to keep the pix on photobucket because if i ever need to retrive them i can get them whenever i want off of any device. plus i can keep all my pix in multiple folders for safe storage. i'll just wait for the month to reset for the pix to be available again.
Nov 11, 2015 | 03:45 PM
#39
Thread Starter
Registered User
Joined: Apr 2012
Posts: 2,817
Likes: 2
From: Los Angeles CA
I just got home from the local trailer store and bought all the items for building my 3500 pound capacity trailer axle 6x5.5 lug pattern. I just need to cut my 1/4" thick 2"x2" square tube to length. I will be making the axle 58" from hub face to hub face to match the wheelbase i have on my 4runner. Just went to the local steel shop but they ran out of that size tube so i gotta wait a few days till they get the new order in then ill start posting some more pix of the axle build.
I also ordered my Propex HS2000 forced air propane heater with thermostat to keep my future roof top tent warm during those winter months and during cold desert nights. So far that was the most expensive item i've bought. I'll also upload pix, website links, and prices once i get the photobucket pix back up.
I also ordered my Propex HS2000 forced air propane heater with thermostat to keep my future roof top tent warm during those winter months and during cold desert nights. So far that was the most expensive item i've bought. I'll also upload pix, website links, and prices once i get the photobucket pix back up.
Nov 11, 2015 | 05:44 PM
#40
on instagram? what is your username i may have missed that.
as for the pix. yea i know i can upload to here now but i like to keep the pix on photobucket because if i ever need to retrive them i can get them whenever i want off of any device. plus i can keep all my pix in multiple folders for safe storage. i'll just wait for the month to reset for the pix to be available again.
as for the pix. yea i know i can upload to here now but i like to keep the pix on photobucket because if i ever need to retrive them i can get them whenever i want off of any device. plus i can keep all my pix in multiple folders for safe storage. i'll just wait for the month to reset for the pix to be available again.
I was having problems with photobucket, they finally upgraded my account to a pro account for 24 months for free


